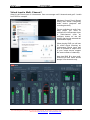
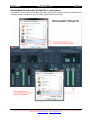
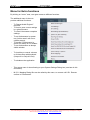
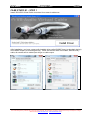
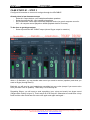
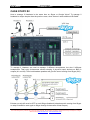
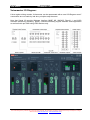
1
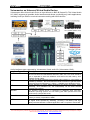
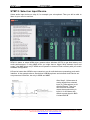
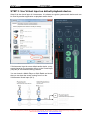
Jan 2015 USER MANUAL VB-Audio Software VOICEMEETER 1.0.3.5 V.Burel revision 4 VOICEMEETER Virtual Audio Mixer for Windows USER MANUAL OFFICIAL WEBSITE www.voicemeeter.com VB-AUDIO Voicemeeter Non Contractual document page 1 Document designed by V.Burel2014-2015 all right reserved. All information provided in this document may be subject to change without notice (www.vb-audio.com / www.voicemeeter.com ). Jan 2015 USER MANUAL VB-Audio Software VOICEMEETER 1.0.3.5 V.Burel revision 4 This Document is a Step By Step Manual. Thanks to follow every step until getting the wanted configuration. USE CASES: How to talk and send music in the same time on Skype or Google Voice? How to manage 2 headsets on Skype or Google voice? How to record Conference-Call in 8 tracks for post production? INSTALLATION: Run setup program and follow instructions. Reboot after installation or de-installation IMPORTANT NOTE: If you do not reboot after de-installation, virtual audio drivers might not be completely de-installed and prevent you to install new version correctly. If it happens, you will be obliged to de-install Voicemeeter’s Virtual audio device’s) manually. (by the system / device manager windows system procedure). Fair Trade, Affordable For Everyone Voicemeeter is a donationware, free to download and free to use! It allows you to set the license price according to your means, if you find this application useful. Thanks for your participation and support! Windows XP, VISTA, WIN7, WIN8, WIN8.1 32/64 bits (MME, WDM/WASAPI, KS, ASIO). www.voicemeeter.com / www.vb-cable.com VB-AUDIO Voicemeeter Non Contractual document page 2 Document designed by V.Burel2014-2015 all right reserved. All information provided in this document may be subject to change without notice (www.vb-audio.com / www.voicemeeter.com ). Jan 2015 USER MANUAL VB-Audio Software VOICEMEETER 1.0.3.5 V.Burel revision 4 Table of Content INTRODUCTION: ........................................................................................................................................... 4 Voicemeeter as Universal Virtual Audio Device: ...................................................................................... 5 Audio Mixing Console Basis: ..................................................................................................................... 6 STEP 1: Select main audio Output Device .................................................................................................... 7 STEP 2: Select an Input Device. .................................................................................................................... 8 Monitor Input in Real Time ...................................................................................................................... 9 STEP 3: Use Virtual Input as default playback device................................................................................. 10 Virtual Input is Multi ‐Channel ! ............................................................................................................. 11 Understand Voicemeeter Virtual I/O in one picture. ............................................................................. 12 STEP 4: Send the Mix Output to Skype Input. ............................................................................................ 13 STEP 5: Enjoy new Audio Controls.............................................................................................................. 14 INTELLIPAN 3D PANEL: The Binaural effect. ........................................................................................... 14 Audibility control & equalizer. ................................................................................................................ 15 STEP 6: Connecting ASIO Application to Voicemeeter. .............................................................................. 16 Special Routing Options on Output BUS. ................................................................................................... 17 M.C. Means “Mute Center”. ................................................................................................................... 17 Menu for Extra functions ........................................................................................................................... 18 CASE STUDY #1 ........................................................................................................................................... 20 CASE STUDY #1 – STEP 1 ......................................................................................................................... 21 CASE STUDY #1 – STEP 2 ......................................................................................................................... 22 CASE STUDY #1 – STEP 3 ......................................................................................................................... 23 CASE STUDY #2 ........................................................................................................................................... 25 CASE STUDY #2 – STEP 1 ........................................................................................................................ 26 CASE STUDY #2 – STEP 2 ........................................................................................................................ 26 CASE STUDY #3 ........................................................................................................................................... 28 System Settings / Options .......................................................................................................................... 30 Getting Optimal Latency: ....................................................................................................................... 31 M.I.D.I. Mapping: .................................................................................................................................... 32 Specifications: ......................................................................................................................................... 33 Voicemeeter I/O Diagram: ..................................................................................................................... 34 KNOWN ISSUES ....................................................................................................................................... 35 Command Line Installation: .................................................................................................................... 35 Voicemeeter Command Line: ................................................................................................................. 36 VB-AUDIO Voicemeeter Non Contractual document page 3 Document designed by V.Burel2014-2015 all right reserved. All information provided in this document may be subject to change without notice (www.vb-audio.com / www.voicemeeter.com ). Jan 2015 USER MANUAL VB-Audio Software VOICEMEETER 1.0.3.5 V.Burel revision 4 INTRODUCTION: Voicemeeter is a virtual mixing console able to manage 3 audio inputs (2 physicals and 1 virtual) and 3 audio outputs (2 physicals and 1 virtual) though 2 busses A & B. As Mixing Console, Voicemeeter offers large amount of use case combinations: To mix in real time your voice with your music, your movie, your video game or web radio and share it on internet through VOIP applications. Voicemeeter is also able to let you manage 2 Headsets and create new VOIP experiences … Voicemeeter General Diagram (3 inputs / 2 Buses Mixing Console) VB-AUDIO Voicemeeter Non Contractual document page 4 Document designed by V.Burel2014-2015 all right reserved. All information provided in this document may be subject to change without notice (www.vb-audio.com / www.voicemeeter.com ). Jan 2015 USER MANUAL VB-Audio Software VOICEMEETER 1.0.3.5 V.Burel revision 4 Voicemeeter as Universal Virtual Audio Device: Voicemeeter offers Virtual Audio Point on Input #3 and on BUS B (Output B). This Virtual Audio I/O (VAIO) supports all possible Audio Interfaces and allows connecting any audio applications, including audio pro DAW or musical instrument working with ASIO devices. Audio interfaces type supported by Voicemeeter Virtual audio I/O (Voicemeeter VAIO). Interface Type Description The MME API or the Windows Multimedia API (also known as WinMM) was MME WDM KS the first universal and standardized Windows audio API. This audio interface type is expected to work with whatever audio device but with latency time possibly around 100ms. That we call WDM (Windows Driver Model) audio interface in voicemeeter is handled by WASAPI : the Latest Microsoft Audio Functions to get best audio performances and small latency (< 30ms) – available since Windows VISTA Kernel Streaming or Direct Kernel streaming API allows low latency audio streaming, since Windows XP, but unfortunately not all audio devices provides this interface. WaveRT The WaveRT miniport driver is supported in Windows Vista and later Windows operating systems and can offers good audio performances and small latency (comparable to KS). Direct-X Direct-X Audio Interface is used by Video Game and some audio software. Latency is usually comparable to MME, Audio Stream Input/Output (ASIO) is a computer sound card driver protocol for digital audio specified by Steinberg, providing a low-latency and high fidelity interface between a software application and a computer's sound card. ASIO VB-AUDIO Voicemeeter Non Contractual document page 5 Document designed by V.Burel2014-2015 all right reserved. All information provided in this document may be subject to change without notice (www.vb-audio.com / www.voicemeeter.com ). Jan 2015 USER MANUAL VB-Audio Software VOICEMEETER 1.0.3.5 V.Burel revision 4 Audio Mixing Console Basis: An audio mixing console is a device able to sum different audio signals (audio sounds) coming from different inputs and route them to different outputs. Mixing desk is usually composed by Strips and Busses. While strips are connected to Inputs, busses are connected to outputs. This schema above shows how basically Voicemeeter can mix 3 inputs into 2 busses (in BUS A if button A is switched on, on BUS B if button B is switched on). Typically BUS A can be used for monitoring (speakers) and BUS B for VOIP or audio recording applications. Each strip (each input) can go through different processing before summing to the busses. Voicemeeter includes funny panels to tweak the sound on input #1 and #2 and a regular 3 bands Equalizer on input #3 (the Virtual Input). Again on usual Mixing Console, we have on each strip a SOLO button (to listen one or several strips only) and a MUTE button to simply mute the signal of the Strip or Bus. Finally the Fader Gain allows to adjust the sound volume for each Strip and Bus. Other controls will be explained later, but basically we have described here the outlines of what is an Audio Mixer, generally speaking. VB-AUDIO Voicemeeter Non Contractual document page 6 Document designed by V.Burel2014-2015 all right reserved. All information provided in this document may be subject to change without notice (www.vb-audio.com / www.voicemeeter.com ). Jan 2015 USER MANUAL VB-Audio Software VOICEMEETER 1.0.3.5 V.Burel revision 4 STEP 1: Select main audio Output Device To make Voicemeeter working, you need at least to select the main output device used for BUS A (A1). We recommend to select first ASIO (if exists) or WDM device type to get best Latency. The main audio output device (A1) can work in 32 kHz, 44.1 kHz, 48 kHz, 88.2 kHz or 96 kHz. This will also be the main sample rate of the entire mixing process and Virtual ASIO points (Voicemeeter will support whatever sample rate on other inputs or outputs points). Windows Control Panel / Sound Properties allow to configure Device Sound Quality: VB-AUDIO Voicemeeter Non Contractual document page 7 Document designed by V.Burel2014-2015 all right reserved. All information provided in this document may be subject to change without notice (www.vb-audio.com / www.voicemeeter.com ). Jan 2015 USER MANUAL VB-Audio Software VOICEMEETER 1.0.3.5 V.Burel revision 4 STEP 2: Select an Input Device. Select audio input device on strip #1, for example your microphone! Then you will be able to listen to your voice in real time. REM: it’s better to select WDM driver (present since Windows VISTA) to get best latency and audio performances. If using MME driver you might have a bigger delay between input and output. Use MME driver only if WDM are not present or does not work correctly with your audio hardware configuration. KS can be better than WDM in some cases but not all audio device are presenting such audio interface. In the example above, Sennheiser USB Microphone and onboard Audio Device are not present as KS device, but only in WDM and MME. After Step 2, Voicemeeter is routing signal from selected input (e.g. Microphone) to A1 selected Output. Then you can hear from this audio output the sound coming in input #1. A & B button are switch to send signal in BUS A or/and BUS B. VB-AUDIO Voicemeeter Non Contractual document page 8 Document designed by V.Burel2014-2015 all right reserved. All information provided in this document may be subject to change without notice (www.vb-audio.com / www.voicemeeter.com ). Jan 2015 USER MANUAL VB-Audio Software VOICEMEETER 1.0.3.5 V.Burel revision 4 Monitor Input in Real Time After Step 2, you can hear what is coming in selected input. Blue VU-meter will show you level in real time. Input signal is per default sent to both busses (A & B) and we have routed the BUS A to an output device in Step 1. WINDOWS CONFIGURATION WARNING Windows “Listen” option can disturb if your input level is too weak (or too loud), voicemeeter routing, so be sure that this check the level of the selected input device. option is disabled or makes sense for you. (Adjust possible pre-amp gain if any). VB-AUDIO Voicemeeter Non Contractual document page 9 Document designed by V.Burel2014-2015 all right reserved. All information provided in this document may be subject to change without notice (www.vb-audio.com / www.voicemeeter.com ). Jan 2015 USER MANUAL VB-Audio Software VOICEMEETER 1.0.3.5 V.Burel revision 4 STEP 3: Use Virtual Input as default playback device. Strip #3 is the virtual input of Voicemeeter. It is shown as regular system audio device and can be used by another application as playback audio device. If Voicemeeter Input is set as default audio device, every sound played on the computer will go on the Virtual Input (Strip #3) of Voicemeeter Mixing Console. You can launch a Media Player or Web Radio and check that you can hear the sound coming from it on the Voicemeeter Virtual Input (IN 3). VB-AUDIO Voicemeeter Non Contractual document page 10 Document designed by V.Burel2014-2015 all right reserved. All information provided in this document may be subject to change without notice (www.vb-audio.com / www.voicemeeter.com ). Jan 2015 USER MANUAL VB-Audio Software VOICEMEETER 1.0.3.5 V.Burel revision 4 Virtual Input is Multi -Channel ! Strip #3, the virtual input of Voicemeeter. Can now manage until 8 channels and get 5.1 audio from DVD for example. Windows Control Panel /Sound Dialog Box allows configuring Audio device (playback and recording devices). To get multichannel audio from DVD player you need to configure the Voicemeeter Input in multi-channel (click on configure button on the left bottom after having selected the Voicemeeter input). When playing DVD you will see 5.1 audio signal incoming on Voicemeeter Virtual Input and also on possible A output level (if your output device support the same number of channels). Note that BUS B is also multichannel but level meter shows always 2 first channels only. VB-AUDIO Voicemeeter Non Contractual document page 11 Document designed by V.Burel2014-2015 all right reserved. All information provided in this document may be subject to change without notice (www.vb-audio.com / www.voicemeeter.com ). Jan 2015 USER MANUAL VB-Audio Software VOICEMEETER 1.0.3.5 V.Burel revision 4 Understand Voicemeeter Virtual I/O in one picture. Voicemeeter virtual inputs and outputs are simply given by the virtual audio driver playback and recording devices installed on your operating system with Voicemeeter. VB-AUDIO Voicemeeter Non Contractual document page 12 Document designed by V.Burel2014-2015 all right reserved. All information provided in this document may be subject to change without notice (www.vb-audio.com / www.voicemeeter.com ). Jan 2015 USER MANUAL VB-Audio Software VOICEMEETER 1.0.3.5 V.Burel revision 4 STEP 4: Send the Mix Output to Skype Input. BUS B, not used yet, can be used to send the mix to virtual output that can be connected to another application (typically a recording or VOIP application). For example in Skype you can select the Voicemeeter Virtual Output as Microphone. VB-AUDIO Voicemeeter Non Contractual document page 13 Document designed by V.Burel2014-2015 all right reserved. All information provided in this document may be subject to change without notice (www.vb-audio.com / www.voicemeeter.com ). Jan 2015 USER MANUAL VB-Audio Software VOICEMEETER 1.0.3.5 V.Burel revision 4 STEP 5: Enjoy new Audio Controls. While you are talking you can tweak your voice in real time with different controls; 2D Panel, Audibility knobs or simple 3 bands Equalizer… INTELLIPAN COLOR PANEL Based on basic equalizer, this panel will allow you to change the color of your voice in a quick way. It gives a spectral identity to your voice by acting on 3 frequency bands and a tiny reverb on the half top. INTELLIPAN 3D PANEL: The Binaural effect. If you right click on panel you can switch to another effect able to position audio sources with a simple room effect (works in stereo only). Voicemeeter includes a binaural effect able to give a spatial identity to audio sources and then increase dialog intelligibility (especially when everyone is talking in the same time). This effect works in stereo, so can be used when recording a stereo stream to improve the sound of the global mix. This also can be used to simply enhance your voice to stereo. This kind of “psycho acoustic” effect is used a lot since decades in audio production to create a better “audio scene” by positioning some music tracks on different virtual location. Today several FOH live mixing consoles are proposing such advanced Pan Pot, mainly because it allows saving audio energy – while the regular pan pot could completely remove the sound from left or right. VB-AUDIO Voicemeeter Non Contractual document page 14 Document designed by V.Burel2014-2015 all right reserved. All information provided in this document may be subject to change without notice (www.vb-audio.com / www.voicemeeter.com ). Jan 2015 USER MANUAL V.Burel revision 4 VB-Audio Software VOICEMEETER 1.0.3.5 Audibility control & equalizer. On both hardware input strips, there is a audibility control and on virtual input there is a regular 3 bands Equalizer. AUDIBILITY CONTROL This single knob controls a compressor / gate allowing to boost your voice and manage noisy talk. It needs To be adjusted according microphone capabilities and sound environment. EQUALIZER 3 Bands Equalizer to boost or remove bass, medium and high frequency (treble). Trick: All controls go back to default value if double click on it ! WINDOWS CONFIGURATION WARNING WITH VOIP Communication options can mute audio device not used by VOIP Application like our microphone connected to Voicemeeter and no more on Skype. About Built In Microphone: Built in Microphone can also work not as well as expected: First, speaker in notebook can be captured by built in microphone and generates feedback loop. Secondly built in microphone can have strange behavior according different exotic options present to manage this microphone and communication functions. We recommend using USB headset or external microphone to also improve sound quality. VB-AUDIO Voicemeeter Non Contractual document page 15 Document designed by V.Burel2014-2015 all right reserved. All information provided in this document may be subject to change without notice (www.vb-audio.com / www.voicemeeter.com ). Jan 2015 USER MANUAL VB-Audio Software VOICEMEETER 1.0.3.5 V.Burel revision 4 STEP 6: Connecting ASIO Application to Voicemeeter. Voicemeeter Virtual I/O’s support also ASIO interface with 4 different client applications. These 4 possible sources get signal from BUS B (as usual) and their outputs are mixed together on the Virtual Input (with possible PC Sound already coming from player, browser, Skype, or whatever video game or audio app). For Recording Applications, take care about the loop back! You might have MUTED outputs or disable monitoring otherwise output signal will come back on input infinitely. Configure DAW Application Configure Musical Instrument Select Voicemeeter Virtual ASIO device In whatever audio applications using ASIO VB-AUDIO Voicemeeter Non Contractual document page 16 Document designed by V.Burel2014-2015 all right reserved. All information provided in this document may be subject to change without notice (www.vb-audio.com / www.voicemeeter.com ). Jan 2015 USER MANUAL VB-Audio Software VOICEMEETER 1.0.3.5 V.Burel revision 4 Special Routing Options on Output BUS. Voicemeeter provides 3 additional routing modes for each Busses A & B in order to use the possible 8 output channels in different ways. MIX DOWN This button is made to make a stereo mix-down with 5.1 or 7.1 sound coming from DVD player on virtual input (strip #3). Left and right channels, Center, Sub and rear are combined to output on stereo speakers. STEREO REPEAT This button is made to use possible 8 outputs channels with a stereo signal. This stereo signal is repeated to channel 3,4 / 5;6 and 7,8. COMPOSITE This last button is made for audio post production. The 8 channels are composed in this way: - ch 1,2 : usual BUS stereo output - ch 3,4: Voicemeeter input #1 before gain fader - ch 5,6: Voicemeeter input #2 before gain fader - ch 7,8: Virtual input channel 1,2 before gain fader With composite signal, it’s possible to record all Voicemeeter Inputs (each in stereo) with a DAW connected to Voicemeeter virtual ASIO for example. It allows recording VOIP interview or conference and making post production process after with the 3 audio stereo tracks. MONO button simply merges channel 1 & 2 to make mono signal in both channel 1 & 2. Made for single speaker monitoring. M.C. Means “Mute Center”. The MUTE CENTER button on Virtual input is made to mute dialog on DVD played in multichannel mode like 5.1 or 7.1. It allows over dubbing your favorite movies for example… VB-AUDIO Voicemeeter Non Contractual document page 17 Document designed by V.Burel2014-2015 all right reserved. All information provided in this document may be subject to change without notice (www.vb-audio.com / www.voicemeeter.com ). Jan 2015 USER MANUAL VB-Audio Software VOICEMEETER 1.0.3.5 V.Burel revision 4 Menu for Extra functions By clicking on “menu” area, user gets access to different functions: The additional menu is there to provide additional functions: - - - To Restart Audio Engine if required. To load or save current settings in a given filename. To reset Voicemeeter complete settings To set Voicemeeter in system tray (in this case it will run on system startup). To decide if Voicemeeter is shown on startup on run hidden. To set Voicemeeter as always visible window. - To hook key to control volumes on Voicemeeter with keyboard (Output A1 or Strip #1 level). - To shutdown the application - This popup menu is also allowing to open System Settings Dialog box (see later in this document). - M.I.D.I. Mapping Dialog Box can be called by this menu, to connect a M.I.D.I. Remote surface to Voicemeeter. VB-AUDIO Voicemeeter Non Contractual document page 18 Document designed by V.Burel2014-2015 all right reserved. All information provided in this document may be subject to change without notice (www.vb-audio.com / www.voicemeeter.com ). Jan 2015 USER MANUAL VB-Audio Software VOICEMEETER 1.0.3.5 V.Burel revision 4 CASE STUDY #1 How to talk and send music in the same time on Skype? VB-AUDIO Voicemeeter Non Contractual document page 19 Document designed by V.Burel2014-2015 all right reserved. All information provided in this document may be subject to change without notice (www.vb-audio.com / www.voicemeeter.com ). Jan 2015 USER MANUAL VB-Audio Software VOICEMEETER 1.0.3.5 V.Burel revision 4 CASE STUDY #1 How to talk and send music in the same time on Skype or Google Voice? To make it, we will use a configuration very closed to our current setup after Step 5 of this document. For this configuration, we need to install VB-Audio Virtual Cable, it makes the things more comfortable since we have control on the 3 sounds: our voice (IN 1), Skype output (IN2) and computer sound (IN 3). VB-Audio Virtual cable will be used to connect the Skype output to Voicemeeter Input #2. VB-AUDIO Voicemeeter Non Contractual document page 20 Document designed by V.Burel2014-2015 all right reserved. All information provided in this document may be subject to change without notice (www.vb-audio.com / www.voicemeeter.com ). Jan 2015 USER MANUAL VB-Audio Software VOICEMEETER 1.0.3.5 V.Burel revision 4 CASE STUDY #1 – STEP 1 Install VB-AUDIO Virtual Cable: download it on www.vb-cable.com After Installation, you have a new audio installed driver called CABLE Input (as playback device) and CABLE Output (as recording device). These are the two ends of the cable, and like every cable, all sounds sent to cable input will go on cable output. VB-AUDIO Voicemeeter Non Contractual document page 21 Document designed by V.Burel2014-2015 all right reserved. All information provided in this document may be subject to change without notice (www.vb-audio.com / www.voicemeeter.com ). Jan 2015 USER MANUAL VB-Audio Software VOICEMEETER 1.0.3.5 V.Burel revision 4 CASE STUDY #1 – STEP 2 Configure Skype to receive audio from Voicemeeter B Output (Virtual Output) and send audio to CABLE (newly installed). Note it’s important to check off “Automatic gain control” because it’s now Voicemeeter mixing console which takes care about levels. Also you can set level to max for the same reason. In this above configuration, Skype will still continue to use your PC speaker to ring you, but for communication, you will need to launch Voicemeeter to make it work of course (see menu to set voicemeeter in system tray and run on Windows startup).. VB-AUDIO Voicemeeter Non Contractual document page 22 Document designed by V.Burel2014-2015 all right reserved. All information provided in this document may be subject to change without notice (www.vb-audio.com / www.voicemeeter.com ). Jan 2015 USER MANUAL VB-Audio Software VOICEMEETER 1.0.3.5 V.Burel revision 4 CASE STUDY #1 – STEP 3 Configure Voicemeeter to connect it to skype through the VB-CABLE. Already done in last document steps: - Select A1 Output device: your headphone/headset speakers. - Select Input device IN1: your headset microphone. - Set Voicemeeter Virtual Input as default playback device (to get all computer sound in IN3 – all computer sound played on default playback device of course). To be done to get skype output: - Select Input device IN2: CABLE output (where Skype output is routed to). With A / B Switches, you can decide what sound you send to monitor (speaker) and what you send to Skype (through Bus B). Basically you will send to your headphone everything but your voice (except if you want to also hear your own voice in speaker). That’s why A is off on strip #1. Regarding Skype, you will want to send everything (your voice and music) but skype sound (Skype caller coming in input 2). That’s why B is off on strip #2. Otherwise we could have a loop back and the caller could hear his own voice again and again and again… VB-AUDIO Voicemeeter Non Contractual document page 23 Document designed by V.Burel2014-2015 all right reserved. All information provided in this document may be subject to change without notice (www.vb-audio.com / www.voicemeeter.com ). Jan 2015 USER MANUAL VB-Audio Software VOICEMEETER 1.0.3.5 V.Burel revision 4 CASE STUDY #2 How to manage 2 headsets on Skype? VB-AUDIO Voicemeeter Non Contractual document page 24 Document designed by V.Burel2014-2015 all right reserved. All information provided in this document may be subject to change without notice (www.vb-audio.com / www.voicemeeter.com ). Jan 2015 USER MANUAL VB-Audio Software VOICEMEETER 1.0.3.5 V.Burel revision 4 CASE STUDY #2 How to manage 2 Headsets in the same time on Skype or Google Voice? To manage 2 headsets is maybe simpler than the previous case, since we don’t need additional VB-Cable. To manage 2 Headset, we need to manage 2 different microphones, but also 2 different headphones. That’s why Voicemeeter allows selecting 2 physical output devices on BUS A outputs (A1 and A2). Then both headset speakers will give the sound coming from Skype (IN3). B button on strip #3 must be OFF to avoid Skype feedback (otherwise audio coming from Skype on strip #3 would be sent again to Skype through Voicemeeter Virtual Output). VB-AUDIO Voicemeeter Non Contractual document page 25 Document designed by V.Burel2014-2015 all right reserved. All information provided in this document may be subject to change without notice (www.vb-audio.com / www.voicemeeter.com ). Jan 2015 USER MANUAL VB-Audio Software VOICEMEETER 1.0.3.5 V.Burel revision 4 CASE STUDY #2 – STEP 1 Configure Voicemeeter to manage 2 headsets It just means to select audio output A1 and A2 for your headphone 1 and 2. Then Select Input Device 1 for your microphone headset #1 and Device 2 for your microphone headset #2. CASE STUDY #2 – STEP 2 Configure Skype Audio Settings to use both Voicemeeter virtual audio i/o : Do not forget to click on SAVE button to validate your settings. Now you are ready to use VOIP application with 2 Headsets. VB-AUDIO Voicemeeter Non Contractual document page 26 Document designed by V.Burel2014-2015 all right reserved. All information provided in this document may be subject to change without notice (www.vb-audio.com / www.voicemeeter.com ). Jan 2015 USER MANUAL VB-Audio Software VOICEMEETER 1.0.3.5 V.Burel revision 4 CASE STUDY #3 How to record Conference-Call in 8 tracks for post production? VB-AUDIO Voicemeeter Non Contractual document page 27 Document designed by V.Burel2014-2015 all right reserved. All information provided in this document may be subject to change without notice (www.vb-audio.com / www.voicemeeter.com ). Jan 2015 USER MANUAL VB-Audio Software VOICEMEETER 1.0.3.5 V.Burel revision 4 CASE STUDY #3 Since Voicemeeter is providing ASIO interface, we can connect audio pro DAW to Voicemeeter, not only to playback into Voicemeeter Virtual input, but also to record the Voicemeeter Virtual Output (which is composed of 8 channels). If we connect for example REAPER to the Voicemeeter Virtual ASIO point, we can manage 8 channels recording. And the COMPOSITE buttons is there to feed these 8 channels with the 3 Voicemeeter inputs before fader (pre fader). Of course channel 1,2 remain unchanged compared to other modes, but the 6 other channels are replaced by voicemeeter inputs. This allows for example to make multi track recording of interview made on Skype or Google Voice and record everything on a pro audio DAW to make post production after. Be careful to disable input monitoring in your recorder application to avoid feedback loop (prevent signal to go again into voicemeeter virtual input). REAPER recording 4 stereo tracks coming from Voicemeeter virtual ASIO output. VB-AUDIO Voicemeeter Non Contractual document page 28 Document designed by V.Burel2014-2015 all right reserved. All information provided in this document may be subject to change without notice (www.vb-audio.com / www.voicemeeter.com ). Jan 2015 USER MANUAL VB-Audio Software VOICEMEETER 1.0.3.5 V.Burel revision 4 EXTRA OPTIONS Voicemeeter Latency M.I.D.I. Mapping Specifications Known issues Command line Installation VB-AUDIO Voicemeeter Non Contractual document page 29 Document designed by V.Burel2014-2015 all right reserved. All information provided in this document may be subject to change without notice (www.vb-audio.com / www.voicemeeter.com ). Jan 2015 USER MANUAL VB-Audio Software VOICEMEETER 1.0.3.5 V.Burel revision 4 System Settings / Options Click on Master Meter LCD Section to open the Options Dialog Box. This modal dialog box will show you the status of the different audio devices currently used by Voicemeeter. - - SR: is giving the current samplerate of the device (which can be different for each device, Voicemeeter is based on multi points and multi formats audio engine able to manage most of audio system configurations). buf gives the current buffer size used by the audio device (Voicemeeter Audio engine support different buffering on all audio points). Ch: gives the number of channel managed by the devices (Voicemeeter can manage 1 to 2 channels on inputs and up to 8 channels on outputs). r : gives the bit resolution of the device (voicemeeter uses 16bits resolution per default). S: means “share mode” (applicable for WDM device only. KS is usually in exclusive mode and MME in share mode. For WDM it depends on devices and audio engine mode). Note: Output A1 device configuration gives the main audio configuration of Voicemeeter and the configuration of Voicemeeter virtual ASIO driver (Sample rate and buffer size). It also means that all audio processing done in voicemeeter will be based on this sample rate (if some audio points work in another sample rate, conversion will be done to this main sample rate.). In this dialog box, you can change the latency used by MME, WDM and/or KS audio drivers. Basically MME driver support buffering between 512 and 2048 samples , while WDM and KS VB-AUDIO Voicemeeter Non Contractual document page 30 Document designed by V.Burel2014-2015 all right reserved. All information provided in this document may be subject to change without notice (www.vb-audio.com / www.voicemeeter.com ). Jan 2015 USER MANUAL VB-Audio Software VOICEMEETER 1.0.3.5 V.Burel revision 4 can go down to 256 samples (that makes audio processing very closed to the real time – practically usable to sing on a song in real time – karaoke – or to play digital piano on music in real time). Some PC configurations (or some audio devices) will work very well with minimal buffering values while other will not (the sound stream could be not stable and generates too much sound’s cut). That’s why per default MME device uses 1024 samples buffering while WDM device is using 512 samples (these default settings should work for 100% PC configuration cases). Under Windows XP, WDM driver are not available. (That we call WDM driver is audio device driver that can be handled by Microsoft WASAPI, for better audio performances and quality). But some audio device can support KS interface and then provide low latency support. Preferred Main Sample Rate can be used as a wish to make Voicemeeter run output device A1 in the wanted sample rate (44.1, 48, 88.2, or 96 kHz). But it also depends on the audio device current configuration (that could stay in its own sample rate anyway). Engine mode provides a SWIFT mode to possibly improve real time (experimental option).WDM Input devices are driven in SHARED mode per default to avoid possible WASAPI Exclusive mode bug (see known issues). Getting Optimal Latency: The choice of the Output A1 is critical since it gives the master sample rate and main buffer size. So we recommend to select your best audio device as output A1 (preferred ASIO if possible, WDM or KS otherwise) – with ASIO device the buffer size is given by the ASIO driver itself (that can usually be set by the ASIO Specific Control Panel of your audio board). To improve latency, you can also decrease the latency buffer size (for example down to 256) especially with WDM or KS devices. If using WDM devices, you can again reduce global latency (the time between microphone and speaker ) by using SWIFT mode. Activating WDM Input Exclusive mode (and Swift mode) will force audio engine to use smallest buffer with WDM input devices. But this exclusive mode could not be stable and produce various potential problems in the time (from audio crash to system crash – pending on audio driver and O/S – see known issues section at the end of this document). Virtual I/O latency can also be optimized by decreasing the Internal Latency of the Voicemeeter VAIO driver by using specific VBCABLE Control Panel program (see VB-CABLE technical documentation). Virtual ASIO driver are adding a single buffer to the global latency (the size of this buffer is given by the buggering of the output A1) VB-AUDIO Voicemeeter Non Contractual document page 31 Document designed by V.Burel2014-2015 all right reserved. All information provided in this document may be subject to change without notice (www.vb-audio.com / www.voicemeeter.com ). Jan 2015 USER MANUAL VB-Audio Software VOICEMEETER 1.0.3.5 V.Burel revision 4 M.I.D.I. Mapping: Voicemeeter allows connecting a MIDI remote surface to control gain, mute, solo buttons of every strips and busses. You just need to select the right MIDI device and enter in Learn process to configure the M.I.D.I. Mapping. This is expected to work with whatever M.I.D.I. Remote. You can even give a title to your mapping and store it on disk or recall it from XML files. Click on Learn (use TAB or up/down arrow key to learn next/previous control) and move your M.I.D.I. Control. Click on M.I.D.I. Code area (black) to reset the M.I.D.I. Implementation (as it was before learning process). PTT option means “Push To Talk” and un-mute the related strip when pushing the button, mute it when release it. RESET MAP: reset entire M.I.D.I. mapping LOAD / SAVE allow to recall and save M.I.D.I. Map from or to file (xml file). M.I.D.I. Map name is a name defined by user to identify precisely the remote surface (stored in M.I.D.I. Map XML file). VB-AUDIO Voicemeeter Non Contractual document page 32 Document designed by V.Burel2014-2015 all right reserved. All information provided in this document may be subject to change without notice (www.vb-audio.com / www.voicemeeter.com ). Jan 2015 USER MANUAL VB-Audio Software VOICEMEETER 1.0.3.5 V.Burel revision 4 Specifications: Device Type: Compatibility: PC Configuration: PC-Core Virtual Audio Mixing Console Windows XP, VISTA, WIN7, WIN8, WIN8.1 (32 / 64 bits) Min: Celeron / Duo Core 1.8 GHz - 512 MB RAM - Disk < 100 MB Number of Audio Device I/O: 3 Inputs (2 physicals / 1 Virtual). 3 Outputs (2 physicals / 1 Virtual) BUS / Layer: Audio Engine Capabilities: 2x BUS (A and B) / Single Layer 32, 44.1, 48, 88.2 or 96 kHz DSP Processing (defined by Output A1 configuration) WDM, KS, MME, ASIO (32 kHz to 96 kHz) - 1 to 8 channels WDM, KS, MME (8 kHz to 192 kHz) - 1 to 8 channels WDM, KS, MME (8 kHz to 192 kHz) - mono or stereo. Output A1 (Main): Output A2: 2x Physical Inputs: 1x Virtual I/O: 1x Virtual ASIO I/O: WDM, KS, MME, DirectX, WaveRT (8 kHz to 192 kHz) 1 to 8 channels 8 channels on virtual input, 2 on virtual output ASIO (32 kHz to 96 kHz) 8 Channels (in and out) / 4x Client Applications. Virtual ASIO configuration is given by Main Output A1 (SR and Buffering) M.I.D.I. Implementation (remoting): Gain faders, Mute, Solo, M.C. (Configuration by Learn process). Strip Processing: - "Color Panel" Control (Equalization). - 3D Panoramic Control (source positioning by binaural effect). - Audibility Knob (Compressor / Gate effect). - 3 Bands Graphic Equalizer (on Virtual Input). - Mute / Solo. - Integrated Limiter and Peak Remover. - Mix Down to convert 5.1 or 7.1 to Stereo. - Stereo Repeat (Stereo signal copied on ch 3,4 / 5,6 / 7,8) - Mute / Mono - Physical Output Synchronization Delay in system settings dialog box. BUS Processing: Others: VB-AUDIO Voicemeeter Non Contractual document page 33 Document designed by V.Burel2014-2015 all right reserved. All information provided in this document may be subject to change without notice (www.vb-audio.com / www.voicemeeter.com ). Jan 2015 USER MANUAL VB-Audio Software VOICEMEETER 1.0.3.5 V.Burel revision 4 Voicemeeter I/O Diagram: Like a regular mixing console, Voicemeeter can be represented with a usual I/O Diagram even if connections are not made by real wire, principles stay the same. Note that Virtual I/O provide Windows Interface (MME, KS, WASAPI, DirectX…) and ASIO Interface (defined by Steinberg gmbh). It allows connecting regular windows audio application as well as audio pro DAW using ASIO devices only. VB-AUDIO Voicemeeter Non Contractual document page 34 Document designed by V.Burel2014-2015 all right reserved. All information provided in this document may be subject to change without notice (www.vb-audio.com / www.voicemeeter.com ). Jan 2015 USER MANUAL VB-Audio Software VOICEMEETER 1.0.3.5 V.Burel revision 4 KNOWN ISSUES Voicemeeter has been validated on different levels and should work 100% in most configurations. However we have notified some few issues, some of them are related to general system configuration, other due to WDM audio device usage (managed by WASAPI): Audio Stream becomes bad (sound is choppy, discontinued): If the audio stream is not stable in the time, with too much cut in the sound, it means your configuration does not support the current buffering latency on one of your audio device (usually the one used for output A1). In this case you can increase the buffering in Voicemeeter System Settings Dialog Box (768 or 1024 samples for WDM). If it’s not enough, select MME audio device instead of WDM (especially for Output A1) because if Output A1 is not stable, it can disturb all other audio stream: Output A1 Audio device is master while all other audio points are slaves. Output A1 and A2 are not exactly synchronized. On Voicemeeter every i/o are independent and we can hear more or less delay between them, especially when using 2 audio outputs on BUS A: if A1 and A2 are routed to 2 audio devices, the sound might be not exactly synchronized (one speaker output can be late and produces a small echo with other speaker output). This is normal (according technical constraint) but can be corrected by compensate one audio output with a delay line (see System Settings Dialog Box). Voicemeeter Audio Stream can be stopped (no more sound, no meter display). It can happen when changing audio system configuration (in Windows Control Panel / Sound properties) or when plug or unplug USB device or when launching other program that could use same audio device … In this case, simply restart audio engine or re-select an audio device out A1 or input 1 or whatever in Voicemeeter. It will restart audio stream automatically (otherwise it could mean that audio device are used by other process and cannot be used anymore by Voicemeeter). Audio Stream is stopped or corrupted after working well several hours. If “WDM Input Exclusive Mode” is set when using WDM device as input, some PC/Audio driver configuration can be not stable and produce this unexpected behavior (including pops and cracks in the sound) after hours of perfect streaming. In this case the workaround is to disable Input Exclusive Mode in Voicemeeter System Settings (this is done by default) or use MME or KS audio device on Inputs (instead of WDM device driver). Command Line Installation: It is possible to make an automatic installation (or de-installation) by using command line options. However it will need to reboot after installation (and after de-installation). So it’s recommended to first call the setup program to uninstall possible previous version, then reboot, and then install new version (and reboot again). –h : to hide GUI –i : to install –u : to uninstall VB-AUDIO Voicemeeter Non Contractual document page 35 Document designed by V.Burel2014-2015 all right reserved. All information provided in this document may be subject to change without notice (www.vb-audio.com / www.voicemeeter.com ). Jan 2015 USER MANUAL VB-Audio Software VOICEMEETER 1.0.3.5 V.Burel revision 4 Voicemeeter Command Line: Voicemeeter.exe and VoicemeeterPro.exe support some command to restart audio engine or to run Voicemeeter with a pre-defined configuration file. It allows for example to add different shortcut on the desktop to run Voicemeeter for different jobs. To Restart Audio Engine by a shortcut use the following command line. Voicemeeter.exe –R (or “–r”) It can be useful to restart audio engine from a shortcut, for example to re-activate a known USB headset already connected to one Voicemeeter hardware input, but not physically plugged to the computer. When re-plugged to the computer, Voicemeeter Audio Engine has to be restarted to make it work again. To run Voicemeeter with a specific configuration file, use these following command line (Voicemeeter must have been shut down before – if Voicemeeter is already running, it will do nothing): –l”filename.xml” or -L”filename.xml” If the xml is in the same directories of voicemeeter.exe –l”filename.xml” or -L”filename.xml” If the xml is in the same sub directories of voicemeeter.exe –l”subfolder\filename.xml” or -L”subfolder\filename.xml” Or you can use absolute patch –l”c:\folder\filename.xml” or -L”c:\folder\filename.xml” VB-AUDIO Voicemeeter Non Contractual document page 36 Document designed by V.Burel2014-2015 all right reserved. All information provided in this document may be subject to change without notice (www.vb-audio.com / www.voicemeeter.com ).