1
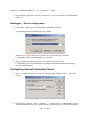
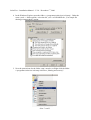
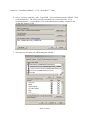
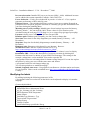
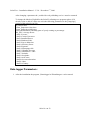
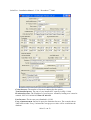
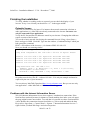
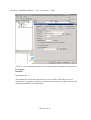
SolarView – Installation Manual – V 2.8 – December 1st, 2009
Installation manual SOLARVIEW
Data logger and web-application for Solarmax S – Inverter.
Author: Manfred Richter
Version 2.8, December 1st, 2009
http://solarlogger.dyndns.tv
http://www.amhamberg.de
[email protected]
Seite 1 von 23
SolarView – Installation Manual – V 2.8 – December 1st, 2009
Inhaltsverzeichnis
Installation manual SOLARVIEW...................................................................................................1
Inhaltsverzeichnis.............................................................................................................................2
Important information before you install .........................................................................................3
Installation start: ...............................................................................................................................4
Datalogger - Service configuration .............................................................................................5
Configuring Internet Information Server .........................................................................................5
Parameters of SolarView.INI .........................................................................................................10
Modifying the labels...................................................................................................................11
Data logger Parameters: .................................................................................................................14
SolarView – Monitor:.................................................................................................................17
Banner: .......................................................................................................................................18
Data import.....................................................................................................................................18
Special Configuration.....................................................................................................................18
Finishing the installation ................................................................................................................21
Potential issues ...........................................................................................................................21
Problems with the Internet Information Server..........................................................................21
Uninstall SolarView: ......................................................................................................................23
Seite 2 von 23
SolarView – Installation Manual – V 2.8 – December 1st, 2009
Important information before you install
Limitations: The test version will only work for 60 days. The diagrams are showing as well the
text „**** unlizenzierte Testversion ****“. After the test period you still can log and store the
data to the database but you can’t visualize them anymore until you have a valid license key.
At the moment up to 9 Solarmax Inverters 2000S, 3000S, 4200S and 6000S are supported. Please
follow the installation steps as described in this manual.
Prerequisites: Windows XP Professional with Service Pack 2 or higher. The application does run
as well with Windows 2000 Service Pack 4 and Windows 2003 Server SP1 or higher. Please
install the Services Packs as required.
Windows 2000 does require as well MDAC 2.8 which can be downloaded from the Microsoft
homepage:
http://www.microsoft.com/downloads/details.aspx?displaylang=de&FamilyID=6c050fe3-c7954b7d-b037-185d0506396c
You need to install as well the Office 2003 Web Components on all systems which can be
downloaded as well from the Microsoft homepage:
http://www.microsoft.com/downloads/details.aspx?FamilyId=7287252C-402E-4F72-97A5E0FD290D4B76&displaylang=de
Download and install Microsoft Office 2003 Web Components Service Pack 1 (SP1) für 2007
Microsoft Office System. You can get it directly for your required language from: Download
OWC SP1 for Office 2007:
http://www.microsoft.com/downloads/details.aspx?displaylang=de&FamilyID=c815dffa-d5f34b71-bf46-13721bd44682
A working network connection between the PC and the Inverter must exist. To log the Inverter
data it is required that the PC and the network are permanently turned on.
Legal liability:
The usage of the Software is on your own risk. The author can’t guarantee any function on your
system and can’t be made responsible for any damage on your PC, network, Inverter or other
component. That is as well valid for wrong or not sent alerts via the SolarView Monitor module.
Internet:
It is possible to publish SolarView on the Internet. How that works depends on various factors
and is not described in this manual. Keyword for that topic are Router configuration, Dyndns,
publish a Webserver, IIS (Internet Information Server)
Seite 3 von 23
SolarView – Installation Manual – V 2.8 – December 1st, 2009
Installation start:
1. IIS (Internet Information Server) installation via Control Panel -> Add/remove programs > Add/Remove Windows Components. Select Internet-Information Services (IIS):
2. Click on “Details” and select the following components:
3.
4. Click “OK” and “Next”. After the successful installation you’ll find a new folder:
„C:\Inetpub“ with additional sub folders.
Seite 4 von 23
SolarView – Installation Manual – V 2.8 – December 1st, 2009
5. Now start the setup SolarView.msi for SolarView, use given settings for the installation
(path etc.)
Datalogger - Service configuration
1. Under Start -> Run type in the following command on click OK:
c:\programme\solarview\Datenlogger.exe –install
Attention: To uninstall the service you have to use the following command:
c:\programme\solarview\Datenlogger.exe –uninstall
2. After successful installation you have to reboot your system. The file
C:\Programme\solarview\datenlogger.log contains information about the dataloggerinverter communication.
Configuring Internet Information Server
1. Start „c:\programme\solarview\web.exe“ and accept the “unzip to folder” – just click
„Unzip“:
2. Open the IIS – console: „Start“->”Settings” -> “Control Panel“->“Administrative tools“->
„Internet Information Services“. Right click the “Default web site” and select properties:
Seite 5 von 23
SolarView – Installation Manual – V 2.8 – December 1st, 2009
3. In the properties window of the „default web site“ select the tab „home directory“ and set
the „local path“ to c:\programme\solarview\web\ using the “browse” button. Click two
times OK.
Seite 6 von 23
SolarView – Installation Manual – V 2.8 – December 1st, 2009
4. In the Windows Explorer open the folder „c:\programme\solarview\web\tmp\“. Under the
menu „tools -> folder options“ select the tab „view“ to DISABLE the „Use simple file
sharing (recommended)” option:
5. Now the permissions for the folder „tmp“ must be set. Right click the folder
c:\progamme\solarview\web\tmp\ and select „Sharing and security”:
Seite 7 von 23
SolarView – Installation Manual – V 2.8 – December 1st, 2009
6. Select „Security“ and click „add“. Type IUSR_”Your workstation name”;IWAM_”Your
workstation name”. The entries must be separated with a semicolon. The “Your
workstation name” is a placeholder. The workstation name normally is shown in the
“From this location” field.
7. Select the two accounts just added and grant „Modify”:
Seite 8 von 23
SolarView – Installation Manual – V 2.8 – December 1st, 2009
Click OK to accept the modifications.
Seite 9 von 23
SolarView – Installation Manual – V 2.8 – December 1st, 2009
Parameters of SolarView.INI
1. Now the parameters for the web frontend need to be set using the program
“SolarView.INI Einstellungen”. Before doing that the „Solar Datenlogger“ – service must
run.
Description of the Parameters:
License: Without a valid license key limitations are active like described at the beginning.
A valid license key can be obtained for a usage fee by contacting
[email protected].
Count of inverters: Number of inverters
Seite 10 von 23
SolarView – Installation Manual – V 2.8 – December 1st, 2009
Inverter aberration: Installed PV power per inverter (kWp * 1000). Additonal inverters
can be added with comma separation. Example: 5460,3240,2720
Power deduction = Yearly power deduction in percent. A value of 1.15 (%) equals a
generator performance of 80% after 20 years.
Efficiency factor = The calculated efficiency rating of your power station. Depends on
parameters like roof pitch, geografic direction etc. Nomally you get this information from
your fitter during the planning phase.
Monthly part of yearly earnings: Monthly part of total earings in percent for January,
February, March…, the sum must be 100%. Exact values for your location can be
calculated using the web page PVGIS (http://re.jrc.ec.europa.eu/pvgis/apps3/pvest.php).
Payment: electric power selling price in Euro cent per kWh.
Database path: Database path. Normally you don’t need to change that.
Start time: Start time for the daily diagramms per month (January, February … till
December)
Stop time: Stop time for the daily diagramms per month (January, February … till
December)
Homepage title: Homepage title showed in your Internet – Browser.
Weather forecast: Link to a weather forecast service. E.g.
http://wetterstationen.meteomedia.de/messnetz/eu_d.html
Average power: If activated the average power of the last 5 minutes is used to display
Installation URL = Link to the description of your power station (by deleting this
Parameter the link won’t be shown on your SolarView Homepage. The settings in the
example „anlage.htm“ can be modified. You need to open the file
c:\progamme\solarview\web\anlage.htm for instance using Notepad. You can also replace
the picture by using your own with the same name and format:
c:\progamme\solarview\web\images\anlage.jpg
You can also point here to another homepage.
latitude, longitude, time zone = Geographical coordinates to calculate sunrise and sunset
for you location. Values can be calculated here: http://www.amhamberg.de/Standort.shtml
Country =
Modifying the labels
By adding/replacing the following parameters in file
c:\programme\solarview\solarview.ini the labels can be adjusted to display it in another
language:
German default labels:
[Language]
l_MomentaneWerte=Momentane Werte
l_rel_abs_Leistung=rel./abs. Leistung
l_WRTemperatur=WR-Temperatur
l_Status=Status
l_SolarMaxTyp=Solarmax - Typ
l_Tagesverlauf=Tagesverlauf
l_Ertrag=Ertrag
l_Umsatz=Umsatz
l_spezifischerErtrag=spezifischer Ertrag
Seite 11 von 23
SolarView – Installation Manual – V 2.8 – December 1st, 2009
l_MaximalLeistung=Maximale Leistung
l_CO2Bilanz=Bilanz (vermieden)
l_Soll=Soll
l_Ist=Ist
l_Aufgang=Aufgang
l_Hoechststand=Höchststand
l_Untergang=Untergang
l_Stunden=Stunden
l_Sonnenlauf=Sonnenlauf
l_WechselrichterDetails=Wechselrichter - Details
l_Summe=Summe
l_Details=Details
l_Leistung=Leistung
l_Zeit=Zeit
l_Werte=Werte
l_Heute=Heute
l_Gesamt=Gesamt
l_DetailWerteAnzeigen=Detailwerte anzeigen
l_DetailWerteAusblenden=Detailwerte ausblenden
l_ertragsKalender=Ertragskalender
l_Vergleich=Vergleich
l_Anlage=Anlage
l_Wettervorhersage=Wettervorhersage
l_ErwarteterErtrag=Erwarteter Ertrag
l_SollAbsolut=Soll (absolut)
l_IstAbsolut=Ist (absolut)
l_SollRelativ=Soll (relativ,
l_IstRelativ=Ist (relativ,
l_Tage=Tage
l_MonatsVerlauf=Monatsverlauf
l_Erreicht=Erreicht
l_Erwartet=Erwartet
l_Nebeneinander=Nebeneinander
l_Uebereinander=Übereinander
l_Jahr=Jahr
l_JahresUebersicht=Jahresverlauf
l_ErreichterErtrag=Erreichter Ertrag
l_GesamtVerlauf=Gesamtverlauf
l_Standardansicht=Standardansicht
l_VergleichenMit=vergleichen mit
French labels proposal:
[Language]
l_MomentaneWerte=Production en temps réel
l_rel_abs_Leistung=Rendement rel./abs.
l_WRTemperatur=Température onduleur
l_Status=Status
Seite 12 von 23
SolarView – Installation Manual – V 2.8 – December 1st, 2009
l_SolarMaxTyp=Solarmax - Modele
l_Tagesverlauf=Journalier
l_Ertrag=Production
l_Umsatz=Gain
l_spezifischerErtrag=Production spécifique
l_MaximalLeistung=Production maximum
l_CO2Bilanz=Bilan
l_Soll=Prod. totale attendue
l_Ist=Rdt Prod. réelle/attendue
l_Aufgang=Lever du soleil
l_Hoechststand=Apogée
l_Untergang=Coucher du soleil
l_Stunden=Ensoleillement
l_Sonnenlauf=Ephémerides
l_WechselrichterDetails=Onduleurs - Détails
l_Summe=Somme
l_Details=Détails
l_Leistung=Puissance
l_Zeit=Temps
l_Werte=Exporter vers Excel
l_Heute=Aujourd'hui
l_Gesamt=Annuel
l_DetailWerteAnzeigen=Production (détail)
l_DetailWerteAusblenden=Production en kW
l_ertragsKalender=Production jour/jour
l_Vergleich=Comparaison
l_Anlage=Installation
l_Wettervorhersage=Prévision météo
l_ErwarteterErtrag=Production attendue
l_SollAbsolut=Attendu (abs.)
l_IstAbsolut=Rdt Prod. réelle/attendue (abs.)
l_SollRelativ=Attendu (rel.,
l_IstRelativ=Rdt Prod. réelle/attendue (rel.,
l_Tage=Jour
l_MonatsVerlauf=Production mensuelle
l_Erreicht=Produit
l_Erwartet=Attendu
l_Nebeneinander=Juxtaposé
l_Uebereinander=Superposé
l_Jahr=Annee
l_JahresUebersicht=Production annuelle
l_ErreichterErtrag=Production effective
l_GesamtVerlauf=Gesamtverlauf
l_Standardansicht=Vue standard
l_VergleichenMit=Comparer avec
Seite 13 von 23
SolarView – Installation Manual – V 2.8 – December 1st, 2009
After changing a parameter the „world wide web publishing service“ must be restarted.
To change the labels to English for the SolarViewSettings.exe program replace (if it
already exist) or add (if it does not exist) the following parameters to the [Language]
section of the solarview.ini file:
pb_cancel=End
Frame_Stopzeiten=Stop time:
Frame_Startzeiten=Start time:
frame_Monatsanteile=Monthly parts of yearly earning as percentage:
chk_PAC=Average Power
Label1=License:
Label2=Count of inverters:
Label3=Installed Power:
Label4=Database-Path:
Label5=Power deduction:
Label6=efficiency factor:
Label9=Payment:
Label14=Homepage title:
Label15=Weather forecast:
Label16=Installation - URL:
Label17=latitude:
Label18=longitude:
Label19=time zone:
Label20=inverter aberration:
Label21=Sum:
Label22=Country:
Data logger Parameters:
1. After the installation the program „Datenlogger.ini Einstellungen“ can be started:
Seite 14 von 23
SolarView – Installation Manual – V 2.8 – December 1st, 2009
Count Inverter: The number of inverters connected to the system
Total installed power: The sum of your installed PV capacity in kWp * 1000.
IP-Adress Inverter: The IP address of your Inverter. Attention, leading zero’s must be
omitted: NOT 192.168.001.052 But 192.168.1.52
Port Inverter: The inverter port (Standard is 12345)
Freq. of measurement: Interval to query the Solarmax Inverter. The example shows
5000 milli seconds. Every 5 minutes the average power value will be written into the
database.
Seite 15 von 23
SolarView – Installation Manual – V 2.8 – December 1st, 2009
NetworkTimeout: Time to wait to connect to the Solarmax Inverter. Example: 3000 milli
seconds
Database-Path: Path to the SolarView database „solar.mdb“. Normally you don’t need to
change this setting.
Web directory-Path: The entry path for the web application. Normally you don’t need to
change this setting.
Startzeiten and Stopzeiten: The data logger starts and ends data logging at the given
time depending on the month. You should set the time to start logging short before the
Inverter starts in the morning and short after it stops in the evening. Best is to use 15
minutes steps.
Language: Select the language in which you like to get the inverter status if there is an
alert
To change the labels of the DatenloggerSettings.exe you can add the following labels (or
replace if already exit) in the section “[Language]” of the file datenlogger.ini.
Label0=Count Inverter:
Label1=total installed power:
Label3=IP - Adress Inverter:
Label4=Port Inverter:
Label5=freq. of measurment:
Label7=Network-Timeout:
Label9=Database-Path:
Label10=Web directory-Path:
Label11=Inverter-aberration:
Label36=Start-Offline - Offset:
Label38=Stop-Offline - Offset:
Label40=Recipient:
Label41=Sender:
Label42=SMTP-Server:
Label43=POP3-Server:
Label44=POP3-Account:
Label45=POP3 - Passwort:
Label46=Line 1:
Label47=Line 2:
Label48=Line 3:
chk_attachbanner=attach banner
chk_banner=create banner
chk_AlarmierungEin=activate alerting
chk_TagesBerichtSenden=send dayly report
chk_requireAuthentication=POP3-Authentication required to send emails:
chk_ReportConnectionErrors=log connection errors
Label14=Language
To modify the language of the report and alert email you can add or replace if it already
exist the following parameters in the [language] section of the file datenlogger.ini
Seite 16 von 23
SolarView – Installation Manual – V 2.8 – December 1st, 2009
l_TagesErtraege=Earning today
l_Ertrag=earning
l_Maximalleistung=Max. Power
l_Summe=Sum
l_AuflaufendeErtraege=accrual earnings
l_DiesesJahr=this year
l_ThisMonth=this month
l_Gesamt=Total
l_Summen=Summary
l_TagesBerichtVom=SolarView Monitor – Daily report
l_EmailTestError=Error while sending eMail:
l_EmailTestSuccess=eMail successfully sent.
l_Error=Error
l_Warning=Warning
l_found=found
l_NichtErreichbar=Can’t connect to inverter!
The parameters MonthsJSPath and Days_HistPath are based on the Webverzeichnis-Pfad
and can’t be changed via the user interface. Every evening at the stop time the files
months.js and days_hist.js are generated You can use that files for automatic updated for
other web services like for instance www.sonnenertrag.eu.
SolarView – Monitor:
Alarmierung aktivieren: The data logger does read the error log of the inverters. In case
of an error an email alert can be sent out. For that the following parameters must be
configured.
Tagesbericht senden: When the data logger stops in the evening an email with the daily
earnings can be sent out.
Start-Offline-Offset and Stop-Offline-Offset: If the data logger is unreachable (offline)
the error log can’t be read. There are various root causes for that (network problems, not
enough sun radiation etc.). To avoid false positive alerts (e.g. because of sun radiation
during morning and evening hours) an offset can be defined. An offset of 120 (minutes)
means that e.g. in December (Start=8:00, Stop=17:00) the offline monitoring will start
only at 10:00am and stops already at 15:00 pm. The two parameters are only affecting
offline errors. If the inverter is reachable and other errors occur an alert will be send out
between e.g. 8:00 and 17:00.
Empfänger: Valid recipient SMTP address for the error and daily earnings email.
Additional recipient SMTP addresses must be separated with a semicolon
Absender: Valid sender SMTP address. Only one address is allowed.
SMTP-Server: Server name (smarthost) which is used to send the emails. Contact your
email service provider for details.
POP3-Server, -Account, -Passwort: The server name, account and password which is
used to receive emails. Some email service providers require POP3 authentication before
you are able to use their SMTP server to send emails.
Seite 17 von 23
SolarView – Installation Manual – V 2.8 – December 1st, 2009
Whether sending emails does work after configuration can be tested with the following
command:
Start -> Run: Type the following command and click OK:
c:\programme\solarview\Datenlogger.exe –testemail
After a successful send you’ll get a few minutes later a test email. If you don’t get one
you probably need to verify the configuration (you should got an error message while
sending the email) or check your Anti-SPAM configuration.
Banner:
It is possible to create a banner which is updated every 5 minutes during logging hours
and can be reached via the URL http://domainname.tld/tmp/banner.png (domainname.tld
is the name of your SolarView – Homepage on the Internet, e.g.
http://solarlogger.dyndns.tv/. The banner can be modified by changing the 3 lines
„Zeile1“, „Zeile2“ und „Zeile3“ and need to be activated be enabling „Banner erzeugen“.
Banner example
Data import
There is a tool available to import data. You can download it from
http://www.amhamberg.de/downloads/editvalues.msi. Please read carefully the
instructions which are available after the installation in a readme.txt file.
Special Configuration
It is possible to query additonal Solarmax inverters even if they are not connected via RS485 with
the first one. For that it is required to create a second instance of Datenlogger as followed:
Create a new folder, for instance c:\programme\solarview\ZweiteInstanz\
Stop the service "Solar Datenlogger" and copy the files datenlogger.exe and datenlogger.ini
folder c:\programme\solarview\ to the new one c:\programme\solarview\ZweiteInstanz\.
Now edit the new c:\programme\solarview\zweiteInstanz\datenlogger.ini and modify/add the
following settings in section [Settings]:
In the example it is assumed that a second inverter is connected to first inverter via RS485 and a
third one is again directly connected to the ethernet network. The first Datenlogger – Service is
already working. The IP address of the third inverter is 192.168.1.53
New parameters are:
Instanz=1
ErsterWR=3
Seite 18 von 23
SolarView – Installation Manual – V 2.8 – December 1st, 2009
This parameter to modify:
RemoteHost=192.168.1.53
Depending on your configuration you might need to change this as well:
RemotePort=12345
WRAnzahl=1
Attention: The inverters connected to the ethernet must have the Device ID 1 assigned! Invertes
connected via RS485 will get DeviceID 2,3…. You can query up to 9 inverts in total. The
RemoteHost-IP must be different from the one in the first inverter but the port can be the same.
Other paramenters doesn’t need to be modified but you must ensure that the database path is the
same as in the original datenlogger.ini.
Explanation: The first inverter chain is queried by the first data logger service. Here you don’t
need to change anything. The 3rd inverter connected to the ethernet will be queried with the
additonal datalogger service instance. The Parameter ErsterWR=3 means that the 3rd inverter
becomes No. 3 in the database (but the physical device address must be 1). The Parameter
Instanz=1 is required to create an addtional service instance. To create the additional instance
open Start->Run and tpye in:
c:\programme\solarview\zweiteInstanz\datenlogger.exe -install
(Important – the path to the addtional directory must be used)
You will find now an additonal "Solar Datenlogger 1" service in the services applet of your
control panel which can be started now.
Directory structure example:
Seite 19 von 23
SolarView – Installation Manual – V 2.8 – December 1st, 2009
Nur die Datei c:\Programme\solarview\ZweiteInstanz\datenlogger.ini muss angepasst werden.
Example how to query multiple inverters connected to Ethernet.
Seite 20 von 23
SolarView – Installation Manual – V 2.8 – December 1st, 2009
Finishing the installation
To verify whether everything works as expected you can check the display of your
inverter. Every view seconds you should see a “C” in the upper middle.
Potential issues
There are several sources for issues. For instance the network connection is broken or
other applications (e.g. MaxTalk) are already connected to the inverter. Inverters can
only be connected to one application.
Verify the IP, Port and Device addresses stored in your inverter. Changing that addresses
require a restart of the inverter!
You can do a basic network check using the command line tool „Ping“: Open„Start ->
Run“ and type in CMD. Click OK. Type into the window „Command Prompt“ which just
had opened the command
PING <<IP-Address of the inverter>>, for instance PING 192.168.1.52
Now you should see someting similar:
C:\Programme\Support Tools>ping 192.168.1.52
Ping wird ausgeführt für 192.168.1.52 mit 32 Bytes Daten:
Antwort
Antwort
Antwort
Antwort
von
von
von
von
192.168.1.52:
192.168.1.52:
192.168.1.52:
192.168.1.52:
Ping-Statistik für
Pakete: Sent =
Ca. Zeitangaben in
Minimum = 0ms,
Bytes=32
Bytes=32
Bytes=32
Bytes=32
Zeit=1ms
Zeit<1ms
Zeit=1ms
Zeit<1ms
TTL=100
TTL=100
TTL=100
TTL=100
192.168.1.52:
4, Received = 4, Lost = 0 (0% Lost),
Millisek.:
Maximum = 1ms, Mittelwert = 0ms
No pakets must be lost (The IP – Adresse 192.168.1.52 is only an example and must be
replaced by the one of your inverter!)!
You can also try MaxTalk (Download http://www.solarmax.com). But you can use only
one application – either MaxTalk or Solarview – Datenlogger.
Problems with the Internet Information Server
XP’s IIS (Internet Information Server) does support 5 simultanious connections. If the
limit has been reached (because for instance a search machine does index your web page)
the page might become inaccessible. To avoid that it is possible to reduce certain timeout
values: Reduce the connection timeout from 900 to e.g. 90 seconds and enable the http
Keep-Alive. Open Start -> Control Panel -> System -> Internet Information Services ->
right click the „Default Web Page“ and select Properties.
Seite 21 von 23
SolarView – Installation Manual – V 2.8 – December 1st, 2009
Check as well c:\programme\solarview\web\robots.txt that it contains exactly this text:
User-agent: *
Disallow: /
Important is the “/”!
The standard for concurrent connections is set to ten in the XP Pro IIS. Per user 2
connections are opened by default. If you like increase that (max is 40) you can run the
following command in a command box:
Seite 22 von 23
SolarView – Installation Manual – V 2.8 – December 1st, 2009
Uninstall SolarView:
Stop the Datenlogger – service. Under Start-> Run type in the following command and
click OK
C:\programme\solarview\datenlogger.exe –uninstall
Now you can unistall the application as usual via „add/remove programs“ in the control
panel of your PC.
Seite 23 von 23