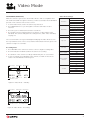
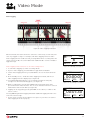
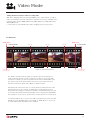
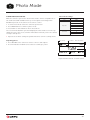
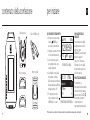
1
user manual
version 1.0.0.
Contents
Precautions
/3
Overview
/4
Using the Camera
/5
Initial Setup
Powering On and Off
Charging
Battery Life
External Power Supply
Micro SD Cards
Camera Menu System
/6
Video Mode
/7
Recording Video
Video Tag/Loop
Simultaneous Photos and Videos
Car DVR
Capturing Photos
Photo Settings
Photo Mode
/ 10
Timelapse Mode
/ 11
Photoburst Mode
/ 12
Camera Settings
/ 13
Two-Way Remote Control
/ 14
Capturing Timelapse Sequences
Timelapse Settings
Capturing Photoburst Sequences
Photoburst Settings
WiFi and Network Name
Date and Time
Camera Settings and Reset
Firmware
Charging
Powering On and Off
Pairing Camera to a Remote Control
Pairing Multiple Cameras to a Remote Control
Using the Remote Control
Shot Setup
/ 16
Connectivity
/ 17
Conserving Battery
/ 18
Updating Firmware
/ 19
Camera Care
/ 20
Technical Specifications
/ 21
Warranty
/ 22
Disclosures
/ 23
Fixing the Camera to the Universal Clip
Attaching the Camera to Mounts
Rear Hatch
Lens Rotation
Connecting to Windows PC
Connecting to Mac
Connecting to WiFi device
Connecting to a TV
LCD Settings
Camera Auto Off
Cleaning the Camera
Cleaning the Lens and LCD Screen
Cleaning the Seals
2
Precautions
General precautions
Attention
Please take note of the following guidelines when using your Stealth 2 camera:
! Rechargeable batteries are only to
be charged under adult supervision.
• The camera is 1.2m shock resistant, but not shock proof—please take care of
your camera and accessories, mounting and storing them securely.
• For your safety, do not press the buttons on the camera during sports activities
• Do not store the camera anywhere prone to dust or damp for extended periods
of time.
• Do not leave the camera exposed to extremely high temperatures—such as
under direct sunlight—for extended periods of time as this may affect the
camera housing and internal components.
• Clean the lens and screen with a micro fibre, antistatic cloth to remove
fingerprints or dust—no cleaning chemicals are required.
• The camera has a working temperature range of -10°C to 40°C (14°F to 104°F).
• Power off the camera before removing the memory card as stored data may
be damaged if it is removed or inserted while the camera is powered on.
• Remove the memory card before storing the camera for long periods of time.
Weather resistance
The Stealth 2 is engineered to be resistant to dust, snow, rain and splashes.
The camera is NOT waterproof without the waterproof case.
• Operating the camera at temperatures below 0°C reduces battery life and
lowers battery performance.
• Do not charge the battery at temperatures below 0°C.
• Clean off any salt water or dirt from the camera immediately and prior storing.
• Do not subject the camera to a sudden impact of water—the camera should
always be used in the waterproof case under intensive water-based applications.
! DO NOT open, puncture or
otherwise damage the internal
rechargeable battery, or dispose of
it in fire.
! DO NOT attempt to open the
camera body or disassemble for
any reason. This will instantly nullify
the standard warrnty, and risks
damaging the internal battery.
! Optimal Camera Storage
We recommend users store cameras
for a minimum of 6-12 hours with the
Back Hatch open, in less then 30%
humidity.
Never open the Back Hatch in damp
or humid conditions if possible.
Disclaimer
Drift Innovation will not, under any
circumstances, be responsible for
injuries or property damaged incurred
during participation of any high-risk
sport or activity not endorsed or
recommended by Drift Innovation.
Remember that the warranty will only
cover manufacturing defects.
3
Overview
E
C
MODE Button (Simultaneous
Photo/Tag)
CYCLE OPTION Button
ACTION Button (On/Off/Rec/Stop)
Status LED
Lens ‘UP’ indicator
Figure 1: Top View
1.3” LCD Screen
300° Rotating / Replaceable Lens
Speaker
¼”-20 Thread
USB Port (Micro Type B)
HDMI Port (Micro Type D)
Micro SDHC Card Slot
Figure 2: Screen View
RESET Button
Standard Rear Hatch
Rear Hatch ‘Up’ Indicator
Lens ‘Up’ Indicator
Built-in Noise Reducing Microphone
Figure 3: Connector View
N
Q
Figure 4: Rear View - No Hatch
Figure 5: Rear View - Standard Hatch
Figure 6: Rear View - Front View
4
Using The Camera
Figure 7: Inserting the Micro SD card
Initial setup
Selecting a micro SD card
1. Unscrew the rear hatch of the camera by hand.
The Drift Stealth 2 is compatible with
Micro SDHC cards of up to 32GB,
and of Speed Class 6 or above.
We recommend Class 10 cards for
recording HD video and system stability.
2. Insert a micro SDHC card into the card slot, as above, until you hear a click
3. Connect the camera by the micro USB cable (provided) to a powered USB
port and charge for at least 4 hours before first use, until fully charged.
4. Replace the rear hatch, ensuring the arrow indicator points to the camera face
with the control buttons.
Below is a table of approximate video
recording times against card size.
Approximate Recording Time (30 FPS)
Powering on and off
Press and hold the ACTION button on the camera—the LED indicator and screen
will power on and display a welcome message.
To power off, hold the ACTION button for 3 seconds, or until the LED indicator
and screen power off.
Charging
1. Connect the micro USB cable to the port at the rear of the camera and then
to a powered USB port in your computer, other USB device or USB power
adaptor (not included).
1080P
720P*
1 GB
9min
12min
WVGA
27min
2 GB
18min
24min
54min
4 GB
36min
48min
1h 48min
8 GB
1h 12min
1h 36min
3h 36min
16 GB
2h 24min
3h 12min
7h 12min
32 GB
4h 48min
6h 24min
14h 24min
Formatting a micro SD card
2. A full charge takes around 4 hours (min 1A)—once the camera is fully charged,
remove the micro USB cable and replace the rear hatch and screw closed
Formatting will remove all files from
a memory card. When using a new
card for the first time, formatting is
recommended. With the card inserted
in the camera:
Battery life
1. Cycle to Camera Settings
At a temperature of 25°C (77°F), with all power saving features off and the camera
recording continuously, the battery will last for about 3 hours (1080p 30FPS, Wi-Fi
off), on a full charge (see Conserving Battery Life, p18).
2. Select ‘Format Memory Card’, press
ACTION and then confirm
Using an external power supply
Removing a micro SD card
The camera can be powered by an external power supply such as a USB power
adapter, Drift Power Pack or Drift 12V Charger. We recommend you power off
your camera before plugging into any external power supply.
To remove the card, push it until you hear
a click. The card slot is spring loaded and
the card will slide from the slot.
! If connected to a computer, the camera screen will show a USB symbol
! If connected to a USB power adaptor, the screen will show ‘Charging...’
Formatting may take a few moments
to complete—please be patient.
Press the ACTION button to begin normal usage when using an external supply.
If the external power is cut off for any reason during recording, the camera will
immediately start drawing power from the rechargeable battery instead and
continue recording, protecting your footage from file corruption.
5
Camera Menu System
C
MODE/Simultaneous Photo/Video
Tag Button
CYCLE OPTION Button
ACTION Button (On/Off/Rec/Stop)
LED Indicator
Figure 8: Stealth 2 Top View
Current Mode
The Drift Stealth 2 has an easy-to-use menu system which can be navigated using
the camera’s three control buttons.
1080p
25 FPS
Mode Selection
The Mode Selection menu is used to select the camera mode.
On pressing the MODE button, the camera will switch between the 4 recording
modes and the Camera Settings. The LCD screen backlight will take over the
colour for the selected mode and the camera is ready to capture.
12:05:59
EXP-2.0
87%
87%
For more information about the four camera modes, (see p7-12).
10s
Cycle Options
The CYCLE button is used to select specific settings for each of the four camera
modes, as well as cycle through setting options.
To change the settings of the current camera mode press the CYCLE button. This
will change the settings between a selection of presets.
For more information about the four camera modes and their settings, (see p7-12).
EXP-2.0
129
87%
3s
5MP
87%
5MP
Camera Settings Menu
The Camera Settings menu is used to view and adjust camera settings.
EXP-2.0
For full details, (see p13).
Resolution
25 FPS
12:05:59
Exposure
87%
Settings mode - Screen
referenc
1s - 3/s
5MP
1080p
2-20
Recording Mode
EXP-2.0
87%
87%
Battery
EXPOSURE
-2.0, -1.0, 0, +1.0, +2.0
87%
SELF-TIMER
OFF,
3S, 5S, 10S
SD
Card
VIDEO FORMAT
Figure 9: Preview Screen
MP4 / MOV
VIDEO TAGGING
ON / OFF
VIDEO TAGGING INTERVAL
10s, 30s, 1MIN, 2MIN, 5MIN
VIDEO STANDARD
NTSC (30) / PAL (25)
WI-FI
OFF / ON
CLONE MODE
OFF / ON
EXPscreen
-2.0 of
87%
1st
Settings Mode.
SETTINGS
SET T I
Exposure
Self Timer
Wi-Fi Format
Video
87%
NG S
0
0.0
X
X
...
MP4
Figure 10:
Mode Selection Flow Chart
As user scrolls through
settings, the selected
setting is highlighted.
6
Video Mode
VIDEO MODE (GREEN LED)
Video Mode Settings
While the camera is powered on and in Video Mode—with a compatible micro
SD card inserted with enough free memory—it will record video when ACTION is
pressed on the camera or the remote control.
1080P
Resolution
25 (1080/960/720/WVGA)
2. Press MODE button to cycle through the 4 modes until video mode is
selected.
! The Stealth 2 will only toggle between resolutions of either NTSC or PAL
standards. This can be changed in the settings menu, under ‘video standard’,
see page 13.
720P
WVGA
1. To enter Video Mode, ensure the camera is powered on.
3. Press the cycle to switch between video resolutions.
960P
30 (1080/960/720/WVGA)
Frame Rate
50 ( 720/WVGA)
60 (720/WVGA)
100 (WVGA)
120 (WVGA)
FOV
135°
-2
The screen will take over a green backlight and display the Video Mode icon in
the top-lefthand corner of the screen, and the LED indicator will turn green—the
camera is ready to record video.
-1
Exposure
0
+1
+2
3s
Recording Video
Self Timer
10s
1. Press ACTION on the camera or remote control to begin recording video
2. The LED indicator will blink red while the camera is recording
Video Tagging
! The duration of the current recording is indicated by the on-screen timer
3. To stop recording, press ACTION on the camera, or STOP on the remote
control—the LED indicator will turn green
5s
On
Off
10s
30s
Video Tagging
1m
Interval
2m
5m
10m
Video Mode
Frame Rate
1m
Resolution
3m
1080p
25 FPS
12:05:59
12
EXP-2.0
87%
Car DVR
5m
10m
15m
87%
Total Video Count
Figure 11: Video Mode - Stand by
Video Mode
Frame Rate
Resolution
1080p
25 FPS
12:05:59
12:05:59
EXP-2.0
Total Video Count
87%
87%
Recording Timing
Figure 12: Video Mode - Recording
7
Video Mode
Video Tagging
Figure 13: Video Tagging Illustration
When activated, this feature allows the camera to continuously record video, but
save only ‘tagged’ footage. For example, with Video Tagging turned on and a
Video Tagging Interval of 30s selected, pressing MENU while recording video will
save the previous 30s, the current 30s and an additional 30s—a total of 1m30s of
tagged footage.
Video Tagging can be turned on or off in the Settings menu.
25 FPS
T
10s
10s
EXP-2.0
EXP
-2
6
90%
90%
1080p
87%
87%
Figure 14: Stand by Screenshot
1. To turn Video Tagging on, switch to Settings Mode
2. Cycle to ‘Video Tagging’, press ACTION to toggle between On/Off
3. Under ‘Video Tagging Interval‘, press ACTION to choose the desired interval
time
4. At the Standby screen, ‘T’indicates Video Tagging is activated, and the set
Video Tagging Interval is displayed, (see Figure 14).
5. Pressing ACTION will begin the loop recording, but without saving any
footage. The LED will be blinking green, (see Figure 15).
6. While recording video, pressing the MODE button will tag and save past,
present and future video intervals. The on screen indicator will turn to a check
mark and the LED will turn RED (see Figure 16).
5. Tagging can be stopped by pressing ACTION on the camera, or STOP on the
remote control
Pressing MODE again while tagging will add an additional tagging interval to the
end of the saved footage.
! Please ensure you have at least 4GB of free space on your micro SD card for
video tagging to function properly
1080p
25 FPS
00:00:07
12:05:59
T
xx
EXP
-2
EXP-2.0
90%
90%
87%
Figure 15: Recording Screenshot
1080p
25 FPS
T
00:01:30
12:05:59
EXP-2.0
EXP
-2
90%
90%
87%
87%
Figure 16: Tagging Screenshot
8
Video Mode
Taking simultaneous photos while recording video
With Video Tagging turned off, pressing MODE on the camera while recording
video will simultaneously take a still photo. Simultaneous Photo is available in the
following video setups: 1080p (30/25 FPS), 960p (30/25 FPS), 720p (30/25 FPS),
WVGA (30/25 FPS).
! This feature is only available when Video Tagging (see p.8) is turned off
Car DVR mode
ENGINE STARTS
ENGINE STOPS
START RECORDING
CAR DVR INTERVAL*
Camera turns on
(Automatically)
New clip
New clip
CAR DVR INTERVAL
New clip
CAR DVR INTERVAL
Figure 17: Car DVR Illustration
STOP RECORDING
CAR DVR INTERVAL
V
Camera turns off
(Automatically)
This hands off mode setting is ideal for insurance and security purposes.
In this mode the camera records footage in a continuous loop style (DVR
Intervals) recording loop after loop until it fills the Micro SD Card. Once full,
the oldest loops will be deleted as the newest ones are saved. DVR loop
intervals can be 1min, 3min, 5min, 10min or 15min intervals.
Car DVR mode can be turned on or off in the Camera Settings menu, it will
automatically power the camera on and begin recording when power is
delivered to the USB port. Setting the Car DVR to ‘M’ (manual) allows the user
to use this feature while manually starting the first loop by pressing ACTION.
This is ideal for users such as cyclists where external power is not often used.
To turn Car DVR mode on, cycle to the Camera Settings menu and select Car
DVR Mode, press ACTION, then select ‘AUTO’ or ‘MAN’. On the screen a car
icon will indicate that Car DVR mode is enabled.
9
Photo Mode
PHOTO MODE (YELLOW LED)
While the camera is powered on and in Photo Mode—with a compatible micro
SD card inserted with available memory—it will capture a still image when
ACTION is pressed on the camera or the remote control.
1. To enter Photo Mode ensure the camera is powered on.
2. Press MODE button to switch to photo mode.
Photo Mode Settings
Resolution
3/5/12MP
FOV
135°
-2
-1
0
Exposure
+1
3. Press CYCLE to switch between Photo Resolutions.
The screen will be backlit in yellow and display the Photo Mode icon in the toplefthand corner of the screen, and the LED indicator will turn yellow—the camera
is ready to take photos.
+2
3s
Self Timer
5s
10s
! Exposure & self timer settings are global and can be set in the settings menu.
Capturing photos
1. Press ACTION on the camera or remote control to take a photo.
2. The LED indicator will blink red once before returning to yellow.
Photo Mode
10s
EXP-2.0
Exposure
Self-Timer
Photo90%
Resolution
129
87%
5MP
45%
87%
Photo Count
Figure 18: Photo Mode - Preview Screen
10
Timelapse Mode
TIMELAPSE MODE (PURPLE LED)
While the camera is powered on and in Timelapse Mode—with a compatible
micro SD card inserted with enough free memory—it will capture a series of still
images at a specified rate when ACTION is pressed on the camera or the remote
control.
Timelapse Mode Settings
Resolution
3MP
FOV
135°
0.5s
1s
2s
1. To enter Timelapse Mode, ensure the camera is powered on
2. Press MODE to switch to Timelapse mode
3s
Sequence Interval
5s
The screen will be backlit in purple and display the Timelapse Mode icon in the
top-lefthand corner of the screen, and the LED indicator will turn purple—the
camera is ready to take timelapse photos.
10s
30s
60s
-2
-1
Capturing Timelapse
The Timelapse Sequence Interval can be set using the CYCLE button
Exposure
0
1
1. While in Timelapse Mode, use the CYCLE button to select between the
interval time options
3. Press ACTION on the camera or remote control to start a timelapse series.
2
3s
Self Timer
5s
10s
4. The LED indicator will blink red once when each photo is taken
5. To stop timelapse, press ACTION on the camera or STOP on the remote control
Timelapse Mode
Timelapse Interval
Photo90%
Resolution
90%
3s
1-1078
5MP
67%
EXP-2.0
Exposure
87%
87%
Total Timelapse Images Count
Total Timelapse Sequence Count
Figure 19: Timelapse - Preview Screen
11
Photoburst Mode
PHOTOBURST MODE (CYAN BLUE LED)
While the camera is powered on and in Photoburst Mode—with a compatible
micro SD card inserted with enough free memory—it will capture a burst of still
images for an allotted duration, at a rate of 3 images a second when ACTION is
pressed on the camera or the remote control.
1. To enter Photoburst Mode, ensure the camera is powered on
Photoburst Mode Settings
Resolution
5MP
FOV
135°
Capture Rate
3/s
Burst Duration
2s
1s
5s
2. Press MODE to switch to Photoburst mode
The screen will be backlit in cyan blue and display the Photoburst Mode icon
in the top-lefthand corner of the screen, and the LED indicator will turn cyan
(light blue)—the camera is ready to take a photoburst series.
-2.0
-1.0
0.0
Exposure
+1.0
+2.0
3s
Capturing Photoburst
The Photoburst Mode settings can be set using the CYCLE button.
Self Timer
5s
10s
1. While in Photoburst Mode, use the CYCLE button to select between the
different burst duration options.
2. Press ACTION on the camera or remote control to start photoburst
3. The LED indicator will blink rapidly during a photoburst shoot
Photoburst Mode
Burst Duration Capture Rate
Photo90%
Resolution
90%
5MP
1s - 3/s
2-20
EXP-2.0
Exposure
87%
67%
87%
Total Photoburst Images Count
Total Photoburst Count
Figure 20: Photoburst - Preview Screen
12
Camera Settings
Upon opening the ‘Settings’ menu, the
screen will display a list of adjustable
camera settings.
Pressing CYCLE will navigate forward
one setting, while holding CYCLE will
move the selection back up the menu
allowing for reverse scrolling.
WiFi
To turn WiFi on or off, switch to
Settings Mode and use the CYCLE
button to navigate to WiFi settings.
Press ACTION to switch between ON
and OFF.
Exposure
Off
-1.0
Low
0.0
Off
Self Timer
3s
5s
10s
WiFi
Video Tagging
On
Off
On
Video Tagging
Interval
Camera LED
On
Off
On
Off
2m
Camera Auto Off
5m
20m
Auto
1m
5m
10m
LCD Backlight
LCD Backlight
Timer
Date
Date/Time
PAL
Reset Settings
Medium
Off
5s
10s
20s
1m
Language
Low
On
Off
NTSC
Off
Mic Sensitivity
Cancel
Off
3m
Video Standard
Refresh
2m
Manual
Car DVR Interval
No
10m
15m
To restore the factory camera settings,
navigate to ‘Reset Settings’ in Settings
Mode and press ACTION, then
confirm.
RC LED
Off
Car DVR Mode
2. Press ACTION to start adjusting the
Date and Time settings
Reset Default Settings
Remote Pairing
Yes
1m
5m
Setting the date and time
3. Use the CYCLE button to adjust the
value of year/month/day/time and
press ACTION to confirm
Remote Control
10s
30s
Medium
High
Off
10m
1. While in Settings Mode, use the
CYCLE button to select the Date
Speaker Volume
1.0
2.0
WiFi Network Name
Your Stealth 2 will come with the SSID
programmed to be: ‘Stealth 2_XXXXX’
where XXXXX is the last 5 characters
of your camera’s unique serial number.
-2.0
Format Memory
Firmware Version
Year/Month/Day
On
Off
English
Yes
No
v.X.X.X.X.
High
Firmware
Selecting ‘Firmware Version’ from the
Camera Settings menu will display the
camera’s current firmware version.
For more details about updating
firmware, (see p19)
13
Two-Way Remote Control
Please note: The Two-Way Remote Control is an accessory for purchase
(see driftinnovation.com for more info) but is NOT
included in the purchase of the Stealth 2.
Charging
Connect the remote control using the Mini USB cable (provided) to a powered
USB port. The LED will blink red. A full charge takes around 2 hours using a 2
amps charger. Once the remote is fully charged, the LED will show solid green—
remove the mini USB cable and replace the rubber dust-proof USB seal.
Powering on and off
1. Ensure the camera is powered on (see p5)
2. Press and hold the ACTION button on the remote—the LED will power on and
indicate the current camera mode
! The remote will automatically power off if it does not find a camera after 15s
Pairing camera to a remote control - one to one ‘RC 1-1’
1. On the camera, navigate to Settings mode using the MODE button
2. Scroll down to ‘RC 1-1’ using the CYCLE button and press ACTION
3. On the remote control, press ACTION—The camera will beep and return to
the Camera Settings menu if it has recognised the remote
! If the camera does not display ‘successful’ and return to the Camera Settings
menu it will not be paired—try pressing ACTION on the remote again
Figure 21: Two-Way Remote
ACTION Button
STOP Button (Tag/Toggle Mode)
LED Indicator
! The Remote is NOT waterproof.
4. On the camera, the icon beside Remote Pairing will change to indicate it is
paired to a remote control
Using the remote control - one to one ‘RC 1-1’
While the camera and remote are both powered on and paired, pressing ACTION
on the remote control will begin recording video, capture a photo, start
timelapse or photoburst, depending on the camera mode.
Pressing ACTION while recording video will capture a photo, or start Video
Tagging (if activated, see p8). Pressing STOP will end video recording or timelapse.
Pressing STOP while the camera is in stand by will toggle between camera
modes, as indicated by the LED indicator on the camera and remote (see
Recording Modes p7 - p12).
14
Two Way Remote Control (cont’d)
Pairing camera to a remote control - one to all ‘RC 1-ALL’
A single remote control can be paired to an infinite number of cameras in a 10m
range from the remote control, to enable footage to be captured from every
angle.
1. On the camera, navigate to Settings mode using the MODE button
2. Scroll down to ‘RC 1-ALL’ using the CYCLE button and press ACTION
3. On the remote control, press ACTION—The camera will beep and return to
the Camera Settings menu if it has recognised the remote
! Any camera that does not display ‘successful’ and return to the Camera
Settings menu it will not be paired—try pressing ACTION on the remote again
4. On the camera, the icon beside Remote Pairing will change to indicate it is
paired to a remote control
! When pairing multiple cameras, always test the remote control to see if it
operates all the cameras before mounting them
Using the remote control - one to all ‘RC 1-ALL’
While the camera and remote are both powered on and paired, pressing ACTION
on the remote control will begin recording video, capture a photo, start
timelapse or photoburst, depending on the camera mode.
Pressing ACTION while recording video will capture a photo, or start Video
Tagging (if activated, (see p8). Pressing STOP will end video recording or
timelapse.
The remote contol indicator lights will show white to indicate the remote control
is paired to multiple cameras.
LED Status
Description
Rapid Blinking Red
Less than 15% battery life remains
Blink Red Once
Taking a photo (Photo, Timelapse and Photoburst Modes)
Blinking Red
Recording video (Video Mode)
Blinking Blue
When the camera receives a signal from the remote control
Blinking Green
Camera is in Video Mode
Blinking Yellow
Camera is in Photo Mode
Blinking Purple
Camera is in Timelapse Mode
Blinking Cyan
Camera is in Photoburst Mode
Figure 22: Remote LED Status
15
Shot Setup
Fixing the camera to the Universal Clip
Lens Rotation
1. Align the screw of the universal clip with the thread on the underside of the
camera body
In order to maximise your mounting
options, the camera lens is rotatable
through 300°, allowing for the perfect
shot from even the most awkward of
positions.
2. Twist the screw thread in a clockwise direction
3. As the universal clip tightens against the body of the camera, rotate the
camera to provide the desired angle of attachment, holding the clip in place
4. Tighten the screw on the universal clip until it fits firmly against the camera
body
Closing the rear hatch
1. Ensure the directional arrow “up” indicator is pointing up towards the buttons
2. Tighten the screw on the rear hatch by hand
! Failure to completely seal the rear hatch will compromise weather resistance
(see p3).
Mounting the camera to a Drift mount
Included with the camera are several Drift mounts which will help you find the
shot you want.
Mounting the camera on goggles
1. Attach the Goggle Mount to the strap of your goggles
2. Slide the camera (with universal clip attached) into the mount until the two
arms on the clip click into place
Mounting the camera on a helmet
1. Position the Curved Surface Mount against your helmet to find the optimum
mounting position
Whilst holding the camera body in
one hand, use the index finger and
thumb of the other hand to hold the
camera lens firmly, then twist the
lens to the desired angle. The arrow
indicator above the lens indicates ‘up’
and corresponds with the top of the
display in Live Preview.
! Be sure to rotate the lens back to
the 0° position (so the ‘up’ indicator
on the lens is aligned with the
LED indicator on the camera, and
the edge of the lens is flush with
the body of the camera) before
mounting, or removing the camera
from a mount to reduce the risk of
damage to the lens.
*The App is the perfect viewfinder
when using the Stealth 2
2. Ensure the mounting surface is clean, dry and free of oil and dust
3. Remove the cover of the mount’s 3M adhesive and fix the mount to the
helmet—allow 24 hours to cure
4. Slide the camera (with universal clip attached) into the mount until the two
arms on the clip click into place
Fixing the camera to the standard ¼” thread
Thread the camera onto a tripod, or any other mount with a standard camera
thread, turning the camera body on the thread clockwise to secure.
! However you choose to mount your camera, ensure that the camera is fitted
firmly to reduce the risk of losing it. Give it a tug before you set out.
! Do not overtighten on a ¼” thread with a thread longer than 6 mm.
16
Connectivity
Recorded video footage and photos can be copied to a computer using the USB
cable provided or—if your computer has an appropriate card reader—directly
from the micro WVGA card.
Playing video on a computer
Connecting to a Windows PC by USB cable
If you experience difficulties playing
video recorded with your camera, you
can download VLC media player for
free from www.videolan.org.
1. Connect the camera to your PC using the USB cable—the camera screen will
display a USB logo and the LED status indicator will blink red.
2. Your PC’s operating system may be setup open new devices automatically; if
not, open My Computer
3. Your PC should recognise the camera as a removable device—look for DRIFT
CARD in the list of devices and open
4. Open the DCIM folder—inside, you will find the 100DRIFT folder which
contains all the files saved on the memory card by the camera.
! If there are a very large numbers of files, there will be multiple folders
(100DRIFT, 101DRIFT, etc)
5. Copy the desired files to your PC
Connecting to a Mac by USB cable
1. Connect the camera to your Mac using the USB cable—the camera screen will
display a USB logo and the LED status indicator will blink red.
Some computers may not have the
correct codecs required for video
playback and editing.
If you are experiencing difficulties
editing video or do not wish to use
VLC player for playback, you will need
to download and install a codec pack.
The FFDshow codec pack can be
downloaded from www.free-codecs.
com/FFDshow_download.htm.
Recommended System Requirements
To smoothly view and edit 1080p video,
powerful hardware is required:
Windows
2. Your Mac’s operating system may be setup open new devices automatically; if
not, open a new Finder window
• 3.2 GHz Pentium 4 processor or
higher
3. Your Mac should recognise the camera as a removable device—look for DRIFT
CARD in the list of devices and open
• At least 2GB of RAM
4. Open the DCIM folder—inside, you will find the 100DRIFT folder which
contains all the files saved on the memory card by the camera.
! If there are a very large numbers of files, there will be multiple folders
(100DRIFT, 101DRIFT, etc)
5. Copy the desired files to your Mac
• Graphics card with at least 256MB
of video RAM (512MB for video
editing)
• Direct X 9.0c or later
• Microsoft Windows XP (SP2 or
later), Windows Vista or Windows 7
Macintosh
Connecting the camera to a TV
• 2.2 GHz Intel Core Duo or higher
1. While the camera is turned off, connect it to your TV using a micro HDMI
cable (not included)
• At least 1GB of RAM
2. Power on the camera
3. Once booted up, the image usually displayed on the camera’s LCD screen will
instead be displayed directly on your TV, and the sound will come out of the
TV speakers
• Graphics Card with at least 256MB
of video RAM (512MB for video
edition)
• Mac OS X v10.4.11 or later
4. Press MODE to cycle through camera modes while connected to a TV.
17
Conserving Battery
The Stealth 2 has an internal rechargeable 1500mAh Lithium-Ion battery, allowing
you to record continuously for hours between charges.
LCD
The camera’s LCD screen consumes power, so one of the best ways to extend
battery life is to use the ‘Backlight Timer’ feature.
The camera will still function as normal when the screen backlight is off.
Camera Auto Off
It is possible to set the camera to power off entirely when no buttons are pressed
for a number of minutes (the duration can be chosen selecting ‘Camera Auto
Off’ from the Camera Settings menu). This can be useful to reduce battery
consumption if the camera is accidently left powered on.
! The camera will not power off while recording is in progress. However,
once the camera has powered off, you will need to power it on again before
capturing any footage.
! The remote control will not operate the camera while the unit is powered off.
18
Updating Firmware
The Drift Stealth 2 should always be operated on the latest firmware available,
downloadable from http://www.driftinnovation.com. Be sure to check back
often for updates as we will continue to add features and options to your
camera after you purchase it.
See p22 for information about the warranty and signing up.
Firmware updates on the Stealth 2 can be done by following steps:
Updating Firmware on the Stealth 2 is accomplished
1) Go to www.driftinnovation.comn and download the latest firmware file
(‘’Stealth 2.bin’’) which will be found easily in the Drift Stealth 2 section, or by
navigating to ‘Firmware’ listed in the bottom footer of any page
2) Plug your Drift Stealth 2 unit into your computer (MAC or PC) using the
supplied USB cable
3) Your camera should come up as an External Device with the ‘’Drift Card’’
Micro SD card being visible as a storage device (see connectivity p17). Please
copy the ‘’Stealth 2.bin’’ firmware file into the root folder of the ‘’Drift Card’’
Micro SD card
4) Safely eject your Drift Stealth 2 and Micro SD as a storage device from your
computer
5) Power on the camera and wait for it to automatically update itself. You will get
a “Firmware update in Progress” message, and the LED status indicator will
blink red. This should take a few seconds and the camera will automatically
power off after
6) The first time you start the camera it will display “wait for restart”. This is
normal and the camera is simply insatalling a Wi-Fi patch.
7) Turn the camera back on. Navigate to the settings menu and check the
“Firmware Version” to ensure the firmware has been successfully updated
19
Camera Care
The Stealth 2 is specifically designed for extreme sports. It is a very durable piece
of equipment. However, to ensure a long and healthy life for your camera, please
follow the guidelines below.
Cleaning the camera
During your sporting activities, the camera will inevitably get dirty or wet.
Although this is not an issue, it is recommended that you clean the camera
after each use. Clean the camera thoroughly with a damp cloth and let it air dry
before you open the back hatch or rotate the lens. Take extra care when cleaning
the built-in microphone and speaker.
Cleaning the lens and LCD screen
In order to provide a clear image for high definition video, it is important to keep
the camera lens clean. Be careful not to scratch the camera lens whilst cleaning
it. Wipe off any surface mud or water from the lens with a damp cloth and use a
dry, micro fibre, scratch proof cloth to polish the lens once it is dry.
20
Technical Specifications
Video resolution
1080p, 960p (4:3), 720p and WVGA (16:9)
File format
.MP4 (H.264 codec)
Sensor type
CMOS
1080P: 25 / 30 fps
Frame rate
960p: 25 / 30 / 48 / 50 fps
720p: 25 / 30 / 50 / 60 fps
WVGA: 25 / 30 / 50 / 60 / 100 / 120 fps
Field of view
Lens focal range
135°
0.5m to infinity
Lens rotation
300°
Photo mode
3 / 5 / 12MP
Exposure
-2, -1, 0, 1, 2
LCD Screen
Weather Resistant
Microphone
1.3” mono graphic backlit LCD
Yes
Built-in, noise reducing microphone
Built-in memory
256MB (not user accessible)
Memory capacity
Micro SD memory cards up to 32GB
Outputs
Compatibility
Remote range
(remote not included)
Radio frequency
Micro HDMI connector type D (cable not included)
USB Plug and Play, mini-B USB connector
Windows XP and up / Mac OS 10.2 and up
10 m (32ft)
2.4G
Dimensions: 80 (L) × 41.9 (W) × 27.6 (D) mm
Camera
Weight:97g
Power:
1500mAh rechargeable lithium-ion battery (built-in) (DC 3.7V)
Dimensions: 59 (L) × 48 (W) × 12 (D) mm
Remote control
(not included)
Weight:22g
Power:
350mAh rechargeable lithium-ion battery (DC 3.7V)
21
Warranty
Drift Innovation (“Manufacturer”) warrants to the original End User (“Purchaser”)
that this product purchased from us or any authorized dealer is free from
manufacturing defects in material and workmanship for the applicable warranty
period, as set forth in the product specification, or 12 months—whichever is the
less. Drift Innovation products purchased from non-authorized dealers might not
be covered by the offered warranty. The warranty period is considered valid from
the issue date confirmed on the sale invoice.
This limited warranty covers defects encountered in the normal use of the
product during the warranty period and does not apply under the following
conditions:
• Product is damaged due to physical abuse, mishandling, accident, negligence
or failure to follow the supplied operating instructions;
• Product is physically modified by Purchaser in any manner other than that for
which it was intended or otherwise previously approved by the Manufacturer;
• Product is damaged or has developed defects caused by the use of
unauthorized parts or by an unauthorized repair service;
Service
To obtain our warranty service, register
your product at driftinnovation.com.
Customer Support
•Check driftinnovation.com for
firmware updates, product updates
and user videos.
• We are here to help you make the
most of your Stealth 2 camera;
if you have any suggestions,
comments or complaints, please visit
the support section of our website—
support.driftinnovation.com—or
contact our customer support team
on [email protected].
• The product has been subject to unsuitable operating or physical conditions
outside those recommended in product specifications as provided by the
Manufacturer;
• Product has it’s serial numbers altered or removed
• Product is damaged due to improper packaging of the warranty return to the
dealer or Manufacturer.
In the event of a product failure under normal use and within the warranty
period, a repair or replacement will be provided at the discretion of the
Manufacturer or the authorized dealer. The Manufacturer warranty does not
cover loss, accidental damage or costs incurred during the handling and
shipping of repairs or replacement products.
The Manufacturer shall have no liability or responsibility whatsoever to Purchaser
or any other person for any loss, injury, death, or any damages derived from the
use of the product or accessories.
22
Disclosures
FCC Information
Motorcycle Disclaimer
This device complies with Part 15 of the FCC Rules.
Interacting with the camera while riding
could cause a crash and you or others
may be seriously injured or killed.
Operation is subject to the following two conditions:
1. This device may not cause harmful interference, and;
2. This device must accept interference received, including interference that may
cause undesired operation.
Warning
Changes or modifications to this unit not expressly approved by the party responsible
for compliance could void the user’s authority to operate the equipment.
• Keep your eyes and mind on the road;
• Avoid looking at the camera for
too long;
• Stop the vehicle in a safe location
before adjusting the camera.
The equipment has been tested and found to comply with the limits for a Class
B digital device, pursuant to Part 15 of the FCC Rules. These limits are designed
to provide reasonable protection against harmful interference in a residential
installation. This equipment generates, uses, and can radiate radio frequency
energy and, if not installed and used in accordance with the instructions,
may cause harmful interference to radio communications. However, there is
no guarantee that interference will not occur in a particular installation. If this
equipment does cause harmful interference to radio or television reception, which
can be determined by powering the equipment on and off, the user is encouraged
to try to correct the interference by one or more of the following measures:
• Reorient or relocate the receiving antenna;
• Increase the separation between the equipment and the receiver;
• Connect the equipment into an outlet on a circuit different from that which
the receiver is connected;
• Consult the dealer or an experienced radio / TV technician for help.
Industry Canada Information
This device complies with Industry Canada license-exempt RSS standard(s).
Operation is subject to the following two conditions:
1. This device may not cause interference, and;
2. This device must accept any interference, including interference that may
cause undesired operation of the device.
This Class [B] digital apparatus complies with Canadian ICES-003.
Cet appareil s’accorde avec Industrie Canada licence-exempte RSS standard.
Son fonctionnement est soumis aux deux conditions suivantes:
1. Cet appareil ne peut pas causer l’intervention, et;
2. Cet appareil doit accepter de l’intervention, y compris l’intervention qui peut
causer l’opération non désirée de.
Cet appareil numérique de la classe [B] est conforme à la norme NMB-003 du Canada.
Cet appareil s’accorde avec Industrie Canada licence-exempte RSS standard.
FCC RADIATION EXPOSURE
This equipment complies with FCC radiation exposure limits set forth for an
uncontrolled environment . This equipment should be installed and operated with
minimum distance 20cm between the radiator & your body.
This transmitter must not be co-located or operating in conjunction with any other
antenna or transmitter.
23
follow us
facebook.com/driftinnovation
vimeo.com/driftinnovation
instagram.com/drift_innovation
twitter.com/driftinnovation
DRIFTINNOVATION.COM
quick guide
contents
Thank you for purchasing the Drift Stealth 2
CUSTOMER SUPPORT
Check our official website for firmware updates, customer
support, news about our products and videos from our users.
If you have any suggestions, comments or concerns, please
contact our customer support team at:
[email protected]
WARRANTY
Warranty does not apply if the product is damaged due
to physical abuse, mishandling, accident, fire, frostbite,
water damage, negligence or failure to follow the supplied
operating instructions.
about your camera | initial setup
3—4
package contents | getting started
5—6
mode selection & settings
7—8
features9—10
mounting the camera | accessory guide
11—12
wifi | connecting the camera
13—14
specifications15—16
disclosures17—18
about your camera
A
B
C
D
initial setup
E
MODE/ Tag / Simultaneous Photo Button
CYCLE OPTION Button
I
J
K
L
ACTION Button
(On/Off/Rec/Stop)
Status LED
Lens “Up” Indicator
Rear Hatch
1.3” Backlit LCD Screen
300° Rotating/Replaceable Lens
F
3
G
H
HDMI Port (Micro-D)
USB Port (Micro-B)
Micro SD Card Slot
Reset Button
Rear Hatch Screw Point
M
1. Unscrew and remove
the rear hatch
2. Insert a Class 10 or
higher Micro SD/HC
card (up to 32GB)
Format before first
usage!
3. Connect the camera
via micro USB cable
to a powered USB
port and charge the
battery for 4 hours
before first use
4. Replace the rear
hatch and screw shut
to secure
4
package contents
Universal Clip
Mount Kit
5
getting started
USB Cable (Micro-B)
Goggle Mount
POWER ON AND OFF
1. Press and hold the
ACTION button to
power on
2. The screen will power
on, show the welcome
display.
3. The camera is now ready
to record video, or take
still photos
4. The current camera mode
is indicated by the icon in
the top left of the display
and by the LED indicator
(for details, see p7-8)
5. To power off, press
and hold the ACTION
button for 3 seconds
1080p
25 FPS
12:05:59
EXP -2
90%
87%
VIDEO INTERFACE
S E T T I NG
Exposure
Self Timer
Wi-Fi
0.0
X
X
MODE NAVIGATION
To change the current
camera recording mode
press the [MODE] button,
changing between;
Video, Photo, Timelapse,
Photoburst and the camera
general setting modes.
MODE SETTINGS
To change the settings
of the current camera
mode press the CYCLE [
button. This will change
the settings between a
selection of presets.
]
SETTINGS INTERFACE
*Note: The camera will power on in the same mode it powered off in.
6
mode selection
VIDEO MODE
(Green LED) The camera
will record video when
ACTION is pressed on the
camera or remote. The
LED will flash red while
recording. Press ACTION on
the camera, or STOP on the
remote, to end recording.
PHOTO MODE
(Yellow LED) The camera
will capture still images
when ACTION is pressed
on the camera or remote.
The LED will blink red every
time a photo is taken (this
applies for Timelapse and
Photoburst modes also).
settings
PHOTOBURST MODE
(Cyan LED) The camera
will capture a burst of still
images for an allotted
duration, when ACTION
on the camera or remote is
pressed (for best results, use
a Class 6 or higher micro
SD card).
CAMERA SETTINGS
•EXPOSURE
-2.0 / -1.0 / 0 / +1.0 / +2.0
•SELF-TIMER
OFF / 3S / 5S / 10S
•WI-FI
•VIDEO TAGGING
•TAGGING INTERVAL
•CAR DVR INTERVAL
7
TIMELAPSE MODE
(Purple LED) The camera
will capture a series of still
images at a specified rate
when ACTION is pressed
on the camera or remote.
To stop recording, press
ACTION on the camera or
STOP on the remote.
•LANGUAGE
ON / OFF
•RESET SETTINGS
ON / M / OFF
OFF / LOW / MED / HIGH
•SPEAKER VOLUME
OFF / LOW / MED / HIGH
•RC 1-1 (Remote Control 1-1)
YES / NO
YES / NO
CURRENT VERSION
ON / OFF
•RC 1-ALL (Remote Control 1-ALL)
ON / OFF
•RC LED
ON / OFF
•CAMERA LED
ON / OFF
•CAMERA OFF
OFF / 2MIN / 5MIN
•LCD BACKLIGHT TIMER
• FIRMWARE VERSION
ON / OFF
[List of Languages]
NTSC (30) / PAL (25)
•MIC SENSITIVITY
•LCD BACKLIGHT
•FORMAT MEMORY CARD
YEAR / MONTH / DAY
1MIN / 3MIN / 5MIN / 10MIN / 15MIN
•VIDEO STANDARD
NTSC vs PAL
The camera records in
both NTSC and PAL video
standards (changeable from
the settings menu) NTSC
delivers frame rate intervals
of 30 (30, 60, 120) FPS
whereas PAL uses frame
rate intervals of 25 (25, 50,
100) FPS.
•DATE / TIME STAMP
OFF / ON
10S / 30S / 1MIN / 2MIN / 5MIN / 10MIN
•CAR DVR MODE •DATE
*Note: In settings mode, pressing the CYCLE button
once will move the selection down one setting.
Holding the CYCLE button will move the selection
back up the list to facilitate navigation.
ON / OFF
OFF / 5S / 10S / 20S / 1MIN
8
PHOTO MODE
Screen
references
features
3s
EXP -2
PHOTO MODE
MODE INDICATOR
The Drift
3s Stealth 2 features
5MP
a multi-coloured status
indicator light system. A
front facing LED combined
-2
90% Display
87%
withEXP
a backlit
LCD
light up depending on the
current camera mode.
Either can be disabled in the
general settings.
129
VIDEO
- green
VIDEO
MODE
PHOTO - yellow
TIMELAPSE
- purple 1080p
25 FPS
PHOTOBURST - cyan
12:05:59
*The
mode
is
EXP
-2 indicator
90%
87%
compatible with the Drift
Two-Way remote control
9
VIDEO TAGGING
When activated, this feature
allows the camera to
continuously record video,
but only saving on ‘tagging’
important footage.
At the Standby screen, ‘T’
indicates Video Tagging
is activated, and the set
Video Tagging Interval is
displayed. (see Standby
Screen-Shot below)
25 FPS
T
10s
EXP -2
6
90%
1080p
87%
Pressing ACTION will begin
129
90%
5MP
EXP -2
1080p
25 FPS
12:05:59
90%
90%
87%
87%
(see Tagging Screen-Shot
VIDEO MODE
below)
the loop recording, but
without saving any footage.
The LED will be blinking
green. (see Recording
VIDEO MODE
Screen-Shot
below)
T
x
EXP -2
129
87%
While recording video,
pressing the MODE button
will tag and save past,
present and future video
intervals. The on screen
TIMELAPSE
MODE
indicator
will turn
to a
check mark and the LED
3s
5MP
indicator will blink red.
1-1078
1080p
25 FPS
T
25 FPS
EXP -2
6
12:05:59
1080p
EXP -2
90%
87%
For example, with a video
90% tagging
87% interval of 30s
selected, on pressing MENU
while recording, the camera
will save the previous 30s,
TIMELAPSE
the
current 30sMODE
and an
additional 30s—a total of
1m30s
3s of ‘tagged’ footage.
5MP
1-1078
The Video Tagging feature
requires a class 10 micro SD
card
with 4GB
of free space
EXP -2
90%
87% to
function correctly.
Image count
Series
*1-1078 is only a
SIMULTANEOUS PHOTO
While recording video,
pressing the MODE button
1080ptake a
25 FPS
will
simultaneously
2MP still photo.
When using the two-way
control,87%
press the
EXPremote
-2
90%
ACTION button for the
same result.
6
This feature is not available when
Video Tagging (left) is enabled.
CAR DVR MODE
This hands off mode setting
is ideal for insurance and
security purposes. In this
mode the camera records
footage in a continuous
loop style (DVR Intervals)
recording loop after loop
until it fills the Micro SD
Card. Once full, the oldest
loops will be deleted as the
newest ones are saved. DVR
loop intervals can be 1min,
3min, 5min, 10min or 15min
intervals.
*see full manual for full detailed guide on how to use various features
Image count
Series
*1-1078 is only a
sample number
10
mounting the camera
1. Attach the Universal Clip
to the camera in any 360°
orientation as needed—
first position the clip in
the desired orientation,
then secure by rotating
the screw base by hand
2. Slide the Universal Clip
into your chosen mount,
ensuring that it ‘clicks’
into place
*Double check it has been
fully inserted by pushing
out the clips
accessory guide
3. Align your shot. Rotate
the lens by hand until
the screen is orientated
correctly. Use the
lens marker as an ‘up’
reference.
TWO-WAY REMOTE CONTROL
Get connected with the Drift
Two-Way remote control.
Start/stop recording, change
mode and ensure recording
with Drift LED mode
indicator integration.
STEALTH 2
WATERPROOF CASE
DRIFT
VENTED HELMET MOUNT
Become immersed with the
Stealth II Waterproof Case.
The dual locking system
creates an air tight seal and the
replaceable front lens keeps
the footage crystal clear.
Attach your Drift camera to
any vented bike, ski, or similar
sports helmet with the new
Drift Helmet Vented Mount.
*Note: For full accessory list visit driftinnovation.com
11
12
wifi
TURNING ON AND OFF
In the Camera Settings
menu, highlight the ‘WiFi’
option and press ACTION,
and select P and press
ACTION.
The network name (SSID)
of your camera will be
‘Stealth 2 XXXXX’ where
the digits correspond to
your camera’s unique serial
number.
13
DOWNLOAD THE DRIFT APP
Shot setup, record,
capture & playback
on your device.
firmware
connecting the camera
UPDATING THE FIRMWARE
Download the latest firmware
from the Drift website (left)
and copy the STEALTH 2.bin
file to a formatted micro
SD card.
Insert the micro SD card
into the camera and power
on. The camera screen will
display ‘Firmware Updating’
as the update is installed.
Once complete, the camera
will power down. To check
the firmware has updated
correctly, power the camera
on and from the Settings
menu select ‘Firmware
Version’ to view the current
firmware.
CONNECTING TO A PC
1. Connect the camera
using the USB cable
(provided); the camera
screen will show a USB
icon
2. The camera’s folder may
open automatically; if
not, open My Computer
3. The camera should
be recognised as a
removable disk; doubleclick to open
4. Open the DCIM folder to
access your files
CONNECTING TO A MAC
1. Connect the camera
using the USB cable
(provided); the camera
screen will show a USB
icon
2. The camera’s folder may
open automatically; if
not, open Finder
3. The camera should be
recognised as a external
device; double-click to
open
4. Open the DCIM folder to
access your files
CONNECTING TO A TV
1. While the camera is
powered off, connect
the camera using a micro
HDMI (Type D) to full
HDMI cable, available
from Drift retailers.
2. Power on the camera
3. The camera’s display will
now show on the TV
and playback of video
or photos will show on
screen; video sound
will come out of the TV
speakers
! While charging only (not through a computer), press ACTION to power on the unit
14
specifications
Video resolution:
File format:
Sensor type:
Frame rate:1080p:
960p:
720p:
WVGA:
Field of view (diagonal):
Lens focal range:
Lens rotation:
Photo mode:
Exposure:
LCD Screen:
Weather Resistance:
Microphone:
Built-in memory:
15
1080p, 720p and WVGA (16:9); 960p (4:3)
.MP4 (H.264 codec)
CMOS
25 / 30 fps
25 / 30 fps
25 / 30 / 50 / 60 fps
25 / 30 / 100 / 120 fps
135°
0.5m to infinity
300°
12 / 5 / 3 megapixels
Auto / Manual (advanced users)
1.3” mono graphic backlit LCD
Yes
Built-in, noise reducing microphone
256MB (not user accessible)
Memory capacity:
Micro SD memory cards up to 32GB
Outputs:
Micro HDMI connector - type D (cable not included)
Connectivity:
USB Plug and Play, micro-B USB connector
Compatibility:
Windows XP and up / Mac OS 10.2 and up
Remote range:
10m (32.81ft)
Radio frequency:
2.4GHz
Dimensions:
80.0 (L) × 42.6 (W) × 27.4 (D) mm
Weight:94g
Power:
1500mAh internal lithium-ion battery (DC 3.7V)
16
disclosures
FCC Information
This device complies with Part
15 of the FCC Rules.
Operation is subject to the
following two conditions:
(1) this device may not cause
harmful interference, and
(2) this device must accept
interference received, including
interference that may cause
undesired operation.
WARNING
Changes or modifications to
this unit not expressly approved
by the party responsible for
compliance could void the
user’s authority to operate the
equipment.
17
The equipment has been
tested and found to comply
with the limits for a Class B
digital device, pursuant to Part
15 of the FCC Rules. These
limits are designed to provide
reasonable protection against
harmful interference in a
residential installation. This
equipment generates, uses,
and can radiate radio frequency
energy and, if not installed
and used in accordance with
the instructions, may cause
harmful interference to radio
communications. However,
there is no guarantee that
interference will not occur
in a particular installation. If
this equipment does cause
harmful interference to radio or
television reception, which can
be determined by powering the
equipment on and off, the user
is encouraged to try to correct
the interference by one or more
of the following measures:
Reorient or relocate the
receiving antenna;
Increase the separation
between the equipment and the
receiver;
Connect the equipment into
an outlet on a circuit different
from that which the receiver is
connected;
Consult the dealer or an
experienced radio / TV
technician for help.
This device complies with
Industry Canada licenseexempt RSS standard(s).
de l’intervention, y compris
l’intervention qui peut causer
l’opération non désirée de.
Operation is subject to the
following two conditions:
(1) this device may not cause
interference, and
(2) this device must accept
any interference, including
interference that may cause
undesired operation of the device.
Cet appareil numérique de la
classe [B] est conforme à la
norme NMB-003 du Canada.
This Class [B] digital apparatus
complies with Canadian
ICES-003.
Son fonctionnement est soumis
aux deux conditions suivantes:
(1) cet appareil ne peut pas
causer l’intervention, et
(2) cet appareil doit accepter
Cet appareil s’accorde avec
Industrie Canada licenceexempte RSS standard.
FCC RADIATION EXPOSURE
This equipment complies with
FCC radiation exposure limits
set forth for an uncontrolled
environment. This equipment
should be installed and
operated with minimum
distance 20cm between the
radiator & your body.
This transmitter must not be
co-located or operating in
conjunction with any other
antenna or transmitter.
MOTORCYCLE DISCLAIMER
Interacting with the camera
while riding could cause a
crash and you or others may be
seriously injured or killed.
• Keep your eyes and mind on
the road;
• Avoid looking at the camera
for too long;
• Stop the vehicle in a safe
location before adjusting the
camera.
18
sommaire
Merci pour votre achat de la nouvelle caméra Drift Stealth 2
SERVICE CLIENTELE
Consultez notre site internet officiel pour les mises à jour
système, le service client, les nouveautés et les vidéos des
utilisateurs. Si vous avez des suggestions, des commentaires
ou des préoccupations, merci de contacter notre équipe de
service clientèle sur:
[email protected]
GARANTIE
La garantie ne s’applique pas si le produit est endommagé
en raison de d’une mauvaise utilisation, d’accident, de feu, de
gel, de dommage liés à l’eau, de négligence ou d’échec dans
l’application des instructions d’utilisation ici fournies.
a propos de votre caméra | configuration initiale
21—22
contenu du kit | pour commencer
23—24
modes & paramètres
25—26
fonctionnalités27—28
fixer la caméra | accessoires recommandés
29—30
wifi | connecter la caméra
31—32
spécifications33—34
certifications légales
35—36
a propos de votre caméra
A
B
C
D
E
MODE/ Tag / Bouton photo simultané
configuration initiale
I
J
K
L
Bouton CYCLE (Options cycliques)
Bouton ACTION
(On/Off/Rec/Stop)
Indicateur LED
Indicateur orientation lentille
Porte arrière
LCD 1.3” rétro éclairé
Lentille rotative 300° /
remplaçable
F
21
G
H
Port HDMI (Micro-D)
Port USB (Micro-B)
Emplacement carte Micro SD
Bouton Reset
Pas de vis pour porte arrière
M
1. Dévissez et retirez la
porte arrière
2. Insérez une carte
Micro SD/HC (jusqu’a
32GB) Classe 10 ou
supérieure
Formatez-la avant la
première utilisation!
3. Connectez la camera
via le câble micro
USB et charger la
batterie durant 4h
avant la première
utilisation.
4. Replacer la porte
arrière et vissez la
pour garantir sa
fermeture.
22
contenu du kit
pour commencer
Clip Universel
Câble USB (Micro-B)
ALLUMER ET ÉTEINDRE LA
MODE NAVIGATION
CAMÉRA
Pressez le bouton [MODE]
1080p
25 FPS
afin de changer le mode
1. Pour allumer la caméra,
de la caméra, vous pouvez
effectuez une pression longue
choisir entre: Vidéo, Photo,
sur le bouton ACTION.
Timelapse, Rafale et le
2. L’écran va s’allumer sur l’écran EXP -2
90%
87%
menu de configuration de
d’accueil.
la caméra.
3. La caméra est alors prête à
INTERFACE VIDEO
MODE RÉGLAGES
enregistrer ou prendre des
photos.
Pressez le bouton CYCLE
afin de changer les
4. Le mode actuel de la caméra
paramètres actuels de la
est indiqué par une icone en
0.0
camera. Cela permet de
haut à gauche de l’écran et par Exposure
choisir parmi une sélection
X
la couleur de l’indicateur LED. Self Timer
de préréglages.
(pour plus de détails, voir p7-8) Wi-Fi
X
5. Pour l’éteindre, appuyez sur le
bouton
ACTION pendant 3 INTERFACE DE CONFIGURATION
secondes.
12:05:59
Kit de fixation
(Patch adhésif plat et incurvé)
23
Fixation masque
S E T T I NG
*Note: La caméra démarrera dans le même mode que celui actif la dernière fois où elle été éteinte.
24
sélection des modes
MODE VIDEO
(LED Verte) La caméra va
enregistrer en appuyant
sur le bouton ACTION
de la caméra ou de la
télécommande. Les LED
clignoterons alors en rouge
lors de l’enregistrement.
Appuyer sur ACTION sur
la caméra ou STOP sur la
télécommande, pour arrêter
l’enregistrement.
NTSC vs PAL
La caméra enregistre
selon les deux standards
vidéo PAL et NTSC
(interchangeables dans le
menu paramètres). NTSC
fourni une fréquence
25
d’images de 30 (30, 60, 120)
images par seconde alors
que PAL utilise une fréquence
d’image de 25 (25, 50, 100)
IPS.
MODE PHOTO
(LED Jaune) La caméra
va prendre des photos en
appuyant sur le bouton
ACTION sur la caméra ou
la télécommande. La LED
clignotera rouge à chaque
photo prise (ceci s’applique
aussi au mode Timelapse et
Rafale).
MODE TIMELAPSE
(LED Violette) La caméra va
paramètres
capturer une série de photos
à intervalles réguliers, après
une pression sur le bouton
ACTION de la caméra ou de
la télécommande. Appuyer
sur ACTION sur la caméra ou
STOP sur la télécommande
pour arrêter l’enregistrement.
RÉGLAGE DE LA CAMÉRA
MODE RAFALE
(LED Bleue) La caméra capture
une séquence de photos en
cascade pendant une période
donnée à la pression du
bouton ACTION de la caméra
ou de la télécommande (pour
de bon résultats, utilisez une
carte micro SD Classe 6 ou
supérieur).
•VIDEO STANDARD
•EXPOSITION
-2.0 / -1.0 / 0 / +1.0 / +2.0
•RETARDATEUR
OFF / 3S / 5S / 10S
•RETROÉCLAIRAGE LCD
OFF / ON
•MINUTEUR RETROÉCLAIRAGE
/ 20S / 1MIN
•VIDEO TAGGING
ON / OFF
•DATE
•INTERVALLE TAG
10S / 30S / 1MIN / 2MIN / 5MIN / 10MIN
•WI-FI
•MODE BOITE NOIRE
ON / M / OFF
•INTERVALLE BOITE NOIRE
•SENSIBILITE MICRO
1MIN / 3MIN / 5MIN / 10MIN
/ 15MIN
NTSC (30) / PAL (25)
•INCRUSTATION DATE / HEURE
•LANGUAGE
•CONFIGURATION INITIALE
•FORMATER CARTE MEMOIRE
•VERSION FIRMWARE
ON / OFF
OFF / 5S / 10S
ANNEE / MOIS / JOUR
ON / OFF
[Liste de langues]
OUI / NON
OUI / NON
VERSION ACTUELLE
OFF / BASSE / MOYENNE / HAUTE
•VOLUME HAUT PARLEUR
•RC 1-1 (TÉLÉCOMMANDE 1-1)
OFF / BAS / MOYEN /
HAUT
ON / OFF
•RC 1-ALL (TÉLÉCOMMANDE 1-ALL)
ON / OFF
•TÉLÉCOMMANDE LED
ON / OFF
•LED CAMERA
ON / OFF
•CAMERA OFF
OFF / 2MIN / 5MIN
*Note: Dans le mode réglage, une pression du
bouton CYCLE permet de passer au réglage suivant.
Maintenez le bouton CYCLE pour retourner à la liste
des réglages et faciliter la navigation.
26
caractéristiques
PHOTO MODE
PHOTO MODE
Screen references
3s
CODE COULUER
La Drift Stealth 2 est
doté
d’un codeMODE
couleur
PHOTO
indiquant le mode de la
caméra.
3sUne LED en façade
5MP
combiné à l’écran rétro
éclairé affichent la couleur
du mode activé.
L’unEXP
ou -2
l’autre90%
peuvent87%
être désactivés dans les
paramètres généraux.
129
VIDEO - vert
PHOTO - jaune
TIMELAPSE
violet
VIDEO -MODE
PHOTOBURST - bleue
ENREGISTREMENT
- 1080p
Rouge
25 FPS
*Le code couleur est
aussi affiché sur la
EXP -2
90%
87%
12:05:59
27
télécommande interactive
Drift.
VIDEO FLASHBACK
Une fois actif, ce mode
permet à la caméra de filmer
de manière continue, mais de
n’enregistrer que les passages
important en ‘tagguant’ la
séquence.
Sur l’écran de veille, un
‘T’ indique que le Video
Flashback est activé, tout en
affichant l’intervalle choisie
(voir capture d’écran de veille
ci-dessous)
25 FPS
T
10s
EXP -2
6
90%
1080p
87%
129
Première pression du
bouton ACTION
EXP -2
90%
87%
démarre une boucle
d’enregistrement mais
sans sauvegarder de
fichier. La LED clignotera
en vert. (voir capture
d’écran d’enregistrement
VIDEO MODE
ci-dessous)
1080p
25 FPS
12:05:59
T
x
EXP -2
90%
3s
5MP
87%
Pendant l’enregistrement
une pression du bouton
MODE va ‘tagguer’ la
séquence et sauvegarder
TIMELAPSE MODE
129
5MP
l’intervalle
vidéo passé,
EXP -2
90%
87%
présentet futur. L’indicateur
affiché sur l’écran montrera
une case cochée et
l’indicateur LED clignotera
rouge.
(voir
capture
d’écran
VIDEO
MODE
Tagging ci-dessous)
de 30s en cours et la boucle
de 30s suivante : soit un
fichier video de 1min30s.
Cette fonctionnalité n’est pas
disponible quand le mode ‘Vidéo
Flashback’ est activé.
Cette fonctionnalité requiert une
carte micro SD classe 10 avec
4GB d’espace disponible afin de
fonctionner correctement.
MODE BOITE NOIRE
Ce mode a démarrage
automatique est idéal à des
fins de sécurité et d’assurance.
Dans ce mode la caméra
enregistre en continu boucle
après boucle (durée =
Intervalle Boite Noire) jusqu’à
remplir la carte mémoire. Une
fois pleine, la boucle la plus
ancienne est effacée au profit
des plus récentes. Les boucles
DVR peuvent être d’une
intervalle de 1min, 3min, 5min,
10min or 15min.3min, 5min,
10min or 15min intervals.
PHOTO EN VIDEO
Pendant
1080p
25 FPS un enregistrement
vidéo, une pression du
T1080p
25 FPS
bouton MODE permet
une photo
EXP -2
EXPde
-2prendre
90%
87%
90%
87%
2MP simultanément à
EXP -2
exemple, pour un
90% Par87%
l’enregistrement vidéo.
intervalle sélectionné de
Lorsque vous utilisez
30 secondes, en appuyant
la télécommande, une
sur MODE pendant
pression du bouton ACTION
l’enregistrement, la camera
donne le même résultat.
sauvegardera la boucle de
TIMELAPSE
30s
précédente,MODE
la boucle
25 FPS
6
1080p
12:05:59
6
*Voir manuel complet pour un guide détaillé des différentes fonctionnalités
3s
5MP
28
fixez la caméra
1. Attachez le clip universel
à la camera selon l’angle
souhaité, en vissant la
molette manuellement.
2. Glissez le clip universel
dans la fixation désirée,
en s’assurant d’entendre
un ‘clic’ témoignant du
bon positionnement dans
la fixation.
*Assurez vous qu’elle
soit bien en place en
poussant les bras du clip
vers l’extérieur.
accessoires recommandés
3. Faites pivoter la lentille
manuellement jusqu’à ce
que l’image soit orienté
correctement. Utilisez la
marque sur le sommet
de la lentille comme
référence pour le haut de
l’image.
TÉLÉCOMMANDE INTERACTIVE
Elle se connecte à la caméra
et permet de débuter/
arrêter l’enregistrement,
de changer de mode et de
vérifier l’état de la caméra
grâce au code couleur sur
l’indicateur LED.
29
CAISSON ÉTANCHE
STEALTH 2
Immergez-vous jusqu’à 40m
grâce au caisson étanche
Stealth II. Le double système de
verrouillage assure une fermeture
hermétique et la lentille plate,
remplaçable, du caisson vous
garanti des images impeccables.
FIXATION DRIFT CASQUE
VENTILÉ
Attachez votre caméra à
n’importe quel casque de vélo,
ski ou tout autre casque avec
ventilations avec cette fixation
réutilisable à sangles.
*Note: Liste complète des accessoires disponible sur driftinnovation.com
30
wifi
firmware
connecter la caméra
ALLUMER ET ÉTEINDRE
TELECHARGER L’APPLICATION
LE WiFi
DRIFT
Dans les réglages de la
Configurez la caméra,
caméra mettre WiFi en
enregistrez et relisez
surbrillance et presser
vos vidéos sur votre
le bouton ACTION,
Smartphone.
sélectionner P et appuyer
sur ACTION. Le nom du
réseau (SSID) de la caméra
sera ‘Stealth 2 XXXXX’ où les
chiffres correspondent au
numéro de série unique de
votre camera.
MISE A JOUR DU FIRMWARE
Téléchargez la dernière version
du Firmware depuis le site
internet Drift et copiez le fichier
STEALTH 2.bin à la racine de la
carte micro SD formaté. Insérez
la carte micro SD dans la caméra
et allumez-la. L’écran de la
caméra affichera ‘Mise à jour du
Firmware’ lors de l’installation de
la mise à jour.
Une fois achevée, la caméra
va s’éteindre. Pour vérifier que
la mise à jour s’est déroulée
correctement, allumez la caméra
et sélectionnez ‘Version du
Firmware’ dans les paramètres
généraux, afin de voir la version
installée du Firmware.
CONNECTION AU PC
1. Connectez la camera
en utilisant le câble
USB (fourni); l’écran de
la camera affichera un
icône USB.
2. Le dossier de la
camera peut s’ouvrir
automatiquement; sinon
ouvrez Ordinateur.
3. La camera doit être
reconnue comme
un disque amovible,
double-cliquez pour
ouvrir.
4. Ouvrez le dossier DCIM
pour avoir accès à vos
fichiers.
31
CONNECTER AU MAC
1. Connectez la camera
en utilisant le câble USB
(fournis); l’écran de la
camera affichera un
icône USB.
2. Le dossier de la
camera peut s’ouvrir
automatiquement; sinon
ouvrez Finder.
3. La camera doit être
reconnue comme
un appareil externe,
double-cliquez pour
ouvrir.
4. Ouvrez le dossier DCIM
pour avoir accès à vos
fichiers.
CONNECTER AU TELEVISEUR
1. Connecter la camera éteinte
au téléviseur via un câble
micro HDMI (Type D),
disponible dans la gamme
de produits Drift.
2. Allumez la caméra
3. L’écran de la camera doit
maintenant s’afficher sur la
TV. Les vidéos et les photos
s’affichent également sur
l’écran, tandis que le son
des vidéos est joué par les
enceinte du téléviseur.
! Lors du chargement (excepté un ordinateur), appuyez sur ACTION pour allumer la caméra. 32
spécifications
Résolution Video:
Format de fichier:
Type de capteur:
Image par secondes:1080p:
960p:
720p:
WVGA:
Champ de vision (diagonale):
Focale de l’objectif:
Rotation de la lentille:
Mode photo:
Exposition:
Ecran LCD:
Résistante aux projections
d’eau (non étanche)
Microphone:
33
1080p, 720p et WVGA (16:9); 960p (4:3)
.MP4 (H.264 codec)
CMOS
25 / 30 ips
25 / 30 ips
25 / 30 / 50 / 60 ips
25 / 30 / 100 / 120 ips
135°
0.5m à l’infini
300°
12 / 5 / 3 megapixels
Auto / Manual (utilisateurs avancés
LCD 1.3” rétro éclairé
Mémoire interne:
256MB (inaccessible par l’utilisateur)
Capacité de mémoire:
Carte micro SD jusqu’a 32GB
Sortie Vidéo:
Connecteur micro HDMI - type D (câble vendu séparément)
Connectique:
USB, connecteur micro-B USB
Compatibilité:
Windows XP et supérieur / Mac OS 10.2 et supérieur
Portée télécommande:
10m (32.81ft)
Fréquence radio:
2.4GHz
Dimensions:
80.0 (L) × 42.6 (W) × 27.4 (D) mm
Poids:94g
Batterie:
1500mAh batterie interne lithium-ion (DC 3.7V)
Oui
Intégré, réduction du bruit
34
certifications légales
Informations FCC
Cet appareil est conforme à la
partie 15 des règles FCC.
Son fonctionnement est sujet
aux conditions suivantes:
(1) Cet appareil ne doit pas
causer d’interférences nuisibles,
et (2) cet appareil doit accepter
les interférences reçues, y
compris celles susceptibles de
provoquer des opérations non
désirées.
ATTENTION
Les changements ou
modifications apportés à cet
appareil, non expressément
approuvés par les parties
responsable de la conformité
pourraient annuler l’autorité
35
de l’utilisateur à utiliser
l’appareil.L’équipement a été
testé et déclaré conforme aux
limites d’un appareil numérique
de classe B, selon la partie 15
des règles FCC. Ces limites
sont conçues pour fournir une
protection raisonnable contre
les interférences nuisibles dans
une installation résidentielle.
Cet équipement génère, utilise
et peut émettre une énergie de
radiofréquence et, s’il n’est pas
installé et utilisé conformément
aux instructions, peut causer
des interférences nuisibles aux
communications radio.
Cependant, il n’existe aucune
garantie que des interférences
ne se produiront pas dans
une installation particulière.
Si cet équipement provoque
des interférences nuisibles à la
réception radio ou télévision,
ce qui peut être déterminé en
éteignant l’équipement et en
le rallumant, l’utilisateur est
encouragé à essayer de corriger
les interférences par une ou
plusieurs des mesures suivantes:
Réorienter ou déplacer l’antenne
de réception;
Augmentez la distance entre
l’équipement et le récepteur;
Connecter l’équipement à une
sortie sur un circuit différent de
celui auquel le récepteur est
connecté;
Consulter le revendeur ou
un technicien radio / TV
expérimenté.
Cet appareil est conforme avec
les standards RSS de l’ Industrie
du Canada.
de l’intervention, y compris
l’intervention qui peut causer
l’opération non désirée de.
Son fonctionnement est
soumis aux deux conditions
suivantes:
(1) cet appareil ne peut pas
causer l’intervention, et
(2) cet appareil doit accepter
de l’intervention, y compris
l’intervention qui peut causer
l’opération non désirée de.
Cet appareil numérique de la
classe [B] est conforme à la
norme NMB-003 du Canada.
Cet appareil numérique de la
classe [B] est conforme à la
norme ICES-003 du Canada.
Son fonctionnement est soumis
aux deux conditions suivantes:
(1) cet appareil ne peut pas
causer l’intervention, et
(2) cet appareil doit accepter
Cet appareil s’accorde avec
Industrie Canada licenceexempte RSS standard.
FCC EXPOSITION AUX
RADIATIONS
Cet équipement est conforme
aux limites d’exposition
aux rayonnements de
la FCC définies pour un
environnement non contrôlé.
Cet équipement doit être
installé et utilisé à distance
minimum de 20cm entre le
radiateur et votre corps.
Cet émetteur ne doit pas être
co-localisées ou opérant en
conjonction avec une autre
antenne ou émetteur. .
MISE EN GARDE MOTARDS
Interagir avec l’appareil photo
lors de la conduite pourrait
causer un accident et vous ou
d’autres personnes peuvent
être gravement blessé ou tué.
• Gardez vos yeux et l’esprit
sur la route;
• Évitez de regarder la caméra
pendant trop longtemps;
• Arrêtez le véhicule dans un
endroit sûr avant de régler
la caméra.location before
adjusting the camera.
36
inhalt
Vielen Dank, dass Sie sich für die Drift HD Ghost entschieden haben
KUNDENSERVICE
Auf unserer offiziellen Internetseite finden Sie Firmware-Updates,
Kundenservice, Neuigkeiten über unsere Produkte und Videos. Wenn
Sie Anregungen, Kommentare oder Fragen haben, wenden Sie sich
bitte an unser Kundenservice-Team:
[email protected]
GARANTIE
Die Garantie gilt nicht wenn das Produkt unsachgemäß verwendet
wurde, einem schweren Unfall, Feuer, Frost oder Wasser ausgesetzt
war oder durch Nachlässigkeit nicht nach den bereitgestellten
Nutzungsbedingungen verwendet wurde.
über Ihre Kamera | ersteinrichtung
39—40
lieferinhalt | erste Schritte
41—42
modusauswahl & einstellungen
43—44
funktionen45—46
montage der Kamera | zubehör leitfaden
47—48
wiFi | kamera verbinden
49—50
technische daten
51—52
hinweise53—54
über Ihre Kamera
A
B
C
D
ersteinrichtung
E
MODUS/ Tag / Gleichzeitige Fotoaufnahme
I
J
K
L
NAVIGATIONS-Taste
AKTIONS-Taste
(On/Off/Rec/Stop)
LED-Status
Bildindikator
Verschlussklappe
1.3” beleuchteter LCD-Display
300° drehbare
Linse
HDMI-Anschluss (Micro-D)
USB-Anschluss (Micro-B)
Micro SD Karten-Steckplatz
Reset-Knopf
F
39
G
H
Verschlussklappen-Gewinde
M
1. Verschlussklappe lösen
und entfernen
2. Class 10 oder höhere
Micro SD/HC Karte (bis
zu 32GB) einlegen
Vor der ersten
Verwendung
formatieren!
3. Kamera über Micro
USB-Kabel mit USBAnschluss verbinden
und die Batterie 4
Stunden vor der ersten
Inbetriebnahme
aufladen
4.Verschlussklappe
wieder aufsetzen und
festziehen
40
lieferinhalt
erste Schritte
Universal-Clip
USB-Kabel (Micro-B)
EIN- UND AUSSCHALTEN
MODUSAUSWAHL
Um den aktuellen
1. Drücken und halten Sie die
1080p
25 FPS
Aufnahmestatus zu ändern,
AKTIONS-Taste gedrückt,
drücken Sie die [MODE]
um das Gerät einzuschalten
Taste. Dadurch schalten
2. Der Bildschirm leuchtet
Sie zwischen Video, Foto,
auf Willkommensanzeige
EXP -2
90%
87%
Zeitraffer, Photoburst und
erscheint
den Kameraeinstellungen
VIDEO MENÜ
3. Die Kamera ist jetzt für
durch.
BENUTZEROBERFLÄCHE
Video- oder Fotoaufnahmen
bereit
MODUSEINSTELLUNGEN
4. Der aktuelle Kameramodus
Um die Einstellungen des
wird durch das Symbol links
aktuellen Aufnahmemodus
Exposure
0.0
oben im Display und durch
zu ändern drücken Sie
X
Self Timer
die LED-Farbe angezeigt
die NAVIGATIONSTaste [ ]. Dies ändert
(weitere Informationen, siehe Wi-Fi
X
die Einstellungen nach
Seite 7-8)
EINSTELLUNGEN
einer Auswahl von
5. Zum Ausschalten drücken
BENUTZEROBERFLÄCHE
Voreinstellungen.
und halten Sie die
AKTIONS-Taste 3 Sekunden
*Info: Die Kamera schaltet in dem gleichen Modus an in dem sie
ausgeschaltet wurde
42
lang gedrückt
12:05:59
Montage-Kit
41
Brillenhalterung
S E T T I NG
modusauswahl
VIDEOMODUS
(Grüne LED) Die Kamera
zeichnet Videos auf, wenn
die AKTIONS-Taste auf der
Kamera oder Fernbedienung
gedrückt wird. Die LED
leuchtet während der
Aufnahme rot. Drücken Sie
die AKTIONS-Taste auf der
Kamera oder die STOP-Taste
auf der Fernbedienung,
um die Aufzeichnung zu
beenden.
NTSC / PAL
Die Kamera filmt sowohl in
NTSC als auch PAL Video
Standards (Einzustellen in
den Kameraeinstellungen).
NTSC filmt in Bildraten von
43 30 (30, 60, 120) FPS,
während PAL Bildraten
von 25 (25, 500, 100) FPS
verwendet.
FOTOMODUS
(Gelbe LED) Die Kamera
nimmt Bilder auf, wenn die
AKTIONS-Taste auf der
Kamera oder Fernbedienung
gedrückt wird. Die LED
leuchtet jedes Mal rot auf,
wenn ein Foto gemacht
wird (dies gilt auch für den
Timelapse- und PhotoburstModus)
ZEITRAFFERMODUS
(Violette LED) Die Kamera
nimmt eine Serie von
Bildern in einer bestimmten
Frequenz auf, wenn die
AKTIONS-Taste auf der
einstellungen
Kamera AKTIONS-Taste
auf der Kamera oder
Fernbedienung gedrückt
wird. Drücken Sie die
AKTIONS-Taste auf der
Kamera oder die STOP-Taste
auf der Fernbedienung,
um die Aufzeichnung zu
beenden.
Kameraeinstellungen
PHOTOBURSTMODUS
(Türkise LED) Die Kamera
zeichnet eine Bildfolge für
eine festgesetzte Zeitspanne
in einer bestimmten
Geschwindigkeit auf, wenn
die AKTIONS-Taste auf der
Kamera oder Fernbedienung
gedrückt wird (verwenden
Sie für beste Ergebnisse eine
Class 6 oder höhere Micro-SD
Karte).
•VIDEO STANDARD
•BELICHTUNG
-2.0 / -1.0 / 0 / +1.0 / +2.0
•SELBSTAUSLÖSER
OFF / 3S / 5S / 10S
•WI-FI
•VIDEO TAGGING
•TAGGING INTERVALL
•CAR DVR INTERVALl
•DATUM / ZEIT ANZEIGE
AN / AUS
•SPRACHE
ON / MANUELL / OFF
1MIN / 3MIN / 5MIN / 10MIN / 15MIN
AUS / 5S / 10S / 20S / 1MIN
•DATUM
AUS / AN
10S / 30S / 1MIN / 2MIN / 5MIN / 10MIN
•CAR DVR MODUS •LCD HELLIGKEIT TIMER
•EINSTELLUNGEN ZURÜCKSETZEN
•SPEICHERKARTE FORMATIEREN • FIRMWARE VERSION
JAHR / MONAT / TAG
AN / AUS
[Liste der Sprachen]
JA / NEIN
JA / NEIN
AKTUELLE VERSION
NTSC (30) / PAL (25)
•MIC EMPFINDLICHKEIT
AUS / LOW / MED / HIGH
•LAUSTÄRKE
AUS / LOW / MED / HIGH
•RC 1-1 (Eine Fernbedienung für eine Kamera)
AN / AUS
•RC 1-ALL (Eine Fernbedienung für mehrere Kameras)
AN / AUS
•RC LED
AN / AUS
•KAMERA LED
AN / AUS
•KAMERA AUS
AUS / 2MIN / 5MIN
•LCD HELLIGKEIT
AN / AUS
*Info: Drückt man die NAVIGATIONS-Taste im
Menü 1mal wird die Auswahl um eine Einstellung
hinunter gescrollt. Hält man die NAVIGATIONS-Taste
gedrückt kommt man mit der Auswahl wieder an den
Anfang der Einstellungen.
44
funktionen
EXP -2
129
90%
PHOTO MODE
87%
3s
Screen references
EXP -2
MODUS-ANZEIGE
Die Drift Stealth 2 besitzt
ein mehrfarbiges SatusAnzeigen-System. Die
vordere LED und das
LCD-Display leuchten
in den Farben dem
aktuellen Kameramodus
entsprechend.
Beide Anzeigen können
in die allgemeinen
Einstellungen deaktiviert
werden.
VIDEO - grün
FOTO - gelb
ZEITRAFFER - violett
PHOTOBURST - türkis
45
*Die Modus-Anzeige
VIDEO MODE
ist mit der ZweiWege-Fernbedienung
1080p
25 FPS
kombinierbar
VIDEO TAGGING
Ist diese Funktion
EXP -2 kann90%
87%
aktiviert,
die
Kamera Videoaufnahmen
ununterbrochen
durchführen, es werden
aber nur die Abschnitte
gespeichert, die als
wichtige Aufnahmen
TIMELAPSE MODE
‘getaggt’, also markiert,
werden. Ist die Kamera im
3s zeigt das ‘T’ auf
5MP
Standby,
dem Display, dass das Video
Tagging aktiviert ist und der
EXPTagging
-2
Video
Intervall
wird
90%
87%
12:05:59
1-1078
angezeigt. (siehe Standby
Screen-Shot unterhalb).
PHOTO MODE
25 FPS
6
129
1080p
T 3s
5MP
10s
EXP -2
90%
87%
EXP -2
90%
87%
Mit einem Druck auf die
AKTIONS-Taste
startet die Aufnahme, aber
ohne die Aufnahmen zu
speichern. Die LED blinkt
grün
(siehe
Standby ScreenVIDEO
MODE
Shot unterhalb).
25 FPS
1080p
12:05:59
T
Image count
Series
x
*1-1078 is only a
EXP -2
90%
87%
sample number
129
90%
5MP
87%
Mit einem Druck auf die
AKTIONS-Taste
startet die Aufnahme, aber ohne
die Aufnahmen zu speichern.
Die LED blinkt grün (siehe
VIDEO MODE
Standby Screen-Shot unterhalb).
Die Tagging-Funktion erfordert
eine Class 10 Micro SD Karte mit
4GB freiem Speicherplatz um
korrekt zu funktionieren.
CAR DVR MODUS
Dieser Modus ist ideal
für Versicherungs- und
Sicherheitszwecke geeignet.
In diesem Modus nimmt die
Kamera in kontinuierlichen
Dauerschleifen (DVR
Intervalle) auf, bis die Micro
SD Karte voll ist. Ist die SDKarte einmal voll wird die
älteste Aufnahme gelöscht
und durch die neueste
ersetzt. Die Intervalle
können 1min, 3min, 5min,
10min oder 15min betragen.
GLEICHZEITIGE
FOTOAUFNAHME
Drücken Sie während der
1080p
25 FPS
1080p
25 FPS
Videoaufnahme
die MODET
Taste, um während der
Videoaufnahme ein Foto
EXP -2
EXPaufzunehmen.
-2
90%
87%
90%
87%
Wenn Sie die Zwei-WegeWird zum Beispiel ein TaggingFernbedienung nutzen,
Intervall von 30s ausgewählt,
drücken Sie die AKTIONSwerden beim Abspeichern
Taste, um ebenfalls zeitgleich
die letzten
Fotos aufzunehmen.
1080p
25 FPS der Aufnahme
30s, die aktuellen 30s und die
Diese Funktion ist nicht verfügbar,
TIMELAPSE
MODE
zukünftigen
30s abgespeichert
wenn Video-Tagging (links)
–
also
ein
markiertes
Video
mit
aktiviert ist.
EXP -2
90%
87%
3s von 1min30s5MP
der Länge
erstellt..
*siehe komplette Bedienungsanleitung wie die unterschiedlichen
12:05:59
6
6
Funktionen zu verwenden sind.
46
kameramontage
1. Befestigen Sie den
Universal-Clip an
der Kamera in einer
360° Ausrichtung –
positionieren Sie den
Clip zunächst in der
gewünschten Ausrichtung,
befestigen Sie ihn dann
durch Drehen der
Schraube.
2. Schieben Sie den
Universal-Clip in die
gewählte Halterung, bis er
hörbar einrastet
*Kontrollieren Sie ob der
Clip eingerastet ist indem
Sie die Bügel nach außen
drücken.
zubehör leitfaden
3. Überprüfen Sie die
Bildschirmausrichtung und
drehen Sie die Linse mit
der Hand, falls notwendig,
um Ihre Einstellung
anzupassen, indem Sie die
Objektivmarkierung als
Richtungshinweis nehmen
(‘oben’)
ZWEI-WEGE-FERNBEDIENUNG
Die Fernbedienung verbindet Sie
drahtlos mit Ihrer Kamera. Die
Fernbedienung ermöglicht einen
Start/Stop der Aufnahmen, eine
Änderungen des Modus und dient
durch die LEDs zur Kontrolle ob
man aufnimmt.
47
STEALTH 2
WASSERDICHTES GEHÄUSE
Gehen Sie unter Wasser mit
dem Stealth 2 wasserdichten
Gehäuse. Das DoppelSchließsystem führt zu einem
absolut dichtem Verschluss und
austauschbare Linsen ergeben
immer ein glasklares Bild.
DRIFT HALTERUNG FÜR
BELÜFTETE HELME
Befestigen Sie Ihre Drift
Kamera an jeden belüfteten
Helm mit der neuen Halterung
für belüftete Helme.
*Info: Das komplette Drift Zubehör finden Sie unter driftinnovation.com
48
wifi
EIN- UND AUSSCHALTEN
Heben Sie im Menü der
Kameraeinstellungen
die ‘WiFi’-Option hervor,
drücken Sie dann die
AKTIONS-Taste und wählen
Sie P. Drücken Sie dann
erneut auf die AKTIONSTaste.
Der Netzwerkname
(SSID) der Kamera wird
‘Stealth 2 XXXXX’ lauten,
wobei die Ziffern die
Netzwerknummer der
Kamera darstellen.
49
firmware
DRIFT-APP HERUNTERLADEN
Aufnahmeeinstellungen,
Aufzeichnungen,
Aufnahmen und
Wiedergabe auf Ihrem Gerät
FIRMWARE AKTUALISIEREN
Laden Sie die neueste Firmware
von der Drift-Webseite herunter
(links) und kopieren Sie die .binDatei auf eine formatierte Micro
SD-Karte.
Legen Sie die Micro SD-Karte
in die Kamera ein und schalten
Sie die Kamera ein. Der
Kamerabildschirm wird die
Wörter ‘Firmware aktualisieren’
anzeigen, wenn die neue Firmware
installiert wird.Nach Abschluss
der Installation schaltet sich die
Kamera automatisch aus. Um
zu überprüfen, ob die Firmware
richtig aktualisiert wurde, schalten
Sie die Kamera ein und navigieren
Sie in den Kameraeinstellungen
ganz nach unten. Dort sehen Sie
die aktuell installierte Firmware.
kamera verbinden
MIT EINEM PC VERBINDEN
1. Verbinden Sie die Kamera
mit dem mitgelieferten USBKabel; der Kamerabildschirm
zeigt ein USB-Symbol an
2. Der Ordner der Kamera
öffnet sich automatisch;
falls nicht, klicken Sie auf
Arbeitsplatz
3. Die Kamera wird
normalerweise als
Wechseldatenträger erkannt:
mit einem Doppelklick
öffnen Sie diesen
4. Öffnen Sie den Ordner
‘DCIM’, um auf Ihre Dateien
zugreifen zu können
!
MIT EINEM MAC VERBINDEN
1. Verbinden Sie die Kamera
mit dem mitgelieferten
USB-Kabel; der
Kamerabildschirm zeigt ein
USB-Symbol an
2. Der Ordner der Kamera
öffnet sich automatisch;
falls nicht, klicken Sie auf
den Finder
3. Die Kamera wird
normalerweise als externer
Datenträger erkannt: mit
einem Doppelklick öffnen
Sie diesen
4. Öffnen Sie den Ordner
‘DCIM’, um auf Ihre Dateien
zugreifen zu können
MIT EINEM FERNSEHER
VERBINDEN
1. Verbinden Sie die
ausgeschaltete Kamera
über ein Micro HDMI (Typ
D) mit einem Full-HDMIKabel, die bei allen DriftEinzelhändlern erhältlich
sind.
2. Schalten Sie die Kamera ein
3. Der Kamerabildschirm wird
nun auf dem Fernseher
dargestellt und die Videos
oder Fotos werden auf
dem Bildschirm angezeigt;
der Videosound läuft über
den Lautsprecher des
Fernsehgerätesscreen
Drücken Sie nur während des Ladevorgangs (nicht über einen Computer)
die AKTIONS-Taste, um zur Live-Vorschau zurückzukehren
50
technische daten
Videoauflösung:
1080p, 720p und WVGA (16:9); 960p (4:3)
Dateiformat:
.MP4 (H.264 Codec)
Sensortyp:CMOS
Bildrate:1080p:
25 / 30 fps
960p:
25 / 30 fps
720p:
25 / 30 / 50 / 60 fps
WVGA:
25 / 30 / 100 / 120 fps
Sichtbereich (diagonal):
135°
Brennweite:
0.5m bis unendlich
Drehung Objektiv:
300°
Fotomodus:
12 / 5 / 3 Megapixel
Belichtung:
Auto / Manuell (erfahrene Benutzer)
LCD-Bildschirm:
1.3” einfarbig beleuchteter LCD-Bildschirm
Witterungsbeständig:Ja
Mikrofon:Mikrofon:
Integrierter Speicher:
256MB (nicht frei zugänglich)
51
Speicherkapazität:
Micro SD Speicherkarten bis zu 32 GB
Ausgänge:
HDMI-Anschluss Typ D (Kabel nicht enthalten)
Konnektivität:
USB Plug and Play, Micro-B USB-Stecker
Kompatibilität:
Windows XP and up / Mac OS 10.2 and up
Reichweite der Fernbedienung: 10m (32.81ft)
Radiofrequenz:2.4GHz
Abmessungen:
80.0 (L) × 42.6 (B) × 27.4 (T) mm
Gewicht:94g
Stromversorgung:
1500mAh integrierter Lithium-Ionen-Akku (DC 3.7V)
52
hinweise
FCC Informationen
Dieses Gerät erfüllt Teil 15 der
FCC-Bestimmungen.
Die Inbetriebnahme unterliegt
folgenden zwei Bedingungen:
(1) Dieses Gerät darf keine
schädlichen Störungen
verursachen und (2) dieses
Gerät muss alle empfangenen
Störungen aufnehmen,
einschließlich Störungen, die
eine unerwünschte Nutzung
verursachen.
ACHTUNG
Änderungen oder Modifikationen
an diesem Gerät, die nicht
ausdrücklich von der zuständigen
Behörde genehmigt sind, können
53
das Recht zur Benutzung des
Gerätes unwirksam machen.Das
Gerät wurde getestet und erfüllt
die Grenzwerte für ein digitales
Gerät der Klasse B, gemäß Teil
15 der FCC-Bestimmungen.
Diese Grenzwerte sollen
einen angemessenen Schutz
gegen schädliche Störungen
bei der Installation in einem
Wohngebiet bieten. Dieses
Gerät erzeugt, verwendet, und
kann hochfrequente Energie
ausstrahlen. Falls es nicht gemäß
der Anleitung verwendet wird,
kann es eine schädliche Störung
des Funkverkehrs verursachen.
Es besteht jedoch keine Garantie,
dass bei einer bestimmten
Installation keine Störungen
auftreten. Wenn dieses Gerät
Störungen bei Radio- und
Fernsehempfang verursacht, was
sich durch ein- und ausschalten
bestimmen lässt, ist der Benutzer
angehalten, die Störungen durch
eine oder mehrere der folgenden
Maßnahmen zu beheben:
Die Empfangsantenne neu
ausrichten;
Den Abstand zwischen dem Gerät
und dem Empfänger vergrößern;
Das Gerät an eine Steckdose
eines anderen Stromkreises
als den des Empfängers
anzuschließen;
Wenden Sie sich an den Händler
oder einen erfahrenen Radiobzw. Fernsehtechniker;
Dieses Gerät erfüllt die
lizenzfreien RSS-Standards des
Industry Canada.
Die Inbetriebnahme
unterliegt den folgenden zwei
Bedingungen:
(1) Dieses Gerät darf keine
Störungen verursachen,
und (2) dieses Gerät muss
alle Störungen aufnehmen,
einschließlich Störungen die
eine unerwünschte Nutzung
verursachen.
Dieses Gerät der Klasse [B]
entspricht der kanadischen
Norm ICES-003
Son fonctionnement est soumis
aux deux conditions suivantes:
(1) cet appareil ne peut pas
causer l’intervention, et
(2) cet appareil doit accepter
de l’intervention, y compris
l’intervention qui peut causer
l’opération non désirée de.
gemeinsam oder in Verbindung
mit einer anderen Antenne
oder einem Sender angeordnet
werden.
Cet appareil numérique de la
classe [B] est conforme à la
norme NMB-003 du Canada.
MOTORRAD HAFTUNGS-
Cet appareil s’accorde avec
Industrie Canada licenceexempte RSS standard.
FCC STRAHLUNGSBELASTUNG
Dieses Gerät entspricht den
FCC-Strahlenbelastungsgrenzen
für unkontrollierte
Umgebungen. Dieses Gerät
sollte mit einem Mindestabstand
von 20 cm zwischen der
Strahlungsquelle und Ihrem
Körper verwendet werden.
Dieser Sender darf nicht
ANSCHLUSS
Die Verwendung der Kamera
werden dem Motorradfahren
kann zu einem Unfall führen
und Sie und/oder andere
Verkehrsteilnehmer ernsthaft
verletzen und/oder töten.
• Bleiben Sie mit Augen und
Gedanken auf der Straße;
• Vermeiden Sie zu lange
Blickkontakte auf die Kamera;
• Stoppen Sie das Fahrzeug in
einer sicheren Umgebung
bevor Sie die Kamera
plazieren;
54
contenido
Gracias por comprar la cámara Drift Stealth 2
SERVICIO DE ASISTENCIA AL CLIENTE
Consulte nuestro sitio web oficial para actualizar el
firmware, asistencia al cliente, noticias sobre nuestros
productos y vídeos de los usuarios. Si tiene cualquier
sugerencia, comentario o duda, póngase en contacto con
nuestro equipo de asistencia al cliente en:
[email protected]
GARANTÍA
La garantía no aplica si el producto se avería debido a uso
o manejo indebidos, accidente, incendio, congelación,
agua, negligencia o por no seguir las instrucciones de uso
facilitadas.
sobre la cámara | configuración inicial
57—58
contenido del paquete | inicio
59—60
selección de modo y configuración
61—62
características63—64
montaje de la cámara | guía de accesorios
65—66
wifi | conexión de la cámara
67—68
especificaciones69—70
declaraciones71—72
sobre la cámara
A
B
C
D
configuración inicial
E
Botón MODE/ Etiqueta / Foto simultánea
Botón de CYCLE OPTION
I
J
K
L
Botón ACTION
(On/Off/Rec/Stop)
F
57
G
H
LED de estado
Indicador de lente “arriba”
Tapa posterior
Pantalla LCD retroiluminada de 1,3”
Lente giratoria 300° y reemplazable
Puerto HDMI (Micro-D)
Puerto USB (Micro-B)
Ranura para tarjeta micro SD
Botón de reinicio
Punto de tornillo de la tapa posterior
M
1. Desenrosque el tornillo y
retire la tapa posterior
2. Inserte una tarjeta micro SD/
HC de clase 10 o superior
(hasta 32 GB).
Formatéela antes de usarla
por primera vez
3. Conecte la cámara con el
cable micro USB a un puerto
USB que reciba alimentación
y cargue la batería 4 horas
antes de usarla por primera
vez
4. Vuelva a colocar la tapa
posterior y sujétela con el
tornillo
58
contenido del paquete
Clip universal
inicio
Cable USB (Micro-B)
ENCENDER Y APAGAR
NAVEGACIÓN DE MODOS
Para cambiar el modo
1. Mantenga pulsado el botón
1080p
25 FPS
actual de grabación de
. ACTION para encenderla
la cámara pulse el botón
2. Se encenderá la pantalla,
[MODE], cambiando
mostrando la pantalla de
entre los modos: Video,
bienvenida
EXP -2
90%
87%
Photo, Timelapse (Lapso
3. La cámara ya está lista para
de tiempo), Photoburst
grabar vídeos o tomar fotos
INTERFAZ DE VÍDEO
(Ráfaga) y la configuración
fijas
general de la cámara.
4. La función actual de la
CONFIGURACIÓN DE
cámara se indica con el
MODOS
icono que aparece en la
Exposure
0.0
Para cambiar la
esquina superior izquierda
configuración del modo
X
de la pantalla y el piloto LED Self Timer
actual de la cámara pulse
(para más detalles, consulte Wi-Fi
X
el botón CYCLE [ ]. Así
las p. 7-8)
cambiará la configuración
INTERFAZ DE
5. Para apagar la cámara,
entre una serie de ajustes
CONFIGURACIÓN
mantenga pulsado el
predeterminados.
botón
ACTION durante 3
*Nota: La cámara se encenderá en el mismo modo en el que se apagó.
segundos
12:05:59
Kit de montaje
59
Montaje para Google
S E T T I NG
60
selección de modo
MODO VÍDEO
(LED verde) La cámara
grabará en vídeo al pulsar el
botón ACTION de la cámara
o del mando a distancia.
La LED parpadeará en
color rojo mientras se está
grabando. Pulse ACTION
en la cámara, o STOP en
el mando a distancia, para
terminar de grabar.
NTSC vs PAL
61
La cámara graba en
formatos de vídeo NTSC y
PAL (intercambiables en el
menú de configuración);
NTSC toma imágenes a
intervalos de 30 (30, 60,
120) FPS (fotogramas por
segundo), mientras que PAL
lo hace a intervalos de 25
(25, 50, 100) FPS.
MODO FOTO
(LED amarilla) La cámara
tomará instantáneas al
pulsar el botón ACTION
de la cámara o del mando
a distancia. La LED
parpadeará en rojo cada
vez que se tome una foto
(esto aplica también a los
modos Timelapse [Lapso
de tiempo] y Photoburst
[Ráfaga]).
MODO TIMELAPSE
(LED morada) La cámara
capturará una serie de
configuración
instantáneas al ritmo
determinado al pulsar el
botón ACTION de la cámara
o del mando a distancia.
Para terminar la grabación,
pulse ACTION en la cámara
o STOP en el mando a
distancia.
configuración de la cámara
•EXPOSICIÓN
OFF / 3S / 5S / 10S
•LCD BACKLIGHT TIMER DE PANTALLA LCD
OFF / 5S / 10S / 20S / 1MIN
•WI-FI
OFF / ON
•FECHA
•ETIQUETADO (tagging) DE VÍDEO
ON / OFF
•IMPRESIÓN FECHA / HORA
•INTERVALO DE ETIQUETAS (tags)
10S / 30S
/1MIN / 2MIN / 5MIN / 10MIN
•MODO CAR DVR •INTERVALO CAR DVR
MODO PHOTOBURST
(LED azul cian) La cámara
capturará una ráfaga de
instantáneas durante un
tiempo determinado al
pulsar el botón ACTION
de la cámara o del mando
a distancia (para obtener
mejores resultados, utilice
una tarjeta micro SD de clase
6 o superior).
-2.0 / -1.0 / 0 / +1.0 / +2.0
•AUTODISPARADOR
ON / M / OFF
1MIN / 3MIN / 5MIN / 10MIN / 15MIN
•ESTÁNDAR DE VÍDEO
NTSC (30) / PAL (25)
•SENSIBILIDAD MIC
OFF / LOW / MED / HIGH
•VOLUMEN ALTAVOZ
OFF / LOW / MED / HIGH
•RC 1-1 (CONTROL REMOTO 1-1)
ON / OFF
[Lista de idiomas]
•VOLVER A CONFIGURACIÓN INICIA
YES/NO
•FORMATEAR TARJETA DE MEMORIA
YES / NO
•VERSIÓN DE FIRMWARE
VERSIÓN ACTUAL
ON / OFF
•RC 1-ALL (CONTROL REMOTO 1- TODO)
ON / OFF
•RC LED (LED DEL CONTROL REMOTO)
ON / OFF
•LED DE LA CÁMARA
•IDIOMA
AÑO / MES / DÍA
ON / OFF
•APAGADO DE LA CAMERA
OFF / 2MIN / 5MIN
•RETROILUMINACIÓN LCD
ON / OFF
*Nota: En el modo de configuración, al pulsar el
botón CYCLE una vez descenderá la selección de un
parámetro. Al mantener pulsado el botón CYCLE se
pasará al primer parámetro de la lista de selección
para facilitar la navegación.
62
Screen references
Características
Screen
references
PHOTO MODE
3s
INDICADOR DE MODO
La cámara
Drift
Stealth 2
PHOTO
MODE
cuenta con un sistema de
pilotos3s
de diversos colores
5MP
indicadores que indican
el estado. Dependiendo
del modo en el que se
EXP -2 la cámara,
90%
encuentre
se
87%
ilumina una LED frontal
junto con la pantalla LCD
retroiluminada.
Ambas pueden ser
deshabilitadas en la
configuración general.
129
VIDEO MODE
VÍDEO - verde
1080p
25 FPS
FOTO - amarilla
LAPSO DE TIEMPO morada
EXP -2- azul90%
RÁFAGA
cian 87%
12:05:59
63
*El indicador de modo es
compatible con el control
remoto Drift Two-Way
ETIQUETADO DE VÍDEO
En la pantalla de espera
(Standby), la “T” indica
que el etiquetado de
vídeo (Video Tagging) está
activado, y aparece el Video
Tagging Interval (intervalo
de etiquetado de vídeo).
(Véase a continuación la
captura de pantalla de
Espera)
25 FPS
T
10s
EXP -2
6
90%
1080p
87%
129
PHOTO MODE
5MP
3s
5MP
vídeo
pasados, presentes
y futuros. El indicador
verde de la pantalla se
EXP -2
90%
transformará
en una
87%
marca de verificación y el
indicador LED parpadeará
en color rojo.
(Véase a continuación la
captura de pantalla de
Etiquetado)
VIDEO MODE
Al pulsar ACTION
comenzará
EXP -2
90%
87%
la grabación en bucle,
pero sin guardar ninguna
filmación. La LED
parpadeará en color verde.
(Véase a continuación la
captura de pantalla de
VIDEO MODE
Grabando)
1080p
25 FPS
12:05:59
T
x
EXP -2
90%
87%
Mientras se graba el
vídeo, al pulsar el botón
MODE se etiquetarán y se
grabarán los intervalos de
TIMELAPSE MODE
129
25 FPS
EXP -2
6
mientras se está grabando,
la cámara guardará los 30 s
anteriores, los 30 s actuales
y otros 30 s, una grabación
total de 1 min 30 s.
La función de etiquetado de
vídeo requiere una tarjeta
micro SD de clase 10 con 4 GB
de espacio libre para funcionar
correctamente.
1080p
25 FPS
1080p
1080p
25 FPSSIMULTÁNEA
FOTO
Mientras se graba el vídeo,
90%
87%
al pulsar el botón MODE se
al mismo
tiempo
EXP -2
EXPtomará
-2
90%
87%
90%
87%
una instantánea de 2 MP.
Por ejemplo, si se
Al utilizar el control remoto
selecciona un intervalo de
de dos vías, pulse el botón
etiquetado de 30 segundos,
ACTION para lograr el
al pulsar el botón MENU
mismo resultado.
T
12:05:59
6
Esta función no está disponible
cuando está habilitado el
etiquetado de vídeo (izquierda).
MODO CAR DVR
Este modo de manos
libres es ideal de cara a la
seguridad. En este modo
la cámara graba en un
bucle continuo (intervalos
de DVR), grabando bucle
tras bucle hasta llenar la
tarjeta micro SD. Una vez
que está llena, los bucles
más antiguos se borran
conforme se guardan los
más recientes. Los intervalos
del bucle de DVR pueden
ser de 1 min, 3 min, 5 min,
10 min o 15 min.
*Consulte
el manual
para ver una guía detallada de cómo usar las diversas funciones.
TIMELAPSE
MODE
64
montaje de la cámara
1. Enganche el clip universal
a la cámara en cualquier
orientación necesaria
dentro de los 360°;
primero coloque el
clip en la orientación
deseada, y luego sujétele
haciendo girar el tornillo
de la base con la mano.
2. Deslice el clip universal
en el soporte que
desee, asegurándose de
que suena un “clic” al
colocarlo.
*Compruebe que está
bien colocado apretando
los clips hacia afuera.
guía de accesorios
3. Alinee el objetivo. Gire
la lente manualmente
hasta que la pantalla esté
bien orientada. Utilice
el marcador de la lente
como referencia de
“arriba”.
CONTROL REMOTO DE DOS VÍAS
(TWO-WAY)
Conéctese con el control
remoto Drift Two-Way
Iniciar/finalizar grabación,
cambiar el modo y asegurar
la grabación con integración
de indicador de modo
mediante LED de Drift.
65
ESTUCHE IMPERMEABLE
PARA STEALTH 2
Sumérjase con el estuche
impermeable para Stealth
II. El sistema de doble cierre
crea un sello estanco y la
lente frontal intercambiable
mantiene la filmación nítida.
SOPORTE DRIFT PARA
CASCO VENTILADO
Sujete la cámara Drift a
cualquier casco ventilado
para bicicleta, esquí u otros
casos deportivos con el nuevo
Soporte Drift para casco
ventilado.
*Nota: Para conocer toda la lista de accesorios, visite driftinnovation.com
66
wifi
ENCENDER Y APAGAR
En el menú de
configuración de la cámara,
resalte la opción “WiFi” y
pulse ACTION, y seleccione
P y pulse ACTION.
El nombre de la red (SSID)
de su cámara será ‘Stealth
2 XXXXX’, donde los dígitos
corresponden al número
único de serie de su
cámara.
67
DESCARGAR LA APP DRIFT
Ajustes de
fotografía,
grabación, captura
y reproducción en
su dispositivo.
firmware
conexión de la cámara
ACTUALIZACIÓN DEL FIRMWARE
Descargue el firmware más
reciente en el sitio web de Drift
(izquierda) y copie el archivo
STEALTH 2.bin en un tarjeta micro
SD formateada.
Inserte la tarjeta micro SD en
la cámara y enciéndala. En la
pantalla de la cámara aparecerá
“Actualizando firmware” mientras
se instala la actualización.
Cuando haya terminado, la cámara
se apagará. Para comprobar que
el firmware se ha actualizado
correctamente, encienda la
cámara y, abra el menú de
configuración y seleccione
“Firmware Version” para ver el
firmware actual.
CONECTAR A UN PC
1. Conecte la cámara
mediante el cable USB
(suministrado); en la
pantalla de la cámara
aparecerá el icono de un
USB.
2. TLa carpeta de la cámara
se abrirá automáticamente;
si no es así, abra “Mi
ordenador (Equipo)”.
3. La cámara debería ser
reconocida como un disco
extraíble; haga doble clic
para abrirlo.
4. Abra la carpeta DCIM para
acceder a sus archivos.
CONECTAR A UN MAC
1. Conecte la cámara
mediante el cable USB
(suministrado); en la
pantalla de la cámara
aparecerá el icono de un
USB.
2. La carpeta de la
cámara se abrirá
automáticamente; si no
es así, abra “Buscador”.
3. La cámara debería ser
reconocida como un
dispositivo externo; haga
doble clic para abrirlo.
4. Abra la carpeta DCIM
para acceder a sus
archivos.
CONECTAR A UN TELEVISOR
1. Cuando la cámara esté
apagada, conéctela
mediante un micro HDMI
(tipo D) a un cable HDMI
completo, disponible en los
distribuidores de Drift.
2. Encienda la cámara.
3. Ahora la pantalla de la
cámara se mostrará en el
TV y se reproducirán los
vídeos o fotos en la pantalla
de este; el sonido del vídeo
saldrá por los altavoces del
televisor.
! Cuando esté solo cargando (no a través de un ordenador), pulse ACTION para encender
68
el aparato.
especificaciones
Resolución de vídeo:
Formato de archivos:
Tipo de sensor:
Fotogramas por segundo:1080p:
960p:
720p:
WVGA:
Campo de visión (diagonal):
Profundidad de campo
de la lente:
Rotación de la lente:
Modo de foto:
Exposición:
Pantalla LCD:
Resistente a la intemperie:
Micrófono:
69
1080 p, 720 p y WVGA (16:9); 960 p (4:3)
.MP4 (códec H.264)
CMOS
25 / 30 fps
25 / 30 fps
25 / 30 / 50 / 60 fps
25 / 30 / 100 / 120 fps
135°
Memoria integrada:
256MB (no accesible al usuario)
Capacidad de memoria:
Tarjetas de memoria micro SD de hasta 32 GB
Salidas:
Conector micro HDMI, tipo D (cable no incluido)
Conectividad:
USB Plug and Play, conector USB micro B
Compatibilidad:
Windows XP y superior / Mac OS 10.2 y superior
Alcance remoto:
10 m (32,81 pies)
Radiofrecuencia:2.4GHz
Dimensiones:
80.0 (L) × 42.6 (A) × 27.4 (H) mm
Peso:94g
Alimentación:
Batería interna de ion de litio 1500 mAh (CC 3,7 V)
de 0,5 mm hasta el infinito
300°
12 / 5 / 3 megapíxeles
Auto / Manual (usuarios avanzados)
LCD mono de 1,3” retroiluminada
Sí
Micrófono integrado, con reducción de ruidos
70
declaraciones
Información FCC
Este dispositivo cumple la parte
15 de la normativa de la FCC.
Su funcionamiento está
sujeto a las dos condiciones
siguientes: (1) este dispositivo
puede no ocasionar
interferencias perjudiciales,
y (2) este dispositivo debe
aceptar las interferencias
recibidas, incluidas
interferencias que pueden
causar un funcionamiento no
deseado.
ADVERTENCIA
Los cambios o las
modificaciones no aprobadas
expresamente por la parte
responsable del cumplimiento
podrían invalidar la autorización
71
del usuario a hacer funcionar
el aparato. Este producto ha
sido sometido a pruebas y se ha
comprobado que está dentro
de los límites para dispositivos
digitales de Clase B, según
la Parte 15 de las normas de
la FCC. Estos límites están
establecidos para proporcionar
una protección razonable
contra las interferencias nocivas
en una instalación residencial.
Este dispositivo genera, usa
y puede radiar energía de
radiofrecuencia u, si no se
instala y se utiliza según las
instrucciones, puede causar
interferencias perjudiciales en
las radiocomunicaciones. No
obstante, no se garantiza que
no se produzcan interferencias
en una instalación concreta.
Si este equipo provoca
interferencias perjudiciales
en la recepción de señales
radiofónicas o de televisión,
que pueden ser determinadas
encendiendo y apagando el
equipo, se anima al usuario
a corregir la interferencia
mediante una o más de las
siguientes medidas:
Este dispositivo cumple las
normas RSS de exención
de licencia de la industria
canadiense.
Reorientar o cambiar de lugar la
antena receptora.
(2) este dispositivo debe
aceptar las interferencias
recibidas, incluidas
interferencias que pueden
causar un funcionamiento no
deseado.
Aumentar la distancia entre el
equipo y el receptor.
Conectar el equipo a un
enchufe o un circuito diferente
al del receptor.
Consultar al distribuidor p
solicitar ayuda a un técnico
especializado en radio o TV.
Su funcionamiento está
sujeto a las dos condiciones
siguientes:
(1) este dispositivo puede no
ocasionar interferencias, y
Este aparato digital de clase B
cumple la norma canadiense
ICES-003.
Son fonctionnement est soumis
aux deux conditions suivantes:
(1) cet appareil ne peut pas
causer l’intervention, et
(2) cet appareil doit accepter
de l’intervention, y compris
l’intervention qui peut causer
l’opération non désirée de.
radiador y su cuerpo.
Cet appareil numérique de la
classe [B] est conforme à la
norme NMB-003 du Canada.
RESPONSABILIDAD PARA
Cet appareil s’accorde avec
Industrie Canada licenceexempte RSS standard.
EXPOSICIÓN A RADIACIONES
DE FCC
Este equipo cumple los límites
de exposición de radiaciones
de las normas FCC fijadas para
un ambiente no controlado.
Este equipo debe ser instalado
y funcionar a una distancia
mínima de 20 cm entre el
Este transmisor no debe ser
colocado ni funcionar junto a
otra antena o transmisor.
EXENCIÓN DE
MOTOCICLETAS
Utilizar la cámara en una
motocicleta en marcha
puede provocar un accidente
en el que pueden resultar
gravemente heridos o fallecer
usted u otras personas.
• Mantenga la atención sobre
la carretera;
• Evite mirar a la cámara
demasiado tiempo;
• Detenga el vehículo en un
lugar seguro antes de ajustar
la cámara.
72
indice
Grazie per avere acquistato la fotocamera Drift Stealth 2
ASSISTENZA ALLA CLIENTELA
Consulta il nostro sito web ufficiale per ottenere
aggiornamenti firmware e assistenza, leggere notizie sui
nostri prodotti e vedere i video dei nostri utenti. In caso di
suggerimenti, commenti o dubbi, si prega di contattare il
nostro team di assistenza su:
[email protected]
GARANZIA
La garanzia non si applica se il prodotto è danneggiato a
seguito di urto, utilizzo inappropriato, incidente, incendio,
congelamento, contatto con l’acqua, negligenza o
inosservanza delle istruzioni operative fornite.
informazioni sulla fotocamera | impostazioni iniziali
75—76
contenuto della confezione | per iniziare
77—78
selezione e impostazioni modalità
79—80
funzioni81—82
montaggio su sostegno della fotocamera | guida agli accessori
83—84
wifi | connessione della fotocamera
85—86
specifiche87—88
altre informazioni importanti
89—90
informazioni sulla fotocamera
A
B
C
D
E
MODALITÀ/ Tag / Tasto foto simultanea
impostazioni iniziali
I
J
K
L
Tasto OPZIONE CICLO
Tasto AZIONE
(On/Off/Rec/Stop)
LED di stato
Indicatore lente verso l’alto
Portello posteriore
Schermo LCD 1,3” retroilluminato
Lente 300° rotante/ sostituibile
F
75
G
H
Porta HDMI (Micro-D)
Porta USB (Micro-B)
Slot scheda Micro SD
Tasto Reimposta
Punto vite portello posteriore
M
1. Svitare e rimuovere il
portello posteriore
2. IInserire una scheda Micro
SD/HC di Classe 10 o
superiore (fino a 32GB)
Formattare prima di
utilizzarla per la prima
volta!
3. Collegare la fotocamera
a una porta USB
alimentata con il cavo
micro USB prima di
utilizzarla la prima volta
4. Riporre il portello
posteriore e assicurarlo
in sede avvitandoloto
76
contenuto della confezione
Clip universale
Cavo USB (Micro-B)
per iniziare
ACCENSIONE E SPEGNIMENTO
1. Premere e tenere premuto
1080p
25 FPS
il tasto
AZIONE per
accendere la fotocamera
2. Il display si accende e mostra
lo schermo di benvenuto.
EXP -2
90%
87%
3. La fotocamera è pronta
per registrare video o per
INTERFACCIA VIDEO
scattare fotografie
4. La modalità corrente della
fotocamera è indicata
dall’icona in alto a sinistra sul
0.0
display e dalla spia a LED (per Exposure
X
Self Timer
dettagli, vedere p. 7-8)
Wi-Fi
X
5. Per spegnere, premere
e tenere premuto il tasto
IMPOSTAZIONI INTERFACCIA
AZIONE per 3 secondi
12:05:59
Kit per sostegno
77
Kit per occhiali
S E T T I NG
NAVIGAZIONE NELLE
MODALITÀ
Per cambiare la modalità
di registrazione corrente,
premere il tasto
[MODALITÀ], selezionando
una delle seguenti:
Video, Foto, Timelapse,
Photoburst e le modalità
di impostazione generale
della fotocamera.
IMPOSTAZIONI MODALITÀ
Per modificare le
impostazioni della modalità
corrente della fotocamera,
premere il tasto CICLO [ ].
In tal modo si potranno
selezionare diverse
impostazioni preimpostate.
*Nota: Quando si accende, la fotocamera è nella stessa modalità che aveva quando è stata spenta.
78
selezione modalità
MODALITÀ VIDEO
(LED verde) La fotocamera
registra video quando
si preme AZIONE
sulla fotocamera o sul
telecomando. Il LED
lampeggerà in rosso
durante la registrazione.
Premere AZIONE sulla
fotocamera, o STOP sul
telecomando, per terminare
la registrazione.
NTSC o PAL
La fotocamera registra
negli standard video
NTSC e PAL (lo standard
è modificabile dal menù
delle impostazioni). L’NTSC
utilizza una velocità di
79
trasmissione di 30 (30, 60,
120) f/s, contro una velocità
di trasmissione di 25 (25,
50, 100) f/s del PAL.
MODALITÀ FOTO
(LED giallo) La fotocamera
scatterà fotografie
quando si preme AZIONE
sulla fotocamera o sul
telecomando. Il LED
lampeggerà in rosso ogni
volta che si scatta una foto
(ciò si verifica anche per
le modalità Timelapse e
Photoburst).
MODALITÀ TIMELAPSE
(LED viola) La fotocamera
scatterà una sequenza
impostazioni
di fotografie a una data
velocità quando si preme
AZIONE sulla fotocamera o
sul telecomando. Premere
AZIONE sulla fotocamera, o
STOP sul telecomando, per
terminare la registrazione.
impostazioni
•ESPOSIZIONE -2.0 / -1.0 / 0 / +1.0 / +2.0
•AUTOSCATTO OFF / 3S / 5S / 10S
•WI-FI
•VIDEO TAGGING
•INTERVALLO DI TAGGING •MODALITÀ DVR AUTOMOBILE MODALITÀ PHOTOBURST
(LED turchese) La fotocamera
scatta una raffica di fotografie
per una data durata quando
si preme AZIONE sulla
fotocamera o sul telecomando
(i risultati migliori si ottengono
con una scheda micro SD di
Classe 6 o superiore).
OFF / ON
ON / OFF
•DATA
10S / 30S / 1MIN / 2MIN /
5MIN / 10MIN
ON / M / OFF
•DATA / MARCATURA ORARIA
•LINGUA
•REIMPOSTA IMPOSTAZIONI
•FORMATTA SCHEDA MEMORIA
•VERSIONE FIRMWARE OFF / 5S / 10S / 20S / 1MIN
ANNO / MESE / GIORNO
ON / OFF
[Lista lingue]
SI / NO
SI / NO
VERSIONE CORRENTE
NTSC (30) / PAL (25)
•SENSIBILITÀ MIC OFF / LOW / MED / HIGH
•VOLUME ALTOPARLANTE
OFF / LOW / MED / HIGH
•RC 1-1 (TELECOMANDO 1-1)
ON / OFF
•TIMER RETROILLUMINAZIONE LCD
•INTERVALLO DVR AUTOMOBILE 1MIN / 3MIN / 5MIN / 10MIN
/ 15MIN
•STANDARD VIDEO
•RETROILLUMINAZIONE LCD ON / OFF
•RC 1-ALL (TELECOMANDO 1-ALL)
ON / OFF
•RC LED (LED TELECOMANDO)
ON / OFF
•LED FOTOCAMERA ON / OFF
•FOTOCAMERA OFF
OFF / 2MIN / 5MIN
*Nota: In modalità impostazioni, premere una volta
il tasto CICLO per spostare in giù di un’impostazione
la selezione. Tenendo premuto il tasto CICLO, la
selezione si risposterà in su nella lista per facilitare
la navigazione.
80
PHOTO MODE
Funzioni
3s
Screen references
SPIA MODALITÀ
La Drift Stealth 2 presenta
un sistema di spie di
PHOTO
MODE
status
multicolore.
Un
LED frontale, insieme a un
display3s
LCD retroilluminato,
5MP
si illuminano a seconda
della modalità fotocamera
corrente.
EXP -2essere
90%
87%
Possono
disattivati
singolarmente nelle
impostazioni generali.
129
VIDEO - verde
FOTO - giallo
VIDEO -MODE
TIMELAPSE
viola
PHOTOBURST - turchese
1080p
25 FPS
12:05:59
81 EXP -2
90%
87%
3s
PHOTO MODE
*La spia modalità è compatibile
con il telecomando Drift
bidirezionale
VIDEO TAGGING
Quando è attiva, questa
funzione consente alla
fotocamera di registrare video
in modo continuo, ma solo di
salvare immagini importanti
‘taggate’. Sullo schermo
Standby, ‘T’ indica che è
attivato Video Tagging e viene
visualizzata l’impostazione
dell’Intervallo del Video
Tagging. (vedere in basso la
schermata Standby)
25 FPS
T
10s
EXP -2
6
90%
1080p
87%
129
5MP
EXP -2
90%
87%
Premendo AZIONE si avvia
la registrazione in loop, ma
senza salvare immagini.
Il LED lampeggerà in
verde. (vedere in basso la
schermata Registrazione)
EXP -2
129
90%
5MP
87%
segno di spunta e la spia
LED lampeggia in rosso.
(vedere in basso la
schermata
Tagging)
VIDEO MODE
La funzione Video Tagging richiede
una scheda micro SD di classe
10 con 4GB di spazio libero per
funzionare correttamente.
MODALITÀ DVR
AUTOMOBILE
Questa modalità senza mani
è ideale per l’assicurazione
e per la vostra sicurezza.
In questa modalità la
fotocamera registra
immagini in loop continuo
(intervalli DVR), registrando
loop dopo loop fino a che
non riempie la scheda
Micro SD. Una volta piena,
i loop più vecchi saranno
cancellati e i nuovi saranno
salvati. Gli intervalli di loop
DVR possono essere di
1min, 3min, 5min, 10min o
15min.
FOTO SIMULTANEA
Durante
video,
1080p
25 FPS la registrazione
premendo il tasto MODALITÀ
T
si scatterà simultaneamente
1080p
25 FPS
1080p
25 FPS
una foto 2MP.
EXP -2
EXP -2
90%
87%
90%
87%
T
Quando si usa il telecomando
x
bidirezionale, premere il tasto
EXP -2
EXP -2
90%
87%
90%
87%
AZIONE per ottenere lo stesso
Per esempio,
selezionando
risultato.
un intervallo di video
tagging di 30s, premendo
Durante la registrazione
Questa funzione non è
MENU durante la
video, premendo il tasto
disponibile con Video Tagging
registrazione,
fotocamera (sinistra) attivato.
MODALITÀ si taggano e
TIMELAPSElaMODE
salverà i 30s precedenti, i
salvano intervalli video
This feature is not available when
30s3s
correnti e altri 30s:
passati,
presentiMODE
e futuri. La
TIMELAPSE
5MP un
Video Tagging (left) is enabled.
totale quindi di 1m30s di
spia su schermo diventa un
*vedere il manuale completo per una guida dettagliata completa
immagini
‘taggate’.
3s
5MP
Image count
25 FPS
VIDEO MODE
12:05:59
6
1080p
12:05:59
1-1078
EXP -2
6
su come usare le varie funzioni
Series
*1-1078 is only a
82
montaggio su sostegno della fotocamera
1. Attaccare la clip
universale alla
fotocamera in qualsiasi
orientamento a 360°,
come necessario:
innanzitutto posizionare
la clip nell’orientamento
desiderato, quindi
assicurarla rotando a
mano la base a vite
2. Fare scivolare la clip
universale nel sostegno
scelto, assicurandosi di
spingerla in sede finché
non si sente un “clic”
*Verificare che sia stata
completamente inserita
spingendo in fuori le clip
3. Scegliere l’inquadratura
desiderata. Ruotare la
lente a mano finché lo
schermo non è orientato
correttamente. Usare
l’indicatore della lente
come riferimento ‘verso
l’alto’.
guida agli accessori
TELECOMANDO BIDIREZIONALE
Collegarsi con il telecomando
Drift bidirezionale. Avviare/
arrestare la registrazione,
cambiare modalità ed
effettuare la registrazione con
l’integrazione della spia di
modalità a LED Drift.
83
GUSCIO IMPERMEABILE
STEALTH 2
Il guscio impermeabile Stealth
II è l’ideale per immergersi
senza problemi. Il sistema di
doppio bloccaggio a tenuta
ermetica e la lente frontale
sostituibile rendono le
immagini nitidissime.
SOSTEGNO CASCO
VENTILATO DRIFT
È possibile attaccare la
fotocamera Drift a qualsiasi
casco ventilato per bicicletta,
sci o altro sport con il nuovo
sostegno per casco ventilato
Drift.
*Nota: Per una lista completa degli accessori, visitare driftinnovation.com
84
wifi
ACCENSIONE E
SPEGNIMENTO
Sul menù Impostazioni
fotocamera, evidenziare
l’opzione ‘WiFi’, premere
AZIONE, e selezionare P e
premere AZIONE.
Il nome della rete (SSID)
della fotocamera è
‘Stealth 2 XXXXX’, dove
le cifre corrispondono al
numero seriale unico della
fotocamera.
85
firmware
COME SCARICARE L’APP DRIFT
Per impostare
le inquadrature,
registrare, scattare
foto e girare video e
riprodurre su altri dispositivi.
AGGIORNAMENTO DEL FIRMWARE
È possibile scaricare l’ultimo
firmware dal sito web Drift (sinistra),
e copiare il file STEALTH 2.bin su
una scheda micro SD formattata.
Inserire la scheda micro SD
nella fotocamera e accenderla.
Lo schermo della fotocamera
visualizzerà ‘Firmware Updating’
(aggiornamento firmware) durante
l’aggiornamento.
Una volta completato, la
fotocamera si spegnerà. Per
verificare che il firmware sia
stato aggiornato correttamente,
accendere la fotocamera e, aprire
il menù Impostazioni fotocamera
e selezionare ‘Firmware Version’
(versione) per vedere il firmware
corrente.
connessione della fotocamera
CONNESSIONE A UN PC
1. Collegare la fotocamera
usando il cavo USB (in
dotazione); lo schermo
della fotocamera
visualizzerà un’icona USB
2. La cartella della fotocamera
potrebbe aprirsi
automaticamente; in caso
contrario, aprire Risorse del
computer
3. La fotocamera dovrebbe
essere riconosciuta come
disco rimovibile; fare
doppio clic per aprire
4. Aprire la cartella DCIM per
accedere ai file
CONNESSIONE A UN MAC
1. Collegare la fotocamera
usando il cavo USB (in
dotazione); lo schermo
della fotocamera
visualizzerà un’icona USB
2. La cartella della
fotocamera potrebbe
aprirsi automaticamente;
in caso contrario, aprire
Finder
3. La fotocamera dovrebbe
essere riconosciuta come
dispositivo esterno; fare
doppio clic per aprire
4. Aprire la cartella DCIM per
accedere ai file
CONNESSIONE A UNA TV
1. A fotocamera spenta,
collegare la fotocamera
usando una HDMI micro
(Tipo D) a un cavo HDMI
completo , disponibile dai
rivenditori Drift.
2. Accendere la fotocamera
3. Il display della
fotocamera ora mostra
la TV e la riproduzione
di video o foto
avverrà sullo schermo
televisivo; l’audio dei
video proverrà dagli
altoparlanti della TV
! Solo quando la fotocamera è in ricarica (non tramite un computer), premere
AZIONE per accendere l’unità
86
specifiche
Risoluzione video:
Formato file:
Tipo sensore:
Velocità di trasmissione:1080p:
960p:
720p:
WVGA:
Campo visivo (diagonale):
Lunghezza focale lente:
Rotazione lente:
Modalità foto
Esposizione:
Schermo LCD:
Resistenza alle intemperie
Microfono:
Memoria incorporata:
87
1080p, 720p and WVGA (16:9); 960p (4:3)
.MP4 (H.264 codec)
CMOS
25 / 30 fps
25 / 30 fps
25 / 30 / 50 / 60 fps
25 / 30 / 100 / 120 fps
135°
da 0,5m a infinito
300°
12 / 5 / 3 megapixel
Auto / Manuale (utenti esperti)
LCD 1,3” grafico, retroilluminato
Sì
Incorporato, con riduzione dei rumori
256MB (non accessibile dall’utente)
Capacità memoria:
Schede di memoria Micro SD fino a 32GB
Uscite:
Connettore Micro HDMI - tipo D (cavo non in dotazione)
Connessioni:
USB Plug and Play, connettore USB micro-B
Compatibilità:
Windows XP e superiori / Mac OS 10.2 e superiori
Portata campo:
10m (32.81ft)
Radiofrequenza:2.4GHz
Dimensioni:
80.0 (L) × 42.6 (A) × 27.4 (P) mm
Peso:94g
Alimentazione:
batteria interna agli ioni di litio da 1500mAh(DC 3,7V)
88
altre informazioni importanti
Informazioni FCC
Questo dispositivo rispetta la
Parte 15 delle norme FCC.
L’utilizzo del dispositivo è
soggetto alle due seguenti
condizioni:
(1) questo dispositivo non può
causare interferenze dannose,
e (2) questo dispositivo deve
accettare le interferenze
ricevute, incluse le interferenze
che potrebbero causare
funzionamenti indesiderati.
ATTENZIONE
Cambiamenti o modifiche a
questa unità non espressamente
approvati dalla parte
responsabile per l’ottemperanza
potrebbero invalidare
89
l’autorizzazione dell’utente
di utilizzare il dispositivo. Il
dispositivo è stato testato ed è
stato riscontrato che rispetta i
limiti di un dispositivo digitale
di Classe B, ai sensi della Parte
15 delle norme FCC. Questi
limiti sono fissati per fornire
una protezione ragionevole
contro le interferenze dannose
in un’installazione residenziale.
Questo dispositivo genera,
utilizza e può irradiare energia
in radiofrequenza e, se non
installato e usato in conformità
con le istruzioni, può causare
interferenze dannose alle
comunicazioni radio. Tuttavia,
non vi è garanzia che non
si producano interferenze
in una data installazione. Se
questo dispositivo dovesse
causare interferenze dannose
alla ricezione radio-televisiva,
fenomeno facilmente
riscontrabile accendendo
e spegnendo il dispositivo,
l’utente è incoraggiato a cercare
di correggere l’interferenza
adottando una o più delle
seguenti misure:
Riorientare o riposizionare
l’antenna ricevente;
Questo dispositivo rispetta lo/gli
standard RSS esenti da licenza
Industry Canada. L’utilizzo del
dispositivo è soggetto al rispetto
delle due seguenti condizioni:
(1) questo dispositivo non può
causare interferenze, e
(2) questo dispositivo deve
accettare ogni interferenza, incluse
le interferenze che potrebbero
causare funzionamenti indesiderati
del dispositivo.
Allontanare il dispositivo dal
ricevitore;
Questo apparato digitale di
Classe [B] rispetta le norme
canadesi ICES-003.
Collegare il dispositivo a una
presa su un circuito diverso da
quello cui è collegato il ricevitore;
Consultare il concessionario o
un tecnico radio-televisivo per
ottenere aiuto.
Son fonctionnement est soumis
aux deux conditions suivantes:
(1) cet appareil ne peut pas
causer l’intervention, et
(2) cet appareil doit accepter
de l’intervention, y compris
l’intervention qui peut causer
l’opération non désirée de.
Cet appareil numérique de la
classe [B] est conforme à la
norme NMB-003 du Canada.
Cet appareil s’accorde avec
Industrie Canada licenceexempte RSS standard.
ESPOSIZIONE A RADIAZIONI
FCC
Questo dispositivo rispetta i limiti
di esposizione alle radiazioni FCC
previsti per un ambiente non
controllato. Questo dispositivo
va installato e fatto funzionare
rispettando una distanza minima
di 20cm tra il radiatore e il corpo
dell’utente.
Questo trasmettitore non deve
essere posto nello stesso luogo o
fatto funzionare in collegamento
con altre antenne o altri
trasmettitori.
DINIEGO DI RESPONSABILITÀ
PER MOTOCICLI
Interagire con la fotocamera
mentre si guida un motociclo
può causare incidenti in cui
l’utente o terzi potrebbero essere
seriamente feriti o rimanere
uccisi.
• Mantenere lo sguardo e
l’attenzione sulla strada;
• Evitare di guardare la
fotocamera per troppo tempo;
• Fermare il veicolo in un posto
sicuro prima di regolare la
fotocamera.
90
follow us
facebook.com/driftinnovation
vimeo.com/driftinnovation
twitter.com/driftinnovation
DRIFTINNOVATION.COM