1
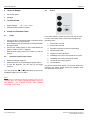
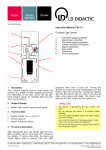
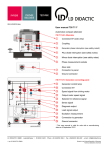
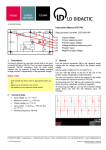
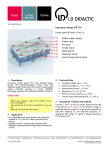
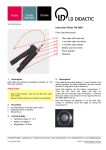
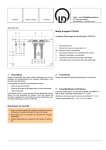
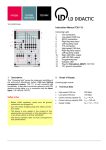
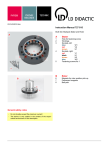
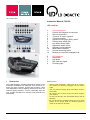
10/14-W2010-Wei 8 7 6 5 4 Instruction Manual 738 189 3 A 9 2 10 11 12 1 B 1 2 LED Headlight A 1 2 3 4 5 6 7 8 9 10 11 12 Connection panel Positive and negative connections LIN bus connection Terminal 15 switch (ignition) Turn signal switch Daytime running light (DRL) switch Parking lamp switch (58) Low beam switch (56b) High beam switch (56a) Operating mode indicator Measurement bridges Ground measuring points Buttons to control the headlight level B 1 2 3 4 LED headlight High beam Low beam DRL and turn signal Cornering light 3 4 1 Description This "LED headlight" set helps with didactic studies on an automotive headlamp with LED light. This serves to examine the light functions, special light functions, lamp level adjustment, LED as lighting element and driver assistance lighting systems. 9 errors, switchable from the rear, provide the basics for intensive and practical troubleshooting. Safety notes - Before initial operation, make sure all 3 connection leads are correctly plugged into the headlight! - Use only safety bridging plugs and safety connection leads! - Be careful not to short-circuit the power supply. Fire hazard! - Do not look directly into illuminated lamps. Risk of blinding! - Do not operate the headlight with the low or high beams on for longer than 10 minutes without a break of at least 15 minutes! Instruction Manual 2 3 4 4.1 4.2 Page 2/2 4.3 Scope of Supply Errors Connection panel Headlight Technical Data Supply voltage: UB = +12 – +15 V= Communication interface: LIN bus Setup und Function Check Setup Connect all three connection leads on the back of the headlight to the connection panel. Insert bridging plugs into the pairs of sockets beneath the toggle switch. Connect the voltage supply to the socket labeled 30 (black = positive, brown = negative). Make sure the rotary switch on the back is in the left position. Operation und Function Check If the rotary switch is all the way to the left, then no error is active. The rotary switch on the back can select the following errors: 1. Ground wire 1 break 2. Ground wire 4 break 3. Permanent positive on the turn signal lamp 4. Parking lamp break 5. Daytime running light break 6. Headlamp level control servomotor short-circuit 7. Headlamp level control servomotor break Switch the voltage supply on. Switch the device on by pressing the ignition switch. To test the functions, you can now try all toggle switches. You can press the ↷ or ↶ pushbuttons to move the 8. LIN bus short-circuit to ground 9. LIN bus break The errors activate after approx. 10 seconds without any change to the switch setting. During this activation time, the LED blinks on the front. headlight's lighting unit up or down. Note: To operate the additional lighting functions such as the cornering light, you need the appropriate data on the LIN bus interface. The manuals provide more detailed information on this topic. LD DIDACTIC GMBH Leyboldstrasse 1 D-50354 Huerth / Germany Phone +49 (0)2233 604-0 Fax +49 (0)2233 604-222 e-mail: [email protected] by LD Didactic GmbH Printed in the Federal Republic of Germany Technical alterations reserved