1
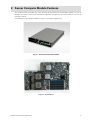
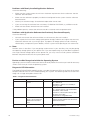
MAXDATA PLATINUM 1000IM User’s Manual Contents Contents 1 Safety Information 7 Safety Warnings and Cautions.................................................................................................................7 Intended Application Uses.......................................................................................................................7 General Warnings.....................................................................................................................................8 Place Battery Marking.........................................................................................................................9 Site Selection...........................................................................................................................................9 Equipment Handling Practices.................................................................................................................9 Power Cord Warnings............................................................................................................................10 System Access Warnings......................................................................................................................10 Rack Mount Warnings............................................................................................................................11 Electrostatic Discharge (ESD).................................................................................................................11 Other Hazards........................................................................................................................................11 Battery Replacement.........................................................................................................................11 Cooling and Airflow...........................................................................................................................11 Laser Peripherals or Devices.............................................................................................................12 2 Server Compute Module Features 13 Connector and Component Locations....................................................................................................15 Configuration Jumpers...........................................................................................................................16 Front Panel Connectors and Indicators..................................................................................................17 Hardware Requirements........................................................................................................................17 Processor..........................................................................................................................................17 Memory.............................................................................................................................................17 Power Supply....................................................................................................................................17 3 Hardware Installations and Upgrades 19 Before You Begin...................................................................................................................................19 Tools and Supplies Needed...............................................................................................................19 Installation Guidelines.......................................................................................................................19 Removing and Installing a MAXDATA PLATINUM 1000IM...................................................................19 Removing a Server Compute Module from the Server System........................................................19 Installing a Server Compute Module into the Server System...........................................................20 Opening and Closing the Top Cover.......................................................................................................20 Opening and Removing the Top Cover.............................................................................................20 Replacing and Closing the Top Cover................................................................................................21 Installing or Replacing a Processor.........................................................................................................22 Installing a Processor........................................................................................................................22 Replacing a Processor.......................................................................................................................27 Installing and Removing Memory Modules............................................................................................31 Supported Memory...........................................................................................................................31 Memory Sparing and Mirroring.........................................................................................................31 Installing DIMMs...............................................................................................................................32 Removing DIMMs.............................................................................................................................34 Installing and Removing a Mezzanine Card............................................................................................36 Installing a Mezzanine Card...............................................................................................................36 Removing a Mezzanine Card.............................................................................................................39 Replacing the CMOS Battery.................................................................................................................41 MAXDATA PLATINUM 1000IM M1 4 Troubleshooting 43 First Steps Checklist...............................................................................................................................43 Hardware Diagnostic Testing.................................................................................................................43 Specific Problems and Corrective Actions.............................................................................................44 Power LED Does Not Light...............................................................................................................44 No Video Display...............................................................................................................................44 Characters are Distorted or Incorrect................................................................................................45 No Available Storage.........................................................................................................................45 Cannot Connect to a Server Compute Module.................................................................................45 Problems with Newly Installed Application Software.......................................................................46 Problems with Application Software that Previously Functioned Properly.......................................46 Devices are Not Recognized within the Operating System..............................................................46 Diagnostic LED Information..............................................................................................................46 BIOS POST Beep Codes...................................................................................................................47 5 Regulatory and Integration Information 49 Product Regulatory Compliance.............................................................................................................49 Product Safety Compliance...............................................................................................................49 Product RoHS Compliance.....................................................................................................................49 Product EMC Compliance......................................................................................................................49 Product Regulatory Compliance Markings.............................................................................................49 Electromagnetic Compatibility Notices..................................................................................................49 Europe (CE Declaration of Conformity).............................................................................................49 Contents Tables 1. 2. 3. 4. 5. Safety Warnings and Cautions...........................................................................................................7 Server Compute Module Features...................................................................................................14 Diagnostic LED Information.............................................................................................................46 POST Error Beep Codes...................................................................................................................47 Product Certification Markings.........................................................................................................49 Figures 1. MAXDATA PLATINUM 1000IM.......................................................................................................13 2. Server Board....................................................................................................................................13 3. Component and Connector Locations..............................................................................................15 4. Configuration Jumper Locations......................................................................................................16 5. Front Panel Connectors and Indicators............................................................................................17 6. Removing Top Cover........................................................................................................................20 7. Installing Top Cover..........................................................................................................................21 8. Removing Processor Air Duct..........................................................................................................22 9. Lifting Processor Socket Handle......................................................................................................22 10.Opening Load Plate..........................................................................................................................23 11.Removing Protective Shipping Cover...............................................................................................23 12.Orienting and Installing Processor....................................................................................................23 13.Removing Socket Protective Cover..................................................................................................24 14.Lowering Load Plate and Socket Lever............................................................................................24 15.Installing Heatsink............................................................................................................................24 16.Removing Second Processor Air Baffle...........................................................................................25 17.Reinstalling Processor Air Duct........................................................................................................26 18.Removing Processor Air Duct..........................................................................................................27 19.Removing the Heatsink....................................................................................................................27 20.Lifting Processor Socket Handle......................................................................................................28 21.Opening Load Plate..........................................................................................................................28 22.Removing Processor........................................................................................................................28 23.Removing Protective Shipping Cover...............................................................................................29 24.Orienting and Installing Processor....................................................................................................29 25.Lowering Load Plate and Socket Lever............................................................................................29 26.Reinstalling Heatsink........................................................................................................................30 27.Reinstalling Processor Air Duct........................................................................................................30 28.DIMM Slot Order..............................................................................................................................32 29.Removing Processor Air Duct..........................................................................................................33 30.Installing DIMMs..............................................................................................................................33 31.Reinstalling Processor Air Duct........................................................................................................34 32.Removing Processor Air Duct..........................................................................................................35 33.Removing DIMMs............................................................................................................................35 34.Reinstalling Processor Air Duct........................................................................................................36 35.Removing Screws from Server Board..............................................................................................37 36.Installing Standoffs for Mezzanine Card...........................................................................................37 37.Installing Mezzanine Card.................................................................................................................38 38.Securing Mezzanine Card to Standoffs............................................................................................38 39.Removing Screws from Mezzanine Card.........................................................................................39 40.Removing Mezzanine Card...............................................................................................................40 41.Removing Standoffs.........................................................................................................................40 42.CMOS Battery Location...................................................................................................................42 MAXDATA PLATINUM 1000IM M1 1 Safety Information This document applies to MAXDATA PLATINUM Server Boards, MAXDATA PLATINUM Server Chassis (pedestal and rack-mount) and installed peripherals. To reduce the risk of bodily injury, electrical shock, fire, and equipment damage, read this document and observe all warnings and precautions in this guide before installing or maintaining your MAXDATA PLATINUM server product. In the event of a conflict between the information in this document and information provided with the product or on the website for a particular product, the product documentation takes precedence. Your server should be integrated and serviced only by technically qualified persons. You must adhere to the guidelines in this guide and the assembly instructions in your server manuals to ensure and maintain compliance with existing product certifications and approvals. Use only the described, regulated components specified in this guide. Use of other products/components will void the UL Listing and other regulatory approvals of the product, and may result in noncompliance with product regulations in the region(s) in which the product is sold. Safety Warnings and Cautions To avoid personal injury or property damage, before you begin installing the product, read, observe, and adhere to all of the following safety instructions and information. The following safety symbols may be used throughout the documentation and may be marked on the product and/or the product packaging. Table 1. Safety Warnings and Cautions Indicates potential hazard if indicated information is ignored Indicates shock hazard that results in serious injury or death if safety instructions are not followed Indicates hot components and surfaces Indicates electrostatic discharge cautions Indicates do not touch fan blades, may result in injury Indicates to unplug all AC power cord(s) to disconnect AC power Intended Application Uses This product was evaluated as Information Technology Equipment (ITE), which may be installed in offices, schools, computer rooms, and similar commercial type locations. The suitability of this product for other product categories and environments (such as medical, industrial, residential, alarm systems, and test equipment), other than an ITE application, may require further evaluation. MAXDATA PLATINUM 1000IM M1 General Warnings The power supply in this product contains no user-serviceable parts. There may be more than one supply in this product. Refer servicing only to qualified personnel. Do not attempt to modify or use the supplied AC power cord if it is not the exact type required. A product with more than one power supply will have a separate AC cord for each supply. The power button on the system does not turn off system AC power. To remove AC power from the system, you must unplug each AC power cord from the wall outlet or power supply. The power cord(s) is considered the disconnect device to the main (AC) power. The socket outlet that the system plugs into shall be installed near the equipment and shall be easily accessible. SAFETY STEPS: Whenever you remove the chassis covers to access the inside of the system, follow these steps: 1. Turn off all peripheral devices connected to the system. 2. Turn off the system by pressing the power button. 3. Unplug all AC power cords from the system or from wall outlets. 4. Label and disconnect all cables connected to I/O connectors or ports on the back of the system. 5. Provide some electrostatic discharge (ESD) protection by wearing an antistatic wrist strap attached to chassis ground of the system-any unpainted metal surfacewhen handling components. 6. Do not operate the system with the chassis covers removed. After you have completed the six SAFETY steps above, you can remove the system covers. To do this: 1. Unlock and remove the padlock from the back of the system if a padlock has been installed. 2. Remove and save all screws from the covers. 3. Remove the cover(s). For proper cooling and airflow, always reinstall the chassis covers before turning on the system. Operating the system without the covers in place can damage system parts. To install the covers: 1. Check first to make sure you have not left loose tools or parts inside the system. 2. Check that cables, add-in boards, and other components are properly installed. 3. Attach the covers to the chassis with the screws removed earlier, and tighten them firmly. 4. Insert and lock the padlock to the system to prevent unauthorized access inside the system. 5. Connect all external cables and the AC power cord(s) to the system. A microprocessor and heat sink may be hot if the system has been running. Also, there may be sharp pins and edges on some board and chassis parts. Contact should be made with care. Consider wearing protective gloves. Danger of explosion if the battery is incorrectly replaced. Replace only with the same or equivalent type recommended by the equipment manufacturer. Discard used batteries according to manufacturer’s instructions. The system is designed to operate in a typical office environment. Choose a site that is: • Clean and free of airborne particles (other than normal room dust). • Well ventilated and away from sources of heat including direct sunlight. • Away from sources of vibration or physical shock. • Isolated from strong electromagnetic fields produced by electrical devices. • In regions that are susceptible to electrical storms, we recommend you plug your system into a surge suppresser and disconnect telecommunication lines to your modem during an electrical storm. • Provided with a properly grounded wall outlet. • Provided with sufficient space to access the power supply cords, because they serve as the product’s main power disconnect. Safety Information Place Battery Marking There is insufficient space on this server board to provide instructions for replacing and disposing of the battery. For system safety certification, the following statement or equivalent statement may be required to be placed permanently and legibly on the chassis near the battery. CAUTION Risk of explosion if battery is incorrectly replaced. Replace with only the same or equivalent type recommended by the manufacturer. Dispose of used batteries according to the manufacturer’s instructions. Site Selection The system is designed to operate in a typical office environment. Choose a site that is: • Clean, dry, and free of airborne particles (other than normal room dust). • Well-ventilated and away from sources of heat including direct sunlight and radiators. • Away from sources of vibration or physical shock. • Isolated from strong electromagnetic fields produced by electrical devices. • In regions that are susceptible to electrical storms, we recommend you plug your system into a surge suppresser and disconnect telecommunication lines to your modem during an electrical storm. • Provided with a properly grounded wall outlet. • Provided with sufficient space to access the power supply cord(s), because they serve as the product’s main power disconnect. Equipment Handling Practices Reduce the risk of personal injury or equipment damage: • Conform to local occupational health and safety requirements when moving and lifting equipment. • Use mechanical assistance or other suitable assistance when moving and lifting equipment. • To reduce the weight for easier handling, remove any easily detachable components. CAUTION The power button, indicated by the stand-by power marking, DOES NOT completely turn off the system AC power, 5 V standby power is active whenever the system is plugged in. To remove power from system, you must unplug the AC power cord from the wall outlet. Your system may use more than one AC power cord. Make sure all AC power cords are unplugged. Make sure the AC power cord(s) is/are unplugged before you open the chassis, or add or remove any non hot-plug components. Do not attempt to modify or use an AC power cord if it is not the exact type required. A separate AC cord is required for each system power supply. Some power supplies in MAXDATA PLATINUM Servers use Neutral Pole Fusing. To avoid risk of shock use CAUTION when working with power supplies that use Neutral Pole Fusing. The power supply in this product contains no user-serviceable parts. Do not open the power supply. Hazardous voltage, current and energy levels are present inside the power supply. Return to manufacturer for servicing. When replacing a hot-plug power supply, unplug the power cord to the power supply being replaced before removing it from the server. To avoid risk of electric shock, turn off the server and disconnect the power cord, telecommunications systems, networks, and modems attached to the server before opening it. MAXDATA PLATINUM 1000IM M1 Power Cord Warnings If an AC power cord was not provided with your product, purchase one that is approved for use in your country. CAUTION To avoid electrical shock or fire, check the power cord(s) that will be used with the product as follows: • Do not attempt to modify or use the AC power cord(s) if they are not the exact type required to fit into the grounded electrical outlets • The power cord(s) must meet the following criteria: - The power cord must have an electrical rating that is greater than that of the electrical current rating marked on the product. - The power cord must have safety ground pin or contact that is suitable for the electrical outlet. • The power supply cord(s) is/are the main disconnect device to AC power. The socket outlet(s) must be near the equipment and readily accessible for disconnection. • The power supply cord(s) must be plugged into socket-outlet(s) that is /are provided with a suitable earth ground. System Access Warnings CAUTION To avoid personal injury or property damage, the following safety instructions apply whenever accessing the inside of the product: • Turn off all peripheral devices connected to this product. • Turn off the system by pressing the power button to off. • Disconnect the AC power by unplugging all AC power cords from the system or wall outlet. • Disconnect all cables and telecommunication lines that are connected to the system. • Retain all screws or other fasteners when removing access cover(s). Upon completion of accessing inside the product, refasten access cover with original screws or fasteners. • Do not access the inside of the power supply. There are no serviceable parts in the power supply. Return to manufacturer for servicing. • Power down the server and disconnect all power cords before adding or replacing any non hotplug component. • When replacing a hot-plug power supply, unplug the power cord to the power supply being replaced before removing the power supply from the server. CAUTION If the server has been running, any installed processor(s) and heat sink(s) may be hot. Unless you are adding or removing a hot-plug component, allow the system to cool before opening the covers. To avoid the possibility of coming into contact with hot component(s) during a hot-plug installation, be careful when removing or installing the hot-plug component(s). CAUTION To avoid injury do not contact moving fan blades. If your system is supplied with a guard over the fan, do not operate the system without the fan guard in place. 10 Safety Information Rack Mount Warnings The equipment rack must be anchored to an unmovable support to prevent it from tipping when a server or piece of equipment is extended from it. The equipment rack must be installed according to the rack manufacturer’s instructions. Install equipment in the rack from the bottom up, with the heaviest equipment at the bottom of the rack. Extend only one piece of equipment from the rack at a time. You are responsible for installing a main power disconnect for the entire rack unit. This main disconnect must be readily accessible, and it must be labeled as controlling power to the entire unit, not just to the server(s). To avoid risk of potential electric shock, a proper safety ground must be implemented for the rack and each piece of equipment installed in it. Electrostatic Discharge (ESD) CAUTION ESD can damage disk drives, boards, and other parts. We recommend that you perform all procedures at an ESD workstation. If one is not available, provide some ESD protection by wearing an antistatic wrist strap attached to chassis ground - any unpainted metal surface - on your server when handling parts. Always handle boards carefully. They can be extremely sensitive to ESD. Hold boards only by their edges. After removing a board from its protective wrapper or from the server, place the board component side up on a grounded, static free surface. Use a conductive foam pad if available but not the board wrapper. Do not slide board over any surface Other Hazards Battery Replacement CAUTION There is the danger of explosion if the battery is incorrectly replaced. When replacing the battery, use only the battery recommended by the equipment manufacturer. Dispose of batteries according to local ordinances and regulations. Do not attempt to recharge a battery. Do not attempt to disassemble, puncture, or otherwise damage a battery. Cooling and Airflow CAUTION Carefully route cables as directed to minimize airflow blockage and cooling problems. For proper cooling and airflow, operate the system only with the chassis covers installed. Operating the system without the covers in place can damage system parts. To install the covers: 1. Check first to make sure you have not left loose tools or parts inside the system. 2. Check that cables, add-in boards, and other components are properly installed. 3. Attach the covers to the chassis according to the product instructions. MAXDATA PLATINUM 1000IM M1 11 Laser Peripherals or Devices CAUTION To avoid risk of radiation exposure and/or personal injury: • Do not open the enclosure of any laser peripheral or device. • Laser peripherals or devices are not user serviceable. • Return to manufacturer for servicing. 12 Safety Information 2 Server Compute Module Features This chapter briefly describes the main features of the MAXDATA PLATINUM 1000IM, as well as provides illustrations showing the location of important components and connections on the server compute module. The MAXDATA PLATINUM 1000IM is shown in the following pictures. Figure 1. MAXDATA PLATINUM 1000IM Figure 2. Server Board MAXDATA PLATINUM 1000IM M1 13 The following table summarizes the major features of the server board. Table 2. Server Compute Module Features 14 Feature Description Processors Support for up to two Dual-Core Intel® Xeon® processors 5000 sequence Memory Support for up to 32 GB of fully-buffered DDR2 667-MHz DIMMs (FB-DIMM) Eight DIMM slots Support for DIMM sparing and memory mirroring Chipset Intel® 5000P chipset, consisting of: • Intel® 5000P Memory Controller Hub (MCH) • Intel® 6321ESB I/O Controller Hub Peripheral Interfaces External connections: • Two USB 2.0 ports • Video connector Internal connections: • One connector to the chassis I/O mezzanine card Video ATI™ ES1000 controller with 16MB onboard memory Hard Drive LSI™ 1064e SAS controller LAN Intel® 8256EB dual port controller Trusted Computing Trusted Platform Module, version 1.2 Server Compute Module Features Connector and Component Locations A M O N P Q R B C S D E L K F J I H G Figure 3. Component and Connector Locations A. Mezzanine Card Connector K. USB2 Port B. Midplane Power Connector L. USB1 Port C. Midplane Signal Connector M. CMOS Battery D. SAS Connector N. Test Connector (manufacturing only) E. FBDIMM Slots O. CPU #2 Heatsink F. CPU1 Socket P. Intel® 6321ESB I/O Controller Hub G. Power/Fault LEDs Q. Intel® 5000P Memory Controller Hub (MCH) H. Power Switch R. Test Connector (manufacturing only) I. Activity and ID LEDs S. Serial Debug Connector (for service only) J. Video Connector MAXDATA PLATINUM 1000IM M1 15 Configuration Jumpers BIOS Bank Select 3 2 Default BOOT FROM EMERGENCY BIOS IMAGE J3A3 PASSWORD CLR Default 2 CLEAR PASSWORD 3 J4A1 BMC Force Update 2 3 Enabled Default Disabled J7A1 CMOS CLR 3 2 CLEAR Default CMOS J1F2 Figure 4. Configuration Jumper Locations Jumper Name Pins What happens at system reset… J7A1: BMC Force Update 1-2 BMC Firmware Force Update Mode - Enabled 2-3 BMC Firmware Force Update Mode - Disabled (Default) J4A1: Password Clear 1-2 These pins should have a jumper in place for normal system operation (Default) 2-3 If these pins are jumpered, administrator and user passwords will be cleared immediately. These pins should not be jumpered for normal operation. 1-2 These pins should have a jumper in place for normal system operation. (Default) 2-3 If these pins are jumpered, the CMOS settings will be cleared immediately. These pins should not be jumpered for normal operation. 1-2 If these pins are jumpered, the BIOS will be forced to boot from the lower bank. These pins should not be jumpered for normal operation. 2-3 These pins should have a jumper in place for normal system operation. (Default) J1F2: CMOS Clear J3A3: BIOS Bank Select 16 Server Compute Module Features Front Panel Connectors and Indicators I A B C D E F G J H Figure 5. Front Panel Connectors and Indicators A. USB1 Port F. Drive Activity LED B. USB2 Port G. ID LED C. Video Connector H. Power Button D. I/O 1 and I/O 2 Activity LEDs I. Fault LED E. NIC1 and NIC2 Activity LEDs J. Power LED Hardware Requirements To avoid integration difficulties and possible board damage, your system must meet the requirements outlined below. Processor The MAXDATA PLATINUM 1000IM supports up to two Multi-Core Intel® Xeon® Processors 5xxx Series. Memory A minimum of two fully-buffered DDR2 667 MHz DIMM(s) (FB-DIMM) should be installed. Additional DIMMs must be installed in pairs, up to eight total. Power Supply A minimum of one 1000-Watt power supply is required to turn on a server compute module. One power supply will support 1 server compute module plus all other modules in the system. Two power supplies will support 2 to 3 server compute modules (in any slot) plus all other modules in the system. Three power supplies will support 4 to 6 server compute modules (in any slot) plus all other modules in the system. Any additional power supplies above minimum required (based on configuration) provide redundancy. MAXDATA PLATINUM 1000IM M1 17 18 3 Hardware Installations and Upgrades Before You Begin Before working with your server product, review the safety and ESD information at the beginning of this manual. Tools and Supplies Needed • Phillips (cross head) screwdriver (#1 bit and #2 bit) • 1/4-inch nut driver • Needle-nosed pliers • Ant-static wrist strap and conductive foam pad (recommended) Installation Guidelines Before installing options: 1. Observe the safety and ESD information at the beginning of this manual. 2. Remove the server compute module from the chassis; before doing so, you must first shut down the operating system and turn off the compute module. You do not have to shut down the chassis. 3. Blue on a component indicates a touch point, where you can grip the component to install or remove it from the server. 4. Green on a component indicates that the component may be hot-swapped. See the instructions included with the hot-swap component for a complete list of installation or removal steps. Removing and Installing a MAXDATA PLATINUM 1000IM Removing a Server Compute Module from the Server System 1. Observe the safety and ESD information at the beginning of this manual. 2. If the server compute module is operating, shut down the operating system and power it down. 3. Release the two retention levers by pressing on the release button located between the two lever handles. 4. Rotate the two lever handles outward and pull the server compute module from the chassis slot. 5. Place either a filler or another server compute module into the bay within one minute; this step is required to maintain proper airflow patterns throughout the server system and to ensure proper system cooling. MAXDATA PLATINUM 1000IM M1 19 Installing a Server Compute Module into the Server System 1. Observe the safety and ESD information at the beginning of this manual. 2. If you have not done so already, install any necessary options, such as processors, memory, hard drives and expansion cards in the server compute module. / Note The top cover is a required component of the server compute module; do not attempt to insert a server compute module into a server system without a top cover installed. 3. Make sure the retention levers on the server compute module are in the open position. 4. Insert the server compute module into an open slot in the system and slide it in until it stops. 5. Close the retention lever handles on the front of the server compute module. Opening and Closing the Top Cover Opening and Removing the Top Cover 1. Observe the safety and ESD information at the beginning of this manual. 2. If the server compute module is installed in a server system, see “Removing a Server Compute Module from the Server System” on page 19 for removal instructions. 3. Carefully lay the server compute module down on a flat, non-conductive surface, with the cover side up. 4. Press the top cover release button (see letter “A” in the following figure) and slide the top cover back, away from the server compute module bezel (see letter “B”). Lift the top cover up and off the server compute module. Caution Always replace the top cover before installing the server compute module into a server system. B A 1 I/O 2 1 2 ID Figure 6. Removing Top Cover 20 Hardware Installations and Upgrades Replacing and Closing the Top Cover 1. Observe the safety and ESD information at the beginning of this manual. 2. Place the top cover on the server compute module so that it engages the cover guide notches. / Note Before closing the top cover, check that all components are installed and seated correctly and that no loose tools or parts are inside the server compute module. 3. Slide the top cover forward to the closed position until the retention latch fully engages. 1 I/O 2 1 2 ID Figure 7. Installing Top Cover MAXDATA PLATINUM 1000IM M1 21 Installing or Replacing a Processor Caution Only processors validated for use in the MAXDATA PLATINUM 1000IM should be installed. You may damage the server compute module if an inappropriate processor is installed. Installing a Processor 1. Observe the safety and ESD information at the beginning of this manual. 2. If the server compute module is installed in a server system, see “Removing a Server Compute Module from the Server System” on page 19 for removal instructions. 3. Remove the top cover. For instructions, see “Opening and Removing the Top Cover” on page 20. 4. Remove the processor air duct. 1 I/O 2 1 2 ID Figure 8. Removing Processor Air Duct 5. Locate the processor socket. Push the lever handle down and away from the socket to release it. Fully raise the socket handle. Figure 9. Lifting Processor Socket Handle 22 Hardware Installations and Upgrades 6. Push the rear tab of the load plate with your finger tip (see letter “A” in the following figure) to bring the front end of the load plate up slightly. Open the load plate (see letter “B”). / Note Do not touch the socket pins; they are very sensitive and easily damaged. A B Figure 10. Opening Load Plate 7. If present, remove the protective shipping cover from the processor. Figure 11. Removing Protective Shipping Cover 8. Orient the processor with the processor socket so that the processor cut-outs match the socket notches (see letter “A” in the following figure). Install the processor (see letter “B”). Caution The underside of the processor has components that may damage the socket pins if installed improperly. The processor must align correctly with the socket opening before installation. DO NOT DROP the processor into the socket. A B Figure 12. Orienting and Installing Processor MAXDATA PLATINUM 1000IM M1 23 9. Remove the socket protective cover. Grasp the socket protective cover tab and pull away from the load plate (see letter “A” in the following figure). Remove the socket protective cover (see letter “B”) and store for future use. / Note Retain the socket protective cover for later use when removing a processor that will not be replaced. A B Figure 13. Removing Socket Protective Cover 10.Lower the processor load plate (see letter “A” in the following figure). With your finger, push down on the load plate (see letter “B”). Lower the socket lever until it is fully latched (see letter “C”). C A B Figure 14. Lowering Load Plate and Socket Lever 11.Ensure that the thermal material is intact on the bottom of the heatsink. 12.Align the heatsink over the processor, thermal material side down, with the captive screws in line with the holes on the heatsink retention module. Press down firmly on the heatsink. 13.Press firmly on the captive screws and tighten them, alternating between screws in a diagonal manner (see tightening order in the following figure). Do not over-tighten the screws by using excessive force. 2 3 4 1 Figure 15. Installing Heatsink 24 Hardware Installations and Upgrades 14.If you are installing a second processor then the second processor air baffle must be removed to ensure proper cooling for two processors. Caution This step only applies if your system has TWO processors. For a one-processor configuration, the second processor air baffle must remain in place to ensure proper cooling. Remove the second processor air baffle by rocking the air baffle back and forth until it breaks off (see letter “A” in the following figure). A Figure 16. Removing Second Processor Air Baffle MAXDATA PLATINUM 1000IM M1 25 15.Reinstall the processor air duct. 1 I/O 2 1 2 ID Figure 17. Reinstalling Processor Air Duct 16.Reinstall the top cover. For instructions, see “Replacing and Closing the Top Cover” on page 21. 17.Reinstall the server compute module in the server system. For instructions, see “Installing a Server Compute Module into the Server System” on page 20. 26 Hardware Installations and Upgrades Replacing a Processor 1. Observe the safety and ESD information at the beginning of this manual. 2. If the server compute module is installed in a server system, see “Removing a Server Compute Module from the Server System” on page 19 for removal instructions. 3. Remove the top cover. For instructions, see “Opening and Removing the Top Cover” on page 20. 4. Remove the processor air duct. 1 I/O 2 1 2 ID Figure 18. Removing Processor Air Duct 5. Carefully remove the processor heatsink by fully loosening the captive screws on the heatsink, and then gently lifting the heatsink off the processor. 2 3 4 1 Figure 19. Removing the Heatsink MAXDATA PLATINUM 1000IM M1 27 6. Push the lever handle down and away from the socket to release it. Fully raise the socket handle. Figure 20. Lifting Processor Socket Handle 7. Push the rear tab of the load plate with your finger tip (see letter “A” in the following figure) to bring the front end of the load plate up slightly. Open the load plate (see letter “B”). A B Figure 21. Opening Load Plate 8. Remove the processor. / Note Do not touch the socket pins; they are very sensitive and easily damaged. Figure 22. Removing Processor 28 Hardware Installations and Upgrades 9. If present, remove the protective shipping cover from the replacement processor. Figure 23. Removing Protective Shipping Cover 10.Orient the replacement processor with the processor socket so that the processor cutouts match the socket notches (see letter “A” in the following figure). Install the replacement processor (see letter “B”). Caution The underside of the processor has components that may damage the socket pins if installed improperly. The processor must align correctly with the socket opening before installation. DO NOT DROP the processor into the socket. A B Figure 24. Orienting and Installing Processor 11. Lower the processor load plate (see letter “A” in the following figure). With your finger, push down on the load plate (see letter “B”). Lower the socket lever until it is fully latched (see letter “C”). C A B Figure 25. Lowering Load Plate and Socket Lever 12.Ensure that the thermal material is still intact on the bottom of the heatsink. 13.Align the heatsink over the processor, thermal material side down, with the captive screws in line with the holes on the heatsink retention module. Press down firmly on the heatsink. MAXDATA PLATINUM 1000IM M1 29 14.Press firmly on the captive screws and tighten them, alternating between screws in a diagonal manner (see tightening order in the following figure). Do not over-tighten the screws by using excessive force. 2 3 4 1 Figure 26. Reinstalling Heatsink 15.Reinstall the processor air duct. 1 I/O 2 1 2 ID Figure 27. Reinstalling Processor Air Duct 30 Hardware Installations and Upgrades 16. Reinstall the top cover. For instructions, see “Replacing and Closing the Top Cover” on page 21. 17. Reinstall the server compute module in the server system. For instructions, see “Installing a Server Compute Module into the Server System” on page 20. Installing and Removing Memory Modules Supported Memory The server board provides support for eight DDR2-667 fully-buffered DIMM sockets across two branches. Each branch has two channels. Channel A consists of slots A1 and A2; channel B consists of slots B1 and B2; channel C consists of slots C1 and C2; and channel D consists of slots D1 and D2. DIMMs must be populated in pairs across consecutive channels starting with the lowest numbered slot in each channel. Slots A1 and B1 are paired, followed by slots C1 and D1. For performance reasons, when configuring four DIMMs, DIMM pair A2 and B2 should never be populated before DIMM pair C1 and D1. A four-DIMM configuration should be populated as A1 and B1; C1 and D1. In non-mirrored mode, all DIMMs with the same slot number within a given branch must match (size, technology, manufacturer). It is not required to match DIMMs between different slot numbers. DIMMs must meet the following requirements: • Use only fully-buffered DIMMs (FB-DIMMs) with DDR2 DRAM technology. • Use only DDR2-667 stacked FB-DIMM modules. In determining your memory requirements, the need for memory sparing or memory mirroring must be considered. Memory Sparing and Mirroring The chipset includes hardware that supports memory mirroring and memory on-line sparing. Both memory mirroring and memory on-line sparing provide a way to prevent data loss in case a DIMM fails. With memory mirroring the system maintains two copies of all data in the memory subsystem. If a DIMM fails, the data is not lost because the second copy of the data is available from the mirrored DIMM in the opposite channel. The system will not fail due to memory error unless both the primary and the mirrored copy of the data become corrupt at the same time. In a mirrored system, the maximum usable memory is one-half of the installed memory, with a minimum of four DIMMs installed. Since the data is duplicated across DIMMs, it means that up to one-half of the installed DIMMs are actively in use at any one time. The remaining DIMMs are used for mirroring. Memory mirroring and memory sparing are mutually exclusive. Only one can be active at a time. MAXDATA PLATINUM 1000IM M1 31 Installing DIMMs DIMM slots are numbered as follows: DIMM B2 DIMM B1 DIMM A2 DIMM A1 DIMM C1 DIMM C2 DIMM D1 DIMM D2 DIMM Sockets Branch 0 Branch 1 Figure 28. DIMM Slot Order Populate DDR2 FBDIMMs in the following order: 1. A1, B1, C1, D1, then 2. A2, B2, C2, D2 To install DIMMs: 1. Observe the safety and ESD information at the beginning of this manual. 2. If the server compute module is installed in a server system, see “Removing a Server Compute Module from the Server System” on page 19 for removal instructions. 3. Remove the top cover. For instructions, see “Opening and Removing the Top Cover” on page 20. 32 Hardware Installations and Upgrades 4. Remove the processor air duct. 1 I/O 2 1 2 ID Figure 29. Removing Processor Air Duct 5. Locate the DIMM sockets. 6. Holding the DIMM by the edges, remove it from its packaging. 7. Open both DIMM socket levers (see letter “A” in the following figure). Position the DIMM above the socket, taking care to align the two small notches in the bottom of the DIMM with the keys in the DIMM socket (see letter “B”). Insert the bottom edge of the DIMM into the socket and press down on the top edge of the DIMM (see letter “C”) until the DIMM is fully seated and the retaining clips (see letter “D”) are locked firmly into place. Important Visually check that each latch is fully closed and correctly engaged with each DIMM edge slot. C D B A Figure 30. Installing DIMMs MAXDATA PLATINUM 1000IM M1 33 8. Reinstall the processor air duct. 1 I/O 2 1 2 ID Figure 31. Reinstalling Processor Air Duct 9. Reinstall the top cover. For instructions, see “Replacing and Closing the Top Cover” on page 21. 10.Reinstall the server compute module in the server system. For instructions, see “Installing a Server Compute Module into the Server System” on page 20. Removing DIMMs To remove DIMMs: 1. Observe the safety and ESD information at the beginning of this manual. 2. If the server compute module is installed in a server system, see “Removing a Server Compute Module from the Server System” on page 19 for removal instructions. 3. Remove the top cover. For instructions, see “Opening and Removing the Top Cover” on page 20. 34 Hardware Installations and Upgrades 4. Remove the processor air duct. 1 I/O 2 1 2 ID Figure 32. Removing Processor Air Duct 5. Locate the DIMM socket and gently open the retaining clips at each end of the socket (see letter “A” in the following figure). This will slightly lift the DIMM from its socket. Holding the DIMM by the edges, remove it from the socket (see letter “B”). Important Store the removed DIMM in an anti-static package. B A Figure 33. Removing DIMMs MAXDATA PLATINUM 1000IM M1 35 6. Reinstall the processor air duct. 1 I/O 2 1 2 ID Figure 34. Reinstalling Processor Air Duct 7. Reinstall the top cover. For instructions, see “Replacing and Closing the Top Cover” on page 21. 8. Reinstall the server compute module in the server system. For instructions, see “Installing a Server Compute Module into the Server System” on page 20. Installing and Removing a Mezzanine Card Installing a Mezzanine Card 1. Observe the safety and ESD information at the beginning of this manual. 2. If the server compute module is installed in a server system, see “Removing a Server Compute Module from the Server System” on page 19 for removal instructions. 3. Remove the top cover. For instructions, see “Opening and Removing the Top Cover” on page 20. 4. Holding the mezzanine card by its edges, remove it from the packaging. Remove the protective connector cover from the mezzanine card. 5. Locate the mezzanine card socket on the server board. 36 Hardware Installations and Upgrades 6. With a Phillips screwdriver, remove four screws from the server board. 11 I/O I/O 22 11 22 ID ID Figure 35. Removing Screws from Server Board 7. With a 1/4-inch nut driver, install the four standoffs that shipped with the mezzanine card. 1 I/O 2 1 2 ID Figure 36. Installing Standoffs for Mezzanine Card MAXDATA PLATINUM 1000IM M1 37 8. Position the mezzanine card above the mezzanine card socket and align the four screw holes with the standoffs taking care to position the connector housing on the mezzanine card with the connector on the server board. Carefully press the mezzanine card into place until it is fully seated in the socket and resting on the standoff supports. 1 I/O 2 1 2 ID Figure 37. Installing Mezzanine Card 9. Secure the mezzanine card to the standoffs with the four screws previously removed. 1 I/O 2 1 2 ID Figure 38. Securing Mezzanine Card to Standoffs 38 Hardware Installations and Upgrades 10.Reinstall the top cover. For instructions, see “Replacing and Closing the Top Cover” on page 21. 11.Reinstall the server compute module in the server system. For instructions, see “Installing a Server Compute Module into the Server System” on page 20. Removing a Mezzanine Card 1. Observe the safety and ESD information at the beginning of this manual. 2. If the server compute module is installed in a server system, see “Removing a Server Compute Module from the Server System” on page 19 for removal instructions. 3. Remove the top cover. For instructions, see “Opening and Removing the Top Cover” on page 20. 4. Locate the mezzanine card. With a Phillips screwdriver, remove the four screws securing the mezzanine card to the standoffs. 1 I/O 2 1 2 ID Figure 39. Removing Screws from Mezzanine Card MAXDATA PLATINUM 1000IM M1 39 5. Holding the mezzanine card by its edges, gently lift it from the socket and store it in an antistatic package. 1 I/O 2 1 2 ID Figure 40. Removing Mezzanine Card 6. With a 1/4-inch nut driver, remove the standoffs. 1 I/O 2 1 2 ID Figure 41. Removing Standoffs 40 Hardware Installations and Upgrades 7. With a Phillips screwdriver, secure the four screws previously removed into the holes vacated by the standoffs. 8. Reinstall the top cover. For instructions, see “Replacing and Closing the Top Cover” on page 21. 9. Reinstall the server compute module in the server system. For instructions, see “Installing a Server Compute Module into the Server System” on page 20. Replacing the CMOS Battery The lithium battery on the server board powers the RTC for up to 10 years in the absence of power. When the battery starts to weaken, it loses voltage, and the server settings stored in the CMOS RAM (for example, the date and time) may be wrong. Contact your customer service representative or dealer for a list of approved replacement batteries. Warning Danger of explosion if battery is incorrectly replaced. Replace only with the same or equivalent type recommended by the equipment manufacturer. Discard used batteries according to manufacturer’s instructions. WARNUNG Wenn eine ungeeignete Batterie eingesetzt wird oder die Batterie falsch eingesetzt wird, besteht Explosionsgefahr. Ersetzen Sie verbrauchte Batterien nur durch Batterien gleichen oder äquivalenten Typs, der vom Hersteller empfohlen wurde. Entsorgen Sie die verbrauchte Batterie entsprechend den Anweisungen des Herstellers. AVERTISSEMENT Danger d’explosion en cas de remplacement incorrect de la pile. Remplacez-la uniquement par une pile du même type ou d’un type équivalent recommandé par le fabricant. Mettez au rebut les piles usagées en vous conformant aux instructions du fabricant. OSTRZEŻENIE Nieprawidłowa wymiana baterii grozi eksplozją. Wymieniać tylko na taki sam lub równoważny typ, zalecany przez producenta. Zużyte baterie utylizować zgodnie z instrukcjami producenta. To replace the battery: 1. Observe the safety and ESD information at the beginning of this manual. 2. If the server compute module is installed in a server system, see “Removing a Server Compute Module from the Server System” on page 19 for removal instructions. 3. Remove the top cover. For instructions, see “Opening and Removing the Top Cover” on page 20. MAXDATA PLATINUM 1000IM M1 41 4. Locate the DMOS battery (see letter “A” in the following figure). A Figure 42. CMOS Battery Location 5. Insert the tip of a small flat-head screwdriver, or equivalent, under the tab in the plastic retainer. Gently push down on the screwdriver to lift the battery. 6. Remove the battery from its socket. 7. Dispose of the battery according to local ordinance. 8. Remove the new lithium battery from its package, and, being careful to observe the correct polarity, insert it in the battery socket. 9. Replace the top cover. For instructions, see “Replacing and Closing the Top Cover” on page 21. 10.Reinstall the server compute module in the server system. For instructions, see “Installing a Server Compute Module into the Server System” on page 20. 11.Run Setup to restore the configuration settings to the RTC. 42 Hardware Installations and Upgrades 4 Troubleshooting This chapter provides information to assist you in troubleshooting the MAXDATA PLATINUM 1000IM. A common cause of server function issues is outdated BIOS and BMC firmware, and outdated operating system level device drivers. Before performing extensive troubleshooting steps, ensure that the system BIOS and BMC firmware code, and device drivers are up to date. One of the first steps to perform in troubleshooting a server compute module is to reboot the system; try resetting your system using one of the methods below. To do this: Press: Soft boot reset to clear the system memory and reload the operating system. <Ctrl+Alt+Del> Cold boot reset. Turn the system power off and then on. This clears system memory, restarts POST, reloads the operating system, and halts power to all peripherals Power off/on First Steps Checklist • Are the server system power LEDs on? • Is the chassis properly connected to an AC power source? • Are the power supplies fully seated in the chassis and the power cables fully seated in the power supplies? • Is the server compute module fully seated in the chassis? • Are the processors fully seated in their sockets on the server board? • Are the installed memory modules fully seated in their sockets on the server board? • If installed, is the add-in mezzanine card fully seated in the slot on the server board? • Are all jumper settings on the server board correct? • Are the configuration settings defined in the BIOS Setup correct? • Is the operating system properly loaded? Refer to the operating system documentation. • Are all device drivers properly installed? Hardware Diagnostic Testing This section provides a more detailed approach to identifying and correcting a hardware problem. 1. Turn off the server compute module. 2. Connect a keyboard and video monitor to the USB and video ports located on the front of the server compute module. Turn on the video monitor and set the brightness and contrast controls to at least two thirds of the maximum range (see the documentation supplied with your video display monitor). 3. Verify that the chassis power supplies are properly installed and connected to grounded AC outlets, and the chassis power LEDs are on. 4. Turn on the server compute module. 5. If the power LED does light, but will not boot the operating system from the hard drive, attempt to boot the from a bootable disk in a USB floppy drive or a USB CDROM drive. 6. If the power LED does not light, see “Power LED Does Not Light” on page 44. MAXDATA PLATINUM 1000IM M1 43 7. If the system fails to boot and emits a series of patterned beeps, see “BIOS POST Beep Codes” on page 47. 8. If one or more system error LEDs is illuminated, see “Diagnostic LED Information” on page 46 for a description of the LED and suggested corrective actions. Specific Problems and Corrective Actions This section provides possible solutions for the following problems: • Power LED does not light • No video display • Characters on the screen appear distorted or incorrect • No available storage • Network problems Try the solutions in the order given. If you cannot correct the problem, contact your service representative or authorized dealer for additional help. Power LED Does Not Light Check the following: • Did you press the power-on button? • Is the system operating normally? If so, the power LED might be defective. • Is the chassis power LED lit? If not, refer to the troubleshooting section of the server system user guide for additional guidance. • Is the server compute module fully seated in the chassis? No Video Display Check the following: • Is the power LED lit? If not, refer to “Power LED Does Not Light” above. • Verify that the video monitor is turned on and functioning properly. • Verify that the brightness and contrast controls on the video monitor are properly adjusted. • Does this video monitor work correctly if plugged into a different system? • Is the system emitting a series of patterned beeps? If so, refer to “BIOS POST Beep Codes” on page 47. • Verify that the installed processor(s) are validated for use in the server compute module. • If only a single processor is installed, verify that it is installed in the first processor socket. • Remove and re-seat the processor(s). • Verify that the installed memory is validated for use in the server compute module. • Verify that the installed memory has been populated according to the system requirements. • Remove and re-seat the memory. • Is the keyboard functioning? Test it by turning the “Num Lock” function on and off to see if the Num Lock light is working. • Is the onboard video controller enabled in the BIOS? • Move the video, keyboard and mouse connections from the management module to the connectors on the front of the server compute module. Do you now get video display? If so, test the server system management module. 44 Troubleshooting Characters are Distorted or Incorrect Check the following: • Is the video monitor properly adjusted? See the manufacturer’s documentation for operating instructions. • Are the video signal cable and power cable connected properly? • Does this video monitor work correctly if plugged into a different system? • Move the video, keyboard and mouse connections from the management module to the connectors on the front of the server compute module. Does video display properly? If so, test the chassis management module. No Available Storage Check the following: • Verify in the MAXDATA PLATINUM Modular System Control GUI that virtual drive(s) are assigned to the server compute module. • Ensure drive(s) assigned to the server compute module are installed and operating properly. • Make sure the installed drives are validated for use with the MAXDATA PLATINUM Modular Server. Cannot Connect to a Server Compute Module • Ensure that the Ethernet switch module is properly installed, the power LED is lit, and the error LED is not lit. • If the switch module is configured for multiple VLANS, verify that the network cable is securely attached to the correct switch port. • Try a different network cable. • Make sure you are using the correct and most current drivers. • Make sure the operating system network settings are configured appropriately for the network the server is physically connected to. Diagnostics Pass but Connection Fails • Make sure that an Ethernet switch is properly installed in the bay associated with the network interface card. • Verify that the network driver is configured properly within the operating system. Controller Stops Working when a Mezzanine Card is Installed • Verify that the system BIOS and firmware, onboard network interface card firmware and mezzanine card firmware are all current. • Try re-seating the mezzanine card first, and then if possible, try installing the mezzanine card in a different server compute module. Mezzanine Card Stops Working Without Apparent Cause • Try re-seating the mezzanine card first, and then if possible, try installing the mezzanine card in a different server compute module. • The network driver files may be corrupt or deleted. Try reinstalling the drivers. MAXDATA PLATINUM 1000IM M1 45 Problems with Newly Installed Application Software Check the following: • Make sure the system meets the minimum hardware requirements for the software. See the software documentation. • Make sure the software is properly installed and configured for the system. See the software documentation. • Use only an authorized copy. Unauthorized copies often do not work. • If you are running the software from a diskette, CD-ROM or DVD-ROM, try a different media. • Make sure the correct device drivers are installed. If the problems persist, contact the software vendor’s customer service representative. Problems with Application Software that Previously Functioned Properly Check the following: • Uninstall and reinstall the software. Make sure all necessary files are installed. • If you suspect that a transient voltage spike, power outage, or brown-out might have occurred, reload the software and try running it again. Symptoms of voltage spikes include a flickering video display, unexpected system reboots, and the system not responding to user commands. / Note Random errors in data files: If you are getting random errors in your data files, they may be getting corrupted by voltage spikes on your power line. If you are experiencing any of the above symptoms that might indicate voltage spikes on the power line, you may want to install a power conditioner between the power outlet and the system power cord. Devices are Not Recognized within the Operating System Operating systems include a limited set of device drivers by default. Ensure that you install all necessary drivers at the time you install the operating system. Diagnostic LED Information The MAXDATA PLATINUM 1000IM includes a number of diagnostic LEDs on the front of the server compute module that can aid in troubleshooting your system. The following table lists these LEDs along with a usage description of each LED. Table 3. Diagnostic LED Information LED Name Function Color Indicator Power LED Identifies power state of system Green Off = Power is off On = Power on Slow Blink = Power is in standby or sleeping mode Fault LED Identifies fault warning Amber Off = No Fault On = Critical error or non-recoverable Slow blink = Non-critical Fast blink = Locate (when device does not have an ID LED) Double blink = Degraded state ID LED Provides an aid in identifying a server compute module from the front panel Blue Use the MAXDATA PLATINUM Modular System Control software to activate or inactivate the LED. Green Off = No drive activity Blink = Drive activity Drive activity LED Indicates drive activity 46 Troubleshooting NIC1 and NIC2 LEDs Indicates network activity and link Green Off = No link On = Link established Blink = Activity I/O 1 and I/O 2 Activity LEDs Indicates network activity and link of NICs on I/O mezzanine card Green Off = No link On = Link established Blink = Activity BIOS POST Beep Codes At the beginning of the server boot-up process, the BIOS runs a power-on self test (POST) routine to check various system components for proper function. Prior to system video initialization, if POST encounters a fatal system error, such as a processor problem, memory problem or video controller problem, the BIOS will trigger a series of patterned beep codes to indicate the error conditions. The following table contains a partial list of the POST error beep codes enabled for the MAXDATA PLATINUM 1000IM. The beep code sounds only when a critical error occurs or when the BIOS fails to boot to the operating system. Please note that not all error conditions are supported by BIOS beep codes. Table 4. POST Error Beep Codes Beeps Error Message Description 3 Memory error System halted because a fatal error related to the memory was detected. 6 BIOS rolling back error System has detected a corrupted BIOS in the flash part and is rolling back to the last good BIOS. MAXDATA PLATINUM 1000IM M1 47 48 5 Regulatory and Integration Information / Note The following information refers to the MAXDATA PLATINUM Modular System with the MAXDATA PLATINUM 1000IM installed. Product Regulatory Compliance Product Safety Compliance The server board complies with the following safety requirements: • EN 60950 (European Union) • IEC 60950 (International) • CE - Low Voltage Directive (73/23/EEC) (European Union) Product RoHS Compliance Restriction of Hazardous Substances: This server system is compliant to European Directive 2002/95/EC (RoHS). Product EMC Compliance The server board has been has been tested and verified to comply with the following electromagnetic compatibility (EMC) regulations when installed a compatible host system. • CISPR 22, 3rd Edition (Class A) - Radiated & Conducted Emissions (International) • EN 55022 (Class A) - Radiated & Conducted Emissions (European Union) • EN 55024 (Immunity) (European Union) • CE - EMC Directive (89/336/EEC) (European Union) Product Regulatory Compliance Markings This product is marked with the following Product Certification Markings: Table 5. Product Certification Markings CE Mark Electromagnetic Compatibility Notices Europe (CE Declaration of Conformity) This product has been tested in accordance to, and complies with the Low Voltage Directive (73/23/ EEC) and EMC Directive (89/336/EEC). The product has been marked with the CE Mark to illustrate its compliance. MAXDATA PLATINUM 1000IM M1 49