1
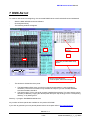
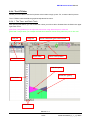
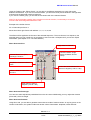
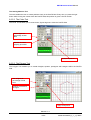
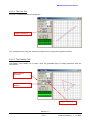
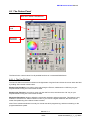
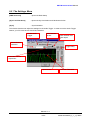
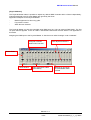
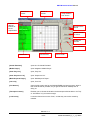
BEDIENUNGSANLEITUNG
USER MANUAL
Wizard-512
Wizard-1024
Für weiteren Gebrauch aufbewahren!
Keep this manual for future needs!
© Copyright
Nachdruck verboten!
Reproduction prohibited!
1 TABLE OF CONTENTS
1
TABLE OF CONTENTS .........................................................................................................2
2
INTRODUCTION ....................................................................................................................4
2.1
2.2
ABOUT THIS MANUAL .............................................................................................................................4
LANGUAGE............................................................................................................................................4
3
THE CONCEPT ......................................................................................................................5
4
INSTALLATION .....................................................................................................................5
4.1
4.2
4.3
4.4
4.5
4.6
5
VERIFICATION OF PACKAGE CONTENTS ...................................................................................................5
SUPPORTED OPERATING SYSTEMS ........................................................................................................6
SYSTEM REQUIREMENTS .......................................................................................................................6
INSTALLATION OF SOFTWARE ON WINDOWS 95B/98/ME .........................................................................7
INSTALLATION OF SOFTWARE ON WINDOWS NT / 2000 / XP ...................................................................7
HARDWARE INSTALLATION .....................................................................................................................7
WORKING WITH THE DMX WIZARD 512/1024 ...................................................................9
5.1
6
STARTING THE SOFTWARE .....................................................................................................................9
THE SOFTWARE STRUCTURE..........................................................................................10
6.1
SHOW.................................................................................................................................................11
6.2
SEQUENCE .........................................................................................................................................11
6.3
SCENE................................................................................................................................................11
6.4
MULTISEQUENCE ................................................................................................................................11
6.5
CUE ...................................................................................................................................................11
6.6
THE MASTER-MODE ............................................................................................................................11
6.6.1
The different Master Modes ......................................................................................................12
7
DMX-SETUP ........................................................................................................................13
7.1
7.2
7.3
7.4
7.5
7.6
7.7
8
CHANGING THE DMX START ADDRESS ................................................................................................14
REMOVING FIXTURES FROM A SHOW ....................................................................................................14
SETTING OF DMX-ADDRESS ON THE FIXTURES .....................................................................................15
DELETING THE ENTIRE SETUP...............................................................................................................15
CREATING A PRINTABLE DMX-SETUP REPORT ......................................................................................15
OPENING THE PANEL DESIGNER ..........................................................................................................15
EXIT THE DMX-SETUP .........................................................................................................................15
WORKING SURFACE..........................................................................................................16
8.1
TRANSPORT-BAR.................................................................................................................................16
8.1.1
Elements in detail ......................................................................................................................17
8.1.2
The Trigger Modes ....................................................................................................................19
8.1.3
The Fade-Modes .......................................................................................................................20
8.1.4
The Scene Tool .........................................................................................................................21
8.2
THE PLAN ...........................................................................................................................................22
8.2.1
The DMX-Monitor ......................................................................................................................23
8.2.2
The Fader Panel........................................................................................................................23
8.2.3
The Plan / MultiPlan ..................................................................................................................24
8.2.3.1
8.2.3.2
8.2.4
8.2.4.1
8.2.4.2
8.2.4.3
8.2.5
8.2.5.1
8.2.5.2
8.2.5.3
8.2.5.4
8.2.5.5
Plan...................................................................................................................................................... 24
MultiPlan .............................................................................................................................................. 24
The V/T-Editor ...........................................................................................................................25
The Time- and Fade Track................................................................................................................... 25
Editing / Illustrating DMX Values .......................................................................................................... 26
The Effects Generator.......................................................................................................................... 26
The Track-Editor........................................................................................................................29
The main window with scaling tools...................................................................................................... 29
The Circle Tool..................................................................................................................................... 30
The Polygon Tool ................................................................................................................................. 30
The Line Tool ....................................................................................................................................... 31
The Rotation Tool................................................................................................................................. 31
DMX Wizard 512/1024 Manual
8.2.6
The Fixture Group Window .......................................................................................................32
8.2.7
The Sequence List.....................................................................................................................32
8.2.8
The MultiSequence Player ........................................................................................................33
8.2.9
Die Cue-Liste.............................................................................................................................33
8.2.10 The Media-Player ......................................................................................................................34
8.2.11 The 3D Visual Emulator.............................................................................................................34
8.2.12 The Play List..............................................................................................................................35
8.3
THE FIXTURE PANEL ...........................................................................................................................36
8.3.1.1
9
The Pan/Tilt-Field................................................................................................................................. 36
THE MENUS ........................................................................................................................37
9.1
9.2
9.3
9.4
9.5
9.6
9.7
9.8
THE SHOW MENU................................................................................................................................37
THE SEQUENCES MENU ......................................................................................................................37
THE SCENES MENU .............................................................................................................................37
THE OPERATION MENU .......................................................................................................................38
THE SETTINGS MENU ..........................................................................................................................39
THE VIEW MENU .................................................................................................................................46
THE FIXTURES MENU ..........................................................................................................................47
THE HELP MENU .................................................................................................................................47
10
THE PANEL DESIGNER ..................................................................................................48
11
TROUBLESHOOTING......................................................................................................51
11.1
KNOWN PROBLEMS .........................................................................................................................51
Das neueste Update dieser Bedienungsanleitung finden Sie im Internet unter:
You can find the latest update of this user manual in the Internet under:
www.futurelight.com
REVISIONS:
Doc.
version
V1.0
V1.1
V1.2
V1.3
V1.4
Date/Vis:
15.10.00 LEB
24.04.01 LEB
15.08.02 LEB
15.02.03 LEB
25.08.03 LEB
Software
Version
V5.58
V5.62
V5.7x
V5.8x
V5.8x
Changes
3D Visual Emulator, CMY-RGB,
Update Position Memory, DMX-Off, Panel strcture, Dimmer, Focus
General refresh, added Remote control function and other deatils
Added DMX Wizard 512 USB Interfaces
Manual V1.4
3/51
51860102X18NXS_V_1_4_E.DOC
DMX Wizard 512/1024 Manual
2 INTRODUCTION
Thank you for choosing the DMX WIZARD 512/1024! With this versatile and modern “tool”, the only limit to
your light Show is your imagination! For club use, rental facitlity, or even for architectual lighting, the DMX
WIZARD 512/1024 is the right choice for any number of professional tasks!
Here are some of the main features of the DMX WIZARD 512/1024:
-
PC-lighting controller for Windows ™ based systems
Suitable for desktop or notebook personal computers
Control of fixtures using the DMX512 (1990) interface
DMX input (only available on DMX WIZARD 512/1024 interface) with multiple possibilites for
routing, recording or controlling
Simultaneous control of up to 128 fixtures, with a maximum of 32 DMX512 channels per fixture
512 output channels (1 Universe) with the DMX Wizard 512 USB Interface (LPT)
1024 output channels (2 Universes) with the DMX WIZARD 512/1024 Interface (USB)
“3D Visual Emulator” to preview the preprogrammed Show without connected fixtures
Music trigger using the PCs soundcard
16 “Multi Sequence Players”
Graphical Pan/Tilt “Track Editor”
2.1 About this manual
We have attempted to lay out this manual as simple as possible. Many funtions of the DMX WIZARD
512/1024 are self explanatory and easy to understand. This manual is meant to introduce you to the world
of the DMX WIZARD 512/1024, and to convey to you the basic skills to work with this versatile system. Of
course, it also takes a certain amount of creativity and fantasy to create an impressive light Show.
We encourage you to read through this manual attentively. For the fastest results, it is a good idea to try
out everything on your DMX WIZARD 512/1024 as we go along. This, of course, is also possible without
having the actual interface of fixtures attached to your computer.
All features are described in detail and some of them have visual aids to assist easy learning.
Software features described in this manual will be presented using square brackets.
Eg: [load Show]
2.2 Language
The basic language of the DMX WIZARD 512/1024 software is English. However, if you like to have the
main menus in another language, the corresponding file dmxcreator.key has to be copied into your
program directory (for example; c:\program files\DMXWizard). Please note, that it’s necessary to restart the
DMX WIZARD 512/1024 software to load the new menu. You can find this file on your product-CD, as well
as on the internet:
CD-ROM: Directory ...:\DMX WIZARD 512/1024 Software\Software\Language patches
Manual V1.4
4/51
51860102X18NXS_V_1_4_E.DOC
DMX Wizard 512/1024 Manual
3 THE CONCEPT
The DMX WIZARD 512/1024 control system consists of two components:
1. The PC-software
2. The DMX512 hardware interface
The interface provides the link between your personal computer and the DMX512 compatible fixtures (e.g.
Mirror heads, moving yolks, foggers etc.)
The DMX WIZARD 512/1024 software is capable of controlling two different hardware interfaces:
1. The DMX Wizard 512 USB interface: USB-interface, 512 channels of output (1 Universe),
power supplied through USB interface
2. The DMX WIZARD 512/1024 interface: USB-interface, 1024 channels of output (2 Universes),
512 channels of input, power supplied through USB interface.
4 INSTALLATION
4.1 Verification of package contents
Please verify that you have received all components of the system. In case that something is missing,
please contact your DMX WIZARD 512/1024 dealer immediately.
Please check first, if your DMXCreator set is complete. If there’s something missing, please contact your
local dealer immediately.
Depending on the type of set you bought, the contents are different:
DMX Wizard 512 USB:
-
1 x DMX Wizard DMX512 hardware interface cable
1 x Product CD
1 x Quick installation guide (this manual)
DMX WIZARD 512/1024:
-
1 x DMX Wizard DMX512 hardware interface blue
1 x USB A-B cable
1 x Product CD
1 x Quick installation guide (this manual)
Manual V1.4
5/51
51860102X18NXS_V_1_4_E.DOC
DMX Wizard 512/1024 Manual
4.2 Supported Operating Systems
OS
Windows 95b
Windows 98 / SE
Windows ME Millenium
Windows 2000
Windows NT
Windows XP
OK
OK
OK
OK
- (no USB-support)
OK
4.3 System Requirements
PCs are flexible systems, and there are any amounts of possibilities to combine hardware and softare.
The basis for stable work with the DMX WIZARD 512/1024 lies in a stable PC system. The DMX WIZARD
512/1024 software has proven in countless tests that it works without problem free on systems with
“normal” configuration.
The DMX WIZARD 512/1024 carries out millions of calculations per second, so that virtually all parameters
are rendered parallel and in real-time. The CPU load is mainly dependent on the following criteria:
-
Number of occupied DMX512 channels
3D Visual emulator in use or not
Single or Multi Sequence use
DMX input enabled / disabled
Audio trigger with low-pass filter enabled / disabled
Here a few tips on how to increase the stability of your PC:
1. Limit the use of other applications simultaneously
2. Disable the power save fuction!
3. Connect the interface directly to the PC whenever possible. Avoid intermediate devices like USB Hubs.
Besides having the right operating system, and free ports for your interface, please be advised of the
following minimum system requirements:
-
IBM compatible PC
Minimum Pentium 1 CPU/ 100 Mhz
32 MB RAM
VGA graphics card with SVGA resolution (800 X 600, 256 colors)
10 MB available hard disk space
CD-ROM drive (for installation)
Mouse
Recommended system requirements for full use of all features:
-
Minimum Pentium 3 CPU/ 500Mhz
64 MB RAM
Fast graphics card with XGA resolution (1024 X 768 with 16 Bit color depth
Sound-Blaster compatible soundcard with MIDI-Interface
Manual V1.4
6/51
51860102X18NXS_V_1_4_E.DOC
DMX Wizard 512/1024 Manual
4.4 Installation of Software on Windows 95b/98/ME
The next step is to install the DMX WIZARD 512/1024 software. Close all running applications on your PC.
Please make sure, that the DMX WIZARD 512/1024 Hardware interface is not connected to the PC right
now.
1.
2.
3.
4.
5.
6.
7.
8.
9.
10.
Start up your computer
Insert the shipped product CD into the CD-Rom drive
Change to the CD-Rom drive folder
Open the folder “DMX WIZARD 512/1024 Software“
Open the folder “Software”
Open the folder with the newest software version
Run the available .exe file (double click on icon)
Setup will guide you trough the installation process
After installation shutdown the computer
Follow chapter 4.6 “Hardware Installation”
Once DMX WIZARD 512/1024 is installed, you can start it by clicking on the DMX WIZARD 512/1024 icon
located in the
programs folder of the Windows start menu.
It is possible that there are multiple software versions on your CD-ROM. The additional versions are Betaversions, which means that they are recent software updates that are not yet completely tested and
released. These versions usually run without complications. Should you encounter any problems with these
software versions, we encourage you to report them to us, so that we can remove them for you and our
other customers.
4.5 Installation of Software on Windows NT / 2000 / XP
Follow chapter 4.4 of installation.
Differences:
If a message like “The program or DLL C:\xxxxx\inf\dmxusbcr.inf in no valid NT-File” appears, just ignore it
and press ok.
If Windows is not able to find the necessary USB drivers, point to the following directory i.E.:
C:\Program Files\DMX WIZARD 512/1024\driver or the “driver” directory on the installation CD
4.6 Hardware Installation
The blue box or cable is the physical harware interface between the PC and your DMX512 fixtures. The
software is able to work with the following interfaces from FUTURELIGHT only:
DMX Wizard 512 USB:
1. Plug the USB Interface Cable into the free USB connector of your PC.
2. Start the PC. Windows will now automatically detect a new USB device and installs the necessary
drivers.
If Windows is not able to find the USB drivers, point it to the following directory:
C:\Program Files\DMXWizard\driver or the “driver” directory on the installation CD
DMX WIZARD 512/1024:
Manual V1.4
7/51
51860102X18NXS_V_1_4_E.DOC
DMX Wizard 512/1024 Manual
1. Plug the USB cable to the DMX512 Interface
2. Plug the other side of the cable to the free USB connector of your PC.
3. Start the PC. Windows will now automatically detect a new USB device and installs the necessary
drivers.
If Windows is not able to find the USB drivers, point it to the following directory:
C:\Program Files\DMXWizard\driver or the “driver” directory on the installation CD
Note: Never connect two DMX Wizard USB interfaces at the same time, else the system will be unstable
and crash. The software supports only one USB interface at once. FUTURELIGHT is not responsible for
any demage that results from connecting two USB interfaces at the same time.
Manual V1.4
8/51
51860102X18NXS_V_1_4_E.DOC
DMX Wizard 512/1024 Manual
5 WORKING WITH THE DMX WIZARD 512/1024
5.1 Starting the software
Up on initiating the software, it will first test the link to the DMX512 interface.
If the following message appears:
- It’s possible that there is no DMX512 hardware interface connected. Press “Yes” to start the program in
demo mode.
- It’s possible that there is a problem with the connection to the DMX512 interface, or that the power supply
is not connected. Verify all cable connections.
- It’s possible that the software is not configured to the right DMX512 interface. Press “YES” to start the
software, and then configure the interface correctly (see chapter 5.2).
There are four options in the initial menu:
-
New Show
Last Show
Load Show
Panel Designer
-create a new Show
-load the most recent Show used
-load saved Show
-see chapter “The Panel Designer”
Choose “new Show” to define your new Show, or choose “load Show”, if you have already programmed a
Show. You can also load a pre-installed sample Show.
Manual V1.4
9/51
51860102X18NXS_V_1_4_E.DOC
DMX Wizard 512/1024 Manual
6 THE SOFTWARE STRUCTURE
The software has the following structure for Shows
SHOW
SHOW
SHOW
Sequence 1
Sequence 2
Sequence 3
Sequence x
Scene 1
Scene 1
Scene 1
Scene x
No Fade
Fade 10sec.
Fade x sec.
Scene 2
Scene 2
Scene x
Fade 3sec.
Fade 10sec.
Scene 3
Scene 3
Fade 5sec.
Fade 10sec.
Scene 4
Fade 10sec.
Each Show consists out of one or more Sequences. Each seqeunce consists out of one or more Scenes,
that may or may not Fade in to each other.
Manual V1.4
10/51
51860102X18NXS_V_1_4_E.DOC
DMX Wizard 512/1024 Manual
6.1 Show
The pool of programmed Sequences is called a “Show”. Show can be saved as files, and include all other
components like the DMX-setup, Sequences, Scenes, cues, playlists, emulator settings etc.
6.2 Sequence
A Sequence can consist of single, or multiple connected Scenes. Each Show can have a maximum of 256
Scenes.
6.3 Scene
A Scene is the lowest or most basic entity of a Show. Scenes are the entered variable values of all fixtures
connected at a given time. A Sequence is built out of one or more Scenes. The maximum number of
Scenes per Sequence is 256. You may define an individual Fade time for each Scene.
6.4 MultiSequence
With the DMX WIZARD 512/1024, it is possible to run up to 16 Sequences at one time. This is helpful,
among other applications if you:
-
wish to control different fixture groups independent of eachother
wish to combine Sequences that only have “pan movement” with Sequences that only have “color
change” for eample
wish to run pan-tilt movement and color change at different rates, or with differing trigger sources
6.5 Cue
A selection of Sequences from the “Multi Sequence Player” can be saved and called up as cue. cues can
be stored and recalled from the “Cue List”
6.6 The Master-Mode
The “Master Mode” plays an important role within the DMX WIZARD 512/1024. It has two different
functions:
1. Stop Mode function (Sequence is not running, Stop button is pressed)
In this mode, you can control single or multiple fixtures simultaneously by holding the “Ctrl” key on
the keyboard, and then clicking on the fixture icon. The text base of the icon at this point turns from
green to red. If different fixture types are selected simultaneously, it is possible to change to and
from the different types. All changes made in the fixture panels are saved in the given Scene
instantly.
You can turn the Master mode off by clicking the “Master Off” button on the menu bar.
2. Play Mode function (Sequence is running, play button is pressed)
When in used in play mode, the fixtures selected to the Master are excluded from the running
Sequence. Like this, they could be used for follow-spot functions, for example. All changes made in
the fixture panels are temporary, and are not saved. When the Master Mode is disengaged, the
fixtures return to the running Sequence.
Quick selection of multiple fixtures, as well as further Master- options are possible by using the
“Group Function” Æ see also “The Fixture-Group Window”
Manual V1.4
11/51
51860102X18NXS_V_1_4_E.DOC
DMX Wizard 512/1024 Manual
6.6.1 The different Master Modes
If you exclude one or more fixtures from the Show they will stop playing the current Sequence and are
available for full manual control. If you don’t like to exlude all functions of the selected fixtures, you may
choose one of the available Master Modes
Non-excluded functions of fixtures in Master will continue to play the current Show
[Full Master]
[Color Only]
[Ex Pan/Tilt]
[Pan/Tilt only]
[Master Group off]
All fixture functions are excluded from the Show (standard Master)
Only the color functions (color wheels, CMY systems) of the fixtures are
excluded from the Show
All functions except pan/tilt are excluded from the Show
Only Pan/Tilt of the selected fixtures is excluded from the Show
Release the Master (all Master fixtures will be deselected)
Note: The Master Mode has to be chosen before selecting the fixtures into Master. It’s not possible to
change the current Master Mode while fixtures are selected in Master.
Æ Check also chapter 9.7 “The [Fixtures] menu“
Manual V1.4
12/51
51860102X18NXS_V_1_4_E.DOC
DMX Wizard 512/1024 Manual
7 DMX-SETUP
To create a new Show from beginning, the connected DMX fixtures must first be defined and addressed.
-
Start the DMX WIZARD 512/1024 software
Choose [New Show]
The following window will appear:
assigned
fixtures
2
3
1
generate printable DMX setup
report
Call the Panel Designer
Æ see chapter „the Panel Designer“
-
The window is divided into three parts:
1. The DMX address field. Here you will find a visual representation of 1024 channels (2
universes). The second universe is only available for output if you use the DMX WIZARD
512/1024 hardware interface
2. The fixtures-pool. This is a list of all currently installed fixture panels. This set of panels can be
arbitrarily modified by copying the desired panel files (with .dsp ending) into the corresponding
directory, or by erasing them.
Directory: c:\program files\DMXWizard\devices
Any number of fixture panels are available on the product CD-ROM
If you wish to generate your own panels please refer to the chapter called “The Panel Designer”.
Manual V1.4
13/51
51860102X18NXS_V_1_4_E.DOC
DMX Wizard 512/1024 Manual
3. The setup field. Here you see the following information:
-
Location of fixtures on the DMX-output of the interface Æ OUT
The DMX-starting address of the assigned fixtures Æ START (this number has to be set on the
corresponding fixture)
Amount of DMX-channels occupied by this fixture ÆNN
The fixture type Æ FIXTURE NAME
Your designated heading for fixtures within the Show Æ USER HEADER (e.g. MAC600 down stage
right)
Pan inversion Æ PAN - This means the pan movement becomes reversed. Indicated by “I” while
active
Tilt inversion Æ TILT- This means the tilt movement becomes reversed. Indicated by “I” while
active
Pan-Tilt-Swap Æ SWAP, this means the pan and tilt channels are exchanged.
To add a fixture to your Show, there are two possiblities:
1. Choose your fixture within the fixture pool. Click and hold down the left mouse button on it.
Now you can drag the the icon to a free starting address on the DMX address field.
2. You can also double click on the desired fixture within the fixture field, and it will appear at the
next available starting address on the left-hand field.
7.1 Changing the DMX Start Address
After placing the fixtures in the DMX address field, you can move it within the field using the mouse. If you
do this in a complete Show, the following window will appear:
-
Confirm by clicking on “YES”, and the programmed data for this fixture will be moved to the new
starting address as well.
If you click “NO”, the data for the fixture will be deleted.
7.2 Removing fixtures from a Show
Fixtures can be removed from the show setup in two ways
1. Point and drag the fixture you wish to remove using the left-hand mouse button from the
starting address field, or from the setup field on the right hand side and place it in the trash can
located on the bottom right-hand side of the screen.
2. Point to the fixture with the mouse cursor, either in the left-hand field, or on the right-hand
setup field, click the right button, and choose “remove fixture”
Manual V1.4
14/51
51860102X18NXS_V_1_4_E.DOC
DMX Wizard 512/1024 Manual
7.3 Setting of DMX-address on the fixtures
Please refer to the user manual of the fixture you wish to control, in order to find out how to set its DMX
starting address. If this is done using a DIP-Switch within the DMX512 standard, you can use the graphical
image at the bottom left as help.
7.4 Deleting the entire setup
If you want to delete an existing setup, please click on the button at the bottom right of your screen called
“Cear All”
7.5 Creating a printable DMX-setup report
In order to facilitate the addressing of the fixtures, you can generate a printable text file of the entire DMX
setup. Press the button on the lower right hand side called “create list”, and a window will appear with all
specifications. You can now print or save this file in .txt format.
7.6 Opening the Panel Designer
By pressing the button that is located farthest in the lower right hand corner, the “Panel Designer” will open.
For more information on this feature please read the chapter “The Panel Designer” in this manual.
7.7 Exit the DMX-setup
Click the “Close” button in order to leave the DMX-Setup. You will now be taken to the working surface
Manual V1.4
15/51
51860102X18NXS_V_1_4_E.DOC
DMX Wizard 512/1024 Manual
8 WORKING SURFACE
The main window is where you will “create” your show. It consists out of three main areas
Transport-bar
Plan
Panel
8.1 Transport-bar
The Transport-bar field is the main control window for Scenes and Sequences.
Manual V1.4
16/51
51860102X18NXS_V_1_4_E.DOC
DMX Wizard 512/1024 Manual
8.1.1 Elements in detail
New Show
Load Show from file
Save Show as... (enter name)
Save Show
Undo changes made since
last accessing Scene
DMX-Setup
Name of the Show
(click to rename)
play/stop current Show
General Blackout
favorite Scene (assign using right hand mouse button)
Effective as of version V5.68, this field will include an additional function that will enable you to turn on and
off the DMX output. By pressing this button, the current Scene becomes frozen. The DMX output remains
off, until the button is pressed again. This function is also called “preview” or “blind” sometimes.
Switch on/off the DMX output
Switch on/off the DMX input
Name of current Sequence
(choose by clicking on
arrow button)
Number of this Sequence
within Show
Create new Sequence
delete current Sequence
Manual V1.4
17/51
51860102X18NXS_V_1_4_E.DOC
DMX Wizard 512/1024 Manual
current Scene name
single play/cycle Scene
create new Scene
(current Scene is template
for new Scene)
delete current Scene
Manual V1.4
18/51
51860102X18NXS_V_1_4_E.DOC
DMX Wizard 512/1024 Manual
8.1.2 The Trigger Modes
Within each Sequence, the manner of synchronization can be chosen individual. There are three different
trigger modes (starting with V5.68, 4 trigger modes) available:
1. Main Tempo Trigger (green field)
Enter rate by pressing twice at
rate of music (this function
can also be entered to a “Hot
Key”
Æsee also chapter called “Hot
Keys”
change synchronization
mode by pressing
Scene speed rate in BPM (e.g. 120 BPM = 0.5s)
The time from Scene to Scene is constant while in Main Tempo Trigger.
2. The Tempo-Track Rate (blue field)
change synchronization
mode by pressing
Current time between Scenes - can be adjusted
directly here or into “Tempo-Track Editor”
The time between Scenes can be varied from Scene to Scene using Tempo-Track Mode. Æ See also “The
V/T Editor”
Manual V1.4
19/51
51860102X18NXS_V_1_4_E.DOC
DMX Wizard 512/1024 Manual
1. The Music-Trigger Rate (yellow field)
change synchronization
mode by pressing
In this mode, a Sequence can be triggered using an external music signal. This feature requires a sound
card in your PC
To find out how to activate the external trigger, please refer to the chapter called Æ “Menus”
Starting with the software version V5.68, there will be a fourth trigger mode implemented:
2. Manual-Trigger Mode (pink mode)
Using this feature, you can trig manually on the drum symbol to get from one Scene to the next. If you use
a Fade between Scenes, the Fade will executed first.
8.1.3 The Fade-Modes
In order to program smooth transitions between Scenes, the DMX WIZARD 512/1024 software offers four
different Fade-Modes:
1. No Fading. The transition from Scene to Scene is not smooth. The DMX-values switch immediately
from Scene to Scene at each trigger. You can activate/deactivate fading by pressing the symbol shown
below:
Fading on/off
2. Equal Fade time for all Scenes. Using this mode, the Fade time for all Scenes in a given Sequence is
equal. The Fade time can be adjusted by pressing the plus- or minus-buttons, or by entering the
desired Fade time directly in to the display.
Fade-Mode symbol
Fade time for all Scenes
Manual V1.4
20/51
51860102X18NXS_V_1_4_E.DOC
DMX Wizard 512/1024 Manual
3. Fade-Track Time. In this mode, the Fade time can be adjusted for each Scene individually, using the
“V/T-EDITOR”. This can also be done by using the plus- and minus-buttons, or by entering the desired
value directly into the display
Fade time for current Scene
4. Fade time equal Scene time. In this mode, the entered Scene time (trigger) equals the Fade time. With
this mode, you can create smooth, seamless Pan/Tilt movements (e.g. Circles).
Fade time for current
speed rate
8.1.4 The Scene Tool
The Scene Tool enables you to jump forwards and backwards between Scenes whilst programming. The
current Scene number is shown in the yellow field.
“COPY” copies the current Scene into a temporary buffer.
“INSERT” pastes the saved (copied) Scene to current location.
“Replace” replaces the Scene in current location with the saved Scene.
Manual V1.4
21/51
51860102X18NXS_V_1_4_E.DOC
DMX Wizard 512/1024 Manual
8.2 The Plan
Open
Sequence
list
Open
Fader
panel
Open
DMX
monitor
Open
Plan
(this
screen)
Open
Groups
window
Open
V/TEditor
Open
TrackEditor
Open Multis
Seqcuence
Player
Open
Cue-list
Open
MediaPlayer
Open 3D
Visual
Emulator
Open
Play list
Background
image (Plan)
Fixture
Icons
The Plan is your workplace. When you create a new Show, the fixture icons appear in the upper left hand
corner. You can drag and drop them in the place you desire using your mouse. By double clicking on the
icons, it is also possible to rotate them 90 degrees at a time. After placing the icons in the desired spots,
you can now lock them in place, by using the “lock icons” function in the “settings” menu. This is to prevent
unwanted displacement of the icons whilst programming your Show
Manual V1.4
22/51
51860102X18NXS_V_1_4_E.DOC
DMX Wizard 512/1024 Manual
8.2.1 The DMX-Monitor
The DMX-Monitor is used to illustrate the decimal DMX-values (0-255) of a chosen fixture (green highlight).
Starting
adress
direct entering of DMX-value
To enter a DMX- channel directly, click on its corresponding field
8.2.2 The Fader Panel
Selected
fixture
one Fader per
DMX-channel
fine tuning
Manual V1.4
23/51
51860102X18NXS_V_1_4_E.DOC
DMX Wizard 512/1024 Manual
Each used DMX channel of the selected fixture is represented by a Fader. You can adjust the DMX-values
by using the Faders, or by using the fine tuning buttons
8.2.3 The Plan / MultiPlan
8.2.3.1 Plan
The background of the Plan is a standard Bitmap picture. To create your own background picture, you can
use the Windows™ program called “Paint” or any other software that can output bmp compatible files.
The file name of the background picture is:
Planimg.bmp -it is located in the program directory (i.E. c:\program files\DMX WIZARD 512/1024\).
In the “Settings” menu, you can change the background image by selecting “Change Plan image”. Just
enter the file name, and click on “open”.
The chosen image is copied and saved in the directory as Planimg.bmp.
The size of your image can be selected based on your screen resolution. For the standard resolution of
800X600 it is ideal to choose a picture with the following specifications:
File type:
Resolution:
Colors:
Bitmap (.bmp)
around 470X470 (variable)
16 or 256
Note: The Plan image will not be saved into the Show file.
8.2.3.2 MultiPlan
If you are using a large number of fixtures in your Show, you can use the MultiPlan feature, which gives you
multiple layers of fixtures. This avoids confusion. From the “Settings” menu, select “Multi-Page Plan”
On the right hand margin of the Plan, a letter “A” will appear. To add more layers, click on the letter with the
right mouse button, and select “Add Plan page”. You can do this up to 16 times, resulting in layers with the
letters from “A” to “P”.
You can now add fixture icons to different layers by clicking on the desired icon with the right mouse button,
and selecting “Place on page”. The next Plan (A-P) you choose will be the destination for the icon.
To move multiple icons simultaneously, use the “Master” or “Group” functions.
Manual V1.4
24/51
51860102X18NXS_V_1_4_E.DOC
DMX Wizard 512/1024 Manual
8.2.4 The V/T-Editor
Should you not be able to see the full picture at the bottom margin, press “F2”, to restore the full picture.
The V/T-Editor has three different graphical adjustment functions:
8.2.4.1 The Time- and Fade Track
After opening this feature, you can choose the values you wish to edit or illustrate from the field in the upper
right hand corner.
[Edit Time Track] Enables you to adjust the Scene time using either the pen or ruler tool
[Edit Fade Time] Enables you to adjust the Fade time between Scenes using either the pen or ruler tool.
Pen tool
Ruler tool
Scene / Fade time of the current Scene
Scene scale
Value cursor position
Standard cursor
Fade time (pink)
Scene time (green)
Time scale
Zoom in/out
Manual V1.4
25/51
51860102X18NXS_V_1_4_E.DOC
DMX Wizard 512/1024 Manual
8.2.4.2 Editing / Illustrating DMX Values
By choosing the “Edit DMX-Channel Values” from the upper right hand corner, you can illustrate or adjust
the values of every DMX- channel within a given Scene/Sequence. The “pen” and “ruler” tools can be used
here as well.
Channels of selected
fixture
DMX-values of selected channel
within the Sequence (green)
Select “Close” to leave the V/T-Editor
Copy/delete data:
Choose an area within the channel table, and outline while holding left mouse button down. Next, click on
the outlined area with the right mouse button. A window will open and prompt you the following possibilities:
Copy Selected: Copies the defined area into a buffer memory. Select another area, and press the right
mouse button on it to paste the copied area there.
Clear Selected: Deletes the defined area Æ sets the DMX values to 0.
8.2.4.3 The Effects Generator
Another tool placed into the V/T Editor is the “Effects Generator”. You have the possibility to create
complex beam movements or brilliant color Fades (CMY fixtures) with just some clicks. At the moment
there are two modules available: the “Wave Generator” and the “Fan for Group” function. The generation of
these effects can be applied to groups of the same fixture type (two or more fixtures selected in Master or
fixture group). The Effects may be used on any available channel of the fixture (not just pan/tilt or CMY)
The basic pricipal of the „Effects Generator“ is the conversion of mathematcal/graphical elements into
DMX-Values. Not like on some other controllers, an Effect will be applied always to a Sequence, that
means the final look of the Effect is depending on how many Scenes the Seqeunces consists. Every step of
the generated Effect may be edited manually using this technology.
Manual V1.4
26/51
51860102X18NXS_V_1_4_E.DOC
DMX Wizard 512/1024 Manual
Using the Faders of the “Effects Panel”, you are able to set different parameters to get a wide range
different combinations. If you move one of the Faders, you will see a small preview window in the right side.
It shows how the graphical waveform looks like.
If you choose a fixture group, you will see the movement shift of the selected fixtures.
Note: To get for example a perfect wave movement on the tilt function, it’s necessary to mount the
scanners with ascending DMX addresses order.
Example with 6 similar fixtures:
No. of channels per fixture: 5
Mount from left to right: fixture with address 1, 6, 11, 16, 21,26
The effects will be applied to all Scenes of the selected Sequence. The more Scenes in a Sequence, the
smoother wave you get. Usually it’s not necessary to use more then 10 Seqeunces if you use the “Equal
Fade Mode” (see chapter 8.1.3 “The Fade Modes”)
Wave Generator Sine
Apply wave to channels
Choose between single
fixture or Master /Fixture
Group
Choose Wave Form (Sine,
Rectangle, Random
Amplitude = maximum size of
wave
Shift of the waves between the
fixtures in degrees (-180 to +180)
Offset = offset for wave from
zero line
Start phase of wave in
degrees (-180 to +180)
Wave Generator Rectangle
You have the same adjustment possiblities like on the sine wave. Additionally you may adjust the duration
(Pulse with) of the rectangle.
Wave Generator Random
Using this mode, you are able to generate waves that are made of random values. At any key press on the
random mode button, the system builds new random values. Parameters: amplitude, offset and shift.
Manual V1.4
27/51
51860102X18NXS_V_1_4_E.DOC
DMX Wizard 512/1024 Manual
The „Fan for Group“ Function
This feature allows you to “spread” or join beams of fixture groups or fixtures in Master (same kind of
fixtures only). The generated fan is static and may be applied to pan/tilt on single Scenes only. However, if
you creates a Seqeunce with different Fan-Scenes, you will get a great looking Show prepared in just some
seconds.
Two samples:
Pan-Spread
Tilt Spread
Note: The „Fan for Group“ is only applicable on fixture groups with fixtures of the same type.
Manual V1.4
28/51
51860102X18NXS_V_1_4_E.DOC
DMX Wizard 512/1024 Manual
If you move one of the Faders, you will see a small preview window in the right side. It shows a preview of
the beam posiition using the actual slider settings. As basic positions, the software uses the actual
programmed values (beam positions) of the Scene. Press the “Apply” button to load the generated
positions into the Scene.
Note: To get a perfect spread or join effect, it’s necessary to mount the scanners with ascending DMX
addresses order.
Example with 6 similar fixtures:
No. of channels per fixture: 5
Mount from left to right: fixture with address 1, 6, 11, 16, 21,26
8.2.5 The Track-Editor
The Track Editor enables you to create geometrical movement patterns for moving yoke and mirror head
fixtures
8.2.5.1 The main window with scaling tools
Apply pattern to seqeunce
From...to...Scen
e. Duration of
figure from
Scene X to Y
Pan/Tilt field
Figure scaling tool
Undo / Restore
Pan/Tilt
positions
Including Scene
numbers
Zoom Pan-Tilt
field
Fixture List (selected
fixture highlighted)
Exit Track-Editor
“Sewing Machine” Tool
If you wish to adjust one or more positions manually, select the positions by pointing and dragging with the
mouse. The selected area will be indicated in blue, and can subsequently be moved using the mouse.
Manual V1.4
29/51
51860102X18NXS_V_1_4_E.DOC
DMX Wizard 512/1024 Manual
The Sewing Machine Tool
This tool enables the user to create positions freely in the Pan/Tilt field. Every time you press the right
button while moving the mouse within the Pan/Tilt field, this position is given a Scene number.
8.2.5.2 The Circle Tool
The Circle Tool enables you to create circles, figures eight etc. within the Pan/Tilt field.
Size of figure as
percentage of total
area
Number of circles
(Eights) generated
Apply to Seqeunce
8.2.5.3 The Polygon Tool
The Polygon Tool enables you to create triangles, squares, pentagons and hexagons within the Pan/Tilt
field.
Size of figure as
percentage of total
area
Number of corners of
the figure
Apply to Seqeunce
Manual V1.4
30/51
51860102X18NXS_V_1_4_E.DOC
DMX Wizard 512/1024 Manual
8.2.5.4 The Line Tool
The Line Tool sets all position in a straight line.
Apply to Seqeunce
You can adjust the line using the scaling and rotation tools or change each position manually.
8.2.5.5 The Rotation Tool
The Rotation Tool enables you to rotate / mirror any generated figure or existing Sequence within the
Pan/Tilt field.
Mirror Vertical /
Horizontal
Angle of rotation in
degrees
Apply to Seqeunce
Manual V1.4
31/51
51860102X18NXS_V_1_4_E.DOC
DMX Wizard 512/1024 Manual
8.2.6 The Fixture Group Window
If you have a large number, or different types of fixtures within a Show, it is helpful to create fixture-groups
for the Master. The creation of fixture groups is done in the same way as the selection for the Master-Mode:
Hold down the CTRL key on your keyboard, and select the fixtures for the group by pressing on their icons
(the text under the icon will appear in red).
Should the fixture icons lie close to each other on the icon Plan, you can outline them by holding down the
CTRL key, and pointing at the outermost fixture icon (the text field under the icon will appear red). Next,
outline the fixtures for your groups by holding the left mouse button down, and dragging a box around the
icons. All text fields of the fixture icons will appear in red.
Open the Fixture-Group window, and press the “+” –button to create a group out of the selected fixtures.
Add Group
Remove Group
Fixtures within Group
Selected Group
Note: It’s possible generate Groups using different Master Modes. See also chapter 6.6 “The Master Mode”
8.2.7 The Sequence List
The Sequence List allows for quick access to all Sequences in a Show during programming or in live
action.
Sequence-Number
and sync mode
colored background
Name of Sequence
Selected Sequence
If you are not in Play-Mode, you can change the names and order of the Sequences directly within the
Sequence List. The standard hot key to open the Sequence List is “F7”
Manual V1.4
32/51
51860102X18NXS_V_1_4_E.DOC
DMX Wizard 512/1024 Manual
8.2.8 The MultiSequence Player
The Sequence List only allows for play of one Sequence at a time. In order to play multiple Sequences at a
time, you can use the MultiSequence-Player. The standard hot key to open the MultiSequence-Player is
“F8”
In each of the 16 Sequence players, you can select the Sequences to be used in the pull down menu, or in
the Cues Window.
Sequence On/Off
Synch-Mode and Loop/Cycle On/Off
It is also possible to turn the Sequences on and off in the Cues Window.
Sequence #9 is running on Player #9
8.2.9 Die Cue-Liste
The various settings within the MultiSequence-Player are saved as “Cue”.
Add / Remove a Cue
Update Cue after modification
Manual V1.4
33/51
51860102X18NXS_V_1_4_E.DOC
DMX Wizard 512/1024 Manual
8.2.10 The Media-Player
The built in Media Player functions like the standard Windows Media Player. It can play multimedia files like
MP3, AVI, Midi etc. independently from your Show.
The Media Player settings are not saved in the Show.
8.2.11 The 3D Visual Emulator
The 3D Visual Emulator is an excellent visualization tool, which can be used as aid while programming your
Show.
The fixtures are placed in a virtual 3D room. (The first pan placement of the fixture icons is adopted here).
The emulator works for yole- and mirror-heads, as well as fixed spots. The 3D virtual light beam is
generated in the color and position programmed (for limitations, see also Æ “The Panel Designer”). Per
fixture, one color wheel as well as one CMY plus one color wheel set is supported.
The representation of Gobos has been left out due to concerns regarding increased system requirements
and complexity of creating fixture panels.
Changing the viewpoint Hold down the left mouse button, and move the mouse.
Changing the distance Hold down right mouse button, and move the mouse.
Within the “Settings” menu, select “Fixtures” to adjust the positions of the fixtures by moving/rotating them
along the X/Y/Z axes.
Manual V1.4
34/51
51860102X18NXS_V_1_4_E.DOC
DMX Wizard 512/1024 Manual
From the “Settings” menu, you can also select “Room Size” to adjust the proportions of the virtual room in
terms of width, height and depth settings.
The Fader termed “Lines” adjust the number of lines representing the virtual light beam of a fixture. A
realistic view is provided if “filling” instead of “lines” is selected. Keep in mind that using “filling” mode, will
increase computing requirements
8.2.12 The Play List
The Play List enables you to run an entire pre-programmed Show. Single Sequences, as well as
MultiSequence-Cues can be programmed with individual start and stop times. In addition to the scheduled
run times of the programmed events, multimedia files can be included in the Show.
The events within your Show are pre-programmed using commands like “Goto”, “Stop”, “Black-Out”, “End”
etc.
Create a new Event by clicking the “NN” field.
New, Load, Save
Starttime
MultiSequenc
e on
Start Stop
Start-time / Stop-time of Multimedia Files
Special
commands
Multimedia File
Comments
The Play-List has its own file-format, and can be saved and loaded independent from the show.
Manual V1.4
35/51
51860102X18NXS_V_1_4_E.DOC
DMX Wizard 512/1024 Manual
8.3 The Fixture Panel
Black-Out / Default / Zero-Buttons
Pan/Tilt
Field
Movement
Resolution
The Panel is the “control-center” for all possible functions of a connected DMX-fixture.
8.3.1.1 The Pan/Tilt-Field
The Pan/Tilt field controls the movement of the light beam of a given fixture. Move the cursor within the field
by holding down the left mouse button.
Blocking the Pan-Axis If you wish to move only along the Tilt Axis, hold down the “Shift” key on your
keyboard while moving the cursor within the field.
Blocking the Tilt-Axis If you wish to move only alon the Pan-Axis, hold down the “Ctrl” key on your
keyboard while moving the cursor within the field.
Movement Resolution Allows to adjust the movement resolution while programming. This feature is only
enabled, if the fixture has 16bit movement control. If you choose a higher resolution, the fixture moves
slower and positioning of the fixture’s beam is easier.
Note: The movement resolution is merely for manual use while programming, and has no bearing on the
programmed fixture speed.
Manual V1.4
36/51
51860102X18NXS_V_1_4_E.DOC
DMX Wizard 512/1024 Manual
9 THE MENUS
Many functions of this software are accessible directly through fields or buttons on your working surface.
All of theses, as well as further functions can be accessed through the menus at the top margin of your
screen.
9.1 The Show Menu
Standard Windows™ file functions such as:
New Show
Load Show
Save Show
Save Show as
9.2 The Sequences Menu
Standard Windows™ functions for working with Sequences.
New
Copy
Insert
Delete
Load
Save
Rename
Split
Merge
9.3 The Scenes Menu
Standard Windows™ functions for working with Scenes.
New
Copy
Insert
Replace
Delete
Rename
Load
Save
Next
Previous
Refresh (simple undo function)
Manual V1.4
37/51
51860102X18NXS_V_1_4_E.DOC
DMX Wizard 512/1024 Manual
9.4 The Operation Menu
Play/Stop
Black Out
Favourite
Play in Background
Record
-calls up the “Favorite Scene”
-lets you edit your Show while it is running in the background
-opens the DMX Record window:
Duration of Recording
Start/Stop
Number of Scenes
Generated
Route Data to Out 1
or Out 2
Store recorded data
Create new Sequence
Show DMX-Input
data
Add to Current
Sequence
DMX recording does only work on the DMX Wizard 512 USB interface
Manual V1.4
38/51
51860102X18NXS_V_1_4_E.DOC
DMX Wizard 512/1024 Manual
9.5 The Settings Menu
[DMX-Channels]
- Opens the DMX Setup
[Synch and Hardware]
- Opens the Synchronization and Hardware window:
[Sync]
- Synchronisation:
This window lets the user adjust the settings for the Audio Trigger. In order to use the Audio Trigger
feature, your PC must have a Sound Card installed.
Enable Audio
Trigger
Bass Detector
On/Off
Filter ON/OFF and
Filter depth
Sound Source
Selection
Trigger delay
Automatic Volume
Adjustment
Input Volume
Detection Threshold
Manual V1.4
39/51
51860102X18NXS_V_1_4_E.DOC
DMX Wizard 512/1024 Manual
[Midi]:
Sequences can be selected within a Show using an external MIDI keyboard or Sequencer
MIDI Reception
Channel
Midi Source
Use MIDI Start/Stop
command
Full Control:
Send Note on commands (0 to 127) to select the corresponding Scene of the actual Sequence.
Send Program change commands (0 to 127) to select the corresponding Sequence.
Sequences 1:
Send Note on or Program change commands (0 to 127)to select the corresponding Sequence
Seqeunces 2:
Send Controller commands to select the corresponding Sequence (Necessary if you want to select
from more than 127 Seqeunces)
Note: If you use a standard Midi keyboard to select Scenes or Seqeunces please remember the following:
Example:
You like to control Seqeunces 1 to 24 (maximum in Sequences 1 Mode: 127 Seqeunces)
Your keyboard has 49 Keys (Maximum keys for Note commands: 127)
The lowest key of they keyboard does not trigger Scene one, as long as you don’t shift the keyboard range
to the lowest note. Use the octave transpose function to shift the range.
Manual V1.4
40/51
51860102X18NXS_V_1_4_E.DOC
DMX Wizard 512/1024 Manual
[Hardware]:
This menu is used to control all the settings for the DMX512 interface.
Enable/Disable
DMX Input
Enable DMX
Record function
Place DMX Input on
DMX Output 1 (only
unused channels of
the Show
Place DMX Input on
DMX Output 2 (only
unused channels of
the Show
Button for testing connection between
PC and DMX512 Interface
Place DMX Input on Physical
Master
Enable Remote Control
(see below
WARNING: Never connect two DMX WIZARD 512/10241024 USB to a PC simultaneously! The software
only supports one interface. Connecting two USB interfaces at once can lead to system failures and
crashes!
Never remove the DMX512 interface while in use. This can also result in system failures. In order to
remove the interface, always shut down the computer first.
Remote Control
Using this feature gives the possibility to control software functions from an external DMX source (i.E.
DMX-Desk or other controller). The external source has to be connected to the DMX-Input of the DMX
hardware interface. The following control functions are availble:
-
“Physical Master“ 1-16
Blackout, value >128 = Blackout
Start / Stop, value 0 to 127 = Stop, value 128 to 255 = Start
Select 32 Seqeunces or Cues (the first 32 into the Sequence or Cue list), value >128 = Select
Switching on/off of the 16 MultSequence players, value 0 to 127 = off, value 128 to 255 = on
The functions may be assigned to the DMX-in channels by moving the function from the right coloumn to
the left side (to the corresponding DMX.in channel.
„Clear all assignments“ will clear all entries in the left side of the table.
Manual V1.4
41/51
51860102X18NXS_V_1_4_E.DOC
DMX Wizard 512/1024 Manual
DMX-in Channels
[Autonom]:
This menu not active on the available USB Wizard Interfaces
[AutoBackup]
The auto-backup function creates a backup copy of the current Show in user defined intervals. The backup
copy is called $autobak.d1k, and is located in the program directory. It can be loaded like a normal Show.
Manual V1.4
42/51
51860102X18NXS_V_1_4_E.DOC
DMX Wizard 512/1024 Manual
[Physical Master]
The Physical Master makes it possible to adjust any desired DMX channels within a Show independently.
Channels assigned to the Physical Master are ignored by the Show.
Application examples for the Physical Master:
-
Master brightness for all moving yolks.
Fog machine control
Static dimmer channels
The Physical Master can also be controlled using DMX-Input (eg. Using an external DMX-desk). The first
16 input channels applied to the 16 Faders. The Master Fader shown window below is not applicable in
this mode.
Assigning the DMX-input to the Physical Master Æ See the menu called “Settings” under “Hardware”
Assigned to Master
Fader when Checked
Fine ddjustment Buttons
Master-Fader
Close window
View Assignment Table
(See Below)
Blackout is ignored by
Physical Master while
pressed
Manual V1.4
43/51
51860102X18NXS_V_1_4_E.DOC
DMX Wizard 512/1024 Manual
Channel and
output number
of current
mouse position
within DMX
patch
DMX Channel
#1
First
Channel of
Respective
Fixture
Clear All
Assignments
Close
Assignment
Table
Channel Assignment:
1. Select the desired Fader above by clicking the DMX value display below the Fader.
2. Select the channels you wish to assign to the Fader from the DMX table.
The selected channels become yellow, and now display the number of their assigned Fader
[Position Memory]
The Position Memory is a function that is primarily helpful for shows that take place at more than one
venue. The different stage dimensions and the resulting focal length changes require the adjustment of
both pan/tilt and focus. In order to avoid time consuming re-programming, or adjustment of individual
Scenes, you can mace use of the Position Memory.
Assign the significant Scenes, where specific Pan/Tilt and/or focus values are of importance, to one of the
32 memory slots. One slot may also contain multiple Scenes that have equal pan/tilt and focus values.
Assigning Position Memory to Scenes:
1.
2.
3.
4.
Close the Position Memory window.
Click on the name of the Scenes in the “Transport” field with the right mouse button.
Select “Assign Position Reference”.
Select the number of the Position Memory slot.
The memory assignment can be removed or adjusted using the same procedure.
Now, when encountering different stage proportion, just adjust the presets by pressing “Update This”or
“Update All” in order to adopt the new positions.
Manual V1.4
44/51
51860102X18NXS_V_1_4_E.DOC
DMX Wizard 512/1024 Manual
Selection of
Preset
Name of
Preset
Adopt Position
from Scene
Fixtures
Without
Pan/Tilt of
Focus
Adjustments
Next/Previous
Scene
Update Preset
to Scene
Update all
Presets
Close Window
Fixture List
Pan/Tilt Field
Focus Fader
[Visual Emulator]
open the “3D Visual Emulator”
[Media Player]
open integrated “Media Player”
[View Play List]
open „Play List“
[View Sequence List]
open “Sequence List”
[Multi-Sequenz Player]
open “Multisequece Player”
[Cue List]
open „Cue List“
[Full Screen]
Uses the full screen size for the DMX WIZARD 512/1024 program. Work in
this mode whenever possible, as you get the maximum desktop size in
doing so
[Transport Control]
Enables you to choose the location for the transport field as either “On Top”
or “On Bottom” of your screen margin.
[Lock Icons]
Locks the fixture icons on the “Plan”, so that they can not be moved by
mistake.
Manual V1.4
45/51
51860102X18NXS_V_1_4_E.DOC
DMX Wizard 512/1024 Manual
[Change Plan Image]
Here you can also replace the background picture for the fixture Plan.
Æsee also “The Plan / MultiPlan”
[Multi-Page Plan]
Here you can also replace the background picture for the fixture Plan.
Æsee also “The Plan / MultiPlan”
[Hot Keys]
This table can be used to place virtually all functions of the DMX WIZARD 512/1024 on the keys of your
keyboard. Click on a field in the Hotkey column, and press on the desired hotkey on your keyboard
subsequently.
Warning: Should you define “normal” keys like A-Z or 1-9 as hotkeys, those keys will always respond with
the assigned functions. You can no longer use the keys to enter text or numbers within the software.
In order to disable a hotkey, choose the field, and press the “Break” key.
[Access]
<Passwortfreigabe>:
Should you wish to restrict access to the DMX WIZARD 512/1024, you can create a password, which only
gives full access those that posess it.
Levels:
1. Setup (L):
2. Edit (M):
The user is restricted from changing the DMX setup.
The user is restricted from changing the Show (Sequences and Scenes)
3. Play (H)
The user is restricted from starting or changing a Show.
If any of these restriction levels are applied, their corresponding letters (L,H or M) are visible in the
“Transport” field.
Apply for Current Session
-Adopts changes to running Show.
If the “Visible” icon (eye) is crossed over, the password remains invisble while being entered.
If no password is entered, the access to all funtions is unrestricted.
9.6 The View Menu
[Monitor]
[Sliders]
[Plan]
open the “Monitor“ view (see also chapter 8.2.1 “The DMX Monitorl”
open the “Slider” view (see also chapter 8.2.2 “The Fader Panel”
open the „Plan“ view (see also chapter 8.2 “The Plan”
Manual V1.4
46/51
51860102X18NXS_V_1_4_E.DOC
DMX Wizard 512/1024 Manual
9.7 The Fixtures Menu
[Copy Fixture Scene]
Copies current Scene of selected fixture into memory.
[Paste Fixture Scene]
Pastes Scene placed in memory to current position.
[Copy (Save) Fixt. Sequence] Copy (Save) Fixt. Sequence:Copies a range of Scenes of selected fixture
into memory or file.
[Paste (Load) Fixt. Sequence Paste (Load) Fixt. Sequence: Pastes range of Scenes from memory or file
to current position.
[Solo]
Only selected fixture can be worked with. All other fixture icons disappear
[Master for Fixture Group]:
See chapter 6.6.1 “The different Master Modes”
Enables you to select all Master settings that will be active the next time you choose the Master function.
[Groups]
[Values/Time Editor]
<öffnet das Gruppen-Fenster> Æ Siehe auch „Das GerätegruppenFenster““
<öffnet den V/T-Editor> Æ Siehe auch „Der V/T-Editor“
9.8 The Help Menu
[Help]
[Serch for Help On..]
[How to use Help]
[About]
open the Help Menu
search in Help
About the DMX WIZARD 512/1024, Software Version
Manual V1.4
47/51
51860102X18NXS_V_1_4_E.DOC
DMX Wizard 512/1024 Manual
10 THE PANEL DESIGNER
The Panel Designer is used to create adjust the fixture panels that are used in the software. It is clear and
easy to use. Nevertheless, some knowledge about DMX512 is required to use the Panel Designer
effectively.
All defined channel values are entered in decimal (0-255)
New Panel
Load Panel
Save Panel
No of channel
Number of DMX
Channels used
by this fixture
Channel on/off
Function
Default value
Fixture - Icon
Fade on/off
Name of fixture
Black-Out value
Test Button for
Panel Testing
with fixture (Only
if Interface is
connected),
Grid on/off
List of All
Elements in
Panel
Lock
elements in
Panel
Active Components for
Panel (See Text)
Invisible in 3D
Visual Emulator
Beam angle in Degrees
(of fixture optics)
Max. Pan/Tilt
Angles in Degrees
Fixture
Type
In order to be aware of all possibilities when creating a panel, load an existing panel as an example. The
installed panel files can be found in the following folder, or on the product CD-ROM:
i.E.: C:\Program Files\DMXWizard\devices
Now you see a control window on the left side, and the panel in progress on the right side. The panel you
are creating looks exactly like the finished panel in the software.
Manual V1.4
48/51
51860102X18NXS_V_1_4_E.DOC
DMX Wizard 512/1024 Manual
When creating a new panel, the following steps may be useful:
1.
2.
3.
4.
5.
Obtain the DMX channel assignment table from the fixture manufacturer.
Press the button called “New Panel”
Enter the amount of DMX channels used by the fixture.
Enter the name or type of fixture. Please put the name of the manufacturer in <>brackets.
If you wish to use a custom picture icon, you can load a bmp picture with a dimension of 32X32 pixels
and 16 colors. This will be the icon for your fixture in the “Plan”.
6. Define the functions of the channels in the table on the right. The following functions are definable:
-
Pan (16-Bit MSB)
Tilt (16-Bit MSB)
Color
Gobo
Pan Fine (16-Bit LSB)
Tilt Fine (16-Bit LSB)
Dimmer (from software V5.68 on)
Focus (from software V5.68 on)
Should you have functions that are not definable within the parameters above, you can place them under
“Undefined”
7. Define the value of channels in “default” state.
8. Define the value of the channels in “blackout” state (Shutter closed or dimmer = 0)
9. Choose “smooth” for linear channels (E.g. dimmer 0-255 or zoom 0-255). This does not apply for
channels that work in snap mode. For example, Colors: 0 = white, 15 = yellow, 30 = blue etc.
Warning: “Fade” only takes into account channels that are “smooth” enabled
10. Close any unused in-between channels within the Used column.
11. Enter the data for the 3-D Visual Emulator in the lower most field.
- Beam Angle
Exit angle of beam in degrees. For fixtures with zoom function, enter a median
value.
- Pan Angle
- Tilt Angle
- Invisible in Emulator
Max. Pan range in degrees
Max. Tilt range in degrees
For fixtures without light output (fog machines), or if you set multiple dimmer
channels on one panel.
Moving mirror, Moving Head or Fixed Spot.
- Fixture Type
Please note that the 3-D Visual Emulator only generates one light beam per panel. For example, if you
place multiple dimmer channels from a dimmer pack on one panel, only one beam will appear in the
emulator.
12. Next, implement all the functions of the fixture in the panel using its available components. In order to
easily place the components, enable the “Snap to Grid” function.
First, click on the desired function, then on the panel in order to place it.
The Functions:
-
Container: This function gathers and groups together components. In order to have a better
overview of your panel, it is useful to create separate functional groups using Containers. For
example, have separate groups for colors and gobos etc. The background and font colors can be
adjusted for each Container.
-
Pan/Tilt Field: This field is for fixtures that have pan and tilt ability.
First, enter the channels for pan and tilt (fine). Next, the following specifications can be made:
Half Size
-Size of field is cut in half.
Manual V1.4
49/51
51860102X18NXS_V_1_4_E.DOC
DMX Wizard 512/1024 Manual
Pan/Tilt 16 Bit
Inverted
-For fixtures with 16Bit pan/tilt resolution (2 channels per axis).
-For special fixtures, pan/tilt axes are inverted.
-
Color Button: Creates buttons for color selection. The color can be specified for each button,
according to the colors available of the fixture. The color selected for the button also serves as
reference for the 3D Visual Emulator. Channel number, as well as DMX value must be entered for
each color.
-
Picture Button: Creates buttons with pictures (gobos) or text. Small Bitmap pictures (size according
to button dimensions) can be loaded to buttons. Format: BMP file, 16/256 colors, around 20X20
pixel. Channel and DMX values must be entered.
-
Dial Knob: Generates DMX values for defined ranges, such as for dimmer or focus functions etc.
Always enter the maximum value first, then the minimum value for the desired range.
-
Faders: Generates DMX values for defined ranges, such as for dimmer or focus functions etc. The
output values can be inverted. Always enter the maximum value first, then the minimum value for
the desired range.
-
Text: Used to label functions or indications. The font itself, as well as font size and color can be
adjusted.
-
Color Mixer: For fixtures with CMY/RGB color mixing system. Color Mixer field size is variable.
-
Multi-Button: The Multi-Button can adjust multiple DMX values from varying channels
simultaneously. (E.g. for switching off lamp)
13. Once the fixture has been connected to the DMX interface, you can test your Panel directly. Enter the
starting address to the field on the left (must be the same as for fixture), and press the Test button. Test
all the components in the panel to the right.
14. Save the panel and exit the “Panel Designer”
Manual V1.4
50/51
51860102X18NXS_V_1_4_E.DOC
DMX Wizard 512/1024 Manual
11 TROUBLESHOOTING
Problem:
Verify
The DMX512 interface is not accessible
- Is the data cable between PCÆ connected
properly?
- Is the USB driver installed properly? Check in
Windows System Settings. Reinstall driver
- Is the DMX512 line connected to the port of the
DMX512 interface?
- Are the starting addresses on the fixtures correct?
The connected fixtures are not reacting.
- Is the cable used a DMX512 standard cable? Do
not use microphone cables.
- Is there a DMX Termination Resistor at the end of
the DMX512 line? (120Ohm resistor between Pin 2
and 3 of XLR-plug.
- Are the starting addresses on the fixtures correct?
The fixtures are not reacting correctly.
When the computer returns from “Standby mode”,
the fixtures are no longer at their programmed
positions
- Disable any “Standby” and “Power Save” functions
of the PC
11.1 Known Problems
Since the original conception of the DMX WIZARD 512/1024 software, more than 70 different fixtures with
DMX512 interface have been tested live in our laboratory. In general, all fixtures that support the DMX512
standard work without fault. There are, however a few fixtures that display problems with processing the
data refresh rate of the DMX WIZARD 512/1024 (40Hz). The DMX512 standard prescribes a maximum
renewal rate of 44Hz.
The table below lists the fixtures and their known problems respectively.
Manufacturer
Problem
Solution
Martin MX-1, MX-4, Acrobat
Loses steps with quick pan
movements
GLP, American DJ, MAX, Mighty Sometimes has a delay in
Scan
reaction to DMX value changes.
SGM Galileo 2 / 4
Does not synchronize with DMX
properly.
DMX WIZARD 512/1024 Firmware
>V5.5
DMX WIZARD 512/1024 Firmware
>V5.5
New firmware for the scanners are
available from SGM Italy. DMX
WIZARD 512/1024 Firmware >V5.5
Manual V1.4
51/51
51860102X18NXS_V_1_4_E.DOC