1
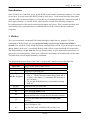
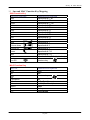
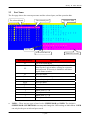
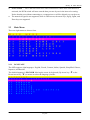
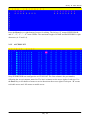
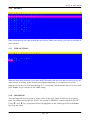
Hotkeys OSD (On Screen Display) User Manual V2.0 2008.2.19 Hotkey & OSD Manual Contents 1. Hotkey ........................................................................................................................................ 3 1.1 Sun and MAC Function Key Mapping ............................................................................... 4 2. OSD (On Screen Display) ......................................................................................................... 5 2.1 Login Window..................................................................................................................... 6 2.2 Port Name ........................................................................................................................... 7 2.3 Main Menu .......................................................................................................................... 8 2.3.1 LANGUAGE ............................................................................................................... 8 2.3.2 PORT NAME EDIT ..................................................................................................... 9 2.3.3 PORT SEARCH ........................................................................................................... 9 2.3.4 USER SECURITY ....................................................................................................... 9 2.3.5 ACCESS LIST ........................................................................................................... 10 2.3.6 HOTKEY ................................................................................................................... 11 2.3.7 TIME SETTINGS ...................................................................................................... 11 2.3.8 OSD MOUSE............................................................................................................. 11 2 / 12 Hotkey & OSD Manual Introduction Once all cables are connected, power up the KVM switch and the connected computers, it is ready for use now. You can control the KVM switch by three ways – local control from the front panel, using the OSD (On-Screen Display), or using hot key commands through the Console keyboard. It takes approximately 1-2 seconds for the video signal to refresh after switching computers. Re-synchronization of the mouse and keyboard signals also occurs. This is normal operation and ensures that proper synchronization is established between the Console and the connected computers 1. Hotkey You can conveniently command KVM switch through a simple hot key sequence. To send commands to KVM switch, you must press the hotkey (default Caps Lock) twice within 2 seconds. You will hear a beep sound confirming entering Hotkey mode. If you do not press any key during Hotkey mode over 2 seconds the Hotkey mode will be escaped and back to Normal state. The default hotkey is Caps Lock but you can change hotkey as your application convenience. If you prefer to use other hotkey, please go to OSD menu and change the default hotkey to the other. The table blow lists all supported hotkey commands. The default hotkey starts from “Caps Lock”+“Caps Lock”, then the keys on the table list. Command Space bar ↑ Function Brings up the OSD overlay screen Switches to the previous port ↓ Switches to following port ■ The first digit is the Switch bank number, starting [1,2,..,8] bank, with “1”. The KVM switch on the daisy chain line is [01, 02,..,32] port on bank 1 (the Master). A standalone KVM switch is also on bank 1. ■ The second & third digits are port numbers starting with “01” Switches to the previous bank Pg. Up Switches to next bank Pg. Dn B Turns the beep sound on/off R For SUPERVISORS that will set the OSD back to the factory default value (except the User Security settings). S For SUPERVISORS that activates the Auto-Scan function U P For SUPERVISORS that turns the Security function on/off. (Default is off). Log out, that’s only valid when the security is on. 3 / 12 Hotkey & OSD Manual 1.1 Sun and MAC Function Key Mapping SUN Function Key Sun-micro keyboard Stop Again Props Undo Front Copy Open Paste Find Cut Windows PS/2 keyboard Caps Lock & L_Alt Caps Lock & F4 Caps Lock & L_Ctrl Caps Lock & F5 Caps Lock & F1 Caps Lock & F6 Caps Lock & F2 Caps Lock & F7 Caps Lock & F3 Caps Lock & F8 Mute Caps Lock & 1 Volume down Caps Lock & 2 Volume up Caps Lock & 3 Power Help Compose Caps Lock & F12 Caps Lock & F11 Caps Lock & L_Shift (Application) Sun OS Windows key MAC Function Key MAC OS Shift Ctrl Windows PS/2 keyboard Shift Ctrl Windows key L Alt/Option F13 F14 Return Delete F15 Alt PrtSc (Print Screen) ScrLk (Scroll Lock) Enter Backspace Pause/Break 4 / 12 Hotkey & OSD Manual Example #1 – To bring up the OSD overlay window, press “Caps Lock”, “Caps Lock”, and the “Space Bar”. Immediately, the OSD overlay screen will appear. The superimposed menu screen is generated by the KVM switch, and does not affect your computers or software function in any way. Caps Lock Caps Lock please enter next key in 2 seconds in the Hotkey sequence Space Bar Example #2 – To switch to Bank 1 Port1, press “Caps Lock”, “Caps Lock”, and “1”, “0”, “1”. Caps a Lock Caps Lock 1 0 1 please enter next key in 2 seconds in the Hotkey sequence Actually there are two methods to bring up the OSD overlay window. 1. Activate OSD by press Hotkey --- press Hotkey twice then press Space bar. 2. Activate OSD by Mouse --Press and hold the left button of the mouse and hit the Esc key to show the Status screen. Press and hold the right button of the mouse and hit the Esc key to bring up the Main Menu. 2. OSD (On Screen Display) OSD Menu provides a menu-driven interface to control the KVM switch. This OSD Menu has four types of display screens: 1. Login Window --- When powering on this KVM switch, it will prompt a login window and ask for user name and password. This KVM system can setup one SUPERVISOR and eight USERs. SUPERVISOR can access to all OSD functions. USER can access to PORT NAME and PORT SEARCH only. 2. Status screen --- after the log in the Status screen will show up to display the current port settings and Hotkey type. 3. 4. Port Name --- this menu displays port status, and you can switch to other port right here. Main Menu --- there are eight menus to operate. They are listed as below: MAIN MENU Function 01 LANGUAGE OSD language selection 02 PORT NAME EDIT PORT NAME modification 03 PORT SEARCH Quick searching by port name 04 USER SECURITY Change password 05 ACCESS LIST Define user access authority 06 HOTKEY Change Hotkey 07 TIME SETTINGS Modify auto-SCAN time interval 08 OSD MOUSE Modify OSD MOUSE speed 5 / 12 Hotkey & OSD Manual 2.1 Login Window Power on the local console monitor, and power on the KVM Switch by plug in the power adapter. If the Security function is enabled (default is disabled), the Login window will show up waiting for user name and password. The Login window The default is SUPERVISOR and default user name is eight zeros “00000000”. The default password is eight zeros “00000000”. There are case-insensitive, while OSD display fixed in upper case. After login or port switch by panel button, OSD or Hotkey, the Status screen will show up to display the information of current settings -- one digit BANK NUMBER, two-digit PORT NUMBER, PORT NAME, and current Hotkey settings. Pressing any key or moving mouse will let the Status screen disappeared. The selected bank no. The selected port no. The port name The Status screen The selected Hotkey Auto-LOGOUT function In Login window, if no input for username and password over 1 minute, the screen will disappear. Hit any key to bring up the Login window again. At normal operation, if no input from the console keyboard or mouse over 10 minutes the KVM switch will turn off the screen display and show up Login window asking for user name and password. One more minute of keyboard/mouse inactivity, the monitor will be turned off (notice the monitor LED turns from green color to orange color). 6 / 12 Hotkey & OSD Manual 2.2 Port Name The first page shows the current port name and the selected port, and the operation hint. The selected bank The selected port Operation Hint User Level Auto-Scan Interval OSD Function Key Description F1 Go to the Main Menu F2 To log out the OSD. If Security is enabled it will show up the Login window waiting for username and password. If Security is disabled it will show up the Status window F3 Previous Menu Enter ↑ / ↓ Switch to the selected port Select the port (press Enter to switch) PgUp Previous Bank PgDn Next Bank Esc ■ Firmware Version Exit 1 Show ports 01 ~ 08 2 Show ports 09 ~ 16 3 Show ports 17 ~ 24 4 Show ports 25 ~ 32 USER --- There are two types of user levels: SUPERVISOR and USER. The default is SUPERVISOR. SUPERVISOR can setup and change the OSD settings at Main Menu. USER can only do the port switch and port search. 7 / 12 Hotkey & OSD Manual ■ SCAN TIME --- This is the time interval for auto-scan function. When auto-scan function is activated, the KVM switch will auto-scan the host port one by one in the interval as setting. Notice that the port without connecting to a computer/server will be skipped over on the scan. ■ The numeric keypad is not supported, while in OSD screen, the arrow keys, PgUp, PgDn, and Enter keys are supported. 2.3 Main Menu There are eight menus to choose from. 2.3.1 LANGUAGE The OSD supports eight languages: English, French, German, Italian, Spanish, Simplified Chinese, Japanese, and Russian. The default language is ENGLISH. Moving the cursor by keyboard (Up Arrow key “©”or the Down Arrow key “ª”) or mouse to select the language you like. 8 / 12 Hotkey & OSD Manual 2.3.2 PORT NAME EDIT The first line bar is Bank number, following lines are port name list. Use keyboard (Up Arrow key “©”, Down Arrow key “ª”) or mouse to select the port. After select the port, you can either press the Enter Key, or move the cursor to port name and double click left button of mouse to switch the port immediately. Press PgUp key or PgDn key for selecting the previous or next Bank. Press Enter key for editing port name. Press Esc key to cancel the editing without any change or press Enter key to complete the editing. 2.3.3 PORT SEARCH Search the computer by port name. Enter “*” will show the all the port names. 2.3.4 USER SECURITY There are two types of user levels: SUPERVISOR and USER. There is one SUPERVISOR and up to eight USERs can be configured. 9 / 12 Hotkey & OSD Manual Press the Enter key or right button of mouse for editing. The left-top “S” means SUPERVISOR, and “1”, “2”, “3”,…., “8” mean USERs. The maximum length of NAME and PASSWORD is eight characters (A~Z and 0~9). 2.3.5 ACCESS LIST Only SUPERVISOR can configure the ACCESS LIST. The first column is the port number, following the server/computer name list. The last 8 columns are the access right of each user. Use the Enter key or left button of mouse to active/deactivate the access right of each port. “X” means to disable access and “O” means to enable access. 10 / 12 Hotkey & OSD Manual 2.3.6 HOTKEY Some keyboard may not equip with all the special keys. Make sure the key you select is available in you keyboard. 2.3.7 TIME SETTINGS When the Auto-Scan function is activated, the KVM switch will auto-scan the host ports one by one in the interval as setting. Notice that the port without connecting to a computer/server will be skipped over on the scan. The interval range is 5 ~ 99 seconds, and the default interval is 10 seconds. Press “Enter” key to save the SCAN TIME setting. 2.3.8 OSD MOUSE You can change the moving speed of mouse cursor in this item. There are three levels to choose from. The fastest moving speed is “FAST”, the second is “MIDDLE” and the slowest is “SLOW”. Using "©" and "ª" key on keyboard to move highlight bar to the wished speed. Press the Enter key to go into effect. 11 / 12 Hotkey & OSD Manual 12 / 12