1
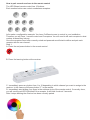
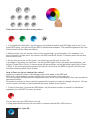
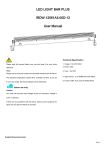
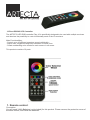
10 Zone RGB-W LED Controller
The ARTECTA LED RGB controller Play-10 is specifically designed to be used with multiple receivers
and also has the possibility to control individually each of the 10 receivers.
Main Functionalities:
- Control up to 10 different receptors-zones individually.
- Adjust color, Brightness and color saturation for each Zone
- Create outstanding color effects for each zone or in all zones.
This product consists of 2 parts:
1. Remote control:
Connection
You will need 3 AAA Batteries (not included) for this product. Please remove the protective cover of
the back remote, and install the batteries.
2. Receiver
C Receptor learning Key
to
A connect
12-24V DC
B
For RGBW functtion
remove jumper
+
- Red
- Green D
- Blue
- White (if Jumper is removed)
How to connect the Receptor:
1. Unscrew the screw that covers the Power input. Once the cover is removed you will find a set of
push down connector screws. Supply power to the power input (A). This receiver has a dynamic
power input that ranges from 12-36V DC. The power input depends of the LED product you are
using.
Example: If you are using 24V LED strips you should supply the unit with 24V DC.
B
Remove jumper for RGBW
Connect jumper for RGB
2. There are many new products in the market that include a white channel.
For example, there are new LED strips that also include a white LED so you can achieve greater
flexibility in your projects.
If you are using a 3-Channel RGB LED Strip, please connect the jumper to the 2 pins.
If you are using a 4-Channel RGBWLED Strip, please remove the jumper from the 2 pins.
3. The black button on top of the receiver is used to pair and assign receiver channel.
Please see next section on how to pair.
4. Connection of the LED Fixtures. Please remove the screw that covers the output screws in the
receiver unit. Once opened you will find 8 push down screws. Please connect the common positive
cable of your led fixture (normally black color) to the "+" sign of the first screw on the top.
(See (D) in the above illustration.
Then connect the 3 Red, Green and Blue cables to each color.
5. Please put back both covers with their respective screws.
How to pair several receivers to the remote control
The LED Wizard remote control has 10 buttons.
Each number button can control numberless receptors.
1
2
3
4
5
6
7
8
9
10
Let's make a configuration example: You have 5 different zones to control in your installation.
Therefore you will have 1 remote control and 5 receptors. You will need to tell each receptor to what
number channel they belong.
Once the receptors have been correctly wired and powered we will start to define and pair each
receptor with its own channel.
Step 1:
A. Press the red power button in the remote control
B. Press the learning button at the receiver.
C. Immediately press any button from 1 to 10 depending in which channel you want to assign to the
receiver. In this case we will press button "1" in the remote.
D. Immediately start sliding your finger in the rainbow circle of the remote control, if correctly done,
you will see the red LED light blink in the receptor. It will blink for about 3 seconds.
After it stops blinking the receiver has been correctly paired.
E: Repeat this with other receivers. You can pair all receivers to the same channel, in this case 1,
or have them in different channels 1-10.
If by any circumstance you wish to reprogram any of the receivers, you will need to "reset" the
receivers. To do this, just simply redo steps A-E above.
How to change color of LED lighting Fixtures?
You can change a single receptor color, brightness and saturation individually or in-group.
To change the color of a single receptor, follow the following procedure:
1. Press the power button in the remote if the remote is off.
2. Select the channel (zone) to be controlled pressing any of the 1-10 keys on the remote:
1
2
3
4
5
6
7
8
9
10
3. Move your finger across the touch color wheel, until you see the color that you want.
How to change color of ALL the LED lighting Fixtures simultaneously?
To change the color of some or all the receptors follow the following
1. Press the power button in the remote if the remote is off.
2. Press in a rapid succession buttons from 1-10. For example, if we want to change the color of
receptor 1,2,3,4, 5, we will press in a rapid succession the buttons from 1-5 and then use the color
wheel to change color of that group of receptors.
3. At the condition of all zones' led on, long press (3 seconds) the button number on remote, to
individually separately turn ON/OFF the zone you want.
2
1
3
4
5
6
7
8
9
10
Fast select of color and fine-tuning colors.
R
G
B
W
1. If you press the red button, you will see your selected receptors and LED lights turn to red. If you
press RED again, you will turn off the RED in all selected receptors. This principle applies for the rest
of the buttons (Green, Blue and White).
2. Mixing colors: You can create a mix of color by pressing 2 or more buttons. For example, if we
want to create a "purple color" we need to use RED and BLUE for this. Therefore press the red and
then the blue color.
3. Every time you press a color button, you either turn on the color or turn it off.
a. Example: If we press the red button, we will get RED lights. If then we press the blue Button, we
will get, Purple (Red + Blue). If now we press the green button, we will get white lights (Red + Green
+ Blue). If we now press the blue button we will turn off the blue, but RED and green will still be on,
therefore creating yellow (Red +Green).
How to fine tune (micro change) the colors?
Imagine you want to create a very strong purple color made of the RED and
Blue colors. Nevertheless you don't wish to have so much blue in the color mix.
You can increase and decrease the brightness of any of the colors individually in this case we want to
decrease the Blue.
First make sure that you have selected correctly the channel you want to change using the 1-10 keys
on the remote, and that you have pressed the power button on the remote.
1. Press for less than 1 second the RED button. ds) the button number on remote, to individually
separately turn ON/OFF the zone you want.
R
You will see now your LED fixture turn red.
2. Now press the blue button for more than 2 seconds until the Blue LED turns on.
Blue Light ON
B
3. Now place your finger in the rainbow color wheel and start moving your finger clockwise to
increase the blue color until it reaches your taste.
You will see that if you move your finger around the color wheel you will increment the blue and if you
move your finger counter clockwise you will reduce the amount of blue in the color mix….
If you want to stop controlling the brightness press the "blue" color button for more than 2 seconds or
until the LED light turns off.
Color Fading programs:
This 10 Zone remote controller has 10 predefined color changing programs. You can control the
speed and brightness of any program.
Also, the unit uses smart ID technology to create a very neat color effect if you are using more than
one receiver.
How to use the Color Effects programs?
1. First select the channels you want to control (1-10).
2. Press the "M" button and you will select the first program with color effects.
M
3. If you press the M button again you will pause the current color chase program.
4. If you press the M button again, you will enter program number 2.
See here how it works:
Program1 ---Pause---Program2----Pause---Program3---Pause---Program4--Pause---Program5---Pause---Program6---Pause---Program7---Pause--Program8---Pause---Program9---Pause---Program10--Pause……..Program1…..
Each time you press the "M" button, you go through all the programs with a pause function in
between the programs.
Controlling Speed and Brightness of programs:
Once you selected the program of your choice, you can adjust the speed of the program and
brightness levels by using the Brightness and speed controls.
Changing Speed:
S-
S+
Slower
Faster
Use the S- and S+ on the remote to change and fine tune the speed at which the colors change in
any of the programs. There are 16 speed levels. The fastest speed is 4 seconds for all the colors to
cycle and the slowest speed is 256 seconds.
Changing Brightness:
BBrightness
Down
B+
Brightness
Up
Use the B- and B+ on the remote to change and fine-tune the brightness Levels of the selected
program.
Note: The B- and B+ also work when you have individual colors selected.
Extended Configuration:
This LED10 Zone RGB-W controller can work with an unlimited number of receptors.
For example:
You can have 5 receptors working in Channel 1,
10 receptors working in channel 2, and one receptor in channel 3.
Also you can have just one receptor on each of the channels.
You can create a chase effect of colors in just one channel.
Example: Imagine you install 10 receptors that will be controlled by the "1"
Channel key in the remote control:
1
Although the 10 receptors have learned to react and adjust when you press the "1" in the remote
control, if you select any of the 10 predefined color changing programs, at some point in time, each
receptor will desynchronize from each other, and after many hours the color showing on each
receptor will be different.
This is due to slight differences in the timing protocol inside each unit.
Nevertheless there is a very simple solution for this and it is to create "Master" and "Slave" units.
Example: Imagine in Channel 1 you want to have 10 receptors. You will then have 1 Master and 9
Slaves. The master will transmit a synchronizing signal to all the slaves; so all receptors work in
perfect timing when showing a color program effect.
How to program the Master Receiver:
We have seen previously how to pair a receiver with a master channel. The procedure is the almost
the same:
Step 1:
A. Press the red power button in the remote control
B. Now press any button from 1 to 10 depending in which channel you want to assign to the receiver.
In this case we will press button "1" in the remote.
C. Press the learning button
D. Instead of sliding your finger around the color wheel as we did before, you will need to press any
of the following buttons, for more than 3 seconds. This does not mean to press any of the following
buttons for 3 seconds, but to press the following buttons many times during 3 seconds or more, or
until the receiver
Learning led stops blinking and turns off.
S-
S+
B-
B+
Be aware that in any channel (1-10) there can only be one master and an infinite number of slaves….
If by any circumstance you wish to reprogram any of the receivers, you will need to "reset" the
receivers by redo steps A-F above.
Electrical
10 Zone RGB(W) Receiver Connection
Receptor learning Key
+
- Red
- Green
- Blue
- White (only if Jumper is removed)
connect to
12-24V DC
For RGBW functtion
remove jumper
Electrical connections:
connect to
230V AC
connect to
12-24V DC
12V DC or 24V DC Powersupply
Set to Controller zone-1 Key
+
-
LED Zone-1
RGBW jumper
connect to
230V AC
connect to
12-24V DC
12V DC or 24V DC Powersupply
Set to Controller zone-2 Key
+
-
LED Zone-2
RGBW jumper
connect to
230V AC
connect to
12-24V DC
12V DC or 24V DC Powersupply
Set to Controller zone-3 Key
+
-
LED Zone-3
RGBW jumper
connect to
230V AC
connect to
12-24V DC
12V DC or 24V DC Powersupply
Set to Controller zone-4 Key
+
-
LED Zone-4
RGBW jumper
connect to
230V AC
connect to
12-24V DC
12V DC or 24V DC Powersupply
Set to Controller zone-5 Key
+
-
LED Zone-5
RGBW jumper
connect to
230V AC
connect to
12-24V DC
12V DC or 24V DC Powersupply
Set to Controller zone-6 Key
+
-
LED Zone-6
RGBW jumper
connect to
230V AC
connect to
12-24V DC
12V DC or 24V DC Powersupply
Set to Controller zone-7 Key
+
-
LED Zone-7
RGBW jumper
connect to
230V AC
connect to
12-24V DC
12V DC or 24V DC Powersupply
Set to Controller zone-8 Key
+
-
LED Zone-8
RGBW jumper
connect to
230V AC
connect to
12-24V DC
12V DC or 24V DC Powersupply
Set to Controller zone-9 Key
+
-
LED Zone-9
RGBW jumper
connect to
230V AC
connect to
12-24V DC
12V DC or 24V DC Powersupply
RGBW jumper
Set to Controller zone-10 Key
+
-
LED Zone-10