1
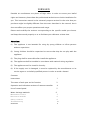
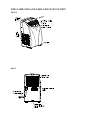
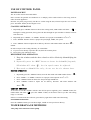
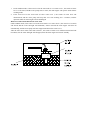
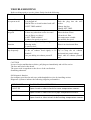
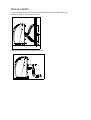
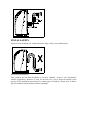
Moveable Air-conditioner User’s Manual
For Model :KY-25F1,KYR-25F1
KY-35F1,KYR-35F1
Please read this user’s manual carefully to ensure proper use,
maintenance and installation
FORWARD
Portable air-conditioners are pieces of high value. In order to ensure your lawful
rights and interests, please have the professional technicians to do the installation for
you. This instruction manual is the universal-purpose version for the units that you
purchase might be slightly different from the ones described in the manual, but it
does not affect your proper operations and usage.
Please read carefully the sections corresponding to the specific model you choose,
and keep the manual properly so as to facilitate your reference at later time.
Attention:
(1) The appliance is not intended for using by young children or infirm persons
without supervision.
(2) Young children should be supervised to ensure that they do not play with the
appliance.
(3) The plug shall be accessible after install the appliance.
(4) The appliance shall be installed in accordance with national wiring regulation.
(5) The appliance can’t be install in laundry.
(6) If the supply cord is damaged, it must be replaced by the manufacturer or its
service agent or a similarly qualified person in order to avoid a hazard.
Contents
Instructions
1
The name of each part and its function
2
Operation and indication sections of remote controller
4
Use of control panel
5
Water drainage methods
Maintenance/service
Reservation methods
Safety cautions
Troubleshooting
Installation
6
7
8
9
10
11
PORTABLE AIR-CONDITIONER
This portable air-conditioner is a small size appliance, which can adjust the
temperature and humidity in a room. Its flexibility characteristics make it
easily used on different occasions in different rooms. It also has multiple
functions, including cooling, dehumidifying and fanning ventilation. This
unit was designed especially to be used in a family house, office, etc. It has
a compact design compared to others with the same cooling capacity.
Power consumption is low and the noise especially low.
Features of heating operation: the machine heating operation, the principle
is that the air is heating by the heating pump before sent out. The function
is not affected by ambient temperature.
Features of cooling operation: Other air conditioning patterns are
recommended when the indoor temperature is either below 170C(630F) or
above 350C(950F).
ATTENTION
Before you use your portable air-conditioner, please read this instruction
manual carefully so that you get the best from the unit.
This instruction manual is used for guidance and does not form part of a
contract. We reserve the right to make technical changes without prior
notice.
THE NAME OF EACH PART AND ITS FUNCTION
FRONT
BACK
THE NAME OF EACH PART AND ITS FUNCTION
Temperature setting button
This button is used to set the room
temperature. Each pressing of the "+" or "-"
button, the temperature is increased or
decreased by 1 ℃/1 F . Pressing"+" and "-"
button at the same time , you can choose
fahrenheit or celsius.
TIMER Button
Press this button to
set the time for
switch-on, switch-off
or to delete the
timing.
POWER
indicator
light ,the
light is
green.
FAN SPEED Button
Press this button will choose
high, middle or low speed of air
delivery.
ON/OFF Button
Press this button
will turn the
machine ON or
OFF
WATER
FULL
Indication
light
SIGNAL
receiver
window
MODE Button
Press this button
will select among
the modes of auto
cooling,or dry
OPERATION
AND
INDICTION
SECTIONS
OF
REMOTE CONTROLLER
MODE Button
Press this
button will
select among
the modes of
auto cooling,
dry or heating.
SPEED Button
Press this
button will
choose high,
middle or low
speed of air
delivery.
USE OF CONTROL PANEL
POWER SOURCE
The AC socket must be firm and reliable.
Don’t connect the portable air-conditioner to a multiply socket outlet which is also being used for
other electrical appliances.
Inset the AC power plug securely into the AC socket using the unit, when it beeps after two seconds,
press ”ON/OFF” button, the unit begins to run.
COOLING OPERATION
1. Repeatedly press ”MODE” button to choose the cooling mode, LED window will show “
”.
During the cooling operation, always place the duct through an open window to exhaust warm air
from the room.
2. Repeatedly press ”TEMP+” or “TEMP-“ button to set a proper room TEMP. at 160C-310C.
3. Press “SPEED” button to choose a proper fan speed, high, middle, low speed.
4. Press “SWING” button to adjust the air delivery direction. The LED window will show“
”.
NOTE:
In order to improve the cooling efficiency, be careful that:
a) If your room is directly exposed to the sun, draw the curtains please.
b) Do no place near other heat source.
DEHUMIDIFYING OPERATION
1. Keep the windows and the doors closed to aid in effectively dehumidifying the
room.
2. Repeatedly press the “MODE” button to choose the dehumidifying mode,
LED window will show “ ”, the fan speed cannot be adjusted.
3. When used as dehumidifier only, do not use the air exhaust dust.
HEATING OPERATION
1. Repeatedly press the “MODE” button, select the heat mode. The LED window shows “
0
”.
0
2. Press “TEMP+” or “TEMP-“ button to set a proper room temperate at 16 C-31 C.
3. Press “ SPEED” button to choose the fan speed: high-middle-low.
4. Press “SWING” button to adjust the air delivery direction. The LED window will
show“
”.
TIME SET FUNCTION
To set time to start the machine with the unit off (but power supplied), press “TIMER” button, the
LED window will show “
”, press the “TIME “ button, set the time to start as you like. The setting
range is 1-24 hours.
If have set switch on/off after 24 hours, press this key again there could cancel the timing.
FAN SPEED FUNCTION
Press the “SPEED” button,you can choose high , middle or low-speed of air delivery.
WATER DRAINAGE METHODS
Auto pump water function of water pump
1. Under random mode, if the water level in the water tank is over water level 1, the switch of water
level 1 will closed, and the water pump starts to work, the main engine will operate under former
working mode.
2. If the water level in the water tank is below water level 1, the switch of water level will
disconnected, and the water pump will stop after over time working for 1.5 minutes, and the
operation mode for main engine will be unchanged.
Water level auto alarm function in water tank
Under random mode, if the water level in the water tank is over water level 2, the water level 2 switch
will closed and the water full light will illuminate, after30 seconds the main engine will shut off
automatically, and the water pump will not stopped until below the water lever1.
After the water level in the water tank is below 1, the switch of water level will disconnected and will
not alarm, also the water full light will disappear, then the main engine will resume standby.
MAINTENANCE/SERVICE
MAINTENANCE METHODS
Pull the plug out of the socket before cleaning.
Make sure there is no power to the unit before beginning to maintain or repair, prevent accident caused
by elec. Shock.
Do not use chemical solvent (like benzene, alcohol glazer) to clean the surface of the unit. If you do so,
the surface will be scratched, damaged, even the whole casing could become deformed.
AIR FILTER
If the air filter is blocked with a lot of dust, the air flow volume will reduce. Clean the filter once every
two weeks.
Open the air filter
1. Open the air filter cover downwards, then take off the air filter.
2. Take the air filter and active carbon filter out of filter cover.
Clean
1. Wash the air filter by immersing it gently into warm (about 400C or 1040F) water with a neutral
detergent, rinse the filter of detergent and dry it thoroughly in a shaded place.
2. Blow the active carbon filter with a blower.
Mounting
1. Attach the filters to the filter cover with the attachment hooks on the inside surface of the cover.
2. Place the hooks at the bottom of the filter cover into the holes in the case, push it back into its
original position.
ATTENTON
Change the active carbon filter after three months.
MAINTENANCE/SERVICE
KEEP SURFACE CLEAN
Clean the surface of the unit with a damp cloth, then dry using a duster or similar.
RESERVATION METHODS
END OF SEASON OPERATIONS
1. To remove the stopper of continuous water drainage. Then operate the unit in fan
mode for half a day until the pipe dry.
2. Switch off the unit and disconnect the plug from the power supply.
3. Tie the cable with the string.
4. Wrap the machine with the plastic bag, and keep it in the dry.
SAFETYCAUTIONS
Do not use the unit in a very narrow room with obstacle so as to avoid breakdown.
Do not use the unit where the sunlight is shining directly onto it so as to avoid surface
color changing
Do not use the unit in water not near water, avoiding leakage of electricity.
Do not use the unit in water or near water, avoiding leakage of electricity.
Do not use near gas appliances, fires or in the vicinity of flammable liquids.
POWER SORCES
Do not use a damaged or improper A/C socket.
When unplugging the unit, hold the power plug securely and pull it out carefully.
OTHERS
Keep the unit one meters away form TV sets or radios to avoid the risk of electromagnetic
interference.
Do not use wit the air outlet close to walls or cover the outlet to avoid overheating.
SERIOUS CAUTION
Do not toggle over or incline, if the unit does toggle please unplug at once and seek
advice from your reseller.
Do not spray with insecticide or other chemicals as the plastic case may be deformed.
FEATURES OF HEATING OPERATION MODE
When the air conditioner heats the room air, the compressor does not work, PTC electric
tube works.
TROUBLESHOOTING
Before seeking repair or service, please firstly check the following.
Trouble
Check
Action
Air conditioner does Is there power?
not operate at all
Is it plugged in?
Did the fuse or circuit breaker break off?
If SET TIME suitable?
Cooling efficiency is Is air inlet or outlet locking?
not good
Is there any other heat source in room?
Are air filters very dirty?
Is SET TEMP. suitable?
Is indoor fan speed set at low?
Too
noise
and It is the inner liquid (refrigerant-gyration)
vibration
Flowing inside.
Is unit leveled?
The machine start and It the voltage of the power source normal?
stop frequently
Is the air exhaust fixed rightly or be
bended?
Are you adding air exhaust yourself?
It is normal
Push the plug into the wall
socket.
Change the fuse.
Change SET TIME.
Clear the locking
Move the heat source
Clean the air filter
Set temperature suitable
Set suitable fan speed.
It is normal
Place it in a horizontal floor
Keep the power source in rated
Try to keep the air exhaust
horizontal not permit enlarge
Don’t add air exhaust yourself
and
CAUTION
In case of major malfunction as below, pull plug out immediately and call for service.
The fuse and switch often break.
The power cord is superheat or the sleeve of the cord broken.
Something abnormal.
Self-diagnosis function
Our company provides the end-users with thoughtful services by installing various
Diagnostic system to indicate the following irregular performances.
CHECK CODE
DIAGNOSIS OF MALFUNCTION
FAULT E0
Open circuit or short circuit in room temperature sensor.
FAULT E1
FAULT E3
Open circuit or short circuit in pipe temperature sensor.
Open circuit or short circuit in defrosting temperature sensor.
INSTALLTION
Selection of installation location
Put the portable air condition in a flat location where the air outlets cannot
Be covered up, place the unit no less than 50cm(20 inch) away from a wall or
Other obstacle.
The air exhaust duct mounting method
1) Fix the square end of the exhaust dust to the exhaust terminal of the unit
2) Put the other end (discharge) to the nearest window Attention: The length
Of the air exhaust between 500mm-1500mm,use the Min
Length when working, we suggested
When mounting, try to keep the air exhaust horizontal not permit enlarge or
Connect the other discharge or will cause malfunction.
INSTALLATION
Correct mounting shown below (if mounting in the wall, the height of the hole
Should be 40cm-130cm(16inch-51inch)
If the air exhaust requires bending, see below.
INSTALLATION
Incorrect hose mounting (air exhaust bend too large, easily cause malfunction.)
Window Kit Installation
Your window kit has been designed to fit most standard “vertical” and “horizontal”
window application. However, it may be necessary for you to improvise/modify some
aspects of the installation procedures for certain types of windows. Please refer to below
figs for minimum and maximum window openings.
INSTALLATION
Installation Accessories
Description
Installation accessories
Flexible exhaust hose-----------------------1/set
Stretches from 50cm up to 150cm
Flexible exhaust hose connector-----------1/set
Cycle exhaust adapter-----------------------1/set
Cycle exhaust adapter cover----------------1/set
Window’s kit----------------------------------3/set
Adjustable window slider kit is from 62cm up to 175cm.
Note: The real products may look different.