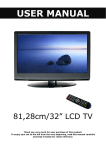
1
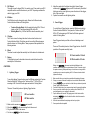
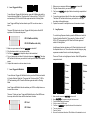
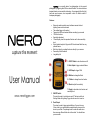
NERO is a versatile device for photographers to take special photographs by triggering their SLRs or external flashes. The device has been designed based on microcontroller technology. It is equipped with built-in light, laser and sound sensors, also incorporates a timer for flexible control of timelapse photography. Features: NERO capture the moment Extremely sensitive optical, sound and laser sensors to detect lightning, laser and sound events The smallest trigger in the market Triggers both SLRs and external flashes according to your needs 10 built-in functions Sensitivity adjustment 10 level display to set the requested function and to show sensitivity level Optical isolated output to fully protect SLR and external flash from any potential harms Built-in hot shoe for mounting the device directly to your camera Powered by 2xAAA batteries Long battery life 1. ON/OFF Switch to turn the device on/off 2. Flash Output to trigger external flashes 3. SLR Output to trigger SLRs User Manual 4. M Button to change the Mode 5. C Button to change the active function 6. Wheel to adjust the sensitivity 7. Display to show the active function and sensitivity level www.nerotrigger.com 1. ON/OFF Switch: This switch is used to turn the device on/off. The device will be at Working Mode with Lightning Trigger function once it is turned on. 2. Flash Output: This output is used to trigger external flashes. You need to use a 3.5mm male to your external flash compatible cable to connect the device to your flash. The package doesn’t contain this cable since there are many different flash units in the market. You should have your own cable. 3. SLR Output: This output is used to trigger SLRs. You need to use a 2.5mm male to your SLR compatible cable to connect the device to your SLR. The package contains the cable to trigger your SLR. 5. Adjust the sensitivity to the highest level while it doesn’t trigger continuously. If NERO triggers your SLR continuously, an artificial light source such as room lights may cause the device to false trigger, turn off the room lights. 6. Capture the moment once the lightning strikes. 4. M Button: The M Button is used to change the mode. Device has 2 different modes, Function Selection Mode and Working Mode. 2. Sound Trigger: Function Selection Mode: Only the selected function LED of 10 level display will be OFF and the remaining LEDs will be ON Working Mode: Only 1 LED will be ON to show the sensitivity level To use the Sound Trigger function, press the M Button and switch to nd Function Selection Mode first. Then press the C button until the 2 LED is OFF and remaining is ON. Press the M button again and switch to Working Mode. 5. C Button: The C button is used to change the active function when the device is at Function Selection Mode. This button can also be used for different purposes when the device is at Working Mode. These purposes will be explained in the following sections. Sound Trigger activates your flash unit for each detecting sound pulses. There are 100 sensitivity levels on Sound Trigger function. Each LED symbolizes 10 separate sensitivity levels. 6. Wheel: The wheel is used to adjust the sensitivity level of the device for related mode. Least sensitive 10 levels 7. Display: 10 level display is used to show the active mode, selected function and the sensitivity level of the device. Most sensitive 10 levels Before using NERO, make some test shots with flashes in dark conditions while keeping the time value between 20 and 30 seconds, adjust the aperture value to get the perfect image. In a dark room no image will be created even your camera is capturing for 20 to 30 seconds unless a flash lightened the image. FUNCTIONS: 1. Lightning Trigger: To use the Lightning Trigger function, press the M Button and switch to Function st Selection Mode first. Then press the C button until the 1 LED is OFF and remaining is ON. Press the M button again and switch to Working Mode. 1. 2. 3. There are 10 sensitivity levels on Lightning Trigger function. 4. 5. Least sensitive 7. Most sensitive 6. 1. 2. 3. 4. Make sure the camera and NERO are turned off Mount the NERO to the camera using the hot shoe mount. Plug the release cable to the camera. First turn on NERO and then the camera. 7. Make sure that the room is as dark as possible while capturing the image Set up your camera, flash and the object such as a balloon filled with water Connect NERO to your main flash unit with the sync cable and place the Sound Trigger close to the balloon Push the shutter button of your camera and get ready for popping the balloon Once you push the shutter button of your camera you will have 20 to 30 seconds (depends on your settings) to take action Pop the balloon with a needle. The popping sound of the balloon will be detected by NERO and it will activate the flash unit at that moment to capture the moment Wait until camera finishes the capturing and check your photo Some practice will make perfect! There are 10 levels on Timelapse Trigger (secs) function. Each LED symbolizes a separate interval from 1 sec to 10 secs. 3. Sound Trigger with Lock: 1 sec interval To use the Sound Trigger with Lock function, press the M Button and switch to rd Function Selection Mode first. Then press the C button until the 3 LED is OFF and remaining is ON. Press the M button again and switch to Working Mode. Sound Trigger with Lock function will not be activated until you press C Button and it will be locked again after detecting the first sound pulse. If you don’t want your flash to be activated after the first sound pulse, then you must use Sound Trigger with Lock function instead of Sound Trigger function. There are 100 sensitivity levels on Sound Trigger with Lock function. Each LED symbolizes 10 separate sensitivity levels. 10 secs interval 1. 2. 3. 4. 5. 6. Make sure the camera and NERO are turned off Mount NERO to the camera using the hot shoe mount Plug the release cable to the camera. First turn on NERO and adjust the interval to the desired level Turn your camera on Capture the moment periodically according to your adjustment Least sensitive 10 levels 5. Timelapse Trigger (mins): Most sensitive 10 levels To use the Timelapse Trigger (mins) function, press the M Button and switch to Function Selection Mode first. Then press the C button until th the 5 LED is OFF and remaining is ON. Press the M button again and switch to Working Mode. Before using NERO, make some test shots with flashes in dark conditions while keeping the time value between 20 and 30 seconds, adjust the aperture value to get the perfect image. In a dark room no image will be created even your camera is capturing for 20 to 30 seconds unless a flash lightened the image. 1. 2. 3. 4. 5. 6. 7. 8. 9. Timelapse Trigger (mins) function activates your SLR periodically Make sure that the room is as dark as possible while capturing the image Set up your camera, flash and the object such as a balloon filled with water Connect NERO to your main flash unit with the sync cable and place the Sound Trigger close to the balloon Push the shutter button of your camera and get ready for popping the balloon Once you push the shutter button of your camera you will have 20 to 30 seconds (depends on your settings) to take action. Push the C Button of NERO to activate the device Pop the balloon with a needle. The popping sound of the balloon will be detected by NERO and it will activate the flash unit at that moment to capture the moment Wait until camera finishes the capturing and check your photo Some practice will make perfect! 4. Timelapse Trigger (secs): To use the Timelapse Trigger (secs) function, press the M Button and switch to th Function Selection Mode first. Then press the C button until the 4 LED is OFF and remaining is ON. Press the M button again and switch to Working Mode. Timelapse Trigger (secs) function activates your SLR periodically between 1 sec to 10 secs according to your needs. between 1 min to 10 mins according to your needs. There are 10 levels on Timelapse Trigger (mins) function. Each LED symbolizes a separate interval from 1 min to 10 mins. 1 min interval 10 mins interval 1. 2. 3. 4. 5. 6. Make sure the camera and NERO are turned off Mount NERO to the camera using the hot shoe mount Plug the release cable to the camera. First turn on NERO and adjust the interval to the desired level Turn your camera on Capture the moment periodically according to your adjustment 6. Laser Trigger with Delay: To use the Laser Trigger with Delay function, press the M Button and switch to th Function Selection Mode first. Then press the C button until the 6 LED is OFF and remaining is ON. Press the M button again and switch to Working Mode. Laser Trigger with Delay function activates your SLR once the laser beam is 1. Make sure your camera or flash and NERO are turned off 2. Plug the release cable to your camera or flash 3. First turn on NERO and adjust the level according to required shot count 4. Fix your laser pointer and direct it to the optical sensor of NERO The active LED will start to blink once you are able to match your laser beam to the optical sensor 5. Capture the moment for multiple times once the laser beam is broken broken. 8. Long Exposure: There are 500 delay levels on Laser Trigger with Delay function. Each LED symbolizes 50 miliseconds delay level. To use the Long Exposure function, press the M Button and switch to th Function Selection Mode first. Then press the C button until the 8 LED is OFF and remaining is ON. Press the M button again and switch to Working Mode. 0-50 milisecond delay 450-500 miliseconds delay Long Exposure function activates your SLR and locks the mirror until the requested time is out. This mode can be used for taking very long exposures as needed for astro or infra-red photography 1. 2. 3. 4. Make sure your camera or flash and NERO are turned off Plug the release cable to your camera or flash First turn on NERO and adjust the delay to the desired level Fix your laser pointer and direct it to the optical sensor of NERO. The active LED will start to blink once you are able to match your laser beam to the optical sensor 5. Capture the moment once the laser beam is broken There are 10 levels on Long Exposure function. Each LED symbolizes a separate interval. 30 secs 15 mins 1 min 30 mins 2 mins 1h 4 mins 2h 8 mins 4h 7. Laser Trigger with Multishot: To use the Laser Trigger with Multishot function, press the M Button and switch th to Function Selection Mode first. Then press the C button until the 7 LED is OFF and remaining is ON. Press the M button again and switch to Working Mode. Laser Trigger with Multishot function activates your SLR for multiple times once the laser beam is broken. There are 10 levels on Laser Trigger with Multishot function. Each LED shows how many shots will be taken once the laser beam is broken. 1 shot 10 shots 1. 2. 3. 4. 5. 6. 7. 8. Make sure the camera and NERO are turned off Mount NERO to the camera using the hot shoe mount Plug the release cable to the camera Set your camera to BULB mode First turn on NERO and adjust the interval to the desired level Turn your camera on Press to C button Mirror will be locked and the active LED will blink until the desired time is out Disclaimer: 9. Super Bulb: To use the Super Bulb function, press the M Button and switch to Function th Selection Mode first. Then press the C button until the 9 LED is OFF and remaining is ON. Press the M button again and switch to Working Mode. Super Bulb function activates your SLR and locks the mirror once you press the C button until you press the C button one more time. This mode can be used for taking very long exposures as needed for astro or infra-red photography 1. 2. 3. 4. 5. 6. 7. 8. Make sure the camera and NERO are turned off Mount NERO to the camera using the hot shoe mount Plug the release cable to the camera Set your camera to BULB mode First turn on NERO Turn your camera on Press to C button Mirror will be locked and the active LED will blink until you press the C button one more time 10. Manual: Lightning can be DANGEROUS. We are not liable for any damage or personal injury associated with the use of NERO The NERO is intended for use as a camera shutter release device only and not any other purpose. The NERO is not waterproof. It should be treated and handled with the care of a camera and should not be dropped and/or exposed to extreme heat or moisture. Don’t connect a flash and a camera to NERO at the same time. Camera Settings for Lightning Trigger 1. Set your camera on the tripod and make sure it is steady. 2. Put the camera to the Manual Focus mode. 3. If available, turn off the Image Stabiliz 4. Set the camera focus to Infinity manually. To use the Manual function, press the M Button and switch to Function Selection th Mode first. Then press the C button until the 10 LED is OFF and remaining is ON. Press the M button again and switch to Working Mode. Manual function activates your SLR for multiple times once you press the C button. 5. Turn the mode selection wheel to M (Full Manuel). There are 10 levels on Manual function. Each LED shows how many shots will be taken once the C button is pressed 1 shot 10 shots 9. 10. 11. 12. 13. 14. Make sure the camera and NERO are turned off Mount NERO to the camera using the hot shoe mount Plug the release cable to the camera First turn on NERO and adjust the interval to the desired level Turn your camera on Capture the moment once you press to C button 6. Set the aperture between 4.0 and 8.0. 7. Set exposure time value to maximum 1/10 (This duration can be adjusted per the ambient light by the user.)