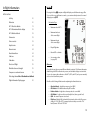
1
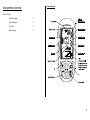
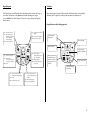
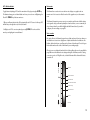
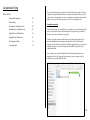
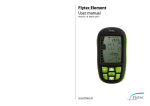
Flytec Element User manual Version 1.1 July 2015 www.flytec.ch Thank you for flying with a Flytec vario. We are proud to present the Element, an ideal choice for any pilot who values accuracy and simplicity. All the information you need to familiarise yourself with the instrument can be found in the Quick Guide included with your vario, and we recommend you start there before digging into the Element User Manual. Table of Contents Instrument overview ............................................................................................ 3 Getting started ....................................................................................................... 6 About Flytec For over 30 years Flytec has taken pride in developing flight instruments of the highest quality. We draw our inspiration from some of the world's most beautiful flying sites near our home in the heart of Switzerland, where we design and test our products. Made by pilots, for pilots–it's as simple as that. In-flight information .......................................................................................... 10 Navigation............................................................................................................. 18 Airspace ................................................................................................................. 25 Stay in touch! Sign up for our newsletter to stay informed of product updates and other useful information: flytec.ch/nl To download this manual in another language, visit element.flytec.ch manuals Competition flying ............................................................................................. 26 Adjustments and customisation ................................................................... 32 Data management ............................................................................................. 36 Firmware updates .............................................................................................. 39 Technical notes and support.......................................................................... 41 Specifications ....................................................................................................... 43 2 Element Diagram Instrument overview In this section: Element Diagram 3 Keypad Diagram 4 Text Entry 4 Menu Diagram 5 3 Keypad Diagram Text Entry The Element's keys serve different functions depending on when and for how long you press them. The keys have a short press function (white lettering) and a longer, 3-second hold function (dark lettering). The keys also help you navigate through the Element menu. When entering data, it may be helpful to visualise the Element's keys as being labelled differently. Here is a guide to how the keys function when in text entry mode. Keypad functions while editing waypoints Press: Select audio volume level Hold: Turn on/off three alarms: Near-thermal tone (page 14) Sink alarm (page 34) Stall alarm (page 35) Press: Toggle between ALT1 and ALT2 (page 12) Hold: Sets ALT1 and ALT2 (page 11) MENU: Selects choices marked F2 Scroll up through character list Move cursor right MENU: Selects choices marked F1 Move cursor left Accept entry and advance to next field Press: Sets ALT3 to zero (page 13) Hold: Activates a menu: F1 - Goto function (page 23) F2 - Activate route (page 20) Press: Switches on (page 6) Toggles between time of day and ALT3 (page 13) Hold: Switches off (page 9) MENU: Escapes current page or steps back one page MENU: Not used Advance character set to capital, lower case, number or symbol or long press to rub out character Escape / cancel entry Scroll down through character list Press: Scroll through seven pages of the Flight Information Display (page 16) Hold: Not used MENU: Scroll up and down in menus Press: Activates information screen with current coordinates, flight time, etc. (page 10) Hold: Main Setup Menu (page 5) MENU: Selects the highlighted choice 4 Menu Diagram Access the Element's Main Setup Menu by pressing and holding MENU for 3 seconds. Then use the arrow keys and OK to navigate forward and ESC to step back through the menu tree. L/#5'6)&09'L)50 !"#$%&'()(*+, -"#(.'/01#* 2#"*& !/3&*+,'4)&$4 !"#$%&4 -"#(.'&%+)4%*"1 2#"*&'5/() 63/5'+/&) 701#*'(*1) 7#+3+/8&'&,9) :)3*+1'(*1) -"#(.'8+);0)53, 7#+3+/8&'<= =)")&) !+);0)53, /1>04&()5& 2#&3%'/1>04&()5& ?/,9*#5&4 A1#& <(9*+&'?2 A1#&' =)")&) 6)+#/"'50(.)+ <5&)+5/"'4)&$4 @-='3*5&+/4& B)/+C&%)+(/" &%+)4%*"1 D/&&)+,'&,9) E#()'F*5) 7"&G'(*1) 6#5H'/01#* :*0&) :)4&*+)'1)8/0"&4 <54&+0()5&'4)&$4 2#&3%'(*1) =)")&) 2+)440+) 3*++)3&#*5 I5#&4 6#5H'&%+)4%*"1 7"&#()&)+ 6#5H'8+);0)53, 69))1 6#5H'/"/+( &%+)4%*"1 2+)440+) J/+#* =#4&/53) J/+#*'4)&$4 69))1 <5&)$+/&)1'K/+#* 6&/""'/"/+( J/+#*'8#"&)+ 69))1'3*++)3&#*5 E#() -**+1#5/&)4 @/4&'&%)+(/" &%+)4%*"1 5 Switching on Getting started The Element comes with two AA alkaline batteries with which the device will operate for about 30 hours. In this section: Switching on 6 GPS acquisition 6 Setting time zone 6 Choosing units 6 GPS acquisition Mounting 6 Detecting take-off 9 Recording flight data 9 Give your Element at least 2 minutes with an unobstructed view of the sky to acquire a GPS signal. GPS 3D will appear at the top of the display screen when the device receives sufficient satellite reception. The Element will automatically calibrate its clock and GPS altimeter. Battery charge state is also indicated. Switching off 9 Press the On/Off key . Confirm On? by pressing OK. Warning: Your radio and mobile phone will interfere with GPS reception, so keep them away from your Element. Setting time zone Time and date are automatically set by GPS, but you must input your time zone. See page 32 for instructions on selecting your UTC offset. Choosing units The Element's default is to use SI units (metric). See page 33 for instructions on how to change your Element's units of measurement. Mounting There are three paraglider mounting options available for the Element, shown on the following pages. A control bar mount for hang gliders is also available. 6 Leg strap mount Harness mount 7 Cockpit mount Hang glider mount 8 Detecting take-off Switching off The Element is programmed to automatically detect your take-off. Launch detection is enabled as soon as GPS 3D has appeared. Your Element will know the moment you begin flying. Switch off your Element at any time by holding down the On/Off key confirming the prompt by pressing OK. Recording flight data The symbol REC will appear at the top of the display screen when your Element is recording flight data. It saves all the data from your flight, and it will only stop recording when it detects your landing or if you switch off your Element. Press and hold and then . Confirm Off? by pressing OK. The Element will also wait for you to switch off once it detects your landing. Switch off by pressing while the flight summary page is displayed. If it is left idle, your Element will switch itself off after 5 minutes to preserve battery life. Note that upon landing, your Element will need a few seconds to determine for sure that you've stopped moving. Once it has, it will display a summary of your flight. While the flight summary is displayed, press to switch off your Element. Flight summary page: • Maximum value of ALT1 • Maximum climb rate of the flight • Maximum sink rate of the flight • Total flight time • Position in Element's memory (most recent flight is always #1) • Date • Time of take-off 9 In-flight information Info key In this section: Info key 10 Altimeters 10 ALT1: Absolute altitude 11 ALT2: Alternative altitude display 12 ALT3: Relative altitude 13 Variometers 13 Vario acoustics 13 Graphic vario 14 Numeric vario 14 Near-thermal tone Pressing the Info key at any time in flight will display a useful information page. After 20 seconds the screen will return to normal, or you can immediately return to the normal display by pressing ESC. Information Page: • Maximum value of ALT1 • Maximum climb rate of the current flight • Maximum sink rate of the current flight • Elapsed flight time 14 • Current GPS coordinates Sink tone 14 • Sink alarm 15 Save current position (see page 21) Direction of flight 15 Wind direction and strength 15 Compass rose and wind arrow 15 Relocating thermalsError! Bookmark not defined. Flight Information Display pages 16 Altimeters As any pilot knows, there are many different altitudes in aviation. The Element determines altitude using both GPS and barometric pressure, and its altitude display is customisable. You can select among three altimeters called ALT1, ALT2, and ALT3, and you can manually set the sea level barometric pressure. We will use the following definitions when explaining the altimeter functions: • • • • • • Absolute altitude – height above mean sea level (MSL) GPS altitude – MSL altitude indicated by GPS satellites Relative altitude – height above a known point such as an airfield AGL Altitude – height over the terrain directly below (above ground level) QNH – the actual air pressure at sea level Flight Level– altitude MSL, in hundred feet intervals, relative to the ISA pressure setting of 1013.25 hPa. FL17, for example, indicates that you are in the 1700' band, between 1650' and 1750' MSL. 10 ALT1: Absolute altitude ALT1 is your altitude above Mean Sea Level (MSL). Toggle between displaying ALT1 and ALT2 (see page 12) by pressing ALT1 / ALT2. ALT1 is automatically set to your GPS altitude as soon as the Element acquires a GPS signal. (Note that ALT1 flashes until the Element has calculated a precise reading.) This altitude calibration means, of course, that the QNH pressure setting is also automatically adjusted. You can manually adjust ALT1 by holding down ALT1, which brings you into the ALT1 setting screen. There are three main reasons you might choose to adjust ALT1: 3. If you want to cancel an adjustment and return to either standard pressure setting or GPS altitude. The F1 and F2 keys will allow you to quickly cancel any ALT1 adjustments and use a standard setting. Press and hold ALT1. Press F1 to confirm the choice to set ALT1 to FL-Alt, MSL using standard atmospheric pressure. OR 1. If you DO know your present altitude, but you DO NOT know your QNH setting. Press F2 to confirm the choice to set ALT1 to GPS altitude. For instance, you notice a sign posted at the take-off giving the actual MSL elevation of the ramp. In this case, you might adjust your ALT1 to match the sign. You will notice that adjusting the altitude setting will also cause a change the QNH pressure setting. Press OK. Press and hold ALT1. Use to adjust ALT1 to the desired reading. Press OK. 2. If you DO NOT know your present altitude, but you DO know your barometric pressure. Perhaps you have an aviation weather report giving the local QNH setting, or perhaps you have a setting from air traffic control. In either case you can change ALT1 to reflect this pressure setting. Press and hold ALT1. Use to adjust ALT1 until QNH matches the desired reading. Press OK. 11 ALT2: Alternative altitude display • Toggle between displaying ALT1 and ALT2 by pressing ALT1 / ALT2. When ALT2 is toggled, your Element will not necessarily display the label ALT2, instead it will indicate whichever ALT2 configuration is presently selected. You can configure ALT2 to show any of four different values using the Instrument Settings menu. Press and hold MENU, then use to select Instrument settings. Relative altimeter (The label ALT2 appears beside the altitude reading. Note that you can adjust this value. These are the available adjustments for ALT2: 1. When in relative altimeter mode, you can rapidly reset the ALT2 relative altimeter to either your current GPS altitude or to zero by holding down the ALT2 key. Press and hold ALT2. Press OK. Use to select Alt2 mode and press OK. Press F1 to set the relative altimeter ALT2 to 0. Use to select your preferred ALT2 mode. OR Press OK. Press F2 to set the relative altimeter ALT2 to your current GPS altitude. Press ESC to return to the Main Setup Menu. Press OK. These are the four available choices for ALT2: 2. When in relative altimeter mode, you can adjust the ALT2 relative altimeter up or down using the arrow keys . • • • GPS altitude (The label GPS appears beside the altitude reading.) Note that you cannot adjust ALT2 when you have selected this option. ALT2 will only display the current GPS altitude. Flight Level (The label FL appears beside the altitude reading.) Note that you cannot adjust ALT2 when you have selected this option, because the Flight Level display is always based on a standard atmospheric pressure value of 1013.25 hPa. ALT1 m/ft inverse (If ALT1 is displayed in metres, then ALT2 displays true altitude in feet. The label ALT1 remains beside the altitude reading but the units change.) Note that you can adjust this value. Adjusting ALT2 in this mode will automatically adjust ALT1 as well. Press and hold ALT2. Use to set the relative altimeter ALT2 to your desired value. Press OK. 3. When in ALT1 m/ft inverse mode, you can adjust ALT2 up or down using the arrow keys . This automatically adjusts ALT1. Press and hold ALT2. Use to set the ALT1 m/ft inverse altimeter ALT2 to your desired value. Press OK. 12 ALT3: Relative altitude Variometers Toggle between displaying ALT3 and the current time of day by pressing the ALT3 key. This altimeter always gives a relative altitude and is easy to reset to zero in flight using the Clear ALT3 CLR A3 key. It has two main uses: The Element has acoustic vario tones and two vario displays: one graphic and one numeric vario. Vario acoustics reflect the values of the graphic vario, not the numeric vario. 1. When your Element detects take-off, it automatically sets ALT3 to zero. In this way, ALT3 will indicate your height above (or below) the launch. The Element's barometric pressure sensor is very sensitive and the vario default settings are designed to help you thermal optimally in normal conditions, so we recommend you do not change them for your first few flights with the Element. Later, if you wish to configure your vario settings, see page 33. Vario acoustics Like most all varios, the Element beeps when you climb and sounds a low tone when you sink. But the vario acoustics are slightly more sophisticated than that. In addition to the familiar climb and sink tones, your Element also features a Near-thermal Tone to help you find weak thermals and it sounds a Sink Alarm if you are sinking rapidly. All vario tones are configurable under the Vario Settings Menu, discussed on page 28. See page 34 for more information about setting and using the Sink Alarm, as well as setting your vario acoustics to "In flight" mode, so that the Element will be silent until it detects your take-off. Climb Climb tone 0 m/s Climb tone threshold Near-thermal tone Near-thermal tone threshold Soundless range Sink tone threshold Sink 2. In flight, reset ALT3 to zero at any time by pressing CLR A3. This can be useful to monitor your height gain in a weak thermal. Sink tone Sink alarm 13 Graphic vario Numeric vario The split bar of the graphic vario shows both your instantaneous vertical speed (climb or sink) and your average vertical speed. The measures are displayed in metres per second, ranging from +10 m/s to -10 m/s in 0.2 m/s increments. (You may also choose feet per minute, ranging from +20 fpm x100 to -20 fpm x100. See page 33 to change your vario display units.) The numeric vario gives your vertical speed averaged over a time interval, displayed in increments of 0.1 m/s from 0 to +/-300 m/s, recalculated every second. The default setting averages the vario readings over the past 5 seconds. (See page 33 to adjust this value.) The wide bar shows your instantaneous vertical speed. It will extend upwards to indicate values from 0 m/s to 5.0 m/s, then begin receding upwards to indicate climbs greater than 5.0 m/s up to a maximum of 10.0 m/s. The graphic vario indicates sink in a similar fashion. Near-thermal tone +3.2 m/s +5.0 m/s +6.8 m/s When the Near-thermal Tone is activated, the symbol ^ appears in the upper right corner of the display. This function is useful when conditions are weak and you are searching for weak thermals with very slow climb rates that might not activate a climb tone. Turn on the Near-thermal Tone and you will hear an indication whenever the Element senses the slight sink indicating you are near a weak thermal. (See page 34 to adjust the Near-thermal Tone threshold.) To activate or deactivate the Near-thermal Tone: A second, narrow bar just to the right of the wide bar on the graphic vario represents your average vertical speed by indicating the current value of the numeric vario (see next section). Press and hold ALARM. Use to select PreTherm. Confirm activating/deactivating the Near-thermal Tone by pressing F1. Press OK. Sink tone The Sink Tone is a low, gradual tone telling you that you are losing altitude. The lower the tone, the higher your sink rate. (See page 34 to adjust the Sink Tone threshold.) 14 Sink alarm Compass rose and wind arrow The Sink Alarm is a continuous tone telling you that you are sinking rapidly. When activated, the symbol v appears in the upper right corner of the display. (See page 34 to adjust the Sink Alarm threshold.) All icons on the compass rose indicate bearings relative to your direction of flight. Your direction of flight is always at the top of this display. The wind arrow appears off to the side. To activate or deactivate the Sink Alarm: Use to select Sink. Confirm activating/deactivating the Sink Alarm by pressing F1. Press OK. Direction of flight Press and hold ALARM. rth e u Tr Direction of flight no ion direct Wind The Element uses GPS to monitor your track over the ground, and it shows your direction of flight relative to north on the compass rose. Note that the Element does not use magnetic compass data and cannot display your heading, i.e., which way you are facing. The GPS compass only works when you are flying or otherwise moving over the earth at 3 km/h or faster. La st Wind direction and strength al pace st airs Wind speed is shown on Flight Information Display Page 3, which you can select at any time using the arrow keys (see page 16.) erm Neare Wind direction is shown on the display as a small wind arrow beside the compass rose. When the arrow points up, you have a tailwind. When the arrow points down, you are flying into a headwind. th Note: The Element calculates wind direction and strength by measuring your track over the ground during 360-degree turns and calculating your drift. For the most accurate wind reading, you should fly two or more slow circles, holding constant speed and bank angle. 15 Relocating thermals Flight Information Display pages To help you in cross country flight, your Element will remember the location of the last thermal as you fly along your route. The bearing to your most recent thermal is displayed as a small arrow on the compass rose. If you fall out of a thermal, or if you are sinking out and want to return to the last thermal, turn your glider until the up arrow indicator appears at the top of the compass rose, then fly straight until you enter the thermal and begin climbing again. In flight, your Element has a lot more information than can be shown all at once on the display screen. Press to cycle through seven pages in the Flight Information Display field, which appears at the bottom of the display screen. You should also use the arrow keys to select Flight Information Display Page 4, which will tell you the bearing and distance to your last thermal. This is shown on page 16. 1. Altimeter graphics This graph shows your altitude during the past 40 seconds. The y-axis will automatically scale itself from 50 m to 100 m (or from 200 ft to 400 ft) if you are climbing or sinking rapidly. (See page 33 to configure your Element's threshold for last thermal strength.) TIP: You can also use the Goto function (see page 23) to guide you to your last thermal, which will appear as _Last in your waypoints list. 2. Variometer graphics This graph shows your rate of climb or sink during the past 40 seconds. The y-axis will also scale itself depending on your vario readings. 3. Wind data This page informs you about the Element's measurement of wind, which is calculated from your drift. For more information about this function as well as the wind arrow, see page 15. Actual track of your flight (0-360°) Wind direction (0-360°) Time since last calculation (in minutes) Wind speed (km/h, kts, or mph, depending on your unit settings) 16 4. Navigation page This page is a multifunction navigation tool that helps you fly to your intended target. Use this page when flying to the next waypoint in an active route (see page 20) or when using the Goto function (see page 23). You can also use this page to help return to the last thermal you climbed in (see page 15). 6. Speed and glide Use this page to help optimise your flight. Should you slow down to minimum sink? Should you use your speed bar? This page makes the decision easy. Speed over ground (km/h, kts, or mph, depending on your unit settings) Name of active waypoint Bearing to waypoint (0-360°) Distance to waypoint (km or miles) 5. Active waypoint: direction and glide While flying to a waypoint, use this page to determine whether or not you can reach your target with enough altitude to continue your flight. The page also shows your track and the required bearing to reach the waypoint. Actual track of your flight (0-360°) Bearing to the waypoint (0-360°) Glide ratio required to reach the waypoint This page also gives a glide path symbol to help you quickly decide if you have enough height to reach the waypoint: Glide ratio over ground Glide ratio required to reach the active waypoint Note that the same glide path symbol from Flight Information Display Page 5 appears here on Page 6 also. 7. Competition data* This screen is useful when flying competitions. See page 26 to learn more about how your Element can help you win races. Position relative to cylinder, and +/- start time Speed required to reach the cylinder edge at start time (before start time), or distance to goal (once started) Distance to cylinder edge *Note that this data field can only be selected when a route is activated. 17 Navigation The Element is the perfect vario to get started with cross-country flying. Here is how you might go about planning and flying a flight using your Element. In this section: Generating coordinates Generating coordinates 18 Entering waypoints manually 19 Uploading waypoints from file 19 Creating a route 20 Activating the route 20 Saving current position as a waypoint 21 Required glide to next waypoint 23 Passing over waypoints 23 Deviating from your route 23 Skipping or repeating waypoints 23 Goto function 23 Erasing the route 24 Erasing individual waypoints 24 Erasing all waypoints 24 The Element saves geographic points in a list of waypoints. You can either naviagete to waypoints individually (“Goto”) or combine several waypoints into a route and fly through those in sequence. The waypoint list has a capacity of 350 waypoints. A route can encompass up to 50 waypoints. First, you will need navigation data. You can get this from your mentor or another pilot, or you can use mapping software to generate your own information. For this tutorial you will use XC Planner, a free online tool (www.xcplanner.appspot.com). You can also use Google Earth or similar software, or even a paper map if you want to do it the hard way. Drag the red line to position waypoints on the map. In XC Planner, right-clicking creates a new waypoint (Control+click on a Mac). Grabbing and dragging the midpoint of the red line also creates a new waypoint. Let's say you want to fly the classic route from Àger to Organyà, in Spain. You will drag the red line to connect likely thermal sources and soarable ridges along the route: 18 To generate coordinates for the waypoints along this route, click the box on the right, labelled Download. Entering waypoints manually The manual way to enter waypoints is shown here using the example of the first waypoint in the list of the example on page 22. Note: see page 4 for a visual guide to help you with text entry. Press and hold MENU, then use Use to select Waypoints. Press OK. to select Edit. Press OK. Press F1 to create a new waypoint. Spell out Ager take-off using to select the letters and F1 / F2 to move back and forth. Use RTE to toggle capital letters and special characters. Holding down RTE will also delete a character. Press OK to move on to the next page. Select N and enter 42° 2.765' for the latitude. Press OK. Select E and enter 00° 44.774' for the longitude. Press OK. Enter 1565 m for the Ager take-off waypoint altitude. Press OK. The waypoint named Ager take-off is now saved. Repeat this procedure to enter the other waypoints. Copy down the information. For now, let's look at how to enter the navigation information manually. (Note: You can also save the waypoints as a file after clicking "Download". You can then drag-and-drop this file directly into your Element. See the next section for instructions.) WP01 WP02 WP03 WP04 WP05 WP06 Ager take-off Vilanova de M Knoll Ridge Santa Fe Organya N N N N N N 42°02.765 42°00.631 42°03.624 42°10.894 42°12.276 42°13.147 E E E E E E 0°44.774 0°54.179 1°01.746 1°04.590 1°18.458 1°19.339 1565 m 813 m 1135 m 1451 m 759 m 549 m Press ESC to return to the Main Setup Menu. Uploading waypoints from file You can also upload waypoints to the Element from many popular file formats using your computer. This feature is a great timesaver when you have many waypoints to enter, or if you've received a waypoints file from someone else—for instance as part of a paragliding competition. 19 The Element currently supports these formats and file extensions: CompeGPS FS waypoints OziExplorer SeeYou WinPilot GPX KML (*.wpt or *.com.wpt) (*.wpt or *.geo.wpt) (*.wpt or *.ozi.wpt) (*.cup) (*.dat) (coming soon) (coming soon) When you connect the Element to your computer it will appear as an external hard drive. Simply drag-and-drop the waypoints file into the folder named waypoints. Switch off your Element. Creating a route To follow your planned cross country flight, you will need to create a route that tells the Element how you want to fly over the waypoints. Note that saving a route creates a file stored separately from the waypoint list already in the device's memory. Press and hold MENU, then select Route. Press OK. Select Edit. Press OK. Press F1 to open the list of waypoints. Use case Ager take-off. Press OK. to highlight your first waypoint, in this Connect the Element to your computer with the USB cable. Use to select the cylinder radius for the waypoint. We recommend the default value of 400 m. Press OK. Open the drive labelled ELEMENT on your computer. Repeat these steps to add the other waypoints on the route. Open the folder named waypoints. Press ESC to save the route and return to the Main Setup Menu. Drag-and-drop the waypoints file from your desktop into the folder waypoints. Activating the route Click Eject or Disconnect Safely before disconnecting your Element. In order to tell the Element you are ready to fly the saved route, you must activate the route. This gives the Element the instruction to start navigating you along the chain of waypoints. Finally, when you restart your Element you must perform the following operation to add the data to your stored waypoints list: Switch on your Element. Press and hold MENU, then use Use to select Waypoints. Press OK. to select Import WP. Press OK. The waypoint files you have copied onto your Element appear as a list. Use the arrows to select the waypoint file you want to import. Select the file of your choice with OK. Note that you will be prompted to enter a start time for your route. For normal cross country navigation, simply select No for the start time. (Entering a start time for your route activates your Element's competition mode. See page 25 for information about flying competition routes.) Press and hold RTE. Confirm Route Start by pressing F2. You will see the prompt Start time. Use to select No. Press OK. The route is now activated and your Element will start navigating automatically upon take-off. Warning: Importing a waypoint file will delete all other waypoints stored on your Element. 20 Saving current position as a waypoint There are two fast and easy ways to save your current coordinates to your waypoints list. 1. Simply create a new waypoint Every time you create a waypoint, the Element offers you its current position as the default coordinates. You can instantly save your current position as a waypoint by simply using the OK key to confirm this default waypoint information. Your position will be stored as a new waypoint with a name comprised of two numbers that represent the date and time you created the waypoint: Ex: 220415 152845 is a waypoint created on 22 April 2015 at 15 h 28 min 45 s (local time). 2. Use the Info key When you call up the Info page by pressing , you can then use OK to automatically save your current location to the waypoints list. The same format is used for the waypoint name. Press . You will see the prompt Pos WP. Press OK. 21 Flying a normal route In flight, the Element will show you the direction to your next waypoint as a bold arrow appearing in the compass rose. To fly to the next waypoint on your route, turn your glider until this arrow stays pointed toward the top of the compass rose. Every time you cross a waypoint, your Element will sound a tone and begin pointing you toward the next waypoint. Compass Rose In the example flight, when you fly from Ager take-off, the device will automatically point the way to Vilanova de M. Once you pass over Vilanova de M, your Element will point you toward Knoll, and so on. Shown below, the pilot has passed Knoll and is heading toward Ridge, but the Element shows the glider is slightly off course. The Element also shows that our pilot's next turn will be to the right, to set a course for Santa Fe. All icons on the compass rose indicate bearings relative to your direction of flight. Your direction of flight is always at the very top of this display 22 Required glide to next waypoint Skipping or repeating waypoints Use Flight Information Display Pages 5 and 6 to help you determine if you have enough altitude to reach your next waypoint when you set off on glide. Page 6 shows you your current glide ratio along with the required glide ratio to reach the next waypoint at the saved waypoint altitude. If your L/D ratio over ground is higher than L/D-required, accelerate with confidence! If you are under the required glide ratio, search for lift. A useful option is to skip forward or backward within an active route. Imagine you just caught a rocketing thermal to over 3000 m at Vilanova de M, so you decide to skip Knoll and proceed straight to Ridge instead. Press and hold RTE. Use to select Ridge. Press OK. You will now be guided to the waypoint you have selected. Once you reach it, the active route will continue from there. Use the same procedure to skip backwards to a previous waypoint in your route. Goto function Navigate to any stored waypoint at any time using the Goto function. Imagine you have passed Knoll but you are losing too much altitude to continue on. You decide to navigate back to Vilanova de M for a safe landing field. Press and hold WPT. Activate Goto - by pressing F1. to select Vilanova de M Press OK. (For more discussion of these displays, see page 16.) Use Passing over waypoints The arrow in the compass rose will now point you to Vilanova de M. You can also easily cancel the Goto function. The Element will sound a short, cheerful tone when you cross a waypoint cylinder edge, and the compass rose will point you toward the next waypoint on your route. Press and hold WPT. Cancel Goto ! by pressing F1. Deviating from your route You do not need to follow your route exactly as planned. It is easy to return to a previous waypoint on the route, or to skip a waypoint, or to interrupt your route and navigate to any other waypoint in your stored waypoints list. As long as you still have an active route, the Element will resume pointing you to the next waypoint along your route once you cancel the Goto function. Deactivating the route An activated route will remain in active mode until you deactivate it, even if you switch off your Element. You also cannot edit the route until you deactivate it. Press and hold RTE. Deactivate Route ! by pressing F2. 23 Erasing the route Deleting the route will not erase the waypoints from your stored waypoints list, because they are stored separately. Press and hold MENU, then use to select Route. Press OK. Select Del all WP. Press OK. You will see the prompt Delete Route? Press OK. Erasing individual waypoints You can also choose to erase waypoints from your Element's stored waypoints list. If the waypoints you delete are also part of a saved route, they will remain in the route. Press and hold MENU, then use to select Waypoints. Press OK. Select Edit and press OK. Use to select Ager take-off. Press F2 to delete. Your waypoint Ager take-off has been deleted. Erasing all waypoints Be careful with this feature! It is easy to erase all the waypoints from your Element. Press and hold MENU, then use to select Waypoints. Press OK. Select Delete and press OK. Confirm all WP Delete? by pressing OK. Press ESC to cancel. 24 Airspace We will soon offer airspace support as a new navigation feature of the Flytec Element. (Coming soon!) Visit element.flytec.ch to check for the most current firmware version. Sign up for our newsletter at flytec.ch/nl to be notified of update releases. 25 Competition flying In this section: Competition waypoints 26 Task briefing 27 Entering the competition route 28 Activating the competition route 28 Flying before the official start 29 Flying after the official start 30 Crossing the goal line 30 Scoring the task 31 This section explains step-by-step how to use the Flytec Element to perform your best in competitions using the "Berga Invitational" as a step-by-step example. If this is your first comp, don't panic! Learning the ropes is not as complicated as it might seem, and we will make it as easy as possible. That way, all you need to focus on is flying the race. Competition waypoints You take the first step to success well before race day when you receive the waypoints file from your competition organiser and then import those waypoints into your Element. (This procedure is discussed in detail on page 19.) Typically, competition organisers will designate a large number of waypoints to give themselves flexibility when creating the competition tasks later. They will save the waypoints as a file, and then they will either email the waypoints file to you as part of your registration package or else make the waypoints file available for download on the competition website. In our example, you've downloaded the file from the Berga Invitational site and are dragging it into the folder “waypoints” which appeared on your computer once the Element was connected with the USB cable. 26 Next you click "eject," then disconnect the Element from the computer. Switch the Element on and use MENU > Waypoints > Import WP to add the waypoints to your stored waypoints list. (See page 19 for detailed instructions on importing waypoints.) With this information you are ready to load the task into your Element. The Berga Invitational has briefed you on today's task: Start type: EXIT Gate open: 11:30 (UTC+2) Note: the Element stores 350 waypoints. You may have to delete some waypoints from your Element's memory to clear enough space before importing your competition waypoints. Task briefing Your competition organisers will host a briefing during which they explain the day's "task". A task is just a route flown over designated waypoints, as fast as possible. There are several things that you need to pay attention to in order to give your Element the information it needs to guide you along the task. • Start time. The task will begin at a designated time called a start gate. Sometimes the task may specify multiple start gates, meaning you may start at one time, or ten minutes later, or ten minutes after that, for instance. • Start type. The task will begin as either an EXIT cylinder (more common) or as an ENTER cylinder (less common). If your start is an EXIT cylinder, then you must be inside the cylinder when the start gate opens and fly out of the cylinder to begin the task. If your start is an ENTER cylinder, you must be outside of the cylinder when the start gate opens and then fly into the cylinder to begin the task. • Waypoints. Which waypoints make up the task route, and in what order? Critically, what is the cylinder radius for each waypoint? • Goal. Is the task complete when you cross the cylinder of the final waypoint, or must you cross a goal line defined by the final waypoint? Waypoint Radius Start T02 1 km TP#1 A31 400 m TP#2: A07 400 m Goal: L01 400 m 27 Entering the competition route Press and hold RTE. Confirm Route Start by pressing F2. If you have a route already active on your Element, deactivate it. (See page 23) If you have a route already stored on your Element, erase it. (See page 24) You will see the prompt Start time. Use to select yes. Press OK. Use to enter 11 for the start time hours. Press OK. Press and hold MENU, then select Route. Press OK. Use to enter 30 for the start time minutes. Press OK. Select Edit. Press OK. Use to select 1 for the number of start gates. Press OK. Use to choose EXIT cylinder Now enter the task waypoints: Press F1 to open the list of waypoints. Use Use to enter 1000 m for the cylinder radius. Press OK. Press F1 to open the list of waypoints. Use Use Press OK. to highlight A31. Press OK. to highlight A07. Press OK. to enter 400 m for the cylinder radius. Press OK. Press F1 to open the list of waypoints. Use Use . to enter 400 m for the cylinder radius. Press OK. Press F1 to open the list of waypoints. Use Use to highlight T02. Press OK. to highlight L01. Press OK. to enter 200 m for the cylinder radius. Press OK. Press ESC to save the route and return to the Main Setup Menu. Activating the competition route Now you must activate the route. Note: selecting "yes" at the prompt "Enter start time" automatically activates the Element's competition mode. Warning: make sure your Element's time zone setting matches your competition location or you will not start the race on time. (See page 32 to change your time zone.) 28 Flying before the official start Pre-start Position Symbol You'll want to be in the air, jockeying for height and position, so that when the start gate opens you are as close to the starting line as you can be. The Element will help you get an optimal start. In the air, use the arrow keys to select Flight Information Display Page 7, which will indicate your position relative to the start cylinder as you wait for your start time. ) ) You are inside the start cylinder You are outside the start cylinder (Flashing if you are on the wrong side of the cylinder for a successful start.) Compass Rose: Before Start Gate Opens Position relative to cylinder, and +/- start time Speed required to reach the cylinder edge at start time If you are inside the start cylinder, the compass rose will show you your position within the cylinder, as well as the direction to the next waypoint. Distance to cylinder edge Direction of flight If you are outside of the start cylinder, the compass rose will point the way back inside. rth e u Tr no int in er n d io lin sit cy Po tart s po way t x Ne 29 The Element will give two separate notifications of a successful competition start: • First, a tone sounds when the countdown timer reaches 00:00:00, meaning that the competition has begun and the start gate is officially open. • Second, a Start OK message will appear and a tone will sound when you cross the start gate correctly. waypoint at the saved waypoint altitude. If your L/D ratio is higher than required, you should reach goal. If you are under the required glide ratio, you need more altitude to reach goal. For more information about this display, see page 16 Special note: Multiple start gates If your competition specifies multiple start gates and you've input that information when setting the route in your Element, the device will assume you want to take the first start gate and watch for you to cross the start cylinder once the start time countdown reaches zero. If you wish to skip a start gate and use then next one, you must enter the route menu and re-select the first waypoint. Then the Element will reactivate the start cylinder and reset the start time countdown according to the start gate interval. It is also important to remember how your competition defines the goal. The Element will notify you that you have reached the final waypoint as soon as you cross the cylinder boundary defined by its radius—but that might not satisfy the task requirements! It is always best to fly straight for a minute or two after crossing the final cylinder boundary to ensure you cross the virtual goal line defined by the task. Flying after the official start Once you cross the start cylinder, the Element will guide you through the waypoints just like it does during a normal navigation. At any time after the official start, use Flight Information Display Page 7 to see your elapsed race time, distance to goal and distance to the next waypoint along your task. Position relative to cylinder, and +/- start time Distance to goal (once started) Distance to next waypoint Crossing the goal line The final glide to goal can make or break you in a competition. Be sure to use Flight Information Display Page 6 to judge if you have enough altitude to glide to goal. Page 6 shows you your current glide ratio along with the required glide ratio to reach the next 30 Scoring the task Even if you are first across the goal, you can't win unless the judges can download and verify your tracklog. Bring your USB cable to the competition, and use it to connect to the scorer's computer. Drag and drop your winning IGC file onto their desktop. See you on the podium! *Remember, in case of any accident where you or the judges accidentally delete your IGC file during the download, you can always manually export the flight and create another IGC file. (See page 38.) 31 Pilot information Adjustments and customisation You can enter your name, aircraft type, and aircraft ID number under this menu. In this section: Note: see page 4 for a visual guide to help you with text entry. Pilot information 32 Time zone (UTC) 32 Units of measurement 33 Coordinate format 33 Audio volume level 33 Variometer adjustments 33 Numeric vario averaging interval 33 Last thermal threshold 33 Turbulence filter 34 Climb audio menu Climb threshold Audio mode Climb frequency Frequency adjustment Pitch adjustment Pitch mode Near-thermal threshold 34 Sink audio menu Sink threshold Sink frequency Sink alarm threshold 34 External wind vane sensor 35 Airspeed calibration 35 Stall alarm 35 Press and hold MENU, then use to select Pilot. Press OK. Select a field to edit and press OK. Spell out your information using to select the letters and F1 / F2 to move back and forth. Use RTE to toggle capital letters and special characters. Holding down RTE will also delete a character. Press OK. Press ESC to return to the Main Setup Menu. Time zone (UTC) Your Element's time and date are automatically set by GPS, however you must input your time zone in the form of an offset from Coordinated Universal Time (UTC). To look up your UTC setting, use www.worldtimeserver.com and click on your country and city. Press and hold MENU, then use to select Instrument settings. Press OK. Select Time zone and press OK. Use to enter your UTC offset. Press OK. Press ESC to return to the Main Setup Menu. 32 Units of measurement Variometer adjustments The Element offers different units of measurement for altitude, speed, pressure, rate of climb/sink, distance, time, and coordinates. Default settings are in SI (metric) units. To select other units, follow these steps: The Element vario is highly customisable. This section explains all the possible adjustments. Remember: when in doubt, use the default settings. Press and hold MENU, then use to select Instrument settings. Press OK. Use to select Units. Press OK. Use to select the unit to be changed. Press OK. Now use to select your unit preference. Press OK. Press ESC to return to the Main Setup Menu. Coordinate format The Element uses the degrees decimal minutes format (dd° mm.mmm') as its default for GPS coordinates because it introduces fewer rounding errors. Selecting other formats may make your GPS less accurate, on the order of 20 metres. Follow the procedure above for changing units of measurement and select Coordinates. The Element supports these coordinate formats: dd° mm.mmm' (default) dd° mm' ss" dd.ddddd° UTM (coming soon in a firmware update) Audio volume level Adjust your Element's audio volume using the key. Pressing it repeatedly allows you to cycle through five audio levels. Audio level is indicated at the top of the display screen with the Audio Symbol. Symbol Level MUTE 25% ) 50% )) 75% )))) 100% Numeric vario averaging interval This value may be adjusted from 1 to 30 seconds. Though the default setting is 5 seconds, it may be useful to adjust the averaging interval to a longer setting. A good strategy is to set the numeric vario averaging interval to at least the time it takes you to turn a complete circle when thermalling: approximately 15 seconds or longer. Press and hold MENU, then use to select Vario settings. Press OK. Use to select Integrated vario. Press OK. Use to select a value. Press OK. Press ESC to return to the Main Setup Menu. Last thermal threshold The Element records thermals using readings of its numeric vario. You can adjust the threshold of the last thermal value from between 0.1 to 3.0 m/s (or 0.2 to 6 ft/min x 100). The default setting is 0.5 m/s or (1.0 ft/min x 100). Press and hold MENU, then use to select Vario settings. Press OK. Use to select Last thermal threshold. Press OK. Use to select a value. Press OK. Press ESC to return to the Main Setup Menu. 33 Turbulence filter The Element has four sensitivity settings to filter turbulence so you get the most usable information from the instrument. The default setting is Level 1. Setting 0 1 2 3 Filter amount Weak Normal High Extreme Appropriate conditions Calm, winter flying Normal flying, light turbulence Turbulent thermals Very rough and strong thermals Climb audio menu Under this menu are numerous fine-tune adjustments you can make to your beeping climb tones. This section will explain them briefly. First, navigate to the Climb audio menu. Press and hold MENU, then to select Climb audio. Press OK. From here, you will be given several items to adjust. Climb threshold (default is 10 cm/s or 20 ft/min x 100) This value sets how fast you must climb to start hearing climb tones. The Element is so sensitive that on some days, such as when strong thermal cycles are coming up the hill, it may sound climb tones even while you are standing around preparing to launch. You can raise this value to prevent this. You can also change the Audio mode (see next). Audio mode (default is "Always") Choose between two settings: Always or In flight. When in the default mode of Always, the Element will emit vario tones whenever it is switched on (and you have the audio volume level above "mute"). It can be inconvenient to hear tones when preparing your gear for flight or if you want to use your Element to record hike-and-fly adventures, for instance, because you won't want to hear vario tones while you walk through nature. Selecting In Flight ensures that the Element will only emit vario tones after it detects your take-off. When your vario is set to In flight audio mode, you can still get a vario sound by briefly pressing the key. You will have vario sound for the next 20 seconds, then your Element will be silent again until it detects a take-off. Climb frequency (default is 800 Hz) You can raise or lower the frequency of the lowest climb tone to hear overall higher or lower pitched beeps. Frequency adjustment (default is 2) The Element climb tones are set to raise in frequency the faster you climb. Some pilots enjoy hearing very excited, high-pitched tones from their varios—in which case they should choose a higher number for this setting. If you want a calmer vario in strong climbs, choose a lower value. Pitch adjustment (default is 2) The Element also beeps at a faster rate when you are climbing faster. Just like the frequency adjustment, if you want your vario to beep wildly, choose a higher number for this setting. If you want a calmer vario in strong climbs, choose a lower value. Pitch mode (default is linear) Choose linear or exponential for this setting, which matches the number of beeps per second to the rate of climb. Exponential will give a rapidly changing pitch from 0.0 - 2.0 m/s, then gradually increasing pitch in climbs from 2.0 - 10.0 m/s. Near-thermal threshold (default is -0.5 m/s or -1.0 ft/min x 100) This tone can be set from -1.0 to 0.0 m/s (or -2.0 to 0 ft/min x 100) and gives you notice that you are approaching a thermal. Sink audio menu This menu lets you adjust your sink tones. Sink Alarm is also located in this menu. Navigate to the Sink audio menu: Press and hold MENU, then use to select Sink audio. Press OK. 34 From here, you will see three items to adjust. Sink threshold (default is -0.5 m/s or -1.0 ft/min x 100) This value sets how quickly you must be sinking in order to activate a sink tone. Sink frequency (default is 600 Hz) Adjust the frequency of the highest sink tone to hear overall lower or higher pitched sink tone. Sink alarm threshold Adjust the vario value at which your Element will sound the Sink Alarm, letting you know you are rapidly losing altitude. External wind vane sensor Press and hold ALARM. Use to select Stall. Confirm activating/deactivating the Stall Alarm by pressing F1. Press OK. Stall Alarm threshold can be set to any value from 15.0 to 99.9 km/h (or from 8.1 to 53.9 kts or from 9.3 to 62.0 mph). Press and hold MENU, then use The Element can be connected to an external wind vane sensor, available for purchase from your vendor. Normally, the Element displays Ground Speed with the label GND shown on the screen, but when connected to a functioning airspeed sensor the label will change to AIR and the Element will display airspeed instead. to select Speed. Press OK. Use to select Stall alarm. Press OK. Use to enter your desired airspeed for the Stall Alarm. Airspeed calibration Press OK. Airspeed can be corrected +/-50% under the Speed menu. This could be useful if the shape of your pod harness is affecting your speed sensor’s accuracy, for example. Press ESC to return to the Main Setup Menu. Press and hold MENU, then use to select Speed. Press OK. Use to select Speed correction. Press OK. Use to enter your desired speed correction. Press OK. Press ESC to return to the Main Setup Menu. Stall alarm Stall Alarm only functions when your Element is connected to an external sensor that provides it with airspeed data. When the Stall Alarm feature is activated, your Element will sound a loud tone if your airspeed drops below the Stall Alarm threshold. To activate or deactivate the Stall Alarm: 35 Recording interval (scan rate) Data management Recording interval (scan rate) 36 Record mode 36 While the Element updates its position every second using GPS, its default setting is to record every 10 seconds in order to manage tracklog file size. The record interval, called scan rate, is adjustable from between 1 to 30 seconds. At 1 second scan rate, your Element can record a single flight of up to 5.4 hours. Complete flights are then stored in the Element's general memory, which can hold 10,000 hours of flight time. Uploading flights to your computer 37 Press and hold MENU, then use Manually exporting flights 38 Deleting flights from your Element 38 In this section: to select Flight memory. Press OK. Use to select Scan rate. Press OK. Use to enter your desired value. Press OK. Press ESC to return to the Main Setup Menu. We recommend you keep the scan rate between 5-10 seconds and manage the memory capacity by deleting flights from your Element once you have transferred the data to your computer. This scan rate range is especially important if you will be uploading your flights to an online contest site. Record mode The Element will default to automatic flight recording mode. You can disable automatic flight recording and choose manual recording mode. This could be useful if you wanted to record a hike-and-fly adventure, for instance, including your track while walking. Press and hold MENU, then use to select Flight memory. Press OK. Use to select Record mode. Press OK. Use to select Man. Press OK. Press ESC to return to the Main Setup Menu. In manual mode, your Element will begin recording as soon as it acquires a GPS fix, indicated by the symbol GPS 3D. It will stop recording when you switch it off. 36 Reviewing flights on your Element Uploading flights to your computer The most recent 50 flights are stored in chronological order on the Element and are available for review until you delete them. To review the summary of any flight, use the Flight Memory menu. The extended memory of your Element will hold additional flights, but they are only accessible using a USB connection. The Element saves flight data automatically as IGC track files for online contests. (Coming soon, in a firmware update, tracklogs will also be saved as KML files for Google Earth.) Your Element works as a USB mass storage device, so when you connect it to your computer it will appear as an external hard drive. Press and hold MENU, then use Your track files are stored in a folder named track. to select Flight memory. Press OK. Use to select Flights. Press OK. Switch off your Element. Use to select a flight. Connect the Element to your computer with the USB cable. Press OK. Open the drive labelled ELEMENT on your computer. Open the folder named track. Flight summary page: Drag-and-drop the tracklog files to your desktop. • Maximum value of ALT1 Click Eject or Disconnect Safely before disconnecting your Element. • Maximum climb rate of the flight • Maximum sink rate of the flight Note: if you accidentally delete the IGC file while trying to upload it, do not panic. Use the manual export feature below to re-create the IGC file from the Element's memory. • Total flight time Warning: Your Element consumes battery power when in USB mode. Do not leave it connected to your computer for an extended period of time or you will drain your battery! • Position in Element's memory Warning: Always choose "Eject" on a Mac or "Disconnect Safely" on a PC before disconnecting your Element! • Date • Time of take-off 37 Manually exporting flights Your Element has a deep storage memory that will allow you to recover a tracklog even if you accidentally delete the IGC file on your computer. Follow these steps to re-create and export the IGC file from a flight: Press and hold MENU, then use to select Flight memory. Press OK. Use to select the flight summary page for the flight you would like to manually export to IGC. Press OK. Confirm Export? by pressing OK. Use ESC to cancel. Finally, follow the procedure above for uploading flights to your computer. In the folder named track you will find the new IGC file for the flight you have exported. Deleting flights from your Element Follow these steps to delete all flight data stored on your Element. This procedure cannot be undone. Press and hold MENU, then use Use to select Flight memory. Press OK. to select Delete. Press OK. Confirm all flights Delete? by pressing OK. Use ESC to cancel. 38 Firmware updates Flytec will periodically issue firmware updates for the Element to improve its functionality and offer new features. It is important to upgrade to the latest firmware version. In this section: The current version of your software is indicated, when starting up your Element. If the vario is switched on, you can check your version as follows: Installing a firmware update 39 Next update 40 Press and hold MENU then use the Future updates 40 Use the arrows to navigate to factory settings. Press OK. and choose serial number. Press OK. What you see displayed is the first line of the firmware version, below is the serial number of your Elements (S/N) as well as an internal identifier. Visit element.flytec.ch to download the most current firmware version. Sign up for our newsletter at flytec.ch/nl to be notified of update releases. Warning: Your Element consumes battery power when in USB mode. Do not leave it connected to your computer for an extended period of time or you will drain your battery. Warning: be sure you have fresh batteries before installing new firmware! If your Element runs out of battery power while it is updating its firmware, it may not work properly. Warning: Always choose "Eject" on a Mac or "Disconnect Safely" on a PC before disconnecting your Element. Installing a firmware update Because your Element works as a USB mass storage device, updating the firmware is fast and easy. When you connect it to your computer it will appear as an external hard drive. Download the new firmware in your language, then connect your Element, and drag-anddrop the UPG file into the folder named update. 39 Switch off your Element. Future updates Connect the Element to your computer with the USB cable. These upcoming firmware upgrades will give your Element even better capabilities: Open the drive labelled ELEMENT on your computer. • Airspace support Open the folder named update. • Optimised competition route Drag-and-drop the UPG file from your desktop into the folder update. • Coordinates in UTM format Click Eject or Disconnect Safely before disconnecting your Element. • AGL altitude (above ground level) Switch on your Element. • Additional languages Confirm Update? by pressing OK. • Flight data export for Google Earth Your Element will read the new firmware and automatically update itself. Note that this could take a few minutes. The firmware file remains in the update folder after the update, but its ending changes from .upg to _pg. If you change the ending back to .upg, your Element will offer to install it again the next time you switch it on. If multiple files with the ending .upg exist in the update folder, the Element will automatically choose only the newest one. Error messages When updating the software of your Element, you may get one of five error messages. Error 1 There is no update file. Go through the procedure above and try again. Error 2 The update file is corrupt. Go through the procedure above and try again. Error 3 There is more than one vaild update file. Check the contents of your update folder and ensure there is only one file ending in .upg Error 4 An error occurred in the Element’s sub-processor. Try again and if it keeps failing, contact Flytec. Error 5 An error occurred in the Element’s main processor. Try again and if it keeps failing, contact Flytec. 40 Technical notes and support Batteries In this section: Your Element comes with two AA alkaline batteries. Battery life in normal use should last around 30 hours. If you store your Element for long periods of time, remove the batteries to prevent corrosion. Batteries 41 Maintenance 41 Reboot 41 If exposed to water 41 Warranty 42 Technical support 42 If you choose to power your Element with NiMH rechargeable batteries, it is important to configure the power supply setting on the device. Press and hold MENU, then use to select Instrument settings. Press OK. Use to select Battery type and press OK. Use to select NiMH 2.1Ah. Press OK. Press ESC to return to the Main Setup Menu. We do not recommend using NiCad rechargeable batteries in the Element. Maintenance The Element is a sensitive instrument–handle it gently. Always store it in its cloth bag when not in use, and only wipe it clean with a soft, damp cloth. Never expose the Element to extreme temperatures, water, or mechanical force. Reboot In the event your Element locks up, you may perform a hard reboot by removing the batteries for 5 minutes before replacing them and restarting the device. If exposed to water The Element is not water resistant! Exposure to water or any other liquid will cause serious damage. In case your Element gets wet, remove the batteries immediately to prevent more damage. If your Element was exposed to salt water, rinse it in warm, clean, fresh water. Dry your Element thoroughly and return it to your vendor or directly to Flytec for servicing. 41 Warranty Flytec provides a 2-year warranty on all our flight instruments, and we encourage you to contact us via our website any time for support. After your warranty has expired we will still repair your Element at a reasonable charge. Technical support Direct all inquiries to your vendor, or directly to Flytec via our website flytec.ch. 42 Specifications Altimeter Range: Resolution Scale: QNH: ALT1: ALT2: ALT3: 0 to 12,300 m 1 m or 1 ft m or ft Air pressure in hPa or inHg Absolute altitude Absolute or relative altitude Differential altitude or AGL (coming soon) Variometer Units: m/s or ft/min x 100 Graphic display Range: ±10 m/s or ±20 ft/min x 100 Resolution: 0.2 m/s or 0.4 ft/min x 100 Digital display Range: Scale: Integrator: Acoustics Volume: ±300 m/s or ±600 ft/min x 100 0.1 m/s or 0.1 ft/min x 100 Adjustable from 1 to 30 sec 4 volume settings All base frequencies and modulations can be modified Climb acoustics Tone and interval modulation with selectable lower threshold Maximum interval frequency threshold: automatic (smart interval) or manual selection from 3 to 11 m/s Sink acoustics Discreet near-thermal tone with selectable lower threshold Discreet sink tone with selectable upper threshold Loud sink alarm with selectable upper threshold Stall alarm (with optional external airspeed sensor) GPS Channels: Update rate: 48 1 Hz, independent of selected recording interval 43 Airspeed measurement (with optional external sensor) Range: 0 km/h up to 120 km/h Units: km/h, kts, or mph Resolution: 1 km/h, 1 kt, or 1 mph Adjustments: ±50% Connectivity Connection: Compatibility: Recording Flights: Recording interval: Memory capacity: Flight data file formats: Waypoints Capacity: Entry: Coordinate formats: File formats: Micro-USB cable, data exchange through file copy Mass storage, compatible with Windows, Mac OS X, Linux, Android (through OTG cable) Miscellaneous Dimensions: Weight: Power supply: Operating time: Charge state: Operating temp: Storage temp: Languages: Warranty: 138 x 74 x 23 mm 178 g (including batteries, without mount) 2 AA alkaline batteries or NiMH accumulators 30 hours (approximately) Continuously monitored battery voltage, with indicator -10 °C to 50 °C -30 °C to 70 °C English, German, French (additional languages coming soon) 24 months 50 flights with start time/date, flight duration, maximum altitude, maximum climb rate, maximum sink rate 1 s to 60 s Extended data storage for 10,000 hours of flight time IGC (.igc), Google Earth (.kml, coming soon) 350 waypoints Store current position, manual entry, load waypoints from file dd°mm.mmm’, dd°mm’ss”, dd.ddddd°. CompeGPS (.wpt), GEO (.wpt), Ozi Explorer (.wpt), SeeYou (.cup), WinPilot (*.dat) Coming soon: GPX (.gpx) and KML (.kml) Routes Capacity: Entry: Competition route: 1 route with up to 50 waypoints Selection from waypoints list Start time, number of start gates, start gate interval time Competition Support Standard: Advanced: Competition route (guided through cylinder centres) Optimised competition route (coming soon) Airspace support (coming soon) Distance and direction to nearest restricted airspace Proximity warning of restricted airspace Nearest exit of restricted airspace 44