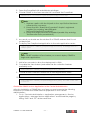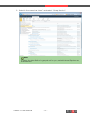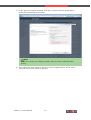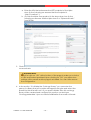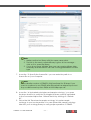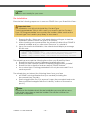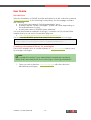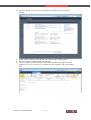
1
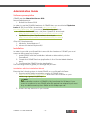
USER MANUAL Version 1.0 DIQA Projektmanagement GmbH Pfinztalstraße 90 76227 Karlsruhe http://www.diqa-pm.com Document Information Document Type created released Version Status GRASP manual v01.docx User Guide 2012-12-01 0.1 2012-12-10 1.0 Hansch Hansch Final History: Version Date 0.1 0.1c 1.0 Approved 2012-11-07 2012-12-10 2012-12-10 modified by Description dh MER DH Created initial version Corrections Final version Place, Date Name th Karlsruhe, December 10 , 2012 © Copyright 2012 DIQA Projektmanagement GmbH Pfinztalstrasse 90 76227 Karlsruhe, Germany Fone: +49 721 609 517 26 Email: [email protected] GRASP 1.0 User Manual -2- Hansch Table of Contents Document Information ................................................................................................ 2 Introduction .................................................................................................................. 4 Product Overview ........................................................................................................ 5 Administration Guide .................................................................................................. 6 Software prerequisites ............................................................................................. 6 Installation................................................................................................................. 6 Installation with the Installation Wizard ......................................................................... 6 Alternative: Installation via the PowerShell ...............................................................10 Create the GRASP Service Application in the Central Administration........11 Configuration of the GRASP Service Application..................................................14 De-installation ........................................................................................................18 User Guide ..................................................................................................................19 Introduction ............................................................................................................19 Creating a document library for ontologies ......................................................19 Managing ontologies in the ontologies library .................................................22 Add an ontology...................................................................................................................23 Upload on ontology into the triplestore .....................................................................24 Create a revision of an ontology ..................................................................................25 Delete an ontology..............................................................................................................26 Query formulation in the SPARQL-webpart ........................................................26 Technical Support......................................................................................................29 Download new releases of GRASP ......................................................................29 Support inquiries ....................................................................................................29 Buying a license.....................................................................................................29 GRASP 1.0 User Manual -3- Introduction GRASP for SharePoint provides ontology management and query answering features for SharePoint 2010. This document contains all the information needed to install and use this product from DIQA Projektmanagement GmbH: Product overview, Administration incl. pre-requisites, installation, activation and configuration, User guide and Technical support. GRASP 1.0 User Manual -4- Product Overview SharePoint does not provide support for Big Data- and Semantic Webstrategies. Therefore you are faced with these challenges: 1. Your enterprise ontologies and taxonomies are valuable company assets that require to be managed, stored, preserved, and deliv ered according to your SharePoint strategy. 2. Your Big Data- and Semantic Web-tools generate insights that are important for you SharePoint users. GRASP directly supports your strategy by introducing features into SharePoint to: 1. Manage ontologies centrally in SharePoint to foster collaboration amongst ontologists and to ensure preservation and compliance with the ECM-strategy of your company. 2. Give business users access to semantic data by introducing SPARQLcapabilities into SharePoint. With the GRASP ontology management features you can: Upload ontologies into a SharePoint-ontology library in the most common syntaxes. Grant access to ontologies according to your security policies. Inspect metadata about ontologies that is extracted automatically and stored in SharePoint. Manage versions of ontologies and create local revisions. Add metadata to ontologies as you need it. Compatible with common ontology editors (e.g. Protégé or NeOn Toolkit) With the GRASP query answering features you can: Upload managed ontologies into RDF-stores from within SharePoint. Formulate queries against uploaded ontologies using SPARQL. Re-use query results in SharePoint-web parts. GRASP connects to any W3C compliant SPARQL 1.1-endpoint and is compatible with these RDF-stores: “Triplestore basic” (DIQA) “Virtuoso Univ ersal Server” (Openlink Software) “Topbraid live” (Topquadrant) GRASP 1.0 User Manual -5- Administration Guide Software prerequisites GRASP requires SharePoint Server 2010. Server Requirements: 1. SharePoint Server 2010 In order to use the SPARQL-features of GRASP then you must install Triplestore basic v1.7.1 (from DIQA, download: http://www.diqapm.com/Triplestore_basic) or one of the following products: Virtuoso Univ ersal Server v6.4 (from OpenLink, download: http://download.openlinksw.com/virtwiz/virtuoso.php) TopBraid Live (from TopQuadrant, download: http://www.topquadrant.com/products/TB_Live.html) Client PC Requirements: 1. Windows Vista/Windows 7 2. Microsoft Internet Explorer 8,9 Installation In order to provide your SharePoint users with the features of GRASP you must execute this sequence of steps: 1. Install GRASP with the Installation Wizard or alternatively via the PowerShell, 2. Create the GRASP Service Application in the Central Administration and 3. Configure the GRASP Service Application The following sections guide you through this process. Installation with the Installation Wizard Execute the following steps to install GRASP on your SharePoint Farm: 1. Download the latest evaluation version of GRASP from: http://www.diqa-pm.com/GRASP and store it as local file on your server, e.g. “grasp-1.0_B27.zip”. Note: The evaluation version of GRASP is fully functional for 30 days. If you want to continue to use GRASP after this period has elapsed you must buy a valid license key from DIQA at: [email protected] 2. Extract the zip-archive on your server. GRASP 1.0 User Manual -6- 3. Execute the file “Setup.exe” with administrator privileges to start the Installation Wizard, which will open in a window: 4. Click on next to perform the system check which indicates if GRASP can be installed: 5. Click on next to see the End-User License Agreement (EULA). If you agree with the license agreement then tick the tick-box named “I GRASP 1.0 User Manual -7- accept the terms in the License Agreement”. 6. Click on next to see the Web Applications where the GRASP Solution Features is going to be deployed in: Note: You cannot change the deployment targets. If you click on “next” then the following features will be installed: 1. “GraspServiceApplication_Installer” (ID: “22cd66d7-4408-4aee96b6-a4214cb57b87”) with scope: Farm 2. “GraspServiceApplication_Grasp “ (ID: “0405ef4b-55a2-4c76aea6-a76c6f8d2fa3”) with scope: Site Collection The “GRASP service application grasp”-feature will be deployed on ALL site collections of all web applications. GRASP 1.0 User Manual -8- 7. Click on next to initiate the deployment process. Upon successful deployment the installation wizard will look like this: 8. Click on next get the list of web applications where the solution has been deployed in. This list will read like this: ***** SOLUTION DEPLOYMENT ***** <SERVER> : http://<server>:14277/ : The solution was successfully deployed. <SERVER> : http://<server>/ : The solution was successfully deployed. <SERVER> : http://<server>12082/ : The solution was successfully deployed. 9. Click on the “close”-button to close the Installation Wizard. 10. Open the Central Administration as a farm administrator 11. Go to “Central Administration > System Settings > Farm Management > Manage Farm Features” and activate the feature “GraspServiceApplication” (this is the Display Name of the feature “GraspServiceApplication_Installer“): GRASP 1.0 User Manual -9- 12. Open the site collection as site collection administrator and go to “Site Collection Administration > Features” and activate the feature named “Grasp”: 13. Repeat this for all site collections that shall provide the GRASP features. Note: Please continue with the section “Create the GRASP Service Application in the Central Administration”. Alternative: Installation via the PowerShell You can also install GRASP via the PowerShell. Execute the following steps to install GRASP on your SharePoint Farm using the PowerShell: 1. Download the latest evaluation version of GRASP from: http://www.diqa-pm.com/GRASP and store it as local file on your server, e.g. “grasp-1.0_B27.zip”. Note: The evaluation version of GRASP is fully functional for 30 days. If you want to continue to use GRASP after this period has elapsed you must buy a valid license key from DIQA at: [email protected] 2. Extract the zip-archive on your server. GRASP 1.0 User Manual - 10 - 3. Open the PowerShell with administrator privileges. 4. To install GRASP to the farm execute this command the PowerShell: Add-SPSolution -LiteralPath "<path>\GraspServiceApplication.wsp" Note: 1. Replace <path> with the full path to the .wsp-file that has been extracted on your server. 2. Ensure that the “SharePoint.Powershell”-Snapin is registered (register it by entering "Add-PSSnapIn Microsoft.SharePoint.PowerShell") 3. Ensure that script-execution is enabled (enable it by entering: "Set-ExecutionPolicy unrestricted") 5. As a result you should see the solution ID of GRASP and see that it is not yet deployed. 6. To deploy the GraspServiceApplication to the web applications enter: Install-SPSolution -Identity graspserviceapplication.wsp -AllWebApplications GACDeployment Note: Since GRASP contains a Farm feature you cannot deploy GRASP to single web applications. 7. Wait a few seconds to allow the deployment to finish. 8. To enable the farm feature (and make the site collection features available) enter Enable-SPFeature -Identity GraspServiceApplication_Installer 9. To install the site collection feature on all web-applications, enter: Install-SPFeature GraspServiceApplication_Grasp 10. Enable the site collection feature for each site collection: Enable-SPFeature -Identity GraspServiceApplication_Grasp -Url <URL of the site collection> Create the GRASP Service Application in the Central Administration After the installation of GRASP into your farm you must execute the following sequence to create the GRASP Service Application in the Central Administration: 1. Go to “Central Administration > Application Management > Service Applications > Manage Service Applications” and reload the page by hitting “Shift” and “F5” at the same time. GRASP 1.0 User Manual - 11 - 2. Select in the menu bar “New” and select “Grasp Service”: Note: In case, the New Button is greyed out for you, restart Internet Explorer as administrator. GRASP 1.0 User Manual - 12 - 3. In the pop up window named “Provision Custom Service Application” enter the requested information: Note: Make sure that your settings comply with your farm administration policy. 4. Save the form and return to the list of service applications. After a few seconds this list should be refreshed. GRASP 1.0 User Manual - 13 - 5. Verify that the “Grasp service application” is listed: Configuration of the GRASP Service Application Execute the following sequence to make GRASP ready for your users: 1. Open the Central Administration with administration privileges. GRASP 1.0 User Manual - 14 - 2. Navigate to the list of service applications: 3. Open the „Grasp service application“ to open its configuration page: 4. Enter the parameters required to establish a connection to your triple store endpoint: GRASP 1.0 User Manual - 15 - a. Enter the URL that references the HTTP endpoint of the triple store (in the following we assume that the endpoint is “http://localhost”.). b. Choose the triple store product in the drop down box (in the following we assume that the triple store is a “Triplestore basic” from DIQA). 5. Click on “Test Connection” to verify that GRASP and the triplestore communicate. Important Note: You must click on “OK” at the bottom of the page to make your choice of URL and Product persistent! Upon clicking on “OK” your triple store settings will be saved and the page is reloaded. You can then resume the configuration. 6. In the section “2. Initialize the Ontology Library” you can enter the name of a library that will contain managed ontologies and select the SharePoint site that will host it. If you press 'Initialize' then this ontology library will be created and configured to use the content type 'OntologyMetadata'. Upon successful initialization the screen will read: GRASP 1.0 User Manual - 16 - Note: 1. Make sure that no library with the same name exists. 2. The link to the newly created library is given in the message – click on it to open the library. 3. If you do not press 'Initialize' then you can create a library later manually and associate it with the 'OntologyMetadata' content type. 7. In section “3. Specify the license file“ you can enter the path to a license file on your computer. Note: The evaluation version of GRASP is fully functional for 30 days. If you want to continue to use GRASP after this period has elapsed you must buy a valid license key from DIQA at: [email protected] 8. In section “4. Uploaded ontologies and sample ontology “ you open the drop down list to verify the ontologies that are currently uploaded to the connected triple store. Refresh the list by clicking on “Refresh list”. 9. Follow the link 'Download a sample ontology' to load a sample ontology to your local machine. You can upload this sample ontology later into your ontology library to verify proper operation of GRASP. GRASP 1.0 User Manual - 17 - Note: GRASP is now ready for your users. De-installation Execute the following sequence to remove GRASP from your SharePoint Farm: Important Note: The installation tool will not de-install the Content Type "OntologyMetadata" if this is still in use! If you want to get the Content Type "OntologyMetadata" removed by the installer, make sure that the content type is not used by any library or document. 1. Execute the file “Setup.exe” with administrator privileges to start the Installation Wizard, which will open in a window. 2. After checking some prerequisites the wizard will detect that GRASP is already installed and you can select "Remove" to uninstall it. 3. Upon successful de-installation, the wizard should display a message like this one: ***** SOLUTION RETRACTION ***** <SERVER> : http://<server>:14277/ : The solution was successful ly retracted. <SERVER> : http://<server>/ : The solution was successfully retracted. <SERVER> : http://<server>:12082/ : The solution was successfully retracted. The wizard has removed the following items from your SharePoint farm SharePoint solution named "graspserviceapplication.wsp" SharePoint farm feature named "GraspServiceApplication_Installer" SharePoint site collection feature named "GRASP features" the content type "OntologyMetadata" will only be removed if it not used anymore. The wizard does not retract the following items from your farm all GRASP ontology libraries that you created (including the documents they contain) Service Application Pool (to remove it open the powershell and enter Remove-SPServiceApplicationPool -Identity "<name of the service pool>") Note: Sometimes the installer aborts the de-installation process with an error. If this is the case, then re-start the installer. The solution will then be retracted completely. GRASP 1.0 User Manual - 18 - User Guide Introduction After the installation of GRASP and the activation for a site collection (named “http://homepage” in the following for simplicity), the homepage contains the following: A content type named “OntologyMetadata” and A library named “GRASP ontologies” (name can differ depending on the administrators choice) A web part named “SPARQL Query Webpart” You can download an example ontology (“countries.owl”) from the DIQA website that you can use for evaluation purposes: http://downloads.diqa-pm.com/free/countries.owl You can use this SPARQL query that works for the countries.owl ontology: SELECT * WHERE { GRAPH ?G{ ?x a <http://smwplus.com/ontologies/countries.owl#SelfGovernedCountry> } } Creating a document library for ontologies This section explains how to create a library in http://homepage that is used to manage ontologies. Note: You can skip this section if your administrator has already created a library that is associated with the content type “Ontology Metadata”. 1. Open your site collection http://homepage with site collection administrator privileges. GRASP 1.0 User Manual - 19 - 2. Use the "Site Actions" menu and select "Create New Document Library": 3. Enter a new name for the library and optionally a description. 4. Choose "None" as document template. 5. Click "Create" and SharePoint will create the library page and will display it for you. It does not contain any documents (i.e. ontologies) yet: GRASP 1.0 User Manual - 20 - 6. Click on "Library Settings" to manage the libraries properties: 7. On the "Document Library Settings" page choose "Advanced settings" and then enable the management of content types for this library (click "Yes" for the top most setting) 8. After clicking "OK" on the bottom of the page you can add new content types to the library. 9. Choose "Add from existing site content types " on the "Document Library Settings" page 10. On the next page add "OntologyMetadata" to the list "Content types to add". This content type is located in the GRASP group: 11. After clicking "OK" the library supports a new content type. GRASP 1.0 User Manual - 21 - 12. Make the OntologyMetadata-content type the default content type for your library: 13. Remove the list content type “Document” from the library; the content type settings for the library will look like this: 14. You can now return to the library page and add ontologies, via the "Add document" button. Managing ontologies in the ontologies library You can manage ontologies in the ontologies library by: 1. Adding an ontology to the library, 2. Uploading an added ontology into the triplestore, 3. Creating a revision of an ontology and 4. Deleting an ontology. GRASP 1.0 User Manual - 22 - Add an ontology 1. Navigate to the ontology library “GRASP ontologies”. 2. Click on “add new document”: 3. Click on „browse“ and select the ontology that is stored on your local machine. Note: The following ontology formats are supported: NTriples, Turtle, Notation 3, RDF/XML, RDF/JSON, RDFa 1.0, TriX . 4. Click on “OK” to initiate the upload process. 5. Upon successful upload, a form opens that displays metadata about the ontology that is preloaded with automatically extracted data: GRASP 1.0 User Manual - 23 - 6. Click on “Save” to store the metadata and to return to the library: Upload on ontology into the triplestore 1. Go to the ontology library and open the context menu of the ontology that you want to upload to the triplestore: 2. Click on the menu item „Upload into triplestore“ to initiate the upload process: GRASP 1.0 User Manual - 24 - Important Note: The upload process was successful if the status bar reads: “Grasp Ontology successfully uploaded! “ and the “Upload Status” field changes to “uploaded”. If this is not the case then you must open the GRASP Service Configuration page to Test the connection with the triplestore. Create a revision of an ontology 1. Go to the ontology library and select the ontology that you want to revise locally. 2. In its context menu select “Check out”: 3. The ontology is now read-only for all other users until you check it in again: 4. You can download a copy of the ontology to your local machine in order to create a new revision by clicking on the link. 5. You can open the downloaded ontology in an ontology editor and modify it. 6. Save the revision of the ontology on your local machine. 7. Upload the new version into the ontologies library, modify the metadata fields as necessary and click on “check in”. Important Note: The new revision of the ontology is not uploaded to the triplestore automatically. Instead you must initiate the upload manually. GRASP 1.0 User Manual - 25 - Note: If you want to manage versions of ontologies you must open the library settings and switch on version control. Delete an ontology 1. Delete the ontology from the triplestore. 2. Delete the ontology from the library. Important Note: Always delete the ontology from the triplestore first before deleting it from the library. Query formulation in the SPARQL-webpart Ontologies that are uploaded in the ontologies library and into the triplestore can be used for query formulation. Execute the following sequence of steps to embed the results of a SPARQL-query into an arbitrary page: 1. Open the article in edit mode that is going to display the results of the SPARQL-query: GRASP 1.0 User Manual - 26 - 2. Click on „Add Webpart“ and select in the list of webparts “SPARQLQueryWebPart” (listed in the category “Custom”): 3. Click on “add” to add it to your page. 4. Click on “edit webpart” in order to configure it: GRASP 1.0 User Manual - 27 - 5. Enter the SPARQL-query into the section “SPARQL Query Webpart settings”: 6. You can use this SPARQL query that works for the countries.owl ontology: SELECT * WHERE { GRAPH ?G{ ?x a <http://smwplus.com/ontologies/countries.owl#SelfGovernedCountry> } } 7. Save the web part and save the page. 8. Click on “Refresh” to load the query results: GRASP 1.0 User Manual - 28 - Technical Support Download new releases of GRASP You find new releases of GRASP in the DIQA-download area: http://downloads.diqa-pm.com/grasp-releases/ The known issues and bugfixes are listed in the contained “Readme” file. Support inquiries If you have issues with the software then please contact this email address: [email protected]. Buying a license The evaluation version of GRASP is fully functional for 30 days. If you want to continue to use GRASP after this period has elapsed you must buy a valid license key from DIQA at: [email protected] GRASP 1.0 User Manual - 29 -