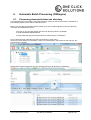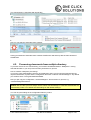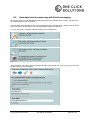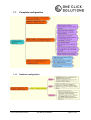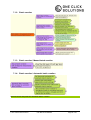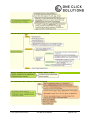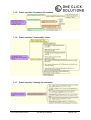
1
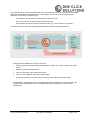
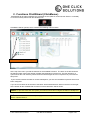
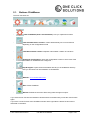
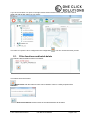
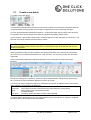
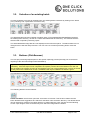
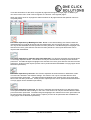
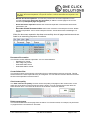
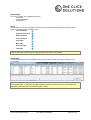
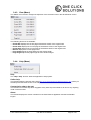
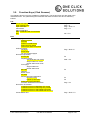
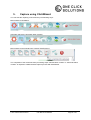
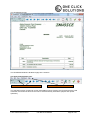
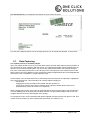
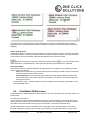
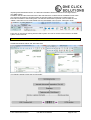
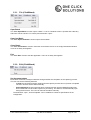
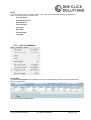
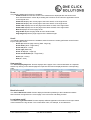
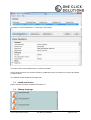
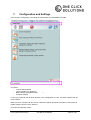
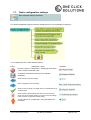
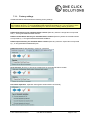
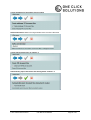
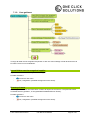
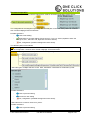
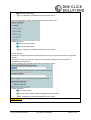
User Manual
ClickWizard Version v4
© One Click Solutions GmbH
Table of Contents
1.
Introduction ............................................................................................................................... 4
2.
Functions ClickWizard (ClickMenue) ..................................................................................... 6
2.1.
Buttons ClickMenue ................................................................................................................. 7
2.1.
Filter functions and batch delete ............................................................................................. 8
3.
Manual Batch Processing (ClickScanner) ............................................................................. 9
3.1.
Create a new batch ............................................................................................................... 10
3.2.
Selection of an existing batch ................................................................................................ 12
3.3.
Buttons (ClickScanner) .......................................................................................................... 12
3.4.
Menu and Function Overview (ClickScanner) ....................................................................... 17
3.4.1.
File (Menu)..................................................................................................................... 17
3.4.2.
Edit (Menu) .................................................................................................................... 19
3.4.3.
View (Menu)................................................................................................................... 23
3.4.4.
Help (Menu) ................................................................................................................... 23
3.5.
4.
Function Keys (Click Scanner) .............................................................................................. 24
Automatic Batch Processing (CREngine) ............................................................................ 26
4.1.
Processing documents from one directory ............................................................................ 26
4.2.
Processing documents from multiple directory...................................................................... 27
4.3.
Automatic batch processing with Email messaging .............................................................. 28
5.
Capture using ClickWizard .................................................................................................... 29
5.1.
Data Capturing ...................................................................................................................... 31
5.2.
ClickWizard ECM-function ..................................................................................................... 32
5.3.
Menu and Function Overview (ClickWizard) ......................................................................... 34
5.3.1.
File (ClickWizard)........................................................................................................... 35
5.3.2.
Edit (ClickWizard) .......................................................................................................... 35
5.3.3.
View (ClickWizard)......................................................................................................... 36
5.3.4.
ClickWizard (ClickWizard) ............................................................................................. 38
5.3.5.
Help (ClickWizard) ......................................................................................................... 39
5.4.
6.
Buttons ................................................................................................................................... 39
Installation, licensing, language ........................................................................................... 42
1.1.
Show current license information .......................................................................................... 42
1.1.
Install new license ................................................................................................................. 43
1.1.
Change language .................................................................................................................. 43
7.
Configuration and Settings ................................................................................................... 44
7.1.
Licence administration ........................................................................................................... 45
7.1.
Basic configuration settings ................................................................................................... 46
© One Click Solutions GmbH
User Manual ClickWizard
Page 2 of 62
7.1.1.
Factory settings ............................................................................................................. 47
7.1.2.
User guidance................................................................................................................ 49
7.1.
8.
Complete configuration .......................................................................................................... 57
7.1.1.
Database configuration .................................................................................................. 57
7.1.2.
Batch creation ................................................................................................................ 58
7.1.3.
Batch creation / Manual batch creation ......................................................................... 58
7.1.4.
Batch creation / Automatic batch creation ..................................................................... 58
7.1.5.
Batch creation / Document file creation ......................................................................... 60
7.1.6.
Batch creation / Scan quality check .............................................................................. 60
7.1.7.
Batch creation / Settings for extraction .......................................................................... 60
7.1.8.
Batch creation / Display message ................................................................................. 61
7.1.9.
Export ............................................................................................................................ 61
7.1.10.
Export / Single document export ................................................................................... 61
7.1.11.
Export / Batch export ..................................................................................................... 62
7.1.12.
Export / Settings index data export................................................................................ 62
Imprint...................................................................................................................................... 62
© One Click Solutions GmbH
User Manual ClickWizard
Page 3 of 62
1.
Introduction
ClickWizard is a capturing tool to extract information into any application that is currently running on
your operating system (except virtual machines). That may be an Microsoft Excel, SAP, Navision,
Sage KHK or any other back office system. It even can be a browser (Explorer or Thunderbird ,,,) or a
DOS window.
The idea is to have a maximum flexible tool without any integration effort or interface problems.
Just install and start!
The operating guidelines describe the basic steps working with the application ClickWizard.
The basic steps are:
a. run manual batch processing
b. run automatic batch processing
c. Capturing with ClickWizard
d. make Setting up
Talking about a batch of paper we mean any amount of documents each of them consisting of one ore
more pages.
A batch of documents can be separated by their document type, e.g. invoice, delivery note. From the
view of ClickWizard it is not a necessary condition due to the fact that ClickWizard anyway does not
care about the types of documents
To capture a batch of documents with ClickWizard the application simply needs free access to the
drive containing the documents. There is no difference whether the drive is local or somewhere in the
local network. Therefore ClickWizard needs no scan-interface or scan-client. Surely the image files
can also be extracted from emails or can be copied from other drives. Again, ClickWizard just needs
free access to the documents which should be captured.
Just a short statement about the quality of the images: the better the quality of the images is the
better the capturing result will be. In general image files with a solution of 300dpi will lead to sufficient
relation between image quality and size of file. Sure, using a high quality scanner 200 dpi might also
be sufficient.
Capacity/performance: the performance i.e. the time which is needed to capture a batch of
documents primarily depends mainly on the computing performance that is available to the OCR. The
factors that influence the performance of the OCR are mainly the amount of characters on a page, the
size and font of the characters, the complexity of the document is (e.g. whether you have characters in
different orientations) and the quality of the contrast between the characters and the background.
The input type of file for capturing may be TIF, PDF and JPG. The output file type may be the same or
even PDF/A; it simply depends on the license key.
Note: documents from text- or calculation-programs and handwritten documents cannot be processed
by ClickWizard.
What kind of format can ClickWizard deal with:
-
each page of a document is one image file (e.g. single page TIF),
-
all documents of a batch are stored in one file,
-
each file includes one document ( e.g. MultiPage-TIF)
© One Click Solutions GmbH
User Manual ClickWizard
Page 4 of 62
In the first two cases a document separation has to be made before the batch process can be started.
Otherwise ClickWizard cannot decide of how many pages a document consists. The document
separation can be done in different ways:
-
put separation sheets (empty sheets) between the documents
-
stick a barcode strip on the first page of each document
-
print a keyword on the first page of each document (e.g. can be done by an imprinter)
A technical overview about the capturing with ClickWizard shows the following diagram:
Working with ClickWizard the common steps are:
1.
Setting up the file OneClickSettings.ini (definitions for batch processing, capturing and data
export)
2.
Optimal: provide lookup data base
3.
Test run: executing manual batch processing
4.
Test run: executing data capturing and data export
5.
Productive operation: automatic batch processing, data capturing and data export
The application ClickWizard runs on the Microsoft platforms Windows XP, Vista and 7 (64- and
32-Bit) as also with Microsoft Server 2003/2008 and can be integrated in Terminal Server
Applications.
© One Click Solutions GmbH
User Manual ClickWizard
Page 5 of 62
2. Functions ClickWizard (ClickMenue)
ClickWizard will be either started by the operating service (Add-on modul “Queue-Service” is needed)
or can be manually started with the desktop-Icon:
ClickMenue will be opened, which contains the following main functions:
ClickMenue with Add-on „Multiqueue“
At the top of the menu you find the buttons for the available functions. The area on the left shows all
the batches which have been already created (the latest batch is at the top). The first element in a
queue shows the scan directory where the documents/images have to be copied to be processed for
this queue..
If your license includes the Add-on module “Multiqueue” you also see the different queues which have
been configured.
If you click on a batch all documents of the batch will be listed with their status in the area on the right.
At the bottom all the available filter functions for the actual batch will be shown.
Notice: to process more than one queue you need to license and configure the Add-on “Multiqueue”.
Notice: to run ClickWizard as an operating system service you have to license and configure the
Add-on “Queue-Service”.
© One Click Solutions GmbH
User Manual ClickWizard
Page 6 of 62
2.1.
Buttons ClickMenue
The main functions are:
-
start ClickWizard (with a selected batch): here you capture documents
-
start Automatic batch creation: creates automatically one or more batches
depending on the configurations made
-
start Manual batch creation: stepwise manual batch creation of one batch
-
Settings & Configuration: opens the configuration section in which most of the
parameters for ClickWizard are configured.
-
Help & Support: opens the documentation directory in the installation directory.
Here you find all kind of documentation to ClickWizard.
-
Website: www.oneclicksolutions.de
-
Exit. Closes ClickMenu.
-
Refresh. Refreshes the menu after having made changes or inputs..
If you select a main function the ClickMenu window will be minimized until you exit the main function
again.
If you touch a main function at the ClickMenu window at the right side the button function will be
described in red letters.
© One Click Solutions GmbH
User Manual ClickWizard
Page 7 of 62
If you click on a batch in a queue in the right window section all documents with their status will be
listed and with all filter status you can select:
The name of a queue is to be configured in the configuration
2.1.
. You can choose the name you like.
Filter functions and batch delete
The following filter and batch options are offered:
The buttons have the function:
Delete batch: with this button a batch can be deleted. There is a safety request before
realization.
Show all documents: all documents of the selected batch will be listed.
© One Click Solutions GmbH
User Manual ClickWizard
Page 8 of 62
3.
Manual Batch Processing (ClickScanner)
In manual processing, pages can be separated manually or documents comprised of several pages
can be put together to make up a logical document, pages can be rotated manually and the individual
pre-processing functions can be initiated manually.
In productive operating environments, manual batch processing will largely be the exception. The
main purpose of manual batch processing is to test settings/parameters. In a majority of cases,
automatic batch processing is used in productive operating environments.
Manual batch processing is to be started via the ClickMenue:
Before you start the manual batch processing (ClickScanner) you have to select either a batch or the
scan directory or the queue name:
Queue name
Scan directory
Batche(es)
If you select a scan directory which is empty or the queue name the ClickScanner window will be
empty and only four buttons are sensitive:
The sensitive buttons are:
- Create new batch
- Open existing batch
- Help: what to do next?
- Exit.
So the next step will be to open an existing batch or create a new one.
© One Click Solutions GmbH
User Manual ClickWizard
Page 9 of 62
3.1.
Create a new batch
To create a new batch press:
The typical Microsoft Windows procedure to store a file or folder has to be passed. As batch name the
configured default name plus date and time will be suggested and can be optionally changed .
For each generated batch ClickWizard creates a *.crb-file and a folder with the same name where all
the captured documents and export files (with the captured Information) will be stored.
In the next step, a batch name and directory must be assigned, in which the batch is to be stored. The
files that are to be processed must be stored in a batch.
Attention: only TIF, PDF, JPEG etc… image files can be processed. Files from
Microsoft processing systems (Word, Excel, PPT) or spread sheets are not image files and as such
cannot be processed.
Having finished this step you will be asked in the following step from which directory and which files
you want to be processed (select between TIF, PDF and “all”). You can also process JPG and other
image files.
Having successfully loaded the image files all buttons in the ClickScanner window will now be
sensitive:
Now pre-processing can commence. Users can select individual files in the left screen panel at any
time. The files are then immediately displayed on the main screen.
The left screen panel contains the table form information on the files. In addition column #, document,
page, asterisk *, and file name are displayed:
#
The pages that are to be processed in the current batch are numbered sequentially.
Document
The number of the document that is to be processed in the current batch
Page
Page number of the respective document
*
Processing status
File name
File name remains the same as when it was imported
The entire table is highlighted in red. This means that the pre-processing has not yet been completed;
the batch cannot yet be captured with ClickWizard.
© One Click Solutions GmbH
User Manual ClickWizard
Page 10 of 62
Notice: to assist you during the manual batch processing you can press the button
at any
time. The button realizes a context help menu and tells you how to proceed.
The manual batch processing includes the sequent steps:
-
Create a new batch
Load the files you want to have to be captured
Eliminate the empty pages
Process the OCR
Execute the document separation
Only when these steps have been done successfully you can proceed with the capturing and training.
© One Click Solutions GmbH
User Manual ClickWizard
Page 11 of 62
3.2.
Selection of an existing batch
If a user would like to process an existing batch, the existing batch is selected by clicking on the button
(or by selecting “File / Open Batch” from the menu):
The displayed Microsoft menu (default navigation path: C:\ProgramData\ClickWizard\Batch) displays
the existing batch directory, as well as a crb-file associated with each directory. The desired crb-file is
selected and is opened by selecting “Open”.
The associated batch image files are now displayed in the left screen panel. The batch status has not
changed since it was the last processed. The user can now continue processing and/or revise the
batch.
3.3.
Buttons (ClickScanner)
The next pre-processing steps depend on the specific capturing process (the step prior to the actual
capturing of the documents begins with ClickWizard).
Important: OCR (Optical Character Recognition) and the separation of documents into logical units are
mandatory. If the two steps are not completed the capture process cannot be initiated. The user can
also ascertain if the capture process can be initiated by the color of the highlight (red or green) of the left
screen panel in the ClickScanner screen. ClickWizard will only be initiated if the status is green.
The important functions of ClickScanner are accessible a buttons:
The following buttons can be selected:
Create new batch: this function opens the “save batch as” window. This function creates the new
batch. Default name suggestions are offered for the batch name and batch directory. The default names
can be changed or renamed. The batch directory is created with the "save" function and the following
screen "open images" refers to the directory from which the image files are loaded.
© One Click Solutions GmbH
User Manual ClickWizard
Page 12 of 62
Open existing batch: this function displays the window in which the existing batch is opened
(corresponding default navigation path). The "Open" function opens the batch and the associated image
files and status. The batch/stack status has not changed since it was last processed.
Detect empty pages. This function eliminates empty pages according to the selected criteria. This
function is to be initiated after OCR has been executed (because OCR blocks cannot be recognized
until the OCR process has been performed). The criteria definition (for example: the minimum number
of pixels that define that a page is not empty) is set in the configuration.
There are different methods to recognize empty pages:
- number of pixel: set a limit of pixels underneath a page is characterized as empty.
- number of OCR blocks: set a limit of OCR blocks underneath a page is characterized as
empty.
- file size: set a limit of file size underneath a page is characterized as empty.
- remove empty pages: eliminates the current recognized empty pages.
OCR recognize all pages. This function performs the actual OCR process, i.e. Optical
Character Recognition. After the OCR process has been completed an asterisk “*” is automatically
entered into each row of the asterisk “*” column. This indicator shows the pages that have been
analyzed with OCR. All the pages of a batch do not have to be analyzed with OCR. However, text
cannot be extracted from pages that have not been analyzed with OCR.
The OCR recognizes only type written letters, numbers and special characters. Hand written characters
and logos will not be properly recognized
Recognized characters look like this:
If you navigate the mouse pointer on a reconized field it will turn red and the recognized expression is
shown:
If you want to check a more than one block just capture it with the mouse pointer and the recognized
blocks will be listed at the bottom of the window:
© One Click Solutions GmbH
User Manual ClickWizard
Page 13 of 62
There are two buttons for the OCR: recognize all pages and recognize a single page. In addition you
can select via the menu “Edit / OCR recognition” the function “unrecognized pages”.
When the OCR is done for all pages the status windows for all pages look like this (asterisk column is
completely filled):
Document separation by MultiPage-TIF files. Based on the criteria settings, this function takes the
individual pages of a logical document and summarizes them into one logical document. This function
can only be executed after the OCR process has been performed. The table background highlight color
switches from red to green after this function has been performed. At this point documents can be
captured with ClickWizard.
Document separation by separator page (auto detected). This function separates documents based
on the empty separator sheets. This function can only be executed after the OCR process has been
performed. The table background highlight color switches from red to green after this function has been
performed. At this point the capture process can be performed with ClickWizard or empty pages can be
eliminated (see above).
Document separation by barcode. This function separates documents based on defined bar codes.
The barcode is defined in the software settings. This function can only be executed after the OCR
process has been performed. . The table background highlight color switches from red to green after
this function has been performed. At this point the capture process can be performed with ClickWizard
or empty pages can be eliminated (see above).
Document separation by keyword. This function separates documents based on a defined keyword.
The keyword is defined under “settings” in the menu. This function can only be executed after the OCR
process has been performed. The table background highlight color switches from red to green after this
function has been performed. At this point the capture process can be performed with ClickWizard or
empty pages can be eliminated (see above).
© One Click Solutions GmbH
User Manual ClickWizard
Page 14 of 62
Manual document separation: new document. This function is utilized for the manual separation of
documents. This function is only possible, if the document separation has not been performed or was
deleted again. The background highlight color of this table must be red.
Manual document separation: follow-up page. This function assigns the current page to the current
document, as a subsequent page. Documents can be comprised of any documents. This function is
only possible, if the document separation has not been performed or was deleted again. The
background highlight color of this table must be red.
Delete page. This function deletes the selected page from a batch. The corresponding page is also
eliminated from the table. The remaining table entries remain unaffected.
Rotate right. In the event this function is performed after the OCR analysis has been completed, OCR
must be repeated because this function overrides the recognized text. The green frame around the text
blocks disappears and the corresponding asterisk “*” disappears from the table.
Rotate left. In the event this function is performed after the OCR Analysis has been performed, OCR
must be repeated because this function overrides the recognized text. The green frame around the text
blocks disappears and the corresponding asterisk “*” disappears from the table.
OCR recognize single pages. OCR analysis can also be performed on individual pages. After this
step has been completed a green frame highlights the recognized text blocks on the respective pages.
The left screen panel background is still highlighted in red. After the OCR process has been completed
an asterisk “*” is automatically entered into each row of the asterisk “*” column. This indicator shows
the pages that have been analyzed with OCR. All the pages of a batch do not have to be analyzed with
OCR. However, text cannot be extracted from pages that have not been analyzed with OCR.
Create documents in Multipage Tif format
© One Click Solutions GmbH
User Manual ClickWizard
Page 15 of 62
Create PDF format (image PDF).
Create PDF/A format
Delete document separation (assignment of pages to documents). This function deletes page
separations that have already been performed. The background of the table in left panel switches back
to red from green.
Context help: Wie geht’s weiter. Kontextbezogene Hilfe, die sie dabei unterstützt, was als nächstes
zu tun ist, bzw. was Sie überhaupt tun können.
Start capturing with current batch. After preprocessing (OCR, document separation, page
assignment) is completed, this button is utilized to initiate the capturing function(e.g. AutoClick,
ClickReader, ClickWizard). This function is only possible, if the document separation has not been
performed or was deleted again. The background highlight color of this table must be green.
Exit.
© One Click Solutions GmbH
User Manual ClickWizard
Page 16 of 62
To the first page
To the next page
To the first document
To the next document
To the previous document
To the last document
To the previous page
To the last page
Pages or documents can be accessed directly by clicking the respective page in the red/green table in
the ClickScanner screen or by selecting the buttons described above.
3.4.
Menu and Function Overview (ClickScanner)
The main menus in ClickScanner are:
3.4.1. File (Menu)
Create a new batch
Read the explanations to the button.
Attention: before a document batch can be captured with ClickWizard, document separation and
OCR page recognition must be performed. However, ClickWizard can be opened with a batch that has
not been processed with optical character recognition, but nothing can be captured (because the
optical character recognition process has not been performed).
© One Click Solutions GmbH
User Manual ClickWizard
Page 17 of 62
Open existing batch:
Read the explanations to this button.
Open last batch:
This function opens the batch which has been processed last time.
Close batch
The function closes an opened batch and returns to the empty ClickScanner screen:
Start ClickWizard
The function starts the ClickWizard application. A batch can be opened for capture in the ClickWizard
screen that is subsequently displayed.
ClickWizard with current batch
The function starts the ClickWizard application with the document batch that is currently being
processed.
Exit
The function closes the ClickScanner application. If the page recognition and page assignment
functions were not performed on the current batch the user is warned by the following message:
By clicking “Yes” the application is shut down properly. The batch pages were not recognized and
assigned.
By clicking “No” the application is not shut down. The user can continue to process the batch.
© One Click Solutions GmbH
User Manual ClickWizard
Page 18 of 62
3.4.2. Edit (Menu)
Empty pages detection
The “Edit / Empty Pages detection” function offers the following options to recognize empty pages in
a batch or to clear empty page recognition:
- Number of pixels: the number of pixels can be set here. Pages are classified as empty if the
pixel number is lower than the setting.
- File size: the files size setting can be set. Pages are classified as empty if the file size is
smaller than the setting.
- Number of OCR blocks: the number of OCR blocks can be set. The number signifies the
number of recognized OCR blocks that would still be classified as an empty page.
- Remove Empty Pages” removes all empty pages.
- Clear Empty Pages Recognition” reverses the empty page recognition process.
Attention: in the event empty page separation is not performed, the “document separation” function is
not able to recognize and delete empty pages!
Attention: the “Document Separation / Separator Page …” function requires the recognized empty
pages to separate the documents. If the empty pages are deleted with the “Delete Empty Pages”
function the document separation process cannot be performed on the basis of empty pages.
OCR page recognition
Read the explanations to this button.
© One Click Solutions GmbH
User Manual ClickWizard
Page 19 of 62
Document separation
-
Existing file: All pages of a MultiPage TIF file are summarized into one logical document.
-
Separator Page:
o
Auto detected scan Mode: The document separation is performed on the basis of
separator sheets; in addition all empty pages are eliminated.
o
Single sided scan mode: Document separation is performed on the basis of separator
sheets and the acceptance of single side scanned documents; in addition all empty
pages are eliminated.
o
Double sided (duplex) scan mode: Document separation is performed on the basis of
separator sheets and the acceptance of duplex scanned documents; in addition all
empty pages are eliminated.
Attention: the function “Separator page” needs all empty pages to work proper. If you
process the function “Remove Empty Pages” before a document separation via separator
page cannot work!
-
Scan page: you can select whether the separation will be made after each page (single sided
scan) or after the always second recognized page (double sided scan).
-
Barcode: this function recognizes the first page of a document by means of defined barcodes.
The definition is performed in the OneClickSettings.ini function.
-
Address: the separation will be done by recognition of an address window.
-
Black corner: this function looks after a black corner on a page and separates then the
document.
-
Keyword: this function recognizes the first page of a document by means of defined keywords
(stamps etc…). The definition is set in the OneClickSetting.ini function. The keyword
definition must be unique and may not appear in the text of the document!
© One Click Solutions GmbH
User Manual ClickWizard
Page 20 of 62
Attention: Optical Character Recognition (OCR) must be performed prior to the execution of
the "Edit / Document Separation / Keyword" function, because otherwise the keyword is not
available.
-
Manual document separation: this function performs the document separation on the
currently listed pages (begin the new document) or adds the current page to the current
document (subsequent page assignment).
-
Delete document separation deletes the document separation of the batch that has been
performed in full.
-
Recreate deleted document data: this function executes in first step the function “Delete
document separation” and in second step the function “Create documents in MultiPage-TIF
format“.
When the document separation has been successfully done all pages and documents are
listed in an ascending sequence of numbers:
Document file creation
The function creates different output files. You can select between:
- MultiPage-TIF format
- PDF Image only format
- Searchable PDF format
- Searchable PDF/A format
Create fulltext files
The function extracts all recognized information from an analyzed document into a text file. This file
will be stored in the same export directory as configured. You can start the function after the OCR and
the document separation have been done.
Check scan quality
The “Edit / Check scan quality” function checks the quality of all pages of the current batch. In the
status line at the bottom of the window the result is shown. You can execute the function after the
OCR has been done. The result will be shown at the bottom of the main window:
Delete current page
The function deletes the current page from the batch. The function should, for example, be performed
on pages that are not needed in a document.
© One Click Solutions GmbH
User Manual ClickWizard
Page 21 of 62
Rotate page
The menu consists of the following functions:
- Clockwise
- Counterclockwise
- 180 degrees
Go to
This function can jump to any page or document in the current batch and displays the associated
page. The following Go to functions exist:
- First document
-
Previous document
-
Next document
-
Last document
-
First page
-
Next page
-
Previous page
-
Last page
Attention: The page assignment must be performed prior to performing the “Edit / Go to” function,
because otherwise the document or page assignment function is not possible.
Show data
The function displays the results table derived from the data records, which were created for the
current batch.
Attention: The page assignment must be performed so that the data records can be created for the
current batch/stack. In the event the page assignment was not performed for the current batch the
displayed results table will not contain any data records.
© One Click Solutions GmbH
User Manual ClickWizard
Page 22 of 62
3.4.3. View (Menu)
The "View” menu function changes the depiction of the document view in the ClickScanner screen.
The following functions are available:
Zoom 25% displays the current page of the batch at 25% of the original size.
Zoom 50% displays the current page of the batch at 50% of the original size.
Zoom 100% displays the current page of the batch at 100% of the original size.
Zoom 200% displays the current page of the batch at 200% of the original size.
Best fit displays the current page in full.
Page width adjusts the page width to fit the window width.
Page height adjusts the page height to fit the window height.
3.4.4. Help (Menu)
Help
The "Help / Help” function starts the application's help system.
Online help
The function starts the internet online help (http://www.oneclicksolutions.de/help/online/cs_de/) where you
will always find the latest version of the help.
Context help, what to do next
The function is a context help which suggests at any state of process what to do next or why anything
could not be executed.
About
The function displays the version numbers for the ClickScanner application and the FineReader
Engine.
© One Click Solutions GmbH
User Manual ClickWizard
Page 23 of 62
3.5.
Function Keys (Click Scanner)
The following function keys are available in ClickScanner. The function keys are also listed in the
individual menus. The yellow background indicates that these functions can also be started by
buttons.
File:
Create new batch
Open existing batch
Open last batch
Close batch
Start ClickWizard
Start ClickWizard with current batch
Exit
Strg + E
Strg + O
Strg + Shift + O
Strg + F4
Alt + F10
Edit:
Empty pages detection:
Number of pixel
File size
Number of OCR blocks
Remove empty pages
Clear empty page recognition
OCR recognition:
All pages
Single page
All unrecognized pages
Document separation:
Existing file
Separator page:
Auto detected scan mode
Single sided scan mode
Double sided scan mode
Scan page:
Single sided scan
Double sided scan
Barcode
Address
Black corner
Keyword
Manual document separation:
New document
Follow-up document
Delete document separation
Recreate deleted document data
Document file creation:
Create documents in MultiPage-TIF format
Create documents in Pdf Image only format
Create documents in searchable Pdf format
Create documents in searchable PDF/A format
Create fulltext files
© One Click Solutions GmbH
User Manual ClickWizard
Strg + Shift + E
F2
Shift + F2
F3
F4
F5
Strg + Ins
Strg + Shift + F4
Page 24 of 62
Check scan quality
Delete current page
Rotate current page:
Clockwies
Counter clockwise
180 degrees
Goto:
First document
Previous document
Next document
Last document
First page
Previous document
Next page
Last page
Show data
Strg + R
Strg + L
Strg + U
Strg + F6
Strg + F7
Strg + F8
Strg + F9
Shift + F6
Shift + F7
Shift + F8
Shift + F9
View:
Zoom 25%
Zoom 50%
Zoom 100%
Zoom 200%
Best fit
Page width
Page height
Page list:
Thumbnails
List
Strg + Shift + 2
Strg + Shift + 2
Strg + Shift + 2
Strg + Shift + 2
Strg + Shift + S
Strg + Shift + B
Strg + Shift + H
Strg + Shift + T
Strg + Shift + D
Help:
Online help
Context Help: What to do?
About
© One Click Solutions GmbH
User Manual ClickWizard
Page 25 of 62
4.
Automatic Batch Processing (CREngine)
4.1.
Processing documents from one directory
The automatic batch processing is manually started by clicking on the second button in ClickMenu or
automatically started via the Add-on “Queue-Service”.
Before you can start the automatic batch creation you have to load image files in the scan directory.
There are two possibilities to do so:
-
You scan or copy the files directly into the scan directory which is by default
C:\ProgramData\ClickWizard\Scans
-
You just manually drag and drop the files into scan directory in ClickMenu.
How to drag and drop image files into the scan directory in Click menu:
Click on the scan directory in ClickMenu. There are no files listed in the window on the right (i.e. the
scan directory is empty):
Drag and drop some image files from any directory into the scan directory of ClickMenu:
© One Click Solutions GmbH
User Manual ClickWizard
Page 26 of 62
The scan directory is then filled with image files:
Now you can start the automatic batch creation:
Having processed the automatic batch creation ClickScanner will show up with the main window of
ClickWizard.
4.2.
Processing documents from multiple directory
To process more than one scan directory you need the ClickWizard Add-on “Multiqueue”. Having
licensed this Add-on you can process as many directories as you like.
How to create a multiqueue processing?
You have to open administration directory of ClickWizard, where you find all processed documents,
captured information, layouts and the configuration file which is named “oneclicksettings.in”. By default
you will find it here: C:\ProgramData\ClickWizard.
Now you just copy the configuration “oneclicksettings.ini” and rename it as you like, e.g.
“oneclicksettings-barcode.ini”.
Notice: Be sure that you have always one file called “oneclicksettings.ini” otherwise ClickWizard will
automatically create a new default oneclicksettings.ini with default settings!
You can vary the settings in the configuration files as you like:
© One Click Solutions GmbH
User Manual ClickWizard
Page 27 of 62
4.3.
Automatic batch processing with Email messaging
Particularly when you have big batches with many pages the automatic batch creation can take some
time. Main reason for this is the OCR.
In these cases the automatic process can be optimized if the automatic batch creation sends an email
to the operator to tell him that he now can start with the training or capturing.
To do so you have to make the following settings in the configuration:
>>>
>>>
>>>
>>>
In this submenu you have to tick the checkbox and then step through the menu til you you come to the
settings with the email addresses:
>>>
© One Click Solutions GmbH
User Manual ClickWizard
Page 28 of 62
5.
Capture using ClickWizard
You can start the capturing of documents by the following ways:
Manual start via ClickMenu:
Automatic start via the automatic batch creation:
Manual start via the manual batch creation (ClickScanner):
The completion of the document batch processing steps "manual batch creation” or "automatic batch
creation” is required to initiate the data capture process with ClickWizard.
© One Click Solutions GmbH
User Manual ClickWizard
Page 29 of 62
The ClickWizard screen:
The ClickWizard window is divided roughly into 2 sections:
The menu and operating area:
Selection and view of documents and
Menu and operating buttons
The operation section contains all current executable functions (menus); the functions that are used
most often are located in this area and can be selected directly via buttons (simpler and quicker
operation).
© One Click Solutions GmbH
User Manual ClickWizard
Page 30 of 62
The document area: it’s the biggest area where the current page is shown.
The size of the window and the size of the page aperture can be varied and adjusted to the monitor.
5.1.
Data Capturing
The capture process is incredibly simple:
Open your target window screen of your back office system and then start capturing the information on
your document by click or drawing with the mouse. The captured information will be transported to the
input box of your current target system. As soon as the captured information has reached the input
box of the current target system the cursor will jump to the next input box in the window screen of the
target system. Due to the different cursor movements in different applications this can be adjusted with
the menu function “ClickWizard / Target application type…”.
All information in the document that can be selected (and as such that can be captured) is highlighted
with a green background. This information can now be captured simply per
- mouse click
- dragging the mouse (several blocks located one after another) or
- mouse click while the Ctrl button is pressed (when capturing several blocks that are not
located directly next to each other or in sequence).
When “dragging the mouse” the mouse can be dragged from left to right and right to left or diagonally.
The best starting point is the point that is furthest from the next green field (simply because one can
navigate with less accuracy and navigate more quickly).
The background color of the information that will be captured will simply switch from green to red. So it
is quite obvious whether you have captured the information you wanted or not:
© One Click Solutions GmbH
User Manual ClickWizard
Page 31 of 62
As soon the mouse clicks a green field the information is located in a framed box that is currently
highlighted with a yellow background and the next field in the layout is activated (yellow background
highlight)
Save captured values
Capturing all fields in a layout is not a prerequisite to saving the captured data for a specific document.
All mandatory fields of a layout (mandatory fields are defined during the creation of the layout with the
Layout Editor) must be completed, otherwise the data/document cannot be saved.
Captured documents are saved by clicking the following button
. In this case the document
status switches to “completed/done”; at this point the capturing process cannot be continued.
Document Status
Each batch document is assigned statuses during and after the completion of the capturing process.
Here is a list of the statuses:
- open: the document has not yet been captured and accordingly no data has been stored and
if required transferred to another system.
-
done/completed: the document has been captured and the captured data/information has
been transferred to a back office system for processing. The status is set automatically upon
saving the document.
The definitions “open”, ““done/completed” can be modified to meet customer specifications in the
OneClickSetting.ini file.
5.2.
ClickWizard ECM-function
ClickWizard has an ECM functionality which allows you to store a document with one index value in an
ECM system.
The idea and procedure is:
In most cases an ERP system is the leading system and an ECM system is just existing due to fact
that the documents have to be stored and can be easily found. The employees are used to work with
their ERP menus and windows and they don’t want to learn a second one (the ECM one).
ClickWizard backs this process as follows: on the first page of each document will be put a serial
barcode. Starting the capturing you click with your first action on the barcode. By this - as the usual
© One Click Solutions GmbH
User Manual ClickWizard
Page 32 of 62
capturing with ClickWizard works – the barcode information will be transferred to the targed field in
your ERP system.
In addition the barcode information will be also transferred to a hidden field in ClickWizard. Now when
you store the document in an ECM system the document will be passed over together with the
barcode information to the ECM system. The barcode information is packed in an xml data set. The
“hidden” index field can be made visible with the ClickWizard menu function “Fullscreen on/off”:
From then on everybody working with the ERP system can look for the document stored in the ECM
system via the barcode.
Notice: the index field cannot be changed or modified.
ClickWizard window without and with index field:
The following graphic shows the process again:
© One Click Solutions GmbH
User Manual ClickWizard
Page 33 of 62
5.3.
Menu and Function Overview (ClickWizard)
The following menus i.e. functions are available (fields highlighted with a green background can be
selected via buttons):
Level 1
Level 2
File
Open batch
Level 3
Open last batch
Close batch
Exit
Edit
Set document status
in work
done/completed
Go to
First document
Previous document
Next document
Last document
First page
Previous page
Next page
Last page
View
Show data
Zoom
Zoom to block
Zoom 25%
Zoom 50%
Zoom 100%
Zoom 200%
Best fit
Page width
Page height
Scroll
Scroll up
Scroll Down
Scroll left
Scroll right
Scroll to top
Scroll to bottom
Home
End
Show page list
Block info on/off
Log window on/off
Properties on/off
Show scan image
ClickWizard
Fullscreen on/off
Target application type
Help
Browser
Excel
Access
Help
About
© One Click Solutions GmbH
User Manual ClickWizard
Page 34 of 62
5.3.1. File (ClickWizard)
Open Batch
The “File / Open Batch” function opens a batch. To do so a window screen is opened and a directory
and batch can be selected. To confirm press the button “open”.
Open last Batch
The “File / Open last Batch” function opens the last batch.
Close Batch
The “File / Close Batch” function closes the current batch returns to an empty ClickWizard window.
There is no safety interrogation.
Exit
The “File / Exit” function exits the application. There is no safety interrogation.
5.3.2. Edit (ClickWizard)
Set document status
Each batch document is assigned statuses during and after the completion of the capturing process.
The user can set the following statuses:
- in work: the document is being captured and the capture process has not yet been completed
The user can also set the status manually.
-
done/completed: the document has been captured and the captured data/information has
been transferred to a back office system for processing. The status is set automatically upon
saving the document. The user can also set the status manually.
The definitions “open”, “done/completed” can be modified to customer specifications in the
configuration.
© One Click Solutions GmbH
User Manual ClickWizard
Page 35 of 62
Go to
This function can jump to any page or document in the current batch and displays the associated
page. The following Go to functions exist:
- First document
-
Previous document
-
Next document
-
Last document
-
First page
-
Next page
-
Previous page
-
Last page
5.3.3. View (ClickWizard)
Show data
The “View / Show Data” function displays a table that containsamong others the index field (barcode)
that is to be captured.
The “Close” button navigates back.
© One Click Solutions GmbH
User Manual ClickWizard
Page 36 of 62
Zoom
The following additional functions are available:
- Zoom to block: this function zooms in the window that is displayed after the function has
been activated with the mouse. By activating the function a second time the application returns
to the original view.
Zoom 25% displays the current page of the batch at 25% of the original size.
Zoom 50% displays the current page of the batch at 50% of the original size.
Zoom 100% displays the current page of the batch at 100% of the original size.
Zoom 200% displays the current page of the batch at 200% of the original size.
Best fit displays the current page in full.
Page width adjusts the page width to fit the window width.
Page height adjusts the page height to fit the window height.
-
Scroll
The following additional functions are available; these functions are usually performed via the function
keys or using the mouse:
- Scroll Up: shifts the page view up (Shift - Page Up)
Scroll Down (Shift – Page Down)
Scroll left (Shift – Home)
Scroll right (Shift End)
Scroll To top (Alt – Page Up)
Scroll to bottomEnd (Alt – Page Down)
Home (Alt – Home)
End (Alt – End)
-
Sow page list
The “View /Display Page List” function displays all the pages of the current batch/stack in a separate
window. By clicking on the desired page the respective document is displayed with the corresponding
page.
Block Info on/off
The “View / Block Info on/off” function displays information pertaining to the individual text blocks
that have been recognized in the current page. This is a service and debug function.
Log window on/off
The “View / Log window on/off” function displays different application information. Each layout switch
is documented in the log window. The current batch name, for example, is recorded there.
© One Click Solutions GmbH
User Manual ClickWizard
Page 37 of 62
Properties on / off
The “View / Properties on / off” function displays different information of the current document.
The properties window is located in the lower left hand corner of the ClickWizard screen and is only
seen when fullscreen is on.
The following information is list in the properties window:
• Document Status
• Creation date
• Date of the last change
• User name of the creator
• Company
• Scan file (name of the image file)
• Target directory of the scan file
Show scan image
The “View / Show scan Image” opens the current page (image file) with a third party graphics
program.
Important: Changes to the original image file do not affect the pages of the current document.
Should the image file be supplemented with additional information the processing of the image file with
the ClickWizard application must be repeated.
. The page recognition function must also be repeated to ensure that all of the existing texts in the
image file are recognized.
5.3.4. ClickWizard (ClickWizard)
Fullscreen On/Off
The “ClickWizard / Fullscreen On/Off” function opens a hidden index field to show the export
mechanism. On plus the buttons from ClickReader are displayed.
© One Click Solutions GmbH
User Manual ClickWizard
Page 38 of 62
Target applications type…
The “ClickWizard / Target applications type…” includes some sub functions to navigate the cursor
in the current target system:
- Browser: after the input the cursor in the target system will stay at the current position.
- Excel: after the input the cursor in the target system will execute the tabulator function.
- Access: after the input the cursor in the target system will execute the carriage return function.
5.3.5. Help (ClickWizard)
Help
The "Help / Help” function opens the application's help system.
About
The “Help / About” function displays the version numbers for the ClickScanner application and the
FineReader Engine.
Important:
All batch processing settings are set in the OneClickSettings.ini file.
(Default: C:\Programs\One Click Solutions\ClickWizard\Cfg\OneClickSettings.ini).
5.4.
Buttons
The function of the buttons are as follows:
Selection of pages and documents. The first 4 buttons are to navigate to documents. The second 4
buttons are to navigate to a certain page.
Open Batch
The button opens a batch. To do so a window screen is opened and a directory and batch can be
selected. To confirm press the button “open”.
© One Click Solutions GmbH
User Manual ClickWizard
Page 39 of 62
Show page list
The button displays all the pages of the current batch/stack in a separate window. By clicking on the
desired page the respective document is displayed with the corresponding page.
Zoom in
Pressing this button you can draw a frame with your mouse which then will be zoomed to the whole
window. Pressing the button again the window turns back.
Calculator
The button opens a type of calculator with which various calculations can be calculated, without
obstructing the click rhythm.
By clicking the different values calculations can be performed; the corresponding results can be
transferred to the corresponding field.
After the function has been performed the quick calculator remains on top and the user can perform
different calculations for the active field.
The most important operators that are available are: addition, subtraction, multiplication, and division.
In addition, values can be multiplied and divided with the factor of 10 and 100.
© One Click Solutions GmbH
User Manual ClickWizard
Page 40 of 62
Upon opening the quick calculator the desired calculator operation can be selected by click.
Subsequently, all values are clicked that are to be calculated in the selected calculation.
By clicking “OK” the result is transferred into the current target field ofa back office system. The quick
calculator is closed and the user can continue with the capture of the next field .
The user can stop a calculation at any by clicking “cancel”. The result is not transferred to the field.
Set state done and export
Sets the intern document status on done and – if you have licensed an interface to an ECM system –
exports the document inclusive the index field contents to a back office system.
Exit
Closes immediately the ClickWizard window and returns to the ClickMenu. There is no safety
interrogation.
© One Click Solutions GmbH
User Manual ClickWizard
Page 41 of 62
6.
Installation, licensing, language
The installation and licensing of AutoClick is written in the document “Installation AutoClick v4”.
You start the licensing via the configuration menu in ClickMenu:
>>>
>>>
1.1. Show current license information
The button „Show current license information“ opens the license administration. All current license with
their status are listed here:
To see a detailed status of a license you just click a license.
© One Click Solutions GmbH
User Manual ClickWizard
Page 42 of 62
The button „License Parameters >>“ showa the current status:
The button „Hide License Parameters <<“closes the window.
Having select a license you can also activate or update the license (for instance if you have purchased
an Add-on later).
The „Refresh“ button refreshes the status then.
1.1. Install new license
Please read the document „Installation AutoClick v4“.
1.1. Change language
© One Click Solutions GmbH
User Manual ClickWizard
Page 43 of 62
7.
Configuration and Settings
In the section “Configuration“ all settings and parameters for ClickWizard are made.
It contains:
- License administration
- Layout creation (for capturing)
- Basic settings (navigated wizard
- Complete settings
)
To give you a general view at which position in the configuration you are, you find the path at the top
of the window.
When you touch a button with the mouse a status line will be opened at the bottom of the window to
explain what the function of the button is.
There are the following menus:
© One Click Solutions GmbH
User Manual ClickWizard
Page 44 of 62
-
Licence management
-
basic configuration settings for AutoClick
-
configuration – Manage all possible configuration settings for AutoClick
-
-
MultiQueue-Mode settings – Manage all possible settings for the MultiQueue-Mode
Change language (German, English, Spanish
The navigation is done by the following buttons:
button
explanation / action
statusline
Exit of the section “configuration“. All settings made which
have not been saved will be lost.
All settings made will be saved and are available
imediately.
(just in main menu „configuration“: the button leads one
level back.
This button is only available when you have set „multiple
scan directories“. The button selects the configuration file
to be configured.
This button is only available when you have set „multiple
scan directories“. The button offers to save the actual
configuration under a new name.
7.1.
Licence administration
Please read chapter „Installation, license, language“.
© One Click Solutions GmbH
User Manual ClickWizard
Page 45 of 62
7.1.
Basic configuration settings
You will be navigated through the following settings (there is no exit possibility in between):
You navigate the menu via the following buttons:
button
explanation / action
statusline
Exit of the section “configuration“. All settings made which
have not been saved will be lost.
All settings made will be saved and are available
imediately.
Button returns to previous setting.
Button navigates to the next setting.
Button confirms a single or multiple choice or indicates the end of
a settings path.
Button quits the aktual settings and returns to the main menu
where you have to decide whether you want to save the settings
made or exit the coniguration without saving.
Just in main menu „configuration“: the button leads one
level back.
© One Click Solutions GmbH
User Manual ClickWizard
Page 46 of 62
7.1.1. Factory settings
ClickWizard will be delivered with the following factory settings:
Notice: the factory settings restored by deleting the configuration file „OneClickSettings.ini“ in the
sub installation directory („C:\ProgramData\ClickWizard\OneClickSettings.ini“). By next opening of the
batch creation function a new “OneClickSettings.ini” with the factory settings will be generated.
Default Scan-directory for automatic batch creation (Directory where the image files are imported
from): „ C:\ProgramData\ClickWizard\Scans“.
Default created batch directory for automatic batch creation (Directory where the created batches
are exported to) „ C:\ProgramData\ClickWizard\Auto\Batch“.
Default export directory for automatic batch creation (Directory where the export files are exported
to): „ C:\ProgramData\ClickWizard\Export“.
Databasecolumn (Field identifier in layout for contractor)
Scan directory: directory to import the images files for the automatic batch creation
Document separation: separator sheet (plane sheet between documents)
© One Click Solutions GmbH
User Manual ClickWizard
Page 47 of 62
Create multipage-TIF document files as output
Suffix and extensio:adds a four digit number at the end of the file name
Create Pdf document files as output: no
Automatically export document files during batch creation: no
© One Click Solutions GmbH
User Manual ClickWizard
Page 48 of 62
7.1.2. User guidance
Through all listed menus will guided sequential. In each sub menu settings or/and decisions have to
be made. There is no exit inbetween.
Layout field to save the recognized supplier
Layout field which will be filled by the trained supplier.
Possible selections
-
proceed to next menu
-
exit „configuration (modified settings will not be saved).
Directory of scans
Directory path where the automatic batch creation will import the scans from. The path has to be a
accesable directory (Default: „ C:\ProgramData\ClickWizard\Scans \Scans“).
Possible selections
-
proceed to next menu
-
exit „configuration (modified settings will not be saved).
© One Click Solutions GmbH
User Manual ClickWizard
Page 49 of 62
Document separation
In first step you have to select which criteria will be used for document separation (single choice):
The configuratione will navigate only through the selected path. At the end of the path it will continue
with “Create multipage-Tif document files“.
Possible selections
-
back to last setting.
confimration to proceed settings (single choice). If you e.g. select „separator sheet“ the
settings for „file“, „barcode“ and „keyword“ will not be shown).
exit „configuration (modified settings will not be saved).
The different paths are as follows:
File: each image file contains exact one document. So no further setting has do be made at this state
and the configuration continues with “Create multipage-Tif document files“.
Barcode: The navigation leads sequential to the following settings:
1. Barcode types: multiple selection choice. With „Autodetect“ ClickScanner will decide by itself:
Possible selections:
-
back to previous setting
-
proceed to next setting
-
exit „configuration (modified settings will not be saved).
2. Barcode has to contain a check sum: yes/no.
Possible selections:
-
back to previous setting
© One Click Solutions GmbH
User Manual ClickWizard
Page 50 of 62
-
proceed to next setting
-
exit „configuration (modified settings will not be saved).
3. Barcode orientation; in which direction should the barcode be read:
Possible selections:
-
bach to previous setting
-
proceed to next setting
-
exit „configuration (modified settings will not be saved).
4. further settings:
- Definition of a regular expression of the barcode has to be (for regular expressions see separate
chapter).
- field name in the layout where the captured barcode will be copied (only for the products
ClickReader und AutoClick)
- selection whether the captured barcode will be used as file name.
Possible selections:
-
back to last setting
-
proceed to next setting “Create multipage-Tif document files“.
-
exit „configuration (modified settings will not be saved).
Separator sheet: separation by separator sheet. The wizard will proceed sequential to the following
settings:
© One Click Solutions GmbH
User Manual ClickWizard
Page 51 of 62
1. Scan-Modus: single choice decision whether the programm will look for single oder double paged
scans or decide by itself.
Next possible selections:
-
back to previous setting
-
proceed to next setting
-
exit „configuration (modified settings will not be saved).
2. empty page recognition: single choice for critera of empty page recognition:
Next possible selections:
-
back to previous setting
-
proceed to next setting
-
exit „configuration (modified settings will not be saved).
Further settings detailed:
Number of Pixel
- EmptyPageMaxBlackWhitePercentage: Max. percent (as floating point) of white (or black) pixel on
an empty page
- EmptyPageThumbnailScalePercentage: size of Thumbnails for emty page recognition (for number of
pixel)
Next possible selections:
-
back to previous setting
-
proceed to next setting
-
exit „configuration (modified settings will not be saved).
- EmptyPageMinWhitePixelBrightness: Min. brightess of white pixel (0 to 255)
- EmptyPageAnalyzeAreaPercent: used size for empty page recognition (for number of pixel)
Next possible selections:
-
back to previous setting
-
confirmation to go to the next setting
-
exit „configuration (modified settings will not be saved).
© One Click Solutions GmbH
User Manual ClickWizard
Page 52 of 62
Number of OCR Blocks
- EmptyPagesMaxBlocks: Max. number of text blocks to detect an empty page
Next possible selections:
-
back to previous setting
-
confirmation to go to the next setting
-
exit „configuration (modified settings will not be saved).
File Size
- EmptyPageMaxFileSize: Max. file size in bytes to detect an empty page:
Next possible selections:
-
back to previous setting
-
confirmation to go to the next setting
-
exit „configuration (modified settings will not be saved).
Keyword: documents will be separated by the defined keyword. The keyword has to be unique and
should not occur somewhere else in a document (otherwise the document will be separated there as
well).
Next possible selections:
-
back to previous setting
-
confirmation to go to the next setting
-
exit „configuration (modified settings will not be saved).
Create Multipage-Tif
Next possible selections:
-
back to previous setting
-
confirmation to go to the next setting
-
exit „configuration (modified settings will not be saved).
Further settings:
- MultiPageSuffixAndExtension: based on a regular expression you define how the end of the file
name will be extended (e.g. continously counting of a four sized number). Additionally you specify the
filename extension (e.g. .tif). In case of the setting 'RenameDocToBarcode=True' you have to choose
'.tif' (see last setting in section „Barcode“).
© One Click Solutions GmbH
User Manual ClickWizard
Page 53 of 62
Next possible selections:
-
back to previous setting
-
confirmation to go to the next setting
-
exit „configuration (modified settings will not be saved).
Create PDF-document files
Definiton of the kind of PDF filetype:
First you decide whether PDF files will be created:
Next possible selections:
-
back to previous setting
-
confirmation to go to the next setting
-
exit „configuration (modified settings will not be saved).
Notice: to create PDF files you need the adequate product licence key!
- PDF type: you can choose between PDF image (pure image file, not searchable), PDF/A (standard)
und searchable (complete searchable file:
Next possible selections:
-
back to previous setting
-
proceed to next setting
-
exit „configuration (modified settings will not be saved).
- PDFSuffixAndExtension: based on a regular expression you define how the end of the file name will
be extended (e.g. continously counting of a four sized number). Additionally you specify the filename
extension (e.g. .tif). In case of the setting 'RenameDocToBarcode=True' you have to choose '.pdf' (see
last setting in section „Barcode“).
© One Click Solutions GmbH
User Manual ClickWizard
Page 54 of 62
Next possible selections:
-
back to previous setting
-
confirmation to go to the next setting
-
exit „configuration (modified settings will not be saved).
Export of document files
Specification as which file type and in which directory the captured index data will be exported:
In the first setting you have to choose whether document files will be exported.
Next possible selections:
-
back to previous setting
-
confirmation to go to the next setting
-
exit „configuration (modified settings will not be saved).
- File type: multiple choice selection. With the selection „text“ there is a sub menu:
Sub menu with selection „Text“:
© One Click Solutions GmbH
User Manual ClickWizard
Page 55 of 62
Next possible selections:
-
back to previous setting
-
proceed to next setting
-
exit „configuration (modified settings will not be saved).
- Batch export: definition in which directory the export files will be copied. In addition you can define
acommand for a programm start another programm and whether fulltext files will be created.
-
ExportBatchIndexDirectory: Export directory for index data files
ExportBatchImageDirectory: Export directory for export document files.Possible wildcards:
#Dn#, #Dt#, #Ly#, #Jjjj#, #Jj#, #Mm#, #Tt#, #Kw# and ##fieldname##
ExportBatchPostProcessingCommand; Command which will be executed after the export.
ExportBatchFulltextFiletype: file type for additional fulltext file export.
Next possible selections:
-
back to previous setting
-
confirmation to go to the next setting
exit „configuration (modified settings will not be saved)
© One Click Solutions GmbH
User Manual ClickWizard
Page 56 of 62
7.1.
Complete configuration
7.1.1. Database configuration
© One Click Solutions GmbH
User Manual ClickWizard
Page 57 of 62
7.1.2. Batch creation
7.1.3. Batch creation / Manual batch creation
7.1.4. Batch creation / Automatic batch creation
Set directories and paths for automatic batch creation
© One Click Solutions GmbH
User Manual ClickWizard
Page 58 of 62
Choose type of document separation and edit settings
Specify command to be called after automatic batch creation
Run automatic batch creation in background mode
© One Click Solutions GmbH
User Manual ClickWizard
Page 59 of 62
7.1.5. Batch creation / Document file creation
7.1.6. Batch creation / Scan quality check
7.1.7. Batch creation / Settings for extraction
© One Click Solutions GmbH
User Manual ClickWizard
Page 60 of 62
7.1.8. Batch creation / Display message
7.1.9. Export
7.1.10. Export / Single document export
© One Click Solutions GmbH
User Manual ClickWizard
Page 61 of 62
7.1.11. Export / Batch export
7.1.12. Export / Settings index data export
8.
Imprint
Status:
April 1, 2012
Version:
2.1
Publisher/Author
One Click Solutions GmbH
Zwergbachstr. 16
D-, GERMANY9428 Syrgenstein
Copyright © 2012 by One Click Solutions GmbH
© One Click Solutions GmbH
User Manual ClickWizard
Page 62 of 62