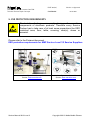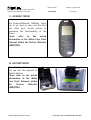
1
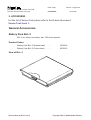
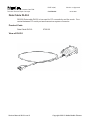
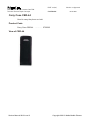
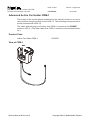
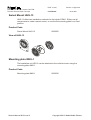
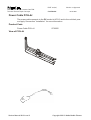
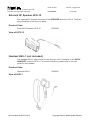
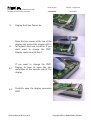
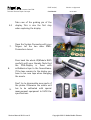
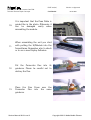
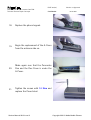
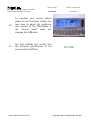
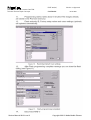
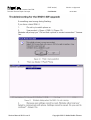
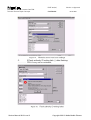
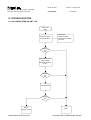
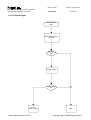
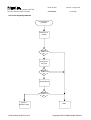
Nokia Mobile Phones Customer Care E&A
Technical Services Repair Concepts
PAGE 1 (50)
Version 1.0 Approved
Confidential
19.07.2001
Service Manual 9210
Service Level 2
Owner
Function
Approver
Document ID
Version/Status
Location
:
:
:
:
:
:
Marco Wydmuch
NMP Customer Care E&A Technical Services Repair Concepts
Manager Repair Concepts
1.0 Approved
Extranet IWR/PWS
Copyright © Nokia Mobile Phones. This material, including documentation and any related computer
programs, is protected by copyright controlled by Nokia Mobile Phones. All rights are reserved. Copying,
including reproducing, storing, adapting or translating, any or all of this material requires the prior
written consent of Nokia Mobile Phones. This material also contains confidential information, which may
not be disclosed to others without the prior written consent of Nokia Mobile Phones.
Change History:
Version Date
0.1
1.0
19.07.2001
19.07.2001
Status
Draft
Approved
Service Manual 9210 Level 2
Handled By
Marco Wydmuch
Marco Wydmuch
Comments
initial draft
approved by Klaus Borgmann
Copyright 2001 © Nokia Mobile Phones
Nokia Mobile Phones Customer Care E&A
Technical Services Repair Concepts
PAGE 2 (50)
Version 1.0 Approved
Confidential
19.07.2001
Introduction
The purpose of this document is to give Nokia service level 2 workshops aids to carry out
service for 9210. The use of this Service Manual is only for Nokia authorized service partners
additionally to other service documentation like Service Bulletins.
While every endeavor has been made to ensure the accuracy of this document, some errors
may exist. If you find any errors or if you have further suggestions, Nokia should be notified.
Please keep in mind also that this documentation is continuously being updated and
modified, so watch always out for the newest version.
Warnings and Cautions
Please refer to the phone’s user guide for instructions relating to operation, care and maintenance including
important safety information. Note also the following:
Warnings:
1. CARE MUST BE TAKEN ON INSTALLATION IN VEHICLES FITTED WITH ELECTRONIC ENGINE MANAGEMENT
SYSTEMS AND ANTI–SKID BRAKING SYSTEMS. UNDER CERTAIN FAULT CONDITIONS, EMITTED RF ENERGY
CAN AFFECT THEIR OPERATION. IF NECESSARY, CONSULT THE VEHICLE DEALER/MANUFACTURER TO
DETERMINE THE IMMUNITY OF VEHICLE ELECTRONIC SYSTEMS TO RF ENERGY.
2. THE HANDPORTABLE TELEPHONE MUST NOT BE OPERATED IN AREAS LIKELY TO CONTAIN POTENTIALLY
EXPLOSIVE ATMOSPHERES EG PETROL STATIONS (SERVICE STATIONS), BLASTING AREAS ETC.
3. OPERATION OF ANY RADIO TRANSMITTING EQUIPMENT, INCLUDING CELLULAR TELEPHONES, MAY
INTERFERE WITH THE FUNCTIONALITY OF INADEQUATELY PROTECTED MEDICAL DEVICES. CONSULT A
PHYSICIAN OR THE MANUFACTURER OF THE MEDICAL DEVICE IF YOU HAVE ANY QUESTIONS. OTHER
ELECTRONIC EQUIPMENT MAY ALSO BE SUBJECT TO INTERFERENCE.
Cautions:
1. Servicing and alignment must be undertaken by qualified personnel only.
2. Ensure all work is carried out at an anti–static workstation and that an anti–static wrist strap is worn.
3. Ensure solder, wire, or foreign matter does not enter the telephone as damage may result.
4. Use only approved components as specified in the parts list.
5. Ensure all components, modules screws and insulators are correctly re–fitted after servicing and
alignment. Ensure all cables and wires are repositioned correctly.
6. All PC’s used with NMP Service Software for this produce must be bios and operating system ”Year 2000
Compliant”.
Service Manual 9210 Level 2
Copyright 2001 © Nokia Mobile Phones
Nokia Mobile Phones Customer Care E&A
Technical Services Repair Concepts
PAGE 3 (50)
Version 1.0 Approved
Confidential
19.07.2001
Table of content
1.
2.
3.
4.
5.
6.
7.
8.
Exploded View and Partslist ............................................................................................... 4
Bill of repair .............................................................................................................................. 5
Accessories ................................................................................................................................ 6
Disassembly/Assembly Instructions .............................................................................. 21
Backup of user data and applications.......................................................................... 28
SW-Update ............................................................................................................................. 29
User Interface Layout ......................................................................................................... 41
Troubleshooting .................................................................................................................... 42
8.1
8.2
8.3
8.4
8.5
8.6
NO CHARACTERS ON CMT LCD ........................................................................................ 42
No PDA LCD function............................................................................................................ 43
No PDA backlight .................................................................................................................. 44
Phone keymat problems........................................................................................................ 45
No service.............................................................................................................................. 46
CMT and keymat illumination problems ................................................................................ 47
9. ESD protection requirements........................................................................................... 48
10.
Service Notes ................................................................................................................... 49
11.
GoNoGo Tester ................................................................................................................ 50
12.
Batterytester .................................................................................................................... 50
Service Manual 9210 Level 2
Copyright 2001 © Nokia Mobile Phones
Nokia Mobile Phones Customer Care E&A
Technical Services Repair Concepts
PAGE 4 (50)
Version 1.0 Approved
Confidential
19.07.2001
1. EXPLODED VIEW AND PARTSLIST
Card Cover 9451767
Antenna 0660214
Antenna Pin 9517065
Plugs set 4 pcs. 9470014
Front Cover Assembly 9467043
Screws M1. 6x4 T6 6190023
CMT Display 4850177
Display Adhesive 9480568
DL2S UI with LCD’s 0201784
Phone Keymat 9794032
Screws M1.6X7 T6 6190013
Cover Label 9381054
Service Manual 9210 Level 2
Copyright 2001 © Nokia Mobile Phones
Nokia Mobile Phones Customer Care E&A
Technical Services Repair Concepts
PAGE 5 (50)
Version 1.0 Approved
Confidential
19.07.2001
2. BILL OF REPAIR
PART NO PG
0201784
9517065
0660214
9794032
6190013
6190023
9381054
4850177
9451767
9467043
9470114
9480568
PART NAME
70 DL2S UI WITH LCDS LINDA SPARE
24 ANTENNA PIN RAE-3
36 ANTENNA TURN.900/1800MHZ GSM/PCN
44 PHONE KEYMAT DMC02629 RAE-3
11 SCREW M1.6X7 DMD01749 T6 FEZN BLK
11 SCREW M1.6X4
11 COVER LABEL DMD05169 RAE-3
46 CMT DISPLAY
17 CARD COVER DMD05146 RAE-3
44 FRONT COVER ASSY DMC02517 RAE-3
22 PLUG DMD05262 RAE-3
17 DISPLAY ADHESIVE
Service Manual 9210 Level 2
Copyright 2001 © Nokia Mobile Phones
Nokia Mobile Phones Customer Care E&A
Technical Services Repair Concepts
PAGE 6 (50)
Version 1.0 Approved
Confidential
19.07.2001
3. ACCESSORIES
For the list of Service Tools please refer to the Extranet document:
Service Tools Level 1.
General Accessories
Battery Pack BLL-3
BLL-3 is a lithium ion battery with 1300 mAh capacity.
Product Codes
Battery Pack BLL-3 (English label) . . . . . .
0670290
Battery Pack BLL-3 (French label) . . . . . .
0670363
View of BLL-3
Service Manual 9210 Level 2
Copyright 2001 © Nokia Mobile Phones
Nokia Mobile Phones Customer Care E&A
Technical Services Repair Concepts
PAGE 7 (50)
Version 1.0 Approved
Confidential
19.07.2001
Fast Travel Charger ACP-9
Operating within the voltage range 90 V...264 V AC (50 Hz...60 Hz), the Fast
Travel Charger is practically current independent in normal office and household use. Like the standard charger, it is compatible with all battery options and
is available for different wall sockets.
The Fast Travel Charger can also be used with basic stand and desktop stand.
Fast Travel Charger (Euro plug) 90-264 Vac
Fast Travel Charger (Chinese plug) 90-264 Vac
Fast Travel Charger (UK plug) 90-264 Vac
Fast Travel Charger (Australia) 90-264 Vac
ACP-9E
ACP-9C
ACP-9X
ACP-9A
0675151
0675204
0675150
0675152
Output cable (supplied with ACP-9):
ACP-9E
ACP-9U
ACP-9X
ACP-9A
Output connectors:
Protection:
Output voltage/current (typ):
Weight approx. with cable
Service Manual 9210 Level 2
Copyright 2001 © Nokia Mobile Phones
Nokia Mobile Phones Customer Care E&A
Technical Services Repair Concepts
PAGE 8 (50)
Version 1.0 Approved
Confidential
19.07.2001
Data Cable DLR-2
RS-232 Data cable DLR-2 to be used for PC connectivity and fax mode. Connected between PC serial port and transceiver system connector.
Product Code
Data Cable DLR-2:
0730132
View of DLR-2
Service Manual 9210 Level 2
Copyright 2001 © Nokia Mobile Phones
Nokia Mobile Phones Customer Care E&A
Technical Services Repair Concepts
PAGE 9 (50)
Version 1.0 Approved
Confidential
19.07.2001
Memory Card DTS-16
The PDA includes a synchronous serial interface that is compatible with the
Multimedia Card Bus (MMC) Protocol. The MMC is a changeable Flash or
ROM memory card with variable memory size, DTS-16 memory capacity is
16Mbytes The MMC connector is located on the BS8 Module.
Note: The same part is used for RAE-2 communicator. The media is electrically
and mechanically compatible. However the data format is different.
RAE-3 is compatible with 4MByte and 8MByte cards also.
Product Code
Memory Card DTS-16:
0271658
View of DTS-16
1
2 3 4 5 6
7
32mm
24mm
Service Manual 9210 Level 2
1.5mm
Copyright 2001 © Nokia Mobile Phones
Nokia Mobile Phones Customer Care E&A
Technical Services Repair Concepts
PAGE 10 (50)
Version 1.0 Approved
Confidential
19.07.2001
Portable Accessories
Audio Headset HDC-8L
The audio headset can be used for normal voice calls instead of the PC audio.
Product Code
Headset HDC-8L
View of HDC-9
Service Manual 9210 Level 2
Copyright 2001 © Nokia Mobile Phones
Nokia Mobile Phones Customer Care E&A
Technical Services Repair Concepts
PAGE 11 (50)
Version 1.0 Approved
Confidential
19.07.2001
Mobile Charger LCH-9
Charging adapter for car environment;
Input voltage
9...32 V
Output voltage
7.8 V /+1.4V/–1.0V)
Charger type
Switching mode power supply
Operation
quick charge (< 0.5-2.5 h), trickle charge
Protection
input fused, output current limit
Green LED indicating input voltage on
Weight
Appx. 78g
Product Code
Portable charger LCH-9
0675005
View of LCH-9
Service Manual 9210 Level 2
Copyright 2001 © Nokia Mobile Phones
Nokia Mobile Phones Customer Care E&A
Technical Services Repair Concepts
PAGE 12 (50)
Version 1.0 Approved
Confidential
19.07.2001
Belt Clip BCH-17
Used to carry the phone on belt. Installation Belt clip is fixed to belt. The counterpiece is fixed to B cover of the transceiver. The belt part is equipped with a
latch to ensure firm retention and easy removal.
Product Code
Belt Clip BCH-17:
0271664
View of BCH-17
Service Manual 9210 Level 2
Copyright 2001 © Nokia Mobile Phones
Nokia Mobile Phones Customer Care E&A
Technical Services Repair Concepts
PAGE 13 (50)
Version 1.0 Approved
Confidential
19.07.2001
Carry Case CBR-44
Used to carry the phone on belt.
Product Code
Carry Case CBR-44 . . . . . . . . 0720262
View of CBR-44
Service Manual 9210 Level 2
Copyright 2001 © Nokia Mobile Phones
Nokia Mobile Phones Customer Care E&A
Technical Services Repair Concepts
PAGE 14 (50)
Version 1.0 Approved
Confidential
19.07.2001
Office Use Accessories
Desktop Stand DCH-10
The desktop stand DCH-10 is designed for calendar data synchronization between a PC and a Communicator with a button press.
The front slot holds and charges the phone, and the rear slot holds and
charges a spare battery.
The desk stand includes red and green LEDs to show the status of the spare
battery charging in the rear slot.
The desk stand supports charging of 4.1V and 4.2V lithium-ion batteries.
The desk stand is powered by an external ACP-9 type charger.
When a RAE-3 is placed in the front slot it is charged at the same rate as if the
external charger was connected directly to the phone. When a spare BLL-3
battery is placed in the rear slot, it is charged at a slower rate. Charging of the
spare battery is delayed until the phone has finished charging.
The front slot provides data connection between the deskstand connected PC
and the RAE-3. The host PC is connected by Nokia data cable to the rear of the
desk stand. The PC must have the Nokia ”Share” software running for the data
transfer to the PC to be successful.
Product Code
Desktop stand DCH-10
0675209
Desktop stand DCH-10 (chinese variant) 0675222
Service Manual 9210 Level 2
Copyright 2001 © Nokia Mobile Phones
Nokia Mobile Phones Customer Care E&A
Technical Services Repair Concepts
PAGE 15 (50)
Version 1.0 Approved
Confidential
19.07.2001
Advanced Handsfree Car Installation Kit CARK109
HHS-13
MKU-1
HFU–2
CRM-1
PCH–4J
AMD-2
HFS–12
HFM-8
HSU-1
Item:
Accessory:
Type
1
2
3
4
5
6
7
8
Active Car Cradle
Handsfree Unit
Handsfree Microphone
Handsfree Speaker
Power Cable
Swivel mount
Mounting Plate
Active Handset (Optional)
CRM-1
HFU-2
HFM–8
HFS-12
PCH-4J
HHS-13
DMS00601
HSU–1
Service Manual 9210 Level 2
Product code:
0630220
0694049
0690016
0692008
0730055
0620055
0620036
0730091
Copyright 2001 © Nokia Mobile Phones
Nokia Mobile Phones Customer Care E&A
Technical Services Repair Concepts
PAGE 16 (50)
Version 1.0 Approved
Confidential
19.07.2001
Advanced Active Car Holder CRM-1
The holder for the mobile phone is attached to the vehicle’s interior in a convenient position using the swivel mount HHS-13. The mounting is secured with a
screw (included with HHS-13).
The cable with the plug-in connector from CRM-1 connects to the PHONE
socket in HFU-2. (The other cable from CRM-1 connects to the external antenna.)
Product Code
Active Car Holder CRM-1
0630220
View of CRM-1
Service Manual 9210 Level 2
Copyright 2001 © Nokia Mobile Phones
Nokia Mobile Phones Customer Care E&A
Technical Services Repair Concepts
PAGE 17 (50)
Version 1.0 Approved
Confidential
19.07.2001
Swivel Mount HHS-13
HHS-13 offers two installation methods for the holder CRM-1. Either use all
components to make a swivel mount, or use the flat mounting plate for a fixed
position.
Product Code
Swivel Mount HHS-13
0620055
View of HHS-13
Mounting plate MKU-1
The handsfree unit HFU-2 can be attached to the vehicle interior using the
mounting plate MKU-1.
Product Code
Mounting plate MKU-1
Service Manual 9210 Level 2
0620036
Copyright 2001 © Nokia Mobile Phones
Nokia Mobile Phones Customer Care E&A
Technical Services Repair Concepts
PAGE 18 (50)
Version 1.0 Approved
Confidential
19.07.2001
Advanced HF Unit HFU-2
The handsfree unit HFU-2 enables the phone to operate in handsfree mode
and it is attached to the vehicle interior using the mounting plate MKU-1.
Product Code
Advanced HF Unit HFU-2
0694049
View of HFU-2
Service Manual 9210 Level 2
Copyright 2001 © Nokia Mobile Phones
Nokia Mobile Phones Customer Care E&A
Technical Services Repair Concepts
PAGE 19 (50)
Version 1.0 Approved
Confidential
19.07.2001
Power Cable PCH-4J
The power cable connects to the DC socket in HFU-2 and to the vehicle’s power supply. See section ”Installation” for more information.
Product Code
Power Cable PCH-4J
0730055
View of PCH-4J
Handsfree Microphone HFM-8
The microphone connects to the MIC socket in HFU-2. Twist the plug clockwise
to lock firmly in place.
Product Code
Power Cable HFM-8
0690016
View of HFM-8
)LJXUH+DQGVIUHHPLFURSKRQH+)0
Service Manual 9210 Level 2
Copyright 2001 © Nokia Mobile Phones
Nokia Mobile Phones Customer Care E&A
Technical Services Repair Concepts
PAGE 20 (50)
Version 1.0 Approved
Confidential
19.07.2001
External HF Speaker HFS-12
The external HF speaker connects to the SPEAKER socket in HFU-2. Twist the
plug clockwise to lock firmly in place.
Product Code
External HF speaker HFS-12
0692008
View of HFS-12
Handset HSU-1 (not included)
The handset HSU-1 offers more privacy during a call. It connects to the DATA/
HANDSET socket in HFU-2. For more information, please refer to the user
guide for the handset.
Product Code
Handset HSU-1
0640047
View of HSU-1
Service Manual 9210 Level 2
Copyright 2001 © Nokia Mobile Phones
Nokia Mobile Phones Customer Care E&A
Technical Services Repair Concepts
PAGE 21 (50)
Version 1.0 Approved
Confidential
19.07.2001
4. DISASSEMBLY/ASSEMBLY INSTRUCTIONS
Attention: Before starting this procedure you must take care of ESD precautions like being in your ESDarea and connecting your armwrist.
1.
Remove the Cover Label carefully
with tweezers. Take care not to
scratch the cover.
Remove the two screws with driver
Torx T6.
2.
Do not use the torquedriver for
loosening because you can damage
or decalibrate it.
3.
Pull back the A-Cover from the
bottom side on. You have to use a bit
more power to release the cover from
its clips. This is a bit tricky, so that
you have to get your own experience.
4.
Take away the Phone Keymat.
Service Manual 9210 Level 2
Copyright 2001 © Nokia Mobile Phones
Nokia Mobile Phones Customer Care E&A
Technical Services Repair Concepts
PAGE 22 (50)
Version 1.0 Approved
Confidential
19.07.2001
5.
Unplug the Coax Connector.
6.
Open the two screws at the top of the
display and protect the display with a
foil against dust and scratches. If you
don’t want to change the CMTDisplay continue with step 7.
6.1
If you want to change the CMTDisplay to have to open the two
metalclips at the bottom side of the
display.
6.2
Carefully open the display connector
X007.
Service Manual 9210 Level 2
Copyright 2001 © Nokia Mobile Phones
Nokia Mobile Phones Customer Care E&A
Technical Services Repair Concepts
PAGE 23 (50)
Version 1.0 Approved
Confidential
19.07.2001
6.3
Take care of the guiding pin of the
display. This is also the first step
when replacing the display.
7.
Open the System Connector with your
fingers. Let the two other SMDConnectors closed.
8.
9.
Press back the whole UI/Module DL2S
carefully with your thumbs. Note that
the PDA-Display is fixed with
selfadhesive tape to the Screenframe.
If the tape remains to the display you
have to use new tape when changing
the moule.
Don’t try to disassemble more parts of
the phone. Otherwise the whole unit
has to be calibrated with special
measurement equipment to fulfill the
specifications.
Service Manual 9210 Level 2
Copyright 2001 © Nokia Mobile Phones
Nokia Mobile Phones Customer Care E&A
Technical Services Repair Concepts
PAGE 24 (50)
Version 1.0 Approved
Confidential
19.07.2001
10.
It is important that the Coax Cable is
guided like in the photo. Otherwise it
can be damaged easily when
assembling the module.
11.
When assembling the unit you start
with putting the UI/Module into the
Screenframe. Remember also to check
or to use a new Display Adhesive.
12.
Put the Connector Flex into its
guidance. Please be careful not to
destroy the flex.
13.
Place the Flex Cover over the
Connector Flex into the same
guidance.
Service Manual 9210 Level 2
Copyright 2001 © Nokia Mobile Phones
Nokia Mobile Phones Customer Care E&A
Technical Services Repair Concepts
PAGE 25 (50)
Version 1.0 Approved
Confidential
19.07.2001
14.
Plug-in the System Connector
through slightly pressing it down with
one finger.
15.
Plug-in the Coax Connector.
16.
Set up your torquedriver with
16 Ncm as seen in the picture. Please
do not underestimate the use of the
right torque. It avoids damaging the
threads and ensures that all the
screws are tightened constantly.
17.
Now you can tighten the two display
screws with 16 Ncm.
Service Manual 9210 Level 2
Copyright 2001 © Nokia Mobile Phones
Nokia Mobile Phones Customer Care E&A
Technical Services Repair Concepts
PAGE 26 (50)
Version 1.0 Approved
Confidential
19.07.2001
18.
Replace the phone keypad.
19.
Begin the replacement of the A-Cover
from the antenna side on.
20.
Make again sure that the Connector
Flex and the Flex Cover is under the
A-Cover.
21.
Tighten the screws with 16 Ncm and
replace the Cover Label.
Service Manual 9210 Level 2
Copyright 2001 © Nokia Mobile Phones
Nokia Mobile Phones Customer Care E&A
Technical Services Repair Concepts
PAGE 27 (50)
Version 1.0 Approved
Confidential
19.07.2001
22.
To complete your service actions
please do the functional testing. You
may have to adjust the brightness
and contrast of the PDA-Display in
the “control panel” when you
changed the UI/Module.
23.
The final GoNoGo test verifies that
the electrical specifications of the
product will be fulfilled.
Service Manual 9210 Level 2
Test OK!
Copyright 2001 © Nokia Mobile Phones
Nokia Mobile Phones Customer Care E&A
Technical Services Repair Concepts
PAGE 28 (50)
Version 1.0 Approved
Confidential
19.07.2001
5. BACKUP OF USER DATA AND APPLICATIONS
To back up and restore user data to and from the multi media card (MMC)
Note:
WinTesla service software can only save the user/phone settings (ringing tone, profile
settings…etc.) and not the user data (phone book, calendar entries, etc.)
You have to save the user data to the memory card or PC-Suite.
The Backup and Restore commands will copy all data. You cannot back up or restore an
individual folder. The backup and restore commands are recursive; that is, they copy folders
and all the contents within the folders.
To be able to back up to and restore from a memory card, the card should be inserted in the
communicator with enough empty space.
1. Press the Office key of the application buttons and select File manager.
Open the File manager and then press the Menu key and select Memory card >
Backup to memory card… or Restore from memory card…, depending on what you
want to do. A dialog opens.
2. If you are making a backup, look for a backup folder on the memory card by
pressing Change or type in the name of a new folder in the Backup folder field.
If you are restoring data to your communicator, select the folder in the
communicator into which you want to restore you data. Normally you should
select the root folder.
3. Press Backup to back up all the communicator data to the memory card.
Press Restore to restore all the backed-up memory card data to the
communicator.
Service Manual 9210 Level 2
Copyright 2001 © Nokia Mobile Phones
Nokia Mobile Phones Customer Care E&A
Technical Services Repair Concepts
PAGE 29 (50)
Version 1.0 Approved
Confidential
19.07.2001
6. SW-UPDATE
SW-Update with FLS-4 is currently under construction and will be updated as soon as possible.
This is the update procedure for FPS-8 Flashbox.
Service Manual 9210 Level 2
Copyright 2001 © Nokia Mobile Phones
Nokia Mobile Phones Customer Care E&A
Technical Services Repair Concepts
Service Manual 9210 Level 2
PAGE 30 (50)
Version 1.0 Approved
Confidential
19.07.2001
Copyright 2001 © Nokia Mobile Phones
Nokia Mobile Phones Customer Care E&A
Technical Services Repair Concepts
Service Manual 9210 Level 2
PAGE 31 (50)
Version 1.0 Approved
Confidential
19.07.2001
Copyright 2001 © Nokia Mobile Phones
Nokia Mobile Phones Customer Care E&A
Technical Services Repair Concepts
Service Manual 9210 Level 2
PAGE 32 (50)
Version 1.0 Approved
Confidential
19.07.2001
Copyright 2001 © Nokia Mobile Phones
Nokia Mobile Phones Customer Care E&A
Technical Services Repair Concepts
Service Manual 9210 Level 2
PAGE 33 (50)
Version 1.0 Approved
Confidential
19.07.2001
Copyright 2001 © Nokia Mobile Phones
Nokia Mobile Phones Customer Care E&A
Technical Services Repair Concepts
Service Manual 9210 Level 2
PAGE 34 (50)
Version 1.0 Approved
Confidential
19.07.2001
Copyright 2001 © Nokia Mobile Phones
Nokia Mobile Phones Customer Care E&A
Technical Services Repair Concepts
Service Manual 9210 Level 2
PAGE 35 (50)
Version 1.0 Approved
Confidential
19.07.2001
Copyright 2001 © Nokia Mobile Phones
Nokia Mobile Phones Customer Care E&A
Technical Services Repair Concepts
Service Manual 9210 Level 2
PAGE 36 (50)
Version 1.0 Approved
Confidential
19.07.2001
Copyright 2001 © Nokia Mobile Phones
Nokia Mobile Phones Customer Care E&A
Technical Services Repair Concepts
Service Manual 9210 Level 2
PAGE 37 (50)
Version 1.0 Approved
Confidential
19.07.2001
Copyright 2001 © Nokia Mobile Phones
Nokia Mobile Phones Customer Care E&A
Technical Services Repair Concepts
Service Manual 9210 Level 2
PAGE 38 (50)
Version 1.0 Approved
Confidential
19.07.2001
Copyright 2001 © Nokia Mobile Phones
Nokia Mobile Phones Customer Care E&A
Technical Services Repair Concepts
Service Manual 9210 Level 2
PAGE 39 (50)
Version 1.0 Approved
Confidential
19.07.2001
Copyright 2001 © Nokia Mobile Phones
Nokia Mobile Phones Customer Care E&A
Technical Services Repair Concepts
Service Manual 9210 Level 2
PAGE 40 (50)
Version 1.0 Approved
Confidential
19.07.2001
Copyright 2001 © Nokia Mobile Phones
Nokia Mobile Phones Customer Care E&A
Technical Services Repair Concepts
PAGE 41 (50)
Version 1.0 Approved
Confidential
19.07.2001
7. USER INTERFACE LAYOUT
Coax Cable
Antenna Pin
Coax Connector
X007
Don’t touch the
contacts with your
fingers. Use gloves
to avoid corrosion!
X001
X003
X003
Service Manual 9210 Level 2
Copyright 2001 © Nokia Mobile Phones
Nokia Mobile Phones Customer Care E&A
Technical Services Repair Concepts
PAGE 42 (50)
Version 1.0 Approved
Confidential
19.07.2001
8. TROUBLESHOOTING
8.1 NO CHARACTERS ON CMT LCD
CMT LCD
faulty
Check connector
X007and X001.
- connection
- optical condition
- mechanical condition
- corrosion
Display
Yes
ok?
No
CMT LCD or LCD
Flex probably
damaged. Replace
LCD.
Display
Yes
ok?
No
Change DL2S
No
Send to
Service Center
Service Manual 9210 Level 2
Display
Yes
ok?
END
Copyright 2001 © Nokia Mobile Phones
Nokia Mobile Phones Customer Care E&A
Technical Services Repair Concepts
PAGE 43 (50)
Version 1.0 Approved
Confidential
19.07.2001
8.2 No PDA LCD function
PDA LCD faulty
Check connector
X001, X002 and
X003.
- connection
- optical condition
- mechanical condition
- corrosion
Check that PDA
display is not
mechanically
damaged, i. e. pixels
missing.
Display
Yes
ok?
No
Change DL2S
No
Send to
Service Center
Service Manual 9210 Level 2
Display
Yes
ok?
END
Copyright 2001 © Nokia Mobile Phones
Nokia Mobile Phones Customer Care E&A
Technical Services Repair Concepts
PAGE 44 (50)
Version 1.0 Approved
Confidential
19.07.2001
8.3 No PDA backlight
PDA Backlight
faulty
Switch the Backlight
on/off/on
Backlight
Yes
ok?
No
Change DL2S
No
Send to
Service Center
Service Manual 9210 Level 2
Backlight
Yes
ok?
END
Copyright 2001 © Nokia Mobile Phones
Nokia Mobile Phones Customer Care E&A
Technical Services Repair Concepts
PAGE 45 (50)
Version 1.0 Approved
Confidential
19.07.2001
8.4 Phone keymat problems
Phone Keymat
problems
Clean the UI
module
Keymat
funktion Yes
ok?
No
Change the
Key mat
Keypad
funktion Yes
ok?
No
Change DL2S
Keypad
No funktion Yes
ok?
Send to
Service Center
Service Manual 9210 Level 2
END
Copyright 2001 © Nokia Mobile Phones
Nokia Mobile Phones Customer Care E&A
Technical Services Repair Concepts
PAGE 46 (50)
Version 1.0 Approved
Confidential
19.07.2001
8.5 No service
No service
No service
Yes with ext.
antenna?
No
Check the
connection
between coax
cable and UI
module
Check the
antenna pin
No
Send to
Service Center
Service Manual 9210 Level 2
Service ?
Yes
END
Copyright 2001 © Nokia Mobile Phones
Nokia Mobile Phones Customer Care E&A
Technical Services Repair Concepts
PAGE 47 (50)
Version 1.0 Approved
Confidential
19.07.2001
8.6 CMT and keymat illumination problems
CMT and Keymat
illumination
problems
Check connector
X001
Lights ok? Yes
No
Change DL2S
No
Send to
Service Center
Service Manual 9210 Level 2
Lights
Yes
ok?
END
Copyright 2001 © Nokia Mobile Phones
Nokia Mobile Phones Customer Care E&A
Technical Services Repair Concepts
PAGE 48 (50)
Version 1.0 Approved
Confidential
19.07.2001
9. ESD PROTECTION REQUIREMENTS
Electrostatic discharge can easily damage the sensitive
components of electronic products. Therefore every Service
Partner has to take care of at least some precautions like ESD
restricted area, floor, table, covering, chair(s), shoes or
armwrist.
Please refer to the Extranet document
ESD protection requirements for NMP Service Level 1/2 Service Suppliers
example configuration of an epa-area
source: www.armeka.com
Service Manual 9210 Level 2
example configuration of a workbench
source: www.warmbier.com
Copyright 2001 © Nokia Mobile Phones
Nokia Mobile Phones Customer Care E&A
Technical Services Repair Concepts
PAGE 49 (50)
Version 1.0 Approved
Confidential
19.07.2001
10. SERVICE NOTES
We recommend using Service Notes when shipping phones to other Service Partners. It
prevents the product from scratches, it is ESD-proved and has the possibility to give
vavuable feedback of the fault symptom through a structured form.
Please refer to the Extranet document Service Notes for faulty NMP transceiver to get
further information.
Service Manual 9210 Level 2
Copyright 2001 © Nokia Mobile Phones
Nokia Mobile Phones Customer Care E&A
Technical Services Repair Concepts
PAGE 50 (50)
Version 1.0 Approved
Confidential
19.07.2001
11. GONOGO TESTER
The Acterna/Wavetek GoNoGo Tester
has to be used to carry out the final
test after your service action to
guarantee the functionality of the
phone.
Please
refer
to
the
actual
information in the Nokia Care Point
Extranet within the Partner Websites
(IWR/PWS).
12. BATTERYTESTER
The Astratec battery tester
lets you test the capacity of
Nokia batteries.
Please refer to the actual
information in the Nokia
Care Point Extranet within
the
Partner
Websites
(IWR/PWS).
Service Manual 9210 Level 2
Copyright 2001 © Nokia Mobile Phones