1
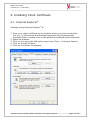
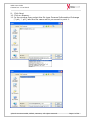
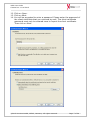
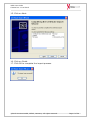
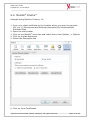
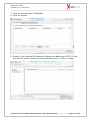
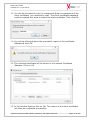
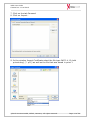
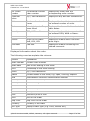
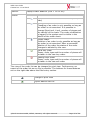
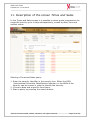
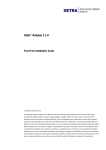
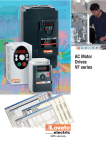
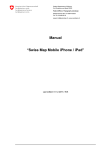
User Guide
Limit Order Xervices Web Frontend
iLOX User Guide
Created on: 11.06.2012
Contents
1. Preface .......................................................................................3
2. System requirements for iLOX .......................................................3
3. Prerequisites for iLOX ...................................................................3
4. Legal Disclaimers .........................................................................3
5. Installing Client Certificate .............................................................4
5.1. Internet Explorer .....................................................................4
5.2. Mozilla Firefox ...................................................................... 10
5.3. Opera .................................................................................. 13
6. First Logon ................................................................................ 18
7. Login to iLOX Web Frontend ........................................................ 19
8. Working with iLOX Web Frontend ................................................. 22
9. Description of the screen New Order ............................................. 24
10. Description of the screen Order Overview ...................................... 26
11. Description of the screen Times and Sales ..................................... 29
©2012 Xervices GmbH, Willich, Germany. All rights reserved.
Page 2 of 29
iLOX User Guide
Created on: 11.06.2012
1. Preface
iLOX is a web-based application for trading securities of the issuer
Commerzbank and Deutsche Bank X-Markets.
iLOX allows over the counter (OTC) trading with limit orders against the
issuers via the internet plus the administration of L.O.X.-orders. Based on
a secure internet connection, a trader can send an order as a limit order
against the issuers.
2. System requirements for iLOX
In order to use iLOX, the user needs internet access and one of the
following web browsers:
- Microsoft® Internet Explorer® 6.x, 7.x or 8.x
(http://www.microsoft.com/)
- Mozilla® Firefox® 3.x or higher
(http://www.mozilla-europe.org/de/)
- Opera® 10.xx or higher
(http://www.opera.com/)
The German language and the (U.S.) English-language versions of the
browsers are supported.
3. Prerequisites for iLOX
Another prerequisite for the use of iLOX is following user-specific data.
This data is provided on the basis of a validated FAX application:
- Client certificate in electronic form, delivery is by email
- Password for the client certificate is sent to the user by mail.
- User data for iLOX is sent also by mail.
4. Legal Disclaimers
All product names, trademarks and registered trademarks used in this
document are owned by their respective owners. Microsoft® Internet
Explorer® is a product name and registered trademark of Microsoft
Corporation USA and other countries. Mozilla® Firefox® is a product name
and registered trademark of the Mozilla Foundation, USA.
Opera® is a product name and registered trademark of Opera Software USA.
©2012 Xervices GmbH, Willich, Germany. All rights reserved.
Page 3 of 29
iLOX User Guide
Created on: 11.06.2012
5. Installing Client Certificate
5.1. Internet Explorer®
Example using Internet Explorer® 8:
1. Copy your client certificate to the location where you want to save the
file, e.g. C:\Documents and Settings\username\My Documents\My
Received Files or double click on the attached certificate within the email.
2. Open the browser
3. Click on the menu bar and select menu item Tools -> Internet Options
4. Click on the tab Content
5. Click on the button Certificates
©2012 Xervices GmbH, Willich, Germany. All rights reserved.
Page 4 of 29
iLOX User Guide
Created on: 11.06.2012
6. Click on the tab Personal
7. Click on Import
8. This will start the Certificate Import Wizard.
©2012 Xervices GmbH, Willich, Germany. All rights reserved.
Page 5 of 29
iLOX User Guide
Created on: 11.06.2012
9. Click Next.
10. Click on Browse...
11. In the window Open select the file type Personal Information Exchange
(*.pfx, *. p12) and the file name which you saved in point 1.
©2012 Xervices GmbH, Willich, Germany. All rights reserved.
Page 6 of 29
iLOX User Guide
Created on: 11.06.2012
12. Click on Open.
13. Click on Next.
14. You will be prompted to enter a password. Please enter the password of
the client certificate that you received by mail. The client certificate
password must only be entered once to import the client certificate.
Then click on Next.
©2012 Xervices GmbH, Willich, Germany. All rights reserved.
Page 7 of 29
iLOX User Guide
Created on: 11.06.2012
15. Click on Next.
16. Click on Finish.
17. Click OK to complete the import process.
©2012 Xervices GmbH, Willich, Germany. All rights reserved.
Page 8 of 29
iLOX User Guide
Created on: 11.06.2012
18. The imported certificate appears in the window Certificates.
Click on Close.
19. In the window Internet Options please click on OK as well.
The import of the client certificate is completed successfully.
©2012 Xervices GmbH, Willich, Germany. All rights reserved.
Page 9 of 29
iLOX User Guide
Created on: 11.06.2012
5.2. Mozilla® Firefox®
Example using Mozilla® Firefox® 12:
1. Copy your client certificate to the location where you want to save the
file, e.g. C:\Documents and Settings\username\My Documents\My
Received Files.
2. Open the the browser
3. Click on the Mozilla® menu bar and select menu item Options -> Options
4. Click on the tab Advanced
5. Select the Encryption tab
6. Click on View Certificates
©2012 Xervices GmbH, Willich, Germany. All rights reserved.
Page 10 of 29
iLOX User Guide
Created on: 11.06.2012
7. Click on the tab Your Certificates
8. Click on Import…
9. Select in the window File Name to Restore the data type PKCS 12 files
and the file name, which you have saved in point 1. Click on Open.
©2012 Xervices GmbH, Willich, Germany. All rights reserved.
Page 11 of 29
iLOX User Guide
Created on: 11.06.2012
10. You will be prompted to type in a password. Enter the password of the
client certificate you received by mail. The client certificate password
must be entered only once to import the client certificate. Then click OK.
11. You will be informed about the successful import of the certificate.
Afterwards click OK.
12. The imported certificate will be shown in the window Certificate
Manager. Click on OK.
13. In the window Options click on OK. The import of the client certificate
will then be completed successfully.
©2012 Xervices GmbH, Willich, Germany. All rights reserved.
Page 12 of 29
iLOX User Guide
Created on: 11.06.2012
5.3. Opera®
Example using Opera® 10:
1. Copy your client certificate to the location where you want to save the
file, e.g. C:\Documents and Settings\username\My Documents\My
Received Files.
2. Open the browser.
3. Click on the Opera® menu bar and select the menu item Settings ->
Preferences.
4. Click on the tab Advanced.
5. Chose Security in the navigation menu
6. Click on Manage Certificates…
©2012 Xervices GmbH, Willich, Germany. All rights reserved.
Page 13 of 29
iLOX User Guide
Created on: 11.06.2012
7. Click on the tab Personal
8. Click on Import…
9. In the window Import Certificate select the file type PKCS # 12 (with
private key) (*. p12) as well as the file that was saved in point 1
©2012 Xervices GmbH, Willich, Germany. All rights reserved.
Page 14 of 29
iLOX User Guide
Created on: 11.06.2012
10. You will be prompted to enter a password. Enter your password of the
client certificate that you have received by mail. The client certificate
password must only be entered once to import the client certificate.
Then click OK.
©2012 Xervices GmbH, Willich, Germany. All rights reserved.
Page 15 of 29
iLOX User Guide
Created on: 11.06.2012
11. You will be prompted to enter a master password. This password
must be assigned at the first import of a user certificate and is
used by Opera® in order to secure the access to your certificate.
Please enter a secure password and approve with OK.
©2012 Xervices GmbH, Willich, Germany. All rights reserved.
Page 16 of 29
iLOX User Guide
Created on: 11.06.2012
12. The imported certificate will be shown in the Certificate Manager.
Click on OK.
13. Please click on OK in the window Settings as well. The import of the
client certificate will then be completed successfully.
©2012 Xervices GmbH, Willich, Germany. All rights reserved.
Page 17 of 29
iLOX User Guide
Created on: 11.06.2012
6. First Logon
After the first Logon to the iLOX Web Frontend your initial password should
be changed. In order to create a new password please obey the following
restrictions:
1. The new password must be at least 8 characters long.
2. Name, first name or login name must not be included in a password.
3. It must consist of a combination of capital letters, lower case letters,
digits and "allowed" special characters.
4. Allowable special characters are; ! "# $% & '() * +` -,. /:; <=>? @ [\]
^ _ `(|) ~
5. It is not allowed to reuse one of the last 12 passwords.
©2012 Xervices GmbH, Willich, Germany. All rights reserved.
Page 18 of 29
iLOX User Guide
Created on: 11.06.2012
7. Login to iLOX Web Frontend
In order to log on to iLOX Web-Frontend you need a Logon User name and
Logon Password. Your Logon details are sent to you by mail.
1. Please open the following homepage:
https://ilox.xervices.de/
2. Please enter your user name in the corresponding username field.
For example: TESTUSER@BROKERB
©2012 Xervices GmbH, Willich, Germany. All rights reserved.
Page 19 of 29
iLOX User Guide
Created on: 11.06.2012
3. Afterwards please type in your password in the password field.
The password will be hidden.
4. Click on Login.
If your login was successful, the New Order screen appears.
©2012 Xervices GmbH, Willich, Germany. All rights reserved.
Page 20 of 29
iLOX User Guide
Created on: 11.06.2012
If the message The login failed appears please check your username and
password and repeat steps 1-4.
Please be aware that your account will be blocked if your password is
wrong three times. If this occurs, please contact the L.O.X. support team.
©2012 Xervices GmbH, Willich, Germany. All rights reserved.
Page 21 of 29
iLOX User Guide
Created on: 11.06.2012
8. Working with iLOX Web Frontend
By using the navigation bar it is possible to navigate to different screens.
The following screens are available:
Screen
Description
Order → New Order
In the New Order screen it is possible
to enter Limit-Orders against the
market makers Commerzbank and
Deutsche Bank.
Order → Order overview
All orders are shown in the order
overview of the broker. Here the user
is able to view the status of his orders
as well as change or delete them.
Furthermore it is possible to assume
the security, the transaction type or
the volume into a new buy- or sell
order.
Order → Times and Sales
In the Times and Sales screen it is
possible to check quote progressions
for a specific security up to 4 days
retrospectively.
Extras
Change your login password.
Help
Contact details of the L.O.X. support
team
©2012 Xervices GmbH, Willich, Germany. All rights reserved.
Page 22 of 29
iLOX User Guide
Created on: 11.06.2012
Navigation bar:
The following information is shown in the navigation bar:
Information
Explanation
Current Menu
Connected to following broker
Current user
Time horizon since your last login
By using the logout button you are
logged out
©2012 Xervices GmbH, Willich, Germany. All rights reserved.
Page 23 of 29
iLOX User Guide
Created on: 11.06.2012
9. Description of the screen New Order
In the New Order screen it is possible to enter Limit-Orders against the
market maker Commerzbank or Deutsche Bank. Entering Quote-Orders is
not possible.
Enter orders:
1. Choose Market Maker
2. Enter the security identifier in the security box. Either the ISIN
(International Securities Identification Number), the WKN or the
name of the security can be chosen in order to identify the security.
While writing ISIN, WKN or the name of the security, a drop-down
menu, with suggestions to complete your entry is shown. After the
selection of the security, information about the security and the
indicative price will be shown on the right side.
3. If necessary choose a country.
4. In the input field Units, the desired amount can be specified.
5. In the comment box, a comment can be stored. The comment is
displayed in the order overview and once set, cannot be changed.
6. Choose Limit order.
©2012 Xervices GmbH, Willich, Germany. All rights reserved.
Page 24 of 29
iLOX User Guide
Created on: 11.06.2012
First choose between buy- or sell transaction before setting to Limit Order
type. Following that you must choose the type of limit.
It is not necessary to set a limit. If no limit is set the order is a market
order. Moreover, there are other order types: Limit-Order, Stop-Market
order and Stop-Limit order. Hence, for market and limit order there is the
possibility to add the addition Fill or Kill.
The order can be set for one day validation or longer than that (max 90
days).
The Order is shown in the order overview.
©2012 Xervices GmbH, Willich, Germany. All rights reserved.
Page 25 of 29
iLOX User Guide
Created on: 11.06.2012
10. Description of the screen Order Overview
All orders of the broker will be shown in the order overview. It is possible
to view the current orders and these orders may be changed, deleted or
the order class, type and amount can be transformed in a new buy- or sell
order.
By using a filter in the order overview the amount of shown orders can be
reduced. Information and status of the order can be checked.
Inputs have the following effect:
Input element
Possible input
Effect on the overview
Order date
from
A valid date as
TT.MM.JJJJ or
MM/TT/JJJJ
Displays all orders that were entered
in the corresponding period.
Order date to
A valid date as
TT.MM.JJJJ or
MM/TT/JJJJ
Displays all orders that were entered
in the corresponding period.
Order number
Current order number
Displays the order with the
corresponding order number.
©2012 Xervices GmbH, Willich, Germany. All rights reserved.
Page 26 of 29
iLOX User Guide
Created on: 11.06.2012
Ext. Order
number
The external current
order number
Displays the order with the
corresponding order number.
Customer
action
Buy / Sell transaction
Displays all buy and sell transactions.
Units
Number of ordered
pieces
Displays all orders that are sent with
the entered number of units.
Status
Select status via Drop- Displays all orders with the selected
Down-Menü
order status.
Security
ISIN, WKN or Name
Displays all orders that are sent with
the entered ISIN, WKN or Name.
User
Username
Displays all orders posted by the user.
Source
Origin of the order:
Web, LOX, XOL
Displays all orders which have the
same origin.
Comment
Free text
Displays all orders containing the
entered comment.
Displayed information about the order:
The following overview explains the columns.
Column
Explanation
Order number
Current order number
Order date
Date of the setting of the order
Time
Timestamp of the order setting
Action
Buy / Sell transaction
Status
Current status of the order, e.g. open, running, expired
ISIN
International Securities Identification Number
Securityname
Name of the security
Country
National recognition
Units
Number of ordered units
Open units
Number of open units
Valid until
Validity of order
Price
Execution price in EUR
Limit
Limit of the order
Stop Limit
Stop-Limit of the order
Currency
Currency if the order
Ord. type
Displays order type (e.g. Limit, Market etc.)
©2012 Xervices GmbH, Willich, Germany. All rights reserved.
Page 27 of 29
iLOX User Guide
Created on: 11.06.2012
Restrict.
Actions
Displays order addition (FOK = Fill or Kill)
Button
Action
Detailed information about this order (view /
hide)
Change order:
Changing of an order is only possible so long as
the order is not executed. It is possible to
change Stop-Limit, Limit, number of pieces and
the validity of the order. The order modification
is logged in the system and is visible in the
details of the order sheet.
Delete Order.
Deletion of an order is only possible as long as
the order is not executed. After a successful
deletion of the order the status of the order
changes to deleted by the user.
Set a buy order.
Genus, order type and the number of pieces will
be taken in the new buy order.
Setting a sell order.
Genus, order type and the number of pieces will
be taken in the new sell order.
The view of the order list can be changed to print view. Furthermore, an
export of the order list as csv file is possible. The buttons for these features
are on the right side above the filter entry section.
Change to print view
Export data as csv file
©2012 Xervices GmbH, Willich, Germany. All rights reserved.
Page 28 of 29
iLOX User Guide
Created on: 11.06.2012
11. Description of the screen Times and Sales
In the Times and Sales screen it is possible to check quote progressions for
a specific security up to 4 days retrospectively, sorted by date, time and
market maker.
Starting a Times and Sales query:
1. Enter the security identifier in the security box. Either the ISIN
(International Securities Identification Number) or the WKN of the
security can be chosen in order to identify the security.
2. Choose a date and a specific time frame.
3. Start a query by pressing the search button.
©2012 Xervices GmbH, Willich, Germany. All rights reserved.
Page 29 of 29