1
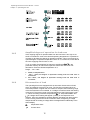
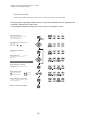
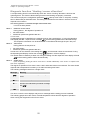
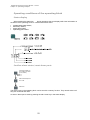
Operating Instructions Hot Runner Control Cabinets Series HRS PSG Plastic Service GmbH P.O. Box 42 01 62 68280 Mannheim Germany Phone +49 621 7162 0 Fax +49 621 7162 162 www.psg-online.de [email protected] Rev. 1.00.05 05/2014 Operating Instructions Series HRS Rev. 1.00.05 Chapter 1 – General hints and information Chapter General hints and information ... On this operating and installation manual This installation and operating manual is valid for all units of the HRS product series. The operating units are equipped with the ETR 132 microprocessor temperature operator. This manual is valid for operating units with and without heating circuit –control. Instructions pertaining to operating units with heating circuit control may be disregarded when employing operating units without the heating circuit control function. Proviso clause This manual was composed bearing the entitlement to the latest information, completeness, and accuracy. Further technical development may result in alteration of the equipment or the software, which may cause incompatibility with this manual. Due to this reason, we are not liable for any interruptions or deficiencies or any subsequent damages created by this circumstance. This operator’s manual is updated with any technical modification. The manual’s version number is updated after any adjustments. The version number is printed on the cover of this manual. If you are not holding the latest version, simply contact us and we will send it to you. Shipment / Scope of shipment / Storage The operation and display unit is shipped fully assembled in a shockproof, cushioned carton box. Under normal circumstances, this provides sufficient protection. If damages are visible prior to opening the carton box, the unit should be checked for any signs of damaging. To evaluate the damaging do not install and / or operate the unit. Contact the supplier immediately! Scope of shipment Storage Aside from the operation and display unit itself, this shipment includes This installation and operating manual. If the unpacked operation and display unit is not put in use immediately it must be stored in a dirt- and humidity protected environment. The permitted temperature range is -10...60°C. 1 Operating Instructions Series HRS Rev. 1.00.05 Chapter 1 – General hints and information Clear identification of the operating unit by the identification tag An identification tag is fixed on the casing of the operating unit. Information on the identification tag states the condition of the unit at the manufacturer as well as the manufacturing date. The unit’s manufacturing date (month/year) and the exact description of the unit, clearly expressed, are stated in addition to the exact product number. To ensure quick handling of potential queries, please provide device and serial number. Notice Precautionary measures Notice Read this manual thoroughly prior to installing and / or operating the nit. Connecting wiring and power lines may only be conducted by authorized personnel and must be in accordance with this manual. Only authorized personnel may operate the unit ! Maximum voltage may not be exceeded ! The operation and display unit may not be used in an explosives‘ area ! If any interruptions occur, the device should always be sent to the supplier . Should you decide to go trouble-shooting yourself, make sure all power lines are disconnected ! Not following these safety measures and the hints stated in chapter 3 „Installation and First-time Operation“ may result in failure of the operation and display unit, the control unit, or in disruption of production. Damages resulting thereof are excluded from the manufacturer’s guarantee. Characteristics – Equipment All HRS operating units are equipped identically with the following functions and equipment. - Temperature operating block based on a micro-processor temperature operator with multi-channel technology Unanimous operating of up to 32 zones State of the art adaptive, self-optimizing operating procedures Heating circuit monitoring Monitoring functions for sensors, temperature limits and voltages Start up function for careful heating in the initiation process Start up function with choke function for accelerated heating of tools Automatic temperature ramp for equal heating of tools Manual mode when sensor broken – with automatic adoption of the most recently computed degree of operation average Zone co-use (allocation of a lead-zone) when sensor broken 2nd set-point (stand by mode) and 3rd set-point (choke function) manually through switch or optionally through machinery operator 2 Operating Instructions Series HRS Rev. 1.00.05 Chapter 1 – General hints and information - Recipe function to save up to 4 set-points Automatic disconnection of load when exceeding maximum set-point or when identifying electrical power when signal heating OFF from controller. 3 Operating Instructions Series HRS Rev. 1.00.05 Chapter 2 – Instructions Chapter Instructions Set- point Parameter Press key. The value of the selected parameter will be shown in the respective zone displays.. Strike key until desired parameter appears. I.e. Low er temperature limit Select further parameters Select one or several zones. Enter input, Select input mode Enter input 1 x keystroke : Single input 2 x keystroke : Block input Hold for 3 sec.:: Change level Change value Select next zone (only possible if single input mode) Zone selection Finish input Confirm change, finish input Select next parameter Return to actual value / deviation display Parameter selection Select further parameters 4 Return to main display Operating Instructions Series HRS Rev. 1.00.05 Chapter 3 – Operating the Unit Chapter Operating the Unit The following chapter describes all operating functions in easy-to-read flow charts. The Basics 3.1 Unanimous Input Sequences Hotkeys When designing the concept of the Operation- and Display Unit the main focus was put on an easily understandable, well visible, and a self-explanatory operating philosophy. Individual hotkeys are assigned to set-point, power parameter, and degree of operation functions. The most important pieces of information are accessible by a single keystroke. s Voltage d Degree of Operation f Set-point To ensure an easy operating, combined functions are initiated by a „commonsense-approach“. For instance, to display power set-points the respective hotkeys are s and f (“Electricity” + ”Set-point”). All other configuration parameters are saved in a separate parameter memory. Status Display After pushing the respective status key the current status of individual control zones (temperature alarms, voltage alarms, control ports) is displayed in the respective status displays. a Deviation Display 5 Operational Steps Control zones status To gain quick overview over the implementation of programmed parameters, pushing a key allows to switch between actual data display and deviation display. All functions are operated in 5 steps: Select function / configuration parameter Select zones 3 different selections pertaining to zones are available: single zone several selected zones (selective block mode) selection of all zones (total block mode) Enter Input If several zones are selected (selective block mode or total block mode) the data of these zones can be altered by the same absolute or 5 Operating Instructions Series HRS Rev. 1.00.05 Chapter 3 – Operating the Unit to the same value. I.e. by applying this method set-point changes for an entire level can be adjusted quite easily. 3.2 Execute change Confirm change / finish or continue input. Operation- and Display elements A Zone displays B Information display C Cursor keys D Status key / Back-up key E Power key F Degree of Operation key G Set-point key H Parameter key I Edit key / Enter key J Switch 2nd Set-point 3rd Set-point K 3.2.1 Power switch Symbol Codes in the Operating Examples The definitions are valid for the following operating examples. Keys of the Operation and Display Unit Zone displays (the order of zones was altered for the purpose of a more applicable presentation.) Information display 6 Operating Instructions Series HRS Rev. 1.00.05 Chapter 3 – Operating the Unit Rapidly flashing zone display – shows the position of the cursor. Slowly blinking zone display – zone was selected. Display-reading in the information display after a certain key was pushed. 7 Operating Instructions Series HRS Rev. 1.00.05 Chapter 3 – Operating the Unit 3.3 Display readings and their Meanings Aside from actual temperature or operating values, further information on the status of the operating zone or the operating unit can be shown in the zone displays. These display-readings are as shown in the chart below. Meaning Display Input operations Zone providing lead-data Zone undergoing lowering process Temperature ramp active Start up operations active Identification active Cooling adaptation active Sensor fractured Sensor short Sensor wrongfully connected Error in the Operation Unit – display data link Data error in channel data Violation of maximum temperature / upper measuring limit Violation of plausibility during identification process Error message „Drift“ during identification process Error message „No heating current measured“ during identif. proc. 2nd Set-point 3rd Set-point th 4 Set-point Error „no power“ occurred during diagnosis / Error „sensor wrongfully connected“ detected Error "wrong zone under power" occurred during diagnosis / Error "temperature increase in a zone" occurred Error „power in an appropriate as well as in another zone“ occurred during diagnosis / Error „temperature increase“ occurred. No error detected during diagnosis Diagnosis in progress Error „Power alarm while heating device turned off“ occurred during diagnosis / Error „Increase in actual value although heating device is turned off“ occurred " Automatic ramp active Automatic ramp active, zone currently the slowest zone Power alarm active although heating device is turned off Saving alarm-function active Automatic cooling adaptation initiated but not in progress yet 8 Operating Instructions Series HRS Rev. 1.00.05 Chapter 3 – Operating the Unit Operating Functions 3.4 Some rather convenient input possibilities are available on the Operation- and Display Unit. How to use them will be shown in the example „Changing set-point parameters“. Operating Examples The following operating examples are identical with different configuration parameter changes. The following three input options are available: 1 Single input To change the set-point of only one zone.“ 2 3 Block input Selection mode To change the set-points of all zones simultaneously Change set-points by a certain value. 3.5 To change the set-points of selected zones. Change set points to a certain value. Change set-points by a certain value. Change set points to a certain value. Option 1 The parameter of only one zone is changed. Option 2 The parameters of all zones are changed simultaneously. In addition, it may be determined whether the parameter is to be changed by or to a certain value. Option 3 The parameters of certain selected zones are changed simultaneously. In addition, it may be determined whether the parameter is to be changed by or to a certain value. Manufacturer’s settings Set-point °C Start up function Start up time 2nd Set-point (lowering ) °C 3rd Set-point (for boost function) °C Start up time 3 ( for boost function ) °C Start up time 4 (for diagnosis function) Temperature limits °C Heater current tolerance % Manual mode Automatic temperature ramp Min Min Set-point data input is limited to 450 °C. If actual data exceeds maximum setpoint data by by > 5 °C a Lastabschaltung will occur automatically. This is to prevent an uncontrolled heating under broken operator conditions. 9 Operating Instructions Series HRS Rev. 1.00.05 Chapter 3 – Operating the Unit The operator in a device with an integrated heating circuit monitor will recognize the heating of a zone – once there is still electricity – although there are no more heating impulses generated by the operator. 3.6 3.6.1 Basic functions of the operating unit Start up function A start up function is used for careful heating (to purge humidity). This function operates the connected operating zone to a set-point of 100°C for a pre-set start up time frame. Upon completion of the start up cycle the operator goes to the final set-point. This always occurs automatically – presuming the start up function is initiated and conditions for start up functions are set – after turning on the operating block. Conditions : after turning on the operating block Start up function on Start up time >0 minutes Set-point>100 °C Actual temperature < 70 °C Parameters for the start up function are saved in the parameter memory activate/deactivate start up function, start up time 0...99 minutes 3.6.2 Start up operation with boost function For faster heating of tools when starting, if the employed materials permit, start up with an increased temperature set-point is possible for a pre set time. The choke function can be activated manually, through a switch on the operating block, or automatically by programming a time frame. This automatic function is coupled with the start up function. Upon completion of the start up cycle the operator automatically goes to the boost set-point. Operating : after turning on operating block start up function activated 3rd set-point > 0 °C start up time of boost set point > 0 minutes Parameters for the choke function are saved in the parameter memory. 3rd set-point ( set-point for boost function ) Start up time 3 ( time frame for active choke function ) 10 Operating Instructions Series HRS Rev. 1.00.05 Chapter 3 – Operating the Unit 3.6.3 2nd Set-point function (standby mode) Set-point function (boost function) 3rd Aside from the main set-point two additional set-points are accesible by switch through the standard operating block. These additional set-points are activated through a switch on the front dashboard on the operating block. Three positions are available on the switch: lower position: 2nd set-point (lowering) middle position: main set-point upper position : 3rd set-point (boost) Both additional set-points are freely adjustable as absolute values in the parameter memory. Set-point 3 is defined in conjunction with start up time 3 for the automatic boost function (increased set-point). Set-point 2 should be used as the lowering set-point. For information purposes a display information for set-point 2 and for set-point 3, respectively, will appear cyclically in the zone display . 3.6.3.1 Switch to activate additional set-points - 3rd set-point ( boost function ) - middle position - 2nd set-point ( lowering function ) Parameters for the 2nd and 3rd set-point are saved in the parameter memory. 3rd set-point ( set-point for boost function ) 2nd set-point ( set-point for lowering function ) 3.6.4 Zone co-use under broken sensor conditions In the event of a broken sensor it is possible to co-use operating data coming from a lead zone with the affected zone. It is important to ensure operating data of the designated lead zone is of almost identical with the damaged zone. 11 Operating Instructions Series HRS Rev. 1.00.05 Chapter 3 – Operating the Unit 3.6.5 Amplified degree of operation for lead zone If the outgoing degree of operation data from the lead zone is too high or too small to maintain the zone at the desired operating temperature it is possible to increase or decrease the degree of operation manually. This occurs through an optional degree of operation amplification factor in 1% increments, which affects the zone supplying data for zone co-use. To do so, select the parameter for lead zone amplification in the parameter memory as well as the respective zone that a lead zone was allocated to. Enter the desired amplification in %. Range : -100...100% 000%; no amplification -001... -100%; the degree of operation coming from the lead zone is weakened. 001...100% ; the degree of operation coming from the lead zone is increased. 3.6.6 Disconnection of load The operating blocks are equipped with an automatic disconnection of load, which is initiated in the event of an error. The function is triggered when an actual temperature is higher than the maximum set-point, the measuring range of the thermal element is exceeded, or a voltage is measured when the heating is turned off. The sensor range of thermal elements of the FeCuNi type is 499 °C. When exceeding maximum temperatures for TemperatureAlarm and for voltage alarm heating will appear cyclically in the respective zone displays. Since this indicates a possibly defective operating part alarm reports occur in saving mode and must be confirmed. When recognizing a voltage despite turned off heating a voltage alarm message flashes additionally in the status display. temperature alarm Current alarm 12 Operating Instructions Series HRS Rev. 1.00.05 Chapter 4 – Operating examples Chapter Operating examples The following chapter describes all operating functions in easily read flow charts. Change set-point Single input The single input option is used when only one set-point is supposed to be changed. 1 Press set- point key Ithe set-points of all zones w ill be show n in the r espective zone displays. The cur sor flashes rapidly on the zone presently selected. Select zone (i.e.. Zone 7) 5 1 j k The cur sor flashes rapidly on the zone presently selected. jk 5 1 Press enter key to confirm The LED in the enter key is turned on and the cur sor blinks slow ly on the zone selected. 5 1 Enter desired value Increase value (slow ly) (rapidly) D ecrease value (slow ly) (rapidly) 5 . . . . . . . . 2 6 2 6 2 6 2 6 . . . . . . . . 3 7 3 7 3 . . . . . 7 3 4 8 4 8 4 8 . 7 4 8 . . . . . . . . Zone selection Further zones can be accessed and changed by pr essing the left / r ight keys.. jk 1 Confirm change / finish input 5 Change is adopted and saved. The LED in the enter key is turned off and the zone selected last flashes r apidlyl. Return to actual value display 13 . . 2 6 . . 3 7 . . 4 8 . . Operating Instructions Series HRS Rev. 1.00.05 Chapter 4 – Operating examples Block mode Block mode / to set set-points of all zones to one value This input option is used when the set-points of all zones are supposed to be increased / lowered to a certain value in one step. In the following example all set-points are set to 140°C. Press set- point key 1 Ithe set-points of all zones are show n in the respective zone displays. The cursor flashes rapidly in the zone presently selected. 5 . . 1 To initiate block input procedures double- click the enter key. 2 6 . . 3 7 . . 4 8 2 3 4 The LED in the enter key is turned on and all zones blink slow ly.. 5 6 7 8 Enter desired value 1 2 3 4 6 7 8 Increase value (slow ly) (rapidly) D ecrease value (slow ly) (rapidly) 5 1 Confirm change / finish input Changes are adopted and saved. The LED in the enter key is turned off. The zone chosen last flashes rapidly.. 5 Return to actual value display (Occurs automatically after 150 seconds if no fur ther key is pushed) 14 . . 2 6 . . 3 7 . . 4 8 . . . . Operating Instructions Series HRS Rev. 1.00.05 Chapter 4 – Operating examples Block mode / Change set-points of all zones by the same value This input option is particularly convenient when the temperature level of all zones is supposed to be simultaneously increased / decreased by the same value. In the following example, the set-points of all zones are increased by 10°C. Press set-point key 1 The set-points of all zones are show n in the zone displays.. The cursor flashes rapidly in the zone presently selected. 5 . . 2 6 . . 3 7 . . 4 8 Hold enter key for about 3 seconds. 1 2 3 4 The LED in the enter key is turned on and all zones blink slow ly. 5 6 7 8 Enter desired value 1 2 3 4 5 6 7 8 Increase value (slowly) (rapidly) Decrease value (slow ly) (rapidly) 1 Confirm change / finish input Changes are adopted and saved. The LED in the enter key is turned off. The zone chosen last flashes rapidly. 5 Return to actual value display (Occurs automatically if no further key is pushed) 15 . . 2 6 . . 3 7 . . 4 8 . . . . Operating Instructions Series HRS Rev. 1.00.05 Chapter 4 – Operating examples Selection mode Selection mode / Change set-points of selected zones to one value This input option is especially suitable when the set-points of selected zones are supposed to be increased / decreased to a certain value. In the following example the set-points of zones 5 and 7 are changed to 140°C. 1 Press set- point key Ithe set -point s of all zones are show n in t he r espect ive zone displays.. The zone select ed flashes rapidly. 5 Select zone ( i.e. zones 5 and 7 ) Left - right - up - dow n j k 1 jk 5 1 Confirm zone selected I.e. Z one 5 5 I.e. Z one 7 Z one 5 blinks slow ly. Cursor on zone 7 flashes rapidly.. . . . . . . 2 6 2 6 2 6 . . . . . . 3 7 3 7 3 7 . . . . . . 4 8 4 8 4 8 . . . . . . Select next zone - 1 The selecting and confirming process may be repeated for as many zones as necessary. jk 5 1 Press enter key to confirm The LED in the enter key is turned on and the zones blink slow er. . 6 . 5 1 Enter desired value Increase value (slow ly) (r apidly) D ecrease value (slow ly) (r apidly) 1 5 The LED in the enter key is t urned off. The zone chosen last flashes rapidly. Return to actual value display 16 2 6 . 5 Confirm change / finish input 2 2 6 . . 2 6 . . 3 . . 3 . . . . 7 . . 4 . 4 7 3 8 . 7 3 7 8 4 8 . . 4 8 . . . . . . . . Operating Instructions Series HRS Rev. 1.00.05 Chapter 4 – Operating examples Selection mode /Change set-points of selected zones by the same value This input option is especially advisable when the set-points of selected zones are supposed to be increased/decreased simultaneously by a certain value. In the following example the set-points of zones 5 and 7 are increased by 5°C. 1 Press set- point key The set-points for all zones are shown in the respective zone displays. The cursor flashes rapidly. Select zone ( i.e. Zones 5 and 7 ) Lleft - right - up - down j k 5 1 jk 5 1 Confirm selected zones I.e.. Zone 5 5 i.e.Zone 7 Zone 5 blinks slow ly . Cursor on zone 7 flashes rapidly. Select next zone The selection and confirming process may be repeated for as many zones as necessary.. 1 jk . . . . . . . 5 2 6 2 6 2 6 2 6 . . . . . . . . 3 7 3 7 3 7 3 7 . . . . . . . . 4 8 4 8 4 8 4 8 . . . . . . . . Press and hold enter key for 3 seconds The LED in the enter key flashes and all zones blink slow ly.. Enter desired value Increase value slow ly) D ecrease value slow ly 1 (r apidly) ) (rapidly) . 5 2 6 I.e. Increase all zones by 5°C. 1 Confirm change / finish input 5 The LED in the enter key is turned off. The zone selected last flashes rapidly.. Return to actual value display (O ccurs automatically after 150 seconds if no fur ther key is pressed.) 17 . . 2 6 . . . . 3 . 7 3 7 4 8 . . 4 8 . . . . Operating Instructions Series HRS Rev. 1.00.05 Chapter 4 – Operating examples Summary set-point changes All examples pertaining to set-point changes given in the preceding chapters can be summarized in one single flow chart. Press key The set-pont curr ently valid w ill appear in the zone displays. This may be: the main set-point the 2., 3. or 4. Set-point or the start up set-point. Expla nation Sta rt up set- point:100°C, Operating system is in start up operations. 2.,3.,4. Set- point: Operating system is in operations mode or program is defined through operating ports.. Z one selection Select one or several zones Press enter key a nd select input mode The main set-point is shown in the zone displays. jk Enter input Zone selection 1 x keystroke : Single input 2 x keystroke : Block input Hold for 3 sec.: Change level Enter desired value If necessary, select further zones (only applicable if single input) jk Z one selection Confirm change / finish input Finish input Return to actual data / deviation displa y Set-points in the operating system Aside from the “normal“ set-point (main set-point) there are additional set-points in the operating block that may be active due to processor conditions (i.e. start up or programming mode) or due to outside influences (i.e. digital ports engaged) coming from the operator. Among the additional set-points are: start up set-point (fixed to 100°C) boost set-point lowering set-point Only the main set-point can be altered through the hotkey / input function set-point change. All other set-points are changed through the respective parameter in the parameter memory. 18 Operating Instructions Series HRS Rev. 1.00.05 Chapter 4 – Operating examples Voltage adoption / change voltage set-point The voltage set-point can either be measured automatically (through “automatic voltage adoption”) or be entered manually. The “automatic voltage adoption” function saves actual voltage values as voltage set-points upon measuring. Automatic electricity adoption Press key Electricity data will be shown in the zone displays.. Automatic electricity data occurs upon pressing the h-key.. Electricity data values presently measured will be saved as electr icity set-points.. Select electricity set- points Select zones to be changed or controlled.. (nach ca. 4 Sek.) Electricity set-point Zone selection jk Confirm input Select input mode (block input, single input, zone selection input mode) Zone selection 1 x keystroke: Single input 2 x keystroke: Block input Hold for 3 sec.: Change level Input If necessary, enter desired value manually Select next zone of needed. ( only possible in single input mode) Confirm change / finish input jk Zone selection Return to actual data / deviation display Finish input Main level If the voltage set-point was measured by “automatic voltage adoption” it is not necessary to enter it manually. 19 Operating Instructions Series HRS Rev. 1.00.05 Chapter 4 – Operating examples Manual Mode This function allows to continue running an operating zone manually even though its sensor is defective. When switching from regular operations to Stellerbetrieb the operating system automatically offers the most recently calculated degree of operation average measured prior to the defective sensor for adoption. Current degree of operations Degree of operations Zone selection Enter input jk Zone selec tion 1 x keystroke : Single input 2 x keystroke : Block input Hold for 3 sec:: Change level Enter input Input Zone selection jk Zone selection jk Finish input Turn on / off Finish input Main level The degree of operation is a number between -100 and 100, stating the ratio of the operation’s port engaged versus being disengaged in reference to the time elapsed during the measuring process. Example: Degree of Operation: 25%, Measuring process time: 4 seconds The heating operation’s port is engaged for 1 second during the measuring process. Attention: Since a sensor can break during the heating process it is absolutely necessary to check the degree of operation also. 20 Operating Instructions Series HRS Rev. 1.00.05 Chapter 4 – Operating examples Zone specific parameters All other zone specific configuration- and process parameters are saved in the parameter memory. Zone specific parameters are parameters for which an individual value may be entered in every zone. Strike key unt il desired parameter is reached. Press key the parameter values of the paramet er selected w ill appear tin the zone displays. Select one or several zones Select input mode (Block input, single input, selected zones input) I.e. Lower temperature limit Zone selection jk Enter input Zone selection 1 x keystroke : Single input 2 x keystroke : Block input Hold for 3 sec.: Change level Input Enter desired value. If necessary, select next or further parameters (only applicable if single input). Confirm change / finish input Parameter selection jk Zone selection Finish input Select next parameter if necessary Return to actual value / deviation display Parameter selection 21 Main level Operating Instructions Series HRS Rev. 1.00.05 Chapter 4 – Operating examples Load / save set-point block 4 temperature set-point blocks for a maximum of all 32 zones (depending on the number of zones in the operating system) may be saved in the operation unit’s memory. A set-point block is defined as one set-point per zone. Load set-point block If this function is selected all set-points presently valid in their respective zones will be replaced by the set-points as they are saved in the set-point block memory. Save set-point block If this function is selected all set-points presently valid will be saved in the set-point block memory. The data saved up to this point will be replaced. Press key The current set-point block is shown in the zone displays. Access set- point block function The words load to load a set-point block Double- click z.B. and save to save a set-point block blink in the infor mation display. Selectl the desired set-point block as well as save / load functions. Save or load selection Select set-point block jk Execute Confirm input The presently valid set-point is displayed again after loading or saving a set-point block. Return to actual data / deviation display 22 Return to main display Operating Instructions Series HRS Rev. 1.00.05 Chapter 4 – Operating examples How to switch between actual value / deviation display Either only actual data or set-point data can be displayed in the zone displays. Therefore, one has the option to switch between actual data and deviation data to be displayed in the main display. The advantage offered by the deviation display is that the operator notices operating conditions at first glance. By pressing either of the two keys the main level display is changed from actual temperature values to deviation display. Set-points i.e. 1 Actual values i.e. 1 Deviation display i.e. 5 5 1 5 2 2 2 6 6 6 3 3 3 7 7 7 4 4 4 8 8 8 Entering a code number Complex system or process specific functions can be initiated in all zones through code numbers, which make handling the system easier 1 Select code function 5 1 Select code i.e. Code 31 to display operating temperatures in °F Confirm selected code The func tion will be executed . 2 3 4 6 7 8 2 3 4 6 7 8 3 Sek. 5 ausführen 23 Operating Instructions Series HRS Rev. 1.00.05 Chapter 4 – Operating examples Process Control Function The process control function allows changes in the control process to be recognised quickly and reliably for every zone. These changes occur e.g. when the tool has a leak and splashes. The control behaviour is monitored for all control zones during production. If changed control behaviour is recognised, an alarm message is issued and for process alarm is shown in the zone. The alarm message can be acknowledged. Once the cause of the changed control behaviour has been rectified, the alarm becomes active again immediately. If however the control behaviour has changed significantly due to production reasons, the new process behaviour can be accepted by entering a code number. The process control function is activated by the parameter PTOL for process tolerance. When the value is set to 000, the function is switched off. In the process tolerance parameter, settings are made to define how large the change in control behaviour can be before an alarm message is issued. Practical experience has shown that a setting of 010% is expedient for standard applications. After the start, (process) is shown in each zone to indicate that process monitoring is active. Once the operating target value has been reached, the process monitoring is automatically activated after a learning phase. To indicate that the monitoring function is now active for this zone, is no longer shown. Activation of the Process Control Function Press the parameter function key. The last selected parameter is shown in the information display e.g. STGR of the regulation ratio. Keep pressing the parameter function key until the The value per zone for the process tolerance is shown in the zone displays. Enter the % value using the arrow keys. 010% is sufficient for standard applications. .. PTOLparameter PTOL is shown in the information display. If necessary, select further zones and enter % value. Confirm entry and quit. The process control function for this zone was activated by the input of a value >000%. Acknowledgement of the Process Alarm OUT Press the status key; the current zone status is shown in the zone display. The status of the zones is shown. The alarm is acknowledged with the input/enter key. The heating output is released. No more alarm messages will appear. Return to basic screen ( actual value display ). The system automatically returns to the basic screen after approx. 180 seconds. 24 Operating Instructions Series HRS Rev. 1.00.05 Chapter 4 – Operating examples Accepting New Process Parameters Code Press both function keys and keep pressed until Code appears in the information display . Enter the code number 305 using the arrow keys. Confirm entry and quit. 25 The code number 000 is displayed in a zone display 350 The new process parameters are accepted for all zones. Operating Instructions Series HRS Rev. 1.00.05 Chapter 4 – Operating examples Diagnosis function “Heating / sensor allocation” A complex testing function to automatically check the “sensor / heating” allocation is built into the operating block. This function allows testing if sensors and heating are properly connected. The function employs the configuration parameter (start up time of the 4th set-point). A testing time is determined per individual zone. The testing time defines the time frame in which a zone is to respond to an incentive. The testing pattern is initiated through code number 602. It occurs in three phases: Phase 1 Defective sensor check During phase 1, the degrees of operation of all active zones whose set-points are greater than 0°C are set to 0%. If a damaged sensor is identified in the respective zones, the zone displays – if using the Operating and Display Unit BA – report an error message and the testing pattern will be aborted entirely. The respective information can be downloaded on the offset 0x60 through the port / bus port. Phase 2 Total check During phase 2 the set-points of all active zones whose set-points are greater than 0°C are set to 0% for the duration of the testing time and the actual values are monitored. If using the Operating and Display Unit BA the message appears in all zone displays. If an actual value increases by at least 5°C during the testing time the respective zone display will read and the testing pattern will be aborted entirely. Phase 3 Single check Upon completing testing all zones each zone is tested individually. This occurs in sequence for each zone separately. The degree of operation of one zone is set to 100% and actual values are monitored. The zone should respond with a temperature increase by 5°C within the testing time frame. The following messages result from a single check: Message Meaning No increase occurred during the testing time frame Sensor incorrectly connected Actual values increased although no heating element was addressed (combined message with ) Zone o.k. If an error occurs the zone displays relay an error message and the testing process is aborted. The following graphs show the course of actual temperature values and the degrees of operation when running the diagnosis function for 24 zones. 26 Operating Instructions Series HRS Rev. 1.00.05 Chapter 4 – Operating examples Checkfunktion Zuordnung Fühler/Heizung Checkfunktion Zuordnng Fühler/Heizungen 700 120 600 100 500 Stellgrad [%] Temperatur [°C] 80 400 300 60 40 200 20 100 137 133 129 125 121 117 113 97 109 93 105 89 101 85 81 77 73 69 65 61 57 53 49 45 41 37 33 29 25 9 21 5 Zeit[Sekunden] 17 13 1 137 133 129 125 121 117 113 97 109 93 105 89 101 85 81 77 73 69 65 61 57 53 49 45 41 37 33 29 25 9 21 5 17 13 0 1 0 Zeit [Sekunden] The testing process must be confirmed with code number 602 upon completing the cycle. The same code number aborts the testing process. 27 Operating Instructions Series HRS Rev. 1.00.05 Chapter 4 – Operating examples Operating conditions of the operating block Status display When pressing the status key during operations the zone displays will show information on the status of the operating zones. It contains information about Temperature limit alarms, Electricity alarms, Alarm port status Operating port status Confirm alarm status / reset alarm ports Information display on the condition of zones (ports, alarms). Alarm status and ports are re-set. Main level The alarm ports on the operating block can be set with a memory function. They remain active until they are confirmed and reset. An alarm / alarm port is reset by pressing the edit / enter key in the status display. 28 Operating Instructions Series HRS Rev. 1.00.05 Chapter 4 – Operating examples Trouble shooting System errors from the operating system The operating system conducts a continuos self-scan. In the event of an error it relays a system error message over the Operating and Display Unit: Comparison error extension module Comparison error main module Error checksum in system datas Basic configuration has changed In this case it is strongly recommended to return the operating unit to the manufacturer. 29 Operating Instructions Series HRS Rev. 1.00.05 Chapter 5 – Configuration parameters Chapter Configuration parameters The following chapter lists all configuration parameters in the HRS operating block system. General hints Manufacturer’s settings All parameters are set to standard parameters when the operating system is shipped. The pre-configuration is adjusted to most common needs and is sufficient for most operating environments. Notice It may be necessary to optimize the settings. Zone specific parameters Parameter Parameter description Range Unit Set-point 000...999 °C/°F Degree of operation -100...100 % Stellerbetrieb on/off Limit - 000...999 °C/°F Limit + 000...999 °C/°F Voltage tolerance 0,0...99,9 % Voltage set-point 0,0...99,9 A 2nd set-point 000...999 °C/°F set-point boost function 000...999 °C/°F Start up mode Start up time (Start up mode) 000...099 min Start up time boost set-point 000...099 min Testing time for diagnosis function 000...999 min Time for diagnosis function 000...999 min Heating identification Temperature ramp on/off on/off 000...999 30 °C/min Operating Instructions Series HRS Rev. 1.00.05 Chapter 5 – Configuration parameters Automatic temperature ramp Amplification lead zone Number of lead zone Zone active / passive on/off 0,1...2,0 000...032 on/off Plug settings Out plug for heating and sensor The pin assignment of the device please see technical documentation enclosed for the device. Alarm report for upper and lower limits and voltage alarm Alarmausgang 1 3 2 Port settings RS 485 (optional) RxD-P 9 5 6 1 Declaration of Conformity See following page. 31 RxD-N TxD-N TxD-P EG-Konformitätserklärung Declaration of Conformity PSG Plastic Service GmbH Pirnaer Strasse 12-16 68309 Mannheim Germany erklärt hiermit, dass die nachstehend beschriebenen Produkte hereby declares, that the following products Heißkanalregler HRS Hot runner controller HRS übereinstimmen mit den Bestimmungen folgender EG-Richtlinien are in conformity with the following standards of the EC directives EMV-Richtlinie 2004/108/EG EMC directive 2004/108/EC Niederspannungsrichtlinie 2006/95/EG Low voltage directive 2006/95/EC Angewandte Normen und technische Spezifikationen Applied standards and specifications EN 60204-1 EN 60204-1 Mannheim, den 25.02.2010 Ort/Datum Place/Date Bernhard Seelert, Produktmanager/Product Manager PSG Plastic Service GmbH ● Pirnaer Str. 12-16 ● 68309 Mannheim ● Germany Phone +49 621 7162 0 ● Fax +49 621 7162 162 ● Email info@psg-online