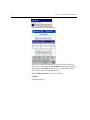
1
English Leaf DP-67 Portable Application www.creo.com/leaf 731-00157A-EN Rev B User Guide Copyright Copyright © 2004 Creo Inc. All rights reserved. No copying, distribution, publication, modification, or incorporation of this document, in whole or part, is permitted without the express written permission of Creo. In the event of any permitted copying, distribution, publication, modification, or incorporation of this document, no changes in or deletion of author attribution, trademark legend, or copyright notice shall be made. No part of this document may be reproduced, stored in a retrieval system, published, used for commercial exploitation, or transmitted, in any form by any means, electronic, mechanical, photocopying, recording, or otherwise, without the express written permission of Creo Inc. This document is also distributed in Adobe Systems Incorporated's PDF (Portable Document Format). You may reproduce the document from the PDF file for internal use. Copies produced from the PDF file must be reproduced in whole. . ................................................................................................... Trademarks The Creo wordmark, Creo logo, and the names of the Creo products and services referred to in this document are trademarks of Creo Inc. Adobe, Acrobat, and the Acrobat logo are registered trademarks of Adobe Systems Incorporated, and are registered in the U.S. Patents and Trademark Office and may be registered in other jurisdictions. Apple, AppleTalk, AppleShare, EtherTalk, LocalTalk, Macintosh, and LaserWriter are trademarks of Apple Computer, Inc. Microsoft, Windows, Windows 2000, and Windows NT are trademarks or registered trademarks of Microsoft Corp. Other brand or product names are the trademarks or registered trademarks of their respective owners. . ................................................................................................... FCC Compliance The Creo equipment referred to in this document complies with the requirements in Part 15 of FCC Rules for a Class A computing device. Operation of the Creo equipment in a residential area may cause unacceptable interference to radio and TV reception, requiring the operator to take whatever steps are necessary to correct the interference. Operation is subject to the following two conditions: (1) this device may not cause harmful intereferenec, and (2) this device must accept any interference received, including interference that may cause undesired operation. . ................................................................................................... Limitation of Liability The product, software or services are being provided on an "as is" and "as available" basis. Except as may be stated specifically in your contract, Creo Inc. expressly disclaims all warranties of any kind, whether express or implied, including, but not limited to, any implied warranties of merchantability, fitness for a particular purpose and noninfringement. You understand and agree that Creo Inc. shall not be liable for any direct, indirect, incidental, special, consequential or exemplary damages, including but not limited to, damages for loss of profits, goodwill, use, data or other intangible losses (even if Creo has been advised of the possibility of such damages), resulting from: (i) the use or the inability to use the product or software; (ii) the cost of procurement of substitute goods and services resulting from any products, goods, data, software, information or services purchased; (iii) unauthorized access to or alteration of your products, software or data; (iv) statements or conduct of any third party; (v) any other matter relating to the product, software, or services. The text and drawings herein are for illustration and reference only. The specifications on which they are based are subject to change. Creo Inc. may, at any time and without notice, make changes to this document. Creo Inc., for itself and on behalf of its subsidiaries, assumes no liability for technical or editorial errors or omissions made herein, and shall not be liable for incidental, consequential, indirect, or special damages, including, without limitation, loss of use, loss or alteration of data, delays, or lost profits or savings arising from the use of this document. .. . . . . . . . . . . . . . . . . . . . . . . . . . . . . . . . . . . . . . . . . . . . . . . . . . . . . . . . . . . . . . . . . . . . . . . . . . . . . . . . . . . . . . . . . . . . . . . . . . . . Patents This product is covered by one or more of the following U.S. patents: RE37,376 4,558,302 4,743,091 4,992,864 5,049,901 5,079,721 5,103,407 5,111,308 5,113,249 5,122,871 5,124,547 5,132,723 5,150,225 5,153,769 5,155,782 5,157,516 5,208,818 5,208,888 5,247,174 5,249,067 5,283,140 5,291,273 5,323,248 5,325,217 5,339,176 5,343,059 5,355,446 5,359,451 5,359,458 5,367,360 5,384,648 5,384,899 5,412,491 5,412,737 5,420,702 5,420,722 5,459,505 5,473,733 5,481,379 5,488,906 5,497,252 5,508,828 5,509,561 5,517,359 5,519,852 5,526,143 5,532,728 5,561,691 5,568,595 5,576,754 5,579,115 5,592,309 5,594,556 5,600,448 5,608,822 5,615,282 5,625,766 5,636,330 5,649,220 5,650,076 5,652,804 5,680,129 5,691,823 5,691,828 5,696,393 5,699,174 5,699,740 5,708,736 5,713,287 5,742,743 5,764,374 5,764,381 5,771,794 5,785,309 5,813,346 5,818,498 5,854,883 5,861,904 5,861,992 5,875,288 5,894,342 5,900,981 5,934,196 5,942,137 5,946,426 5,947,028 5,958,647 5,966,504 5,969,872 5,973,801 5,986,819 5,995,475 5,996,499 5,998,067 6,003,442 6,014,471 6,016,752 6,031,932 6,043,865 6,060,208 6,063,528 6,063,546 6,072,518 6,090,529 6,096,461 6,098,544 6,107,011 6,112,663 6,115,056 6,121,996 6,130,702 6,134,393 6,136,509 6,137,580 6,147,789 6,158,345 6,159,659 6,164,637 6,180,325 6,181,362 6,181,439 6,186,068 6,189,452 6,191,882 6,204,874 6,208,369 6,214,276 6,217,965 6,260,482 6,266,080 6,266,134 6,267,054 6,268,948 6,283,589 6,295,076 6,299,572 6,318,266 6,352,816 6,353,216 6,366,339 6,371,026 6,377,739 6,387,597 6,396,422 6,396,618 6,407,849 6,414,755 6,422,801 6,435,091 6,441,914 6,450,092 6,456,396 6,476,931 6,477,955 6,509,903 6,541,181 6,545,772 6,564,018 .. . . . . . . . . . . . . . . . . . . . . . . . . . . . . . . . . . . . . . . . . . . . . . . . . . . . . . . . . . . . . . . . . . . . . . . . . . . . . . . . . . . . . . . . . . . . . . . . . . . . Creo Inc. 3700 Gilmore Way Burnaby, B.C., Canada V5G 4M1 Tel: +1.604.451.2700 Fax: +1.604.437.9891 http://www.creo.com .. . . . . . . . . . . . . . . . . . . . . . . . . . . . . . . . . . . . . . . . . . . . . . . . . . . . . . . . . . . . . . . . . . . . . . . . . . . . . . . . . . . . . . . . . . . . . . . . . . . . 731-00157A-EN Rev B Revised March 2004 Contents iii Contents Using This Manual vi Who Should Use This Manual .................................................................................................................. vii Conventions Used in This Manual ........................................................................................................... viii Terminology .................................................................................................................................... viii Symbols............................................................................................................................................. ix For More Information ............................................................................................................................... ix 1 Introduction to Leaf DP-67 1 Shooting on the Move: Improving the Workflow ...................................................................................... 2 Detailed Leaf DP-67 Application Workflow ............................................................................................... 3 2 Getting Started 7 Arrange For Portable ................................................................................................................................ 8 Starting the Leaf DP-67 Application ................................................................................................. 12 Capturing............................................................................................................................................... 15 Single Shot ...................................................................................................................................... 15 Rapid Shooting (Burst) ..................................................................................................................... 15 Reviewing............................................................................................................................................... 16 Leaf DP-67 Views ................................................................................................................................... 17 1-View ............................................................................................................................................ 17 Full-screen View............................................................................................................................... 18 Multi-views...................................................................................................................................... 18 List View.......................................................................................................................................... 19 3 1-View 20 Introduction to 1-View ........................................................................................................................... 21 System Bar ............................................................................................................................................. 21 Leaf Status Icon ............................................................................................................................... 21 Close Icon........................................................................................................................................ 22 Display Area ........................................................................................................................................... 22 Functions Toolbar ................................................................................................................................... 24 Color/B&W Button........................................................................................................................... 24 Orientation Button........................................................................................................................... 24 Zoom Button ................................................................................................................................... 25 Functions Menu...................................................................................................................................... 26 Exposure ................................................................................................................................................ 27 iv Histogram ....................................................................................................................................... 27 Spot Sample .................................................................................................................................... 28 Show Under/Show Over .................................................................................................................. 29 Auto Meter ..................................................................................................................................... 30 Gray Balance (Gray) ................................................................................................................................ 31 Image Neutral.................................................................................................................................. 31 Send to Shoot Setup........................................................................................................................ 32 Develop Curve (Develop) ........................................................................................................................ 33 Output Size ............................................................................................................................................ 33 Send to Shoot Setup........................................................................................................................ 34 Notes ..................................................................................................................................................... 34 Mark Buttons .................................................................................................................................. 35 Notes Button ................................................................................................................................... 35 File Management ................................................................................................................................... 37 4 Multi-views 39 Introduction to the Multi-views .............................................................................................................. 40 Display Area ........................................................................................................................................... 40 File Management ................................................................................................................................... 41 Functions Area ....................................................................................................................................... 41 Mark Buttons .................................................................................................................................. 41 5 List View 43 Introduction to List View ........................................................................................................................ 44 Display Area ........................................................................................................................................... 44 File Management ................................................................................................................................... 45 Functions Area ....................................................................................................................................... 45 Mark Buttons .................................................................................................................................. 45 Notes Button ................................................................................................................................... 45 6 Command and Status Bar 47 File ......................................................................................................................................................... 48 Open............................................................................................................................................... 48 Delete ............................................................................................................................................. 50 DM Utility........................................................................................................................................ 51 Transport......................................................................................................................................... 53 ....................................................................................................................................................... 54 About.............................................................................................................................................. 59 Close............................................................................................................................................... 60 View ...................................................................................................................................................... 61 Prev/Next................................................................................................................................................ 62 Sort........................................................................................................................................................ 62 Show ..................................................................................................................................................... 63 Disk and Batteries................................................................................................................................... 63 Contents v Leaf Digital Magazine Disk and Battery Status.................................................................................. 64 Shoot Setup ........................................................................................................................................... 65 Connect and Disconnect......................................................................................................................... 69 7 Additional Status Indicators 71 Beeps ..................................................................................................................................................... 72 Indicator Lights....................................................................................................................................... 73 Exterior Indicator Light..................................................................................................................... 73 Auxiliary Port Indicator Lights........................................................................................................... 74 Index 75 Using This Manual Who Should Use This Manual ........................................................... vii Conventions Used in This Manual .....................................................viii For More Information......................................................................... ix Who Should Use This Manual vii Who Should Use This Manual This manual is intended for users of the Leaf DP-67 application on the Leaf DP-67 (iPAQ). It explains how to use the software on the Leaf DP-67 (iPAQ) in conjunction with photographic equipment. A familiarity with the Leaf Capture V8 application is necessary for a full understanding of the contents of this user guide. To use this manual, you should: • Be familiar with the Leaf DP-67 (iPAQ) operating system (Pocket PC 2002 or higher). • Have a working knowledge of Leaf Capture V8 and be familiar with the Leaf Capture V8 User Guide. This manual assumes that: • All the hardware and software are installed, configured, and operating correctly according to the Leaf Valeo Installation Guide and other Leaf documentation provided with your Leaf equipment. viii Using This Manual Conventions Used in This Manual This section describes the terminology and symbols used in this manual. Terminology Click Place the mouse pointer over the specified option or button, and then press and release the left mouse button. Double-click Place the mouse pointer over the specified option or button, and then quickly press and release the left mouse button twice. Stylus The instrument used to tap the Leaf DP-67 (iPAQ) screen. Tap Touch the screen with the stylus. Drag When used in reference to the Leaf DP-67 (iPAQ): Press the stylus on the screen, move it across the screen. Enter Type the information, and then press the ENTER or RETURN key. Point Position the mouse pointer over a submenu or menu command. For example, point to the File menu. Press When used in reference to the Leaf DP-67 (iPAQ): Hold the stylus on the screen (for example, to open a menu). When used in reference to a keyboard: Press the specified key or key combination on your keyboard. For example, press CTRL+ALT+DEL. Right-click Place the mouse pointer over an area of the application window, and then press and release the right mouse button to display the shortcut menu. For more information about using shortcut menus, see your Windows documentation. For More Information ix Select When used in reference to the Leaf DP-67 (iPAQ): Tap the stylus on the specified option. When used in reference to a keyboard: Place the mouse pointer over the check box for the specified option, and then click the left mouse button so that an X or check mark appears in the check box. Or: Place the mouse pointer over the specified box or button, and then click the left mouse button. Type Type the information. Do not press the ENTER or RETURN key. Symbols Note: A note provides additional information that you may need to consider. Tip: This symbol indicates information that can help you perform a task more quickly or easily. This symbol indicates a procedure. The reference symbol indicates that related information on the topic is available in another document. Important: This symbol indicates things that may cause process delays or reduce functionality, reliability, or quality. For More Information Visit Leaf at www.creo.com/leaf. Introduction to Leaf DP-67 Shooting on the Move: Improving the Workflow.................................2 Detailed Leaf DP-67 Application Workflow..........................................3 Shooting on the Move: Improving the Workflow 2 The Leaf DP-67 (iPAQ) and application, together with your Leaf Valeo digital camera back, enable you to work without being connected to a host computer—thus giving you the freedom of portability. And with the latest Bluetooth® technology, the Leaf DP-67 (iPAQ) can communicate remotely with the Leaf Valeo digital camera back, offering you even more freedom of movement. The advantages of large storage space for your images and full control over the capture process are maintained by the Leaf Digital Magazine and Leaf DP-67 (iPAQ) display and control devices. If you have been using a consumer digital camera until now, the initial transition to photography with the Leaf DP-67 involves a little effort but there is immediate gain for the professional photographer. Significant differences between the consumer digital camera and Leaf DP-67 distinguish Leaf DP-67 as the professional tool—and one you will enjoy using. This brief introduction will familiarize you with Leaf DP-67 and start you on an enjoyable digital route to professional photography—in any location. Shooting on the Move: Improving the Workflow There are several identifiable stages in today’s professional photographic project, as described in the following section: (1) Capture, (2) Develop, (3) Review and Select, and (4) Output for Print. For detailed information about shooting stages when shooting analog or digital, see From Analog to Digital: Improving the Workflow, Leaf Capture V8 User Guide. With Leaf DP-67, these steps can be carried out quickly and effectively, as described below: 1. Capture Photograph the subject. To verify composition, use the instantaneous, full-screen digital preview on the Leaf DP-67 (iPAQ). The shot is saved directly to the Leaf Digital Magazine. 3 Chapter 1 – Introduction to Leaf DP-67 2. Develop The image is developed immediately with digital image processing. You can zoom in to 1:1 detail to verify focus. Examine and correct exposure and gray balance using familiar tools from Leaf Capture V8. The stylus and pressure-sensitive screen of the Leaf DP-67 (iPAQ) make use of the Leaf DP-67 application quick and easy. Optional Step—Continuous Capture At this stage, it is possible to disconnect the Leaf DP-67 (iPAQ) and shoot rapidly, storing images in the Leaf Digital Magazine’s internal memory. The Leaf Digital Magazine can store a large quantity of shots, the exact amount depending upon the resolution of the Leaf digital camera back. 3. Review and Select At any time during or after the session, reconnect the Leaf DP-67 (iPAQ) and examine the shots in the digital display. Consult other participants in the shoot by letting them view captures on the Leaf DP-67 (iPAQ). Manage your image files—mark images as Good or Not Good, sort, annotate, change a file name, or delete. 4. Output for Print Simply plug in the Leaf Digital Magazine to the FireWire port of your host computer and open the images in Leaf Contact Sheet or Leaf Capture V8. Process images as you would host-captured images. Detailed Leaf DP-67 Application Workflow The following is a more detailed examination of each stage of the Leaf DP-67 workflow: 1. Preliminary Step: Arrange for Portable Before you start a shooting sequence, set up the Leaf Digital Magazine with the preferred data that makes captures made with Leaf DP-67 compatible with your work on the host computer. Attach the Leaf Digital Magazine to the FireWire port and select Arrange For Portable in the main menu of Leaf Capture V8. Detailed Leaf DP-67 Application Workflow 2. 4 Shoot Setup: Subject and Lighting To begin shooting with a Leaf digital camera back and Leaf DP-67, select a Shoot Setup in the Leaf DP-67 application that is suitable for the shoot conditions, and start taking pictures. You can use the Leaf DP-67 as your display and control device in order to verify and correct shoot setup parameters such as Exposure or Gray Balance. On the Leaf DP-67 (iPAQ), you can conveniently enlarge the image to the size of a typical Polaroid print. The stylus and pressuresensitive screen make interaction with the Leaf DP-67 application quick and easy. 3. Exposure You can check exposure with the familiar exposure tools of Leaf Capture V8: • Auto Meter—Indicates if your exposure is on, near, or off target, and by how much (in f-stops). 4. • Histogram—Enables you to quantitatively assess your image in terms of exposure to verify that your shots are correctly exposed. • Spot tool sample—Enables you to select a specific point in the 1:1 image or in the full frame, and read its relative exposure level. • Show Over/Show Under—Tools which enable you to view the over-exposed and under-exposed areas of an image. Gray Balance The Gray Balance function allows you to select a gray point in the image then apply it to subsequent shots. Alternatively, you can use one of the default gray balance settings. If you want to use a gray card at a distance, zoom in to 1:1, then select a point on the card. 5. Composition and Focus If you know the frame proportion for your final images, you can select an output size frame in the Output Size function and locate it on the image. This helps to verify correct composition. Check depth of field, zoom in to 1:1, and examine details in any part of the image. 5 Chapter 1 – Introduction to Leaf DP-67 6. Other Shoot Setup Parameters You can change other Shoot Setup parameters such as Input Profile, Sharp Table, and ISO Rating in the Leaf DP- 67 application, as you would in Leaf Capture V8. Familiar Develop Curves for different image brightness and contrast are available. You can specify low contrast or high contrast "film" to match scene requirements. 7. Shooting After setting the exposure, gray balance, output size, and other shoot setup parameters, you can disconnect the Leaf DP-67 display so that you can concentrate on your subjects and what’s in the viewfinder. Alternatively, you can keep the Leaf DP-67 (iPAQ) connected and use it, as needed, to verify images you capture. If storage space or battery power runs low, the Leaf DP-67 application gives you ample warning. 8. Review and Select After you have captured a series of images, you may want to review them in order to select good images or discard poor ones. There are 1-View, 4-View, and 9-View image displays. Mark and annotate image files in the 1-View, 4-View, 9-View, or List view using the stylus on the pressure sensitive screen. Discard poor images to free up storage space and to save time when transferring files to the host computer for output. The Leaf DP-67 (iPAQ) can also be passed to other shoot participants for viewing. 9. Return to Leaf Capture for Output Disconnect the Leaf Digital Magazine from the Leaf digital camera back and connect it to the FireWire port of your host computer. Immediately, you can view images in Leaf Contact Sheet, open them in Leaf Capture V8, or process them with the Leaf Batch Processor application. Copy over image files and delete the originals from the Leaf Digital Magazine in preparation for the next shooting session. Transfer speed is that of the host computer, which is very much faster than the speed of compact storage used by other digital cameras and camera backs. Detailed Leaf DP-67 Application Workflow 10. Enhance and Output for Print Use the powerful tools available in Leaf Capture V8 to enhance and output your images. For more information about the enhancement and output of images, see the Leaf Capture V8 User Guide. 6 Getting Started Arrange For Portable ...........................................................................8 Leaf DP-67 Views..............................................................................17 Capturing .........................................................................................15 Reviewing .........................................................................................16 Arrange For Portable 8 Arrange For Portable To access Arrange for Portable: 1. Open Leaf Capture V8 (version 8.0.1 or higher). 2. From the main menu, select Arrange>For Portable. The Arrange for Portable window opens. In the Arrange for Portable windows, you can copy shoot setups and other tables to the Leaf Digital Magazine for use when you work portably with the Leaf DP-67 application. To arrange the Leaf Digital Magazine: 1. Connect the FireWire cable from the Leaf Digital Magazine to the Macintosh computer. 2. The Leaf Digital Magazine disk icons appear on the desktop: • Leaf DM SYS—This Leaf Digital Magazine disk contains all of the parameters needed for work with the Leaf Digital Magazine and camera. Important: Do not delete any files from or add any files to this disk. • Leaf DM—All images captured portably are saved to one of the Leaf Digital Magazine disk(s). 3. Double-click the Leaf Capture V8 application icon. The application starts. 4. On the main menu, select Arrange>For Portable. The Portable Settings dialog box appears. 5. Select a digital back from the Digital Back list. 9 Chapter 2 – Getting Started 6. Select a camera type from the Camera Type list. 7. Click OK. The Arrange For Portable - Shoot Setup window opens. In the Arrange For Portable windows, you can copy shoot setups and/or other tables from Leaf Capture V8 to the Leaf Digital Magazine for use with the portable kit. The first time you use Arrange For Portable, all of the factory tables that suit the camera type and Leaf digital camera back you have selected appear in the Leaf Capture list and are copied automatically to the Digital Magazine list. Custom tables can be copied from the Leaf Capture list to the Digital Magazine list. Note: The shoot setup that is bold in the Digital Magazine list is the default shoot setup used for the next shoot. To use Arrange For Portable automatically: ¾ Click the Finish button. All default settings are automatically copied from the Leaf Capture list to the Digital Magazine list and the window closes. Arrange For Portable 10 To copy a Shoot Setup from the Leaf Capture list to the Digital Magazine list: When you copy a Shoot Setup, you are copying all of the tables in that Shoot Setup. 1. In the Arrange For Portable window, select a table in the Leaf Capture list. 2. Click the Copy To button. The table is copied to the Digital Magazine list. Note: In the Shoot Setup window, you cannot leave the Digital Magazine list empty. If the Digital Magazine list is empty, the Next and Finish buttons are unavailable. To set a default shoot setup: 1. From the Digital Magazine list, select the shoot setup you want to assign as the default. 2. Click the Set Default button. The selected shoot setup is bold in the Digital Magazine list. This shoot setup is the default for the next shoot. Custom or factory shoot setups can be designated as the default shoot setup. This is useful when you want to shoot without being attached to the Leaf DP-67 (iPAQ). Notes: A default shoot setup is selected automatically. It changes only when you set the default shoot setup using the Set Default button. If you select a default shoot setup, you can shoot after connecting to the Leaf DP-67 (iPAQ) or you can shoot without being connected. To remove a shoot setup from the Digital Magazine list: 1. In the Arrange For Portable window, select a table in the Digital Magazine list. 2. Click the Remove button. The table is removed from the Digital Magazine list. If you want to copy custom tables or tables not included in the shoot setup, you must do so in each of the relevant Arrange For Portable windows. 11 Chapter 2 – Getting Started The Arrange For Portable windows that follow the Arrange For Portable Shoot Setup window are: • • • • • Gray Balance Develop Curve Output Size Sharp ICC Profile To copy custom tables: 1. In the Leaf Capture list, select the custom tables you want to copy to the Digital Magazine list. 2. Click the Copy To button. The custom tables are copied to the Digital Magazine list. 3. Click the Next and Prev buttons to move from one Arrange For Portable window to another and revise your selections, as required. 4. Click the Finish button to save and close all Arrange For Portable settings. A message appears informing you that Arrange For Portable was successfully completed. To remove tables from the Digital Magazine list: 1. In the Arrange For Portable window, select a table in the Digital Magazine list. 2. Click the Remove button. The table is removed from the Digital Magazine list. Notes: In the Arrange For Portable windows, a table is unavailable if it is a table that is required as part of a shoot setup that appears in the Digital Magazine list. Unavailable tables cannot be removed from the list. If a table in the Leaf Capture list also appears in the Digital Magazine list, it cannot be copied from the Leaf Capture list to the Digital Magazine list. If you want to cancel the settings in the Arrange For Portable window(s), click Cancel. All changes are cancelled and the Arrange For Portable window closes. A message appears informing you that the settings are cancelled. Arrange For Portable 12 Starting the Leaf DP-67 Application After you turn on the Portable kit and connect the Leaf Valeo digital camera back to the Leaf DP-67 (iPAQ), start the Leaf DP-67 application. Important: There are two transport methods: Serial and Bluetooth. Before starting the Leaf DP-67 application, review the section Transport on page 53. To start the Leaf DP-67 application: ¾ From the home screen menu, tap Leaf DP-67. 13 Chapter 2 – Getting Started The Leaf DP-67 synchronizing status message appears over the following display: Arrange For Portable 14 If there are no images on the Leaf Digital Magazine, the following display appears: If there are images in the Shooting Folder, the last captured image is displayed: 15 Chapter 2 – Getting Started Note: The connect icon on the command and status bar appears green when the Leaf digital camera back is successfully connected and the Leaf DP-67 application is synchronized. The connect icon appears red when the Leaf digital camera back is not properly connected or the Leaf DP-67 application is not synchronized. Tip: Beeps also indicated successful or unsuccessful connection. For more information about beeps, see the section Beeps on page 72. Capturing You can shoot while either connected or not connected to the Leaf DP-67 (iPAQ). You can display images as you capture, in either 1-View or fullscreen view. Single Shot When you shoot a single shot in 1-View, first a low resolution image with a histogram appear. After a short delay, the Leaf status icon stops moving, a high resolution image appears, and all functions in the functions area become available. When you shoot a single shot in full-screen view, images appear in 1-View size and then in full-screen size. Rapid Shooting (Burst) When you are rapid shooting in 1-View, the last capture in the burst series is displayed as a low resolution image. After a short delay, the Leaf status icon stops moving, a high resolution image appears, and all functions in the functions area become available. When you are rapid shooting in full-screen view, the last image in the burst series appears in 1-View size and then in full-screen size. Note: If you capture images while not connected to the Leaf DP-67 (iPAQ), you can connect afterwards to review them. Reviewing 16 Reviewing You can review images in any of the views while the Leaf DP-67 (iPAQ) is connected or disconnected. You can scroll using the Prev/Next buttons or the Navigator button on the Leaf DP-67 (iPAQ) (see page 16). With the Prev/Next button, in 1-View or full-screen view you can move from image to image within a folder and in the multiple views from page to page within a folder. With the left/right controls on the Navigator button, in 1-View, full-screen view, multiple-views, you can move from image to image within a folder. For more information about the Prev/Next buttons, see Prev/Next on page 65 and for more information about the Navigator button on the Leaf DP-67 (iPAQ), see Reviewing on page 16. If the Leaf digital camera back is connected when you review images, all functions are available. If the Leaf digital camera back is disconnected when you review images, only the Close, Prev/Next buttons, View, Sort, Show, and the Navigator buttons on the Leaf DP-67 iPAQ are available. Tip: You can also download images directly from the Leaf Digital Magazine to a host computer on which Leaf Capture V8, Leaf Contact Sheet, and/or Leaf Batch Processor are installed. Leaf DP-67 (iPAQ) with 4-way Navigator button circled To scroll with the Navigator button: ¾ Press the left control on the Navigator button to scroll backwards. ¾ Press the right control on the Navigator button to scroll forward. 17 Chapter 2 – Getting Started Leaf DP-67 Views This section describes the Leaf DP-67 views on the Leaf DP-67 (iPAQ). There are four types of views in the Leaf DP-67 application. 1-View system bar single image display functions toolbar functions menu functions area command and status bar Leaf DP-67 Views 18 Full-screen View single image display Multi-views multi-image display (4-View or 9-View) functions area (Notes only) command and status bar 19 Chapter 2 – Getting Started List View list display functions area (Notes only) command and status bar 1-View Introduction to 1-View ......................................................................21 System Bar ........................................................................................21 Display Area......................................................................................22 Functions Toolbar..............................................................................24 Functions Menu ................................................................................26 Exposure ...........................................................................................27 Gray Balance (Gray) ..........................................................................31 Develop Curve (Develop) ...................................................................33 Output Size.......................................................................................33 Notes................................................................................................34 File Management ..............................................................................37 21 Chapter 3 – 1-View Introduction to 1-View 1-View is the default view. After every capture, 1-View is displayed (regardless of which display you may have last selected in the View menu). system bar display area functions toolbar functions menu file name box functions area command and status bar Leaf DP-67 (iPAQ) keyboard and other controls System Bar The system bar displays information related to the Leaf DP-67 (iPAQ) system (such as time and sound), gives you access to the operating system menu, as well as information related to the Leaf DP-67 application (the Leaf status icon, application name, and the Close icon). The system bar is always displayed except in full-screen view. Leaf Status Icon The Leaf status icon indicates that the system is performing a task. For example, the Leaf status icon on the system bar moves when images are being processed. When the Leaf status icon stops moving, the images have been processed. Display Area 22 Close Icon To close the application: ¾ On the system bar, tap the Close icon. Notes: The Close icon is always available except in full-screen view. The last image that was captured is displayed when you reactivate the application. Display Area In the default 1-View display area, you can view a full image or an image at a 1:1 zoom ratio. The display area can be enlarged to the size of the full screen. vertical display horizontal display 23 Chapter 3 – 1-View 1-View (default) 1-View zoom full-screen view full-screen zoom Functions Toolbar 24 Functions Toolbar The functions toolbar includes the Color/B&W, Orientation, and Zoom buttons. Color/B&W Button From the Color/B&W button menu, you can select either color or black and white for your next image capture. For more information about Color and B&W, see the Color or B/W button, Chapter 2, Main Toolbar, in the Leaf Capture V8 User Guide. Orientation Button From the Orientation button menu, select Auto-orientation or the orientation which corresponds to the orientation of the Leaf digital camera back sensor, and thus your next image. If you select Auto-orientation, the application automatically determines the orientation of the digital camera back and displays all subsequent captures according to this orientation. If you select an orientation from the list, the three orientations are: Portrait CW, Portrait CCW, and Landscape. For more information about Orientation, see Orientation button, Chapter 2, Main Toolbar, page 25 in the Leaf Capture V8 User Guide. 25 Chapter 3 – 1-View Zoom Button To zoom in: 1. Tap the Zoom button. 2. Tap the image. The image is displayed at a 1:1 zoom ratio. To zoom out: ¾ Tap the Zoom button. The image display returns to the default. To view an image full screen: ¾ Double-tap the image. Note: You can expand the view to full screen from either the 1-View display or from a zoom. To return to the 1-View display: ¾ Tap the image. Tip: You can use all functions in the functions menu on an image in a zoom display. Functions, such as Gray Balance, are more easily applied when the image is displayed in zoom. Functions Menu 26 Functions Menu There are five functions in the functions menu: • • • • • Exposure Gray Balance Develop Curve Output Size Notes Note: On the functions menu, some of the function names appear in a shortened form (specifically, Gray Balance appears as Gray and Develop Curve appears as Develop). If you press the functions menu, the functions menu opens, and the full names are displayed. To select a function: ¾ Tap the menu arrow to display the next function. ¾ Press on the menu to open it and then select from the menu. ¾ Use the 4-way Navigator button (top and bottom controls) on the Leaf DP-67 (iPAQ) to scroll the menu, then tap. Press the top of the Navigator button to select the previous item on the menu. Press the bottom of the Navigator button to select the next item on the menu. Notes: When Notes (which is the last item on the functions menu), is selected and you press the bottom of the Navigator button, the next menu item that appears is Exposure (which is the first item on the functions menu). When Exposure (which is the first item on the functions menu) is selected and then you press the top of the Navigator button, the menu item that appears is Notes (which is the last item on the functions menu). Tip: You can use all functions with an image in the default display size or in a zoom display. 27 Chapter 3 – 1-View Exposure Exposure refers to the amount of light to which the sensor cells in the Leaf digital camera back have been exposed. Using the same reference scale (that is, f-stops) as in traditional photography, the exposure functions enable you to access the exposure of your image using several different tools. When you select Exposure from the functions menu, the Exposure functions are displayed in the functions area. histogram spot sample functions menu file name box Show Under icon Auto meter under-exposure indicator f-stop reading over-exposure indicator Show Over Histogram The histogram is a graphical representation of the exposure data in a captured image. It displays the overall pixel distribution of the image. Use the histogram to view changes you make to the exposure and lighting of the scene. You can then make exposure or lighting adjustments, and view the adjustments in the image display and on the histogram itself. The shape of the histogram illustrates the key type or the tonal range of the image. It is a tool that you can use continually throughout your photo session, to verify that your shots are correctly exposed. Tips: Images with proper lighting contrast will normally be spread across the histogram from the lightest to the darkest areas. If the histogram shows a lack of sufficient light, it is recommended to reshoot at a better exposure. Under-exposed images do not respond well to subsequent digital processing. For detailed information about the histogram, see Histogram in the Capture toolbox - Advanced section of Chapter 5, Toolboxes, Leaf Capture V8 User Guide. Exposure 28 Spot Sample The spot sample is a valuable indicator of the relative exposure of a selected spot. The f-stop value of the spot is displayed under the spot sample. To determine the exposure of a specific point on the image: ¾ Tap a point on the image in the image display area. At the selected point, a white spot appears on the image. The spot sample appears on the histogram. The spot sample’s position on the scale, indicates (in f-stops) the relative exposure of the spot to 18% gray (0 on the histogram scale). Each time you select a point, the position of the spot sample on the histogram, and the f-stop reading, change accordingly. Tips: If you require specific points in the captured image to include detail, they must be correctly exposed. By using the spot sample, you can verify into which exposure zone each point falls and ensure that you obtain the results you require. The spot sample enables you to easily calculate the exposure ratio between the highlight and shadow areas of the image. In digital photography, it is of key importance that highlight detail be correctly exposed. Select the brightest detail area and ensure that the spot sample is at approximately +2. For more information, see Show Under/Show Over, Chapter 5, Toolboxes, in the Leaf Capture V8 User Guide. 29 Chapter 3 – 1-View Show Under/Show Over Under-exposed or over-exposed areas may lack image detail and may not respond well to subsequent digital processing. With the Show Under and Show Over icons, you can highlight the areas of an image that are under-exposed or over-exposed in the image display. To highlight under-exposed and/or over-exposed areas: ¾ Tap the Show Under icon and/or the Show Over icon. The icon(s) appears on a white square background to indicate that it is activated. In the image display area, areas of the image that are over- and/or under-exposed are highlighted in blue. Note: There may be a short delay before highlighting appears on the image display. To remove highlighting from the image: ¾ Tap the activated Show Under icon and/or the Show Over icon. The white square background is no longer displayed behind the icon(s). The highlighting is removed from the image display. Under-exposure and Over-exposure Indicators The under-exposure and over-exposure indicators, on the histogram scale, show the range between under-exposure and over-exposure. Exposure 30 Auto Meter The Auto meter indicates the difference (in f-stops) between the ideal overall exposure for a standardly lit image and the actual image exposure indicated by the exposure indicator on the histogram. This information is helpful in determining whether or not the current image exposure levels are appropriate for the image you have captured. The overall exposure of the image is represented by digits, with 0.0 indicating an even exposure, a negative number indicating an underexposure and a positive number indicating an over-exposure. For details about the exposure and exposure functions, see Exposure in the Capture toolbox sections of Toolboxes, Chapter 5, Leaf Capture V8 User Guide. The color of the Auto Meter box indicates the exposure range, as follows: Green—An ideal exposure Orange—A slightly over-exposed image (if the reading is greater than zero or a slightly under-exposed image if it is to the less than zero) Red—A poor exposure 31 Chapter 3 – 1-View Gray Balance (Gray) With film, color bias in light source and film emulsion can be corrected using color correction filters. In digital capture, neutrality is achieved with the Gray Balance option, usually in combination with a neutral-colored surface in the scene. When you select Gray Balance from the functions menu, the Gray Balance functions are displayed in the functions area. functions menu file name box Gray Balance table box Send to Shoot Setup button Image Neutral button The Gray Balance table box displays the Gray Balance table of the selected shoot setup. There are tables for different Leaf digital camera backs and for various types of lighting. Image Neutral Neutral option is used to balance the image prior to evaluating colors. This option reads the point that you choose in the image to be a neutral point (for example, an 18% gray card or another neutral point in the image) and automatically makes it neutral. The red, green, and blue values of this neutral point are identical. The Image Neutral option is very useful for ensuring consistent, predictable results in your work. As you would use a gray card in analog photography or the white balance option on a video camera, use the Image Neutral option before you proceed with any further adjustments to the image. Gray Balance (Gray) 32 To set a neutral point for an image: 1. Include a gray patch in the image, such as the one provided by Leaf or the Kodak Q14 grayscale. Position the patch in the center of your composition, making sure it receives light from the different light sources and is not in a shadow or highlight area. Instead of including a gray patch, you can use a gray component in the image. 2. Tap the Image Neutral button. 3. Tap a point on the gray patch or a gray color in one of the components of the image. The image neutral is set according to the values of this point. The neutral setting is retained with the image file and is available whenever the picture is open, unless you manually change it. The suffix .1 is added to the table name displayed in the Gray Balance table list. Send to Shoot Setup The Send to Shoot Setup option retains the current Gray Balance tables for subsequent shots. To save the Gray Balance tables for the next shoot: ¾ After setting the Gray Balance for the image, tap the Send to Shoot Setup button. The Shoot Setup window is automatically updated. For details about Gray Balance, see Gray Balance in the Capture toolbox sections of Toolboxes, Chapter 5, Leaf Capture V8 User Guide. 33 Chapter 3 – 1-View Develop Curve (Develop) A develop curve is the digital equivalent of the analog film lab. Simple predefined curves offer a variety of developing processes, allowing you to control the results in the image and in its display. For example, you can “develop” an image with more or less contrast by using a digital “push and pull” type process. When you select Develop Curve (Develop) from the functions menu, the Develop Curve box is displayed in the functions area. functions menu file name box Develop Curve box The Develop Curve box displays the develop curve of the selected shoot setup. Output Size Output Size defines the dimensions of the output image. When you select Output Size from the functions menu, the Output Size functions are displayed in the functions area. functions menu file name box Send to Shoot Setup button Output Size list The Output Size list contains Output Size tables that you can apply to an image. When you select an output size, an Output Size frame appears on the image. Notes 34 To reposition the frame: ¾ In the image display area, drag the white Output Size frame to the position you require. The suffix .1 is added to the name in the Output Size list. Send to Shoot Setup The Send to Shoot Setup option retains the current output size for subsequent shots. To save the output size for a future shoot: ¾ After selecting the output size, tap the Send to Shoot Setup button. The Shoot Setup window is automatically updated. For information about the Shoot Setup window in the Leaf DP-67 application, see Shoot Setup on page 68. For details about Output Size, see Output Size in the Capture toolbox sections of Toolboxes, Chapter 5, Leaf Capture V8 User Guide. Notes In the Notes function area, you can assign a mark and/or notes to an image. When you select Notes from the functions menu, the Notes functions are displayed in the functions area. functions menu file name box Notes box Notes button scroll Marks buttons 35 Chapter 3 – 1-View Mark Buttons You can toggle the Mark buttons to place a mark on or remove a mark from an image. The mark you assign to an image with the Mark buttons is saved with the image. The marks aid you in classifying images. Note: In 1-View, marks are not displayed with an image but are indicated by pressed or unpressed Mark buttons in the Notes functions area. The marks are: • • Good No Good ¾ To mark an image, tap a Mark button. The Mark button appears pressed in the Notes function area. Tips: Marks can also be applied directly from the multi-views or List View. A mark appears alongside the image in these views. For more information, see View on page 64. Marks that you assign to an image file also appear when you open the file in the Leaf Capture V8 application. For more information, see Marks, Chapter 2, Main Toolbar, Leaf Capture V8 User Guide. Notes Button The notes button opens the Notes window, where you can enter information about an image. Notes that you attach to an image appear in the notes box in the Notes functions area. To attach a note to an image: 1. Tap the notes button. The notes window and keyboard open. Notes 36 2. Tap a note. 3. Tap Save. The note is saved with the image and the Notes window closes. The note is displayed in the Notes box. Important: Do not change file names. 37 Chapter 3 – 1-View File Management In the display area, you can access a file management menu to copy, move, or delete an image file. To open the file management menu: • On the image, press and hold. A ring of red circles appears and the menu opens. To copy an image file: 1. Open the file management menu. 2. From the menu, select Copy. The browser opens. 3. Select a destination. 4. Tap the Select button. The image is copied and appears in the list in the selected destination. File Management 38 To move an image file: 1. Open the file management menu. 2. Select Move from the menu. A message appears: Are you sure you want to move the selected item? 3. Tap Yes. The browser opens. 4. Select a destination. 5. Tap the Select button. The image is moved. To delete an image file: 1. Open the file management menu. 2. Select Delete from the menu. A message asks you to confirm if you want to delete the image file. 3. Tap Yes to delete the image file. Notes: You can only delete a folder only if it is empty. You can copy and move a file to the Leaf Digital Magazine disk. Multi-views Introduction to the Multi-views .........................................................40 Display Area......................................................................................40 File Management ..............................................................................41 Functions Area ..................................................................................41 Introduction to the Multi-views 40 Introduction to the Multi-views In the multi-views, you can view groups of four or nine images. The Notes functions, and the command and status bar, are common to both multiviews. For more information about the Notes functions and command and status bar, see View on page 64. Display Area 4-View 9-View 41 Chapter 4 – Multi-views File Management In the display area, you can access a file management menu to copy, move, or delete an image file, a group of images files, or a folder. To open the menu: • For a single image—In the gray area beside an image, press and hold. A ring of red circles appears and the menu opens. • For a group of images—Press and drag, horizontally, then vertically to select the images. In the gray area beside any image, press and hold. A ring of red circles appears and the menu opens. For more information about the file management menu, see File Management on page 37. Functions Area When images are displayed in 4-View or 9-View, the Notes functions and the folder location box are displayed in the functions area. Mark Buttons Marks appear beside images in the multi-views. Functions Area 42 To mark an image: ¾ Tap the image, and then the Mark button. The mark appears next to the image in the image display area. Notes: If you select more than one marked image, and the images have different marks, the Mark button does not appear pressed. If you select more than one marked image, and the images have the same marks, the Mark button appears pressed. If you select a single marked image, the relevant Mark button appears pressed. If you change the mark, the newly selected Mark button appears pressed. For more information about the Mark buttons, see Mark Buttons on page 35. Notes Icon For information about attaching a note to an image, see Notes Button on page 35. Folder Location Box The folder location box shows the location of the image that is currently displayed. This box only appears in the Notes function area of the multiviews. List View Introduction to List View ...................................................................44 Display Area......................................................................................44 File Management ..............................................................................45 Functions Area ..................................................................................45 Introduction to List View 44 Introduction to List View List View includes a list of files, Notes functions in the functions area, and the command and status bar. The List view is the same as the multi-views; List view, however, displays file names rather than images. Display Area ¾ Select View>List to open a list of folders and files. 45 Chapter 5 – List View File Management In the list area, you can access a file management menu to copy, move, or delete an image file, a group of images files, or a folder. To open the menu: • For a single image file—In the blue area, beside the selected image file, press and hold. • For a group of image files—In the blue area between the selected image files, press and hold. A ring of red circles appears and the menu opens. Note: To select a group of image files, press and drag vertically in the blue area between the image file names. For more information about the file management menu, see File Management on page 37. Functions Area In the List view, the Notes functions are displayed in the function area. Mark Buttons To mark an image: 1. Tap the file name. The name is highlighted 2. Tap a Mark button. For more information about the Mark buttons, see Notes on page 34. Notes Button For information about attaching a note to an image, see Notes Button on page 35. Command and Status Bar File....................................................................................................48 View .................................................................................................61 Prev/Next ..........................................................................................62 Sort ..................................................................................................62 Show ................................................................................................63 Disk and Batteries .............................................................................63 Shoot Setup......................................................................................65 Connect and Disconnect ...................................................................69 File 48 File Via the File menu, on the command and status bar, you can obtain basic information about the application version, open and delete image files, access the browser, recover and format the disk, specify serial or Bluetooth communication, and close the Leaf DP-67 application. Open You can open both files and folders via File>Open. To open an image file: 1. Tap File>Open. The browser opens. 2. In the list, select the image you want to open. 3. Tap the Open button. The image opens in 1-View. For information about View options, see View on page 61. To open a folder: 1. Tap File>Open. The browser opens with the active folder open in the list display. 49 Chapter 6 – Command and Status Bar 2. Select the folder you want to open. 3. Tap the Select button. The images in the folder open in the 9-View image display. For information about the 9-View display, see View on page 61. Note: The first time you select File>Open after starting the application, the shooting folder that is specified in the Shoot Setup dialog box opens automatically in the browser. Tip: To open a folder in the list, you can also double-tap the folder name. File 50 Delete To delete a file or folder: 1. Tap File>Delete. The browser opens. 2. Select the file or folder you want to delete. Notes: You can only delete a folder if it is empty. 3. Tap Delete. A message appears: Are you sure you want to delete the selected item? 4. Tap Yes. The file or folder is removed from the list and deleted from the Leaf Digital Magazine. Tip: You can also access Delete by pressing a file or folder name in the Listview, or an image in a multi-view. A ring of red circles appears and a menu opens from which you can select Copy, Move, or Delete. 51 Chapter 6 – Command and Status Bar DM Utility You can recover or format a Leaf Digital Magazine disk via File>DM Utility. Recover If you have difficulties with a disk on the Leaf Digital Magazine or on the Macintosh computer (for example, if you connect the Leaf Digital Magazine to the Macintosh computer and one of the disks is not displayed), you can use the Recover function in the Leaf DP-67 application to recover the disk. To recover a disk: 1. From the File menu, select DM Utility>Recover. The browser opens. 2. Select the disk you want to recover. 3. Tap the Recover button. A message appears. Do you want to recover the selected partition? 4. Tap OK. The disk is recovered. File 52 Format You must format each disk separately. Important: When you format a disk, all the data on the disk is erased. To format a disk: 1. From the File menu, select DM Utility>Format. The browser opens. 2. Select the disk you want to format. 3. Tap the Format button. A message appears: Formatting will erase all data on this disk. Do you want to continue? 4. Tap OK. Note: If you select a disk that contains the current shooting folder or if an image in the selected disk is open, a message appears: The shooting folder is on this disk. In order to format the disk, you must change the location of the shooting folder to another disk. 53 Chapter 6 – Command and Status Bar Transport You can select either serial or Bluetooth communication via File>Transport. Notes: The factory default setting is Serial. Setting Serial Communication 1. From the File menu, select Transport. The Transport Communication dialog box opens. 2. Select Serial. 3. Tap the Set button. The Leaf DP-67 application synchronizes. File 54 Notes: You can set Serial communication before or after the Leaf digital camera back is connected with the FireWire cable. If you change the Transport Communication setting, the latest setting becomes the default. The default Transport communication setting is saved in the device. Setting Bluetooth Communication The Leaf Valeo digital camera back (the device) must be within ten meters of the Leaf DP-67 (iPAQ) in order for Bluetooth communication to be established. 1. From the File menu, select Transport. The Transport Communication dialog box opens. 2. Select Bluetooth. 3. Make sure that you turn on the Leaf Valeo digital camera back. 4. Tap the Set button. The Searching for devices message appears. 55 Chapter 6 – Command and Status Bar The My Leaf Valeo dialog box opens. If you are using the Bluetooth device for the first time, the default device name(s) appears in the Device Name column and a red check mark appears in the New column. The check mark indicates that a device is new and is therefore not bonded. 5. From the Device Name list, select a device name. 6. Tap Next. A dialog box opens. File 56 The factory default device name appears in the Enter Device Name box. 7. If you want to change the device name, tap a new device name in the Enter Device Name box. Tip: Use a meaningful name that is easy to use and remember. 8. In the PIN (personal identification number) box, tap the factory default PIN (1234). 9. If you want to change the PIN, in the New PIN box, tap a PIN of your choice, and then confirm the new PIN in the Confirm box. Note: A PIN may only include digits and cannot exceed sixteen digits in length. 10. Tap Finish. The device is bonded and Bluetooth communication is established. The Leaf DP-67 Synchronizing message appears. 57 Chapter 6 – Command and Status Bar If you are not using the device for the first time: The New column is blank for that device indicating that the device is already bonded. 1. Select the device you want to use. 2. If you want to change the device name or assign a new PIN to the device, tap Next. A dialog box opens. Follow the relevant procedures on page 56. 3. Tap Finish. The Leaf DP-67 Synchronizing message appears File 58 If you want to delete a device name: 1. In the My Leaf Valeo dialog box, from the list, select the device you want to delete. 2. Tap the Delete button. The device is deleted from the list. The next time you establish Bluetooth communication with this device, the factory default device name appears in the Device Name box. The PIN is the last PIN assigned to the device. Note: If a device is out of range (for example, to a distance greater than ten meters), established Bluetooth communication is broken. The Disconnect icon appears on the Command and Status bar. To reestablish communication, reenter the range and the Leaf DP-67 Synchronizing message appears indicating that communication is established. 59 Chapter 6 – Command and Status Bar About You can read information about the application version and the connected Leaf digital camera back via File>About. ¾ From the File menu, select About>Leaf DP-67 Application to view information about the current Leaf DP-67 application version on the connected Leaf DP-67 (iPAQ). File 60 ¾ From the File menu, select About>Leaf Valeo to view information about the version of the connected Leaf digital camera back. To close the window: ¾ Tap OK. Close Close closes the application and takes you back to the home screen of the operating system. ¾ To return to the Leaf DP-67 application, in the Start menu, tap Leaf DP-67. Notes: The Close option is always available. The last image that was captured is displayed when you reactivate the application. Tip: You can also close the application by tapping the Close icon on the system bar. For more information, see Close Icon on page 22. 61 Chapter 6 – Command and Status Bar View The View menu includes the following options: • • • • 1-View—Default view. For more information, see 1-View on page 20. 4-View—For more information, see Multi-views on page 41. 9-View—For more information, see Multi-views on page 41. List—For more information, see List View on page 43. To move from view to view: ¾ Select another view from the View menu. Notes: If you are in a multi-view, and you select 1-View, the red-framed image in the multi-view is displayed in 1-View. You can also double-tap the red-framed image to see it in 1-View. If you are in 1-View and you select a multi-view (4-View or 9-View), the image that was displayed in 1-View appears within the red frame in the multi-view. If you are in List View and you select 1-View, the image file that is highlighted in the list is displayed in 1-View. Prev/Next 62 Prev/Next With the Prev/Next buttons you can move back and forth between image files according to the order in which they are sorted in the folder or on a Leaf Digital Magazine disk. The Prev/Next buttons appear in all views. To move between images or image groups: ¾ Tap the Prev/Next buttons. ¾ Use the 4-way Navigator button (left and right controls) on the Leaf DP-67 (iPAQ) as Prev/Next buttons. For more information about scrolling with the Navigator button, see Reviewing on page 16. In 1-View and List view, Prev/Next displays the previous or next image according to the order in which the images are sorted in the folder or Leaf Digital Magazine disk. In the multi-views, the red selection frame moves to the first image in the previous/next group of 4 or 9 images. Sort The Sort function sorts images in the selected view. The Sort options are: Sort by Name, Sort By Date, and Sort by Mark. 63 Chapter 6 – Command and Status Bar Show In the multi-views, you can display images according to the mark assigned to them. The Show options are: • • • —Shows all images regardless marks. —All images marked as Good are displayed in the selected view with the Good mark. —All images marked as No Good, are displayed in the selected View, with the No Good mark. Note: In 1-View, a selected mark is only indicated by a pressed Mark button. For more information about marking an image, see Notes on page 34. Disk and Batteries The Disk and Batteries icon opens the Leaf Digital Magazine Disk & Battery Status window. Disk and Batteries 64 Leaf Digital Magazine Disk and Battery Status • Remaining Exposures—The remaining number of exposures that can be stored on the Leaf Digital Magazine. When there are less than a total of 20 exposures in the Leaf Digital Magazine disks, the number of exposures appears in red as a warning. There is a warning beep when the disk is full. • Remaining Power—The remaining power in the Leaf Digital Magazine batteries. Each section of the Remaining Power status bar represents approximately 25% of the batteries’ capacity, according to the following indications: 4 sections shaded: Fully charged 3 sections shaded: 75% charged 2 sections shaded: 50% charged 1 section shaded: 25% charged When the remaining power reaches a low level (approximately 25%, depending on the camera being used), a warning beep is emitted, the Leaf Digital Magazine Disk and Battery Status window opens, and the one shaded section of the battery icon appears red. When the remaining power reaches the lowest possible level at which the system can operate, a warning beep is emitted and the system shuts off. 65 Chapter 6 – Command and Status Bar DP-67 Battery • Remaining Power—The remaining power in the Leaf DP-67 battery. The percentage displayed is the battery power remaining. Each section of the Remaining Power status bar represents approximately 25% of the battery’s capacity, according to the following indications: 4 sections shaded: Fully charged 3 sections shaded: 75% charged 2 sections shaded: 50% charged 1 section shaded: 25% charged Important: It is recommended that you charge the battery when the low remaining power warning appears. Do not wait until the Leaf DP-67 (iPAQ) turns off due to lack of battery power. The amount of remaining power shown in the DP-67 Battery section only applies to the internal battery of the Leaf DP-67 (iPAQ). When you use an external battery, the DP-67 Battery section indicates that there is no power remaining (0%). Ignore this indication. To open the Leaf Digital Magazine Disk and Battery Status window: ¾ On the command and status bar, tap the Disk and Batteries icon. To close the Leaf Digital Magazine Disk and Battery Status window: ¾ Tap the window. Shoot Setup The Shoot Setup window contains all tables and parameters for the next shoot. For more information about Shoot Setup and tables in the Shoot Setup window, see Chapter 3, Shoot Setup, page 74, in the Leaf Capture V8 User Guide. To open the Shoot Setup window: ¾ Tap the Shoot Setup icon on the command and status bar. The Shoot Setup window opens. Shoot Setup 66 Setup Name The Setup Name is the name of the shoot setup currently displayed in the Shoot Setup window. You can select a shoot setup in the Setup Name list. The shoot setup you select is applied to the next capture. Note: When you change a table or other component of a shoot setup, the shoot setup name appears in the list with the suffix .1. OK ¾ Tap OK in the Shoot Setup window to apply the shoot setup to the next capture and close the Shoot Setup window. Note: After you tap OK it may take a few seconds for the shoot setup to be updated. Cancel ¾ Tap Cancel to cancel any changes to the shoot setup and close the Shoot Setup window. 67 Chapter 6 – Command and Status Bar Prefix The file name prefix proceeds the number automatically assigned to a captured image. The automatically assigned number indicates an image’s position within the sequence of images captured. The default prefix is L. You can assign a different prefix by tapping a new prefix in the Prefix box. A prefix can be a maximum of 5 characters within the 8 character file name. The number of digits in the file name is determined by the length of the prefix. If the number of images with the same prefix exceeds the maximum number of digits available after the prefix, a new folder is opened and numbering starts again at 1. For example, if you are using a 5 character prefix, and there are currently 999 images in the folder, the 1000th image with the same prefix is placed in a new folder and named XXXXX001). If the prefix you use is already assigned to images in the same folder, the number given to the file follows consecutively from the highest file number in the folder. To add a prefix: 1. Tap inside the Prefix box. The iPAQ keyboard automatically appears. 2. Tap a new prefix. Note: If you leave the Prefix box empty, you are not able to shoot. A message appears informing you that you need to use a prefix. Shooting Folder In the Shooting Folder box, browse to select a folder in which to store captures on the Leaf Digital Magazine or create a new folder. The last image in the selected folder is displayed in the image display area. Gray Balance The Gray Balance list includes Gray Balance tables available from the shoot setups on the Leaf Digital Magazine. Develop Curve The Develop Curve list contains Develop Curves available from the shoot setups on the Leaf Digital Magazine. Shoot Setup 68 Output Size The Output Size list contains the output sizes available in the Leaf Digital Magazine. Sharp Table The Sharp Table list includes several types of tables. Select the table that most suitable to the type of image you want to capture. For example, a sharp table suitable for portrait photography is Valeo 22 Portrait. For more information about Sharp tables, see Sharpness, Chapter 5, Toolboxes, in the Leaf Capture V8 User Guide. Process Type Standard is displayed in the Process Type box. Color Management and Profiles Disable ICC Color Management check box—The Disable ICC Color Management check box enables you to disable or enable ICC Color Management for input and output profiles. To disable ICC Color Management: ¾ Select the Disable ICC Color Management check box. Notes: The Input Profile and Output Profile boxes are unavailable if the Disable ICC Color Management check box is selected. To enable Color Management: ¾ Tap the Disable ICC Color Management check box to clear the check box. You can now select an input or output profile. For more information about the disabling ICC profiles, see Introduction, Chapter 1 and Color Tab in Chapter 3 of the Leaf Capture V8 User Guide. Input Profile—The Input Profile relates to the profile of the camera back you are using. Each Leaf digital camera back has suitable profiles with specific characteristics. Factory Input Profiles are recognizable according to the components of their name, such as NS (normal saturation), LS (low saturation), and W (warm). Select an Input Profile that characterizes your 69 Chapter 6 – Command and Status Bar Leaf digital camera back type, lighting, and preferred color effect. Selecting an Input Profile is similar to selecting a film type in analog photography. All of the Input Profiles listed are profiles produced by Leaf. To select an Input Profile: ¾ Select an Input Profile from the Input Profile list. The Input Profile appears in the Input Profile box. Output Profile—The Output Profile section relates to the Output Profiles or RGB Working Space of the image. Select an Output Profile according to the requirements of the destination or output application. To select an Output Profile: ¾ Select an Output Profile from the Output Profile list. The Output Profile appears in the Output Profile box. For more information about Input Profiles and Output Profiles, see the Color Tab section of the Main Menu chapter in the Leaf Capture V8 User Guide. ISO Rating There are several ISO ratings available in the list. The selected ISO rating is used for all subsequent shots. Camera Type A list of camera types that are compatible with the digital camera back is automatically displayed. ¾ From the Camera Type list, select the camera type you are using. Note: To select a table in the Shoot Setup window, tap the arrow to open a list, then tap a table name. Connect and Disconnect The green Connect icon indicates that the Leaf digital camera back is properly connected to the Leaf Digital Magazine and that the system is ready for capturing. It also indicates that the Leaf digital camera back and the Leaf DP-67 application are synchronized. Connect and Disconnect 70 The red Connect icon indicates that information is being transferred to a disk on the Leaf Digital Magazine and that you should not disconnect the Leaf digital camera back from the Leaf Digital Magazine. Important: If the Connect icon is red, do not disconnect the FireWire cable from the Leaf digital camera back. If you disconnect while the icon is red, there is a risk that not all images on the Leaf Digital Magazine will be transferred from the Leaf digital camera back to the Leaf Digital Magazine. During a rapid shoot, the connect icon may often appear red. If you mark many images in rapid succession, the Connect icon turns red until the mark information on the iPAQ and on the Leaf Digital Magazine is the same. The Disconnect icon indicates that the Leaf digital camera back is disconnected from the Leaf Digital Magazine. If you are using Bluetooth communication, the Disconnect icon indicates that the device (the Leaf Valeo digital camera back) is out of range of the Leaf DP-67 iPAQ. Notes: When the Leaf DP-67 (iPAQ) is not connected, the image files are named .jpeg. When the Leaf DP-67 (iPAQ) is connected and the system is ready for use, the image files are named .mos. Additional Status Indicators Beeps................................................................................................72 Indicator Lights .................................................................................73 Beeps 72 Beeps Beeps serve as status indicators. Beep Description Indication 1 short, ascending beep Leaf Portable system is ready for the next shot. sequence of short beeps The Leaf Digital Magazine has 25% battery power or less remaining. 1 long beep Warning. Possible reasons: • • Error in back • • Full Leaf Digital Magazine Arrange for Portable was not set up correctly to suit the camera you are using Insufficient battery power 73 Chapter 7 – Additional Status Indicators Indicator Lights Exterior Indicator Light When the Leaf Valeo digital camera back is connected to the Leaf Digital Magazine and turned on, the Leaf digital camera back’s exterior indicator light illuminates to indicate the following information: Indicator Light (LEDs) Description Indication orange Not ready. steady Possible reasons: • • flashing Error in back Busy insufficient battery power full Leaf Digital Magazine Not ready. Temporarily busy. Possible reasons: • • • green Internal memory is full Calibrating back Processing long exposure steady Ready to shoot. flashing Ready to shoot but busy. Possible reasons: • Image being transferred to host computer • Processing image Important: Do not turn off the Leaf Digital Magazine or disconnect the FireWire cables when the indicator light is flashing green or you may lose some of the images that you captured. Indicator Lights 74 Auxiliary Port Indicator Lights The indicator lights inside the auxiliary port of a Leaf Valeo Wi digital camera back indicate the following information: orange green Indicator Light (LEDs) Description Indication orange Bluetooth communication not ready. In standby mode. flashing Reason: Bluetooth communication is on but connection is not yet established with Leaf DP-67 (iPAQ). green flashing Bluetooth communication ready. Bluetooth communication is established between the Leaf digital camera back and the Leaf DP-67 (iPAQ). The two devices are bonded. 75 Index Numerics 1-View display area, 21 functions area, 27 functions menu, 26 introduction, 21 Zoom, 25 4-way Navigator button, 26, 62 A Arrange in Main Menu of Leaf Capture V8, 8 Arrange for Portable, 3, 8 closing, 11 copying custom tables, 11 in workflow, 3 Next/Prev, 11 Shoot Setup window, 9 windows, 11 attention symbol, ix Auto meter, 30 auxiliary port indicator lights, 74 B Battery status, 64 beeps, 72 Bluetooth, 2, 48, 53, 54, 74 C Close, 60 Close icon, 22 color management, 68 Color/B&W, 24 command and status bar, 47 Connect, 69, 70 Disk and Batteries, 63 File, 48 Show, 63 Sort, 62 View, 61 Connect, 69 green icon, 69 red icon, 70 conventions used in the manual, viii D develop curve, 33 Disconnect, 69 Disk Format, 52 Recover, 51 Disk and Batteries icon on command and status bar, 63 Disk status, 64 display area in 1-View, 22 in multi-views, 40 List View, 44 DM Utility, 51 downloading images, 16 E exposure, 27 F File, 48 Open, 61 Transport, 53 file management, 41, 45 File menu, 48 FireWire port, 3, 5 folder location box in multi-views, 42 Full-screen view, 21 full-screen view, 18 functions area in List View, 45 in multi-view, 41 Notes in multi-view, 45 functions menu 4-way Navigator button, 26 Develop Curve, 33 Exposure, 27 Gray Balance, 31 Notes, 34 Output Size, 33 Functions toolbar, 24 G Gray, 31 Gray Balance in Shoot Setup window, 67 H histogram, 27 I Image Neutral, 31 Indicator lights, 73 indicator lights auxiliary port, 74 exterior, 73 Input Profile, 68 ISO Rating in Shoot Setup window, 69 L Leaf, vii, 35 Leaf Batch Processor, 5 Leaf Capture V8, 2, 3, 4, 5, 6, 24, 27, 28, 30, 32, 34, 65, 68 Leaf Contact Sheet, 16 Leaf Digital Magazine, 5 disks, 8, 64 downloading images from, 16 images on magazine upon connect, 14 power status, 64 Index remaining exposures status, 64 status indicators, 72 Leaf DM, 8 Leaf DP-67 starting application, 12 views, 17 Leaf DP-67 (iPAQ) 4-way Navigator button, 26, 62 battery, 65 shooting with and without, 15 with external battery, 65 Leaf DP-67 battery power status, 65 Leaf status icon, 21 Leaf Valeo, 2 LEDs, 73 List View display area, 44 functions area, 45 introduction, 44 M Mark in 1-View, 35 in List View, 45 multi-views display area, 40 functions area, 41 introduction to, 40 marking an image, 45 N Navigator button, 16, 26 neutral, 31 setting, 32 Next/Prev in Arrange for Portable windows, 11 note symbol, ix Notes, 34 Notes icon, 35 Notes window, 35 O online help symbol, ix Orientation, 24 in Shoot Setup window, 69 76 Output Profile, 69 Output Size Shoot Setup window, 68 output size, 33 frame, 33 list of tables, 33 over-exposure, 29 P Polaroid, 4 Portable Settings dialog box, 8 Prefix, 67 Prev/Next 4-way Navigator button, 62 in 1-View and List view, 62 in multi-views, 62 on command and status bar, 62 Process Type, 69, 70 in Shoot Setup window, 68 R rapid shooting images on Leaf DP-67 (iPAQ), 15 red selection frame, 62 reference symbol, ix Return, 5 reviewing, 16 under-exposure and overexposure indicators, 29 Sort on command and status bar, 62 Spot, 28 spot sample, 28 Start menu, 12 status indicators beeps, 72 storage space, 2 symbols used in the manual, ix synchronizing, 14 system bar, 21 T Tap, 25 terminology used in the manual, viii tip symbol, ix Transport communication Bluetooth, 54 serial, 53 U under-exposure, 29 under-exposure/over-exposure indicators, 29 V S Send to Shoot Setup, 32 Setup Name, 66 Sharp Table Shoot Setup window, 68 Sharp tables list of, 69, 70 Shoot Setup window, 65 Develop Curve, 67 Gray Balance, 67 Orientation, 24 Output Size, 68 Process Type, 68 Setup Name, 66 Sharp Table, 68 Shooting Folder in Shoot Setup window, 67 Show Under/Show Over, 29 highlighting with, 29 View on command and status bar, 61 W workflow stages, 2 capture, 2 continuous capture, 3 detailed, 3 Arrange for Portable, 3 composition and focus, 4 enhance and output for print, 6 exposure, 4 gray balance, 4 other shoot setup parameters, 5 return to Leaf Capture for output, 5 77 review and select, 5 shoot setup, 4 shooting, 5 develop, 3 output for print, 3 review and select, 3 Z Zoom, 25 www.creo.com