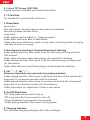
1
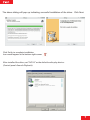
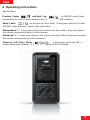
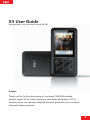
X3 User Guide
Be applicable to any versions beyond FW2.05
Preface
Thank you for the kind purchasing of our latest 192K/24B portable
lossless player X3. In order to help you take better advantage of X3 in
enjoying music, we specially designed this user guide with some collected
frequently asked questions.
1
Content
Ⅰ Product Overview
Ⅱ Introduction to Basic Button Operation
Ⅲ Firmware Upgrade
Ⅳ Graphical Introduction to Menu Operation
Ⅴ
Literal Introduction to Menu Operation
3
3-5
6
7-8
9-12
Ⅵ User Tips
12
Ⅶ FAQ Center
13
A. Introduction
13
B. About Charging
13
C. About Transmitting Songs
15
D. About Firmware Upgrading
15
E. About External Card
16
F. About Music Playing
17-18
G. Other Operations
19
H. Connection with Other Audio Devices
20
USB DAC [ Refer to“FiiO X3 User Guide-2(USB DAC)”]
2
Ⅰ. Product Overview:
X3 is a high fidelity digital audio player which can support MP2, MP3, WAV, WMA,
APE, FLAC, AAC, ALAC, OGG, AIFF and other music formats with the highest
supporting sample rate up to 192K/24bit. It is also a high-performance portable
player that supports CUE index play and gapless play. X3 supports USB DAC too.
Here combine some related pictures to give better introduction to its operation.
Ⅱ. Operation Instructions
13) Coaxial Out
14) RESET
15) Headphone Output
Rear cover in aluminum material
1) 2.4inch TFT Screen (240*320)
12) HOLD
4) Next
Upward
selecting
3) Menu/Back
7) Vol“+”
2) TF Card Slot
5) Previous/
Downward
Selecting
8) On/Off/
Play/Pause
9) Charging
Indicator
6) Vol“-”
10) Micro USB Port
11) Line Out Port
3
1. 2.4inch TFT Screen (240*320):
Display operation interface and related information.
2. TF Card Slot:
For standard TF card with 64G at its most.
3. Menu/Back:
Short-press:
One short-press: Go back step by step under any interfaces.
Two short-presses: Go back twice.
Long-press:
Under playing interface: Back to“Songs operation”.
Under other interfaces: Back to Main Menu.
Under main menu: Both short-press or long-press, it would go back to playing
interface (if music is playing).
4. Next/Upward selecting;5. Previous/Downward Selecting:
Under playing interface: Short-press to go for next song and long-press for
fast-forward.
Under other interfaces rather than playing: Go upward for selecting.
Under playing interface: Short-press to go for previous song and long-press
for fast-rewind.
Under other interfaces apart from playing: Go downward for selecting.
6. Vol“-”; 7. Vol“+”:
Volume is adjustable even not under the playing interface.
Under playing interface: Short-press to decrease one level of the volume and
long-press to continuous decrease until its minimum.
Under playing interface: Short-press to increase one level of the volume and
long-press to continuous increase until its maximum.
Under main menu: For adjustment if there is sub option.
8. On/Off/Play/Pause:
*On: Long-press one second to turn on.
*Off: Long-press for three seconds to turn off.
*Forced shutdown: Long-press for ten seconds.
*Under playing interface: Short-press for play/pause.
9. Charging Indicator:
Turn red when charging and green after fully-recharged.
4
10. Micro USB Port:
a. For data transmission and charging.
b. USB DAC
11. Line Out Port:
3.5mm audio output port and to connect amplifier.
12. HOLD:
To lock or unlock key operation.
13. Coaxial Out:
Output digital coaxial signal and can connect to devices with digital coaxial input.
Note: Coaxial output has the highest output priority which would close other
phone out or line out when coaxial cable plug in.
14. RESET:
Press down would automatically reboot the system.
15. Headphone Output:
3.5mm headphone port which is suitable for headphones
with different impedances.
5
Ⅲ. Firmware Upgrade
USB Disk Function
It possesses standard USB disk function which supports windows XP, windows7,
windows8, Mac OS X 10.x or above (free from driver installation).
Firmware Upgrade
Firmware upgrade is to improve and optimize the performance of the player which
won’t influence the normal function of the player without upgrading. The player
can support external TF card upgrade.
It might disable the device and make it unable to use if operate incorrectly when
upgrading. So please read the following instruction carefully before upgrading.
TF card upgrade would copy the X3.fw document provided by FiiO to the TF card
in FAT32 format. Turn it off and then simultaneously press the menu button and
power button, you will see the TF upgrade dialog box, after its finish, the player
would restart automatically.
Important notes:
It is suggested to use TF memory card with a capacity of 32G or lower. And it
should be a blank card in FAT32 format. In order to avoid upgrading failure, please
make sure the X3 has sufficient battery (better to with full power). If the firmware
upgrading failed for the first time, please long-press the power button for 10s to
get it reset, and then back to the upgrading procedure again. After the upgrading
finished, please go to the “Update Lib” option.
Firmware upgrading now
Upgrade completed
updating...
update success
Delete the x3.fw file from the TF card after upgrade completed
Check firmware version: 【System Settings】>【Info/Storage】
Note: Discrepancy would lie in different hardware & software version which we would not give further notice.
6
Ⅳ. Graphical Introduction to
Without song playing, it gets to
various options for music file.
Menu Operation: [Main Menu]
With song playing, it gets to the
playing interface directly, rather than
displaying this menu.
Button Operation
Press
Get to next menu “>”
Press
To change the number or option
Press
To choose menu item
Press
To back to previous menu
Choose music according to
categor y.
The categor y information in the
music file would be updated after
stored into the machine, which
would create the categor y list
automatically.
Storage location
No TF card or music
List of all the songs
List of “Favorites”
Shuffle
Single Repeat One
Repeat
All
cycle
Available treble range: -10~10
Available bass range: -10~10
>Position丨Track丨OFF
>ON丨OFF
>31~60
>Memory丨Custom(5~30)
>Cover丨Lyrics
>Low丨High
>L10~R10,
1
2
3
Status icons:
1. Current track/ Total file
2. Current volume
3. Hold
4. Sleep mode
5. Repeat mode
6. Playing
7. Battery indicator
4
5 6
7
>Set system language
>OFF丨Shut down 10~120mins
>Long Light丨Screen off 10~60s
>OFF丨30/60/90/120/150/180/210s
>OFF丨30s丨60s丨90s
>Select Theme
>Manual丨Auto; Press OK to confirm
>Storage丨DAC
>External Storage formatting
7
Ⅳ. Graphical Introduction to Menu Operation: [Playing Menu]
Cover
Artist, album, code and other
Add to Favorites list
Remove from Favorites list
Available treble range: -10~10
Available bass range: -10~10
Delete Current File from memory
Choose different loop mode
Back to main menu
Long press
menu button
Lyrics
Ⅳ. Graphical Introduction to Menu Operation: [USB DAC]
Press
To change the number or option
Press
To choose menu item
Long Press
To back to previous menu
* Long
press “Menu” to exit current interface and get into main interface, at when the
DAC stops working.
* When choosing “USB Mode” under the system settings, the default can be set as
Storage or DAC. After any change, you need to re-plug the USB cable.
* To ensure X3 works normally under the DAC mode, the connecting PC needs to install
the specified driver for the first time of using. For more information, please refer to
“FiiO X3 User Guide-2(USB DAC)”
8
Ⅴ. Literal Introduction to Menu Operation
1. ON / OFF
First boot, please select the system language.
ON: Long-press “OK” button for one second to turn on.
OFF: Long-press “OK” button for three seconds to turn off.
2. Playing
A. Under main menu interface
a. “Memory Play” being set as “On” (Automatically play starting from where it stops)
Choose “Play” after it turns on, short press the “OK” button, it will bring you to the
playing interface
b. “Memory Play” being set as “Off” (When there is no music playing)
Choose “Play” after it turns on, short press the “OK” button, it will bring you to its
submenu where has options as follows: “Play All”, “Favorites”, ”Album”, “Genre”,
“Artist” and “Browse Files”.
B. Under playing interface
Long press the “Menu/Back” button, then you will see its submenu which includes:
“Information”, “Add to Favorites”, “Remove from Favorites”, “Treble”, “Bass”,
“Delete Current File“ “Play Mode” and “Back to Main Menu”.
3. Play All
Press the “OK” button to get to the full list of files. Then choose one song to bring you to the
playing interface.
4. Favorites
A. When there is no file in the folder, a prompt would pop up which reads “Playback Failure File
not found”.
B. If there are files in the folder, short press the “OK” button to get to the playing interface.
5. Category
It is divided into three categories: Album, Genre and Artist.
6. Browse Files
Short press the “OK” button, get into the “Local disk” and “TF Card”.
If there is no TF card inserted in, the prompt would pop up and reads “Playback Failure File
not found”.
7. Play Mode
It includes four options: Normal, Shuffle, Single Repeat and Repeat All. Press vol+ or vol- button
to switch.
9
8. Treble
The default value of it has been set as 0dB, with the decreasing value of 10KHZ per degree.
Short press vol+ once to increase the treble by one degree and continuously increase by holding
on to it until reaches the maximum of 10dB.
And vice verse, short press vol- once to decrease the treble by one degree and continuously
decrease by holding on to it until reaches the minimum of -10dB.
9. Bass
The default value of it has been set as 0dB, with the decreasing value of 100KHZ per degree.
Short press vol+ once to increase the bass by one degree and continuously increase by holding
on to it until reaches the maximum of 10dB.
And vice verse, short press vol- once to decrease the bass by one degree and continuously
decrease by holding on to it until reaches the minimum of -10dB.
10. Player Settings
A. Memory Play
There are three options: OFF, Track and Position. Press vol+ or vol- button to switch.
Track: It memorizes the track where it stops, and play from the start when turns on next time.
Position: It memorizes the position of the track where it stops, and play from that position when
turns on next time.
B. Gapless Playback
This function mainly focuses on file with CUE index while not so smooth in playing. Turn it on to
shorten the delay so as to bring convenience to end-users; press vol+ or vol- button to switch.
C. Max Vol
The maximum volume limit is from 31 to 60. The reason we do not set its minimum as 0 is to
avoid being regarded as faulty machine; press vol+ to turn up and vol- to turn down.
D. Default Vol
There are two options: Memory and Custom.
Memory: The volume would display as last time.
Custom: The volume would display as the set value.
Short press the “OK” button, get to the default volume settings and press “Next” or
“Previous” button to switch.
When lock on “Custom”, press vol+ to turn up and vol- to turn down; check the set value by
short pressing the “OK” button.
While the vol+ and vol- button would be out of use when lock on “Memory”.
E. Play Display
There are three options: Cover and Lyrics ,press vol+ or vol- to switch.
*Cover: Display cover if there is one; display default cover
*Lyrics: Display ID3 if there is no lyrics.
10
F. Gain
There are two options: Low (low end refers to 0dB) and High (high end refers to 6dB).
Press vol+ or vol- to switch..
G. Balance
Short press “OK” button, get into the adjustment interface; Adjust the level by pressing
vol+ and vol-, with maximum to 10dB at left channel and 10dB at right channel; check the set
value by short pressing the “OK” button
11. System Settings
A. Language/语言
It supports multiple languages, such as simplified Chinese, traditional Chinese, English, Japanese,
Korean, French, German and Spanish.
B. Sleep
The sleep time can be set as OFF, 10m, 20m, 30m, 40m, 50m, 60m, 70m, 80m, 90m, 100m, 110m
or 120m; press vol+ or vol- to switch; the clock icon would appear after set the sleep timer
(it would turn off automatically when the set time runs out).
Note: The sleep time would turn off after it once took effect.
C. Backlight Time
The backlight time can be set as Long Light, 10s, 20s, 30s, 40s, 50s or 60s; Press vol+ or vol- to
switch; it would screen off automatically when the set backlight time runs out
D. Idle Poweroff
The idle poweroff can be set as OFF, 30s,60s,90s,120s,150s,180s,210s; Press vol+ or vol- to switch;
it would turn off automatically if there is no operation or playing after the set time runs out.
E. Backlight Brightness
Backlight brightness provides five degree from the maximum to the minimum; press vol+ or
vol- to switch.
F. Theme
Short press the “OK” button, get into the theme setting interface; press vol+ or vol- to switch;
it takes effect after back to the menu list.
G. Update Lib
There are two options: Manual and Auto.
Manual: You have to update the library manually each time after exchanged data with PC.
Auto: It would update the library automatically as long as being connected to PC.
No operation during the updating process (“Updating File Please Wait”), otherwise, a prompt
would pop up which reads “Update Failed Reupdate MediaLib”; after update finished, it would
read as “Completed MediaLib Updated”.
11
H. USB Mode
Storage or USB DAC can be set as the default.
After set the default as DAC, connect the X3 to PC, the DAC settings interface would pop up.
I. Info/Storage
You can check its internal memory & available capacity, external memory & available capacity
and its firmware version. What’s more, you can check the player’s copy rights information of
FiiO Electronics Technology Co., Ltd by pressing vol- and vol+.
J. Storage formatting
External Storage (Micro SD card) formatting.
k. Restore/恢复出厂设定
After you choose “Restore”, a prompt would pop up to confirm; after you confirm by clicking
the “OK” button, it would restore to factory settings and pop up “Completed Restore Factory
Settings”.
Ⅵ. User Tips
1. How to play the “Favorites” folder?
You can enjoy your loved songs after added them into the “Favorites” folder. However, most
lossless songs are with CUE index, while it is not permitted to add songs with CUE index to the
“Favorites” folder, nor delete from the folder. If most of your songs are with CUE index, it’s a
little pity that they can’t be played via “Favorites” folder.
2. How to check song information and EQ shortcut operations?
This function is frequently used.
A. You can check its information under the playing interface via long pressing menu key.
B. You can also add the song to the “Favorites” folder if you want.
C. Feeling the voice is not bright enough or bass is not deep enough? Adjust the treble and bass
to get better effect.
D. Play mode also can be easily adjusted in this interface.
E. If you go too far into the sub-directory, while intending to back to the root directory, you can
also back to main menu in this interface.
3. How to set memory play, cover or lyrics display?
A. It’s strongly advised to turn on the memory play function so that you can free from choosing
songs each time you turn it on.
B. Another frequently used menu is play display which includes cover or lyrics (the priority of the
two ranks in this sequence). While most of the users would be more likely into the cover or
lyrics display. ID3 exists in every song, while it requires you to set the display according
to your preferences if there are cover and lyrics at the same time.
12
4. How to set the gain and gapless playback function?
A. Gain needs to be adjusted when using different earplugs and headphones.
Low gain is suggested for normal headphones, while high gain is suggested for high
impedance headphones.
B. Gapless playback means there is no pause from one audio file to another file. Then there would
be no interruption during the listening, especially for many live performance files or classical
albums.
How to set gapless playback? Please do as follows:
Player settings→ Gapless play(turn on) →Back to main menu→Category playback→Album
playback (normally under the unknown artists folder). There is one more requirement to file in
gapless playback; that is they should be in the same album, with continuous audio track.
5. How to save power in case of temporarily lay-off and want to continue after back?
Battery life is a matter that concerns users always. How to prolong its playback time?
There are several function settings can meet this requirement.
Firstly, you can set sleep when you enjoy the music at night for fear of forgetting turning it off.
It will turn off automatically when reaching set point. But please kindly noted that sleep timer
only be effective for once, and back to zero again when turning on next time.
Secondly, when there is no need to enjoy music for temporary things, users can press pause
button and then set the “Idle Poweroff” on which would save power effectively.
6. Set the “Update Lib” as Auto
It would update the library automatically each time after copied songs into it.
Ⅶ. FAQ Center
A. Introduction
Thank you for the kind purchasing of our latest portable lossless player X3 with 192K/24B. In
order to help you take better advantage of our X3 in enjoying music, we specially collect some
frequently asked questions from end-users. Related answers to the questions are as follows,
hope that helps.
B. About Charging
The power supply of X3
It can charge by laptop or notebook through the USB port, or any USB charger with 5V output
voltage and 1.5A (or above) output current.
The charging current of X3
When charging by PC, the current is about 450mAh (power off);
When charging by external charger, the current is about 900mAh.
13
The charging time of X3
Forced shutdown Power off charging Power on charging
charging
Charging while
working
PC USB
7 hrs
9 hrs
9 hrs
15 hrs
Charger
4 hrs
4 hrs
4 hrs
4 hrs
Forced shutdown charging: Press “Play” key to shut down while charging.
Power off charging: Charge when power off with the charging icon on the screen.
Power on charging: Normal display of the screen.
Charger: With 5V rated output voltage and 1.5A (or above) rated output current.
X3 can be recharged by portable charger?
Yes, as long as its output current is 1.5A or higher.
X3 can work while charging?
Yes, listening to music while charging is allowable. But it is suggested to charge it with power off
so as to avoid prolonged charging time and slight fever.
X3 feels hot when working while charging?
It is recommended to charge with power off at this time.
Better not to leave it exposed in the air without silicon case on, or turn down the volume to
reduce the fever.
Note: The slight hot won’t damage the machine itself as well as not causing any harm to the user.
Why X3 stops charging while not fully-recharged?
X3 is equipped with charging time protection function which would automatically stop charging
if it is not full after 10hrs of charging. At this time, the red and green light would flash in turn.
In short, please turn it off to get recharged so as to get the possible highest current.
Can X3 be recharged by other Micro USB data cable?
Yes. But the original data cable is specially made with power wire in large diameter which can
reduce the wear and tear. Other non-original USB cable may result in slow charging speed.
What’s worse, if it is very poor quality, it may unable to charge due to the high voltage loss.
What is the best way to charge X3?
By using Apple original charger for iPad and X3 original data cable to get it recharged with power
off. This can achieve the best charging effect.
Why X3 can’t get recharged or in very slow speed when connecting to the front USB port
of desktop?
The front USB ports of the desktop connect to the motherboard through tiny wires. When
connecting to equipment with large current, its output voltage would drop considerably.
14
The accuracy of X3’s battery indicator
The battery capacity is calculated based on its voltage. Due to the inaccuracy of this method and
the big variation of voltage while playing, the battery indicator is for reference only.
How to distinguish the charging status of X3?
There is a charging indicator at the bottom of the button panel which appears red when charging,
and changes to green when fully-recharged. If it is power on charging, the battery icon at the
upper-right corner would scroll; if it is power off charging, there would be a big green battery icon
on the screen to indicate charging.
How to tell whether it has been fully recharged or not?
When fully recharged, the indicator would appear green.
When power on, the battery icon at the upper-right corner would stop scrolling; when power off,
the charging icon would disappear, the screen would turn black and the indictor change to green.
C. About Transmitting Songs
Supportable operating system of X3
X3 supports WIN XP/WIN7/WIN8 and other operating systems in 32bit or 64bit, as well as MAC
OS operating system of Apple.
Supportable USB interface type of X3
USB2.0 and USB3.0
The transmitting speed of X3
The speed depends on the file size, and it’s about 4.5M/S on average.
Why the transmitting speed would become slow when connecting X3 to the front USB of
the laptop?
Please use the rear USB port to transmit data when connecting X3 to laptop.
Can I copy or move document folder on X3?
Yes.
Can I delete or copy file by dragging through the computer’s File Manager?
Yes.
Do I need to install any driver when connecting X3 to computer?
Nope, X3 is completely driver free.
Can X3 support LINUX operating system?
Theoretically, the answer is positive.
But due to the variety of LINUX operating system, we can’t say yes for sure.
15
Why the computer can’t recognize X3?
Since WIN8 operating system and USB 3.0 are n technology applied area, X3 is not perfect
enough in supporting them. But we would solve this issue ASAP by upgrading firmware. In
short-term, the solution would be keep in line with WIN7 and WIN XP system and USB 2.0 type.
D. About Firmware Upgrading
Ways of keeping updated with latest firmware upgrading of X3.
1. Facebook:www.facebook.com.cn/FiiOAUDIO
2. Official website: www.fiio.net
3. Forum: http://www.head-fi.org/forum/list/180
4. Email us at [email protected] to know latest firmware.
What's the name of X3 firmware?
The name of X3 is X3.FW and any modification on the file name or extension would make it invalid.
Upgrading Steps
1. Get one blank TF card (1G to 32G) with Class4 speed or higher. And you should format the TF
card into FAT32.
2. By using card reader or plugging the card into X3 directly, get the firmware copied into the
root directory of the card (not subdirectory).
3. Get the X3 powered off; plug the TF card (with firmware) into X3.
4. Simultaneously press the “Menu” button and “OK” button, the upgrading prompt would
pop up.
5. You can release the button after seeing the upgrading progress bar.
6. If upgrading failed, please long-press the power button for 10s and then back to step 4.
Why there are so many requirements to the card used for upgrading?
Generally speaking, FAT32 can meet the requirement and the upgrading doesn’t have close
relation to the capacity, speed or content of the card.
However, owing to the varying quality of card in the market, it is recommended to meet our
listed requirements to ensure the upgrading success rate.
Fear of bricking in case of upgrading failure?
If being operated correctly, normally this won’t happen.
In case of bricking, please contact us timely so that we can assist you to solve it.
E. About External Card
Supportable card of X3
It supports TF card (or Micro SD card) which includes SDHC and SDXC.
16
Are there any requirements about the TF card?
After test, it has good support for TF card in well-known brand (such as Kingston and
SanDisk).Though we are unable to test all the brands, normally it can work well once with good
quality.If the speed of card is too slow, X3 would get stuck in operation or unable to play high data
rate lossless music (like 192K/24B in APE format). In this case, we would suggest you to use TF card
in CLASS6 or even higher.
The capacity of supportable card.
After test, X3 can support as large as 64G.But the card in 64G should be formatted to FAT32 first.
How to format TF card into FAT32?
It is suggested to use card reader to connect to PC. After found the card in the “Server
Explorer”, right click it, and format it into FAT32 according to its prompt. At this time, please
remember NOT to choose 64K under the Allocation unit size when formating the TF card.Note: TF
card in 64G can’t format into FAT32 under windows system, please try to use third party tool to
format. You can download the specialized format tool (Guiformat/smdk_fat32) from the
""Download"" section under the ""Support"" column.
All the audio files in the TF card can't be readed by the X3.
1. After inserting the TF card into the X3, please go to ""System Settings""—>""Info/Storage"" first,
then to check whether the capacity of the ""External memory"" and Available is normal (compared
with the capacity of the TF card showing in the computer). If the capacity showing in the X3 is
abnormal, please try to format the TF card into FAT32.2. If FAT 32 still doesn't work, then please
format into NTFS.3. If convenient, it's suggested to change another TF card to have a try.
Only certain files in the TF card can be showed in the X3.
1. Please check the displaying situation of the audio files via ""Play All"", ""Category"" and
""Browse Files".
2. If all the audio files can be showed via ""Browse Files"", but not via ""Play All"" or ""Category"",
please ungrade your X3 to the latest firmware.
3. After a successful upgrade, please delete the hidden datebase file in the X3, then remember to
update the library manually. It will help create a new database file.
How to delete the database file in the X3 disk?
1. Please connect the X3 with your computer via the USB cable first, and find the X3 disk in the
computer after the X3 has been regconized.
2. Double click the X3 disk to enter the X3's internal memory. On the pop up dialog box, please go
to Tools—>Folders Options—>View—>Advanced Settings, and in order to display all the files in
the X3 disk, it is recommended to UNCHECK "Hide protected operating system files" option and
CHECK "Show hidden files, folders, or drives" under the folder of "Hide files and folders". You can
refer to the two red boxes on the attached picture.
3. After the second step done, please just delete the pop up database file named
"usrlocal_media.db ".
4. Disconnect the X3 with the computer, and update the library manually so as to create a new
database file (usrlocal_media.db) in the X3.
Note: Following Step 3, it's suggested to restore the settings mentioned in Step 2 to factory
default, in order to avoid deleting other important operating system files by mistake.
17
Are there any requirements about the TF card?
After test, it has good support for TF card in well-known brand (such as Kingston and SanDisk).
Though we are unable to test all the brands, normally it can work well once with good quality.
If the speed of card is too slow, X3 would get stuck in operation or unable to play high data
rate lossless music (like 192K/24B in APE format). In this case, we would suggest you to use TF
card in CLASS6 or even higher.
The capacity of supportable card
After test, X3 can support as large as 64G.
But the card in 64G should be formatted to FAT32 first.
How to format TF card into FAT32?
It is suggested to use card reader to connect to PC. After found the card in the “Server
Explorer”, right click it, and format it into FAT32 according to its prompt.
Note: TF card in 64G can’t format into FAT32 under windows system, please try to use third
party tool to format, such as guiformat.
F. About Music Playing
Music in MP3 doesn't work on X3
To guarantee the sound quality, X3 doesn’t support MP3 music lower than low bit rate
(Bit depth: 8 bit; Data rate: 32K or lower). These are used for cross-talk or language teaching
program.
Music in WAV doesn't work on X3
Check the file to see whether it is in DTS or DOLBY multi-channel format through Foobar or
other music player software on your computer. Or the bit depth is higher than 24bit; say
32bit or 64bit?
Music in APE doesn't work on X3
There are 5 different levels of compressed model for APE which includes Fast, Normal, High,
Extra High and Insane. X3 is unable to support Extra High and Insane model in all sample rates,
as well as High model with 192K/24B or higher sample rate.
CUE playback is supportable or not?
X3 can play external CUE file and will automatically separate tracks when playing.
Can't play even with CUE file
X3 can’t support music with built-in CUE file.
CUE file should with the same name as the music.
Can't find the CUE file when browsing
X3 would separate tracks automatically, so you can only see the separate songs out of the CUE file.
18
How to shuffle play cross folders?
Set it as shuffle play, and choose any song to play under “Play All “list.
Can't display the album cover
First, set the play display as “Cover”.X3 supports cover display for multiple music formats.
It supports jpg, bmp and png formats (the picture should be within 1M, and with less than 1024px
resolution), yet no display for other formats.The built-in cover can be embedded in to the music
file by means of Foobar, TTPlayer, iTune or this kind of software on PC. The name of the external
cover should be identical to that of the music file, and they two should be put in the same folder
so as to display normal.
Can't display lyrics
X3 only supports external lyrics in LRC format. The name of the lyrics should with the same as
the song. Meanwhile, remember to set it as “Lyrics” in “Play Display”under “Play Settings”.
How to set “My Favorites”?
Under the playing interface, after long press the “Menu” button, a prompt would pop up
where you can find the “Add to Favorites”.
Can't play by category (By Album, Genre and Artist)
X3 can only search for related information and set search library after it finishes Update Lib”.
You can set “Update Lib” as “Auto” under the “System Settings” or you can update it
manually each time use it.
Discrepancy between the X3 displayed song quantity and the real number that had been
moved in
The total number displayed by X3 only contains those can be played.
G. Other Operations
How to prolong the battery life of X3?
1. Better off setting as “Idle power off “at 30s.
When there is no music playing or other operation, it will shut down automatically after 30s. It
can only last for 20hrs even there is no music being played.
2. Set the “Backlight “at 20s.
After 20s of INOP, it would turn off the screen to save power after 20s.
3. Set HOLD as “On” to avoid turning on the screen due to error operation.
Lags in response on X3
1. When playing music in high data rate, especially APE file in 192k/24B, it requires more to
decode and calculate which would make it become slow in response. You can transform the APE
file into WAV or FLAC by FOOBAR.
2. It would become slow when there are too many music files in X3. Please do not put too many
files in it.
19
3. There are some other non-music files, like video or photos in it which requires X3 to identify.
Please do not store non-music file since those are not supportable by X3.
4. It may because of the slow speed TF card. Better use well-known brand TF card at CLASS10.
5. Disorder of file, such as a number of APE and CUE file in one folder. It is suggested to do as
follows:
Create subdirectory according to different artists, and then create subdirectory under the artist
directory based on different albums.
6. Mingle music files in various format and data rate. It is better to file them in different folders.
And choose to play by category to prevent X3 from changing decoder frequently.
Feeling slight hot when working
X3 adopts 600MHz master control, separate DAC and high-power amplifier chip, so its power
consumption would be much higher than other MP3 with all-in-one chip. Small part of these
consumption turn into electrical signal and be output through the headphone, while most of
the consumption transform to heat. Therefore, it is normal to feel slight hot when working, but
the heat won’t damage the machine itself as well as not causing any harm to the user.
Hearing sound inside of the machine when turning on and plug or unplug headphone
The amplifier output of X3 was transit to the headphone port through a electric relay. When
turning on/off and plug/unplug headphone, it would momentary disconnect the connection of
the relay. At this time, the headphone is disconnected to the inside of X3 so as to avoid any
sonic boom or abnormal sound. However, the disconnection of the relay depends on the
electrical signal which would generate slight sound.
H. Connection with Other Audio Devices
How to connect to other devices through the LO port of X3?
The LO of X3 is standard line output which can only connect to headphone amplifier, standard
audio amplifier, car audio, home theater, active speaker, etc. Since the LO is with fixed level
output, please do not connect to headphone directly in order to protect your ears from the super
loud sound.
How to connect through its digital output?
The digital output is with standard SPDIF coaxial audio signal, it can support the connection as
long as the audio decoder meets the SPDIF specification and has coaxial input port.
When connecting X3 to the home theater amplifier, why it can’t play properly for the first
10 seconds?
The digital input of most amplifiers is set as Auto-ID, so please set the input as coaxial on the
amplifier. Take the AV amplifier of Marantz for example; if the input signal hasn’t been set
properly, it needs about 10 seconds to identify the signal is from HDMI or coaxial.
20
X3 User Guide -2
(192KHz/24Bit USB DAC)
Be applicable to any versions beyond FW2.05
Foreword:
This article will detail the preparations and precautions regarding using the X3
as a USB DAC, and the USB DAC driver installation method. Frequently asked
questions will also be answered. Please study this article in detail for a quick
trouble-free installation of the X3 as a USB DAC.
1
Contents
1. Items to prepare before driver installation:
3
2. Precautions:
3-4
3. Driver installation steps
4-8
4. Operating instructions
8
5. Frequently asked questions
8-9
2
1. Items to prepare before driver installation:
The X3, a TF card (microSD card), the computer, USB cable, ASIO driver and the firmware
provided with this article.
2. Precautions:
1. For desktop computers, connect the X3 to a USB port on the rear of the case, not the
front. This is because front USB ports on desktop computers are connected to the
motherboard via long unshielded cables. As a result, front USB ports have low power
output, low transfer speeds and are prone to electrical interference, degrading sound
quality or causing crackling / dropouts.
2. When the X3 is decoding 192k/24bit audio via USB, the required data throughput is
huge. A high quality USB cable, with low signal loss and good shielding, is required.
Please use the original USB cable provided with the X3 if possible. If you need to
purchase another cable, please do not buy generic USB cables (including cables
provided with most smartphones), but buy USB-to-micro-USB cables from a reputable
brand supporting the USB2.0 standard.
3. If the X3 doesn't work as a USB DAC after installation of the driver, please try rebooting
the computer.
4. With Windows XP computers, the X3 will not enter the DAC interface before
installation of the driver. This is normal. You may proceed with installing the driver
normally.
5. Known issue: the driver will fail to install on Windows 8 64bit computers. This is
related to the driver signature module. The driver has not been signed for Windows 8
64bit and will not work while driver signature enforcement is in effect. Please disable
driver signature enforcement as follows:
3
Mouse over upper right corner of screen->settings->Change PC settings->General->
Advanced->start-up->Restart
now->Troubleshoot->Advanced options->Start-up Settings->Restart
After such a restart, the computer will be able to install unsigned drivers, but give a
warning when this happens (as is the case with installation in XP, Vista, Windows 7), just
click “Install anyway” to proceed.
http:// b bs. p cbeta. c om/ v iewthread- 1 122720- 1 - 1 . h tml
http:// b bs. p cbeta. c om/ v iewthread- 1 122886- 1 - 1 . h tml
Please refer to above threads to know more, or Refer to this video for a walkthrough of
the process.
http:// w ww. y outube. c om/ w atch? v = N M1MN8QZhnk
6.The driver attached to this article should only be run on windows systems. Mac and Linux
computers have no need for such a driver and will be able to use the X3's USB DAC function
as soon as the X3's firmware is updated.
3. Driver installation steps (using Windows 8 as example)
1. Upgrade the X3's firmware to version beyond FW2.05 as follows:
Copy the “x3.fw”file provided by FiiO to the root directory of a TF (microSD) card formatted
in FAT32 and insert the card into the X3. With the X3 powered off, hold down both the
menu and power on buttons until the upgrade via TF dialog shows up on the screen.
When the progress bar to the upgrade is completed, the player will restart automatically.
Precaution: The TF (microSD) card should preferably be 32GB or smaller, and be a blank
card formatted in FAT32. Please ensure the X3's battery is sufficiently charged (preferably
fully charged) to prevent failure during the upgrade. Please do not touch the player's
buttons while the upgrade is in progress. If the upgrade fails the first time, please hold
the power button for over 10 seconds to perform recovery, and repeat the actions
described in this step (1) to complete the upgrade. After upgrade is complete, please
refresh the songs database.
4
2. After upgrade is complete, a USB mode will be added to the X3's system settings menu:
DAC mode. This is the new default. The other mode is mass storage mode (the old mode).
3. After confirming that the USB mode is “DAC”, connect the X3's micro USB port to the
computer's USB port via the prepared USB cable. (for desktop computers, please
connect to a rear port and not a port on the front panel), and the X3 will enter the
USB DAC interface after startup (except when connected to a windows XP computer).
Double click the in the driver package attached to this article, and the following dialog
will pop up:
Click Next
Use the default installation path and click Install
5
While the installation is proceeding, the following warning dialog will pop up more
than once (usually twice). Select “install this driver software anyway” each time the dialog
pops up:
Select “install this driver software anyway”
Next>
6
The above dialog will pop up indicating successful installation of the driver. Click Next.
Click Finish to complete installation.
Icon would appear at the bottom right corner:
After installed the driver, set “FiiO X3” as the default audio play device.
(Control panel>Sound>Playback).
7
4. Operating instructions
Key functions:
Previous / down
and Next / up
: In USB DAC mode, these
two buttons are used to select between the 5 options in the DAC interface.
Menu / back
:no function on short press. A long press exits the X3 from
USB DAC mode and puts it back in the main menu.
Volume down “-“ : a short press lowers the volume one step while a long press lowers
the volume continuously down to the minimum.
Volume up “+” : a short press increases the volume one step while a long press increases
the volume continuously up to the maximum.
Power on / off | Play / Pause
: a short press mutes the DAC, a
second short press unmutes. A long press switches off the X3 directly.
8
5. Frequently asked questions
1. When switching between songs of different sample rates, there will be a slight pop
sound. This is caused by the WM8740 changing its system clock.
2. When you change TTPlayer's output device from wave out to KS (kernel streaming), it
may show a “cannot open” error. Please restart TTPlayer to fix this.
3. Why can't I adjust the X3's volume from the computer?
A: You may adjust the music player's output options. If wave out or Directsound output is
chosen, both the computer and X3 may adjust the volume. If kernel streaming or ASIO is
chosen, only the X3 may adjust the volume.
4. Can the X3 switch between storage and DAC modes without switching off or pulling
the USB cable?
A: No. Please unplug the USB cable, change the USB mode on the X3 and then replug.
Or change the mode, switch off or reset the X3 and turn it back on.
5. Is the X3's decoding synchronous, adaptive or asynchronous?
A: Asynchronous transfer and decoding.
6. Changes in the X3's volume, bass / treble settings, and channel balance in DAC mode
will be reflected back in player mode and vice versa.
7. Under windows XP, using Directsound or wave out, playing songs with sample rates
64kHz, 32kHz and under 32kHz, the X3 will show the sample rate as 192kHz. The coaxial
output will also be upsampled to 192kHz (e.g. while connected to the E17 for decoding)
8. The X3 always shows the output bit depth as 24bits, even when the song itself is 16
bit. This is because the data is padded to 24bits before sending to the internal DAC and
is a known issue.
9