1
Panasonic_X100_O/I
X100EN1CP1
Operating Instructions Part 1
Digital Cellular Phone
All screen images in this manual are simulated.
Some phone colours may not be available in every country.
Mobile Phone
Panasonic Mobile & Automotive Systems Czech s.r.o.
Pardubice, Czech Republic
Printed in Czech Republic
Before operating this handset, please read these
instructions (parts 1 and 2) completely.
Charge battery before operation.
Contents
Appearance............................ 1
Camera................................. 60
Part Names ...........................1
Keys and Symbols ................2
Icons .....................................3
Camera Appearance .......... 60
Preview mode..................... 62
Capture mode..................... 66
Getting Started ...................... 4
Messages............................. 67
Battery and SIM ....................4
Settings .............................. 67
Create................................. 71
Inbox and Outbox ............... 72
Chat SMS F ...................... 73
User messages .................. 73
Cell Broadcast F ............... 74
Basic Operation..................... 7
Switching On/Off ...................7
Mobile lock On/Off ................8
Making a Call ........................9
Incoming call .......................12
In-call operations.................13
Text Entry............................20
Exploring the Menus........... 22
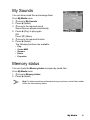
My Phone ............................. 23
Profiles ................................24
Sounds................................25
Display ................................28
Language ............................30
Auto answer ........................30
Shortcut key ........................31
Phone settings ....................32
Defaults...............................38
Contacts............................... 39
Contacts list ........................40
Create .................................43
Groups ................................45
Memory status ....................46
My numbers ........................47
Service dial E ...................47
Voicemail ............................48
Hot key dial .........................49
My Contacts ........................49
Games .................................. 50
Games ................................50
Browser................................ 53
Starting the Browser ...........53
Bookmarks ..........................55
Settings ...............................58
X100EN1WW1b
Calendar............................... 76
Viewing the Calendar ......... 76
My Media.............................. 79
My Pictures......................... 79
My Animations.................... 80
My Sounds ......................... 81
Memory status.................... 81
Applications ........................ 82
Games................................ 83
Alarms ................................ 83
Sound recorder................... 84
Clock .................................. 84
Auto power on .................... 85
Auto power off .................... 86
Calculator ........................... 86
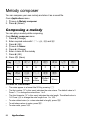
Melody composer ............... 88
Accessory............................ 89
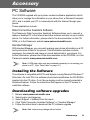
PC Software ....................... 89
Accessory Options ............. 90
Troubleshooting.................. 92
Important Error
Messages ........................ 94
Glossary of Terms .............. 96
Personal Settings................ 98
Index..................................... 99
Note .................................... 104
Contents
i
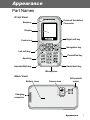
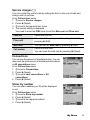
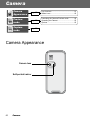
Appearance
Part Names
<Front View>
Personal Handsfree
Connector
Earpiece
Display
Right soft key
Centre key
Navigation key
Left soft key
Power/End key
Send key
Hash/Quiet key
Asterisk/Shift key
Microphone
<Back View>
Battery cover
Camera lens
Self-portrait
mirror
Charging
connector
Appearance
1
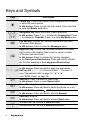
Keys and Symbols
Keys
Description
<
Centre key: Press in the centre of the Navigation key to select
or enter the menu options.
In idle screen: Press to enter the main menu. Press and hold
to enter the Mobile lock menu.
051
37
Navigation key: Move the cursor in each directions.
In idle screen: Press 1 or 5 to enter the Contacts list. Press
7 to display the Calendar. Press 3 to enter My Media menu.
A
@
#–,
C
D
E
Asterisk/Shift key: Enter . Shift key in text entry.
In idle screen: Press and hold to start the Browser.
Hash key: Enter #.
In idle screen: Press and hold to activate Quiet mode.
Indicates that the function is SIM dependent.
F
Indicates that the function is Network dependent.
"
!
2
Left soft key: Perform the functions indicated in the lower
left corner of the display.
In idle screen: Press to enter the Messages menu.
Right soft key: Perform the functions indicated in the lower
right corner of the display. Mainly used to cancel or return
to the previous menu level.
In idle screen: Press to activate the function assigned
to the Short press Shortcut key. Press and hold to activate
the function assigned to the Long press Shortcut key.
Numeric keys: Enter numbers.
In idle screen: Press and hold to apply the appropriate
Hot key dial ($ – ,). Press and hold # to enter “+”
(see “International calls” on page 11), “p” or “w”
(see “DTMF Tones” on page 19).
Send key: Press to answer or make a call.
In idle screen: Press to enter Recent calls.
Power/End key: End a call or return to the idle screen.
In idle screen: Press and hold to switch the phone on or off.
Appearance
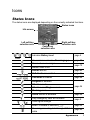
Icons
Status Icons
The status icons are displayed depending on the currently activated functions.
Status icons
Idle screen
Left soft key
selection area
–
–
–
Centre key
selection area
Right soft key
selection area
Indicates Battery level
page 5
On non-home network – Roaming (F)
page 97
Red
Green
Received new messages
Media Folder is full
page 70
Alarms are set
page 83
Call diverts are enabled
page 34
Voicemail is enabled
page 48
Ringtone is enabled
Vibration mode
Vibration and Ringtone mode
page 26
Flashing mode
GPRS service is available
Only emergency calls are available
–
GSM signal strength
Line 1 or Line 2 is selected (E)
page 96
page 9
page 32
Receiving or sending data through USB data
page 89
cable
Appearance
3
Getting Started
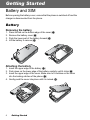
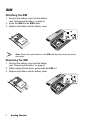
Battery and SIM
Before opening the battery cover, ensure that the phone is switched off and the
charger is disconnected from the phone.
Battery
Removing the battery
1.
2.
3.
4.
Press the tab on the bottom edge of the cover (N)
Remove the battery cover (O)
Push the lower part of the battery forward (P)
Lift the battery to remove (Q)
Attaching the battery
1. Insert the upper edge of the battery (N)
2. Push down on the lower edge of the battery carefully until it clicks (O)
3. Insert the upper edge of the cover. Make sure to fit notches on the cover
into the locking catches of the phone (P)
4. Gently push the cover into place until it is locked (Q)
4
Getting Started
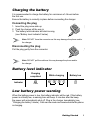
Charging the battery
It is recommended to charge the battery for a minimum of 4 hours before
the first use.
Ensure the battery is correctly in place before connecting the charger.
Connecting the plug
1. Insert the plug arrow side up
2. Push the charger all the way in
3. The battery level indicator will start moving
(see “Battery level indicator” below)
Note: DO NOT force the connector as this may damage the phone and/or
the charger.
Disconnecting the plug
Pull the plug gently from the connector
Note: DO NOT pull the cable as this may damage the phone and/or
the charger.
Battery level indicator
Charging
completed
Indicator
While charging
–
Green
Green
–
Battery low
–
Red
Red
Low battery power warning
When the battery power is low, the battery indicator will be red. If the battery
power is critically low, a warning tone will beep. 2 minutes after the beep,
the power will automatically shut off. Plug in the charger immediately (see
“Charging the battery” above). Calls can be made and received while the phone
is charging.
Getting Started
5
SIM
Attaching the SIM
1. Remove the battery cover and the battery
(see “Removing the battery” on page 4)
2. Insert the SIM into the SIM holder
3. Replace the battery and the battery cover
Note: Ensure the gold contacts on the SIM and the phone body are facing
each other.
Removing the SIM
1. Remove the battery cover and the battery
(see “Removing the battery” on page 4)
2. While holding the tab down, gently slide the SIM out
3. Replace the battery and the battery cover
6
Getting Started
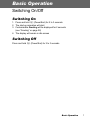
Basic Operation
Switching On/Off
Switching On
1. Press and hold D (Power/End) for 2 to 3 seconds
2. The start-up animation will start
3. Customisable Greeting will be displayed for 2 seconds
(see “Greeting” on page 28)
4. The display will remain in idle screen
Switching Off
Press and hold D (Power/End) for 2 to 3 seconds
Basic Operation
7
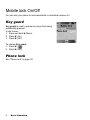
Mobile lock On/Off
You can lock your phone to avoid accidental or intentional misuse of it.
Key guard
Key guard is used to prevent any keys from being
accidentally pressed.
In idle screen
1. Press and hold < (Menu)
2. Press < (On)
3. Press < (OK)
To release Key guard
1. Press < (
)
2. Press < (OK)
Phone lock
See “Phone lock” on page 35.
8
Basic Operation
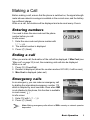
Making a Call
Before making a call, ensure that the phone is switched on, the signal strength
meter shows network coverage is available in the current area, and the battery
has sufficient charge.
While on a call, the duration will be displayed and auto-reset every 4 hours.
Entering numbers
You need to have the area code and the phone
number before you call.
In idle screen
1. Enter the area code and phone number with
#–,
2. The entered number is displayed
3. Press C (Send)
Ending a call
When you end a call, the duration of the call will be displayed. If Max Cost (see
“Max cost” on page 33) is set, the remaining units will also be displayed.
While on a call
1. Press D (Power/End)
2. Duration is displayed (when the counter reaches 04:16:00, it will be reset)
3. Max Cost is displayed (when set)
Emergency calls
In an emergency, you can make an emergency call
by dialling the international emergency number 112
which is adopted by most countries. Even when SIM
is not attached in the phone, this function is available
in most cases (F).
In idle screen
1. Enter 112 with # – ,
2. Press C (Send)
Note: Making emergency calls without a SIM is country or network operator
dependent.
Basic Operation
9
Recent calls
Making a call from Recent calls list
You can select phone numbers from Last call,
Answered call or Unanswered call. There can be
stored up to 50 recent numbers each in the Last call
and the Answered call lists, and up to 20 in the
Unanswered call list.
In idle screen
1. Press C (Send) to show Recent calls lists
2. 4 move to the required list
3. Press < (Select)
4. 4 to the required number
5. Press C (Send)
Managing the entries in Recent calls
You can view, delete or delete all the entries in Recent calls.
From Recent calls menu
1. 4 move to the required Recent calls list
2. Press < (Select)
3. 4 move to the required entry
4. Press < (Menu)
5. 4 move to View, Delete or Delete all
6. Press < (Select)
Menu
Description
View
View the call information.
Delete
Delete a number from the list.
Delete all
Delete all numbers from the list.
Storing Recent calls in Contacts
You can store the required entry in Recent calls lists in Contacts.
From Recent calls menu
1. 4 move to the required list
2. Press < (Select)
3. Press A (
)
(see “Contacts list” on page 40)
10
Basic Operation
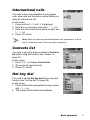
International calls
You need to have the destination country/region
code, area code and the phone number before you
make an international call.
In idle screen
1. Press and hold # until “+” is displayed
2. Enter the country/region code with # – ,
3. Enter the area code and the phone number with
#–,
4. Press C (Send)
Note: When you make an international phone call, remember to omit the
first “0” of the area code. (There are some exceptions.)
Contacts list
You need to store the phone numbers in Contacts
list before using this function (see “Create” on
page 43).
In idle screen
1. Press 1 or 5 to display Contacts list
2. 4 move to the required entry
3. Press C (Send)
Hot key dial
You need to set the Hot key dial before using this
function (see “Hot key dial” on page 49).
In idle screen
1. Press and hold the appropriate hot key number
with $ – ,
2. The number will be dialled automatically
Basic Operation
11
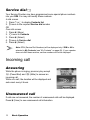
Service dial
E
Your Service Provider may have programmed some special phone numbers
into your SIM. You may not modify these numbers.
In idle screen
1. Press 1 or 5 to display Contacts list
2. 4 move to the required Service dial number
OR
From idle screen
1. Press < (Menu)
2. 0 move to Contacts
3. Press < (Select)
4. 4 move to Service dial
5. Press < (Select)
Note: SDN (Service Dial Numbers) will be displayed only if SIM or All is
selected in My Contacts (see “My Contacts” on page 49). If your operator
does not offer these services, service numbers will not be displayed.
Incoming call
Answering
While the phone is ringing, press any key except
D (Power/End) and @ (Mute) to answer an
incoming call.
While on a call, the duration will be displayed and
auto-reset every 4 hours.
Unanswered call
If calls are not answered, the number of unanswered calls will be displayed.
Press < (View) to see unanswered call information.
12
Basic Operation
Rejecting
While the phone is ringing, press D (Power/End) to reject the call. The number
of the unanswered calls will be displayed. Press < (View) to see unanswered
call information.
Auto answer
If Auto Answer is enabled, and the Personal Handsfree kit is connected, calls
can be answered without pressing any keys. Any call waiting should be
answered in the normal way (see “Auto answer” on page 30).
Caller’s ID
If you receive an incoming call whose number is stored in Contacts list, the
caller’s name will be displayed. If the number is not stored in the Contacts list,
only a phone number will be displayed.
In-call operations
You may use various functions while on a call.
Volume control
You can adjust the speaker volume while on a call.
While on a call
1 volume up
5 volume down
Accessing Contacts list
You can access the Contacts list, which is stored in the SIM or the phone, while
on a call.
While on a call
1. Press A (
)
2. 4 move to the required entry
(see “Contacts” on page 39)
Basic Operation
13
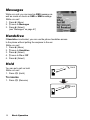
Messages
While on a call, you can send an SMS message as
well as create or check an SMS or MMS message.
While on a call
1. Press < (Menu)
2. 4 move to Messages
3. Press < (Select)
(see “Messages” on page 67)
Handsfree
If Handsfree is activated, you can use the phone handsfree access
to the phone without putting the earpiece to the ear.
While on a call
1. Press < (Menu)
2. 4 move to Handsfree
3. Press < (Select)
4. 4 move to On or Off
5. Press < (Select)
Hold
You can put a call on hold.
While on a call
1. Press @ (Hold)
nec
Con
1
tion
Call A
To resume
1. Press @ (Resume)
Co n
14
Basic Operation
o
necti
n1
Hold Call A
Call waiting
F
If Call waiting is on, you can receive another call or you can make
a Multi-party call.
Hold and answer
You can place a current connection
on hold and answer a new call.
While on a call
1. You hear an incoming call and
the Caller’s ID is displayed
2. Press C (Send)
Co n
on 1
necti
Call A
Call B
Co n
on 1
necti
Conn
ectio
n
Hold Call A
2
Call B
on 1
necti
Call A
End and answer
You can end the current connection
and answer a new call.
While on a call
1. You hear an incoming call and
the Caller’s ID is displayed
2. Press D (Power/End)
3. Press C (Send)
Co n
Call B
End Call A
Conn
ectio
n1
Basic Operation
Call B
15
Rejecting a new call
You can reject a new call while you
are on a call.
While on a call
1. You hear an incoming call and
the Caller’s ID is displayed
2. Press @ (Reject)
Co n
o
necti
n1
Call A
Call B
on 1
necti
Co n
Call A
Reject Call B
Second call
You can make another call while on
a call.
While on a call
1. Press @ (Hold)
2. Enter the required phone
number with
#–,
OR
Press A (
) and select the required number
3. Press C (Send)
The first call will be put on hold.
16
Basic Operation
Co n
o
necti
Con
ne
n1
ction
2
Hold Call A
Call B
Swapping call
You can swap between 2
connections.
While on the second call
1. Press @ (Resume)
2. The second call will be placed
on hold and you will be
returned to the first call
3. Press @ (Hold)
4. The first call will be placed on
hold and you will be returned to
the second call
on 1
necti
Co n
Conn
Co n
ectio
n2
Call B
on 1
necti
Call A
Conn
ectio
n2
Co n
Hold Call A
on 1
necti
C onne
Hold Call B
Hold Call A
ction 2
Call B
Ending one connection
While on calls
1. Press < (Menu)
2. 4 move to Hang up
3. Press < (Select)
4. 4 move to Active or Hold
5. Press < (Select)
C on n
ectio
n2
Ending both connections
While on calls
Press D (End)
Call A
on 1
necti
Co n
Co n
Co n
on 1
necti
necti
on 2
End Call B
End Call A
End Call B
Basic Operation
17
Multi-party call (Conference)
F
You can have up to 5 calls on a Multi-party call. You cannot have more than one
Multi-party call at a time.
Making a Multi-party call
While on 2 calls, with 1 call is on
hold
1. Press < (Menu)
2. 4 move to Conference call
3. Press < (Select)
Adding more callers
on 1
necti
Conn
ectio
n2
Co n
18
Basic Operation
Call B
Call A
Call B
on 1
necti
Call C
C on
necti
on 1
Hold
Conn
ectio
n
2
on 1
necti
Co n
Splitting a caller
You can split a call from a Multiparty call and make it another
connection.
While on a Multi-party call
1. Press < (Menu)
2. 4 move to Private call
3. Press < (Select)
4. 4 move a to required phone
number
5. Press < (Select)
The Multi-party call is kept on
hold.
Hold Call A
Call A
Call B
Call C
...
You can have up to 5 calls on a
Multi-party call.
While on a Multi-party call
1. Press @ (Hold)
The Conference is placed on
hold.
2. Make another call
OR
Answer an incoming call
3. Press < (Menu)
4. 4 move to Conference call
5. Press < (Select)
Con
on 1
necti
Con
1
tion
nec
Con
Co
nn e
ctio
n
Hold
2
Call A
Call B
Call C
Call D
Call E
Call A
Call B
Call C
Call D
Call E
Call A
Call B
Call D
Call E
Call C
Ending a call in a Multiparty call
tion
nec
Con
1
You can end a call in a Multi-party
call one by one.
While on a Multi-party call
1. Press < (Menu)
2. 4 move to Hang up
3. Press < (Select)
4. 4 move to the required phone number
5. Press < (Select)
DTMF Tones
Call A
Call B
Call C
End
Call D
Call E
Ending a Multi-party call
You can end a Multi-party call.
While on a Multi-party call
1. Press D (End)
2. All calls will be disconnected
End
1
ion
ect
nn
Co
End
End
Call A
End
Call B
End
Call C
End
Call D
End
Call E
DTMF (Dual Tone Multi-Frequency)
Tones can be sent while on a call. These are often used to access voice mail,
paging and computerised home banking. For example, you may need to enter
a number to remotely access voice mail messages. A phone number may be
stored in Contacts together with a DTMF sequence, allowing the number to be
dialled upon recall and the DTMF sequence to be sent automatically. You can
use “p” to pause for a few second and “w” to pause and wait your response.
Basic Operation
19
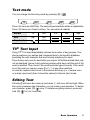
Text Entry
You can use alphanumeric characters to enter text. Press the appropriate key
several times until a required character is displayed. If you need to use the same
key for different characters, enter the first character and wait 1 second. To enter
text, you can press and hold # – , and the selection will be displayed.
Move to the required letter with 0 and press < (Select).
Text Mode
English
T9®
Key
Normal (abc)
Greek
(ΑΒΓ)
Extended
(aäå)
Numeric
(0 – 9)
#
+_
+_
+_
.@/:;*#+-”,!¡?¿_()[]{}’&%\^
$
~|<>=€£$¥¤§
AÄÅÆBCÇ
ACB2 acb2
ABC abc
ΑΒΓ
%
aäåæàbc
EDF3 edf3
DEF def
∆ΕΖ
DEÉF deèéf
&
IHG4 ihg4
GHI ghi
ΗΘΙ
GHI ghiì
'
KLJ5 klj5
JKL jkl
ΚΛΜ
JKL jkl
(
MNÑOÖØ
MNO mno
ΝΞΟ
) OMN6 omn6
mnñoöøò
ΠΡΣ
PQRS pqrsß
* SPRQ7 sprq7 PQRS pqrs
TVU8 tvu8
TUV tuv
ΤΥΦ
TUÜV tuüùv
+
ΧΨΩ
WXYZ wxyz
, XWYZ9 xwyz9 WXYZ wxyz
Shift/Lock
Shift/Lock
Lock
"
Space
Space
Space
Space
!
.,-?!’@
:;/1
0
1
2
3
4
5
6
7
8
9
*
#
Example of Text entry
Entering “Hello!”
Mode
Key Operation/Display
English
T9®
"
Normal
(abc)
"
20
'
&
(
(
)
$
5×4
I
He
Gel
Hell
Hello
Hello.
Hello!
'
×2
H
&
×2
He
(
×3
Hel
(
×3
Hell
)
×3
Hello
$
× 12
Hello!
Basic Operation
Text mode
You can change the text entry mode by pressing A (
T9
abc
0-9
).
ΑΒΓ
aäå
Press " once as a Shift key. The next entered character will be a capital letter.
Press " twice as a Caps Lock key. You can enter all capitals.
Normal
T9
abc
Shift
T9
Abc
Caps Lock
T9
ABC
0-9
ΑΒΓ
aäå
AÄÅ
T9® Text Input
Using T9® Text Input dramatically reduces the number of key presses. Your
phone analyses your entries and compares them to its linguistic database,
predicting the next character that most closely matches your input.
Press the key only once for each letter you require. At first the desired letter may
not be displayed. Ignore it and continue pressing other keys until the end of the
word is reached. Then check if the word has been typed correctly. If the result
is not the word you require, press 4 or # to see other matches.
In case the required word is not in the internal dictionary (i.e. a unique noun
or a rarely used word) then it should be entered in Normal (abc) mode.
Editing Text
Pressing 4 will move the cursor up and down, 2 will move left and right. When
the cursor is between two characters, you can insert a new character. To delete
one character, press @ ( ) once. To delete everything entered, press and
hold @ ( ) for 2 to 3 seconds.
Basic Operation
21
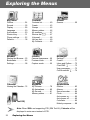
Exploring the Menus
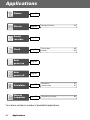
My Phone
Contacts
Games
Profiles ...................... 24
Sounds ...................... 25
Display ...................... 28
Language .................. 30
Auto answer .............. 30
Shortcut key .............. 31
Phone settings .......... 32
Defaults ..................... 38
Contacts list............... 40
Create ....................... 43
Groups ...................... 45
Memory status........... 46
My numbers .............. 47
Service dial E........ 47
Voicemail................... 48
Hot key dial ............... 49
My Contacts .............. 49
Games ....................... 50
Browser
Camera
Messages
Starting the Browser...53
Bookmarks ................ 55
Settings ..................... 58
Camera Appearance....60
Preview mode............ 62
Capture mode............ 66
Settings...................... 67
Create........................ 71
Inbox and Outbox ...... 72
Chat SMS F............ 73
User messages.......... 73
Cell Broadcast F..... 74
Calendar
My Media
Applications
Viewing the Calendar...76
My Pictures................ 79
My Animations........... 80
My Sounds ................ 81
Memory status........... 81
Games ....................... 83
Alarms ....................... 83
Sound recorder.......... 84
Clock.......................... 84
Auto power on ........... 85
Auto power off ........... 86
Calculator .................. 86
Melody composer ...... 88
STK (SIM Tool Kit)
E
Note: When SIM is not supporting STK (SIM Tool Kit), Calendar will be
displayed in main menu instead of STK.
22
Exploring the Menus
My Phone
page 24
Activating a profile ...........................................24
Editing a profile ................................................24
Returning to the default setting........................25
Renaming a Profile ..........................................25
page 25
Volume.............................................................25
Ringtone ..........................................................26
Message tone ..................................................26
Key tone ..........................................................26
Warning tone ...................................................27
Alerts................................................................27
Display
page 28
Wallpaper.........................................................28
Colour themes .................................................28
Greeting ...........................................................28
Operator notice F .........................................29
Backlight time ..................................................29
Key backlight ...................................................29
Language
page 30
Auto
answer
page 30
Shortcut
key
page 31
Phone
settings
page 32
Defaults
page 38
Profiles
Sounds
Call services.................................................... 32
Call diverts F................................................ 34
Security ........................................................... 35
Network........................................................... 38
My Phone
23
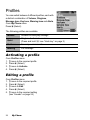
Profiles
You can switch between 4 different profiles, each with
a distinct combination of Volume, Ringtone,
Message tone, Key tone, Warning tone and Alerts.
From My Phone menu
Press < (Select)
The following profiles are available:
Normal
Suitable for everyday settings
Quiet
Ringtone for formal occasions
(Press and hold ! see “Hash key” on page 2)
Outdoor
For noisy environments
Meeting
For meetings
Activating a profile
From Profiles menu
1. 4 move to the required profile
2. Press < (Select)
3. 4 move to Activate
4. Press < (Select)
Editing a profile
From Profiles menu
1. 4 move to the required profile
2. Press < (Select)
3. 4 move to Edit
4. Press < (Select)
5. 4 move to the required setting
(see “Sounds” on page 25)
24
My Phone
Returning to the default setting
From Profiles menu
1. 4 move to the required profile
2. Press < (Select)
3. 4 move to Defaults
4. Press < (Select)
Renaming a Profile
From Profiles menu
1. 4 move to the required profile except Normal
2. Press < (Select)
3. 4 move to Rename
4. Press < (Select)
5. Enter a profile name
(see “Text Entry” on page 20)
6. Press < (OK)
Sounds
You can select each sound from a preinstalled
selection (shown in the figure right) or downloaded
Ringtone in My Sounds (see “My Sounds” on
page 81).
From My Phone menu
1. 4 move to Sounds
2. Press < (Select)
Volume
You can adjust the ringtone volume.
From Sounds menu
1. Press < (Select)
2. The ringtone will start to ring
3. 0 adjust the volume
1 or 3 volume up
5 or 7 volume down
4. Press < (OK)
My Phone
25
Ringtone
You can select a Ringtone from the preinstalled
selection or from My Sounds.
From Sounds menu
1. 4 move to Ringtone
2. Press < (Select)
3. 4 move to Preinstalled or My Sounds
4. Press < (Select)
5. 4 move to the required sound and sample sound
will be played
6. Press < (Select)
Message tone
You can select a Message tone from the preinstalled
selection or from My Sounds.
From Sounds menu
1. 4 move to Message tone
2. Press < (Select)
3. 4 move to Preinstalled or My Sounds
4. Press < (Select)
5. 4 move to the required sound and sample sound
will be played
6. Press < (Select)
Key tone
The Key tone is the sound you hear when you press
a key.
From Sounds menu
1. 4 move to Key tone
2. Press < (Select)
3. 4 move to On or Off
4. Press < (Select)
26
My Phone
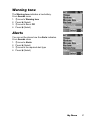
Warning tone
The Warning tone indicates a low battery.
From Sounds menu
1. 4 move to Warning tone
2. Press < (Select)
3. 4 move to On or Off
4. Press < (Select)
Alerts
You can set the phone how the Alerts indicates.
From Sounds menu
1. 4 move to Alerts
2. Press < (Select)
3. 4 move to the required alert type
4. Press < (Select)
My Phone
27
Display
Wallpaper
You can change the Wallpaper by selecting a preinstalled image or from My
Pictures.
From Display menu
1. Press < (Select)
2. 4 move to Preinstalled or My Pictures
3. Press < (Select)
4. 4 move to the required image as wallpaper
5. Press < (Select)
Colour themes
You can change the Colour themes which affect the
colour of the cursor and the background.
From Display menu
1. 4 move to Colour themes
2. Press < (Select)
3. 4 move to the required theme
4. Press < (Select)
Greeting
You can set your original Greeting which appears
after startup animation.
From Display menu
1. 4 move to Greeting
2. Press < (Select)
3. Enter your original greeting
(see “Text Entry” on page 20)
4. Press < (OK)
28
My Phone
Operator notice
F
Operator notice is a feature which reminds you of
how to operate selected features after you leave the
display idle for few minutes.
From Display menu
1. 4 move to Operator notice
2. Press < (Select)
3. 4 move to On or Off
4. Press < (Select)
Backlight time
You can set the time length of the backlight.
From Display menu
1. 4 move to Backlight time
2. Press < (Select)
3. 4 move to the required time length
4. Press < (Select)
Key backlight
You can set the Key backlight on or off for the
numeric keys.
From Display menu
1. 4 move to Key backlight
2. Press < (Select)
3. 4 move to On or Off
4. Press < (Select)
Note: Setting Key backlight On might make the battery life shorter.
My Phone
29
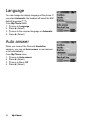
Language
You can change the display language of the phone. If
you select Automatic, the handset will select the SIM
default language (E).
From My Phone menu
1. 4 move to Language
2. Press < (Select)
3. 4 move to the required language or Automatic
4. Press < (Select)
Auto answer
When you connect the Personal Handsfree
earpiece, you can set Auto answer on and answer
a call automatically.
From My Phone menu
1. 4 move to Auto answer
2. Press < (Select)
3. 4 move to On or Off
4. Press < (Select)
30
My Phone
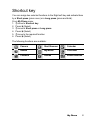
Shortcut key
You can assign two selected functions to the Right soft key and activate them
by a Short press (press once) or a Long press (press and hold).
From My Phone menu
1. 4 move to Shortcut key
2. Press < (Select)
3. 4 move to Short press or Long press
4. Press < (Select)
5. 4 move to the required function
6. Press < (Select)
The following functions are available:
Camera
Start Browser
Calendar
Games
My Media
Calculator
Contacts
Alarms
Sound recorder
My Phone
31
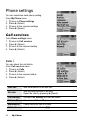
Phone settings
You can customise each phone setting.
From My Phone menu
1. 4 move to Phone settings
2. Press < (Select)
3. 4 move to the required settings
4. Press < (Select)
Call services
From Phone settings menu
1. 4 move to Call services
2. Press < (Select)
3. 4 move to the required setting
4. Press < (Select)
Calls F
You can check the call status.
From Call services menu
1. 4 move to Calls
2. Press < (Select)
3. 4 move to the required status
4. Press < (Select)
32
Last call
See the duration of the last call.
All calls
See the total duration of all calls.
Reset the total by pressing < (Reset).
Call waiting
Activate Call waiting and see the status.
Caller’s ID
Check how Caller’s ID is received.
Withhold ID
Check how your call ID is sent.
Active line
Select a line to activate (E).
My Phone
Service charges E
You can control the cost of calls by setting the limit on the cost of calls and
charge units of call time.
From Call services menu
1. 4 move to Service charges
2. Press < (Select)
3. 4 move to the required item to set
4. The current setting is displayed
You need to enter the PIN2 code to edit the Max cost and Price unit.
Cost left
Check the cost left.
Price unit
You can set the price per unit to add up the total by
pressing < (Edit).
Max cost
You can edit the Max cost by pressing < (Edit).
Call meters
Check the total cost.
You can reset the total cost by pressing < (Reset).
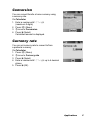
Connections
You can see the amount of transferred data. You can
also reset the total amount of transferred data shown
in All connections menu.
From Call services menu
1. 4 move to Connections
2. Press < (Select)
3. 4 move to Last connections or All
connections
4. Press < (Select)
Show my number
You can select whether your ID will be displayed
or not.
From Call services menu
1. 4 move to Show my number
2. Press < (Select)
3. 4 move to the required method
4. Press < (Select)
My Phone
33
Call diverts F
You can divert calls by setting the condition according
to the type of calls.
From Phone settings menu
1. 4 move to Call diverts
2. Press < (Select)
3. 4 move to the required type of calls or Cancel
all
4. Press < (Select)
When you select Voice calls,
4 move to the required type and press < (Select)
5. 4 move to Status, On or Off
6. Press < (Select)
When you select On, enter the phone number to divert. Then press < (OK)
Voice calls
Voice calls will be diverted under the following conditions:
Not reachable: When the phone is not in the network
coverage area, all incoming voice calls will be diverted.
No reply: Unanswered incoming voice calls will be diverted.
Busy: When the lines are busy, all incoming voice calls will
be diverted.
All conditional: With above 3 conditions, all incoming voice
calls will be diverted (E).
All voice calls: All incoming voice calls will be diverted.
Fax calls
Fax calls will be diverted.
Data calls
Data calls will be diverted.
Cancel all
No calls will be diverted.
34
My Phone
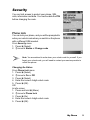
Security
You can limit access to protect your phone, SIM,
calls, information and data. You must enable the PIN
before changing the code.
Phone lock
You can lock your phone, and you will be prompted to
enter your unlock code when you switch on the phone
with a different SIM inserted.
From Security menu
1. Press < (Select)
2. 4 move to Status or Change code
Note: You are advised to write down your unlock code for yourself. If you
forget your unlock code, you will need to contact your service provider to
unlock the phone.
Changing the Status
From Phone lock menu
1. Press < (Select)
2. 4 move to On or Off
3. Press < (Select)
4. Enter the correct 4-digit unlock code
5. Press < (OK)
OR
In idle screen
1. Press and hold < (Menu)
2. 4 move to Phone lock
3. Press < (On)
4. Enter the correct 4-digit unlock code
5. Press < (OK)
My Phone
35
Changing the Unlock code
From Phone lock menu
1. 4 move to Change code
2. Press < (Select)
3. Enter old unlock code
4. Press < (OK)
5. Enter new unlock code
6. Press < (OK)
7. Enter new unlock code to verify
8. Press < (OK)
Call bar F
You can bar certain outgoing and/or incoming calls
using a password supplied by your service provider.
When updating/checking the Call bar status, the
phone must be registered to a network.
From Security menu
1. 4 move to Call bar
2. Press < (Select)
3. 4 move to the required function
4. Press < (Select)
Bar voice
You can bar Voice calls and select the type from
Incoming calls and/or Outgoing calls.
Bar data
You can bar Data calls and select the type from
Off, International calls except home,
International calls or All calls.
Cancel all
You can cancel all Call bar settings.
Change password
You can change the password.
36
My Phone
PIN
You can protect your SIM against unauthorised use.
Once you enable the PIN, you will be prompted to
enter the PIN code each time you switch on the
phone. You must enable the PIN before changing the
PIN code, and you must enter the PIN code to unable
the PIN.
From Security menu
1. 4 move to PIN
2. Press < (Select)
3. 4 move to Status or Change
4. Press < (Select)
Changing the PIN code
Ensure the PIN Status is On before changing the PIN code.
1. Enter old PIN code with # – ,
2. Press < (OK)
3. Enter new PIN code with # – ,
4. Press < (OK)
5. Enter new PIN code to verify
6. Press < (OK)
Changing the Status
1. 4 move to On or Off
2. Press < (Select)
3. Enter the PIN code with # – ,
4. Press < (OK)
PIN2
You cannot change the PIN2 code without the current
PIN2 code.
From Security menu
1. 4 move to PIN2
2. Press < (Select)
3. Enter old PIN2 code with # – ,
4. Press < (OK)
5. Enter new PIN2 code with # – ,
6. Press < (OK)
7. Enter new PIN2 code to verify
8. Press < (OK)
My Phone
37
Fixed dial E
The Fixed dial feature allows you to limit your
outgoing calls to a certain set of numbers saved in
FDN (Fixed Dial Numbers), which is located in your
SIM. When this function is on, only FDN can be
dialled, and any attempt to call other numbers will fail.
From Security menu
1. 4 move to Fixed dial
2. Press < (Select)
3. Enter SIM PIN2 code with # – ,
4. Press < (OK)
5. 4 move to On or Off
6. Press < (Select)
Network
You can select a Network that is available in your
current location.
From Phone settings menu
1. 4 move to Network
2. Press < (Select)
3. 4 move to New network or Search mode
4. Press < (Select)
New network
You can find a New network from the list.
Search mode
You can select an available network by Manual or
Automatic.
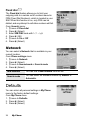
Defaults
You can return all personal settings in My Phone
menu to the factory default settings.
From My Phone menu
1. 4 move to Defaults
2. Press < (Select)
3. Press < (Select)
38
My Phone
Contacts
Contacts
list
page 40
Viewing the Contacts list ................................. 40
Viewing the entries in the Contacts list............ 40
Editing the Contacts list ................................... 41
Making a call using the Contacts list ............... 41
Sending messages from the Contacts list ....... 42
Deleting an entry from the Contacts list .......... 42
Copying an entry to the other Contacts list ..... 42
Create
page 43
Creating a new entry ....................................... 43
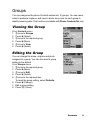
Groups
page 45
Viewing the Group........................................... 45
Editing the Group ............................................ 45
Memory
status
page 46
Copying all entries to the other Contacts list ... 46
My
numbers
page 47
Viewing My numbers ....................................... 47
Editing My numbers......................................... 47
Voicemail
page 48
Viewing Voicemail ........................................... 48
Editing Voicemail ............................................. 48
Hot key
dial
page 49
Assigning Hot keys.......................................... 49
Viewing Hot key dial list................................... 49
My
Contacts
page 49
You can store phone numbers in two locations: the SIM Contacts list and the
Phone Contacts list.
Note: See “Text Entry” on page 20 for information on entering text.
Contacts
39
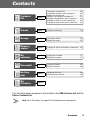
Contacts list
You can browse the SIM Contacts list and the Phone Contacts list
individually, or both Contacts list together.
Viewing the Contacts list
From Contacts menu
1. Press < (Select)
2. 4 move to the required entry
OR
Press the numeric key which contains the first
letter of the required name
Located in Phone Contacts list
Located in SIM Contacts list
Viewing the entries in the Contacts list
From Contacts list menu
1. 4 move to the required entry
OR
Press the numeric key which contains the first
letter of the required name
2. Press < (Menu)
3. Press < (Select)
40
Contacts
Editing the Contacts list
From Contacts list menu
1. 4 move to the required entry
OR
Press the numeric key which contains the first
letter of the required name
2. Press < (Menu)
3. 4 move to Edit
4. Press < (Select)
5. 4 move to the required item
6. Press < (Edit)
7. Edit an entry item
8. Press < (OK)
9. Press A (Save)
Note: SIM Contacts list can contain only Name, Tel number 1 and
Location No.
Making a call using the Contacts list
From Contacts list menu
1. 4 move to the required entry
OR
Press the numeric key which contains the first letter of the required name
2. Press C (Send)
From Contacts list menu
1. 4 move to the required entry
OR
Press the numeric key which contains the first letter of the required name
2. Press < (Menu)
3. 4 move to Call
4. Press < (Select)
Contacts
41
Sending messages from the Contacts
list
You can send messages via the Contacts list (see “Messages” on page 67).
From Contacts list menu
1. 4 move to the required entry
OR
Press the numeric key which contains the first letter of the required name
2. Press < (Menu)
3. 4 move to Create MMS or Create SMS/EMS
4. Press < (Select)
5. 4 move to the required item
6. Press < (Select)
7. Press A (Done)
Follow the steps in Messages (see “Messages” on page 67).
Deleting an entry from the Contacts list
From Contacts list menu
1. 4 move to the required entry
OR
Press the numeric key which contains the first letter of the required name
2. Press < (Menu)
3. 4 move to Delete
4. Press < (Select)
5. Press < (Yes)
Copying an entry to the other Contacts
list
From Contacts list menu
1. 4 move to the required entry
OR
Press the numeric key which contains the first letter of the required name
2. Press < (Menu)
3. 4 move to Copy
4. “Copy (entry name) to (SIM or Phone)?” is displayed
5. Press < (Yes)
42
Contacts
Create
SIM Contacts list: You can store Name, Tel number and Location No.
Phone Contacts list: You can store Name, 3 Tel numbers, 2 E-mail addresses,
Ringtone type, Group, Hot key dial, Photo, Note and Location No.
Creating a new entry
From Contacts menu
1. 4 move to Create
2. Press < (Select)
3. 4 move to SIM or Phone
4. Press < (Select)
5. 4 move to the required item
6. Press < (Edit)
7. Edit the entry item
8. Press < (OK)
9. Press A (Save)
From Contacts list menu
1. Press < (Menu)
2. 4 move to Create
3. Press < (Select)
4. 4 move to SIM or Phone
5. Press < (Select)
6. 4 move to the required item
7. Press < (Edit)
8. Edit the entry item
9. Press < (OK)
10. Press A (Save)
Contacts
43
From Contacts list menu
1. 4 move to [New entry]
2. Press < (Select)
3. 4 move to SIM or Phone
4. Press < (Select)
5. 4 move to the required item
6. Press < (Edit)
7. Edit the entry item
8. Press < (OK)
9. Press A (Save)
The following entry items are available:
Icon
44
Contacts
Item
Icon
Item
Name
Hot key dial
Tel number 1 – 3
Photo
E-mail address
1, 2
Note
Ringtone
Location in Phone
Contacts list
Groups
Location in SIM
Contacts list
Groups
You can categorise the phone Contacts entries into 10 groups. You can name,
select a particular ringtone, and insert a photo as an icon for each group to
identify incoming calls. This function is available with Phone Contacts list only.
Viewing the Group
From Contacts menu
1. 4 move to Groups
2. Press < (Select)
3. 4 move to the required group
4. Press < (Menu)
5. 4 move to View
6. Press < (Select)
Editing the Group
You can change the name, ringtone and photo
assigned to a group. You can also reset a group
setting to the default.
From Groups menu
1. 4 move to the required group
2. Press < (Menu)
3. 4 move to Edit
4. Press < (Select)
5. 4 move to the required item
To reset the group setting, select Defaults.
6. Press < (Change)
7. Edit a group setting
8. Press A (Save)
Contacts
45
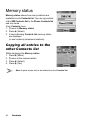
Memory status
Memory status shows how many locations are
available in each Contacts list. You can copy entries
of the SIM Contacts list to the Phone Contacts list
and vice versa.
From Contacts menu
1. 4 move to Memory status
2. Press < (Select)
3. 2 bars indicating Contacts list memory status
are displayed
(in use location(s)/maximum locations)
Copying all entries to the
other Contacts list
While displaying the Memory status
1. Press < (Menu)
2. 4 move to the required action
3. Press < (Select)
4. Press < (Yes)
Note: Original entries will not be deleted from the Contacts list.
46
Contacts
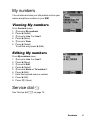
My numbers
You can store and view your information such as your
names and phone numbers in your SIM.
Viewing My numbers
From Contacts menu
1. 4 move to My numbers
2. Press < (Select)
3. 4 move to Line 1 or Line 2
4. Press < (Menu)
5. 4 move to View
6. Press < (Select)
To edit the entry press < (Edit).
Editing My numbers
From My numbers menu
1. 4 move to Line 1 or Line 2
2. Press < (Menu)
3. 4 move to Edit
4. Press < (Select)
5. 4 move to Name or Tel number 1
6. Press < (Edit)
7. Enter the required name or number
8. Press < (OK)
9. Press A (Save)
Service dial E
See “Service dial E” on page 12.
Contacts
47
Voicemail
You can store the phone number to your Voicemail
and make a call to check if you have Voicemail.
Viewing Voicemail
From Contacts menu
1. 4 move to Voicemail
2. Press < (Select)
3. Press < (Menu)
4. 4 move to View
5. Press < (Select)
To edit the entry press < (Edit).
Editing Voicemail
From Voicemail menu
1. Press < (Menu)
2. 4 move to Edit
3. Press < (Select)
4. 4 move to Name or Tel number 1
5. Press < (Edit)
6. Enter the required name or number
7. Press < (OK)
8. Press A (Save)
48
Contacts
Hot key dial
You can quickly dial the numbers which are assigned to each numeric key $
– , (see “Hot key dial” on page 11). This function is available with Phone
Contacts list only.
Assigning Hot keys
While editing the Contacts list entry
1. 4 move to <Hot key dial>
2. Press < (Edit)
3. Enter the required number $ – ,
4. Press < (OK)
Note: To clear the Hot key dial assignment of an entry, enter # instead
of the entry’s original Hot key dial number. Then press < (OK).
Viewing Hot key dial list
From Contacts menu
1. 4 move to Hot key dial
2. Press < (Select)
3. The Hot key dial list is displayed
My Contacts
You can select from All, SIM or Phone to display
the entries in the Contacts list entries.
From Contacts menu
1. 4 move to My Contacts
2. Press < (Select)
3. 4 move to All, SIM or Phone
4. Press < (Select)
Contacts
49
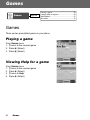
Games
Games
page 50
Playing a game ............................................... 50
Viewing Help for a game................................. 50
Wall Breaker.................................................... 51
Move Box ........................................................ 52
Games
There are two preinstalled games in your phone.
Playing a game
From Games menu
1. 4 move to the required game
2. Press < (Select)
3. Press < (Select)
Viewing Help for a game
From Games menu
1. 4 move to the required game
2. Press < (Select)
3. 4 move to Help
4. Press < (Select)
50
Games
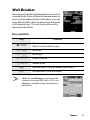
Wall Breaker
Move a board to deflect a ball towards rows of various
coloured bricks. Some of the bricks release power up
items, such as board extension, ball reduce, gun and
more. But be careful: there are some items that works
in the opposite way. The next level is achieved by
removing all the bricks.
Key operation
Key
Function
</(
Release a ball
Shoot (if your board has gun)
7/'
3/)
5/#
1/%
@
D
Move left
Move right
Pause/Continue
Suicide a ball
Exit and back to the Wall Breaker game menu
Quit and back to the idle screen
Note: You can Resume your game from the
moment you pressed @ (exit) or D (quit).
Resume is available as long as the phone is
switched on.
Games
51
Move Box
Arrange all the boxes into designated places.
You can only push the boxes and only one at a time.
So be careful not to push them into corners.
Key operation
Key
1/%
5/+
7/'
3/)
$
(
*
@
D
Function
Move up
Move down
Move left
Move right
Restart the current stage from the beginning
Return to the last step
Save the current game
Exit and back to the Move Box game menu
Quit and back to the idle screen
Note: You can Resume your game from the
point you pressed @ (exit) or D (quit).
Resume is available as long as the phone is switched on.
Meanwhile, if you have saved your game by pressing *,
you can Load your saved data to continue from the stage
you left off. The saved data is available even after the
phone is switched off.
52
Games
Browser
Starting the
Browser
page 53
Navigating contents......................................... 53
Using the Browser........................................... 54
Bookmarks
page 55
Managing Bookmarks in Browser ................... 55
Managing off-line Bookmarks.......................... 56
Settings
page 58
Editing GPRS Connection............................... 59
Editing CSD Connection ................................. 59
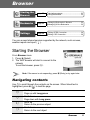
You can access Internet services supported by the network, such as news,
weather reports and sport (F).
Starting the Browser
From Browser menu
1. Press < (Select)
2. The WAP browser will start to connect to the
network
To exit the browser, press D.
Note: If the server is not responding, press < (Retry) or try again later.
Navigating contents
Use 0 to scroll through the contents on the screen. When linked text is
highlighted, press < ( ) to load the page.
1
5
7
3
Scroll up
Page up with Long press
Scroll down
Page down with Long press
Scroll up
Return to the previous object
Scroll down
Return to the next object
Browser
53
Using the Browser
While browsing the homepage
1. Press A (Menu) or C (Send)
2. 4 move to Browser Menu
To exit the browser, select Done
OR
Press D (Power/End) or @ ( )
3. Press < ( )
Menu
Description
Back
Return to the previous page.
Go To URL
Enter URL and jump to the homepage.
Home
Jump to the homepage which is pre-defined in the
browser settings.
Inbox
Store, view or delete WAP push messages from the
network. Jump to the home page.
Bookmarks
Jump to a page by setting a bookmark. Add the current
page to bookmarks (see “Managing Bookmarks
in Browser” on page 55).
Save Items
Save images or other items from the current page.
Snapshots
Capture the screen image of the current page and view
or delete it.
Reload
Reload and update the current page.
Settings
Select and set the following:
Homepage
Downloads
Restart Browser
Security
About...
Information about the browser type and security
options.
54
Browser
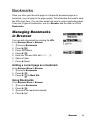
Bookmarks
Once you store your favourite page or a frequently accessed page as a
bookmark, you can jump to the page quickly. This eliminates the need to enter
the URL every time. You can also assign hot keys to jump to particular pages.
There are 2 types of bookmarks, one is in Browser and the other is off-line
Bookmarks.
Managing Bookmarks
in Browser
You can add a bookmark by entering the URL.
From Browser Menu in Browser
1. 4 move to Bookmarks
2. Press < ( )
3. Press A (Menu)
4. Press < ( )
5. Enter the Title and URL with # – ,
6. Select a folder
7. Press < (Save)
Adding a current page as a bookmark
From Browser Menu in Browser
1. 4 move to Bookmarks
2. Press < ( )
3. Press < ( ) to Mark Site
Using Bookmarks
From Browser Menu in Browser
1. 4 move to Bookmarks
2. Press < ( )
3. 4 move to the required bookmark
4. Press < (Go)
Browser
55
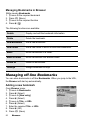
Managing Bookmarks in Browser
While viewing Bookmarks
1. 4 move to the required bookmark
2. Press A (Menu)
3. 4 move to the required function
4. Press < ( )
The following functions are available:
Details
Display and edit the bookmark information.
Delete
Delete the bookmark.
New Bookmark
Add a new bookmark.
New Folder
Add a new folder in which to save the bookmarks.
Move
Move a bookmark in a folder.
Move to folder
Move a bookmark into another folder.
Delete all
Delete all bookmarks.
Hotkeys
Assign bookmarks to keys.
Managing off-line Bookmarks
You can store bookmarks in off-line Bookmarks. When you jump to the URL,
the Browser will start up automatically.
Adding a new bookmark
From Browser menu
1. 4 move to Bookmarks
2. Press < (Select)
3. 4 move to [New entry]
4. Press < (Select)
5. 4 move to Title: or URL:
6. Press < (Select)
7. Enter the required Title: or URL:
8. Press < (OK)
9. Press A (Save)
56
Browser
Managing Bookmarks in off-line
Bookmarks
From Browser menu
1. 4 move to Bookmarks
2. Press < (Select)
3. 4 move to the required bookmark
4. Press < (Menu)
5. 4 move to the required function
6. Press < (Select)
The following functions are available:
Select
Jump to the selected bookmark site.
Edit
Edit the Title and URL.
Delete
Delete the bookmark.
Delete all
Delete all bookmarks.
Browser
57
Settings
Before accessing the Internet services, you need to
set up a subscription with your network operator or
Internet Service Provider (ISP) to enable the relevant
configuration information. If you have any trouble with
your network settings, please contact your network
service provider.
Note: Modifying default settings may cause failure of the Browser.
See “Personal Settings” on page 98, for your details.
From Browser menu
1. 4 move to Settings
2. Press < (Select)
3. 4 move to the required network
4. Press < (Select)
5. 4 move to Activate or Edit
To activate the selected network, select Activate.
To edit the network settings, select Edit.
6. Press < (Select)
7. 4 move to the required setting
8. Press < (Select)
You can edit the following settings:
•
•
•
•
•
•
•
•
Server name
Primary IP
Primary port
Secondary IP
Secondary port
Linger time
Homepage
Connection
In the Connection menu, you can edit GPRS and CSD connections.
See the following section for details.
58
Browser
Editing GPRS Connection
From Connection menu
1. 4 move to GPRS
2. Press < (Select)
3. Press < (Select) to Edit
•
Login name, Password, GPRS APN, Authentication
Editing CSD Connection
From Connection menu
1. 4 move to CSD
2. Press < (Select)
3. Press < (Select) to Edit
•
Login name, Password, Dial number, Call type,
Transfer rate
Browser
59
Camera
Camera
Appearance
page 60
Key functions................................................... 61
Status icons ..................................................... 62
Preview
mode
page 62
Launching the Camera Preview mode ............ 62
Operating the Camera..................................... 63
Options ............................................................ 63
Capture
mode
page 66
Camera Appearance
Camera lens
Self-portrait mirror
60
Camera
Key functions
Key
1
5
3
7
<
A
@
D
Function
Zoom in
Zoom out
Brightness up
Brightness down
Shutter/Options (Capture mode)
Options/Save a captured image
Exit the camera mode/Delete a captured image
Exit to the idle screen
Zoom in
Shutter
Cancel
Options
Brightness up
Brightness down
Zoom out
Camera
61
Status icons
Image size
Quality
Close up mode
Brightness
Zoom (only Wallpaper size)
Twilight mode
Preview mode
Launching the Camera Preview mode
•
•
In idle screen, press @ (
) (if Camera is selected as Shortcut key)
From main menu, press < Camera
Note: The quality of display images may vary depending on the object
or environment.
Note: Displayed images may distort when shooting moving objects
especially in a fast moving environment.
62
Camera
Operating the Camera
Brightness
In Preview mode
3 brightness up
7 brightness down
Zoom
In Preview mode
1 zoom in
5 zoom out
Taking a picture
In Preview mode
Press < (Shutter) to take a picture
Note: See “Image size” below for changing the size of images.
Options
In Preview mode
1. Press A (
)
The option menu is displayed.
2. 4 move to the required function
3. Press < (Select)
Image size
From options menu
1. Press < (Select)
2. 4 move to the required size
3. Press < (Select)
The following image sizes are available:
• Wallpaper size (128 × 128 pixels)
• CIF (352 × 288 pixels)
Camera
63
Close up mode
Close up mode can be used to take pictures at a close range.
From options menu
1. 4 move to Close up mode
2. Press < (Select)
3. 4 move to On or Off
4. Press < (Select)
Twilight mode
Twilight mode can be used to take pictures in low light conditions.
From options menu
1. 4 move to Twilight mode
2. Press < (Select)
3. 4 move to On or Off
4. Press < (Select)
Quality
You can choose the image quality of your picture.
From options menu
1. 4 move to Quality
2. Press < (Select)
3. 4 move to Fine, Normal or Economy
4. Press < (Select)
Effect
You can enjoy various effects on your picture.
From options menu
1. 4 move to Effect
2. Press < (Select)
3. 4 move to the required effect
4. Press < (Select)
The following effects are available:
•
•
•
•
•
•
64
Normal
Sunset
Monochrome
Inverse
Emboss
Cold
Camera
Self timer
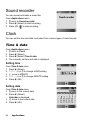
Self timer automatically takes a picture after a 10 second delay. After pressing
the shutter, a series of ringtone will begin. The picture will be taken when you
hear the shutter sound.
From options menu
1. 4 move to Self timer
2. Press < (Select)
3. 4 move to On or Off
4. Press < (Select)
Shutter sound
You can change the sound of the shutter.
From options menu
1. 4 move to Shutter sound
2. Press < (Select)
3. 4 move to the required sound
4. Press < (Select)
Anti flicker
If the display flickers, you can change Anti flicker to 50Hz or 60Hz. Choosing
50Hz or 60Hz is country dependent.
From options menu
1. 4 move to Anti flicker
2. Press < (Select)
3. 4 move to 50Hz or 60Hz
4. Press < (Select)
Note: When taking a picture, flicker may appear in certain environments.
Exit
Use to Exit the camera mode. You can also Exit by pressing D (Power/End)
anytime.
Camera
65
Capture mode
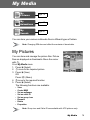
When you press the shutter, all images are saved in My Pictures (see “My
Media” on page 79). You can confirm and control the image before you save it.
In Capture mode
1. Press < (
)
2. 4 move to the required function
3. Press < (Select)
The following functions are available for a picture:
•
•
•
•
•
•
•
•
Create MMS
Set as wallpaper
Set as caller ID
Set as group ID
Effect (available only in Wallpaper size)
Rename
Properties
Delete
Note: When the memory of your phone is nearly full, it may take some
time to save the image and to Create MMS (to check available memory,
see “Memory status” on page 81).
66
Camera
Messages
Settings
page 67
Create
page 71
Inbox and
Outbox
page 72
Chat
SMS
page 73
User
messages
page 73
Cell
Broadcast
page 74
MMS settings ...................................................68
SMS/EMS settings...........................................69
Receiving messages........................................70
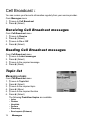
Receiving Cell Broadcast messages ...............74
Reading Cell Broadcast messages..................74
Topic list ...........................................................74
Languages .......................................................75
Your phone has various messaging features, including SMS/EMS and MMS.
You need to customise the settings of Messages and Network before you start.
SMS/EMS – You can send short text messages with media attached to phone
numbers whose network support SMS/EMS.
MMS – You can send media attached messages to phone numbers whose
network support MMS or E-mail address (F).
Settings
From Messages menu
1. 4 move to Settings
2. Press < (Select)
3. 4 move to MMS or SMS/EMS
4. Press < (Select)
Messages
67
MMS settings
Server list
You can configure up to 5 server profiles.
From Settings menu
1. Press < (Select)
2. Press < (Select)
3. 4 move to the required network
4. Press < (Select)
5. 4 move to Activate or Edit
6. Press < (Select)
To activate the selected network, select Activate.
To edit the network settings, select Edit.
7. 4 move to the required setting
8. Press < (Select)
You can edit the following settings:
•
•
•
•
•
•
•
•
68
Server name
Primary IP
Primary port
Secondary IP
Secondary port
Linger time
MMS centre
Connection
Messages
Other settings for MMS
Signature
You can set a signature to add to your message.
Reply text
You can select On or Off to add the reply text
to the messages.
Receive setting
You can select, accept or reject anonymous messages.
Auto reception
You can select On, Off or Interactive.
Mail settings
Validity period: Set the duration that your message
is stored at the message centre. Select Maximum
or Manual.
Delivery report: Request a report on the delivery
status of your message. Select On or Off.
Sender visibility: Select Show or Hide your address
to the recipient.
Restore settings
Reset the MMS settings to the factory default settings.
SMS/EMS settings
You can change the following settings:
Validity period
You can select from Defaults, 1 hour, 12 hours, 1 day,
1 week or Maximum.
Message centre
You can change the server’s service number.
Protocol
You can select the type of protocol from SMS, Fax,
Email, Paging, X.400, ERMES or Voice.
Delivery report
You can select from On, Off or Ask.
Messages
69
Receiving messages
When one or more messages arrive, New Message(s)! dialogue and the
message indicator ( ) will appear in the screen together with a message tone
(see “Message tone” on page 26).
Note: Please be sure to keep enough free memory for new messages.
When the phone memory is full, ( ) will be displayed in the upper left of the
display. Delete unnecessary messages from the Inbox or Outbox.
Reading received messages
When New Message(s)! is displayed, press < (Read). If you have more than
one message, use 4 to move to the required message.
If you press other keys without reading new messages, the idle screen will be
displayed. To read new received messages, press A ( ) and check the
Inbox.
The following functions are available for received messages:
Reply
Create a reply message to the sender.
Call
Call back to the sender.
Forward
Forward the selected message.
Chat
Send a chat message to the sender. (SMS only)
Extract number
Save the sender’s phone number in Contacts list.
Delete
Delete the message.
Delete all
Delete all messages in Inbox.
Extract media
Save the attached image in My Media.
Move to SIM
Move the message to the SIM memory. A (SMS only)
Message info
View information about the message.
70
Messages
Create
From Messages menu
1. Press < (Select)
2. 4 move to MMS or SMS/EMS
3. Press < (Select)
4. Enter message (see “Text Entry” on page 20)
5. Press < (Menu)
The following functions are available:
OK
When you are ready to send a message, select OK.
Add slide
Add new slide after the last slide. (MMS only)
Insert slide
Insert slide between slides. (MMS only)
Insert media
Insert media from My Pictures, My Animations
or My Sounds.
Previous/Next
slide
Move to the previous or next slide.
User msg.
Select pre-defined sentences and insert in the
message.
Add signature
Add signature to the message.
View
View and confirm the message before sending.
(MMS only)
Delete slide/
picture/animation/
sound
Delete the current displayed slide, picture, animation
or sound.
Set timer
Set a time and delay for sending (maximum
60 seconds) the message. (MMS only)
Select
Select text to be copied or cut.
Copy
Selected text is copied into text memory.
Cut
Selected text is deleted and stored in text memory.
Paste
Insert the copied or cut text from the text memory.
Messages
71
When you are ready to send a message, you need to edit the following items:
To:
Enter receiver’s phone number for SMS/EMS, phone number
or email address for MMS.
Cc:
Send carbon copied message to other receivers.
Bcc:
Send carbon copied message to other receivers and hide that
information.
Subj:
Enter a title for this message.
6. Press A (Menu)
7. 4 move to Send or Save
To send the message immediately, move to Send and press < (Select).
To save the message in Draft folder, move to Save and press < (Select).
8. Press < (OK)
Note: If a call comes in while you are creating an MMS message, the phone
may abort the message without saving it.
Note: When the memory is nearly full, your phone may take some time to
insert My Pictures to an MMS message, or may fail to save a new MMS
message (to check available memory, see “Memory status” on page 81).
Inbox and Outbox
You can store received messages in the Inbox and sent messages in the
Outbox.
From Messages menu
1. 4 move to Inbox or Outbox
2. Press < (Select)
The following folders are available in Outbox:
Draft
Save messages which are not ready for sending or template
messages.
Unsent
Messages which failed to send.
Sent
Successfully sent messages.
72
Messages
Chat SMS F
The Chat SMS feature enables you to read sent and
received messages on one screen while in the chat
mode with another party.
From Messages menu
1. 4 move to Chat SMS
2. Press < (Select)
3. 4 move to Start chat
To check the history, select History and press < (Select).
To clear the history, select Clear history and press < (Select).
4. Press < (Select)
5. Enter your nickname (up to 10 characters)
6. Press < (OK)
Then you can start chatting with the other party, providing he/she has
the Chat SMS facility on his/her phone.
7. Enter your message
8. Press < (OK)
9. 4 move to Phone number or Contacts
10. Press < (Select)
11. Enter or select a destination phone number
12. Press < (OK)
Your phone sends the message.
When receiving a message from the other party in chat mode, the text will
be displayed automatically above the last message.
13. Press < (OK) to continue the chat
User messages
You can add your original text in User messages.
From Messages menu
1. 4 move to User messages
2. Press < (Select)
3. 4 move to [New user msg]
4. Press < (Select)
5. Enter text (see “Text Entry” on page 20)
6. Press < (OK)
Messages
73
Cell Broadcast F
You can receive your favourite information regularly from your service provider.
From Messages menu
1. 4 move to Cell Broadcast
2. Press < (Select)
Receiving Cell Broadcast messages
From Cell Broadcast menu
1. 4 move to Receive
2. Press < (Select)
3. 4 move to On or Off
4. Press < (Select)
Reading Cell Broadcast messages
From Cell Broadcast menu
1. 4 move to Latest messages
2. Press < (Select)
3. 4 move to the required message
4. Press < (Read)
Topic list
Managing a topic
From Cell Broadcast menu
1. 4 move to Topic list
2. Press < (Select)
3. 4 move to the required topic
4. Press < (Menu)
5. 4 move to the required function
6. Press < (Select)
The following Predefined topics are available:
•
•
•
•
•
•
74
Index
Flashes
Hospitals
Doctors
Pharmacy
Road reports (Distance)
Messages
•
•
•
•
•
•
•
•
•
•
Road reports (Local)
Taxis
Weather
District
Network information
Operator services
Directory enquiries (National)
Directory enquiries (International)
Customer care (National)
Customer care (International)
Adding a new topic
From Cell Broadcast menu
1. 4 move to Topic list
2. Press < (Select)
3. Press < (Menu)
OR
4 move to [New channel] and press < (Menu)
4. Press < (Select) to Insert
5. 4 move to Predefined topics or Manual
6. Press < (Change)
7. To select from Predefined topics,
4 move to the required topics
OR
To enter Channel no: manually,
Enter Channel no:
8. Press < (Select)
Languages
You can select the language of the message you
receive.
From Cell Broadcast menu
1. 4 move to Languages
2. Press < (Select)
3. 4 move to the required language set
4. Press < (Change)
5. 4 move to the required language
6. Press < (Select)
Messages
75
Calendar
Viewing the
Calendar
page 76
Moving the cursor............................................ 76
Creating a reminder ........................................ 77
Reminder list ................................................... 77
You can organise your calendar to remind you of a personal event, such as
a holiday period or birthday. You need to set the clock, day and time before
entering anything in the calendar.
Viewing the Calendar
In idle screen
1. Press < (Menu)
2. 0 move to Calendar
3. Press <
OR
In idle screen
Press 7 to display Calendar
Moving the cursor
When the Calendar is displayed, the cursor is on the current day. Press 0 to
move the cursor to a different day. To display the next/previous month, place
the cursor on the Month and press 4. To display the next/previous year, place
the cursor on the Year and press 4.
76
Calendar
Creating a reminder
On Calendar
1. 0 move to the required date
2. Press < (OK)
3. Set HOUR with # – ,
OR
4 to set HOUR
4. 2 move to MINUTE
5. Set MINUTE with # – ,
OR
4 to set MINUTE
6. Press < (OK)
7. Enter a title of the event
OR
On Calendar
1. Press A (List)
2. 4 move to [New event]
3. Press < (Select)
Follow the step 1 – 7 above.
Reminder list
Viewing a reminder
On Calendar
1. Press A (List)
2. 4 move to the required entry
3. Press < (View)
Editing a reminder
On Calendar
1. Press A (List)
2. 4 move to the required entry
3. Press < (View)
4. Press < (Edit)
See “Creating a reminder” above.
Calendar
77
Deleting a reminder
On Calendar
1. Press A (List)
2. Press A (Del.)
3. Press < (Yes) to delete
OR
Press @ (No) not to delete
78
Calendar
My Media
My
Pictures
page 79
My
Animations
page 80
My
Sounds
page 81
You can store your various multimedia files in different types of folders.
Note: Changing SIM does not affect the contents of stored data.
My Pictures
You can store and manage the picture files. Picture
files are displayed as thumbnails. Move the cursor
with 0.
From My Media menu
1. Press < (Select)
2. 0 move to the required picture
3. Press < (View)
OR
Press A (Menu)
4. 4 move to the required function
5. Press < (Select)
The following functions are available:
•
•
•
•
•
•
•
•
View
Create MMS
Set as wallpaper
Set as caller ID
Set as group icon
Rename
Delete
Properties
Note: Group icon and Caller ID are available with JPG pictures only.
My Media
79
My Animations
You can store and manage the animation files.
Animation files are displayed as thumbnails. Move
the cursor with 0.
From My Media menu
1. 4 move to My Animations
2. Press < (Select)
3. 0 move to the required animation
4. Press < (View)
OR
Press A (Menu)
5. 4 move to the required function
6. Press < (Select)
The following functions are available:
•
•
•
•
View
Rename
Delete
Properties
Note: Only GIF format animations are available with your phone.
80
My Media
My Sounds
You can store sound files and manage them.
From My Media menu
1. 4 move to My Sounds
2. Press < (Select)
3. 4 move to the required sound
Sound files are played automatically.
4. Press < (Play) to play again
OR
Press A (Menu)
5. 4 move to the required function
6. Press < (Select)
The following functions are available:
•
•
•
•
•
Play
Create MMS
Rename
Delete
Properties
Memory status
You can check the Memory status occupied by media files.
From My Media menu
1. 4 move to Memory status
2. Press < (Select)
Note: To obtain maximum performance from your phone, control the number
of files for free memory space.
My Media
81
Applications
Games
page 83
Alarms
page 83
Sound
recorder
page 84
Clock
page 84
Auto
power on
page 85
Auto
power off
page 86
Calculator
page 86
Conversion ...................................................... 87
Currency rate .................................................. 87
Melody
composer
page 88
Composing a melody....................................... 88
Setting the Alarms ........................................... 83
Time & date ..................................................... 84
Format ............................................................. 85
Your phone contains a number of preinstalled applications.
82
Applications
Games
See “Games” on page 50.
Alarms
You can set 3 sets of alarms to sound or vibrate when the set time is reached.
Note: If the phone is switched off at the alarm set time, the phone will switch
on automatically and the alarm will sound. The phone remains on after the
alarm.
Setting the Alarms
From Applications menu
1. 4 move to Alarms
2. Press < (Select)
3. 4 move to the required alarm set
4. Press < (Select)
5. 4 move to the required type of alarm
To cancel the alarm setting, select Cancel.
6. Press < (Select)
7. # – , or 4 move and set HOUR
8. 2 move to the MINUTE
9. # – , or 4 move and set MINUTE
10. Press < (OK)
The following types of alarm frequency are available:
•
•
•
•
•
Time
Once
Daily
Mon to Fri
Mon to Sat
You can select the alarm tone from Melody.
When an alarm sounds, the chosen melody will be heard and the display will
flash with an alarm message. The alarm will sound for 55 seconds.
To end the alarm, press any key.
Applications
83
Sound recorder
You can record and make a sound file.
From Applications menu
1. 4 move to Sound recorder
2. Press < (Select) to start recording
3. Press @ ( ) to stop recording
Clock
You can set the time and date, and select from various types of clock formats.
Time & date
From Applications menu
1. 4 move to Clock
2. Press < (Select)
3. Press < (Select) Time & date
4. The currently set time and date is displayed
Setting time
From Time & date menu
1. Press < (Select)
2. # – , or 4 to change HOUR setting
3. 2 move to MINUTE
4. # – , or 4 to change MINUTE setting
5. Press < (OK)
Setting date
From Time & date menu
1. 4 move to the current date
2. Press < (Select)
Calendar is displayed
3. 0 move to the current date
4. Press < (OK)
84
Applications
Format
From Clock menu
1. 4 move to Format
2. Press < (Select)
3. 4 move to the required format
4. Press < (Select)
Auto power on
You can set Auto power on and automatically
switch on the phone at the set time.
Note: Even if the phone is switched off at the set Auto power on time,
the phone will switch on automatically.
From Applications menu
1. 4 move to Auto power on
2. Press < (Select)
3. # – , or 4 to change HOUR setting
4. 2 move to MINUTE
5. # – , or 4 to change MINUTE setting
6. Press < (OK)
7. 4 move to the required setting
8. Press < (Select)
Applications
85
Auto power off
You can set Auto power off and automatically switch
off the phone at the set time.
From Applications menu
1. 4 move to Auto power off
2. Press < (Select)
3. # – , or 4 to change HOUR setting
4. 2 move to MINUTE
5. # – , or 4 to change MINUTE setting
6. Press < (OK)
7. 4 move to the required setting
8. Press < (Select)
Calculator
You can use the 4-function calculator (addition,
subtraction, multiplication and division) for simple
arithmetic operations.
From Applications menu
1. 4 move to Calculator
2. Press < (Select)
3. Enter a number with # – ,
(maximum 8 digits)
If a decimal point is required, press ".
Press C to add “ - ” if needed
4. Press ! to select an arithmetic operation
5. Enter a number (maximum 8 digits)
6. Press < ( )
86
Applications
Conversion
You can convert from/to a home currency using
a currency rate.
On Calculator
1. Enter a number with # – ,
(maximum 8 digits)
2. Press A (Menu)
3. 4 move to Conversion
4. Press < (Select)
Calculated amount is displayed.
Currency rate
You can set currency rate to convert to/from
a particular currency.
On Calculator
1. Press A (Menu)
2. 4 move to Currency rate
3. Press < (Select)
4. Enter a number with # – , up to 6 decimal
places
5. Press < (OK)
Applications
87
Melody composer
You can compose your own melody and store it as a sound file.
From Applications menu
1. 4 move to Melody composer
2. Press < (Select)
Composing a melody
You can play a melody while composing.
From Melody composer menu
1. Press < (Change)
2. Enter required notes with # – ,, " and !
3. Press < (OK)
4. 4 move to Name:
5. Press < (Change)
6. Enter a name for the melody
7. Press < (OK)
8. Press A (Save)
Key
$
%
&
'
(
)
*
Note
C
D
E
F
G
A
B
Key
+
,
#
"
!
Note
Rest
Note
length
Set
octave
Dotted
Note
Sharp
Format of the Notes
•
•
•
•
•
•
88
The notes appear in a format like 2C4 by pressing $.
The first number (“2” in this case) indicates the note octave. The default value is 2.
Press # to change the octave from 1 to 3.
The third character (“4” in this case) indicates the note length. The default value is
1/4. Press , to change the note length from 1 to 1/32.
To enter dotted notes (i.e. notes extended in length), press ".
To add sharp values to notes, press !.
To enter rests, press +.
Applications
Accessory
PC Software
The CD-ROM supplied with your phone contains software applications which
allow you to manage the information in your phone from a Personal Computer
(PC), and to enable your PC to communicate with the Internet through your
phone.
These applications include:
Data Connection Assistant Software
The Panasonic Data Connection Assistant Software allows you to connect a
laptop or desktop PC to the Internet and other network services via your mobile
phone. For further information, please refer to the documentation on the CDROM, or to the Panasonic website www.panasonicmobile.com.
Handset Manager
With Handset Manager you can easily manage your phone information on a PC
and synchronise it back to the phone. This information includes contacts,
messages, the calendar and image or sound data stored in your phone. For
further information, please refer to the documentation on the CD-ROM, or to the
Panasonic website www.panasonicmobile.com.
Note: A USB data cable must be purchased separately for connecting your
phone to a PC. (See “Data Cable” on page 91.)
Installing the Software
The software is compatible with PCs and laptops running Microsoft Windows™
98 or later. On most PCs, the software should auto-install when the CD-ROM is
inserted into the CD drive. If not, then autoplay must be manually selected in
Windows Explorer. Follow the instructions that appear on the PC screen to
install the software.
Downloading software upgrades
1.
2.
3.
4.
5.
Browse www.panasonicmobile.com
Select region and language
Select Support > Software from the menu
Click “Data Connection Assistant Software” or “Handset Manager”
Follow the instructions to download the PC software upgrade
Note: Web contents may change without notice.
Accessory
89
Accessory Options
Fast Travel Charger
Carry a lightweight portable charger wherever you go to ensure you always
have the power to talk. Each charger type is only available in the country/region
of use.
EB-CAX500EU
EB-CAX500UK
Battery
Double your talk time by having a spare battery.
90
Accessory
EB-BSX500
Personal Handsfree
EB-EMD35
Talk and move while keeping your hands free by
using this accessory. Just place the earpiece in your
ear and the adaptor in the side of the handset – and
talk!
Data Cable
EB-USX500
Use this to connect your phone to a PC so you can
transfer data between them.
Car Charger
EB-CDG60
Top up your battery in your vehicle by attaching this
accessory to your phone and to the cigarette lighter
socket.
Accessory
91
Troubleshooting
Should any problem persist, contact your dealer.
Problem
Cause
Remedy
Check that the battery
is fully charged and
correctly connected
to the phone.
Phone will not switch
on.
Extremely short
battery life for a new
battery.
The network you are
using and the condition
of the battery can affect
battery life.
Short battery life for
an old battery.
The battery has worn
out.
Replace with a new fully
charged battery.
The battery level
indicator does not
appear and the
phone cannot be
switched on when
charging.
The battery is not
attached to the phone or
when the battery has
been deeply discharged
the phone will take a
short time until the
indicator lights.
Leave the phone
charging the battery for
a few minutes before
the indicator is lit and
attempting to switch
it on.
The battery is not
attached to the phone.
Battery fails to
charge.
The battery has been
connected to the phone
after the fast travel
charger has been
switched on.
The battery has been
deeply discharged. The
phone will take a short
time until indicator lights.
92
Troubleshooting
Ensure the battery is
fitted to the phone prior
to commencing
charging.
Leave the phone
charging the battery for
a few minutes before
the indicator is lit and
attempting to switch
it on.
Problem
Calls cannot be
made.
Cause
Remedy
The phone is locked.
Unlock the phone.
Outgoing calls are
barred.
Disable outgoing call
barring, or barred dial.
The phone is not
registered to a network.
Move to a coverage area
and operate your phone
after it has registered
with a network.
Check whether your SIM
supports Fixed Dial.
Check if the Fixed Dial
is switched on.
Check whether the
phone number is stored
in the Fixed Dial.
Calls cannot be
made from Fixed
Dial Store.
The phone is not
switched on.
Switch the phone on.
Incoming calls are
barred.
Disable incoming call
barring.
The phone is not
registered to a network.
Move to a coverage area
and operate your phone
after it has registered
with a network.
Emergency calls
cannot be made.
You are not in a GSM
coverage area.
Check that the antenna
symbol
is displayed –
move to a coverage area
and operate your phone
when the antenna
symbol is displayed.
Phone numbers
cannot be recalled
from Contacts.
The phone is locked.
Unlock the phone.
Phone number has been
restricted.
Switch off restriction.
Calls cannot be
received.
Troubleshooting
93
Important Error Messages
Capacity full!
The message area is full. Your messages cannot be
stored until some of the currently stored messages
are deleted.
Function
unavailable
The selected feature is either not supported by the
SIM or is not available with the current subscription –
contact your Service Provider.
Incorrect: xx tries
left
The entered code is incorrect – re-enter the code
correctly.
Insert SIM
The phone has detected a problem with the SIM –
switch the phone off and then back on; if the
message is still displayed contact your Service
Provider.
Invalid SIM
The SIM is blocked because one of the PIN/PIN2
unblocking keys (PUK/PUK2) has been entered
incorrectly ten times – contact your Service Provider.
Capacity full!
A message has been received, but the message
store is full – to receive messages, delete some
of the currently stored messages or set messages
to Auto Delete (MMS only).
Password
incorrect: Try again
The SIM has failed one or more of the SIM
personalisation checks – contact your Service
Provider.
Phone number too
long (Max:20)
The edited or newly created Contacts number is too
long for the SIM.
PIN2 must be
unblocked
The PIN2 is blocked permanently because the wrong
PUK2 has been entered ten times. Services
controlled by PIN2 cannot be used – contact your
Service Provider.
Unlock code
incorrect. try again.
On changing the phone lock code, verification of the
new code is incorrect – retry changing the lock code
with correct verification.
Disabling or enabling the lock code has failed due to
incorrect entry of the lock code – re-enter lock code.
94
Important Error Messages
Unregistered SIM
The network has detected an authentication failure
because your SIM is not registered with that network
– contact your Service Provider.
Important Error Messages
95
Glossary of Terms
APN
Access Point Name. Directs the user to the gateway
or the required service.
CHAP
Challenge Handshake Authentication Protocol. A security
feature in the GPRS network.
Copy
Copies selected text from short text message without
removing it from the original message.
CSD
Circuit Switched Data. A communication method used
to transmit data over telephone connections.
Cut
Permanently removes selected text from short text
message.
DTMF Tones
Dual Tone Multi-Frequency tones allow you to
communicate with computerised phone systems, voice
mailboxes etc.
EMS
Enhanced Message Service. Upgraded feature of Text
Messages.
GPRS
General Packet Radio Service. A GSM data transmission
technique that transmits and receives data in packets
rather than setting up a continuous channel. It makes
very efficient use of available radio spectrum and users
pay only for the volume of data sent and received.
GSM
Global System for Mobile Communications. The name
given to the advanced digital technology that your phone
uses.
MMS
Multimedia Messaging Service. Attach images and music
to text message.
Network
Operator
The organisation responsible for operating a GSM
network.
PAP
Password Authentication Protocol. A security feature
in the GPRS network.
Password
Used to control Call Bar. Supplied by your Service
Provider.
96
Glossary of Terms
PIN
Personal Identification Number used for SIM security.
Supplied by your Service Provider. If the PIN is entered
incorrectly 3 times, the PIN will be blocked.
PIN2
Personal Identification Number used to control the Fixed
Dial Store and Call Charge metering. Supplied by your
Service Provider. If the PIN2 is entered incorrectly 3
times, the PIN2 will be blocked.
PUK/PUK2
PIN/PIN2 Unblocking Key. Used to unblock the PIN/
PIN2. Supplied by your Service Provider. If the PUK/
PUK2 is entered incorrectly 10 times, the PUK/PUK2
will be blocked.
Registration
The act of locking on to a GSM/GPRS network. This
is usually performed automatically by your phone.
Roaming
The ability to use your phone on networks other than
your Home network.
Service
Provider
The organisation responsible for providing access
to the GSM/GPRS network.
SIM
Subscriber Identity Module. A small smart-card which
stores unique subscriber and user-entered information
such as Contacts and Short Messages. Supplied by your
Service Provider.
SMS
Short Message Service. A basic mail system used for
cellular phones. This service allows sending/receiving
of short text messages.
WAP
Wireless Application Protocol. The communication
standard which enables you to download resources
from the Internet to your phone.
Glossary of Terms
97
Personal Settings
Use the table below to record your GSM/GPRS WAP settings.
Item
Hint
WAP setting
Primary IP
Primary port
Secondary IP
Secondary port
Timer
Homepage
Connections
GPRS
Login name
Password
GPRS APN
Authentication
None/PAP
CSD
Login name
Password
Phone number
Call type
Transfer rate
98
Personal Settings
Analog/ISDN
Automatic/9600
Current setting
Index
A
Accessory ............................................. 89
Active line ............................................. 32
Alarms ........................................3, 31, 83
Alerts .................................................... 27
All calls, Call services ........................... 32
Answered call, Recent calls ................. 10
Answering, Incoming call ..................... 12
Anti flicker, Camera .............................. 65
APN ...................................................... 96
GPRS APN .................................. 59
Appearance
Camera ........................................ 60
Phone body .................................... 1
Applications .................................... 22, 82
Asterisk key ........................................ 1, 2
Authentication, GPRS .......................... 59
Auto answer ................................... 13, 30
Auto power off ...................................... 86
Auto power on ...................................... 85
Auto reception, MMS ............................ 69
B
Backlight time ....................................... 29
Battery .............................................. 4, 90
Battery cover .......................................... 1
Battery level indicator ............................. 5
Bookmarks ........................................... 55
Bookmarks in Browser ......................... 55
Brightness, Camera ....................... 62, 63
up/down ....................................... 61
Browser ................................................ 22
Settings ........................................ 58
C
Calculator ....................................... 31, 86
Calendar ...................................22, 31, 76
Creating a reminder ..................... 77
Moving the cursor ........................ 76
Reminder list ................................ 77
Call bar ................................................. 36
Call diverts ....................................... 3, 34
Call meters, Service charges ............... 33
Call services ......................................... 32
Call type, CSD ...................................... 59
Call waiting .....................................15, 32
End and answer ........................... 15
Ending both connections .............. 17
Ending one connection ................. 17
Hold and answer .......................... 15
Caller ID ............................................... 79
Caller’s ID .......................................13, 32
Calls ..................................................... 32
Camera .....................................22, 31, 60
Capture mode ............................... 66
Preview mode ............................... 62
Shutter .......................................... 61
Status icons .................................. 62
Camera lens .....................................1, 60
Cancel, Camera ................................... 61
Capture mode, Camera ........................ 66
Car Charger (EB-CDG60) .................... 91
Cell Broadcast, Messages .................... 74
Centre key ......................................1, 2, 3
Change mode, Camera ........................ 63
CHAP ................................................... 96
Charging connector ................................ 1
Chat SMS ............................................. 73
Clock .................................................... 84
Close up mode, Camera ................62, 64
Colour themes ...................................... 28
Conference ........................................... 18
Connections
Call services ................................. 33
MMS ............................................. 68
Contacts .........................................22, 31
Contacts list .......................................... 40
Accessing while on a call ............. 13
Making a call ................................ 11
Memory status .............................. 46
Conversion ........................................... 87
Copy ..................................................... 96
Cost left, Service charges .................... 33
Create
Contacts list .................................. 43
Messages ..................................... 71
CSD ................................................59, 96
Index
99
Currency rate ........................................87
Cut ........................................................96
D
Data Connection Assistant Software ....89
Date ......................................................84
Defaults, My Phone ...............................38
Delivery report
MMS .............................................69
SMS/EMS .....................................69
Dial number, CSD .................................59
Display ............................................. 1, 28
Draft folder, Messages ..........................72
DTMF Tones .................................. 19, 96
E
Earpiece ..................................................1
Effect, Camera ......................................64
E-mail address, Contacts list ................44
Emergency calls ......................................9
EMS ............................................... 69, 96
Create from Contacts list ..............42
Settings .........................................69
End key .............................................. 1, 2
Ending a call ...........................................9
Error Messages .....................................94
Exit, Camera .................................. 61, 65
F
Fast Travel Charger (EB-CAX500xx) ....90
Fixed dial ...............................................38
Flashing ..................................................3
G
Games ...............................22, 31, 50, 83
Glossary of Terms .................................96
GPRS ......................................... 3, 59, 96
Greeting ................................................28
Groups ..................................................45
Groups (Status Icons) ...................44
Set as group icon ..........................79
GSM ................................................. 3, 96
100
Index
H
Handset Manager ................................. 89
Handsfree ............................................. 14
Hash key ............................................ 1, 2
Holding call ........................................... 14
Hot key dial .......................................... 49
Hot key dial (Status Icon) ............. 44
Making a call ................................ 11
I
Idle screen .............................................. 3
Image size, Camera ............................. 62
Inbox, Messages .................................. 72
In-call operations .................................. 13
Incoming call ........................................ 12
International calls ................................. 11
International calls except home
Bar data ........................................ 36
K
Key backlight ........................................ 29
Key guard ............................................... 8
Key tone ............................................... 26
L
Language
Cell Broadcast, Messages ........... 75
Display ......................................... 30
Last call
Call services ................................. 32
Recent calls .................................. 10
Left soft key ....................................1, 2, 3
Linger time, MMS ................................. 68
Location
Phone Contacts list ...................... 44
SIM Contacts list .......................... 44
Login name
CSD .............................................. 59
GPRS ........................................... 59
Long press ........................................... 31
Low battery power warning .................... 5
M
Mail settings, MMS ............................... 69
Main Menu ........................................... 22
Making a call .......................................... 9
Max cost, Service charges ................... 33
Melody composer ................................. 88
Memory
Memory status, Contacts list ........ 46
My Media ..................................... 81
Message centre
MMS ............................................. 68
SMS/EMS .................................... 69
Message tone ....................................... 26
Messages ....................................... 22, 67
Cell Broadcast .............................. 74
Inbox ............................................ 72
Outbox ......................................... 72
Send from Contacts list ................ 42
Sending while on call ................... 14
Settings ........................................ 67
Microphone ............................................ 1
MMS ..................................................... 96
Create from Contacts list ............. 42
MMS settings ............................... 68
Server list ..................................... 68
Mobile lock ............................................. 8
Multi-party call ...................................... 18
My Animations ...................................... 80
My Contacts ......................................... 49
My Media ..................................22, 31, 79
My numbers ......................................... 47
My Phone ....................................... 22, 23
My Pictures .......................................... 79
My Sounds ........................................... 81
N
Navigating contents .............................. 53
Navigation key .................................... 1, 2
Network
New network ................................ 38
Search mode ................................ 38
Network dependent ................................ 2
Network Operator ................................. 96
Note, Contacts list ................................ 44
Notes, Melody format ........................... 88
Numeric keys .......................................... 2
O
Operator notice ..................................... 29
Outbox, Messages ............................... 72
Draft folder .................................... 72
Sent folder .................................... 72
Unsent folder ................................ 72
P
PAP ...................................................... 96
Part Names ............................................ 1
Password .............................................. 96
CSD .............................................. 59
GPRS ........................................... 59
PC Software ......................................... 89
Downloading ................................. 89
Installing ....................................... 89
Personal Handsfree .............................. 90
Personal Handsfree Connector ...... 1
Phone ................................................... 40
Phone lock ............................................ 35
Phone settings ...................................... 32
PIN .................................................37, 97
PIN2 ...............................................37, 97
Playing, Games .................................... 50
Power key ...........................................1, 2
Preview mode, Camera ........................ 62
Camera preview mode ................. 62
Price unit, Service charges ................... 33
Primary IP, MMS .................................. 68
Primary port, MMS ............................... 68
Profiles (Sounds) .................................. 24
Meeting ......................................... 24
Normal .......................................... 24
Outdoor ........................................ 24
Quiet ............................................. 24
Protocol, SMS/EMS .............................. 69
PUK ...................................................... 97
PUK2 .................................................... 97
Index
101
Q
Quality, Camera ............................. 62, 64
Quiet key .................................................1
R
Receive settings, MMS .........................69
Receiving messages .............................70
Recent calls ..........................................10
Registration ...........................................97
Rejecting
A new call .....................................16
Incoming call .................................13
Reminder list, Calendar ........................77
Reminder, Calendar ..............................77
Reply text, MMS ....................................69
Restore settings, MMS ..........................69
Right soft key ................................. 1, 2, 3
Ringtone ........................................... 3, 26
Roaming ........................................... 3, 97
S
Save, Camera .......................................61
Second call ...........................................16
Secondary IP, MMS ..............................68
Secondary port, MMS ...........................68
Security .................................................35
Self timer, Camera ................................65
Self-portrait mirror ............................ 1, 60
Send key ............................................ 1, 2
Sender visibility, Messages ...................69
Sent folder, Messages ..........................72
Server list, MMS ....................................68
Server name, MMS ...............................68
Service charges ....................................33
Service dial .................................... 12, 47
Service Provider ....................................97
Settings
Alarms ...........................................83
Browser .........................................58
EMS ..............................................69
Messages .....................................67
MMS .............................................68
Phone settings ..............................32
102
Index
Restore MMS settings .................. 69
SMS ............................................. 69
Shift key ............................................. 1, 2
Short press ........................................... 31
Shortcut key ......................................... 31
Show my number ................................. 33
Shutter sound, Camera ........................ 65
Shutter, Camera ................................... 61
Signature, MMS ................................... 69
SIM .............................................6, 40, 97
Attaching ........................................ 6
Removing ....................................... 6
SIM dependent ....................................... 2
SMS ..................................................... 97
Create from Contacts list .............. 42
Settings ........................................ 69
Sound recorder .............................. 31, 84
Sounds ................................................. 25
Start Browser ....................................... 31
Status icons ............................................ 3
Status icons, Camera ........................... 62
STK (SIM Tool Kit) ............................... 22
Swapping call ....................................... 17
Switching On/Off .................................... 7
T
Text Entry ............................................. 20
Example ....................................... 20
Extended ...................................... 20
Greek ........................................... 20
Normal .......................................... 20
Numeric ........................................ 20
T9® ............................................... 20
Time ..................................................... 84
Time & Date ......................................... 84
Topic list, Cell Broadcast ...................... 74
Transfer rate, CSD ............................... 59
Trouble Shooting .................................. 92
Twilight mode, Camera .................. 62, 64
T9® Text Input ...................................... 21
U
Unanswered call, Incoming call ............ 12
Unanswered call, Recent calls ............. 10
Unsent folder, Messages ..................... 72
USB data cable ..........................3, 89, 91
User messages .................................... 73
V
Validity period
MMS ............................................. 69
SMS/EMS .................................... 69
Vibration ................................................. 3
Voicemail .......................................... 3, 48
Volume ...........................................13, 25
W
Wallpaper .......................................28, 79
WAP ..................................................... 97
Warning tone ........................................ 27
Withhold ID ........................................... 32
Z
Zoom, Camera ...............................62, 63
Index
103
Note
104
Note
Note
Note
105
Note
106
Note
Panasonic_X100_O/I
X100EN1CP1
Operating Instructions Part 1
Digital Cellular Phone
All screen images in this manual are simulated.
Some phone colours may not be available in every country.
Mobile Phone
Panasonic Mobile & Automotive Systems Czech s.r.o.
Pardubice, Czech Republic
Printed in Czech Republic
Before operating this handset, please read these
instructions (parts 1 and 2) completely.
Charge battery before operation.