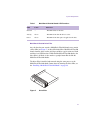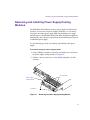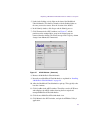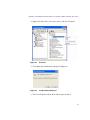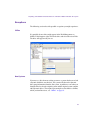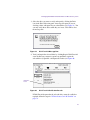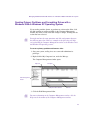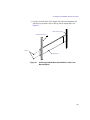
1
Avid® MediaDock™ Ultra320
Setup and User’s Guide
m a k e m a n a g e m ove | m e d i a ™
Avid
®
Copyright and Disclaimer
Product specifications are subject to change without notice and do not represent a commitment on the part
of Avid Technology, Inc. The software described in this document is furnished under a license agreement.
You can obtain a copy of that license by visiting Avid's Web site at www.avid.com. The terms of that license
are also available in the product in the same directory as the software. The software may not be reverse
assembled and may be used or copied only in accordance with the terms of the license agreement. It is
against the law to copy the software on any medium except as specifically allowed in the license
agreement. Avid products or portions thereof are protected by one or more of the following United States
patents: 4,746,994; 4,970,663; 5,045,940; 5,267,351; 5,309,528; 5,355,450; 5,396,594; 5,440,348;
5,452,378; 5,467,288; 5,513,375; 5,528,310; 5,557,423; 5,568,275; 5,577,190; 5,584,006; 5,640,601;
5,644,364; 5,654,737; 5,715,018; 5,724,605; 5,726,717; 5,729,673; 5,745,637; 5,752,029; 5,754,851;
5,799,150; 5,812,216; 5,852,435; 5,883,670; 5,905,841; 5,929,836; 5,929,942; 5,930,445; 5,946,445;
5,987,501; 5,995,115; 6,016,152; 6,018,337; 6,023,531; 6,035,367; 6,038,573; 6,058,236; 6,061,758;
6,091,778; 6,105,083; 6,118,444; 6,128,001; 6,130,676; 6,134,607; 6,137,919; 6,141,007; 6,141,691;
6,157,929; 6,198,477; 6,201,531; 6,211,869; 6,223,211; 6,239,815; 6,249,280; 6,269,195; 6,301,105;
6,317,158; 6,317,515; 6,327,253; 6,330,369; 6,351,557; 6,353,862; 6,357,047; 6,392,710; 6,404,435;
6,407,775; 6,417,891; 6,426,778; D396,853; D398,912. Additional U.S. and foreign patents pending. No
part of this document may be reproduced or transmitted in any form or by any means, electronic or
mechanical, including photocopying and recording, for any purpose without the express written permission
of Avid Technology, Inc.
Copyright © 2003 Avid Technology, Inc. and its licensors. All rights reserved.
The following disclaimer is required by Apple Computer, Inc.
APPLE COMPUTER, INC. MAKES NO WARRANTIES WHATSOEVER, EITHER EXPRESS OR IMPLIED,
REGARDING THIS PRODUCT, INCLUDING WARRANTIES WITH RESPECT TO ITS
MERCHANTABILITY OR ITS FITNESS FOR ANY PARTICULAR PURPOSE. THE EXCLUSION OF
IMPLIED WARRANTIES IS NOT PERMITTED BY SOME STATES. THE ABOVE EXCLUSION MAY NOT
APPLY TO YOU. THIS WARRANTY PROVIDES YOU WITH SPECIFIC LEGAL RIGHTS. THERE MAY BE
OTHER RIGHTS THAT YOU MAY HAVE WHICH VARY FROM STATE TO STATE.
The following disclaimer is required by Sam Leffler and Silicon Graphics, Inc. for the use of
their TIFF library:
Copyright © 1988–1997 Sam Leffler
Copyright © 1991–1997 Silicon Graphics, Inc.
Permission to use, copy, modify, distribute, and sell this software [i.e., the TIFF library] and its
documentation for any purpose is hereby granted without fee, provided that (i) the above copyright notices
and this permission notice appear in all copies of the software and related documentation, and (ii) the
names of Sam Leffler and Silicon Graphics may not be used in any advertising or publicity relating to the
software without the specific, prior written permission of Sam Leffler and Silicon Graphics.
THE SOFTWARE IS PROVIDED “AS-IS” AND WITHOUT WARRANTY OF ANY KIND, EXPRESS,
IMPLIED OR OTHERWISE, INCLUDING WITHOUT LIMITATION, ANY WARRANTY OF
MERCHANTABILITY OR FITNESS FOR A PARTICULAR PURPOSE.
IN NO EVENT SHALL SAM LEFFLER OR SILICON GRAPHICS BE LIABLE FOR ANY SPECIAL,
INCIDENTAL, INDIRECT OR CONSEQUENTIAL DAMAGES OF ANY KIND, OR ANY DAMAGES
WHATSOEVER RESULTING FROM LOSS OF USE, DATA OR PROFITS, WHETHER OR NOT ADVISED
OF THE POSSIBILITY OF DAMAGE, AND ON ANY THEORY OF LIABILITY, ARISING OUT OF OR IN
CONNECTION WITH THE USE OR PERFORMANCE OF THIS SOFTWARE.
The following disclaimer is required by the Independent JPEG Group:
Portions of this software are based on work of the Independent JPEG Group.
The following disclaimer is required by Paradigm Matrix:
Portions of this software licensed from Paradigm Matrix.
The following disclaimer is required by Ray Sauers Associates, Inc.:
“Install-It” is licensed from Ray Sauers Associates, Inc. End-User is prohibited from taking any action to
derive a source code equivalent of “Install-It,” including by reverse assembly or reverse compilation, Ray
Sauers Associates, Inc. shall in no event be liable for any damages resulting from reseller’s failure to
perform reseller’s obligation; or any damages arising from use or operation of reseller’s products or the
software; or any other damages, including but not limited to, incidental, direct, indirect, special or
consequential Damages including lost profits, or damages resulting from loss of use or inability to use
reseller’s products or the software for any reason including copyright or patent infringement, or lost data,
even if Ray Sauers Associates has been advised, knew or should have known of the possibility of such
damages.
The following disclaimer is required by Videomedia, Inc.:
“Videomedia, Inc. makes no warranties whatsoever, either express or implied, regarding this product,
including warranties with respect to its merchantability or its fitness for any particular purpose.”
“This software contains V-LAN ver. 3.0 Command Protocols which communicate with V-LAN ver. 3.0
products developed by Videomedia, Inc. and V-LAN ver. 3.0 compatible products developed by third parties
under license from Videomedia, Inc. Use of this software will allow “frame accurate” editing control of
applicable videotape recorder decks, videodisc recorders/players and the like.”
The following disclaimer is required by Altura Software, Inc. for the use of its Mac2Win
software and Sample Source Code:
©1993–1998 Altura Software, Inc.
The following disclaimer is required by Ultimatte Corporation:
Certain real-time compositing capabilities are provided under a license of such technology from Ultimatte
Corporation and are subject to copyright protection.
The following disclaimer is required by 3Prong.com Inc.:
Certain waveform and vector monitoring capabilities are provided under a license from 3Prong.com Inc.
Attn. Government User(s). Restricted Rights Legend
U.S. GOVERNMENT RESTRICTED RIGHTS. This Software and its documentation are “commercial
computer software” or “commercial computer software documentation.” In the event that such Software or
documentation is acquired by or on behalf of a unit or agency of the U.S. Government, all rights with
respect to this Software and documentation are subject to the terms of the License Agreement, pursuant to
FAR §12.212(a) and/or DFARS §227.7202-1(a), as applicable.
Trademarks
888 I/O, AirPlay, AirSPACE, AirSPACE HD, AniMatte, AudioSuite, AudioVision, AutoSync, Avid,
AVIDdrive, AVIDdrive Towers, AvidNet, AvidNetwork, AVIDstripe, Avid Unity, Avid Xpress, AVoption, AVX,
CamCutter, ChromaCurve, ChromaWheel, DAE, D-Fi, D-fx, Digidesign, Digidesign Audio Engine,
Digidesign Intelligent Noise Reduction, DigiDrive, DINR, D-Verb, Equinox, ExpertRender, FieldPak,
Film Composer, FilmScribe, FluidMotion, HIIP, HyperSPACE, HyperSPACE HDCAM, IllusionFX,
Image Independence, Intraframe, iS9, iS18, iS23, iS36, Lo-Fi, Magic Mask, make manage move | media,
Marquee, Matador, Maxim, MCXpress, Media Composer, MediaDock, MediaDock Shuttle, Media Fusion,
Media Illusion, MediaLog, Media Reader, Media Recorder, MEDIArray, MediaShare, Meridien, MetaSync,
NaturalMatch, NetReview, NewsCutter, OMF, OMF Interchange, OMM, Open Media Framework,
Open Media Management, ProEncode, Pro Tools, QuietDrive, Recti-Fi, rS9, rS18, Sci-Fi, Softimage,
Sound Designer II, SPACE, SPACEShift, Symphony, Trilligent, UnityRAID, Vari-Fi, Video Slave Driver,
VideoSPACE, and Xdeck are either registered trademarks or trademarks of Avid Technology, Inc. in the
United States and/or other countries.
iNEWS, iNEWS ControlAir, and Media Browse are trademarks of iNews, LLC.
Apple, Mac, Macintosh, and Power Macintosh are trademarks of Apple Computer, Inc., registered in the
U.S. and other countries. ATTO is a trademark of ATTO Technology, Inc. Disk First Aid is a trademark of
Apple Computer, Inc. DiskWarrior is a registered trademark of Alsoft, Inc. Microsoft, MS-DOS, Windows,
and Windows NT are either registered trademarks of Microsoft Corporation in the United States and/or
other countries. Norton Utilities is a registered trademark and Norton Disk Doctor is a trademark of
Symantec Corporation. All other trademarks contained herein are the property of their respective owners.
Avid MediaDock Ultra320 Setup and User’s Guide • Part 0130-05757-01 • May 2003
Contents
Using This Guide . . . . . . . . . . . . . . . . . . . . . . . . . . . . . . . . . . . . 13
Who Should Use This Guide . . . . . . . . . . . . . . . . . . . . . . . . . . . . . . . . . 13
About This Guide . . . . . . . . . . . . . . . . . . . . . . . . . . . . . . . . . . . . . . . . . . 13
Symbols and Conventions . . . . . . . . . . . . . . . . . . . . . . . . . . . . . . . . . . . 14
If You Need Help . . . . . . . . . . . . . . . . . . . . . . . . . . . . . . . . . . . . . . . . . . 16
Related Information . . . . . . . . . . . . . . . . . . . . . . . . . . . . . . . . . . . . . . . . 17
If You Have Documentation Comments . . . . . . . . . . . . . . . . . . . . . . . . . 17
How to Order Documentation . . . . . . . . . . . . . . . . . . . . . . . . . . . . . . . . . 18
Avid Educational Services . . . . . . . . . . . . . . . . . . . . . . . . . . . . . . . . . . . 18
Chapter 1
Overview . . . . . . . . . . . . . . . . . . . . . . . . . . . . . . . . . . . . . . . . . . . 19
Introduction. . . . . . . . . . . . . . . . . . . . . . . . . . . . . . . . . . . . . . . . . . . . . . . 19
Features . . . . . . . . . . . . . . . . . . . . . . . . . . . . . . . . . . . . . . . . . . . . . . . . . 20
System Requirements . . . . . . . . . . . . . . . . . . . . . . . . . . . . . . . . . . . . . . 21
SCSI Bus Architecture . . . . . . . . . . . . . . . . . . . . . . . . . . . . . . . . . . . . . . 22
System Components . . . . . . . . . . . . . . . . . . . . . . . . . . . . . . . . . . . . . . . 22
Status Panel. . . . . . . . . . . . . . . . . . . . . . . . . . . . . . . . . . . . . . . . . . . 23
MediaDock Ultra320 Slots . . . . . . . . . . . . . . . . . . . . . . . . . . . . . . . . 24
MediaDock Ultra320 Connectors . . . . . . . . . . . . . . . . . . . . . . . . . . . 25
MediaDock Ultra320 Shuttles . . . . . . . . . . . . . . . . . . . . . . . . . . . . . 26
Power Supply/Cooling Modules . . . . . . . . . . . . . . . . . . . . . . . . . . . . 28
Audible Alarm. . . . . . . . . . . . . . . . . . . . . . . . . . . . . . . . . . . . . . . . . . 29
Chapter 2
Preparing the MediaDock Ultra320 for Installation. . . . . . . . . 31
Preparing for Installation. . . . . . . . . . . . . . . . . . . . . . . . . . . . . . . . . . . . . 31
Selecting a Location for the MediaDock Ultra320 . . . . . . . . . . . . . . 32
Checking the MediaDock Ultra320 Hardware . . . . . . . . . . . . . . . . . 33
Using the Grounding Wrist Strap . . . . . . . . . . . . . . . . . . . . . . . . . . . . . . 33
Configuring the SCSI Bus Configuration Module . . . . . . . . . . . . . . . . . . 34
Removing and Installing Power Supply/Cooling Modules. . . . . . . . . . . . 37
Chapter 3
Configuring the MediaDock Ultra320 . . . . . . . . . . . . . . . . . . . . 39
Determining the SCSI Bus Configuration . . . . . . . . . . . . . . . . . . . . . . . . 40
Supported Configurations . . . . . . . . . . . . . . . . . . . . . . . . . . . . . . . . . . . . 40
SCSI Bus IDs . . . . . . . . . . . . . . . . . . . . . . . . . . . . . . . . . . . . . . . . . . 41
Rear Panel LEDs . . . . . . . . . . . . . . . . . . . . . . . . . . . . . . . . . . . . . . . 44
Termination and Cables for the MediaDock Ultra320 . . . . . . . . . . . . . . . 45
Connecting the MediaDock Ultra320 . . . . . . . . . . . . . . . . . . . . . . . . . . . 45
Single-Bus Configuration . . . . . . . . . . . . . . . . . . . . . . . . . . . . . . . . . 46
Dual-Bus Configuration . . . . . . . . . . . . . . . . . . . . . . . . . . . . . . . . . . 47
Installing a MediaDock Ultra320 Shuttle . . . . . . . . . . . . . . . . . . . . . . . . . 48
Connecting the MediaDock Ultra320 Power Cord . . . . . . . . . . . . . . . . . 50
Canceling the Windows 2000 or Windows XP Found
New Hardware Wizard . . . . . . . . . . . . . . . . . . . . . . . . . . . . . . . . . . . . . 51
Disable Windows 2000 Hardware Wizard . . . . . . . . . . . . . . . . . . . . 51
Disable Windows XP Hardware Wizard . . . . . . . . . . . . . . . . . . . . . . 53
Chapter 4
Replacing Shuttle Packs . . . . . . . . . . . . . . . . . . . . . . . . . . . . . . 55
Understanding the Status Panel . . . . . . . . . . . . . . . . . . . . . . . . . . . . . . . 56
Replacing a MediaDock Ultra320 Shuttle on a Mac OS 9 System . . . . . 57
Replacing a MediaDock Ultra320 Shuttle on a Mac OS X System . . . . . 60
Replacing a MediaDock Ultra320 Shuttle on a Windows NT System . . . 61
Replacing a MediaDock Ultra320 Shuttle on a Windows 2000 or
Windows XP System . . . . . . . . . . . . . . . . . . . . . . . . . . . . . . . . . . . . . . 61
Removing Shuttles While the System is Turned On. . . . . . . . . . . . . 62
Adding Shuttles while the System is Turned On. . . . . . . . . . . . . . . . 64
Exceptions . . . . . . . . . . . . . . . . . . . . . . . . . . . . . . . . . . . . . . . . . . . . 69
Offline. . . . . . . . . . . . . . . . . . . . . . . . . . . . . . . . . . . . . . . . . . . . . 69
New Systems . . . . . . . . . . . . . . . . . . . . . . . . . . . . . . . . . . . . . . . 69
Chapter 5
Preparing Your Drives . . . . . . . . . . . . . . . . . . . . . . . . . . . . . . . . 71
Managing MediaDock Ultra320 Shuttles on Mac OS 9 Systems . . . . . . 72
6
Checking MediaDock Ultra320 Shuttles . . . . . . . . . . . . . . . . . . . . . 73
Using Disk First Aid to Repair MediaDock Ultra320 Shuttles . . . . . 73
Erasing MediaDock Ultra320 Shuttles . . . . . . . . . . . . . . . . . . . . . . . 76
Managing MediaDock Ultra320 Shuttles on Mac OS X Systems . . . . . . 76
Managing MediaDock Ultra320 Shuttles on a Windows 2000 or
Windows XP System . . . . . . . . . . . . . . . . . . . . . . . . . . . . . . . . . . . . . . 77
Supported Windows File Systems . . . . . . . . . . . . . . . . . . . . . . . . . . 78
Creating Primary Partitions and Formatting Drives with a
Windows 2000 or Windows XP Operating System. . . . . . . . . . . . 79
Creating a Disk Configuration Floppy Disk from a
Windows NT System . . . . . . . . . . . . . . . . . . . . . . . . . . . . . . . . . . 81
Transferring Disk Drives or Stripe Sets from a Windows NT
System to a Windows 2000 or Windows XP System . . . . . . . . . . 82
Importing the Disk Configuration into a Windows 2000 or
Windows XP System . . . . . . . . . . . . . . . . . . . . . . . . . . . . . . . . . . 83
Striping . . . . . . . . . . . . . . . . . . . . . . . . . . . . . . . . . . . . . . . . . . . . . . . . . . 84
Diagnostic Utilities . . . . . . . . . . . . . . . . . . . . . . . . . . . . . . . . . . . . . . . . . 85
Chapter 6
Troubleshooting. . . . . . . . . . . . . . . . . . . . . . . . . . . . . . . . . . . . . 89
Avid Editing System Can’t Access the MediaDock Ultra320 Shuttles . . 90
Avid Editing System Recognizes Only Some Slots in the MediaDock
Ultra320 Enclosure . . . . . . . . . . . . . . . . . . . . . . . . . . . . . . . . . . . . . . . 90
The Power Supply/Cooling Module LED Is Amber and the MediaDock
Ultra320 Alarm Is Sounding . . . . . . . . . . . . . . . . . . . . . . . . . . . . . . . . 91
Avid Editing System Hangs When a MediaDock Ultra320 Shuttle Is
Removed . . . . . . . . . . . . . . . . . . . . . . . . . . . . . . . . . . . . . . . . . . . . . . . 91
Avid Editing System Doesn’t Recognize the Newly Installed
MediaDock Ultra320 Shuttles . . . . . . . . . . . . . . . . . . . . . . . . . . . . . . . 92
Appendix A
MediaDock Ultra320 Specifications . . . . . . . . . . . . . . . . . . . . . 93
Dimensions and Weight . . . . . . . . . . . . . . . . . . . . . . . . . . . . . . . . . . . . . 93
Environmental Specifications . . . . . . . . . . . . . . . . . . . . . . . . . . . . . . . . . 94
Electrical Specifications . . . . . . . . . . . . . . . . . . . . . . . . . . . . . . . . . . . . . 95
7
Power Cord Specifications . . . . . . . . . . . . . . . . . . . . . . . . . . . . . . . . . . . 95
CEE-22 Power Cord Requirements . . . . . . . . . . . . . . . . . . . . . . . . . 95
United States and Canada Power Cord Requirements . . . . . . . . . . 96
European Countries Power Cord Requirements . . . . . . . . . . . . . . . 97
Appendix B
Rack Mounting the MediaDock Ultra320 Enclosure . . . . . . . . 99
Equipment Environmental and Safety Guidelines. . . . . . . . . . . . . . . . . 100
Checking the Contents of the Rack-Mount Kit . . . . . . . . . . . . . . . . . . . 101
Installing the MediaDock Ultra320 in a Rack . . . . . . . . . . . . . . . . . . . . 101
Installing the Support Rails . . . . . . . . . . . . . . . . . . . . . . . . . . . . . . . 102
Attaching the Rack Nuts to the Rack . . . . . . . . . . . . . . . . . . . . . . . 103
Securing the MediaDock Ultra320 in a Rack . . . . . . . . . . . . . . . . . 106
Appendix C
Converting the MediaDock Ultra320 Rack Enclosure into a
Tower Configuration. . . . . . . . . . . . . . . . . . . . . . . . . . . . . . . 109
Checking the Contents of the Tower Kit . . . . . . . . . . . . . . . . . . . . . . . . 109
Installing the MediaDock Ultra320 Tower Kit . . . . . . . . . . . . . . . . . . . . 110
Attaching the MediaDock Ultra320 Labels to the Front Bezel. . . . . . . . 113
Appendix D
Regulatory and Safety Notices . . . . . . . . . . . . . . . . . . . . . . . . 115
FCC Notice . . . . . . . . . . . . . . . . . . . . . . . . . . . . . . . . . . . . . . . . . . . . . . 115
Canadian ICES-003 . . . . . . . . . . . . . . . . . . . . . . . . . . . . . . . . . . . . . . . 116
European Union Notice . . . . . . . . . . . . . . . . . . . . . . . . . . . . . . . . . . . . . 116
Australia and New Zealand EMC Regulations . . . . . . . . . . . . . . . . . . . 118
Taiwan EMC Regulations . . . . . . . . . . . . . . . . . . . . . . . . . . . . . . . . . . . 118
Index . . . . . . . . . . . . . . . . . . . . . . . . . . . . . . . . . . . . . . . . . . . . . 119
8
Figures
Figure 1
Status Panel . . . . . . . . . . . . . . . . . . . . . . . . . . . . . . . . . . .23
Figure 2
Slot Allocation . . . . . . . . . . . . . . . . . . . . . . . . . . . . . . . . . .24
Figure 3
Component Locations . . . . . . . . . . . . . . . . . . . . . . . . . . . .25
Figure 4
MediaDock Ultra320 Shuttles . . . . . . . . . . . . . . . . . . . . . .26
Figure 5
Drive-Filler . . . . . . . . . . . . . . . . . . . . . . . . . . . . . . . . . . . . .27
Figure 6
Power Supply Location . . . . . . . . . . . . . . . . . . . . . . . . . . .28
Figure 7
Fan Location . . . . . . . . . . . . . . . . . . . . . . . . . . . . . . . . . . .29
Figure 8
Connecting the Grounding Wrist Strap . . . . . . . . . . . . . . .34
Figure 9
Removing the SCSI Bus Configuration Module . . . . . . . . .35
Figure 10
SCSI Bus Configuration Module Cover Screws. . . . . . . . .35
Figure 11
Configuration Module Board Screws . . . . . . . . . . . . . . . . .36
Figure 12
Removing the Power Supply/Cooling Module . . . . . . . . . .37
Figure 13
MediaDock Ultra320 SCSI IDs . . . . . . . . . . . . . . . . . . . . .42
Figure 14
Rack-Mount Position . . . . . . . . . . . . . . . . . . . . . . . . . . . . .43
Figure 15
Rear Panel LEDs and Alarm Mute Button . . . . . . . . . . . . .44
Figure 16
SCSI Connector Configurations. . . . . . . . . . . . . . . . . . . . .45
Figure 17
68-pin VHDCI Connector . . . . . . . . . . . . . . . . . . . . . . . . . .46
Figure 18
68-pin High Density Connector . . . . . . . . . . . . . . . . . . . . .46
Figure 19
SCSI LVD Board Connectors . . . . . . . . . . . . . . . . . . . . . .46
Figure 20
Connecting a SCSI Cable in a Single-Bus
Configuration . . . . . . . . . . . . . . . . . . . . . . . . . . . . . . . . .47
Figure 21
Connecting a SCSI Cable in a Dual-Bus
Configuration . . . . . . . . . . . . . . . . . . . . . . . . . . . . . . . . .48
Figure 22
Installing a MediaDock Ultra320 shuttle or Drive-Filler . . .49
Figure 23
Connecting the MediaDock Ultra320 Power Cord . . . . . . .50
Figure 24
Status Panel . . . . . . . . . . . . . . . . . . . . . . . . . . . . . . . . . . .56
Figure 25
ADU2 Window . . . . . . . . . . . . . . . . . . . . . . . . . . . . . . . . . .58
Figure 26
Identify Window . . . . . . . . . . . . . . . . . . . . . . . . . . . . . . . .58
Figure 27
ADU2 Window - (Unmount) . . . . . . . . . . . . . . . . . . . . . . . .59
Figure 28
Device Manager Disk Drive List. . . . . . . . . . . . . . . . . . . . .62
Figure 29
Uninstall . . . . . . . . . . . . . . . . . . . . . . . . . . . . . . . . . . . . . . .63
Figure 30
Confirm Device Removal . . . . . . . . . . . . . . . . . . . . . . . . . .63
Figure 31
Disk Management . . . . . . . . . . . . . . . . . . . . . . . . . . . . . . .64
9
Figure 32
Rescan Disk . . . . . . . . . . . . . . . . . . . . . . . . . . . . . . . . . . . 65
Figure 33
Foreign Disk . . . . . . . . . . . . . . . . . . . . . . . . . . . . . . . . . . . 65
Figure 34
Scan for Hardware Changes . . . . . . . . . . . . . . . . . . . . . . 66
Figure 35
New Disk Listed . . . . . . . . . . . . . . . . . . . . . . . . . . . . . . . . 67
Figure 36
Foreign Disk Pop-up Menu. . . . . . . . . . . . . . . . . . . . . . . . 68
Figure 37
Import Foreign Disk . . . . . . . . . . . . . . . . . . . . . . . . . . . . . 68
Figure 38
Disk First Aid Main Window Functions . . . . . . . . . . . . . . . 74
Figure 39
Disk First Aid Message Box . . . . . . . . . . . . . . . . . . . . . . . 75
Figure 40
Disk First Aid Verification Results. . . . . . . . . . . . . . . . . . . 75
Figure 41
Receptacle (CEE-22) . . . . . . . . . . . . . . . . . . . . . . . . . . . . 96
Figure 42
NEMA 5-15P Style Plug . . . . . . . . . . . . . . . . . . . . . . . . . . 96
Figure 43
Rack-Mount Kit Contents . . . . . . . . . . . . . . . . . . . . . . . . 101
Figure 44
Connecting Rails . . . . . . . . . . . . . . . . . . . . . . . . . . . . . . 102
Figure 45
Positioning the MediaDock Ultra320 . . . . . . . . . . . . . . . 103
Figure 46
Attaching Rack Nuts onto the Rack Enclosure. . . . . . . . 104
Figure 47
Attaching the MediaDock Ultra320 Rails to the
Front Mounting Rails . . . . . . . . . . . . . . . . . . . . . . . . . . 105
Figure 48
Attaching the MediaDock Ultra320 Rails to the
Figure 49
Installing a MediaDock Ultra320. . . . . . . . . . . . . . . . . . . 107
Figure 50
Tower Bezel Screws. . . . . . . . . . . . . . . . . . . . . . . . . . . . 110
Figure 51
Status Panel Tabs . . . . . . . . . . . . . . . . . . . . . . . . . . . . . 111
Figure 52
Replacing the Tower Bezel and Securing the
Rack Back Mounting Rails . . . . . . . . . . . . . . . . . . . . . 106
MediaDock Ultra320 . . . . . . . . . . . . . . . . . . . . . . . . . . 112
Figure 53
10
Tower Kit Labels. . . . . . . . . . . . . . . . . . . . . . . . . . . . . . . 113
Tables
Table 1
MediaDock Ultra320 Shuttle LED Functions . . . . . . . . . . .27
Table 2
Status Panel Functions . . . . . . . . . . . . . . . . . . . . . . . . . . .56
Table 3
Dimensions . . . . . . . . . . . . . . . . . . . . . . . . . . . . . . . . . . . .93
Table 4
Weight . . . . . . . . . . . . . . . . . . . . . . . . . . . . . . . . . . . . . . . .94
Table 5
Environmental Specifications. . . . . . . . . . . . . . . . . . . . . . .94
Table 6
Electrical Specifications . . . . . . . . . . . . . . . . . . . . . . . . . . .95
Table 7
United States and Canada Power Cord Requirements . . .96
Table 8
European Power Cord Requirements . . . . . . . . . . . . . . . .97
11
12
Using This Guide
This guide contains information about installing and using the
Avid® MediaDock™ Ultra320 enclosure, drive shuttles, and related
software. The MediaDock Ultra320 is available in both a rack-mount
version and a tower version. Most of the configurations within this guide
show the MediaDock Ultra320 chassis in a rack-mount version. Difference
between the two versions are documented as appropriate.
Who Should Use This Guide
This guide is designed for anyone who is installing or troubleshooting a
MediaDock Ultra320 enclosure and MediaDock Ultra320 shuttles.
About This Guide
This guide describes how to install, configure, and troubleshoot the
MediaDock Ultra320. The information in this guide is organized as
follows:
•
Chapter 1, “Overview,” describes the system requirements and features
of the MediaDock Ultra320. It also provides an overview of the
components of the MediaDock Ultra320.
•
Chapter 2, “Preparing the MediaDock Ultra320 for Installation,”
describes how to prepare the MediaDock Ultra320 for installation.
•
Chapter 3, “Configuring the MediaDock Ultra320,” describes the
supported configurations and how to connect the MediaDock Ultra320
to match those configurations.
Using This Guide
•
Chapter 4, “Replacing Shuttle Packs,” describes the day-to-day
functions that a user performs.
•
Chapter 5, “Preparing Your Drives,” describes how to format your
drives on Windows® and Macintosh® operating systems. This chapter
also includes information about how to move MediaDock Ultra320
shuttles from one system to another. See this chapter for information
on available diagnostic utilities.
•
Chapter 6, “Troubleshooting,” describes how to resolve basic problems
that might occur during the installation and operation of the
MediaDock Ultra320.
•
Appendix A, “MediaDock Ultra320 Specifications,” lists the
dimensions, electrical requirements, environmental requirements, and
power specifications for the MediaDock Ultra320.
•
Appendix B, “Rack Mounting the MediaDock Ultra320 Enclosure,”
provides the information you need to mount the MediaDock Ultra320
in a rack.
•
Appendix C, “Converting the MediaDock Ultra320 Rack Enclosure
into a Tower Configuration,” provides the information you need to
convert the MediaDock Ultra320 enclosure to a tower configuration.
•
Appendix D, “Regulatory and Safety Notices,” describes the
regulatory and safety notices that apply to the MediaDock Ultra320.
•
Finally, a detailed Index helps you quickly locate specific topics.
Symbols and Conventions
Unless noted otherwise, the material in this document applies to the
Windows NT, Windows 2000, Windows XP, Mac OS® 9, and Mac OS X
operating systems. When the text applies to a specific operating system, it
is marked as follows:
14
•
(Windows) or (Windows only) means the information applies to the
Windows NT, Windows 2000, and Windows XP operating system.
•
(Macintosh) or (Macintosh only) means the information applies to the
Mac OS 9 and Mac OS X operating system.
Symbols and Conventions
The majority of screen shots in this document were captured on the
appropriate operating systems. Where differences exist, both Windows and
Macintosh screen shots are shown.
Avid documentation uses the following symbols and conventions:
Symbol or Convention Meaning or Action
n
A note provides important related information,
reminders, recommendations, and strong
suggestions.
c
A caution means that a specific action you take could
cause harm to your computer or cause you to lose
data.
w
A warning describes an action that could cause you
physical harm. Follow the guidelines in this
document or on the unit itself when handling
electrical equipment.
>
This symbol indicates menu commands (and
subcommands) in the order you select them. For
example, File > Import means to open the File menu
and then select the Import command.
t
This symbol indicates a single-step procedure.
Multiple arrows in a list indicate that you perform
one of the actions listed.
k
This symbol represents the Apple® or Command key.
Press and hold the Command key and another key to
perform a keyboard shortcut.
Margin tips
In the margin, you will find tips that help you
perform tasks more easily and efficiently.
Italic font
Italic font is used to emphasize certain words and to
indicate variables.
Courier Bold font
Courier Bold font identifies text that you type.
15
Using This Guide
Symbol or Convention Meaning or Action
Click
Quickly press and release the left mouse button
(Windows) or the mouse button (Macintosh).
Double-click
Click the left mouse button (Windows) or the mouse
button (Macintosh) twice rapidly.
Right-click
Quickly press and release the right mouse button
(Windows only).
Drag
Press and hold the left mouse button (Windows) or
the mouse button (Macintosh) while you move the
mouse.
Ctrl+key
k+key
Press and hold the first key while you press the
second key.
If You Need Help
If you are having trouble using the MediaDock Ultra320:
1. Retry the action, carefully following the instructions given for that task
in this guide. It is especially important to check each step of your
workflow.
2. Check the release notes supplied with your Avid application for the
latest information that might have become available after the hardcopy
documentation was printed.
3. Check the documentation that came with your Avid application or your
hardware for maintenance or hardware-related issues.
4. Visit the online Knowledge Center at www.avid.com/support. Online
services are available 24 hours per day, 7 days per week. Search this
online Knowledge Center to find answers, to view error messages, to
access troubleshooting tips, to download updates, and to read/join
online message-board discussions.
5. For Technical Support, please call 800-800-AVID (800-800-2843).
For Broadcast On-Air Sites and Call Letter Stations, call
800-NEWSDNG (800-639-7364).
16
Related Information
Related Information
The following documents provides useful information when using the
Avid MediaDock Ultra320 and the MediaDock Ultra320 shuttles:
•
Storage Manager Setup and User’s Guide
This guide provides step-by-step instructions for diagnosing drive
problems, spinning down drive shuttles, as well as other storage related
functions.
•
AVIDdrive Utility 2 User’s Guide
This guide provides step-by-step instructions for partitioning, erasing,
identifying, and testing drives. This utility also creates and removes
striped sets, as well as other storage related functions.
•
ATTO ExpressStripe RAID for Macintosh OS X Installation and
Operation Manual
This guide provides step-by-step instructions for creating partitions
and striped sets on Mac OS X systems, as well as other storage related
functions.
If You Have Documentation Comments
Avid Technology continuously seeks to improve its documentation. We
value your comments about this guide and other Avid-supplied
documentation.
Simply e-mail your documentation comments to Avid Technology at
[email protected]
Please include the title of the document, its part number, and the specific
section you are commenting on in all correspondence.
17
Using This Guide
How to Order Documentation
To order additional copies of this documentation from within the
United States, call Avid Sales at 800-949-AVID (800-949-2843). If you are
placing an order from outside the United States, contact your local
Avid representative.
Avid Educational Services
For information on courses/schedules, training centers, certifications,
courseware, and books, please visit www.avid.com/training or call
Avid Sales at 800-949-AVID (800-949-2843).
18
Chapter 1
Overview
This chapter provides an overview of the Avid MediaDock Ultra320 SCSI
storage subsystem.
The chapter contains the following sections:
•
Introduction
•
Features
•
System Requirements
•
SCSI Bus Architecture
•
System Components
Introduction
The Avid MediaDock Ultra320 provides a high-throughput, high-capacity
storage environment for video and audio editing, graphics and image
processing, and broadcast applications.
The MediaDock Ultra320 communicates with the Avid editing system
through a small computer system interface (SCSI) bus. The bus is the
pathway for moving information from one part of the system to another.
When you use the Macintosh operating system, the AVIDdrive™ Utility 2
software (Mac® OS 9), ATTO™ ExpressStripe software (Mac OS X), and
the Storage Manager software, you can safely exchange Avid MediaDock
Ultra320 shuttle packs within your Avid editing system.
Chapter 1 Overview
n
For information on using AVIDdrive Utility 2, see the AVIDdrive Utility 2
User’s Guide and the release notes.
Some operating systems require you to restart the Avid editing system
before the operating system can see a MediaDock Ultra320 shuttle that has
been removed and replaced. Other operating systems use an utility to
remove and replace MediaDock Ultra320 shuttle packs without turning off
the system. For details on removing and installing MediaDock Ultra320
shuttles from the MediaDock Ultra320 enclosure, see Chapter 4. The Avid
Disk Mounter utility allows you to move striped sets of drives from
Windows NT systems to other Windows systems, see “Transferring Disk
Drives or Stripe Sets from a Windows NT System to a Windows 2000 or
Windows XP System” on page 82.
Features
The MediaDock Ultra320 ships as a 19-inch rack-mountable chassis; a
tower option is available. The MediaDock Ultra320 contains:
•
•
20
Twelve slots that support:
-
Low-Voltage Differential (LVD) Ultra technology
-
Wide bus data transfers over a 16-bit bus up to 320 megabytes per
second (MB/s) (depending on the host bus adapter)
-
One MediaDock Ultra320 shuttle per slot containing a single
1.0-inch-high hard disk in a 3.5-inch form factor
A configurable SCSI bus that allows:
-
A single bus with 12 slots
-
Dual buses with six slots each
•
Intelligent MediaDock Ultra320 shuttle insertion sensing
•
An LED status panel to monitor MediaDock Ultra320 functions
•
Dual power supplies
•
Temperature sensor and audible alarm
•
Three variable-speed fans in each power supply, fan speed is regulated
by the temperature sensors
System Requirements
•
Robust MediaDock Ultra320 shuttles with a lever for inserting or
removing the shuttle from the MediaDock Ultra320
•
Internal, automatic single-bus and dual-bus termination
System Requirements
To use a MediaDock Ultra320, you need the following hardware and
software:
•
One of the following hardware platforms and operating software
releases:
-
A supported Power Macintosh® system running Mac OS 9.0 or
later
-
A supported personal computer (PC) that runs the Windows NT
operating system (with Service Pack 3 or later)
-
A supported PC that runs the Windows 2000 operating system
(with Service Pack 2 or later)
-
A supported PC that runs the Windows XP operating system (with
Service Pack 1 or later)
•
An Avid software application that supports SCSI LVD
•
The following utilities and exercisers:
-
AVIDdrive Utility (ADU) 2 Version 2.2 or later for Mac OS 9.0
-
ATTO ExpressStripe Version 1.2 or later for Mac OS X
-
Storage Manager Version 1.3 or later
-
StorEx for the Macintosh operating system Version 1.5 or later for
Mac OS 9.0
-
DiskWarrior™ for the Macintosh operating system
-
Avid Disk Mounter for the Windows NT operating system
•
A SCSI LVD/Ultra320 connection to the Avid editing system
•
An approved Ultra320 cable
•
One or more MediaDock Ultra320 shuttles
21
Chapter 1 Overview
SCSI Bus Architecture
The MediaDock Ultra320 can operate in a single-bus or dual-bus
configuration, depending on how the bus configuration module is set. The
MediaDock Ultra320 is factory configured for a single-bus configuration.
n
The MediaDock Ultra320 cannot be daisy-chained with other SCSI devices
or to a second MediaDock Ultra320.
System Components
The following sections explain the MediaDock Ultra320 system
components:
22
•
Status Panel
•
MediaDock Ultra320 Slots
•
MediaDock Ultra320 Connectors
•
MediaDock Ultra320 Shuttles
•
Power Supply/Cooling Modules (Power and cooling functions are
together in one module)
•
Audible Alarm
System Components
Status Panel
The status panel, shown in Figure 1, provides the following indicators:
•
Power — Power LED
•
MediaDock Ultra320 faults — Fault LED
•
SCSI bus configuration (single- or dual-bus) — Configuration LED
Access hole for
rack mounting
Power LED
Not used
Fault LED
Figure 1
n
Configuration LED
Status Panel
For more information about the status panel, see “Understanding the
Status Panel” on page 56. Additional LEDs are located on the rear of the
enclosure; see “Rear Panel LEDs” on page 44.
23
Chapter 1 Overview
MediaDock Ultra320 Slots
The MediaDock Ultra320 has 12 slots for MediaDock Ultra320 shuttles
(see Figure 2). If you are using the MediaDock Ultra320 in a single-bus
configuration, all 12 slots are on SCSI bus A. If you are using the
MediaDock Ultra320 in a dual-bus configuration, the top six slots are on
SCSI bus A and the bottom six slots are on SCSI bus B. Figure 3 identifies
the SCSI bus A and B connectors on the rear of the MediaDock Ultra320
enclosure.
Single-bus configuration
Dual-bus configuration
SCSI ID 13
SCSI ID 5
SCSI ID 12
SCSI ID 4
SCSI ID 11
SCSI ID 3
SCSI bus A
SCSI ID 10
SCSI ID 2
SCSI ID 9
SCSI ID 1
SCSI bus A
SCSI ID 8
SCSI ID 5
SCSI ID 5
SCSI ID 4
SCSI ID 4
SCSI ID 3
SCSI ID 3
SCSI ID 2
SCSI ID 2
SCSI ID 1
SCSI ID 1
SCSI ID 0
SCSI ID 0
Figure 2
24
SCSI ID 0
Slot Allocation
SCSI bus B
System Components
MediaDock Ultra320 Connectors
You connect the MediaDock Ultra320 to the SCSI bus using 68-pin very
high-density cable interconnect (VHDCI) SCSI bus connectors (see
Figure 3). You can use either SCSI port when in a single SCSI port
configuration. The MediaDock Ultra320 automatically terminates the
SCSI bus whether you are using a single- or a dual-bus configuration.
In a dual-bus configuration, one SCSI connector is used for each bus.
Separate SCSI controllers or SCSI channels must be used for each
MediaDock Ultra320 SCSI bus.
MediaDock Ultra320 rack-mount
MediaDock Ultra320 tower
Power supply/
cooling modules
68-pin VHDCI
SCSI bus B
connector
Power supply/
cooling modules
68-pin VHDCI
SCSI bus A
connector
Bus configuration module
Bus configuration module
68-pin VHDCI
SCSI bus A connector
68-pin VHDCI
SCSI bus B connector
Figure 3
Component Locations
25
Chapter 1 Overview
MediaDock Ultra320 Shuttles
The MediaDock Ultra320 uses only MediaDock Ultra320 shuttles. Each
MediaDock Ultra320 shuttle contains three LEDs that provide information
about the MediaDock Ultra320 shuttle’s activity (see Figure 4). Table 1
describes the function of each LED.
n
The three MediaDock Ultra320 shuttle LEDs are located on the backplane.
There are three light tubes built into the MediaDock Ultra320 shuttle that
carry the light from the backplane to the front of the MediaDock Ultra320
shuttle.
MediaDock Ultra320 shuttle (front view)
MediaDock Ultra320 shuttle (rear view)
Not used LED
Activity LED
Power LED
Avid logo and
drive type
80-pin connector
Figure 4
c
MediaDock Ultra320 Shuttles
The MediaDock Ultra320 shuttles have SCA-2 80-pin connectors.
Earlier models of MediaDock Shuttle™ packs do not fit in the
MediaDock Ultra320 chassis.
Instructions for inserting the drive-filler, see the “Installing a MediaDock
Ultra320 Shuttle” on page 48.
n
26
As drive size and drive speed improve, different MediaDock Ultra320
shuttles will be available for use in the MediaDock Ultra320. Contact your
local Avid Reseller or call the Avid Sales and Product information line at
800-949-2843 for the available MediaDock Ultra320 shuttles.
System Components
Table 1
MediaDock Ultra320 Shuttle LED Functions
LED
Color
Function
Not used
—
This LED is has no function.
Activity
Green
This LED is On when the drive is active.
Power
Green
This LED is On when power is applied to the drive.
MediaDock Ultra320 Drive-Filler
Any slot that does not contain a MediaDock Ultra320 shuttle must contain
a drive-filler (see Figure 5). A drive-filler looks like a MediaDock Ultra320
shuttle from the front, but the Avid logo and drive type locations are blank
and there is no LED function. Unlike the MediaDock Ultra320 shuttles, the
drive-filler is all black, it does not have a purple button like the like the
MediaDock Ultra320 shuttles.
The drive-filler is installed and removed using the same process as the
MediaDock Ultra320 shuttle. Instructions for inserting the drive-filler, see
the “Installing a MediaDock Ultra320 Shuttle” on page 48.
Figure 5
Drive-Filler
27
Chapter 1 Overview
Power Supply/Cooling Modules
Each MediaDock Ultra320 is capable of supporting two power supplies.
Although one power supply is sufficient to operate the system, a second,
power supply provides automatic power backup if the first power supply
fails. Two power supplies ensure continuous data retrieval.
n
Having two power supplies allows you to remove a faulty power supply
and replace it with a new power supply while the MediaDock Ultra320 is
operating (without impacting operation).
Figure 6 shows the power-supply locations in the rack-mount version of
the MediaDock Ultra320. To remove a power supply, see “Removing and
Installing Power Supply/Cooling Modules” on page 37.
The power supply has two LEDs. The green LED is On when power is on
and within specifications. The amber LED is On when a power-supply
fault is detected (the green LED is Off).
Thumbscrew
LEDs
Thumbscrew
Power supply 1
Ac power connector
Figure 6
Power switch
Power supply 2
Power Supply Location
Each power supply includes three enclosed fans. Figure 7 shows the
location of the fan vents in the power supplies.
28
System Components
If a temperature failure is detected, the Fault LED will light amber. A
temperature failure could be an indication that a fan has failed. You must
replace the power supply that includes the failed fan. To remove a power
supply, see “Removing and Installing Power Supply/Cooling Modules” on
page 37.
Ventilation holes for the three
fans in each power supply
Figure 7
Fan Location
Audible Alarm
The MediaDock Ultra320 sounds an alarm when any one of the following
conditions occurs:
•
A fan fails.
•
A power supply fails.
•
The internally monitored temperature threshold is exceeded.
•
A drive fault is detected.
When the alarm sounds, there is a mute button on the back of the
MediaDock Ultra320 used to turn the alarm off. The location of the Alarm
Mute button is shown with the “Rear Panel LEDs” on page 44.
29
Chapter 1 Overview
30
Chapter 2
Preparing the MediaDock
Ultra320 for Installation
The following sections describe how to configure the MediaDock Ultra320
enclosure for a single or dual SCSI bus. Also included are instructions for
removing and installing the power supply/cooling modules.
This chapter contains the following sections:
•
Preparing for Installation
•
Using the Grounding Wrist Strap
•
Configuring the SCSI Bus Configuration Module
•
Removing and Installing Power Supply/Cooling Modules
Preparing for Installation
Before you begin to install the MediaDock Ultra320, do the following:
•
Decide where you are going to place the MediaDock Ultra320.
•
Unpack the MediaDock Ultra320 and each MediaDock Ultra320
shuttle or drive-filler.
•
Use a grounding wrist strap (if available) to change the bus
configuration and to remove or install a power supply/cooling module.
•
Locate a grounded, surge-protected ac outlet.
Chapter 2 Preparing the MediaDock Ultra320 for Installation
•
Have a Phillips screwdriver available for configuring the SCSI bus and
for removing or installing the power supply, the tower kit, or the rack
kit.
-
If you plan on using a dual-bus configuration, see “Configuring the
SCSI Bus Configuration Module” on page 34.
-
If you are removing or installing a power supply, see “Removing
and Installing Power Supply/Cooling Modules” on page 37.
-
For information about installing a MediaDock Ultra320 in a rackmount configuration, see Appendix B.
-
For information about installing a MediaDock Ultra320 in a tower
configuration, see Appendix C.
After you have finished preparing the MediaDock Ultra320 enclosure and
set it up as either a tower or rack-mount configuration, see “Installing a
MediaDock Ultra320 Shuttle” on page 48.
Selecting a Location for the MediaDock Ultra320
Before you install the MediaDock Ultra320, find a location that meets the
following criteria:
32
•
The MediaDock Ultra320 has a minimum of 4 in (10 cm) of clearance
from any objects behind the MediaDock Ultra320.
•
The location of the MediaDock Ultra320 in relation to the Avid editing
system depends on the length of the SCSI LVD cable between the host
and the MediaDock Ultra320.
•
The MediaDock Ultra320 is placed in a well-ventilated area to prevent
overheating.
•
For a tower configuration, position the MediaDock Ultra320 on a
sturdy, level surface or on the floor.
•
For a rack-mount configuration, position the MediaDock Ultra320 in a
rack with at least 12 in (30 cm) of clearance behind it for adequate
airflow. For more information, see “Installing the MediaDock Ultra320
in a Rack” on page 101.
Using the Grounding Wrist Strap
Checking the MediaDock Ultra320 Hardware
As you unpack the
boxes, retain all cartons
and packing materials
in case you need to
store or ship the system
or MediaDock
Ultra320 shuttles in the
future.
Unpack the MediaDock Ultra320 and check the contents of the packages
to ensure that all parts were shipped. The packages should contain:
•
The Avid MediaDock Ultra320 chassis that includes:
-
A bus configuration module
-
Two power supply/cooling modules
-
Drive-fillers
-
SES/bus ID switch module
•
Two ac power cord
•
The Avid MediaDock Ultra320 Setup and User’s Guide (this
document)
•
A tower or rack-mount kit (depending on what you ordered)
•
MediaDock Ultra320 shuttles (depending on how many you ordered).
A storage utilities CD-ROM is included with the shuttles. For
information about the utilities, see “Diagnostic Utilities” on page 85.
Using the Grounding Wrist Strap
During the installation and normal use of the MediaDock Ultra320, you
will perform actions that could cause damage to portions of the
MediaDock Ultra320 if proper care is not taken. This section explains how
to properly ground yourself by using a grounding wrist strap.
To use the grounding wrist strap:
1. Make sure the MediaDock Ultra320 chassis is turned Off.
2. Put the grounding wrist strap on your wrist.
33
Chapter 2 Preparing the MediaDock Ultra320 for Installation
3. Attach the grounding clip to any one of the metal thumbscrews on the
rear of the MediaDock Ultra320 chassis (see Figure 8).
Two thumbscrews are
located on each module.
Figure 8
Connecting the Grounding Wrist Strap
Configuring the SCSI Bus Configuration Module
The MediaDock Ultra320 ships configured as a single SCSI bus. If you
plan to work in a single-bus configuration, you do not need to perform the
procedure in this section. To determine if dual-bus configuration works
best for you, see “Determining the SCSI Bus Configuration” on page 40.
The location of the SCSI bus configuration module is shown in Figure 9.
To change the MediaDock Ultra320 into a dual-bus configuration, relocate
a circuit board inside the module.
Before you continue the installation of the MediaDock Ultra320 system,
configure the SCSI bus.
n
34
The following procedure assumes that you are configuring the SCSI bus
module before you install the MediaDock Ultra320 and that no power is
applied.
Configuring the SCSI Bus Configuration Module
To configure the SCSI bus configuration module:
1. Using a Phillips screwdriver, loosen the two thumbscrews attached to
the SCSI bus configuration module (see Figure 9).
l
2. Push the cam levers down to eject the module and pull it out of the
enclosure (see Figure 9).
0
l
Thumbscrews
Cam levers
SCSI bus configuration
module
Figure 9
Removing the SCSI Bus Configuration Module
3. Remove the configuration module cover screws (see Figure 10).
1 of 2 cover
screws
Figure 10
SCSI Bus Configuration Module Cover Screws
35
Chapter 2 Preparing the MediaDock Ultra320 for Installation
4. Lift the configuration module cover off the module.
5. Remove the configuration module board screws (see Figure 11).
1 of 5 board
screws
Figure 11
Configuration Module Board Screws
6. Lift the configuration module board off the front set of stand-offs.
7. Replace the configuration module board on the back set of stand-offs,
and secure the board with the board screws.
Only 4 screws are used to used to secure the board in the dual bus
configuration. You will have one screw left over. Screw the extra screw
into one of the unused standoffs so not to lose it.
8. Replace the configuration module cover, and secure the cover screws.
9. Slowly insert the SCSI bus configuration module completely into the
MediaDock Ultra320 enclosure. Lift the two cam levers to draw the
module into enclosure.
c
Do not slam or force the module into the enclosure, or damage might
result.
10. Once in the enclosure and with the cam levers lifted, firmly press the
SCSI bus configuration module into the enclosure.
11. Using a Phillips screwdriver, tighten the two thumbscrews to secure
the SCSI bus configuration module in the enclosure.
36
Removing and Installing Power Supply/Cooling Modules
Removing and Installing Power Supply/Cooling
Modules
The MediaDock Ultra320 ships with two power supplies installed in the
enclosure. If one of the two power supplies should fail, you can remove
and replace the failing power supply while the remaining power supply
provides power to the MediaDock Ultra320. When both power supplies are
operating they share the power requirements, thus minimizing the stress on
an individual power supply.
Use the following procedure for removing and installing either power
supply.
To install or remove a power supply module:
1. Using a Phillips screwdriver, loosen the two thumbscrews attached to
the power supply/cooling module (see Figure 12).
l
2. Push the cam levers down to eject the module and pull it out of the
enclosure.
Thumbscrews
0
Cam levers
Figure 12
l
Power supply/
cooling module
Removing the Power Supply/Cooling Module
37
Chapter 2 Preparing the MediaDock Ultra320 for Installation
3. Slowly insert the new power supply/cooling module completely into
the MediaDock Ultra320 enclosure. Lift the two cam levers to draw the
module into enclosure.
c
Do not slam or force the module into the enclosure, or damage might
result.
4. Once in the enclosure and with the cam levers lifted, firmly press the
power supply/cooling module into the enclosure.
5. Using a Phillips screwdriver, tighten the two thumbscrews to secure
the power supply/cooling module in the enclosure.
To attach the power cord and turn the power-supply power switch on, see
“Connecting the MediaDock Ultra320 Power Cord” on page 50.
38
Chapter 3
Configuring the MediaDock
Ultra320
You can connect the MediaDock Ultra320 in different configurations to
suit your system needs. This chapter describes the supported
configurations and how to connect the MediaDock Ultra320 to match those
configurations.
This chapter contains the following sections:
•
Determining the SCSI Bus Configuration
•
Supported Configurations
•
Termination and Cables for the MediaDock Ultra320
•
Connecting the MediaDock Ultra320
•
Installing a MediaDock Ultra320 Shuttle
•
Connecting the MediaDock Ultra320 Power Cord
•
Canceling the Windows 2000 or Windows XP Found New Hardware
Wizard
Chapter 3 Configuring the MediaDock Ultra320
Determining the SCSI Bus Configuration
You must determine if you want the MediaDock Ultra320 to run as a
single-bus or dual-bus configuration. Familiarize yourself with the
MediaDock Ultra320 parts, determine how you will configure the
MediaDock Ultra320 shuttles and any external MediaDrive enclosures,
and plan your installation. Consider the following:
•
How many drives do you need to support?
A single-bus configuration supports up to 12 MediaDock Ultra320
shuttles per SCSI bus.
A dual-bus configuration allows up to six MediaDock Ultra320
shuttles per SCSI bus.
•
Do you want the MediaDock Ultra320 enclosure to connect to two
Avid editing systems?
You must use a dual-bus configuration to connect one MediaDock
Ultra320 chassis to two Avid editing systems. See “Configuring the
SCSI Bus Configuration Module” on page 34.
When shipped, the bus configuration module is set for a single-bus
configuration. No daisy-chained configuration is supported in either a
single- or a dual-bus configuration.
Supported Configurations
Avid supports the Avid MediaDock Ultra320 in the following three
configurations:
•
40
Single-bus MediaDock Ultra320 connects the MediaDock Ultra320
enclosure to one channel of a dual-channel SCSI LVD/Ultra320 board
or directly to an internal SCSI LVD/Ultra320 port when supported by
your Avid editing system.
Supported Configurations
n
•
Dual-bus MediaDock Ultra320 connected to a dual-channel
LVD/Ultra320 SCSI board installed in one Avid editing system or to a
dual channel LVD/Ultra320 SCSI connection on the system board.
One bus on the MediaDock Ultra320 is connected to one channel on
the Avid editing system, and the other MediaDock Ultra320 bus is
connected to the second channel on the Avid editing system.
•
Dual-bus MediaDock Ultra320 connected to two Avid editing systems.
One bus on the MediaDock Ultra320 is connected to one Avid editing
system, and the other MediaDock Ultra320 bus is connected a second
Avid editing system.
The MediaDock Ultra320 does not support daisy-chaining.
SCSI Bus IDs
SCSI bus IDs are assigned in two areas:
•
Boards that attach the MediaDock Ultra320 to the SCSI bus
•
MediaDock Ultra320 shuttles installed in the enclosure.
The SCSI LVD/Ultra320 board in your Avid editing system is always
assigned SCSI ID 7. There are two SCSI IDs reserved for the MediaDock
Ultra320 enclosure: SCSI ID 14 and SCSI ID 15.
41
Chapter 3 Configuring the MediaDock Ultra320
When you place a MediaDock Ultra320 shuttle in the MediaDock
Ultra320, it is automatically given the SCSI ID assigned to the slot (see
Figure 13 and Figure 14).
•
In a single-bus configuration, the slots are assigned numerically from
left to right in a rack configuration or the bottom to the top in a tower
configuration as: SCSI bus A, SCSI IDs 0, 1, 2, 3, 4, 5, 8, 9, 10, 11, 12,
and 13.
•
In a dual-bus configuration, the slots are assigned numerically from
left to right in a rack configuration or the bottom to the top in a tower
configuration as: SCSI bus A, SCSI IDs 0, 1, 2, 3, 4, and 5; and SCSI
bus B, SCSI IDs 0, 1, 2, 3, 4, and 5.
Single-bus configuration
Dual-bus configuration
SCSI ID 13
SCSI ID 5
SCSI ID 12
SCSI ID 4
SCSI ID 11
SCSI ID 3
SCSI bus A
SCSI ID 2
SCSI ID 10
SCSI ID 1
SCSI ID 9
SCSI bus A
SCSI ID 8
SCSI ID 5
SCSI ID 5
SCSI ID 4
SCSI ID 4
SCSI ID 3
SCSI ID 3
SCSI ID 2
SCSI ID 2
SCSI ID 1
SCSI ID 1
SCSI ID 0
SCSI ID 0
Figure 13
42
SCSI ID 0
MediaDock Ultra320 SCSI IDs
SCSI bus B
Supported Configurations
n
In the rack-mount version of the MediaDock Ultra320, the status panel is
on the right side of the rack as shown in Figure 14.
Single-bus configuration
SCSI ID 10
SCSI ID 11
SCSI ID 12
SCSI ID 13
SCSI ID 2
SCSI ID 3
SCSI ID 4
SCSI ID 5
SCSI ID 9
SCSI ID 8
SCSI ID 5
SCSI ID 4
SCSI ID 3
SCSI ID 2
SCSI ID 1
SCSI ID 0
SCSI bus A
Dual-bus configuration
Figure 14
SCSI ID 1
SCSI ID 0
SCSI ID 5
SCSI ID 4
SCSI ID 3
SCSI ID 2
SCSI ID 1
SCSI ID 0
SCSI bus B
SCSI bus A
Rack-Mount Position
43
Chapter 3 Configuring the MediaDock Ultra320
Rear Panel LEDs
The rear panel contains LEDs and an Alarm Mute button. To stop the
audible signal caused by a fault in the system, press the Alarm Mute
button. Figure 15 shows the rear panel LEDs.
n
Pressing the Alarm Mute button does not clear the actual fault.
This switch has no function
and might not be installed on
some enclosures.
0
Power LED
Fault LED
Alarm Mute button
Power supply 1 power LED
Power supply 2 power LED
Power supply 1 fault LED
Power supply 2 fault LED
SCSI bus fault LED
Active SCSI bus LEDs
Figure 15
44
Rear Panel LEDs and Alarm Mute Button
Termination and Cables for the MediaDock Ultra320
Termination and Cables for the MediaDock Ultra320
This section describes the cables available through Avid for your
MediaDock Ultra320. The MediaDock Ultra320 is self-terminated for both
single- and dual-bus configurations and does not need to be terminated
externally.
Use only Avid Ultra320-compatible cables with your MediaDock
Ultra320. Each cable is specifically designed for systems that run real-time
applications on an Ultra320 SCSI bus. The cable lengths and electrical
properties are designed to ensure data integrity on the SCSI bus.
Avid supplies two cable configurations, at three different lengths 4.95 ft
(1.5 M), 9.9 ft (3 M), and 16.5 ft (5 M). These cables are identified with a
blue sleeve on the cable. The connector configurations include:
•
A high density 68-pin connector on one end of the cable and other end
has a 68-pin very high-density cable interconnect (VHDCI) connector.
•
A 68-pin VHDCI connector on both ends.
68-pin VHDCI connector
68-pin high density connector
This connector is used on the
MediaDock Ultra320.
Figure 16
SCSI Connector Configurations
Connecting the MediaDock Ultra320
The following sections explain how to connect the MediaDock Ultra320
enclosure to one or two Avid editing systems. For supported
configurations, see “Supported Configurations” on page 40. All
configurations show the MediaDock Ultra320 chassis in a rack-mount
version.
45
Chapter 3 Configuring the MediaDock Ultra320
Single-Bus Configuration
The single-bus configuration allows the 12 slots in the MediaDock
Ultra320 to be connected to one host or one SCSI channel.
To connect a single-bus configuration to your Avid editing system:
1. Shut down your Avid editing system.
2. Locate the SCSI Ultra320 cable.
3. Connect the one end of the SCSI cable to your Avid editing system.
-
If connecting to an add-in SCSI board, this will be a VHDCI
connector.
Figure 17
-
If connecting to the system board SCSI, this will be a high density
68-pin connector.
Figure 18
-
68-pin VHDCI Connector
68-pin High Density Connector
If you are using a dual-port Ultra320 SCSI board (see Figure 19),
connect SCSI LVD cable to the channel 1 connector.
CHANNEL 1
Figure 19
46
CHANNEL 2
SCSI LVD Board Connectors
Connecting the MediaDock Ultra320
4. Connect the other end of the Ultra320 SCSI cable to either VHDCI
SCSI connector on the rear of MediaDock Ultra320 (see Figure 20).
VHDCI SCSI connectors
Figure 20
Connecting a SCSI Cable in a Single-Bus Configuration
5. Secure both ends of the cable by tightening the thumbscrews that are
part of the connector.
Dual-Bus Configuration
The dual-bus configuration provides two 6-slot single buses in one
MediaDock Ultra320 (see Figure 13). Both SCSI buses can be connected
to one dual-SCSI-channel host, or each SCSI bus can be connected to
separate hosts.
To connect a dual-bus configuration to one or two Avid editing
systems:
1. Shut down your Avid editing system.
2. Locate two Ultra320 SCSI cables.
3. Connect the one end of one Ultra320 SCSI cable to your first Avid
editing system. See Figure 17, Figure 18, and Figure 19.
-
If connecting to an add-in SCSI board, this will be a VHDCI
connector.
-
If connecting to the system board SCSI, this will be a high density
68-pin connector.
-
If you are using a dual-port Ultra320 SCSI board, connect a
Ultra320 SCSI cable to the channel 1 connector.
47
Chapter 3 Configuring the MediaDock Ultra320
4. Connect the one end of the second Ultra320 SCSI cable to your second
Avid editing system. See Figure 17, Figure 18, and Figure 19
-
If connecting to an add-in SCSI board, this will be a VHDCI
connector.
-
If connecting to the system board SCSI, this will be a high density
68-pin connector.
-
If you are using a dual-port SCSI LVD board, connect the second
Ultra320 SCSI cable to the channel 2 connector.
5. Connect the other ends of both Ultra320 SCSI cables to either VHDCI
SCSI port connection on the rear of the MediaDock Ultra320 (see
Figure 21).
VHDCI SCSI connectors
Figure 21
Connecting a SCSI Cable in a Dual-Bus Configuration
6. Secure both ends of both cables by tightening the thumbscrews that are
part of the connector.
Installing a MediaDock Ultra320 Shuttle
This section explains how to install the MediaDock Ultra320 shuttles and
fillers in the MediaDock Ultra320 enclosure.
Each MediaDock Ultra320 shuttle has a purple button on the front, while
the drive-fillers have a black button. Pushing the button releases the shuttle
handle. The black handle is then pulled outward. A lever on the inside of
the handle pushes the shuttle or drive-filler, out of the MediaDock
Ultra320 (see Figure 22). When you close the handle with the MediaDock
Ultra320 shuttle partially in the MediaDock Ultra320, the lever catches the
side of the enclosure and gently connects the MediaDock Ultra320 shuttle
to the MediaDock Ultra320 backplane.
48
Installing a MediaDock Ultra320 Shuttle
c
n
You must completely install or completely remove one MediaDock
Ultra320 shuttle at a time. If you attempt to remove a second adjacent
MediaDock Ultra320 shuttle when the first MediaDock Ultra320
shuttle handle is open, the shuttles will hit and could damage either
shuttle.
Drive-fillers are inserted and removed the same way as drive shuttles. The
difference is the drive-fillers are shorter, have a black button, and do not
include a drive.
MediaDock Ultra320 shuttle
MediaDock Ultra320
Purple button
Handle
Figure 22
c
Lever
Populated with drive shuttles
or drive-fillers
Installing a MediaDock Ultra320 shuttle or Drive-Filler
To ensure proper cooling you must use a drive-filler in any slot that
does not contain a MediaDock Ultra320 shuttle. Do not operate the
MediaDock Ultra320 with an open slot.
To install a MediaDock Ultra320 shuttle or drive-filler:
1. Carefully align the MediaDock Ultra320 shuttle or drive-filler in front
of an empty slot.
2. Pull the handle outward to the open position.
3. Insert the MediaDock Ultra320 shuttle or drive-filler into the slot, and
gently push until you feel a slight resistance and the lever contacts the
inside of the MediaDock Ultra320.
49
Chapter 3 Configuring the MediaDock Ultra320
4. Gently but firmly close the handle.
If the MediaDock Ultra320 chassis is powered up and you insert a
MediaDock Ultra320 shuttle or drive-filler, the shuttle will spin up as soon
as it is fully latched into the MediaDock Ultra320 chassis.
Connecting the MediaDock Ultra320 Power Cord
This section describes how to connect the power cord to the
MediaDock Ultra320. To connect power to the MediaDock Ultra320,
connect the power supplies to ac outlets.
1. Attach one end of the power cord to power supply 1.
2. Plug the other end of the power cord into a surge-protected outlet (see
Figure 23).
3. Repeat step 1 and step 2 for power supply 2.
Power supply 1
AC power connector
Figure 23
n
AC power connector
Power supply 2
Connecting the MediaDock Ultra320 Power Cord
After you have plugged the power supplies into the ac outlets, turn on
power supply 1 and then power supply 2.
After you turn on the MediaDock Ultra320, you can turn on your Avid
editing system.
50
Canceling the Windows 2000 or Windows XP Found New Hardware Wizard
Canceling the Windows 2000 or Windows XP Found
New Hardware Wizard
When you turn on your Windows 2000 or Windows XP Avid editing
system for the first time, the operating system detects the
MediaDock Ultra320 and displays the Found New Hardware Wizard. You
need to disable the Hardware Wizard for this device. Once disabled, the
MediaDock Ultra320 enclosure will not cause the Found New Hardware
Wizard to open each time you start the Avid editing system.
Disable Windows 2000 Hardware Wizard
To disable the Hardware Wizard on Windows 2000 Operating
Systems:
1. Turn on the MediaDock Ultra320 enclosure.
2. Turn on the Avid editing system.
The Found New Hardware Wizard window opens.
51
Chapter 3 Configuring the MediaDock Ultra320
3. Click Next.
The Install Hardware Device Drivers window opens.
4. Select “Search for a suitable driver for my device” and click Next.
The Locate Drive Files window opens.
5. Deselect all the “Optional search locations” check boxes and click
Next.
The Drive File Search Results window opens.
6. Select “Disable the device” and click Finish.
The MediaDock Ultra320 enclosure will not cause the Windows 2000
Found New Hardware Wizard to open each time you start the Avid editing
system.
52
Canceling the Windows 2000 or Windows XP Found New Hardware Wizard
Disable Windows XP Hardware Wizard
To disable the Hardware Wizard on Windows XP Operating Systems:
1. Turn on the MediaDock Ultra320 enclosure.
2. Turn on the Avid editing system.
The Found New Hardware Wizard window opens.
3. Select “Install the software automatically” and click Next.
The Cannot Install this Hardware window opens.
53
Chapter 3 Configuring the MediaDock Ultra320
4. Select “Don’t prompt me again to install this software” and click
Finish.
The Get Help with Your Hardware Device window opens.
5. Select No, and click Next.
A second Get Help with Your Hardware Device window opens.
6. Click Finish.
The MediaDock Ultra320 enclosure will not cause the Windows XP Found
New Hardware Wizard to open each time you start the Avid editing
system.
54
Chapter 4
Replacing Shuttle Packs
The following sections explains the front status panel LEDs and how to a
replace MediaDock Ultra320 shuttles for each of the supported operating
system. You can also remove and replace a power supply while the system
is running; see “Removing and Installing Power Supply/Cooling Modules”
on page 37.
This chapter contains the following sections:
•
Understanding the Status Panel
•
Replacing a MediaDock Ultra320 Shuttle on a Mac OS 9 System
•
Replacing a MediaDock Ultra320 Shuttle on a Mac OS X System
•
Replacing a MediaDock Ultra320 Shuttle on a Windows NT System
•
Replacing a MediaDock Ultra320 Shuttle on a Windows 2000 or
Windows XP System
Chapter 4 Replacing Shuttle Packs
Understanding the Status Panel
Before you use the MediaDock Ultra320, you should understand the status
panel and how to use it (see Figure 24). The status panel includes three
status LEDs.
Not used
Power LED
Fault LED
Figure 24
Configuration LED
Status Panel
The status LEDs allow you to monitor the MediaDock Ultra320 while it is
operating. See Table 2 for the functions of the LEDs.
Table 2
Status Panel Functions
Status Panel Icon
Function
Power
This LED is On when power is applied to the
MediaDock Ultra320.
This LED is Off when no power is applied to the
MediaDock Ultra320.
Fault
This LED is On when a system malfunction has occurred.
The malfunction could be with the temperature, the power
supply, or a drive fault.
Dual Bus
This LED is On when the MediaDock Ultra320 is in
dual-bus mode.
The LED is Off when the MediaDock Ultra320 is in
single-bus mode.
56
Replacing a MediaDock Ultra320 Shuttle on a Mac OS 9 System
Replacing a MediaDock Ultra320 Shuttle on a
Mac OS 9 System
When a MediaDock Ultra320 is attached to a Mac OS 9 system, you can
replace a MediaDock Ultra320 shuttle while the MediaDock Ultra320 is
running. For Mac OS X systems, see “Replacing a MediaDock Ultra320
Shuttle on a Mac OS X System” on page 60.
c
Before you change any MediaDock Ultra320 shuttle on a Mac OS 9
system, use the AVIDdrive Utility 2 (ADU2) software to unmount and
spin down the MediaDock Ultra320 shuttle from the desktop.
When you have three or four MediaDock Ultra320 shuttles in the
MediaDock Ultra320, each with several partitions mounted on the desktop,
it can be difficult to associate the partitions to a specific MediaDock
Ultra320 shuttle and its location in the MediaDock Ultra320. Before you
replace a MediaDock Ultra320 shuttle, use the identify feature in the
ADU2 software (Mac OS 9) or Storage Manager software to match
partitions to a specific MediaDock Ultra320 shuttle in the MediaDock
Ultra320.
57
Chapter 4 Replacing Shuttle Packs
To replace a MediaDock Ultra320 shuttle on Mac OS 9:
1. Double-click the ADU2 icon. The ADU2 window opens, showing the
state of the application when it was used last (see Figure 25).
Figure 25
ADU2 Window
2. To find the drive partition names, click the Striped and UnStriped tabs
at the top of the window (see Figure 25). The window changes to
display the name of each partition on the drive as shown on the
desktop.
3. When you find the drive you want to replace, click the Drive icon to
select the drive and all its partitions.
4. Select Option > Identify. The Identify window opens (see Figure 26).
Figure 26
58
Identify Window
Replacing a MediaDock Ultra320 Shuttle on a Mac OS 9 System
5. Look for the flashing activity light on the front of the MediaDock
Ultra320 shuttles. The shuttle or shuttles with the flashing lights are
the ones you need to remove. Note the location of the shuttles.
6. In the Identify window, click Stop to end the Identify process.
7. Click Unmount in the ADU2 window (see Figure 27). All the
partitions on the unstriped drive group or the striped group are
removed from the desktop. The Status message in the Capacity column
changes from Mounted to Unmounted.
Figure 27
ADU2 Window - (Unmount)
8. Remove the MediaDock Ultra320 shuttle.
9. Insert the new MediaDock Ultra320 shuttle as explained in “Installing
a MediaDock Ultra320 Shuttle” on page 48.
10. Allow the MediaDock Ultra320 shuttle to spin up. This typically takes
less than 1 minute.
11. Click Scan Bus in the ADU2 window. The utility scans the SCSI buses
and redisplays the ADU2 window showing the new striped and
unstriped MediaDock Ultra320 shuttles.
12. Click the new MediaDock Ultra320 shuttle icon.
13. Click Mount in the ADU2 window, and quit the AVIDdrive Utility 2
application.
59
Chapter 4 Replacing Shuttle Packs
Replacing a MediaDock Ultra320 Shuttle on a
Mac OS X System
When a MediaDock Ultra320 is attached to a Mac OS X system, you must
turn off the Mac OS X system to replace a MediaDock Ultra320 shuttle in
the MediaDock Ultra320.
When you have three or four MediaDock Ultra320 shuttles in the
MediaDock Ultra320, each with several partitions mounted on the desktop,
it can be difficult to associate the partitions to a specific MediaDock
Ultra320 shuttle and its location in the MediaDock Ultra320. Before you
replace a MediaDock Ultra320 shuttle, use the identify feature in the
Storage Manager software to match partitions to a specific MediaDock
Ultra320 shuttles in the MediaDock Ultra320.
To replace a MediaDock Ultra320 shuttle on Mac OS X:
1. Make sure you have quit all user applications.
2. Shut down the Mac OS X system as you normally would. (You do not
need to turn off the MediaDock Ultra320.)
3. Remove the MediaDock Ultra320 shuttle and place the shuttle in a
cool, clean, static-free environment.
4. Insert the new MediaDock Ultra320 shuttle as explained in “Installing
a MediaDock Ultra320 Shuttle” on page 48.
5. Allow the MediaDock Ultra320 shuttle to spin up. This typically takes
less than 1 minute. (If you have turned off the MediaDock Ultra320,
turn on the MediaDock Ultra320.)
6. Reboot the Avid editing system. The new MediaDock Ultra320 shuttle
can be seen and used by the Mac OS X system.
60
Replacing a MediaDock Ultra320 Shuttle on a Windows NT System
Replacing a MediaDock Ultra320 Shuttle on a
Windows NT System
The Windows NT operating system might not always detect or use a
replacement MediaDock Ultra320 shuttle when the MediaDock Ultra320
is connected to a Windows NT system. The replacement of a MediaDock
Ultra320 shuttle can also be affected by the type of workgroup
environment being used at your site.
To make sure the operating system can see the replacement
MediaDock Ultra320 shuttle in the system:
1. Make sure you have quit all user applications.
2. Shut down the Windows NT system as you normally would. (You do
not need to turn off the MediaDock Ultra320.)
3. Remove the MediaDock Ultra320 shuttle and place the shuttle in a
cool, clean, static-free environment.
4. Insert the new MediaDock Ultra320 shuttle as explained in “Installing
a MediaDock Ultra320 Shuttle” on page 48.
5. Allow the MediaDock Ultra320 shuttle to spin up. This typically takes
less than 1 minute. (If you have turned off the MediaDock Ultra320,
turn on the MediaDock Ultra320.)
6. Reboot the Avid editing system. The new MediaDock Ultra320 shuttle
can be seen and used by the Windows NT system.
Replacing a MediaDock Ultra320 Shuttle on a
Windows 2000 or Windows XP System
The Windows 2000 and Windows XP operating systems support
MediaDock Ultra320 shuttle replacement without rebooting the Windows
operating system. The following sections describe how to move a drive
from one Windows system to another without first shutting down either
computer.
61
Chapter 4 Replacing Shuttle Packs
n
MediaDock Ultra320 shuttles can always be removed and installed when
the MediaDock Ultra320 is turned off. When the MediaDock Ultra320 and
Avid editing system are turned on again, the added or removed shuttles
will be detected by the operating system.
Removing Shuttles While the System is Turned On
To remove shuttles from a Windows system:
1. Right-click on My Computer and select Manage.
2. Click Device Manager.
3. Click the Disk drives + (plus) sign to expand the list of drives currently
attached to the system.
Figure 28
62
Device Manager Disk Drive List
Replacing a MediaDock Ultra320 Shuttle on a Windows 2000 or Windows XP System
4. Right-click on the drive you want to remove and select Uninstall.
Figure 29
Uninstall
5. Click OK in the Confirm Device Removal dialog box.
Figure 30
Confirm Device Removal
6. Drive list will update and the drive will no longer be listed.
63
Chapter 4 Replacing Shuttle Packs
7. Unlatch the handle on the MediaDock shuttle so that the drive begins
to spin down. Wait for the drive to finish spinning down
(approximately 10-15 seconds).
8. Remove the MediaDock shuttle completely from the MediaDock
enclosure.
Adding Shuttles while the System is Turned On
To add shuttles from a Windows system:
1. Carefully insert the new MediaDock Ultra320 shuttle as explained in
“Installing a MediaDock Ultra320 Shuttle” on page 48.
2. Close the handle so that the drive seats completely and begins to
spin up.
3. Wait 10-15 seconds for the drive to finish spinning up.
4. Right-click on My Computer and select Manage.
5. Select Disk Management from the Storage section.
Figure 31
64
Disk Management
Replacing a MediaDock Ultra320 Shuttle on a Windows 2000 or Windows XP System
6. Select Action > Rescan Disks.
Figure 32
Rescan Disk
After the disk rescan is complete, you will see the new drive listed as
Foreign at the bottom of the window.
Figure 33
Foreign Disk
65
Chapter 4 Replacing Shuttle Packs
7. (Option) If the new drive does not appear, select Device Manager.
8. (Option) Select Disk drives from the left pane and select Action > Scan
for hardware changes.
Figure 34
66
Scan for Hardware Changes
Replacing a MediaDock Ultra320 Shuttle on a Windows 2000 or Windows XP System
The new drive should appear in the Device Manager and in Disk
Management lists.
Figure 35
New Disk Listed
9. Select Disk Management from the Storage section.
10. In the left pane, right-click on the Foreign disk and select Import
Foreign Disks.
n
For information on importing foreign disks or mounting drives such as a
MediaDock Ultra320 shuttle, see your Windows operating system
documentation or Disk Management Help.
67
Chapter 4 Replacing Shuttle Packs
Figure 36
Foreign Disk Pop-up Menu
11. At the Import Foreign Disks dialog, check the disk group box and
click OK.
Figure 37
Import Foreign Disk
The new drive will appear in the Disk Management list with its name and
letter and be ready for use.
68
Replacing a MediaDock Ultra320 Shuttle on a Windows 2000 or Windows XP System
Exceptions
The following sections describe possible exceptions you might experience.
Offline
It is possible the new drive might appear in the Disk Management as
Offline. If this happens, right-click on the drive and select Reactivate Disk.
The drive will appear ready for use.
New Systems
If you move a drive from an existing system to a system that has never had
a dynamic disk drive attached to it, the system will take on the dynamic
drive group information from the first system. A problem occurs when you
bring the drive back to the original system and the original system contains
other dynamic drives. The original system might see the shuttle as Offline,
which you then Reactivate, see “Offline” on page 69.
69
Chapter 4 Replacing Shuttle Packs
If the drive does not appear all, Microsoft recommends attaching this drive
to a third system, where it will show up as Foreign. Import it as a foreign
drive into the third system. Then, bring it back to the first system and
import it as foreign, see “Adding Shuttles while the System is Turned On”
on page 64. The drive will appear ready for use.
To avoid this scenario, Avid recommends that you attached an unused
drive to a system that has never had a dynamic drive, and initialize the
drive as a ready to use dynamic drive.
This make the system dynamic drive friendly and prepares it for use with
other dynamic drives. This only needs to be done once.
70
Chapter 5
Preparing Your Drives
Your MediaDock Ultra320 shuttles need to be partitioned and formatted
before you can use them. Partitioning allows you to divide a drive into
more than one section if needed, and formatting places a file system on
each partition.
When using the MediaDock Ultra320 shuttles on a Windows operating
system, use the Disk Administrator application provided by the operating
system to format and stripe the MediaDock Ultra320 shuttle. For mounting
and unmounting striped sets on a Windows NT operating system, use the
Avid Disk Mounter utility. The Windows 2000 and Windows XP
operating systems do not need to use this utility.
n
For complete and up-to-date instructions on using the features available in
the Windows operating system, see your Microsoft® operating system
documentation.
To format the MediaDock Ultra320 shuttle on a Macintosh system, see
“Managing MediaDock Ultra320 Shuttles on Mac OS 9 Systems” on
page 72 or “Managing MediaDock Ultra320 Shuttles on Mac OS X
Systems” on page 76. When using the MediaDock Ultra320 shuttles on a
Macintosh operating system, use the ADU2 software (Mac OS 9) or ATTO
ExpressStripe (Mac OS X) to format and stripe the MediaDock Ultra320
shuttle.
This chapter contains the following sections:
•
Managing MediaDock Ultra320 Shuttles on Mac OS 9 Systems
•
Managing MediaDock Ultra320 Shuttles on Mac OS X Systems
Chapter 5 Preparing Your Drives
•
Managing MediaDock Ultra320 Shuttles on a Windows 2000 or
Windows XP System
•
Striping
•
Diagnostic Utilities
Managing MediaDock Ultra320 Shuttles on Mac OS 9
Systems
If you are using a Mac OS 9 operating system, install the latest version of
the ADU2 software. The ADU2 software that came with your MediaDock
Ultra320 shuttle might not be the latest version. (See the Avid Knowledge
Center for any updates.) The ADU2 software is the utility that Avid
provides for formatting and striping MediaDock Ultra320 shuttles on
Mac OS 9 systems. For installation instructions and procedures, see the
AVIDdrive Utility 2 User’s Guide.
MediaDock Ultra320 shuttles are compatible with the following Avid
utilities:
•
AVIDdrive Utility Release 2.2 and later
•
Avid StorEx Release 1.5 and later
•
AVIDdrive Utility Extension Release 2.2 and later
To keep your MediaDock Ultra320 shuttles in peak operating condition in
a Mac OS 9 system, perform maintenance operations and checks on a
regular basis, including:
72
•
Checking MediaDock Ultra320 Shuttles
•
Using Disk First Aid to Repair MediaDock Ultra320 Shuttles
•
Erasing MediaDock Ultra320 Shuttles
Managing MediaDock Ultra320 Shuttles on Mac OS 9 Systems
Checking MediaDock Ultra320 Shuttles
Many drive problems are not hardware related but are problems with the
file system written on the drive. The file system consists of data structures
that hold critical information about the files stored on your drive. All these
data structures allow your drive to be recognized as a Macintosh volume.
File system errors tend to grow over time. You should fix then as soon as
possible after discovery. File system errors are generally caused by system
crashes, improper system shutdowns, and power failures. They should not
be interpreted as a precursor to a mechanical drive failure.
Media Composer Release 8.1 and Later
If you are using Media Composer® Release 8.1 and later, use the
DiskWarrior application to maintain the file system and its data structures.
Avid recommends periodic use of this utility on any MediaDock Ultra320
shuttle and other standalone drives, as well as your editing system’s
internal drive, to ensure a healthy file system. Avid ships the DiskWarrior
application and a CD-ROM that contains a .pdf manual that explains how
to use DiskWarrior. DiskWarrior is not explained in this guide. The Disk
First Aid™ utility, supplied by Apple, can be used for directory problems
on Media Composer Release 8.1 systems and later.
n
Avid does not support the use of Norton Disk Doctor® on any Macintosh
system running Media Composer Release 8.0 and later.
Using Disk First Aid to Repair MediaDock Ultra320 Shuttles
Disk First Aid is a drive directory structure repair tool supplied by Apple
with each system. This tool can find and repair many basic directory
structure problems to help keep your drives functioning correctly. You
should use Disk First Aid when your system is reporting drive errors or
when files on the drive can’t be opened and used by Avid application
software.
n
Run Disk First Aid regularly as a proactive method of avoiding drive
problems.
73
Chapter 5 Preparing Your Drives
You’ll find a copy of Disk First Aid in one of the following locations:
•
The Utilities folder on the Avid (or system) drive
•
The system software CD-ROM that came with your system
•
The Avid software CD-ROM that came with your system (You will
need to install the Avid software to install a copy of Disk First Aid.)
To repair a MediaDock Ultra320 shuttle:
1. Open the Utilities folder on the Macintosh HD.
2. Double-click the Disk First Aid icon to start the application. The Disk
First Aid window opens (see Figure 38). This window contains all the
necessary controls for you to run Disk First Aid.
Drive Selection
panel
Verify button
Repair button
Stop button
Disk First Aid
instructions
Figure 38
74
Disk First Aid Main Window Functions
Managing MediaDock Ultra320 Shuttles on Mac OS 9 Systems
3. Select the drive you want to verify and repair by clicking the Drive
icon in the Drive Selection panel. A message box opens if you are
checking a drive with open files or a shared drive (see Figure 39). You
can only verify these drives while they are in use. Click OK to close
the message box.
Figure 39
Disk First Aid Message Box
4. Verify and repair the selected drive by clicking Repair. Disk First Aid
scans the directory structures, reports any problems, repairs the
selected drive (if possible) and reports the results (see Figure 40).
Verification
results
Figure 40
Disk First Aid Verification Results
If Disk First Aid reports that the selected drive cannot be verified or
repaired, follow the steps in “If Drive Status Can’t Be Verified” on
page 76.
75
Chapter 5 Preparing Your Drives
5. When you are finished, select File > Quit.
If Drive Status Can’t Be Verified
If Disk First Aid is unable to verify or repair a MediaDock Ultra320
shuttle, copy all media files and other data files (if possible) to another
MediaDock Ultra320 shuttle.
If you are still experiencing problems or are not able to repair the
MediaDock Ultra320 shuttle, contact Avid Customer Support for
additional assistance.
Erasing MediaDock Ultra320 Shuttles
Occasionally, you might want to erase the drives on your Avid editing
system to remove all the data that is on them. Erasing re-creates the
partition map and directory structure, improving overall drive
performance. When you are between projects or when the media files and
other data on the drives are no longer needed, that is the best time to erase
drives.
c
Erasing a MediaDock Ultra320 shuttle destroys all the data on the
shuttle. Before you erase the shuttle, back up all the critical data on
the shuttle to tape or another shuttle.
For more information on erasing drives, see the AVIDdrive Utility 2 User’s
Guide.
Managing MediaDock Ultra320 Shuttles on Mac OS X
Systems
If you are using a Mac OS X operating system, install the latest version of
the ATTO ExpressStripe software. The ATTO ExpressStripe software
comes with the MediaDock Ultra320 shuttle or with your Avid editing
application. The ATTO ExpressStripe software is the utility that Avid
provides for formatting and striping MediaDock Ultra320 shuttles on
Mac OS X systems. For installation instructions and procedures, see the
76
Managing MediaDock Ultra320 Shuttles on a Windows 2000 or Windows XP System
ATTO ExpressStripe RAID for Macintosh OS X Installation and Operation
Manual. This online PDF file is included with the ATTO ExpressStripe
software.
n
The ATTO ExpressStripe software is also included with Avid editing
systems that run on Mac OS X.
MediaDock Ultra320 shuttles are compatible with ATTO ExpressStripe
Version 1.2 and later.
Managing MediaDock Ultra320 Shuttles on a
Windows 2000 or Windows XP System
The Windows 2000 and Windows XP operating systems allow you to
create multiple partitions or logical drive assignments as a way to manage
projects and files. You can configure your drive as one large partition or
multiple partitions varying in size. Each partition is assigned a drive letter.
The Windows 2000 and Windows XP operating systems define two types
of disk drives:
•
Basic disk drives allow disks to be divided into partitions. This type of
drive normally is used for standalone disk drives in Windows 2000 and
Windows XP operating systems.
•
Dynamic disk drives allow disks to be divided into volumes. Disk
drives must be dynamic if you want to stripe, mirror, or use disk drives
in the RAID style. Avid supports the use of dynamic disk drives when
you need to create a striped volume on your Windows 2000 and
Windows XP systems.
To use your MediaDock Ultra320 shuttles on a Windows 2000 or
Windows XP system, you need to format and partition them properly.
After you do this, keep your MediaDock Ultra320 shuttles in peak
operating condition by performing maintenance operations and checks on
a regular basis. For more information, see “Diagnostic Utilities” on
page 85.
77
Chapter 5 Preparing Your Drives
The Windows 2000 and Windows XP operating systems contain a diskchecking feature in the Properties section of each drive. For information
about how to use this feature, see the Windows documentation.
Supported Windows File Systems
The Windows 2000 and Windows XP operating systems support three
types of file systems:
n
c
c
78
•
Two types of File Allocation Table (FAT): FAT 16 and FAT 32.
FAT 16 is used primarily when backward compatibility is needed on
operating systems such as MS-DOS® or other Windows versions. The
new FAT 32 file system is no longer limited to a 2-GB partition size.
Avid does not support the FAT 16 file system for media.
•
New Technology File System (NTFS). NTFS affords the user security,
compression, and other file-recovery features. Drives employing
NTFS support partitions of any size.
Avid recommends NTFS when you partition your disk drives.
One of your internal disk drives (normally designated drive C) has a
partition that contains the operating system. This drive might be
labeled System or Boot. You should not reformat this partition unless
you need to rebuild your system disk drive.
If you have striped sets connected to an Ultra320 SCSI board in your
Windows NT system, you must transfer the striped sets using the disk
configuration floppy disk and import the information to the
Windows 2000 or Windows XP system. See:
•
“Replacing a MediaDock Ultra320 Shuttle on a Windows 2000 or
Windows XP System” on page 61.
•
“Transferring Disk Drives or Stripe Sets from a Windows NT System
to a Windows 2000 or Windows XP System” on page 82.
Managing MediaDock Ultra320 Shuttles on a Windows 2000 or Windows XP System
Creating Primary Partitions and Formatting Drives with a
Windows 2000 or Windows XP Operating System
If you need to partition, format, or perform any action on the disks, click
the disk (partition or unallocated disk) in the Computer Management
window; the white section of the disk changes to stripes, showing that the
section has been selected.
n
You might not have the same partitions and disk configuration shown in
the following procedure. However, examples in the procedure will help
you understand the Computer Management window in the Windows 2000
and Windows XP operating systems.
To create a primary partition and format a drive:
1. Start your system, and log in to an account with administrative
privileges.
2. Right-click the My Computer icon, and select Manage.
The Computer Management window opens.
Help icon
Text pane
Disk Management
Folder
Physical disk selection
Disk 1
3. Click the Disk Management folder.
n
For more information on the Computer Management window, click the
Help icon in the toolbar of the Computer Management window.
79
Chapter 5 Preparing Your Drives
4. Designate the disk as a Basic disk before you partition it, unless you
are going to stripe it with another drive. To designate a disk as Basic:
a. Place the pointer over the physical disk selection.
b. Right-click, and select Basic Disk.
5. Place the pointer over Disk 1, right-click, and select “Create partition.”
The Create Partition Wizard opens and explains the function of the
wizard.
6. Click Next.
The wizard leads you through partitioning and formatting of the
selected unallocated section of your disk.
a. In the Select Partition Type window, select Primary, and click
Next.
b. In the Partition Size window, select Maximum to make the
complete unallocated space a partition, and click Next. To make a
smaller partition, divide the maximum number by the number of
partitions you want to make, for a maximum of four partitions per
disk. You need to run the wizard for each partition.
c. In the Assign Drive Letter window, assign the partition an unused
drive letter or use the letter automatically selected by the wizard.
d. In the Format Partition window, select “Format this partition with
the following settings.”
e. In the “File system to use” list, select NTFS.
f.
80
In the Allocation unit size list, select Default.
Managing MediaDock Ultra320 Shuttles on a Windows 2000 or Windows XP System
g. In the “Volume label text box,” type a label that easily identifies
the volume.
h. Select Perform a Quick Format.
7. Click Next.
The Completing the Create Partition Wizard opens and provides a list
of your selections.
8. Verify your selections and click Finish. (This might take 1 minute to
complete.)
9. Repeat this procedure to partition and format any unallocated disk
sections.
Creating a Disk Configuration Floppy Disk from a Windows NT
System
The following instructions explain how to create the disk configuration
floppy disk from a Windows NT system.
To create a disk configuration floppy disk from a Windows NT
system:
1. Acquire a blank, formatted floppy disk.
2. Click the Start button and select > Programs > Administrative Tools,
and then select Disk Administrator.
The Disk Administrator window opens.
3. Place the formatted floppy disk in the floppy disk drive.
4. Select Partition > Configuration > Save.
The Insert Disk dialog box opens.
5. Click OK.
The stripe set disk configuration is placed on the floppy disk so you
can transfer it to a Windows 2000 or Windows XP system.
81
Chapter 5 Preparing Your Drives
6. Write down the following information about the drive that contains the
Windows NT operating system (for use later):
-
Disk number — for example, 0
-
Drive letter — for example, C
-
Partition size — for example, 2047 MB
7. Close the Disk Administrator window.
Transferring Disk Drives or Stripe Sets from a Windows NT
System to a Windows 2000 or Windows XP System
The following list provides an overview of this section on how to transfer
MediaDock Ultra320 shuttles from an existing Windows NT system to a
Windows 2000 system using the disk configuration floppy disk. The
sections that follow the bulleted list provide step-by-step procedures.
82
•
Create a disk configuration floppy disk if you have not already done
so, as described in “Creating a Disk Configuration Floppy Disk from a
Windows NT System” on page 81.
•
Make sure both systems are properly shut down and you move the disk
drives to the Windows 2000 or Windows XP system.
•
Make sure you have installed the latest drivers for the disk controller
board on the Windows 2000 or Windows XP system before you move
drives or stripe sets.
•
Determine the drive numbering (SCSI IDs) of the disk drives on the
Windows NT system and maintain the same SCSI IDs on the Windows
2000 and Windows XP systems. You might need to change the SCSI
IDs of existing drives on the Windows 2000 and Windows XP
systems.
•
Make sure there are no SCSI ID conflicts.
•
Make sure the termination is set properly after you move the drives or
stripe sets.
•
Have all disk drives properly connected and turned on prior to turning
on the Windows 2000 and Windows XP systems.
Managing MediaDock Ultra320 Shuttles on a Windows 2000 or Windows XP System
Importing the Disk Configuration into a Windows 2000 or
Windows XP System
This section explains how to import the disk configuration from the
Windows NT system into the Windows 2000 and Windows XP systems.
Insert the Ultra320 shuttles in your MediaDock Ultra320 enclosure, and
perform the following procedure.
To import the disk configuration:
1. Start your Windows 2000 or Windows XP system, and log in to an
account with administrative privileges.
2. Right-click the My Computer icon, and select Manage.
The Computer Management window opens.
Maximize button
Disk
Management
folder
3. Click the Disk Management folder. If the size of the window is small,
you might want to click the Maximize button in the upper right corner
of the window.
For more information,
see “Creating a Disk
Configuration Floppy
Disk from a
Windows NT System”
on page 81.
4. Insert the disk configuration floppy disk into the floppy drive.
5. Select Action > Restore Basic Disk Configuration.
The Restore Disk Configuration dialog box opens.
83
Chapter 5 Preparing Your Drives
6. Select the disk number that is associated with the floppy drive, and
then click Yes.
7. A Confirm dialog box opens, stating that a reboot is required after the
operation.
8. Click Yes.
9. Remove the floppy disk prior to rebooting the system.
n
For more disk drive information, see “Managing MediaDock Ultra320
Shuttles on a Windows 2000 or Windows XP System” on page 77.
Striping
You can stripe multiple MediaDock Ultra320 shuttles on one SCSI bus
channel or across two SCSI bus channels.
On Windows 2000 and Windows XP systems, you can move striped drives
from one Avid editing system to another by using the Disk Management
tool. For information about the striping process, see the setup guide for
your Avid editing system, your Windows documentation, or Disk
Management Help.
When using a Mac OS 9, use the ADU2 to create and manage striped
drives. For more information, see the ADU2 documentation. When using
Mac OS X, use ATTO ExpressStripe. For more information, see Create a
RAID 0 Volume in the ATTO ExpressStripe documentation.
The following sections contain procedures for using the Windows Disk
Management tool to manage striped MediaDock Ultra320 shuttles:
84
•
“Creating Primary Partitions and Formatting Drives with a
Windows 2000 or Windows XP Operating System” on page 79
•
“Creating a Disk Configuration Floppy Disk from a Windows NT
System” on page 81
•
“Transferring Disk Drives or Stripe Sets from a Windows NT System
to a Windows 2000 or Windows XP System” on page 82
•
“Importing the Disk Configuration into a Windows 2000 or
Windows XP System” on page 83
Diagnostic Utilities
Avid provides drive-striping information when configurations are tested
and when drives and software are released. This information refers to the
number of drives that need to be striped to achieve a specific resolution.
To view the latest performance information:
1. Go to www.avid.com.
2. Click support.
3. Click online support.
4. Click Documentation under the Avid Knowledge Center heading.
5. Click Login.
n
If you are not already a registered user of the Knowledge Center, click
Register and follow the on-screen registration instructions to register now.
Registered users can access more information.
6. Click the Drive Striping Tables link or, alternatively, type Drive
Striping Tables in the Search field at the top of the Web page,
select Documentation, and click Go.
Links to the latest drive-striping information are posted here.
Diagnostic Utilities
Avid provides a hard-drive exerciser in the Utilities folder where your
Avid editing application has been installed on your system. Avid
diagnostic utilities can also be found on the Avid Knowledge Center. Use
the hard-drive exerciser program to test for SCSI subsystem failures,
recoverable data errors, nonrecoverable data errors. Depending on your
release, the Utilities folder will contain Avid StorEx or Storage Manager.
n
Before you run a diagnostic program, unmount the MediaDock Ultra320
shuttles.
Avid provides the following utilities for these operating systems. Always
check the release notes that ship with your Avid software release to see if
there have been any updates that relate to the MediaDock Ultra320
enclosure.
85
Chapter 5 Preparing Your Drives
Windows NT Systems
If you are using the MediaDock Ultra320 enclosure on a Windows NT
system, there are two major software utilities available:
•
Avid Disk Mounter is an Avid utility that allows you to move striped
drives easily from one Avid Windows NT system to a second Avid
Windows NT system. For more information about Avid Disk Mounter,
see the Avid MediaDrive Utilities User’s Guide.
•
Avid StorEx is a general-purpose, hard-drive exerciser program. For
more information about Avid StorEx, see the setup guide that ships
with your system.
There is also a disk-checking feature in the Properties section of each
drive. For information about how to use this feature, see the Microsoft
Windows NT documentation.
Windows 2000 and Windows XP Systems
If you are using the MediaDock Ultra320 enclosure on a Windows 2000 or
Windows XP system, one of the following hard-drive exerciser programs
is in the Utilities folder on your Avid editing system:
•
StorEx — See the setup guide that ships with Avid editing systems
running Windows operating systems.
•
Storage Manager — Use the Help linked to the application.
Avid provides the latest version of Storage Manager on the Avid
Knowledge Center. If you do not have Storage Manager or want to
check for a newer version, the utility is available for downloading on
the Knowledge Center
n
Avid editing applications install the Storage Manager software with
application.
There is also a disk-checking feature in the Properties section of each
drive. For information about how to use this feature, see the Microsoft
Windows 2000 documentation.
86
Diagnostic Utilities
Macintosh Systems
If you are using the MediaDock Ultra320 enclosure on a Macintosh
system, use the following software utilities as appropriate:
•
•
•
AVIDdrive Utility 2 (Mac OS 9) or ATTO ExpressStripe (Mac OS X)
allows you to:
-
Identify drives (use Storage Manager for Mac OS X)
-
Select and create partitions
-
Create striped groups
-
Erase partitions
One of the following hard-drive exerciser programs is in the Utilities
folder on your Avid editing system:
-
StorEx — See the Avid StorEx User’s Guide that ships with Avid
editing systems running the Macintosh operating system.
-
Storage Manager (Mac OS X) — Use the online Help linked to the
application.
DiskWarrior specializes in eliminating directory errors by allowing
you to rebuild your disk directory using data recovered from the
original directory. By doing this, you can recover files and folders that
you thought were lost. Your disk must be a Mac OS Standard (HFS) or
Mac OS Extended (HFS Plus) disk.
87
Chapter 5 Preparing Your Drives
88
Chapter 6
Troubleshooting
Occasionally, you might have problems with your MediaDock Ultra320
that you can repair on your own. The following sections describe problems
that might occur when you use your MediaDock Ultra320 with either a
Macintosh operating system or Windows operating system, and solutions
to these problems.
•
Avid Editing System Can’t Access the MediaDock Ultra320 Shuttles
•
Avid Editing System Recognizes Only Some Slots in the MediaDock
Ultra320 Enclosure
•
The Power Supply/Cooling Module LED Is Amber and the
MediaDock Ultra320 Alarm Is Sounding
•
Avid Editing System Hangs When a MediaDock Ultra320 Shuttle Is
Removed
•
Avid Editing System Doesn’t Recognize the Newly Installed
MediaDock Ultra320 Shuttles
Whenever a hardware fault occurs, an audible alarm sounds. You can use
the fault LED indicators to point to the problem locations.
Chapter 6 Troubleshooting
Avid Editing System Can’t Access the MediaDock
Ultra320 Shuttles
If your Avid editing system does not access the MediaDock Ultra320
shuttles, do the following:
•
Look for lit fault LEDs on the front of the MediaDock Ultra320
shuttles.
•
Verify that the SCSI cable you are using is properly fastened on both
ends.
•
Check the cable for bent pins.
•
Check for possible SCSI bus connection problem. Remove and
reinstall the dual-bus module, see “Configuring the SCSI Bus
Configuration Module” on page 34.
•
On Windows 2000 and Windows XP systems, see “Adding Shuttles
while the System is Turned On” on page 64
For SCSI ID slot location for a single-bus configuration and a dual-bus
configuration, see “MediaDock Ultra320 Slots” on page 24.
Avid Editing System Recognizes Only Some Slots in
the MediaDock Ultra320 Enclosure
If your Avid editing system recognizes only some slots in the MediaDock
Ultra320, you might have a SCSI bus connection problem. Make certain
each shuttle is properly seated inside its slot. The SCSI IDs are hardwired
and cannot be changed. For SCSI ID slot location for a single-bus
configuration and a dual-bus configuration, see “MediaDock Ultra320
Slots” on page 24.
90
The Power Supply/Cooling Module LED Is Amber and the MediaDock Ultra320 Alarm Is Sounding
The Power Supply/Cooling Module LED Is Amber and
the MediaDock Ultra320 Alarm Is Sounding
Verify that the cooling fans are working. If a fan has failed, remove the
power supply/cooling module containing the failed fan and replace the
module as explained in “Removing and Installing Power Supply/Cooling
Modules” on page 37.
Check that the ambient room temperature does not exceed safe operation
limits. If it does, shut down the system and cool the room before you turn
on the MediaDock Ultra320 again. For the proper temperature
specifications, see Appendix A.
The fault LED and alarm also indicates a variety of power supply failures;
for example, if a voltage is not within its tolerance. Any fan or power
supply failure requires that the power supply/cooling module be replaced.
Avid Editing System Hangs When a MediaDock
Ultra320 Shuttle Is Removed
If your Avid editing system hangs when you remove a MediaDock
Ultra320 shuttle, follow the appropriate procedure for your operating
system.
•
See “Replacing a MediaDock Ultra320 Shuttle on a Mac OS 9
System” on page 57.
•
See “Replacing a MediaDock Ultra320 Shuttle on a Mac OS X
System” on page 60.
•
See “Replacing a MediaDock Ultra320 Shuttle on a Windows NT
System” on page 61.
•
See “Replacing a MediaDock Ultra320 Shuttle on a Windows 2000 or
Windows XP System” on page 61.
91
Chapter 6 Troubleshooting
Avid Editing System Doesn’t Recognize the Newly
Installed MediaDock Ultra320 Shuttles
If your Avid editing system does not recognize any newly installed
MediaDock Ultra320 shuttles, use AVIDdrive Utility 2 (Mac OS 9) or
ExpressStripe (Mac OS X) or Storage Manager on Windows systems to
scan the bus and mount the newly installed MediaDock Ultra320 shuttles.
92
•
See “Replacing a MediaDock Ultra320 Shuttle on a Mac OS 9
System” on page 57.
•
See “Replacing a MediaDock Ultra320 Shuttle on a Windows NT
System” on page 61.
•
See “Replacing a MediaDock Ultra320 Shuttle on a Windows 2000 or
Windows XP System” on page 61.
Appendix A
MediaDock Ultra320
Specifications
The following sections provide the dimensions and weight, and the
environmental, electrical, and power cord specifications for the
MediaDock Ultra320 system.
Dimensions and Weight
Table 3 and Table 4 show the dimensions and weight for the Avid
MediaDock Ultra320 tower and Avid MediaDock Ultra320 rack-mount
enclosures.
Table 3
Dimensions
Dimension
Tower
Rack-mount
Width
10.5 in (267 mm)a
17.6 in (447 mm)
Height
21.5 in (546 mm)a
3.5 in (89 mm)
Depth
21.5 in (546 mm)
20.3 in (515 mm)
a. This includes the base.
Appendix A MediaDock Ultra320 Specifications
Table 4
Weight
Configuration
Weight
Tower
76 lb 9 oz (34.7 kg)a
Rack-mount
62 lb 9 oz (28.3 kg)a
a. This is the maximum weight of the enclosure with 12 drives and 2 power supplies.
Environmental Specifications
Table 5 shows the environmental specifications for the Avid
MediaDock Ultra320 and shuttles.
Table 5
Environmental Specifications
Environment
MediaDock Ultra320 and Shuttles
Ambient room temperature (Maximum) 104°F (40°C)
94
Operating humidity
5% to 90% noncondensing
Storage temperature
–40°F to 158°F (–40°C to 70°C)
Storage humidity
5% to 95% noncondensing
Electrical Specifications
Electrical Specifications
Table 6 shows the electrical specifications for the Avid
MediaDock Ultra320.
n
The specifications listed in Table 5 are the maximum and minimum
tolerances and not the normal values used under typical operating
conditions.
Table 6
Electrical Specifications
Topic
Specification
Voltage
90 V ac to 264 V ac
Frequency
50 Hz to 60 Hz
Current
6 a to 2.5 a
Watts
420 W @ 120 V aca
a. This is the maximum (peak) wattage with 12 drives and 2 power supplies.
Power Cord Specifications
Select the power cord according to the country destination; it must comply
with local safety requirements. Use the guidelines in the following sections
if you need to replace the original power cord.
CEE-22 Power Cord Requirements
The female receptacle of the cord set, shown in Figure 41, must comply
with CEE-22 requirements.
95
Appendix A MediaDock Ultra320 Specifications
Figure 41
Receptacle (CEE-22)
United States and Canada Power Cord Requirements
In the United States and Canada, the male plug is a NEMA 5-15P style and
is UL listed and CSA certified. Figure 42 shows the plug. SVT cord can be
used with desktop or stackable units; all other equipment requires SJT
cord. Only SJT-type cord sets can be used for units that rest on the floor.
Select the cord set according to the current rating of your unit. For the
selection criteria for power cords in the United States and Canada, see
Table 7.
Figure 42
NEMA 5-15P Style Plug
Table 7
United States and Canada Power Cord Requirements
Cord
Type
Size of Conductors
in Cord
Maximum Current
Rating of Unit
SJT
16 AWGa
12 A
SVT
18 AWG
10 A
SVT
17 AWG
12 A
a. AWG = American wire gauge.
96
Power Cord Specifications
European Countries Power Cord Requirements
In Europe, use only an H05VV-F, <HAR>, VDE, PVC, 3 x 1.00 mm2
power cord. Für den Gebrauch in Deutschland muß ein Netzkabel des Typs
H05VV-F, <HAR>, PVC, Größe, 3 x 1.00 mm2 verwendet werden. For the
selection criteria for European power cords, see Table 8.
Table 8
European Power Cord Requirements
Cord
Type
Size of Conductors
in Cord
Maximum Current
Rating of Unit
SJT
3 x 1.00 mm 2
10 A
SVT
NAa
NA
a. NA = Not applicable.
97
Appendix A MediaDock Ultra320 Specifications
98
Appendix B
Rack Mounting the
MediaDock Ultra320
Enclosure
This appendix provides the information you need to rack mount the
MediaDock Ultra320 in either a National Electrical Manufacturers
Association (NEMA) or Electronics Industries Association (EIA) rack.
Avid recommends that you mount your MediaDock Ultra320 in a rack
before you install any MediaDock Ultra320 shuttles. When the shuttles are
installed, the MediaDock Ultra320 is very heavy and awkward to work
with.
This appendix contains the following sections:
•
Equipment Environmental and Safety Guidelines
•
Checking the Contents of the Rack-Mount Kit
•
Installing the MediaDock Ultra320 in a Rack
Appendix B Rack Mounting the MediaDock Ultra320 Enclosure
Equipment Environmental and Safety Guidelines
When you install the MediaDock Ultra320 in a rack, you must take the
following precautions:
100
•
Elevated Operating Ambient Temperature — When the
MediaDock Ultra320 is installed in a closed or multiunit rack
assembly, the operating ambient temperature of the rack environment
might be greater than the room ambient temperature. Therefore,
consider installing the equipment compatible with the manufacturer’s
maximum ambient temperature of 104°F (40°C).
•
Reduced Airflow — Do not compromise the amount of airflow
required for safe operation of the equipment.
•
Mechanical Loading — Avoid a hazardous condition due to an
uneven mechanical loading.
•
Circuit Overloading — Consider connecting the equipment to the
supply circuit and the effect that overloading of circuits might have on
overcurrent protection and supply wiring. Use appropriate equipment
nameplate ratings.
•
Reliable Earthing — Maintain reliable earthing of rack-mount
equipment. Give particular attention to supply connections other than
direct connections to the branch circuit (for example, the use of power
strips).
Checking the Contents of the Rack-Mount Kit
Checking the Contents of the Rack-Mount Kit
Unpack the rack-mount kit, and check the contents; the kit should contain:
•
•
Six sections of rails (see Figure 43)
-
Two MediaDock Ultra320 rails
-
Four extender rails (two short and two long)
Assorted screws and other mounting hardware
For racks 24 inches
to 27 inches
Rails
Figure 43
For racks 27 inches
to 30 inches
Rack-nut clip
Rack-Mount Kit Contents
Installing the MediaDock Ultra320 in a Rack
The MediaDock Ultra320 is designed for 19-inch (483-mm) rack
enclosures and requires two EIA rack units (2U), or 3 ½ inches (76.2 mm)
of rack space. The MediaDock Ultra320 provides rack nuts for those rack
enclosures that do not have threaded holes. Rack-nut clips position the rack
nuts at the holes of the rack and are used to secure the rack components in
place.
w
To ensure the stability of the rack enclosure, start from the bottom
when you install the rack components in the rack enclosure.
101
Appendix B Rack Mounting the MediaDock Ultra320 Enclosure
Installing the Support Rails
The rack-mount MediaDock Ultra320 can be installed in either an NEMA
or EIA rack.
To install the MediaDock Ultra320 rack-mount rails:
1. Determine the rack depth (24 inches to 27 inches or 27 inches to
30 inches).
2. Locate the correct set of support rails in the rail kit that allow you to
create two rails 24 inches to 27 inches or two rails 27 inches to 30
inches. Figure 43 shows the rails.
3. Make two complete support rails by connecting the rails using four
pan-head screws as shown in Figure 44.
Tighten the adjustment screws just enough so you can adjust the rails
to the proper rack size.
Adjustment screws
Figure 44
102
Connecting Rails
Installing the MediaDock Ultra320 in a Rack
Attaching the Rack Nuts to the Rack
Install the rack nuts where the MediaDock Ultra320 front panel will secure
to the rack enclosure.
To attach the rack nuts to the rack enclosure:
1. Select the lowest position in the rack where you can mount the
MediaDock Ultra320. Position the support rails so the bottom of each
rail is at the baseline of a U-alignment position (see Figure 45).
Rack mounting rail
5/8 in
Rack mounting rail
hole spacing
5/8 in
1/2 in
5/8 in
1 3/4 in
3U
5/8 in
1/2 in
5/8 in
1 3/4 in
2U
5/8 in
1/2 in
1 3/4 in
1U
5/8 in
EIA rack unit
Figure 45
MediaDock Ultra320
5/8 in
1/2 in
Baseline of MediaDock Ultra320 is at
U-alignment position between
two 1/2-inch holes.
Positioning the MediaDock Ultra320
103
Appendix B Rack Mounting the MediaDock Ultra320 Enclosure
2. From the inside of the enclosure rail, slide the rack-nut clip over the
hole you want to use (see Figure 46). If your rack enclosure has
threaded holes, continue with step 4.
3. Attach a rack-nut clip for each front and rear hole in the support rails.
Each support rail needs 3 rack-nut clips for the front mounting rail and
2 rack-nut clips for the rear mounting rail.
Rack-nut clip slid
over hole
Rack enclosure
mounting rail
Figure 46
Attaching Rack Nuts onto the Rack Enclosure
4. Place one support rail over the front mounting rail. The rail ends
should be outside the mounting rails.
5. Locate two pan-head screws in the rail kit.
104
Installing the MediaDock Ultra320 in a Rack
6. Loosely attach the front of the support rail to the front mounting rail
with the two pan-head screws in the top and the bottom holes (see
Figure 47).
Rear mounting rail
Front mounting rail
Screws
Support rail
Figure 47
Attaching the MediaDock Ultra320 Rails to the Front
Mounting Rails
105
Appendix B Rack Mounting the MediaDock Ultra320 Enclosure
7. Locate two pan-head screws in the rail kit.
8. Loosely attach the rear of the support rail to the rear mounting rail with
the two pan-head screws in the top and the bottom holes (see
Figure 48).
Rear mounting rail
Screws
Adjustment screws
Support rail
Figure 48
Attaching the MediaDock Ultra320 Rails to the Rack
Back Mounting Rails
9. Tighten the screws for each MediaDock Ultra320 support rail at the
front mounting rail and the rear mounting rail.
10. Tighten the adjustment screws of the support rail.
11. Repeat steps 4 through 10 for the second support rail.
Securing the MediaDock Ultra320 in a Rack
The MediaDock Ultra320 is secured in the support rails and rack with two
rackmount screws. If your rack has threaded holes, you might have your
own rack screws. If your rack does not have threaded holes, install the rack
nuts included with the MediaDock Ultra320 (see “Attaching the Rack Nuts
to the Rack” on page 103).
Make sure you have installed the rack-mount MediaDock Ultra320 support
rails (see “Installing the Support Rails” on page 102).
106
Installing the MediaDock Ultra320 in a Rack
c
You should have someone helping you to lift the MediaDock Ultra320
enclosure:
To secure the MediaDock Ultra320 into the rack.
1. From the front of the rack, position the MediaDock Ultra320 in the set
of support rails (see Figure 49). Slide the MediaDock Ultra320 in until
the MediaDock Ultra320 is flush against the front mounting rails.
Front mounting rail
a
Screws
Status panel
Figure 49
Installing a MediaDock Ultra320
2. Align the holes in the MediaDock Ultra320 with the holes in the front
mounting rail. From the front of the rack enclosure, insert the screws
through the MediaDock Ultra320 and front mounting rail, and tighten.
107
Appendix B Rack Mounting the MediaDock Ultra320 Enclosure
108
Appendix C
Converting the MediaDock
Ultra320 Rack Enclosure
into a Tower Configuration
This appendix provides the information you need to install the MediaDock
Ultra320 into the tower enclosure. Avid recommends that you install the
MediaDock Ultra320 in the tower shell before you install any MediaDock
Ultra320 shuttles. When the shuttles are installed, the MediaDock
Ultra320 is very heavy and awkward to work with.
This appendix contains the following sections:
•
Checking the Contents of the Tower Kit
•
Installing the MediaDock Ultra320 Tower Kit
•
Attaching the MediaDock Ultra320 Labels to the Front Bezel
Checking the Contents of the Tower Kit
Unpack the tower kit, which ships in one piece. The two floor stands are
mounted to the base of the enclosure. The front bezel of the tower is
attached to the front but is temporarily removed to insert the MediaDock
Ultra320. Figure 50 shows how it is separated. Top and bottom MediaDock
Ultra320 labels are also included.
Appendix C Converting the MediaDock Ultra320 Rack Enclosure into a Tower Configuration
Installing the MediaDock Ultra320 Tower Kit
You will need a Phillips screwdriver to remove and replace the front bezel
of the tower. When the The MediaDock Ultra320 is placed in the tower
enclosure, these front bezel screws secured the MediaDock Ultra320 in the
tower.
c
You should have someone help you lift the MediaDock Ultra320
enclosure.
To secure the MediaDock Ultra320 into the tower.
1. Remove the four front bezel screws (see Figure 50).
Four front
bezel screws
Figure 50
110
Tower Bezel Screws
Installing the MediaDock Ultra320 Tower Kit
2. Remove the plastic status panel from the MediaDock Ultra320 by
pushing the two plastic tabs on the back side of the panel through the
metal chassis.
Two plastic tabs
Status panel
Figure 51
Status Panel Tabs
3. Repeat step 2 to remove the plastic panel on the other side of the
MediaDock Ultra320 enclosure.
111
Appendix C Converting the MediaDock Ultra320 Rack Enclosure into a Tower Configuration
4. From the front of the tower, position the MediaDock Ultra320 into the
tower so the that status LEDs are on the top (see Figure 52). Slide the
MediaDock Ultra320 into the tower shell until it is flush against the
front of the enclosure.
Four tower
bezel screws
Figure 52
Replacing the Tower Bezel and Securing the
MediaDock Ultra320
5. Insert the screws through the front bezel of the MediaDock Ultra320
into the holes in the tower shell, and tighten.
112
Attaching the MediaDock Ultra320 Labels to the Front Bezel
Attaching the MediaDock Ultra320 Labels to the Front
Bezel
Attach the MediaDock Ultra320 labels included with the tower kit, to the
top and bottom of the front bezel.
To attach the labels:
1. Locate the MediaDock Ultra320 labels included in the kit.
2. Remove the backing from the adhesive label that has the Avid logo.
3. Carefully adhere the label to the top of the front bezel so that the Avid
logo is to the left, and the LEDs in the front bezel protruded through
the holes in the label.
LED holes
LEDs
Figure 53
Tower Kit Labels
4. Remove the backing from the other adhesive label. The other label is a
blank label.
5. Carefully adhere the second label to the bottom of front bezel so that
the bottom front bezel screws are covered.
113
Appendix C Converting the MediaDock Ultra320 Rack Enclosure into a Tower Configuration
114
Appendix D
Regulatory and Safety
Notices
FCC Notice
This device complies with Part 15 of the FCC Rules. Operation is subject
to the following two conditions:
1. This device may not cause harmful interference.
2. This device must accept any interference received, including
interference that may cause undesired operation.
This equipment has been tested and found to comply with the limits for a
Class A digital device, pursuant to Part 15 of the FCC Rules. These limits
are designed to provide reasonable protection against harmful interference
when the equipment is operated in a commercial environment. This
equipment generates, uses, and can radiate radio frequency energy and, if
not installed in accordance with the instruction manual, may cause harmful
interference to radio communications. Operation of this equipment in a
residential area is likely to cause harmful interference in which case the
user will be required to correct the interference at his own expense.
Appendix D Regulatory and Safety Notices
Canadian ICES-003
This Class A digital apparatus meets all requirements of the Canadian
Interference Causing Equipment Regulations.
Cet appareil numérique de la classe A respecte toutes les exigences du
Règlement sur le matériel brouilleur du Canada.
European Union Notice
Declaration of Conformity
(According to ISO/IEC Guide 22 and EN 45014)
Application of Council 73/23/EEC, 89/336/EEC.
Directives:
Standards to which
Conformity is
Declared:
EN60950:1999 Third Edition
CISPR 22:1997 / EN55022:1994 + A1:1995 +
A2:1997 Class A
EN55024:1998/EN61000 — 3-2, 4-2, 4-3, 4-4, 4-5,
4-6, 4-8, 4-11
Manufacturer’s Name: Avid Technology, Inc.
1925 Andover Street
Tewksbury, MA 01876, USA
European Contact:
Nearest Avid Sales and Service Office or
Avid Technology International B.V.
Sandyford Business Center
Unit 3,
Dublin 18, Ireland
Type of Equipment:
Information Technology Equipment
Application of Council 73/23/EEC, 89/336/EEC.
Directives:
116
European Union Notice
Product Name:
Products for the Windows NT, Windows 2000, or
Windows XP Operating System: Media Composer,
Film Composer, Avid Xpress, Avid Xpress DV,
Avid Unity, Avid Unity MediaManager, Avid Unity
TransferManager, Avid|DS, NewsCutter,
NewsCutter XP, NewsCutter DV, Symphony,
MediaDrive, MediaDock Ultra320, MediaRAID,
MediaNetwork, MediaDock 2+, MEDIArray,
MEDIArray II, MEDIArray Drive, MEDIArray II
Drive, LANserver, LANserver EX, PortServer,
Meridien I/O box, Avid Equinox Break-Out-Box
Products for the Mac OS X Operating System:
Media Composer, Film Composer, Avid Xpress,
Avid Xpress DV, Avid Unity, Avid Unity
MediaManager, Avid Unity TransferManager,
MediaDrive, MediaDock Ultra320, MediaRAID,
MediaNetwork, MediaDock 2+, MEDIArray,
MEDIArray II, MEDIArray Drive, MEDIArray II
Drive, LANserver, LANserver EX, PortServer,
Meridien I/O box
Products for the UNIX Operating System: AirPlay,
VideoSPACE
Base Model Numbers: None
Product Options:
All
Year of Manufacture:
2003
(1) Products for the Windows NT, Windows 2000, or Windows XP
Operating System: products were tested in a typical Media Composer,
Film Composer, Avid Xpress, Avid Xpress DV, Avid Unity, Avid Unity
MediaManager, Avid Unity TransferManager, Avid|DS, NewsCutter,
NewsCutter XP, NewsCutter DV, Symphony, MediaDrive,
MediaDock LVD, MediaRAID, MediaNetwork, MediaDock 2+,
MEDIArray, MEDIArray II, MEDIArray Drive, MEDIArray II Drive,
LANserver, LANserver EX, PortServer, Meridien I/O box, or
Avid Equinox Break-Out-Box configuration.
117
Appendix D Regulatory and Safety Notices
(2) Products for the Mac OS X Operating System: products were tested in
a typical Media Composer, Film Composer, Avid Xpress, Avid Xpress DV,
Avid Unity, Avid Unity MediaManager, Avid Unity TransferManager,
MediaDrive, MediaDock Ultra320, MediaRAID, MediaNetwork,
MediaDock 2+, MEDIArray, MEDIArray II, MEDIArray Drive,
MEDIArray II Drive, LANserver, LANserver EX, PortServer, or Meridien
I/O box configuration.
(3) Products for the UNIX Operating System: products were tested in an
AirPlay or VideoSPACE configuration.
I, the undersigned, hereby declare that the equipment specified above
conforms to the above Directives and Standards.
George R. Smith, Director of Hardware Engineering.
Australia and New Zealand EMC Regulations
N1709
John Kells, Australian Operations Manager
Avid Technology (Australia)
Unit B
5 Skyline Place
French Forest NSW 2086
Australia
Phone: 61-2-8977-4800
Taiwan EMC Regulations
Taiwan EMC Regulations BSMI Class A EMC Warning
118
Index
ABCDEFGHILMNOPRSTUVW
A
B
Ac power connector 28
ADU2
diagnostics 87
identifying MediaDock Ultra320 shuttles 58
mounting MediaDock Ultra320 shuttles 59
overview 87
unmounting MediaDock Ultra320 shuttles 59
using 57
window 58
Alarm
fault conditions 29
mute button 44
See also System components
ATTO ExpressStripe
manage partitions 87
striping 84
Australia EMC regulations 118
Avid editor software 73
Avid Knowledge Center 85
Avid StorEx
hard-drive exerciser 85
overview 87
Avid Web site 85
AVIDdrive Utility 2 72
See ADU2
Basic disk 77
Button, rear panel 44
C
Canadian interference causing equipment
regulations 116
Checking MediaDock Ultra320 shuttles 73
Clearance 32
Components 33
Computer Management window 79, 83
Configuration
dual-bus 47
module installing 34
single-bus 46
Connecting
dual-bus 47
power cord 50
single-bus 46
technology 25
Cooling module 28
installing 37
replacing 37
Creating partitions 79
Current 95
Index
D
Data transfers rate 20
Determining drive partition
on Mac OS 9 systems 58
on Mac OS X systems 76
on Windows 2000 and Windows XP systems
79
Device Manager
Windows 2000 and Windows XP 62
Diagnostic utilities
folder 85
Macintosh 87
Windows 2000 and Windows XP 86
Windows NT 86
Dimensions 93
Disable the Hardware Wizard 51, 53
Disk exerciser 85
Disk First Aid
for repairing MediaDock Ultra320 shuttles 74
main window 74
using 73
verification problems 76
verification results 75
Disk Management 64
Disk offline 69
DiskWarrior 73
overview 87
where to find 73
Drive-filler
installing 48
overview 27
Drives
formatting 72, 76, 79
installing 49
partition 58
preparing, Macintosh 72–76
preparing, Windows 77–81
removing 48
striping 71, 85
Dual-bus configuration
120
cabling 47
functions 41
LED 56
module 34
two systems 40, 47
Dynamic drives 69, 77
E
EIA rack units 101
Electrical specifications 95
Environmental specifications 94
Erasing MediaDock Ultra320 shuttles 76
European Union notice 116
F
Fans
cooling module 28
location 28
problems with 91
swappable units 28
FAT file system 78
Fault
conditions 29
front panel LED 56
rear panel LEDs 44
FCC notice 115
Features 20
File system, errors 73
Foreign 65, 67
Formatting
Macintosh 71
Windows 2000 and Windows XP 79
Windows NT 71
Found New Hardware Wizard 51
Frequency 95
Index
G
M
Grounding wrist strap 33
Mac OS 9
diagnostics 87
striping 84
Mac OS X
diagnostics 87
striping 84
Managing MediaDock Ultra320 shuttles
on Macintosh systems 72–77
on Windows 2000 and Windows XP systems
77–83
MediaDock Ultra320 enclosure
contents 33
installing in rack 107
installing in tower 110
MediaDock Ultra320 shuttles
checking 73
differences from MediaDock shuttle packs 26
erasing 76
installing 49
LED functions 27
LED location 26
Mac OS 9 managing 72
Mac OS X managing 77
Macintosh software 74
mounting 59
offline 69
on new system 69
overview 26
removing 48
repairing 74
spinning up 50
status 76
striping 84, 87
testing 85
troubleshooting 90–92
unmounting 59
Windows managing 77
Mute button, alarm 44
H
Hard-drive exerciser 85
Hardware 33
Hardware requirements 21
Hardware Wizard 51
I
Identifying MediaDock Ultra320 shuttles 58
Import Foreign Disks 67
Installation, preparing for 31
Installing
ADU2 software 72
ATTO ExpressStripe software 76
configuration module 34
cooling module 37
MediaDock Ultra320 in a rack 101
MediaDock Ultra320 in a tower 110
MediaDock Ultra320 shuttles 48
power supply 37
L
LEDs
MediaDock Ultra320 shuttle 27
power supply 28
rear panel 44
status 56
121
Index
N
R
New Zealand EMC regulations 118
NTFS file system 78
Rack-mount
installation 101
kit contents 101
positioning 103
rack nuts 103
rails 102
securing the MediaDock Ultra320 in 106
size 20
Reactivate Disk 69
Rear panel
LEDs 44
Regulatory information 115
Replacing
a MediaDock Ultra320 shuttle on a Mac OS 9
system 57
a MediaDock Ultra320 shuttle on a Mac OS X
system 60
a MediaDock Ultra320 shuttle on a Windows
2000 and Windows XP system 61
a MediaDock Ultra320 shuttle on a Windows
NT system 61
a MediaDock Ultra320 shuttle unit 48
a power supply/cooling module 37
Required tools 32
Requirements, system 21
Rescan Disks 65
O
Offline drives 69
Operating system
Mac OS 9 72
Mac OS X 76
Windows 2000 and Windows XP 78
Windows NT 81
P
Packaging contents 33
Partitioning MediaDock Ultra320 shuttles
creating partitions 79
Macintosh 87
Windows 2000 and Windows XP 77
Placing the MediaDock Ultra320 system 32
Power
front panel LED 56
rear panel LEDs 44
Power cord
connection 50
specifications 95–97
Power supply
installing 37
LEDs 28
location 28
overview 28
replacing 37
Power switch 28
Problems, when MediaDock Ultra320 shuttle
removed 91
122
S
Safety information 115
Scan for hardware changes 66
SCSI bus
board IDs 41
configuration module 34
connector configuration 25
dual operation 90
SCSI IDs 41
selecting single- or dual-bus 40
Index
slot locations 24
support 40
SCSI controller
dual-bus connections 47
Single-bus connections 46
Shuttles
See MediaDock Ultra320 shuttles
Single-bus configuration
cabling 46
support 40
Slots per bus 24
Software
ATTO ExpressStripe 71, 76
Avid editing 73
AVIDdrive Utility 2 72
Disk Administrator 71
Disk First Aid 73
Disk Mounter 71
DiskWarrior 73
formatting 71
Mac OS 9 formatting 72
Mac OS X formatting 76
Windows 2000 and Windows XP formatting
79
Software requirements 21
Sound See Alarm
Specifications 93
MediaDock Ultra320 93–95
power cord 95–97
Spinning up MediaDock Ultra320 shuttle 50
Status panel 23, 56
Striping 85
Mac OS 9 72
Mac OS X 76
MediaDock Ultra320 shuttles 84, 87
Windows 71
Striping tables 85
Supported SCSI bus configurations 40
System
hangs 91
requirements 21
specifications 93–95
System components
audible alarms 29
fans 28
MediaDock Ultra320 Components 25
MediaDock Ultra320 shuttles 26
MediaDock Ultra320 slots 24
power supply 28
slots 24
status panel 23
T
Taiwan EMC regulations 118
Terminator 25
Testing MediaDock Ultra320 shuttles
on Macintosh systems 87
on Windows 2000 and Windows XP systems
86
on Windows NT systems 86
utilities 85
Tools 32
Tower
kit contents 109
securing the MediaDock Ulta320 in 110
Troubleshooting 89
U
Ultra320 shuttles
See MediaDock Ultra320 shuttles
Uninstall 63
Unpacking, MediaDock Ultra320 33
Utilities
folder 85
versions 21
123
Index
V
Ventilation 32
VHDCI (very high-density cable interconnect) 25
Voltage 95
W
Watts 95
Weight 93
Windows 2000 and Windows XP
Device Manager 62
disable hardware wizard 51
Disk Management 64
disk offline 69
file systems, described 78
new system 69
partitions 79
replacing MediaDock Ultra320 shuttles 61
striping 84
Wizard
Windows 2000 51
Windows XP 53
Wrist strap grounding 33
124