1
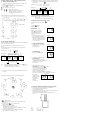
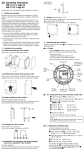
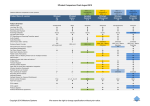
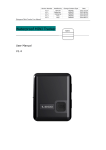
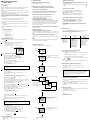
GB Operating Instructions
EM/2 digi 42
4. Additional functions
Reading the entered dates
4.1 Manual summer/winter time changeover
● press "±1h" button once
WA-EKF 80.10.1038.7
1. Starting Up
4.2 Automatic summer and winter time changeover
Electrical equipment should always be installed and assembled by a professional
electrician. (The term professional electrician is defined in VDE 0105).
Press "±1h" and "Day" buttons once simultaneously
All the entered dates can now be read in sequence by pressing the
"±1h" several times
You can switch to the current mode at any time by pressing the " "
button
The following 3 changeover variants are available
Changing the entered dates
Note:
The device contains well thought-out electronics. These electronics are protected
from most kinds
of external interference. However, it must be noted that the mains voltage can have
extremely high voltage spikes superimposed on it.
Problems also occur when switching contactors, which can affect an electronic
device in spite of all the internal protection measures. In order to provide as much
operational reliability as possible, attention should be paid to the following details
when connecting.
AU (Automatic) = fixed changeover
a) In larger systems safety coils switched directly by the clock switch
must be screened using a suitable varistor or RC module.
cHA (calculated semi-automatic) =
selectable changeover with weekday reference
b) If inductive direct current consumers are switched, a free-wheeling diode must
be installed.
The summer time start date that applies to your location/country is entered
(e.g. date of last Friday in April of current calendar year) and the summer
time end date (e.g. date of first Tuesday in October of current calendar year).
c) Inductive loads and especially fluorescent tubes put a particular strain on the
output contacts
The program automatically assigns the correct weekday to these dates
(Friday or Tuesday in this case).
In isolated cases, check whether the installation of a cutoff relay or contactor is
required.
In subsequent years the time change always takes place on the calculated
Weekday, irrespective of the date (last Friday in April and First Tuesday in
October in this case).
2. Keyboard description
The S/W time changeover takes place using a preset calendar program,
which is programmed up to the year 2079 and cannot be modified.
(Legal summer time regulation of European Union and Switzerland)
Start of summer time: always the last Sunday in March.
The hour counter is moved forward by one hour from 2 to 3 o’clock.
A prerequisite for the automatic S/W time changeover is entry of the current
date.
Note:
operations are required to carry out a switching program.
If the switch clock is switched to AM/PM, the month is set using the "h+"
button and the day using the "m+" button.
3.1 Reset
Operate "Res" button using a pencil or similar object.
This puts the switch clock into the normal state.
– before every fresh start
– to delete all switching times, the time and the date
blinked
Then the S/W changeover can be made either manuallyby pressing
the "±1h" button once, or new dates can be entered as described in
figures 1 to 5.
4.3 Manual Switch "
"
The current switching status can be changed at any time using the "
button for channel 1 or 2 (depending on version).
The entered switching program does not change in this case.
Automatic Mode
Manual Mode
= ON
= OFF
= OFF
= ON
Switching times
correspond with
entered program
Press "±1h" and "Day" buttons once simultaneously
If the current switching
status is changed
manually, the next
switching command
is automatically
performed again
according to the
entered program.
"
Continuous Mode
= Continuous ON
= Continuous OFF
You can only return to
automatic mode from
switching statuses
and
by
pressing the " "
button
Figure
3.2 Entering the time and the day of the week
After pressing the "Res" button (see 3.1)
During summer time, press: "±1h" button once
Hold " " button down during step , , enter hours using "h+" button
4.4 Reading the programmed switching times
press "Prog." button several times:
– displays all entered switching times, starting with the first memory
location
– enter current day using "h+" button,
e.g. 09 Taste
– enter current month using "m+" button,
e.g. 02
Figure
press "±1h" button once
The colon now blinks every second.
Note:
If the "h+/m+" buttons are held down for longer than 2 seconds
a fast run occurs.
Figure
– enter current year using "m+"
3.3 Enter switching times
42 memory locations are available. Each switching time occupies
1 memory location.
press "Prog." Button until a free memory location "– – : – –"
is displayed.
select the switch function using "
" button for channel 1 or 2
(depending on version) "
" = ON or " " = OFF.
enter hours using "h+" button
press "±1h" button once
– select required variant using "m+"
button
Figure
enter minutes using "m+" button
If a switching command is to be performed every day, continue with step .
If a particular switching command is only to be performed on 1 day or
certain days, skip step and continue with step .
AU (Automatic)
activate
save using "Prog." button
or
select 1 day using "Day" button on which switching command is not
to be performed (cursor blinks)
confirm this day with "Sel." button (weekday and cursor blink)
Clock switch switches
to current mode.
– press "
once
" button
press "Day" key (day is deselected)
Repeat step , and for each day to be deselected.
Save using "Prog." button
(next free memory location is displayed)
press "±1h" button once
– enter summer time start date using
"h+" and "m+" buttons
e.g. 28:04
Figure
press "±1h" button once
Falls Sie einen Tag abgewählt haben an dem der Schaltbefehl doch
ausgeführt werden soll:
– enter summer time start date using
"h+" and "m+" buttons
e.g. 26:09
Figure
"Day" Taste drücken (Tag ist wieder angewählt)
mit "Prog." Taste speichern
(es wird der nächste freie Speicherplatz angezeigt)
oder
press "
" button once
" Taste speichern
3.4 Free channel blocking
Channels 1 and 2 (or 1 or 2) can be assigned to any switch command –
" " or " ".
" button:
The clock switch switches to the current mode and displays the current time.
4.5 Changing the programmed switching times
keep pressing "Prog." Until switching time to be changed
is displayed
Then the new dates can be entered as described in section 3.3
Note on storing switching times:
If the programming procedure is not completed by pressing the " "
button after entering the switching times (3.3), the entire switching
command will be stored after approx . 90 seconds regardless.
Then the clock switch switches to the current mode and displays the
current time again.
4.6 Deleting individual switching times
keep pressing the "Prog." button until the switching time to be deleted
is displayed
set to "– –" using the "h+" button or the "m+" button and hold the
" " button down for approx. 3 seconds.
If the "±1h" button and the "h+" button are pressed simultaneously, the time
display switches to AM/PM mode.
(mainly used in English-speaking countries.)
Switch output:
Channel 1 = green strand
Channel 2 = white strand
Note:
If an incomplete entry is made, the segments that have not yet been
selected are displayed in blinking mode.
mit "Day" Taste den abgewählten Tag neu anwählen
(Wochentag und Cursor blinken)
mit "Sel." Taste diesen Tag bestätigen (Cursor blinkt)
If all the memory locations are occupied, the following appears on the
display: "FR
"
4.7 AM/PM Time display
or
Each other switching time and the associated switching state
= ON or =
OFF start again at 3.3.
– then the number of free memory locations is displayed
The switching time is deleted and the current time is displayed when the button
is released.
" button
The clock switch switches to automatic mode and displays the current
time.
– then the first free memory location "– – : – –" is displayed
press "
enter minutes using "m+" button
enter day of week using "Day" button: 1=Mon... 7 = Sun
release "
" button
mit "
Press "±1h" and "Day" buttons once simultaneously
Keep pressing the "h+" button until "– –" is displayed
(after last day of respective month)
Press " " button: Clock switches to current mode
Entering the current date
blinking
save using "
Press "±1h" and "Day" buttons once simultaneously
Press "±1h" button twice
Select the cHA or HA variant using the "m+" button
Modify changeover times as described in figures 1 to 5
Deactivating the automatic S/W time changeover
Activating automatic summer/winter time changeover
The marked
End of summer time: Always the last Sunday in October.
The hour counter is moved back from 3 to 2 o’clock.
HA (Semi-automatic) =
Selectable changeover with date reference
The summer time start and end dates that apply to your location/country are
entered. In subsequent years the time change always takes place on the same
date.
3 Operating the Switch Clock
Changes can only be made in the cHA and HA variants!
Clock switch switches to current
mode.
6.0 RND = Random program / random number generator
7.1 Switching times for holiday program are entered like "Standard” switching
commands, see 4.4, but the symbol
for each holiday switching time must
also be entered.
a) without assigned switching times
The random program can be switched separately for channels 1 and 2
manual =
On or =
Off.
The "random" switching times lie within the following fixed values:
max. 60 minutes
min. 5 Minuten
max. 30 minutes
}
RND +
5x
1/
1/
Example for CH 1: 1 2 3 4 5 6 7 (Mon... Sun) 04.00
1 2 3 4 5 6 7 (Mon... Sun) 11.00
Buttons: Prog
#
h+, m+
#
2 = Switch random program on
2 = Switch random program off and return to
automatic program or programmed
RND off
command. See section 6.0 b
Prog
1,
Prog
$
"
"
Possible starting points (per channel) without assigned switching times
7.2 Start and duration of holiday program
Important: Before the start and the duration of the holiday program
can be entered
You must switch to the current mode using button
.
If no switching times are stored for the holiday program
and button x is clicked, the holiday symbol
blinks.
Entering switching times for the holiday symbol,
see 7. 1
at least 5 minutes
Press button
once and
appears in the display:
The cursor for the current
weekday blinks.
If button
is now pressed the
holiday program (HO=Holiday)
becomes active immediately
and for an unlimited period
- see 7.0 c.
e.g. Wednesday
a) If the holiday program is to start on
the current weekday, the number of
holiday days is entered using "Select".
If the "Select" button is held down for
more than 2 seconds roll mode occurs.
e.g. 10 holiday days
Example:
b) with assigned switching times
The switching times to which the "RND" index has been assigned determine the
start and stop of the random program.
The "random" switching times are within the specified fixed values,
see 6.0 a
b) This entry is stored using button
and the current switching status
is established at the same time in
accordance with
the holiday program.
Example:
The connected consumers, e.g. corridor lighting, is (randomly) switched
on at regular intervals.
Example for CH 1: 4
4
Buttons: Prog
#
(TH)
(TH)
21.00
23.55
Day, Select, h+, m+,
# Prog
$
RND
RND
1, RND
c) Note: Press button
to read the current:
Weekday, time, switching status
Prog
"
Example
"
d) The number of preselected holidays (1)
is decremented daily,
e.g.. d10, d9, d8...
Then the current time is redisplayed.
The switching times for the holiday program
are retained, but are inactive,
see section 7.0c.
RND
& Random
21.00
Note:
switching times%
23.55
After "RND " the switching status of the relay can be
Depending on the situation, an additional
"Standard" command must be programmed.
or
.
c) Of course, the random program can be manually interrupted or indexed
at any time
e) If the holiday program is to start
at a later time (max. 6 days) button
is used to
enter the value.
Select the current day using "Day",
e.g. 1 = Monday and enter the number of
holiday days using "Select", see item 7.2.
This entry is saved using button
And the current mode is established at the same time.
The current day is displayed up to the preselected holiday program.
Day change
possible starting position (per channel) with assigned switching times
When the day
changes (midnight)
the holiday program
starts and the
duration thereof is
displayed,
see section 7.2.
7.3 Premature cancellation/interruption of holiday program
a) If the holiday program has already started, press button once.
The clock switch goes into the current mode.
b) with assigned switching times
The switching times to which the "RND" index has been assigned determine
the start and stop of the random program.
The "random" switching times are within the specified fixed values,
see 6.0 a.
7.0
= Holiday program
a) The holiday program has priority over the "standard week program",
see section 4.4
b) The holiday program
can only be entered if all 7
weekdays have been selected.
c) The holiday program is only active if
- switching times have been stored, see 7.1
- the duration of the holiday period has been preselected (1...99 days)
- or has been defined as unlimite
d) The start of the holiday program can be the current weekday,
or be preselected for a maximum of 6 days.
red
black
green
white
+1,5 V
0V
switch output CH 1
switch output CH 2