1
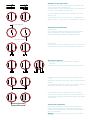
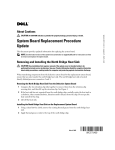
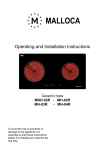
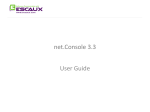
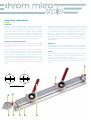
Operating instructions
Preparation
In order to keep the movement between the glass scale and
the metal frame friction-free, the CHROM-MICRO-SCALE
should be cleaned periodically on the bottom with cleaning
alcohol and treated with talcum powder. Sticky materials
should also be treated in the same manner. It is very important
that the frame lays parallel to the plane to be measured. If the
piece to be measured is shorter than the frame, the frame
should be shimmed on the ends to the same thickness.
Measuring with the Dial Indicator
Position Dial Indicator A to locate against bracket C. Tighten
lock-screw D. Caution: Over-tightening can cause the indicator
to stick!
Move the scale with the adjusting screw E to get mark B
approx. in the middle of the range F. Line up the 0-line of the
scale as close as possible with the first line a to be measured.
Use left loupe to make corrections with the adjusting screw E
to match the 2 lines exactly. Reset Dial Indicator A to «0» on
the bezel. During measurement the adjusting screw E should
be moved in the same direction each time (cw). In case the
movement was too far please move back and start again turning cw.
To measure the distance between a (left loupe) and b (right
loupe) move the scale with the adjusting screw E (cw) until the
line b lines up exactly with the next graduation line, as shown
in our example 154.2mm. By reading the deviation on the
black, metric graduation of the Dial Indicator A e.g. – 0.02mm,
the actual distance a to b is the addition of the two readings,
154.18mm. Measurements in inches are performed in the
same manner using the inch graduations on scale and indicator
(red graduation).
Illuminator
The illuminators H are very helpful if there is not enough backlighting available. They fit into the base of the loupes. To switch
on and off and to search for the best illumination turn the lamp
Loupes
The loupes feature 15x magnification and a field of view of
Ø12mm. A red centering ring helps to avoid parallax errors.
To focus the loupe simply turn the black ring.
The loupes or rather the bases of the loupes can be easily
moved on the scale or removed from it by pressing the red
knob G.
E
a
b
0
154
G
distance a – b
K
A
D
C
F
B
H
f
Reading error through parallax
Graduation and line to be checked meet on the same plane:
even in oblique view no parallax error.
Graduation and line to be checked are apart from each other:
on oblique view a parallax error will result.
To avoid parallax errors each loupe is equipped with a red
centering ring.
Perpendicular viewing = ring concentric = no parallax error.
Oblique viewing = ring eccentric = a parallax error may result.
Light gap disappears
Measuring of line thicknesses
a) narrow lines
Use the special measuring marks with the light-eliminating
method («shaving» the left and right edge of the line).
Proper offset-marking alignment: light gap dissapears
Light gap disappears
b) thick lines
Use the scale divisions by aligning the edges of the line to be
measured with the center of the graduation line («halved»).
Measuring of distances
a) aligning to the line to be measured by estimating
symmetry
Methods for correct alignment of different line thicknesses
X
b) without estimating symmetry through edge alignment of
lines
Alignment of left and/or right edges with the light-eliminating
method.
If line thicknesses are equal, dimension X (center to center of
lines) equals dimension X1 (edge to edge of lines).
X1
If line thicknesses are not equal, dimension X (center to
center of lines) equals the average of the two dimension X1
(measurement left edges) and X2 (measurement right edges).
X = (X1+X2)/2
X
X2
Cleaning and maintenance
Glass scale, metal frame, rubber pads and the adjusting
screw E can be cleaned with cleaning alcohol whenever
necessary. The adjusting screw should be lubricated with a
drop of oil afterwards.
Warning: to not oil any other parts of the scale or the Dial
Indicator!