1
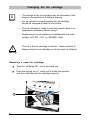
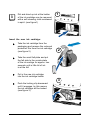
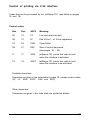
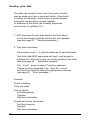
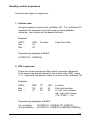
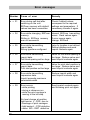
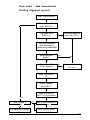
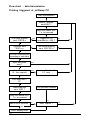
Operating Instructions
jetStamp 791
Electronic hand stamp
with flexible imprint selection
Version 3.0
© 2003 Ernst Reiner GmbH & Co. KG
All rights reserved. Translations, reprints, or any other form of reproduction
of this manual, even in part and regardless of form, require our express
written permission.
This manual is subject to change without prior notice.
This manual has been compiled with the utmost care, however
we cannot assume any form of liability for errors or omissions or
for damage resulting from them.
2
Table of contents
Safety instructions ...................................................................................... 4
Control elements ..........................................................................................5
Commissioning ............................................................................................ 6
Stamping ......................................................................................................7
Changing the ink cartridge ...........................................................................8
Possible faults ..............................................................................................
10
Reset button .................................................................................................
10
Technical data ..............................................................................................
11
Certifications .................................................................................................
12
Description of V 24 interface .......................................................................
15
Works settings for V 24 interface .....................................................
16
Control of printing via the V 24 interface ..........................................
17
Code table - general - .......................................................................
18
West European code table .................................................................
19
Sending print data ..............................................................................
20
Sending control sequences ................................................................
21
Control codes / Control sequences ...................................................22
Instructions for using control sequences ............................................
26
Print character sets ............................................................................
27
Limits 14 .............................................................................................
27
Status messages (Print status) ........................................................
28
Status message (Memory status) ....................................................
29
Status message (Print mode status) ................................................
29
Error messages ..................................................................................
30
Flow chart - data transmission (printing triggered by host) .............
31
Flow chart - data transmission (printing triggered at jetStamp) .......
32
Application example ...........................................................................
33
Summary of available control codes in numerical order ...................34
i
=
Information / Notice
=
Caution
=
Safety hint
Note
!
Warning
Safety instructions
On this page, you will find safety instructions that you must always
observe when handling and working with your electronic hand htamp.
•
jetStamp 791 complies with the relevant safety regulations for
information technology equipment, including office machinery
•
Unauthorised opening of the unit and improper repairs can cause
considerable danger (fire hazard)
To avoid the danger of crushing, do not insert your finger
between the baseplate and the print carriage
•
The ink in the ink cartridge is harmful! Never hold the lower face
of the jetStamp 791 against a person's face.
Keep ink cartridges out of the reach of children.
•
Transport the machine only in its original package or other suitable
package that provides protection against shock and impact.
•
If the machine is taken from a cold environment into a warm room,
dew may form on it. Wait until the machine has warmed up to room
temperature and is absolutely dry before starting to use it.
•
Make sure that the local mains voltage corresponds to the
voltage stated on the mains unit
•
Ensure that the locally-installed mains socket with protective earth,
which you use for the machine, is readily accessible at all times
•
The machine has no ON / OFF switch. To disconnect it from
the mains you must pull the mains unit out of the mains socket
•
Arrange the connection leads so that they do not create a hazard
(danger of tripping) and cannot be damaged
•
Take care that no objects (e.g. necklaces, paper clips, or liquids)
fall into the machine - danger of electric shock and short circuit
•
In an emergency, e.g. in the event of damage to the machine casing,
control elements or the mains lead, or if an object or liquid
falls into the machine, pull the mains unit out of the mains socket
and inform your sales agent or our Service Department
4
Control elements
3
4
2
5
1
6
7
8
1 =
2 =
3
4
5
6
7
8
=
=
=
=
=
=
Base unit
Connection for data transfer (V 24 interface)
and mains unit
Connection socket for external triggering
Trigger
Locking rail for ink cartridge
Ink cartridge
Green indicator lamp
Locating tab
5
Commissioning
Unpack the stamp
Note:
use only original REINER components !
Place jetStamp 791 in the base unit, taking care of the following points:
Engage the locating tab (8) and place jetStamp 791
in the base unit
Connect the V 24 adapter with the mains unit, use the data
cable to connect jetStamp 791 to the V 24 adapter.
Connect the V 24 adapter to the PC:
The green indicator lamp (7) lights
Avoid exposing jetStamp 791 to direct sunlight (see page 11,
'Technical data' for permissible ambient temperature
Installing the ink cartridge:
Take jetStamp 791 out of the base unit
Take the ink cartridge out of its packing and remove
the protection filmfrom the ink cartridge
Press the locking rail (5) to the rear and insert the ink cartridge
into the print carriage with its grip (6) towards you.
Pull the locking rail (5) forwards again until it engages
5
6
7
6
8
Stamping
!
Warning
•
The ink in the ink cartridge is harmful! Never hold the lower
face of the jetStamp 791 against a person's face!
•
•
•
The length of cable for external triggering must not exceed 1 m
Voltages at the built-in socket of >1 V cause damages
A power failure while printing may cause an incomplete
imprint at the paper
External triggering
through a contact, which is connected to the
built-in socket with a jack (2.5 mm / 2-pin / mono)
see also page 5, 'Control elements'
Manual triggering
Stamping is carried out by pressing the red trigger
in the grip. Depending on the set imprint,
a single or two-line imprint will be printed.
The positions of the two lines of the imprint
are shown in the diagram below
Depending on the imprint transmitted in 'Online' mode, or on the stored
imprint in 'Offline' mode, a single or two-line imprint will be printed.
The print positions of the two lines are shown in the diagram below.
Stamping is not possible under the following conditions :
•
When there is a power failure
•
jetStamp 791 is in 'Offline' mode and no imprint is stored
•
jetStamp 791 is in 'Online' mode and no imprint is transmitted
•
jetStamp 791 is in the base station
ABCDEFGHIJKLM
NOPQRSTUVWXYZ
print position of the first line
print position of the second
line
maximum width
of both lines
7
Changing the ink cartridge
i
• The change of the ink cartridge may be necessary if the
imprint is incomplete or if dots are missing
Note
• For an optimal print performance the ink cartridge
should be changed at least all six months
• The ink cartridge is ready to print that means there is no
preparation necessary before using it
• Replacement ink cartridges are available with the order
number 801 307 - 000 on REINER stock
The ink in the ink cartridge is harmful. Never swallow it!
Always keep the ink cartridge out of the reach of children!
!
Warning
Removing a used ink cartridge:
Take the jetStamp 791 out of the base unit
Push the locking rail (7) back until it clicks into position,
and then withdraw the ink cartridge forwards
7
8
i
Note
Dirt and dried up ink at the holder
of the ink cartridge can be removed
with a soft cleaning cloth moistened
in spirit (see figure1)
1
Insert the new ink cartridge:
Take the ink cartridge from the
packaging and remove the coloured
protection film from the ink cartridge
(see figure 2)
2
Take the small felt plate and put
the felt side to the nozzle plate
of the ink cartrige for approx. two
seconds until a little bit of ink
is at the felt
Put in the new ink cartridge
into the ink cartridge holder
3
Push the locking clip downward
until it engages, by this means
the ink cartridge will be locked
(see figure 3)
9
Possible faults
i
Note
Mains failure
In the event of a mains failure or the supply
being interrupted during printing, the print carriage
stops immediately; that imprint is not completed.
When the power supply has been restored, restarting
printing first moves the print carriage to its initial position,
then a new printing operation starts.
Reset button
i
Note
10
•
Resetting the unit restarts the machine program
•
The reset button should be operated if jetStamp 791
is in an underfined condition, or if the display is confused
•
The reset button is operated by inserting a straightened
paper clip or similar object into the small
circular opening in the rear face of the machine
Technical data
Stamping time
approx. 0,7 seconds
Stamping cycle
> 2 seconds
Print capacity per ink cartridge
approx. 300.000 characters
Dimensions, jetStamp 791 only
(B x D x H in mm)
Dimensions, base unit only
(B x D x H in mm) 102 x 135 x 32
Height of jetStamp in base unit
187 mm
Weight of jetStamp 791
approx. 490 g
Weight of base unit
approx. 360 g
Ambient temperature for operation
+ 8° C ... + 35° C (temperat. limits)
down to - 8° C conditional
Temperature for transport and
storage
- 20° C ... + 60° C (up to 48 hours)
Humidity for operation
30% ... 70%
relative humidity
Humidity for transport and storage
10% ... 90%
relative humidity
Power supply
REINER AC adapter model
A30908G, Protection class II
Manufacturer
Ontop European Div. of SAC Group
Max. power consumption
of jetStamp
13,2 W
Cable length for external triggering
maximum 1 m
Noise level
< 60 dB(A)
(Workplace related emissions
to ISO 7779)
95 x 70 x 170
11
Certifications
Tested safety
jetStamp is manufactured to the safety standards
IEC / EN 60950 - 1
Marking
jetStamp complies with EC directives
2004 / 108 / EG ‘Electromagnetic compatibility’
Electro- and electronic appliances are off the point
of domestic waste or residual waste
12
13
14
Description of V 24 interface
General
REINER jetStamp 791 can be operated in the following ways:
•
In “Online printing mode ” by communicating with a host
computer via the V 24 serial interface
or
•
In “Offline printing mode” independent of a host computer
“Online printing” mode:
In its standard setting, jetStamp permits bi-directional operation.
The host computer sends printing and control information and receives
status information back through the V 24 interface.
The handling of printing tasks is line-related, that is to say, before
printing is started all printing information must have been transmitted.
A print start code automatically starts the printing operation.
A printing operation can also be started manually using the trigger at
jetStamp (see page 5). To do this, print initiation must be called up
using the sequence ' Status message ' Print data and the print start
code are transmitted.
“Offline printing” mode:
After transmitting the sequence " Save an internal impression " and
then sending the impression data (text blocks), these will be stored
and can be printed by operating the trigger, as soon as the sequence
" Offline stamping " has been transmitted.
When jetStamp 791 has to be used in the " Online stamping "
mode again, the unit must be reconnected to the host computer
and the sequence " Online stamping " has to be transmitted.
15
Works settings for V24 - interface
Configuration and parameter settings:
The interface is located at the rear face of the unit (see page 5,
'Control elements' )
Assignment of the RJ 12 6 - pin interface:
Signal name
Pin
Pin
Pin
Pin
1, 2
3
4
5, 6
:
:
:
:
Meaning
GND
/ TxD
/ RxD
VCC
Signal ground
Transmit data
Receive data (input)
Supply voltage
:
:
:
:
:
:
9600
NONE
8
1
1
Software (XON / XOFF)
Standard settings:
•
•
•
•
•
•
Baud rate
Parity
Date bits
Start bits
Stop bits
Handshake
Software-Handshake XON / XOFF
Control codes:
XOFF :
interface for print data trasmission inactive
XON :
interface for print data transmission active
XOFF is sent when:
- print buffer is full
XON is sent when:
- print buffer is empty
Status request (ESC ?):
- A status request is always possible, even during printing. However,
acknowledgement of the status request only takes place when the
stamping operation has been completed ( > = 600 msec after
transmission of control code FF)
16
Control of printing via V 24 interface
Codes that can be processed by the jetStamp 791 (see tables on pages
18 and 19)
Control codes:
Hex
Dec.
ASCII
Meaning:
0C
12
FF
Line end and print start
0A
10
LF
End of line 1 of 2-line impression
18
24
CAN
Clear buffer
1B
27
ESC
Start of control sequence
(see pages 18 ... 22)
11
17
XON
jetStamp 791 sends this code to host
when the interface is activated.
13
19
XOFF
jetStamp 791 sends this code to host
when the interface is de-activated.
Printable characters:
Characters as given in the code table on page 18, except control codes
(FF, LF, XON, XOFF, CAN and ESC).
Other characters:
Characters not given in the code table are printed as blanks.
17
Code table - general Characters from 0 to 127
Dec.
Hex.
0
16
32
48
64
80
96
112
0
1
2
3
4
5
6
7
BLANK
0
@
P
!
1
A
Q
“
2
B
R
#
3
C
S
0
0
1
1
2
2
3
3
4
4
$
4
D
T
5
5
%
5
E
U
6
6
&
6
F
V
7
7
‘
7
G
W
8
8
(
8
H
X
9
9
)
9
I
Y
10
A
*
:
J
Z
11
B
+
;
K
[
£
12
C
,
<
L
\
¥
13
D
-
=
M
]
€
14
E
.
>
N
15
F
/
?
O
18
XON
XOFF
CAN
ESC
FF
West european code table:
Characters from 128 to 255
Dez.
128
144
160
176
192
208
224
240
Hex.
8
9
A
B
C
D
E
F
0
0
Ç
É
1
1
2
2
3
3
4
4
5
5
6
6
7
7
8
8
9
9
Ö
10
A
Ü
11
B
12
C
13
D
14
E
Ä
15
F
Å
Ó
Æ
Ê
È
Ñ
Á
Í
À
Ú
Ø
19
Sending print data
Print data can consist of one or two lines, each of which
may be made up of one or more text blocks. A text block
is a string of characters, which occupy a certain position
in the print line and have a certain typeface.
To determine a text block, the following sequences
must be sent to jetStamp 791 :
1. ESC sequence for print start position (first text block)
or text block spacing (further text blocks) and typeface
(see also page 21, ' Sending sequences ' )
2. Text block characters
Transmission order 1, 2 must be observed for each text block.
Text block data (ESC sequences and text) must be sent to
jetStamp 791 from left to right, and will be printed in that order
(see also page 33, ' Application example '.
The 'Limits' given on page 27 must be observed.
If these limits are exceeded, then Error 08 occurs
and must be cleared by taking the appropriate measures
(see page 30, ' Error messages ')
Example:
Printer initializing
Clear line buffer
First text block:
Print start position
Typeface
Text block characters
Second and further text blocks:
Text block spacing
Typeface
Text block characters
20
Sending control sequences
There are two types of sequences:
1. Control code
A single character is sent to the jetStamp 791. The jetStamp 791
interprets this character as control code (not as a printable
character) and carries out the desired function.
Example:
ASCII :
Hex. :
Dec. :
CAN
18
24
Function:
Clear line buffer
Programming example in BASIC:
10 PRINT #1, CHR$(24);
2. ESC sequences:
There are control sequences that consist of several characters.
Such sequences are introduced by the control code ESC, where
< n > represents the decimal value to be sent to the jetStamp 791.
Example:
ASCII :
Hex. :
Dec. :
ESC
1B
27
"$"
24
36
<35>
23
35
Function:
Print start position
10 mm from extreme
left / right of print zone
((10 / 0,282) = 35)
Programming examples in BASIC:
1st. possibility:
2nd. possiblility:
10 PRINT #1, CHR$(27);"$";CHR$(35);
10 PRINT #1, CHR$(27);CHR$(36);CHR$(35);
21
Control codes / Control sequences
Printer initializing
ASCII
Hex.
Dez.
:
:
:
ESC @
ESC
1B
27
"@"
40
64
Description of printer initializing (default settings):
typeface
:
narrow
Stamping start position :
0
Text block spacing
:
0
Clear line buffer
ASCII
Hex
Dec.
:
:
:
CAN
CAN
18
24
Description of Clear line buffer:
All information about the print line is erased.
Print start of line 1 at 2-line imprint
ASCII
Hex
Dec.
:
:
:
LF
LF
0A
10
Description of print start:
Data in the line buffer for Line 1 are printed. If there is a
mechanical problem preventing free movement of the carriage,
Error 09 may be displayed (see page 30, ' Error messages ')
Print start
ASCII
Hex
Dec.
FF
:
:
:
FF
0C
12
Description of print start: Data in the line buffer for Line 1
of a single-line imprint or for Line 2 of a 2-line imprint
are printed. If there is a mechanical problem preventing
free movement of the carriage, Error 09 may be displayed
(see page 30, ' Error messages ')
22
Typeface
ASCII
Hex.
Dec.
ESC k
:
:
:
ESC
1B
27
"k"
6B
107
<n>
<n>
<n>
n: decimal value
Description:
Selection of a typeface:
n = 1 (dec.01) :
normal type
2,54 mm alpha numeric,
10 characters / inch
n = 2 (dec.02) :
narrow type
2,11 mm alpha numeric,
12 characters / inch
n = 3 (dec.03) :
broad type
4,23 mm numbers only,
6 characters / inch
n > = 4 (> = dec.04) :
wrong typeface; narrow type
was set and Error 05 will be
displayed (see page 30,
' Error messages ')
See page 27 for the details of the print characters
Print start position
ASCII
Hex.
Dec.
:
:
:
ESC $
ESC
1B
27
"$"
24
36
<n>
<n>
<n>
n: decimal value
Description:
Values for print start position: 0 < n < 247 (decimal values)
Resolution: n = 1 / 152 inch
The maximum print start position (n = 247) is 41,3 mm from the
left-hand reference point of the impression zone.
If a print start position n > = 248 is entered, the print start position
is set to 0 and Error 07 is displayed (see page 30)
The print start position must always be set before the first
text block is transmitted.
23
Text block spacing
ASCII
Hex.
Dec.
:
:
:
ESC SP
ESC
1B
27
""
20
32
Description:
Values for Text block spacing:
Resolution:
<n>
<n>
<n>
n: decimal value
0 < n < 234 (decimal values)
n = 1 / 152 inch
The maximum text block spacing (n = 234) is 39,1 mm
It is the distance between two adjacent text blocks.
If a text block spacing n > = 248 is set, the text block
spacing is set to 0, and Error 06 is displayed
(see page 30, ' Error messages ')
The text block spacing must always be set before
the first text block is transmitted.
Ink cartridge to change position
ASCII
Hex.
Dec.
:
:
:
ESC
1B
27
"i"
69
105
"T"
54
84
ESC i T A 4
"A"
41
65
"4"
34
52
Description:
When the control sequence is sent for the first time,
the print carriage with the ink cartridge is moved to the
change position, so that it is possible to remove the ink cartridge.
Renewed transmission of the control sequence
returns the print carriage to its starting position (left-hand stop)
24
Saving an internal imprint
ASCII
Hex.
Dec.
:
:
:
ESC
1B
27
":"
3A
58
ESC : 1
"1"
31
49
Description:
After the control sequence ' ESC x1 ' has been sent, the print data
(Line 1: control sequences, control codes, data etc., control code
LF (FF) are stored as an internal imprint if the quantity of print data
does not exceed the value '220'. The internal imprint can then be
printed after transmitting the control sequence Offline printing
' ESC x1 ' and operating the trigger on the unit. If Error 04
appears, then proceed as described in ' Error messages '
on page 30.
Online printing
ASCII
Hex.
Dec.
:
:
:
ESC x 0
ESC
1B
27
"x"
78
120
"0"
30
48
Description:
Default setting. The machine prints data that have been transmitted
via the V 24 interface if the trigger is pressed, or if the application
program carries out a print start function (see also page 29,
' Print mode status request ')
Offline printing (internal imprint)
ASCII
Hex.
Dec.
:
:
:
ESC
1B
27
"x"
78
120
ESC x 1
"1"
31
49
Description:
It is only possible to switch from the ' Online printing ' mode to
' Offline printing ' if an imprint has first been saved.
The machine prints the print data stored internally when the trigger
is pressed (see also page 29, ' Print mode status ')
25
Instructions for using control sequences
The points below are important and must be observed:
•
Clear sequences for initializing the printer and the print buffer:
Before sending text block data, these sequences must be sent.
•
Transmission order for text blocks:
The position in which the text blocks should appear
on the document is the determining factor.
The Text block data, Text block spacing, typeface and text
must be sent to the printer in order, from left to right.
•
For text block data, the order must be as follows:
1.
2.
3.
4.
5.
6.
26
Print start position (only before the first text)
Typeface
Text 1
Text block spacing
Typeface
Text 2 etc.
•
A typeface setting is only valid for the text block
that immediately follows it.
It does not apply to further text blocks.
•
If certain characters are not available in the typeface
selected, they will be printed as blanks
•
If the wrong data parameters are given in ESC sequences,
(e.g. text block spacing too large in ESC " ") an error number
will be displayed (see also page 30, 'Error messages').
Errors can be called up under 'Print status' (see also page 28)
Print character sets
1. Normal type: characters 0 - 9, blank, /, &, *, ,, -, ., :, A to Z
and country - specific characters (see pages 18 and 19)
2. Narrow type: characters 0 - 9, blank, /, &, *, ,, -, ., :, A to Z
and country - specific characters (see pages 18 and 19)
3. Broad type:
characters 0 - 9, blank, -, /
Assignment: typeface (see ESC "k" < n >) to print character set
Typeface
<n>
Meaning
Relevant print
character set
1
Normal type 10 characters / inch
1
2
Narrow type 15 characters / inch
2
3
Broad type
3
7 characters / inch
Limits
Line - related limits:
Max.
Max.
Max.
Max.
Max.
impression length
text blocks
no. of characters, normal type
no. of characters, narrow type
no. of characters, broad type
:
:
:
:
:
43,43 mm
30
17
20
9
:
20 in narrow type
Text block - related limits:
Max. no. of characters
27
Status status
Print status
ESC ?
Requirements for a status message from the jetStamp 791
ASCII
Hex.
Dec.
:
:
:
ESC
1B
27
Reaction:
ASCII
Hex.
Dec.
"?"
3F
63
jetStamp 791 sends the following
status messages when it receives ESC "?"
:
:
:
ESC
1B
27
"?"
3F
63
n
n
n
n: HEX-Codes
Possible values of n:
•
Error messages
n = 01h to n = 09h
(see page 30, 'Error messages')
An error can be called up until the next impression is printed
•
Other messages
n
n
n
n
=
=
=
=
i
Note
28
00h
10h
20h
28h
:
:
:
:
Print end, no error
Printing operation is active
Print carriage in change position
Trigger on jetStamp 791 operated
A status request is always possible, even during printing.
However, acknowledgement of the status request
only occurs when printing is almost completed.
There will normally be a time delay of up to 600 msec.
for the acknowledgement signal.
Memory status
ESC : ?
Requirements for a status message from jetStamp 791
ASCII
Hex.
Dec.
:
:
:
Reaction:
ASCII
Hex.
Dec.
ESC
1B
27
":"
3A
58
"?"
3F
63
jetStamp 791 sends the following status message
when it receives ESC ":?"
:
:
:
ESC
1B
27
":"
3A
58
"?"
3F
63
n
n
n
n:
ASCII- Code
Possible values of n:
Error messages
n = "0" :
Error during saving. Imprint data not saved
Unit in mode "Offline printing"
n = "1" :
Saving operation OK. Imprint saved
n = "2" :
Saving operation active
n = "3" :
No saving operation carried out
Print mode status
ESC x ?
Requirements for a status message from the jetStamp 791
ASCII
Hex.
Dec.
:
:
:
Reaction:
ASCII
Hex.
Dec.
ESC
1B
27
"x"
78
120
"?"
3F
63
jetStamp 791 sends the following status message
when it receives ESC "x?" :
:
:
:
ESC
1B
27
"x"
78
120
"?"
3F
63
n
n
n
n:
ASCII- Code
Possible values of n:
Error messages
n = "0" :
Machine is in print mode "Online printing"
n = "1" :
Machine is in print mode "Offline printing"
29
Error messages
Number
Cause of error
Remedy
n = 01
Error during self-test after
switching on the unit.
EEProm memory with default
values has been overwritten
Check if default values
correspond to the required
settings and parameters. If
necesssary transfer it again
n = 04
Error while changing EEProm
memory.
Writing in EEProm memory
was not successful
Internal EEProm has writing
errors. Send values again.
If error occurs again,
change EEProm
n = 05
Error while transmitting
imprint data.
Wrong typeface configured
Value for typeface is not defined.
Define typeface and send
imprint contents again
n = 06
Error while transmitting
imprint data.
Text block spacing set too large
Value for text block spacing is
too large. Reduce value and
send imprint contents again
n = 07
Error while transmitting
imprint data.
Print start position set too large
Value for print start position is
too large. Reduce value and
send imprint contents again
n = 08
Error while transmitting
impression data.
Imprint exceeds maximum
permissible width
Reduce imprint width and
send imprint contents again
n = 09
Error occurs:
• while printing
• during a reference run
• while the print carriage is
moving to the left stop
Send imprint contents again
and following print out again
No level change at position
light barrier L - POS due to:
• blockage of print carriages
• light barrier L - POS defective
• motor MO - DMT defective
30
Flow chart - data transmission
Printing triggered by host
Start transmission
Print start position
sent ESC $ n
Text block spacing
sent ESC SP n
Typeface sent
ESC k n
Text block charcters
sent according to
typeface and code table
Send next text
block ?
yes
no
Send Line 2 ?
(2-line imprint)
yes
Line end for Line 1
LF sent
no
Send print start ?
FF
Status request
sent ESC ?
Wait until status
ESC? n is received
yes
New imprint ?
no
Print operation complete
no
Has an error occurred ?
yes
Host: display error
31
Flow chart - data transmission
Printing triggered at jetStamp 791
Start transmission
Status - request
sent ESC ?
Wait until status ESC
? n is received
Print start position
sent ESC $ n
yes
Trigger on 791
operated (n = 28) ?
no
Text block spacing
sent ESC SP n
Typeface sent
ESC k n
Text block characters sent
according to code table
Next text block
sent ?
yes
no
Line 2 sent ?
(2 - line imprint)
yes
Line end for Line 1
LF sent
no
Print start sent ?
FF
Print operation complete
Status request
sent ESC ?
Wait until status ESC
? n is received
no
Has an error occurred ?
yes
Host: display error
32
no
New imprint ?
yes
Application example
To be performed steps:
1.
2.
3.
4.
Connect the V 24 mains adapter with the mains unit. Use the data
cable to connect the jetStamp 791 to the V.24 adapter, and connect
the V 24 adapter to the PC.
Comply with the interface parameters of the jetStamp 791 (see page 16).
Send the sequences given below as examples to the jetStamp 791 .
The next print order may only be sent when the jetStamp 791 has
signalled XON .
Please note also the following:
a)
Imprint : "TESTABDRUCK GERÄT 791"
Printer initialization
Clear line buffer
Print start position:
Typeface:
Text 1:
Text block spacing:
Typeface:
Text 2:
Text block spacing:
Typeface:
Text 3:
Immediate print start
b)
0 mm
normal type
" TESTABDRUCK "
6 mm (6 / 0,167 = 36)
narrow type
" GERÄT "
3 mm (3 / 0,167 = 18)
broad type
" 791 "
ESC - sequences:
Decimal
ESC - sequence
Meaning
(decimal value in < >)
27
24
27
27
77
66
75
27
27
71
27
27
55
12
ESC “@”
CAN
ESC “$” < 0 >
ESC “k” < 1 >
Printer initialization
Clear line buffer
Print start pos. in column 0
Typeface 1 (normal type)
Text: “TESTABDRUCK”
ESC “SP” < 36
ESC “k” < 2 >
Text block spacing 36 columns
Typeface 2 (narrow type)
Text: “GERÄT”
Text block spacing 18 columns
Typeface 3 (broad type)
Text: “791”
Immediate print start
64
36 0
107 01
69 73 78 65
68 82 85 67
32 36
107 02
69 82 142 84
32 18
107 03
56 53
ESC “SP” < 18 >
ESC “k” < 3 >
FF
33
c) Program example in Basic:
04
05
10
20
30
40
70
80
90
100
110
120
130
140
150
160
170
180
190
200
210
220
230
240
250
260
REM
OPEN
REM
PRINT #1,
REM
PRINT #1,
REM
PRINT #1,
REM
PRINT #1,
REM
PRINT #1,
REM
PRINT #1,
REM
PRINT #1,
REM
PRINT #1,
REM
PRINT #1,
REM
PRINT #1,
REM
PRINT #1,
REM
PRINT #1,
i
Open V 24-interface COM1, set device-timeout DSR 1000 ms
"com1:9600,N,8,1,DS1000" AS #1
Sends control sequence 'Printer initializing'
CHR$(27);"@"
Sends control code 'Clear line buffer'
CHR$(24)
Sends control sequence 'Print start position 0'
CHR$(27);"$";CHR$(0)
Sends control sequence 'Typeface 1' (normal type)
CHR$(27);"k";CHR$(1)
Text sent
"TESTABDRUCK"
Sends control sequence 'Text block spacing 36 columns'
CHR$(27);CHR$(32);CHR$(36)
Sends control sequence 'Typeface 2' (narrow type)
CHR$(27);"k";CHR$(2)
Sends text
"GERÄT"
Sends control sequence 'Text block spacing 18 columns'
CHR$(27);CHR$(32);CHR$(18)
Sends control sequence 'Typeface 3' (broad type)
CHR$(27);"k";CHR$(3)
Sends text
"791"
Sends control code 'Print start'
CHR$(12)
During transmission of the print data, there must be immediate
reaction to a change in the software handshake code, so as to
prevent an overflow of the internal print buffer.
Note
Summary of available control codes in numerical order
Decimal
Hexadec.
ASCII
Function
12
10
0C
0A
FF
LF
Line end and print start
Line end Line 1 for
2 - line imprint
Clear line buffer
Text block spacing
Print start position
Request status message
Printer initializing
Set typeface
24
27
27
27
27
27
34
32
36
63
64
107
18
1B
1B
1B
1B
1B
20
24
3F
40
6B
CAN
ESC
ESC
ESC
ESC
ESC
SP
$
?
@
k
Page
19
19
19
21
20
25
19
20
35
Ernst Reiner GmbH & Co KG
Baumannstr. 16
D - 78120 Furtwangen
Telephone
Fax
E - Mail
Internet
790 103 - 011 b
+ 49 7723 6570
+ 49 7723 657200
[email protected]
www.reiner.de
02 / 2009