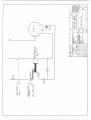
1
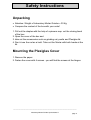
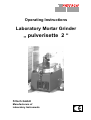
Operating Instructions
Laboratory Mortar Grinder
„ pulverisette 2 “
Fritsch GmbH
Manufacturers of
Laboratory Instruments
Operating Instructions, Version of December 1, 1995
(Valid from Ser.-No. 5000)
Copyright 1995
(Diese Betriebsanleitung ist auch in Deutsch erhältlich)
FRITSCH GmbH
Telephone
Manufacturers of Laboratory Instruments
Fax
Industriestraße 8
Telex
06784700
067847011
426203fritsd
D - 55743 Idar-Oberstein
Fritsch GmbH
On June 24, 1995, Fritsch GmbH was certified by the TÜV-Zertifizierungsgemeinschaft
e.V.
An audit was conducted (Report No. Q94/107) to verify that Fritsch meets the
requirements of
DIN ISO 9001 / EN 29001
(Certificate No. 71 100 4 008)
________________________________________________________
Laboratory Mortar Grinder „pulverisette 2“
Page 1
Table of Contents
1
2
3
4
4.1
4.2
4.3
5
5.1
5.2
5.3
6
7
7.1
7.2
7.3
8
8.1
8.2
9
10
10.1
10.2
10.3
10.4
11
12
Page
Safety Signs, Application and Use
Safety Instructions
Method of Operation
Operating Safety
Setting up
Electrical Connections
Checking for accordance of voltage and current
Motor
Fuses
Front Panel
Power on
Activating the Laboratory Mortar Grinder
Overload switch
Selection of mortar bowl and pestle
Installation of the grinding set
Mortar bowl
Pestle
Scraper
Grinding
Charging the sample to be ground
Collecting the ground sample
Grinding during forced cooling
Maintenance
Cleaning
Re-grinding the grinding set
Drive motor
Instrument
Warranty
Technical Data
List of Spareparts
Wiring Diagram
3
4
7
7
8
8
8
8
8
9
9
9
9
10
10
11
11
12
12
12
13
13
14
14
14
14
15
15
15
16
17
________________________________________________________
Laboratory Mortar Grinder „pulverisette 2“
Page 2
Safety Signs
Application and Use
Safety signs indicate dangers:
Caution:
Combustible ma- Materials detriterials
mental to health
Danger, electrical power
Caution
Warning of dangers
Wear eye protection
Use of the Laboratory Mortar Grinder
This operator’s manual describes the area of application and
the use of the Laboratory Mortar Grinder.
Any use other than for grinding with the grinding parts
manufactured by Fritsch is impermissible
Modifications may be made to the Mortar Grinder only after
consultation with and written approval from FRITSCH. If
modifications are made without approval, the conformity declared by FRITSCH in respect of the European directives will
no longer apply.
· Exercise caution when working with combustible or poisonous materials.
Always comply with valid safety regulations (MAC values) when handling samples or cleaning liquids which
are dangerous to your health. Where applicable, set up
the Mortar Grinder in a well-ventilated safety zone.
____________________________________________________________________________
Laboratory Mortar Grinder „pulverisette 2"
page 3
Safety Instructions
· Do not remove information signs.
· Allow only trained personnel to perform maintenance.
· Replace covers after maintenance.
· Do not disable safety devices permanently.
· Check safety device regularly.
· „Out of service“ Þ Turn off master switch on rear side.
· Allow only trained specialists to work on the mill.
· Do not open Laboratory Mortar Grinder until it is completely stopped.
· Always wear safety glasses when working.
· Operate Mortar Grinder only with fixed pestle.
· Do not put your hands into Mortar Grinder while it is running.
· Set up the Laboratory Mortar Grinder indoors only.
· Set it up on a sturdy work table.
· Ambient temperature 0 to 40°C
· Dimensions: 395 x 435 x 870 mm (H x W x D)
· Weight (net): approx. 30 kg
· Danger: Electricity:
· The instrument contains electrical switches in the low voltage
range 230 Vrms.
· Noise level: 70 dB
· Beware of:
· Squeezing on counterweight!
· Squeezing on lid toggle catch !
· Squeezing on pestle fixing device and its spindle!
Read instructions manual before use!
____________________________________________________________________________
Laboratory Mortar Grinder "pulverisette 2"
page 4
Safety Instructions
Unpacking
· Attention: Weight of Laboratory Mortar Grinder = 30 Kg
· Compare the content of the box with your order!
1. Pull out the staples with the help of a pincers resp. cut the closing band
of the box.
2. Open the cover of the box and
3. take out the accessories such as grinding set, pestle and Plexiglas lid.
4. Don´nt use the rod as a hold. Take out the Mortar with both hands at the
lid.
Mounting the Plexiglas Cover
1. Remove the paper
2. Fasten the cover with 4 screws - you will find the screws at the hinges.
____________________________________________________________________________
Laboratory Mortar Grinder "pulverisette 2"
page 5
Operating Instructions
Laboratory Mortar - Grinder
„ pulverisette 2 “
The „pulverisette 2“ is an automatic mortar grinder for the universal dry- or wet grinding down to analytical size.
When preparing samples for the synthesis, the Laboratory Mortar Grinder is used for
mixing or homogenising dry samples, emulsions or pastes.
The Laboratory Mortar Grinder grinds inorganic as well as organic samples for the
analysis, quality control and material testing as for example:
Plants
leafs
coniferous needles
spices
nuts
almonds
food
gelatine
sugar
grain
pellets
feed
drugs
dragèes
tablets
soil
coal
ashes
chemicals
fertilisers
chalk
clay
porcelain
gypsum
lime
clinker
cement
silicate
cinder
The initial feed size should not exceed 3 mm and the quantity of a charge should not
be more than 150 ml. (Larger pieces shall be reduced to small pieces before charging
into the grinder.)
The final fineness will depend upon the grinding time - 1 μm as a mean particle size
can be reached.
_________________________________________________________
Laboratory Mortar - Grinder "pulverisette 2"
Page 6
951201VB
1 Method of Operating
The size reduction from dried foods with hand mortar and pestle is the oldest known
grinding procedure. Archaeologists in Jordan have found a mortar with stage whose
age could be determined at approx. 10.000 years.
Similar to hand mortar and pestle by using the Laboratory Mortar Grinder the comminution takes place by pressure and friction between the mortar bowl and the free rotating pestle.
But opposite to the hand mortar the automatic mortar is rotating and the axis of the
pestle is in a stationary position. A relatively large grinding surface ensures quick and
uniform process and simple pestle adjustment. Sticky materials could be ground after
adding some liquid into the bowl.
The sample is moved by the motor-driven mortar bowl and taken off from the wall and
the bottom of the mortar bowl by the Vulcollan scraper. The sample is turned around
by the scraper working like a plough bringing it back in front of the pestle.
Compared to the usually more plain hand mortars the grinding bowl of the Laboratory
Mortar Grinder is closed. A lip seal between grinding bowl and lid guarantees for lossfree comminution - even if suspension is to be ground.
Reproducible results are obtained by the built-in timer and the easy positioning of the
load of the pestle. A large acrylic safety cover permits observation of the grinding process which can be controlled by adjustment of scraper and pestle.
The extremely robust construction of the driving unit, the guidance of the pestle and all
the other movable parts guarantees for a long lasting lifetime of the unit and prepared
it in everydays readiness.
2 Operating safety
The operating safety of the Laboratory Mortar Grinder was proofed by the TÜVSaarland. After the successful final test the TÜV-Saarland certified that the Laboratory
Mortar Grinder by with its construction and manufacturing meets the requirements of
DIN EN 61010 (03/94) resp. IEC-1:1990+ A1:1992. This was confirmed by an official
Certification of Conformity.
The enclosed „Declaration of Conformity“ ensures, that the Laboratory Mortar Grinder
delivered with this paper was built according to the regulations.
_________________________________________________________
Laboratory Mortar - Grinder "pulverisette 2"
Page 7
3 Setting up the Laboratory Mortar Grinder
Set up the Laboratory Mortar Grinder indoors on a flat, sturdy surface.
It is not necessary to fasten it in place.
The room temperature must be between 0 and 40°C.
Make certain that the grinder is easy to access.
4 Electrical connections
4.1 Checking for concordance of voltage and current
Before connecting the grinder, check the setting of the voltage selector on the back of
the grinder and compare it to the voltage of your local mains.
Þ
Only a trained specialist is permitted to change over the
supply voltage and/or alter the connecting cable.
The slot in the axle of the switch must point to the value of your
network.
100/110/200/230/240 V A.C.
with protective earth; fuse max. 16 A
Turn on the master switch (black switch) on the rear side. The green lamp (Power On)
will light up.
4.2 Motor
The motor (single-phase brushless A.C. motor with PE conductor, 50/60Hz) can be
started by turning the timer.
In the case of overload - f.e. after blockage of the mortar - the drive motor is protected
by an overload switch on the front panel.
To continue the grinding process - after release of the blockage - press the button in
the middle of the switch.
4.3 Fuses
There is a fuse in the connection plug at the rear side of the grinder, above the inlet
for the power cable.
Replacement: 5 x 20 TA4
_________________________________________________________
Laboratory Mortar - Grinder "pulverisette 2"
Page 8
5 Front Panel
5.1 Power on
The green lamp (Power On) will light up after you turn on the master switch (black
switch) on the rear side.
5.2 Activating the Laboratory Mortar Grinder
Timer:
1. Setting the run time: Set knob-operated switch of timer to run time.
2. Setting constant operation: Set knob-operated switch of timer to continuous
operation "ON".
3. Maximum grinding period: 1 hour.
4. Before restarting, examine the grinding conditions.
5. When operating with external timer, examine the temperature of the sample.
Shutting down: Wait until time set on the timer has elapsed, or turn knob-operated
switch on timer to "OFF".
5.3 Overload switch
The motor is protected against overload - f.e. after blockage of the mortar - by an
overload switch.
To continue the grinding process - after release of the blockage - press the button in
the middle of the switch.
_________________________________________________________
Laboratory Mortar - Grinder "pulverisette 2"
Page 9
6 Selection of mortar bowl and pestle
When selecting the material of the grinding set you must consider the hardness of the
sample and the tolerated contamination arising from the abrasion of the grinding set.
Even a very small contamination may qualitatively influence your analytical results.
Mortar bowl and pestle can be supplied with the following
materials:
Material
(Mortar and pestle)
Order. NR.
(Complete set)
Abrasion
resistance
46.011.00
adequate
Mineral materials
Hard Porcelain
Sintered Corundum 1
85% Al2O3
46.007.00
satisfactory
Sintered Corundum 2
99.7% Al2O3
46.006.00
rather good
Agate
99.9% SiO2
46.005.00
good
Zirconium Oxide
94% ZrO2
46.012.00
very good
Chrome-Nickel-Steel
acidproof
46.010.00
rather good
Chrome-Steel
hardened
46.009.00
good
46.008.00
very good
Metallic materials
Tungsten Carbide
93% WC + 6% Co
7 Installation of the Grinding Set
Caution: The parts of the grinding set installed in the mortar grinder have been exactly matched to each other. Therefore mortar bowl, pestle and scraper
must always be used jointly.
The setting of mortar bowl, pestle and scraper has been optimised at works.
Depending of the hardness of the sample to be ground, the pestle and the scraper
must be re-set from time to time. Also when a different grinding set (or a new one) is
installed, the setting must be readjusted.
_________________________________________________________
Laboratory Mortar - Grinder "pulverisette 2"
Page 10
7.1 Mortar Bowl
To replace a mortar bowl, simply lift the bowl from its support
plate and put it back by placing it on to the support, the two traction screws being introduced in the two holes on the bottom of
the plastic setting of the bowl.
The bowl should not „dangle“.
7.2 Pestle
To remount or replace a pestle you need the enclosed tools:
· Fork wrench 19 mm,
· Fork wrench 24 mm,
· Hexagon socket screw key (Allan key) 3 mm and
· Face spanner
1. Hold the pestle axle with the provided fork wrench 19 mm.
Then loosen the counter screw with the provided fork wrench 24 mm. The pestle
can than be unscrewed from the axle by turning to the left.
2. Re-mounting the pestle is being done the opposite way.
When the lid is closed, the pestle must be well set in the lower radius of the mortar
bowl. To enable you to do this setting the axle of the pestle is arranged eccentric.
Turning this eccentric the axis will be drawn near the edge of the bowl resp. the opposite way.
The eccentric is fixed with a hexagon socket screw.
1. Fill in the bowl some sample (f.e. small amount of sand).
The sand will take care of the friction between bowl and pestle in order to turn around
the pestle. Only by this you will be able to do the setting correctly.
2. Close the lid and fasten the locking system.
3. To frees the eccentric loosen the 3 mm hexagon socket with the Allan key.
4. Insert the provided face spanner into the eccentric and reset the eccentric in a way
that the pestle slightly presses against the radius of the mortar bowl.
Caution: The front of the bowl should not come up!
If the setting is correctly done, then the pestle will rotate on itself by gentle pressure
against the radius of the bowl. If the pestle does not rotate, than the setting must be
corrected.
5. Re-tighten the 3 mm hexagon socket screw firmly.
_________________________________________________________
Laboratory Mortar - Grinder "pulverisette 2"
Page 11
7.3 Scraper
The Vulkollan scraper can be adjusted horizontally with the spherical button and vertically by loosening and re-tightening the side knob.
A new scraper has to be ground before use:
· The part in contact with the bottom of the bowl must be ground so that its rear
edge (in eye direction) touches the bottom.
· The part of the scraper in contact with the wall must be ground so that its front
edge (in eye direction) touches the bottom and the scraper wipes off the sample
from the bowl.
8 Grinding
Instructions: Before closing the lid, make certain that the grinding set is firmly seated.
· Close lid securely.
· Pay attention to heating of material to be ground:
in case of longer run time, possibly stop to cool down.
In order to go easy with the grinding parts:
Laboratory Mortar Grinder with lid in closed position should not be operated
the lid being closed without sample to be ground.
8.1 Charging the sample
1. Open the cover and the lid of the Laboratory Mortar Grinder and fill in the sample
into the mortar bowl. The initial feed size should not exceed 3 mm and the quantity
should not be more than 150 ml.
2. Switch-on the instrument.
3. Then close the lid. By doing this, lift the pestle by pushing up the weight on its rod.
4. After having closed the lid locking system slowly release the weight on its rod on the
sample to be ground.
5. By sliding the weight on its rod, the grinding pressure on the sample can be selected and thus the load of the pestle can be adapted to the hardness and the
grindability of the sample.
(Front position: ca. 3 kg load,
rear position:
ca. 9 kg load.)
6. Then close the cover.
_________________________________________________________
Laboratory Mortar - Grinder "pulverisette 2"
Page 12
Advice:
For preliminary crushing of larger pieces you may slowly release the pestle on the
sample in order to break them before the pestle reaches its normal operating position and can be arrested.
8.2 Collecting the ground sample
1. After completion of the grinding process turn the timer in its „OFF“ position or the
timer stops the unit by itself.
2. Lift the cover and lift up the rod with the grinding weight before the lid is opened.
Then lift the pestle out of the bowl by opening the lid until the rod comes to a stand
at the rear side.
3. Remove the bowl out of its recess by hand and collect the sample.
Advice:
You may collect your sample more complete by lifting the lid only a little and clean
up the pestle from sticking sample f.e. using a brush. The sample will drop directly
into the bowl.
9 Grinding during forced cooling
Whenever material which is very heat sensitive is to be ground, we recommend a forced cooling with liquid nitrogen. The liquid nitrogen is introduced directly into the bowl
together with the material to be ground.
"Dry ice" (solid carbon dioxide) can also be used. Keep in mind, however, that dry ice
frequently contains frozen condensation water on its surface.
Caution:
Wear safety glasses when working with liquid nitrogen:
With some materials to be ground, grinding can be improved by using coolants
prior to grinding. For example, animal tissue or special plastics can be rendered brittle
by dipping them briefly in to liquid nitrogen or freezing them in a deep freeze beforehand. Here, too, you must protect the material to be ground against condensing water.
For example, you could place the material in a PVC bag during the cooling procedure.
_________________________________________________________
Laboratory Mortar - Grinder "pulverisette 2"
Page 13
10 Maintenance
The most important process in preventive maintenance is regular cleaning:
Caution:
The cleaning and maintenance of the Laboratory Mortar
Grinder has to be done in accordance to the national safety
regulations - specially when the environment contains certain amount oft dust so that dust explosion could happen.
10.1 Cleaning of the Laboratory Mortar Grinder
The frequency with which a thorough cleaning must be performed depends on the
grinding material and its final fineness. We recommend adapting the cleaning intervals
to the use of the Laboratory Mortar Grinder by making regular checks at the outset.
When the lid is open, the mortar bowl can be removed and can easily be cleaned - i.e.
under running water. The pestle and the scraper are easily accessible when the lid is
open and grinding residues are to be removed. Use a brush too if necessary.
Residual ground material on the rubber seal at the lid or
at the border of the mortar bowl may destroy the lip seal
We can also recommend alcohol as an organic cleaning media. Other solvents should
not be utilised. (See paragraph 7 as to dismantling the pestle and the scraper.)
10.2 Re-grinding the grinding set
After a long use scratches or roughness may appear on the grinding surfaces of the
grinding set. In such cases, charge about 20 gr. carborundum (silicon carbide) of 0.5
mm particle size and about 20 ml water into the bowl, close the lid and let the instrument operate for about 30 minutes to 1 hour. The silicon carbide paste in the mortar
bowl will re-grind the grinding set to a great extend by abrasion.
10.3 Drive motor
The drive motor does not require any maintenance.
The switches installed on the grinder should be checked for function (smoothness of
action) in event of contamination.
10.4 Laboratory Mortar Grinder
The Laboratory Mortar Grinder itself does not require any maintenance. The bearings
of the rotating components are permanently lubricated.
_________________________________________________________
Laboratory Mortar - Grinder "pulverisette 2"
Page 14
11 Warranty
The warranty card enclosed with this shipment must be returned to the supplier completely filled out in order for the warranty to take effect.
Fritsch GmbH of Idar-Oberstein and our "Application technology laboratory" and/or our
agent in your country will be glad to advise and help you.
In order to answer any questions you may have, we will require the serial number
stamped on the nameplate.
12 Technical Dates
Weight with mortar bowl and pestle:
30 kg
Dimensions: H, W, D:
450, 250, 450 mm
Power consumption at 22°C and 225 Volt:
I
= 0.87 A
Power
P
= 145 W
max. Power
Pmax
= 165 W
_________________________________________________________
Laboratory Mortar - Grinder "pulverisette 2"
Page 15