1
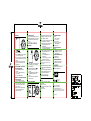
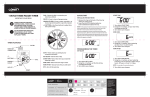
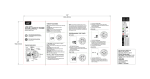
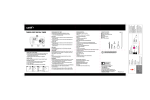
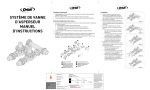
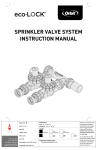
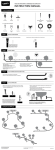
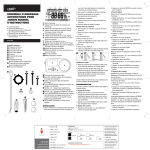
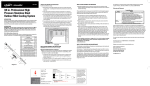
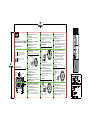
RAIN DELAY
OUTLET 2
T
SE CK
O
CL
AM
START
TIME
© 2015 Orbit Inc.
This work is the property
of Orbit®, and cannot be
used, reproduced or
distributed in any way
without their express
permission.
∙
∙
∙
∙
Additional Information
PMS
0000
W: 12.0"
H: 6.0"
L: 0.0"
W: 3.0"
H: 1.5"
Flat
Folded
PMS
0000
PMS
0000
PMS
0000
Glue
Product
Coverage
Fold
Dims./
Callout
Dieline
SOFTWARE: Adobe Indesign CS6
ARTWORK №: 56544-24 rB
DESIGNER: SH MARKETING: SW
DATE: 02/16/2015
K
Orbit ®
1.801.299.5555
orbitonline.com
F
OF
ST
TIMART
E
START TIME
1.Turn dial to HOW LONG.
2. Press the STATION button to move through and
select a station; 1 or 2.
3. Using the +/- buttons, select watering duration
from 1 to 360 minutes for each desired station.
Timer advances faster if button is held down.
NOTE: To remove a watering duration press CLEAR.
4. Turn dial to save changes.
PRINTERS ARE
REQUIRED TO MATCH
ALL SPECIFIED
PMS COLORS.
Printers are responsible
for meeting print
production requirements.
Any changes must be
approved by Orbit®.
Printed piece must meet
designated specifications
on this form.
DIAL
OUTLET 1
1 2
TO
AU
RESET
MANUAL/
CLEAR
STATION
W
HO NG
LO
MANUAL
CLEAR
INSTALLING THE BATTERIES
1.Remove the tray on the back of the timer by
sliding or pulling it out.
2.Insert two AAA (1.5V) alkaline batteries (not
included) and replace the tray.
NOTE: Firmly replace the battery tray to ensure
water resistance and increase battery life. You will
know the battery tray is fully inserted if it does not
MINUTES
A B C
H
OF OW
TE
N
PM
HOURS MINUTES PM
HOW
LONG
START TIME
S
CL ET
OC
K
W
HO NG
LO
H
OF OW
TE
N
OF
F
+/- BUTTONS
W
HO TEN
OF
HOW
LONG
T
SE CK
O
CL
AUTO
ST
TIMART
E
1 2
MANUAL
NEXT START TIME
TIME
EVERY DAYS AM
AM
1 2
F
STATION
STATION
STATION
OF
STATION
HOW LONG
W
HOTEN
OF
ARROW
AUTO—Timer waters according to your
customized schedule.
SET CLOCK—Set the time of day.
START TIME—Select what time you would
like to start watering.
HOW LONG—Determine how long to water
HOW OFTEN—Choose how often you will water
OFF—Turn off all watering.
1. Turn dial to SET CLOCK.
2.Using the +/- buttons, set the time of day,
including AM and PM. Timer advances faster if
button is held down.
3. Press the ARROW button to set current day.
4.Press the +/- buttons to move between and
select the current day of the week. Press the
ARROW button to toggle back to the time
of day.
5. Turn dial to save changes
OFF
START
TIME
FILTER
A B C
H
LO OW
NG
CL SET
OC
K
TO
AU
OFF
TIMER FEATURES
LOW
BATTERY
INDICATOR
SET
CLOCK
PM
Filter traps dirt particles, prolonging
life of timer. Clean filter regularly and
replace if worn.
HOSE TAP
CONNECTION
T
AR
ST IME
T
When expecting freezing temperatures,
timers should be removed from the hose
faucet and stored indoors to avoid potential
freeze damage.
SET CLOCK AND DAY
AU
TO
Important, please read!
PROGRAMMING THE TIMER
A start time is the time of day that the timer
will begin to water. This timer features three
start times.
1. Turn dial to START TIME.
2. Press the ARROW button to move through start
times; A, B, and/or C.
3. Using the + / - buttons, set your first start time,
including AM and PM. Timer advances faster
if button is held down. A box is placed around
each programmed start time.
NOTE: To remove a start time press CLEAR.
4. Press the STATION button to move through
stations; 1 or 2.
5. Press the + / - buttons to toggle the stations
on/off. Note: All stations are automatically
selected when a start time is added.
Press the - button to toggle a station off.
6. Repeat steps 2 - 5 to program additional
start times.
7. Turn dial to save changes.
NOTE: Only one start time is required.
AUTO
HOSE FAUCET TIMER
pull out easily. Used up or dead batteries must be
removed from the timer and disposed of properly.
Replace batteries when low battery icon appears on
display. Do not dispose of batteries in fire. Batteries
may explode or leak.
HOW
OFTEN
1 Dial 2 Outlet
DIAL—Rotate the dial to customize your
watering schedule.
+/- BUTTONS—Use these buttons to adjust
time and program.
RAIN DELAY—While in AUTO press to
activate Rain Delay.
ARROW—Moves cursor around the screen
during programming.
STATION—Moves between Station 1
and Station 2.
MANUAL/CLEAR—Press to water manually or
to clear programming.
RESET—Press to reset back to factory settings.
CONGRATULATIONS!
F
W
HO TEN
OF
1.With the dial on AUTO, press the button.
2. Using the +/- buttons select a delay of
1 to 7 days.
3. Screen will flash between clock and hours
remaining before programmed cycle
resumes.
4. To remove rain delay, turn dial to OFF and
then back to AUTO.
MANUAL/HAND WATERING
STATION
MANUAL
MANUAL
1 2
1 2
AUTO
MINUTES
ST
TIMART
E
STATION
T
SE CK
O
CL
• Using the ARROW button move to INT.
• Press the + / - buttons to cycle through each
interval. You may choose to interval water
every 1 hour, 2 hours, 4 hours, 6 hours, 12
hours, or 1 to 7 days.
5. Repeat steps 2 and 4 to program watering
frequency for additional start times.
6. Turn dial to save changes.
Rain delay allows you to postpone watering for
a set period of time. To access the rain delay,
follow the steps below.
OF
F
INTERVAL - SELECT AN INTERVAL PERIOD
YOU WANT TO WATER:
AUTO
W
HO TEN
OF
• Using the ARROW button move to the
desired day.
• Press the + / - buttons to toggle the day
of the week on/off.
• Select any combination of days.
DAYS
ST
TIMART
E
DAYS OF THE WEEK - SELECT SPECIFIC
DAYS YOU WANT TO WATER:
T
SE CK
O
CL
1.Turn dial to HOW OFTEN.
2. Press the ARROW button to move through and
select a start time A, B, and/or C.
3. Press + or – button to move the cursor down to
select Days of the Week or Interval watering
frequency.
4. There are two ways to set your watering
frequency for each start time; Days of the
Week or Interval.
ADDITIONAL FEATURES
RAIN DELAY
OF
T
AR
ST IME
T
H
LO OW
NG
SET
CLOCK
F
AU
TO
OF
HOW
OFTEN
HOW
LONG
A B C
Your timer is now programmed. Turn your dial
to AUTO to allow your timer to water according
to programmed time, station, duration, and
frequency.
HOW
LONG
HOW OFTEN
This feature allows you to manual water without
interrupting your set schedule. To access this
feature, follow the steps below.
1. There are two ways to manual water: all stations
as programmed or selected stations.
To manual water all stations as programmed:
• With the dial on AUTO, press the
MANUAL button.
• “ALL” will be displayed and the timer will
water all stations as programmed.
To manual water specific stations or durations:
• With the dial on AUTO, press the
MANUAL button.
• Press the STATION button to select
desired station.
• Using the +/- buttons, select watering
duration from 1 to 360 minutes.
NOTE: There may be a slight delay between the
time the manual button is pressed and when
watering begins.
2. Screen will flash between clock and time
remaining before automatic programming
resumes.
3. To stop manual watering, turn the dial to OFF.
4. Turn the dial back to AUTO to resume your
programmed watering schedule.
TIMER DOES NOT WATER.
Check if:
• Timer is set to AUTO.
• Hose faucet is on.
• Batteries are low.
• Clock is set to correct time,
including AM and PM.
• Rain Delay is on.
WATER WON’T TURN OFF.
Check if:
• HOW LONG is set to desired time.
• HOW OFTEN is set to desired
interval hour or day.
WORKING WATER PRESSURE:
• Minimum: 10 psi
• Maximum: 100 psi
WORKING TEMPERATURE:
• Maximum: Do not exceed 120°F
• Minimum: Keep from freezing
WARNINGS:
For outdoor use with cold water only.
Not for use with appliances.
TROUBLESHOOTING
WATER DOES NOT COME ON AT DESIRED TIME.
Check if:
• Clock is set to correct time, including
AM and PM.
• Dial is set to “Auto”
• Start time is set to desired time, including
AM and PM.
• Rain Delay is on.
Customer Service
1-800-488-6156
orbitonline.com
Orbit® Irrigation Products, Inc.
North Salt Lake, UT 84054
© 2015 Orbit Irrigation Products, Inc.
All rights reserved. All trade names are registered
trademarks of respective manufacturers listed.
PN 56544-24 rC