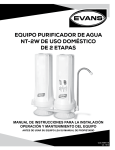
1
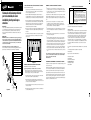
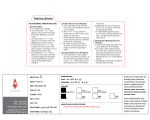
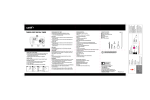
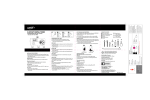
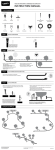
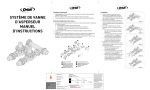
MODEL 30002
Mist System Assembly and Mounting
USEFUL TIPS FOR MIST SYSTEM LAYOUT
For the most effective cooling:
g
1.Place mist line around the perimeter of the area to be cooled. This forms a “mist curtain,” a cooling barrier between the protected area and the out
side heat.
3/8 in. Professional High
Pressure Stainless Steel
Outdoor Mist Cooling System
3. For a deep patio (more than 12' deep), mount the pipe on the inside of the fascia board with nozzles directed slightly downward into the patio for the most effective cooling. This will result in better cooling, but may result in some residual moisture buildup during cooler temperatures or more humid conditions.
Thank you for selecting the quality of Orbit®|Arizona Mist® and the Professional High
Pressure Stainless Steel Outdoor Mist Cooling System. You will enjoy many years
of satisfactory and trouble-free service when properly installed and maintenance is
observed. Please read the installation and instruction manual completely.
Instructions
4
2
3
6
5
8
Description
Qty
End Compression Fitting
2
2
Collar (2 per each end of tubing)
34
3
White Washer
34
4
Black Rubber O-Ring
17
5
Nut
17
6
24 in. Stainless Steel Tubing
6
7
Straight Compression Fitting
5
8
Brass & Stainless Steel Misting Nozzle
6
9
Elbow Compression Fitting (not shown)
2
10
Tee Compression Fitting (not shown)
1
11
3 in. Stainless Steel Tubing (not shown)
1
12
6 in. Stainless Steel Tubing (not shown)
1
13
12 in. Stainless Steel Tubing (not shown)
1
4
7
g
g
24"
10'-15'
Water feed line. To attach feed line, attach the male quick connect end at the start of mist line closest to water source.
End of Mist Line. Cap the end by attaching the end fitting in the same fashion as shown in Diagram A.
Water Connection/Flush System/Begin Mist Operation. Attach T Filter to the water spigot, then attach Orbit®|Arizona Mist® High Pressure Feed Line to the end of the mist line and attach the other end to the quick connect outlet on the Orbit®|Arizona Mist® High Pressure Pump. Turn on water (at full pressure) for a few minutes to flush out any dirt or debris from within the mist line. Turn off water, hand-thread nozzles in threaded fitting openings (hand tighten only). Turn on the water, turn on the Orbit®|Arizona Mist® High Pressure Pump, set your start and stop times as instructed in the High Pressure Pump manual and begin misting!
For your installation convenience, a length of 3 in., 6 in. and 12 in. tubing is included
in this kit. For additional pieces, please contact Orbit® Irrigation Products, Inc. at
1-800-488-6156 or 1-801-299-5555.
www.orbitonline.com
Mist System Operation and Maintenance
Diagram B
Mist System Assembly and Installation
The following recommendations will assist you in maintaining your mist nozzles and
preventing unnecessary clogging.
Mist Line Assembly Preparation and Planning
g Make sure each section of precut stainless steel are completely free of debris. Remove any shavings from outside edges and interior of pipes/fittings, then flush with air or water to clean thoroughly.
Nozzle Cleaner - Periodically clean the nozzles in the system. See bottle for instructions. Sediment or Calcium Inhibitor Filter - A T Filter should be used to prevent any
solid sediments from passing from water source to nozzles.
REMEMBER: Read all instructions before assembly.
Flushing System - Always remove nozzles at the end of the summer season. Before
reinstalling your nozzles the following year, flush the system for 5 minutes. To keep
the mist line free from debris in the off season, install Orbit®|Arizona Mist® Nozzle
Plugs in place of the nozzle. You should also flush the system if it has been idle for
longer than a month.
1. Predetermine the hanging position of mist line (inside or outside of patio fascia), then mark. Connect them together with the supplied fittings as shown in Diagram A.
2. Calculate the number of 2 ft. lengths needed for straight runs of mist line.
3
2
proof no:
7
date: 10.24.08
des: MZ spck: MZ
job no: N/A
dimensions:
Printers are responsible for
meeting print production
requirements. Any changes
must be approved by the
client and Fluid Studio.
printed piece must meet
designated specifications
on this form.
flat: w: 19" h: 8.5"
finished: w: 4.75” h: 8.5”
colors
Registration
color
non printing
color
non printing
Black
PMS
????
PMS
????
client: Orbit
sku: 30002
p 801 295 9820
f 801 951 5815
www.fluid-studio.net
1065 South 500 West
Bountiful, Utah 84010
upc: N/A
file name: 30002-24 rB.indd
software: InDesign CS3
additional instructions:
· Font sizes cannot be smaller than 7 pt.
· LB 408578
·
PMS
????
Warranty and Statement
troubleShooting
Problem
Leak at Nozzle
Join all sections at corners by installing a 90 degree elbow into place at corners using the same process as shown in Diagram A. Be sure that mist
line is positioned at the proper angle for misting—this will be the permanent position of mist line.
3. Determine where you will connect water source to mist line (this is your water feed line – model #92079).
5
Diagram A
g
5. If your mist line will require more than one 90 degree elbow, purchasing a Stainless Steel Tubing cutter is recommended to allow for cutting of stain less steel tubing in exact lengths required.
3/8 in. Misting System Contents List
Check the contents in the parts bag. If items are missing, please return unopened to
the place of purchase, or call Orbit® Customer Service at (800) 488-6156.
1
g
4. For a shallow patio (less than 12' feet deep), mount the pipe on the outside of the fascia board with nozzles positioned slightly down and outward.
IMPORTANT: This mist system will operate under increased pressure up to 1000 psi.
IE: 1000 psi misting pump (Orbit®|Arizona Mist® Item # 92075). Any pressure above
1000 psi is not condoned by this manufacturer. Read all instructions and check kit
contents before beginning assembly.
1
Place assembled mist line along your marks with the first nozzle beginning approximately 2 feet from the house. Attach hanging clamps into place (see Diagram B).
Repeat this step until all straight sections are hung.
2. Place mist nozzles 24" apart for mist lines mounted 10' to 15' above the ground. Nozzle spacing should be shortened if mist line is mounted higher.
Introduction
Assemble straight sections of mist line. Connect the precut sections of pipe using the stainless steel fittings included. Diagram A shows the order in which to assemble the fittings.
For questions or comments, please contact Orbit® Customer Service at Orbit®
Irrigation Products, Bountiful, UT 84011 or by calling at (800) 488-6156.
© 2007 Fluid Studio. This
work is the property of Fluid
Studio, and cannot be used,
reproduced or distributed
in any way without their
express permission.
Leak at
Connector
Solution
1. Make sure the nozzle is sufficiently tightened into place. HAND
TIGHTEN ONLY DO NOT USE TOOLS.
2. Check to make sure the nozzle O-ring is in place.
3. Nozzle may be clogged which can give the appearance of
“leaking” or dripping. Clean with nozzle cleaner (See use
instructions on nozzle cleaner bottle) and/or remove debris left
from inadequate flushing of mist line by blowing out with air. do
not attempt to clean by sticking foreign object into nozzle
opening–this will result in nozzle damage.
1. Turn water and pump off.
2. Remove fitting and ensure all washers, O-rings and stainless
steel collars are included in the fitting.
3. Reassemble to ensure fitting is tightened on both sides.
Orbit® Irrigation Products, Inc. warrants to its customers that its Orbit®|Arizona
Mist® products will be free from defects in materials and workmanship for a period
of four years from the date of purchase. We will replace, free of charge, the defective part or parts found to be defective under normal use and service for a period of
up to four years after purchase (proof of purchase required). We reserve the right to
inspect the defective part prior to replacement. Orbit® Irrigation Products, Inc. will
not be responsible for consequential or incidental cost or damage caused by the
product failure. Orbit® liability under this warranty is limited solely to the replacement or repair of defective parts.
To exercise your warranty, return the unit to your dealer with a copy of the sales
receipt.
Questions please call: 1-800-488-6156 or 1-801-299-5555
www.orbitonline.com
Register your product online at www.orbitonline.com
Orbit® Irrigation Products Inc.
845 N. Overland Rd.
North Salt Lake, Utah 84054 USA
http://www.orbitonline.com
800-488-6156 | 801-299-5555
PN 30002-24 Rev B
MODELO 30002
CONSEJOS ÚTILES PARA LA DISPOSICIÓN DEL SISTEMA DE ROCÍO ATOMIZADO
Para obtener el enfriamiento más efectivo:
g
1. Coloque la línea de rocío atomizado alrededor del perímetro del área que se va a enfriar. Esto forma una “cortina de rocío atomizado,” una barrera de enfriamiento entre el área protegida y el calor del exterior.
Sistema de enfriamiento profesional
por rocío atomizado, de acero
inoxidable y de alta presión para
exteriores
2. Coloque las boquillas atomizadoras a 24 pulgadas (61 cm) de las líneas de rocío atomizado montadas de 8 a 10 pies (2,4 a 3 m) por encima del suelo. El espaciado de la las boquillas se debe acortar si la línea de rocío atomizado está montada más arriba.
3. En un patio profundo (más de 12 pies [3,7 m] de profundidad) y para un enfriamiento más efectivo, monte el tubo en la parte interior del alero con las boquillas orientadas ligeramente hacia abajo y en dirección al patio. Esto dará como resultado un mejor enfriamiento pero también provocará la acumulación de humedad residual en temperaturas más frías y condiciones más húmedas.
INTRODUCCIÓN
Gracias por elegir la calidad del Orbit®|Arizona Mist® y el sistema de enfriamiento profesional
por rocío atomizado, de acero inoxidable y de alta presión para exteriores. Disfrutará de
muchos años de servicio satisfactorio y sin problemas si lo instala correctamente y si
sigue los procedimientos de mantenimiento. Lea el manual de instalación e instrucciones
completamente.
4. En un patio poco profundo (menos de 12 pies [3,7 m] de profundidad), monte la tubería en la parte exterior del alero con las boquillas orientadas ligeramente hacia abajo y hacia afuera.
5. Si la línea de rocío atomizado requiere más de un codo de 90 grados, se recomienda comprar un cortador para tuberías de acero inoxidable para obtener la longitud exacta necesaria.
INSTRUCCIONES
IMPORTANTE: Este sistema de rocío atomizado funcionará con presiones altas de hasta 1000
psi. Es decir: bomba de rocío atomizado de 1000 psi (artículo # 92075 Orbit®|Arizona Mist®) o
con una bomba reforzadora de 160 psi (artículo # 92100 Orbit®|Arizona Mist®). El fabricante no
acepta presiones superiores a 1000 psi. Lea las instrucciones y revise el contenido del kit
antes de comenzar con el ensamblado.
24"
Lista del contenido del sistema por rocío atomizado de 3/8 pulgadas (0,95 cm)
Revise el contenido de la bolsa de las piezas. Si faltan piezas, devuelva la bolsa sin abrir al
lugar donde compró el kit o llame al Servicio al cliente de Orbit® al (800) 488-6156.
4
1
2
3
6
5
8'-10'
Descripción
Cant.
1
Conector de compresión de extremo
1
2
Anillo
34
3
Arandela blanca
34
4
Junta tórica de goma negra
17
5
Tuerca
17
6
Tubería de acero inoxidable
6
7
Conector de compresión recto
5
RECUERDE: Lea las instrucciones antes del ensamblado.
8
Boquilla atomizadora de latón y
acero inoxidable
6
Conector de compresión acodado
(no se muestra)
3
Preparación y planificación para el ensamblado de la línea de rocío atomizado
Asegúrese de que cada sección de acero inoxidable precortado esté sin restos de desechos. Quite todas las virutas de los bordes exteriores e interiores de las tuberías o conectores, luego purgue con aire o agua para limpiarlos muy bien.
9
4
7
Diagrama B
Ensamblado e instalación del sistema DE rocío atomizado
g
3
Diagrama A
2. Predetermine la posición de colgado de la línea de rocío atomizado (en la parte interior o exterior del alero del patio) y luego márquela. Conéctelas con los conectores
provistos tal como se muestra en el Diagrama A.
3. Calcule la cantidad de largos de 2 pies (61 cm) necesaria para los tramos rectos de la línea de rocío atomizado.
5
2
Ensamble las secciones rectas de la línea de rocío atomizado. Conecte las secciones precortadas de la tubería con los conectores de acero inoxidables provistos y asegúrese de envolver los extremos roscados con cinta de teflón. El Diagrama A muestra el orden en el que se deben ensamblar los conectores.
4. Determine dónde conectará la fuente de agua para la línea de rocío atomizado (esta es la línea de alimentación de agua).
LOCALIzACIÓn y SOLuCIÓn dE PrObLEMAS
Problema
Pérdida en la
boquilla
Coloque la línea de rocío atomizado ensamblada sobre las marcas que realizó con la primera
boquilla comenzando aproximadamente a 2 pies (61 cm) de la casa. Clave los sujetadores
colgantes en su lugar (vea el Diagrama B). Repita este paso hasta colgar todas las secciones
rectas.
g
g
g
g
Una todas las secciones en las esquinas con un codo de 90 grados con el mismo procedimiento que se muestra en el Diagrama A. Asegúrese de que la línea de rocío atomizado esté ubicada en el ángulo correcto para la aspersión. Esta será la posición permanente de la línea de rocío atomizado (vea el Diagrama C).
Línea de alimentación de agua. Para colocar la línea de alimentación, conecte el extremo macho de conexión rápida al comienzo de la línea de rocío atomizado más cercana a la fuente de agua.
Extremo de la línea de rocío atomizado. Tape el extremo con el conector de extremo tal como se muestra en el Diagrama A.
Conexión de agua/purgado del sistema/comienzo de la operación de rocío atomizado. Conecte el filtro T en el grifo del agua, luego conecte la línea de alimentación de alta presión de Orbit®|Arizona Mist® en el extremo de la línea de rocío atomizado y conecte el otro extremo en la salida de conexión rápida de la bomba de alta presión Orbit®|Arizona Mist®. Abra el agua (a toda presión) durante unos cuantos minutos para purgar cualquier impureza o desechos dentro de la línea de rocío atomizado. Cierre el agua, ajuste las boquillas con la mano en las aberturas con conector roscado (ajuste sólo manualmente). Abra el agua, abra la bomba de alta presión Orbit®|Arizona Mist®, configure el tiempo de inicio y parada tal como se indica en el manual de la bomba de alta presión y ¡comience a rociar!
Para su comodidad al efectuar la instalación se incluyen tramos de tubos de 7,6 cm; 15,2 cm
y 30,5 cm con este kit. Para obtener tramos adicionales, sírvase contactar Orbit® Irrigation
Products, Inc. al 1-800-488-6156 o 1-801-299-5555.
www.orbitonline.com
1. Asegúrese de envolver las conexiones roscadas de compresión con cinta de teflón. NO se necesita cinta de teflón en las boquillas atomizadoras.
8
Ensamblado y montaje del sistema DE rocío atomizado
Funcionamiento y mantenimiento del sistema de rocío atomizado
Las siguientes recomendaciones lo ayudarán a mantener las boquillas atomizadoras y prevenir
obstrucciones innecesarias.
Limpiador de boquillas: limpie periódicamente las boquillas del sistema. Vea la botella para
conocer las instrucciones. Filtro inhibidor de calcio o sedimentos: se debe utilizar un filtro T
para evitar que pasen sedimentos sólidos desde la fuente de agua hacia las boquillas.
Purgado del sistema: quite siempre las boquillas cuando finalice el verano. Antes de volver
a instalar las boquillas al año siguiente, purgue el sistema durante 5 minutos. Para mantener
la línea de rocío atomizado sin desechos durante los meses fuera de temporada, instale los
tapones para boquillas Orbit®|Arizona Mist® en el lugar de las boquillas. También debe purgar
el sistema si no se lo utilizó durante más de un mes.
Solución
1. Asegúrese de que la boquilla esté bien ajustada. AJÚSTELA
SÓLO MANUALMENTE, NO UTILICE HERRAMIENTAS.
2. Controle para asegurarse de que la junta tórica de la boquilla
esté en su lugar.
3. La boquilla puede estar obstruida y puede parecer que está
“perdiendo” o goteando. Limpie con el limpiador para boquillas
(vea las instrucciones en la botella del limpiador) y/o sople para
sacar los desechos de la línea de rocío atomizado que quedaron
después de una limpieza incorrecta. no trate de limpiar mediante
la introducción de objetos extraños en la abertura de la boquilla,
esto dañará la boquilla.
Si tiene alguna pregunta o cometario, comuníquese con el Servicio al cliente de Orbit® en
Orbit® Irrigation Products, Bountiful, UT 84011 o llame al (800) 488-6156.
Garantía y declaración
Orbit® Irrigation Products, Inc. les garantiza a sus clientes que sus productos Orbit®|Arizona
Mist® no tendrán defectos en los materiales ni en la mano de obra durante un período de
cuatro años desde la fecha de compra. Reemplazaremos, sin cargo, el componente o los
componentes defectuosos en condiciones de uso y servicio normales durante un período
de hasta cuatro años después de la compra (se requiere comprobante de compra). Nos
reservamos el derecho de revisar el componente defectuoso antes de reemplazarlo.
Orbit® Irrigation Products, Inc. no se responsabilizará de los daños o costos incidentales o
consecuentes ocasionados por la falla del producto. La responsabilidad de Orbit® en virtud
de esta garantía se limita únicamente al reemplazo o la reparación de los componentes
defectuosos.
Para hacer valer su garantía, devuelva la unidad a su distribuidor con una copia del recibo de
venta.
Si tiene alguna pregunta, llame al: 1 (800) 488-6156 ó 1 (801) 299-5555
www.orbitonline.com
Registre su producto en línea en www.orbitonline.com
Orbit® Irrigation Products Inc.
845 N. Overland Rd.
North Salt Lake, Utah 84054 USA
http://www.orbitonline.com
800-488-6156 | 801-299-5555
PN 30002-24 Rev B