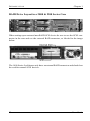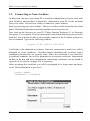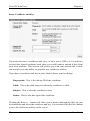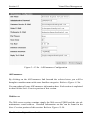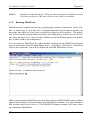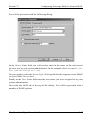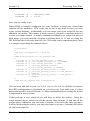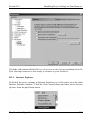
1
G UARDIAN D IGITAL
L INUX L OCKBOX
U SER M ANUAL
Linux Lockbox 1.0.1
C OPYRIGHT
AND
PATENT I NFORMATION
Copyright c 2000 - 2001 Guardian Digital, Inc. All rights reserved. This material may be distributed
only subject to the terms and conditions set forth in the Open Publication License, V1.0 or later (the
latest version is presently available at http://www.opencontent.org/openpub/)
Distribution of substantively modified versions of this document is prohibited without the explicit
permission of the copyright holder.
Distribution of the work or derivative of the work in any standard (paper) book form for commercial
purposes is prohibited unless prior permission is obtained from the copyright holder.
Information in this manual is subject to change without notice. Companies, names, and data used
in examples herein are fictitious unless otherwise noted.
Linux Lockbox, EnGarde and GD WebTool are trademarks of Guardian Digital, Inc. in the United
States and other countries. This product is covered by one or more pending patent applications.
Microsoft, Internet Explorer, Windows 95, Windows 98, Windows Millennium, Windows NT and
Windows 2000 are either registered trademarks or trademarks of Microsoft Corporation in the United
States and other countries.
MindTerm is a trademark of MindBright Technology in the United States and/or other countries.
Netscape and Netscape Navigator are registered trademarks of Netscape Communications Corporation
in the United States and other countries.
RSA Public Key Cryptosystem and MD5 are registered trademarks of RSA Data Security, Inc.
All other trademarks and trade names are the property of their respective owners.
Printed in the United States of America.
Written by Nicholas DeClario
Edited by Dave Wreski
With contributions from Ryan Maple and Pete O’Hara
Written using LATEX
Linux Lockbox
User Manual
Copyright c 2001 Guardian Digital, Inc.
January 2001
Contents
1
2
I NTRODUCTION
1
1.1
Features . . . . . . . . . . . . . . . . . . . . . . . . . . . . . . .
2
1.2
Hardware Summary
. . . . . . . . . . . . . . . . . . . . . . . .
5
1.2.1
Rear View of Connectors of a Single Processor Machine .
7
1.2.2
Rear View of Connectors of a Dual Processor Machine . .
8
1.3
RAID Support
. . . . . . . . . . . . . . . . . . . . . . . . . . .
9
1.4
List of Chapters and Appendices . . . . . . . . . . . . . . . . . .
11
1.5
Important SafeGuards
. . . . . . . . . . . . . . . . . . . . . . .
13
1.6
Registration . . . . . . . . . . . . . . . . . . . . . . . . . . . . .
15
1.7
Obtaining Technical Support . . . . . . . . . . . . . . . . . . . .
16
1.8
Warranty
18
. . . . . . . . . . . . . . . . . . . . . . . . . . . . . .
G ENERAL S ECURITY
19
2.1
Why Do We Need Security? . . . . . . . . . . . . . . . . . . . .
20
2.2
How Secure is Secure? . . . . . . . . . . . . . . . . . . . . . . .
20
2.3
Security Planning and Policy . . . . . . . . . . . . . . . . . . . .
20
3
I NSTALLING
YOUR
L OCKBOX
22
3.1
Configuring the Client Machine . . . . . . . . . . . . . . . . . .
23
3.2
Connecting to Your Lockbox . . . . . . . . . . . . . . . . . . . .
24
3.3
Configuring the Lockbox . . . . . . . . . . . . . . . . . . . . . .
26
3.3.1
Change the Root Password
. . . . . . . . . . . . . . . .
26
3.3.2
Change the GD WebTool Password . . . . . . . . . . . .
27
3.3.3
Create a New User . . . . . . . . . . . . . . . . . . . . .
28
3.3.4
Setup the Network Configuration . . . . . . . . . . . . .
29
3.3.5
Define Trusted Hosts . . . . . . . . . . . . . . . . . . . .
30
3.3.6
Define Your Time Zone . . . . . . . . . . . . . . . . . . .
31
3.3.7
Set up Services that are Active at Boot . . . . . . . . . . .
32
3.3.8
Summary . . . . . . . . . . . . . . . . . . . . . . . . . .
32
3.3.9
Reboot . . . . . . . . . . . . . . . . . . . . . . . . . . .
32
4 THE GD W EB T OOL
4.1
ii
34
Connecting and Logging into the GD WebTool . . . . . . . . . .
35
4.1.1
Logging in . . . . . . . . . . . . . . . . . . . . . . . . .
35
4.2
The Main GD WebTool Menu Screen . . . . . . . . . . . . . . .
37
4.3
Virtual Host Management
39
. . . . . . . . . . . . . . . . . . . . .
4.3.1
Creating a Virtual Host
. . . . . . . . . . . . . . . . . .
4.3.2
Creating a Secure Virtual Host
. . . . . . . . . . . . . .
41
4.3.3
Editing a Virtual Host . . . . . . . . . . . . . . . . . . .
42
4.3.4
Directory Structure . . . . . . . . . . . . . . . . . . . . .
53
4.3.5
Setup Name Virtual Hosts . . . . . . . . . . . . . . . . .
55
4.3.6
Configure Web Site Log Analysis . . . . . . . . . . . . .
55
4.3.7
Creating an On-line Store . . . . . . . . . . . . . . . . .
56
4.3.8
Editing and Deleting a Store . . . . . . . . . . . . . . . .
64
4.3.9
Configure a Store
69
. . . . . . . . . . . . . . . . . . . . .
40
4.4
4.5
4.6
4.7
4.8
5
70
4.4.1
User Account Administration . . . . . . . . . . . . . . .
70
4.4.2
Network Configuration
. . . . . . . . . . . . . . . . . .
73
4.4.3
Change System Time . . . . . . . . . . . . . . . . . . . .
78
4.4.4
Secure Shell Management . . . . . . . . . . . . . . . . .
79
4.4.5
Mail Server Management . . . . . . . . . . . . . . . . . .
82
4.4.6
DNS Management . . . . . . . . . . . . . . . . . . . . .
85
System Status Monitor . . . . . . . . . . . . . . . . . . . . . . . 100
4.5.1
Logfile Management . . . . . . . . . . . . . . . . . . . . 100
4.5.2
Process Management . . . . . . . . . . . . . . . . . . . . 100
Security . . . . . . . . . . . . . . . . . . . . . . . . . . . . . . . 105
4.6.1
Change WebTool Password . . . . . . . . . . . . . . . . . 105
4.6.2
Change Administrator E-Mail Address . . . . . . . . . . 106
4.6.3
WebTool Access Control
4.6.4
System Access Control
4.6.5
Edit Login Banner . . . . . . . . . . . . . . . . . . . . . 110
. . . . . . . . . . . . . . . . . 108
. . . . . . . . . . . . . . . . . . 109
System Backup . . . . . . . . . . . . . . . . . . . . . . . . . . . 111
4.7.1
Backup Maintenance . . . . . . . . . . . . . . . . . . . . 111
4.7.2
Schedule a Named Backup . . . . . . . . . . . . . . . . . 113
Changing a User’s Password . . . . . . . . . . . . . . . . . . . . 116
GD U PDATE
5.1
6
System Management . . . . . . . . . . . . . . . . . . . . . . . .
118
Running the GD Update . . . . . . . . . . . . . . . . . . . . . . 118
L OCKBOX C ONNECTIVITY
6.1
Connecting from Windows 9x/ME/NT/2000
120
. . . . . . . . . . . 121
6.1.1
Installing MindTerm . . . . . . . . . . . . . . . . . . . . 121
6.1.2
Running MindTerm . . . . . . . . . . . . . . . . . . . . . 122
iii
6.2
6.1.3
Secure Copy (SCP)
6.1.4
M ENUS . . . . . . . . . . . . . . . . . . . . . . . . . . . 131
Connecting from Unix . . . . . . . . . . . . . . . . . . . . . . . 137
6.2.1
7
8
Using OpenSSH . . . . . . . . . . . . . . . . . . . . . . 137
S ECURE E-M AIL
139
7.1
Configuring Netscape Mail for Secure IMAP . . . . . . . . . . . 140
7.2
Configuring Outlook for Secure IMAP and POP3 . . . . . . . . . 147
A LL C OMMERCE
8.1
Introduction to AllCommerce
8.1.1
8.2
8.3
iv
. . . . . . . . . . . . . . . . . . . . 128
159
. . . . . . . . . . . . . . . . . . . 160
Overview . . . . . . . . . . . . . . . . . . . . . . . . . . 160
Tutorial for Creating a New Store . . . . . . . . . . . . . . . . . 161
8.2.1
Part I - Store Creation . . . . . . . . . . . . . . . . . . . 161
8.2.2
Part II - Name Virtual Hosts . . . . . . . . . . . . . . . . 177
8.2.3
Part III - DNS Configuration . . . . . . . . . . . . . . . . 178
8.2.4
Part IV - Firewall / Proxy Configuration . . . . . . . . . . 178
8.2.5
Part V - Store Content Configuration . . . . . . . . . . . . 179
Using CyberCash CashRegister with Your Store . . . . . . . . . . 180
8.3.1
Setting up a Merchant Credit Card Account . . . . . . . . 180
8.3.2
About Merchant Accounts . . . . . . . . . . . . . . . . . 180
8.3.3
Fees and Rates . . . . . . . . . . . . . . . . . . . . . . . 181
8.3.4
Understanding Credit Card Processing Models . . . . . . 182
8.3.5
Before Getting Started . . . . . . . . . . . . . . . . . . . 182
8.3.6
Setting Up a Merchant Account . . . . . . . . . . . . . . 182
8.3.7
Setting up the Merchant Account to Accept Online Payments . . . . . . . . . . . . . . . . . . . . . . . . . . . . 183
8.3.8
After the Merchant Account is Approved . . . . . . . . . 183
8.3.9
Editing the CashRegister templates . . . . . . . . . . . . 184
9 The Linux Intrusion Detection System (LIDS)
186
9.1
Introduction to LIDS . . . . . . . . . . . . . . . . . . . . . . . . 186
9.2
Using LIDS . . . . . . . . . . . . . . . . . . . . . . . . . . . . . 189
9.3
9.2.1
Using the lidsadm Utility
9.2.2
Adding an Entry . . . . . . . . . . . . . . . . . . . . . . 191
9.2.3
Deleting an Entry
9.2.4
Deleting and Updating All Entries . . . . . . . . . . . . . 192
9.2.5
Password Creation . . . . . . . . . . . . . . . . . . . . . 193
9.2.6
Viewing LIDS Status
9.2.7
Viewing the Current LIDS Configuration . . . . . . . . . 193
. . . . . . . . . . . . . . . . . . . . . 192
. . . . . . . . . . . . . . . . . . . 193
Protecting Your Files . . . . . . . . . . . . . . . . . . . . . . . . 194
9.3.1
9.4
. . . . . . . . . . . . . . . . . 190
An Example: Protecting a Freshly Installed Package . . . 194
Kernel Capabilities . . . . . . . . . . . . . . . . . . . . . . . . . 198
9.4.1
Capability Names and Descriptions . . . . . . . . . . . . 198
A Q UICK S TART G UIDE
204
A.1 Network Interfaces . . . . . . . . . . . . . . . . . . . . . . . . . 205
A.2 DNS Server . . . . . . . . . . . . . . . . . . . . . . . . . . . . . 206
A.3 Mail Server . . . . . . . . . . . . . . . . . . . . . . . . . . . . . 208
A.4 Web Server . . . . . . . . . . . . . . . . . . . . . . . . . . . . . 209
B ISO C ODES
212
B.1 Currency Codes (ISO 4217) Needed for AllCommerce . . . . . . . . 212
B.2 Language Codes (ISO 639-2) Needed for AllCommerce . . . . . . . 219
C G ENERAL L INUX
220
C.1 Introduction . . . . . . . . . . . . . . . . . . . . . . . . . . . . . 220
C.1.1
Root Access on Your Lockbox
. . . . . . . . . . . . . . 220
C.2 Basic Bash Commands . . . . . . . . . . . . . . . . . . . . . . . 221
v
C.2.1
Moving Around the System . . . . . . . . . . . . . . . . 221
C.2.2
File Manipulation . . . . . . . . . . . . . . . . . . . . . . 222
C.2.3
Editing a File . . . . . . . . . . . . . . . . . . . . . . . . 223
C.3 File System Structure . . . . . . . . . . . . . . . . . . . . . . . . 224
C.4 Services and Daemons . . . . . . . . . . . . . . . . . . . . . . . 225
C.5 Groups and Users . . . . . . . . . . . . . . . . . . . . . . . . . . 226
D F IREWALLS
AND
P ROXY S ERVERS
228
D.1 Configuring a Firewall or Proxy Server . . . . . . . . . . . . . . . 228
D.2 Disabling Proxy Settings in Your Browser . . . . . . . . . . . . . 230
D.2.1 Netscape Navigator . . . . . . . . . . . . . . . . . . . . . 230
D.2.2 Internet Explorer . . . . . . . . . . . . . . . . . . . . . . 231
E C ERTIFICATES
234
E.1 General Certificate Information . . . . . . . . . . . . . . . . . . . 234
E.1.1
Getting a Certificate Signed . . . . . . . . . . . . . . . . 234
E.1.2
Certificates, IP and Virtual Host Issues . . . . . . . . . . . 235
E.2 Accepting an Unsigned Certificate . . . . . . . . . . . . . . . . . 235
F L ICENSES
240
F.1
GNU Public License (GPL) . . . . . . . . . . . . . . . . . . . . . 240
F.2
BSD License . . . . . . . . . . . . . . . . . . . . . . . . . . . . 247
F.3
Apache License . . . . . . . . . . . . . . . . . . . . . . . . . . . 248
F.4
OpenSSL License
. . . . . . . . . . . . . . . . . . . . . . . . . 250
G G LOSSARY
252
H R EFERENCES
258
vi
1
I N TRODUCTION
W ELCOME TO THE
G UARDIAN D IGITAL L INUX L OCKBOX
The Guardian Digital Linux Lockbox provides all the tools necessary to create
a highly reliable and secure e-business storefront or Web site. The Linux Lockbox leverages the Zelerate AllCommerce e-business software with the power of
EnGarde, an Open Source Linux distribution engineered by Guardian Digital to
achieve the level of security required to conduct e-business.
The Linux Lockbox improves security of existing versions of Linux in several
important ways:
Advanced forms of data integrity management and assurance
Intrusion alert capabilities
Reduction of any threat that occurs should an administrative account be
compromised
Improved authentication and access control utilizing strong cryptography
Real-time around-the-clock remote notification via e-mail or pager with information of an immediate threat to your organization
The Linux Lockbox GD WebTool offers easy-to-use secure graphical report and
administration capabilities, providing the complete ability to create hundreds of
storefronts or virtual Web sites quickly and easily. Its real-time network and security monitoring features provide a level of assurance that the server is operating
efficiently and securely, and can alert an administrator to any issues that require
immediate attention.
Linux administrators revel at their ability to continue performing administrative
tasks as they normally do, while non-technical people can use the Web-based
graphical front end to perform similar tasks, all without sacrificing the power and
flexibility of the Linux operating system.
I NTRODUCTION
1.1
Chapter 1
Features
The Guardian Digital Lockbox is the first Open Source network server appliance
designed to serve as a complete e-business solution. Powering the Lockbox is
EnGarde, Guardian Digital’s Linux, engineered to achieve the level of security
required to conduct e-business. Its secure Web-management software provides an
easy-to-use storefront configuration and system administration tool, making the
Lockbox the right choice for any e-business deployment.
Guardian Digital’s products are optimized to work with Linux to achieve the highest level of performance and compatibility. Multiple rackmount configurations are
available to address space saving considerations at co-location facilities and ASPs.
The Guardian Digital Lockbox features:
Browser-Based Administration - Browser-based secure remote administration can be performed using the Guardian Digital WebTool. The GD
WebTool provides security through a 1024-bit SSL connection and allows
an administrator to perform 100% of the functions that could previously
only be performed from the command line.
GD Secure Update - The GD Update Tool will automatically alert you
to new security updates and packages and provide you with the ability to
proactively update your system.
Built-in E-Commerce - Secure E-Commerce sites can be painlessly created
using the GD WebTool and integrated SSL support. Creation of SSL certificates and maintenance can be automatically managed through the WebTool.
Web Services - All Web functions are controllable through the GD WebTool.
The creation of thousands of virtual Web sites can be easily managed and
maintained.
Intrusion Detection and Prevention - The intrusion detection features will
detect and notify you of possible threats and security related events.
System Logging and Auditing - Extensive logging is performed to insure
that you have the latest system information.
2
Host Security - Security of the host itself has been significantly increased.
Enforcement of longer user passwords, control of expiration dates, and utilization of the latest in advanced forms of password encryption close one of
the most common and easily exploitable means of intrusion.
User Guide
Section 1.1
Features
Electronic Mail Server - The included e-mail server has been engineered
to provide security and stability and can control e-mail for hundreds of domains with the click of a mouse. Mail can then be retrieved in a secure
format using conventional mail clients. Additional security improvements
have been made including protection from common threats as well as restricting unsolicited e-mail.
PHP Embedded Scripting - The PHP HTML embedded scripting language makes it easy for developers to create dynamically-generated Web
pages. PHP also offers built-in database integration for database management systems, providing the ability the produce database-enabled Web
pages with a short learning curve.
Database Support - The included database server provides a true multiuser, multi-threaded SQL (Structured Query Language) database server, enabling Lockbox users and applications to create robust interactive Web sites
and powerful E-Commerce sites.
Secured IMAP and POP3 - SSL Secured IMAP and POP3 are fully supported to help increase the security of personal e-mail.
Domain Name Services - The Guardian Digital Linux Lockbox can manage DNS for thousands of domains for external users trying to access virtual
Web sites on the Lockbox, as well as DNS for internal users. This is all configurable using the WebTool.
Common Gateway Interface (CGI) Support - The administrator has the
ability to enable CGI-based dynamic Web content on an individual virtual
server basis.
Server Side Includes - The Lockbox has the full ability to correctly display
server-parsed Web pages (.shtml files).
Secure Shell Accounts -The Secure Shell provides a secure encrypted communications link with the Guardian Digital Linux Lockbox from a remote
location, eliminating the risk previously found in other remote access methods.
Web Server Aliasing - The Lockbox has the ability to create thousands of
virtual Web sites from the same IP address.
E-Mail Server Aliasing - The Lockbox gives the administrator the ability
to add e-mail server aliases, allowing the creation of thousands of virtual
e-mail domains.
The Guardian Digital Linux Lockbox
3
I NTRODUCTION
4
Chapter 1
Hardware and Software RAID - Lockbox configurations are available that
include hardware and software RAID options, offering maximum performance and redundancy of data.
User Guide
Section 1.2
1.2
Hardware Summary
Hardware Summary
Guardian Digital has a number of different hardware solutions available to fit most
every server requirement. From the small workgroup server to the full enterprise
solution, Guardian Digital products are optimized for scalability, reliability and
efficiency.
Guardian Digital Lockbox Commerce 1000 Series
1U Low Profile 19" Rack-mount Chassis
Single Intel Pentium III Processor from 667 Mhz to 933 Mhz
128 Mb to 512 Mb PC133 SDRAM
One 20Gb, 40Gb, 60Gb or 80Gb EIDE 7,200 RPM Hard Disk
40x EIDE CDROM Drive
1.44Mb Floppy Drive
Integrated Intel Fast-Ethernet LAN Controller
Guardian Digital Lockbox Commerce 1400 Series
1U Low Profile 19" Rack-mount Chassis
Single Intel Pentium III processor from 667 Mhz to 933 Mhz
128 Mb to 512 Mb PC133 SDRAM
One or two 10,000 RPM 9Gb to 36Gb Ultra160 SCSI Hard Disks
Two Hot Pluggable SCSI Drive backplane
40x EIDE CDROM Drive
1.44Mb Floppy Drive
Integrated Intel Fast-Ethernet LAN Controller
Software or Hardware RAID mirroring support
The Guardian Digital Linux Lockbox
5
I NTRODUCTION
Chapter 1
Guardian Digital Lockbox Commerce 2000 Series
2U Low Profile 19" Rack-mount Chassis
Single Intel Pentium III processor from 667 Mhz to 933 Mhz
128 Mb to 512Gb PC133 SDRAM
Up to four 10,000 RPM 9Gb to 36Gb Ultra160 SCSI Hard Disks
Four Hot Pluggable SCSI Drive backplane
40x EIDE CDROM Drive
1.44Mb Floppy Drive
Integrated Intel Fast-Ethernet LAN Controller
Software or Hardware RAID mirroring support
Guardian Digital Lockbox Commerce 2200 Series
2U Low Profile 19" Rack-mount Chassis
Single or Dual Intel Pentium III processor from 667 Mhz to 933 Mhz
128 Mb to 2Gb PC133 SDRAM
Up to four 10,000 RPM 9Gb to 36Gb Ultra160 SCSI Hard Disks
Four Hot Pluggable SCSI Drive backplane
40x EIDE CDROM Drive
1.44Mb Floppy Drive
Integrated Intel Fast-Ethernet LAN Controller
Software or Hardware RAID mirroring support
6
External SCSI Support for Disk Storage Arrays
User Guide
Section 1.2
Hardware Summary
1.2.1 Rear View of Connectors of a Single Processor Machine
Item
A
B
C
D
E
F
G
H
I
J
K
L
Description
Mouse connector
Keyboard connector
Network connector
USB port 0 connector
USB port 1 connector
Video connector
Parallel port connector
Serial port A connector
Midi/Game port
Audio line out
Audio line in
Microphone in
The Guardian Digital Linux Lockbox
7
I NTRODUCTION
Chapter 1
1.2.2 Rear View of Connectors of a Dual Processor Machine
Item
A
B
C
D
E
F
G
H
I
8
Description
USB connectors
Serial port 2 connector
Serial port 1 connector
NMI switch
Parallel port connector
Keyboard connector
Mouse connector
Video connector
Network connector
User Guide
Section 1.3
1.3
RAID Support
RAID Support
Several versions of the Guardian Digital Linux Lockbox provide RAID support
in RAID-1 or RAID-5 configurations. RAID is an array of independent disks
which yeilds performance greater than that of a single disk. This array appears as
a single logical storage unit or drive to the computer. It can be made fault-tolerant
by redundantly storing information in various ways. The redundant information
enables recovery of the data if one of the disks should fail.
The Lockbox 1400 series implements RAID Level 1 (RAID-1), also known as
disk mirroring, which consists of two disks that contain identical information.
Should one of the disks fail, the other can continue to operate until the failed disk
is replaced.
The Lockbox 2200 series implements RAID-1 or RAID-5, depending on the initial
configuration at time of purchase. RAID Level 5 (RAID-5) writes data across
multiple disks rather than onto one disk. Additionally, redundancy is added by
writing critical information to a ’parity’ disk which contains all the information
necessary to reconstruct a failed disk.
You do not need to enable RAID on your Lockbox. It is enabled by default when
the system is shipped to you. You cannot disable or modify this configuration.
In case of a failed hard disk, your system will alert you to the failed drive at which
point it must be replaced. Contact Guardian Digital RMA department for expedient disk replacement. The system administrator will receive an email informing
of the impending disk failure. Additionally, the System Status Monitor menu of
the GD WebTool will contain information on which drive has failed.
Once the hard disk has been replaced and the Lockbox rebooted, the system will
automatically detect the new hard disk and integrate into the RAID array.
RAID Drive Layout in a 1400 Series Case
The Guardian Digital Linux Lockbox
9
I NTRODUCTION
Chapter 1
RAID Drive Layout in a 2000 & 2200 Series Case
When setting up an external non-RAID SCSI device be sure to use the SCSI connector in the rear and not the external RAID connector, as labeled in the image
below:
The 1400 Series Lockboxes only have an external RAID connector and should not
be used for normal SCSI devices.
10
User Guide
Section 1.4
1.4
List of Chapters and Appendices
List of Chapters and Appendices
Chapter 1 Introduction covers basic information about your Lockbox.
Chapter 2 General Security gives you an understanding of basic security.
Chapter 3 Installing Your Lockbox is an guide for installing and initially configuring your Lockbox.
Chapter 4 The GD WebTool covers all the functions of the GD WebTool configuration utility.
Chapter 5 GD Update shows you how to take advantage of the automated update
system.
Chapter 6 Lockbox Connectivity has information of the different ways of connecting to your Lockbox from a remote location without using the
GD WebTool.
Chapter 7 Secure E-Mail shows you how to configure different e-mail clients to
work with secure e-mail services.
Chapter 8 AllCommerce has the manual for administering and running a Zelerate AllCommerce store.
Chapter 9 The Linux Intrusion Detection System (LIDS) is covered in the GD
WebTool but delves into a much more technical aspect of this feature.
Appendix A Quick Start Guide contains a step-by-step guide on setting up all the
major components of your Lockbox.
Appendix B ISO Codes contains country and currency codes used by AllCommerce.
Appendix C General Linux has some basic BASH commands for getting around
the system from the console.
Appendix D Firewalls and Proxy Servers covers how to allow your Lockbox to
get through a firewall or proxy server and how to get a client system
to the Lockbox from behind a firewall or proxy server.
Appendix E Certificates has basic information on what certificates are, how to
manage them and getting a certificate signed.
Appendix F Licenses covers all the major licenses attached to the different software programs included in the Lockbox.
The Guardian Digital Linux Lockbox
11
I NTRODUCTION
Chapter 1
Appendix G Glossary covers common jargon and terms used in this manual.
Appendix H References has a list of references used to aid in the creation of this
manual.
12
User Guide
Section 1.5
1.5
Important SafeGuards
Important SafeGuards
For your protection, please read the following safety precautions regarding your
Lockbox.
1. Read instructions
Read and understand all precautions, safety guidelines and proper operation procedures of the Lockbox before operating. The manual will guide
you through all the steps necessary to fully utilize all features of your Lockbox.
2. Ventilation
The vents and fan openings on the Lockbox are located on the front and
rear and are provided for ventilation and reliable operation of the Lockbox
and to protect if from overheating. These openings must not be blocked
or covered. This product should not be placed in an enclosed area unless
proper ventilation is provided.
3. Lithium Battery
The lithium battery on the system board provides power for the real-time
clock and CMOS RAM. The battery has an estimated life expectancy of 5
to 10 years. If your system no longer keeps accurate time and date settings,
it may be time to change the battery. Contact Guardian Digital for service
information. There are no operator serviceable parts inside.
WARNING : There is a danger of explosion if the battery is incorrectly installed,
or replaced with the wrong type of battery. Replace only with the same or equivalent type recommended by the equipment manufacturer. Dispose of used batteries
according to manufacturer’s instructions.
4. Electrical Shock
To reduce the risk of electrical shock, do not disassemble this product. Take
it to a qualified service person when service or repair work is required.
Opening or removing covers may expose you to dangerous voltage or other
risks and may void the warranty. Incorrect reassembly can cause electric
shock when this product is used in a manner not in accordance with manufacturer specifications.
The Guardian Digital Linux Lockbox
13
I NTRODUCTION
Chapter 1
5. Operating the Unit in an Equipment Rack
If you plan to install the Lockbox in an equipment rack, take the following precautions:
(a) Ensure the ambient temperature around the Lockbox, which may be
higher than the room temperature, stays within 50 to 80 degrees Fahrenheit for proper operation.
(b) Ensure there is sufficient air flow around the unit.
(c) Ensure electrical circuits are not overloaded; consider the nameplate
ratings of all the connected equipment and ensure you have overcurrent protection.
(d) Ensure the equipment is properly grounded, particularly any equipment connected to a power strip.
(e) Do not place objects on top of the Lockbox.
14
User Guide
Section 1.6
1.6
Registration
Registration
Registering your Guardian Digital Linux Lockbox gives you the ability to join our
mailing list, priority access to the latest system and security updates and Guardian
Digital technical support as described in the next section.
Register Online
Guardian Digital offers the ability to register your Linux Lockbox from your local
desktop. Simply connect to:
http://www.guardiandigital.com/register
You can fill out all the necessary information here and submit it directly to Guardian
Digital. You will have immediate access to the latest updates upon registration.
Register by Mail
To register by mail simply fill out the registration card that was included with your
Linux Lockbox and mail it to:
Lockbox Registration
Guardian Digital, Inc.
3 Industrial Avenue
Upper Saddle River, NJ 07458
A Guardian Digital representative will notify you by phone or e-mail when your
account is ready. Please allow some time for mail delivery and processing.
The Guardian Digital Linux Lockbox
15
I NTRODUCTION
1.7
Chapter 1
Obtaining Technical Support
Before contacting Guardian Digital’s technical support, please make an effort to
resolve the problem on your own by doublechecking these common problems:
Make sure all connections to your Lockbox are correct
Check to make sure the network connection is connected to the hub.
Is the port the ethernet cable plugged into lit?
Can you ping the box?
If the status or link light on the network equipment is not lit but a cable
is connected to both the network equipment and the Lockbox, check the
integrity of the cable.
Can you connect to it from another PC?
If none of the above solutions helped then please visit our Web site or contact us.
The following information can help speed up your support call:
a hard copy and/or e-mail of any error messages you have received and the
time when they occured
the process you were running or what changes you had made when the error
occurred
the steps taken thus far to resolve the problem
peripherals, if any, connected to your system
any additional software installed
Guardian Digital provides thirty (30) days of free e-mail support starting when the
first e-mail is sent. Five (5) incidents of phone support to our call center within
the first ninety (90) days are provided. Additional support is available from your
Guardian Digital sales representative. Hardware is guaranteed under a one (1)
year warranty.
You can contact Guardian Digital via phone at:
16
User Guide
Section 1.7
Phone:
Obtaining Technical Support
1-866-GDLINUX
201-934-9230
E-Mail:
[email protected]
You must have previously registered on our site:
http://www.guardiandigital.com/register
before any technical support can be given. This is necessary so we have up-todate information on your running system to aid us in solving your problem more
efficiently.
The Guardian Digital Linux Lockbox
17
I NTRODUCTION
1.8
Chapter 1
Warranty
PORTIONS OF THIS PRODUCT ARE COVERED UNDER THE GNU GENERAL PUBLIC LICENSE
THIS PRODUCT MAY NOT BE EXPORTED TO, OR SOLD TO A NATION
OF, ANY COUNTRY OTHER THAN THE UNITED STATES AND CANADA.
THIS SOFTWARE IS PROVIDED BY GUARDIAN DIGITAL, INC. “AS IS” AND ANY
EXPRESS OF IMPLIED WARRANTIES, INCLUDING BUT NOT LIMITED TO, THE
IMPLIED WARRANTIES OF MERCHANTABILITY AND FITNESS FOR A PARTICULAR PURPOSE ARE DISCLAIMED. IN NO EVENT SHALL GUARDIAN DIGITAL, INC. OR CONTRIBUTORS BE LIABLE FOR ANY DIRECT, INDIRECT, INCIDENTAL, SPECIAL, EXEMPLARY, OR CONSEQUENTIAL DAMAGES (INCLUDING, BUT NOT LIMITED TO, PROCUREMENT OF SUBSTITUTE GOODS OR SERVICES; LOSS OF USE, DATA, OR PROFITS; OR BUSINESS INTERRUPTION) HOWEVER CAUSED AND ON ANY THEORY OF LIABILITY, WHETHER IN CONTRACT,
STRICT LIABILITY, OR TORT (INCLUDING NEGLIGENCE OR OTHERWISE) ARISING IN ANY WAY OUT OF THE USE OF THIS SOFTWARE, EVEN IF ADVISED OF
THE POSSIBILITY OF SUCH DAMAGE.
This publication and the information herein is furnished AS IS, subject to change without notice, and
should not be construed as a commitment by Guardian Digital, Inc. Furthermore, Guardian Digital,
Inc., assumes no responsibility or liability for any errors or inaccuracies, makes no warranty of any
kind (express, implied or statutory) with respect to this publication, and expressly disclaims any and
all warranties of merchantability, fitness for particular purposes and non infringement of third party
rights.
18
User Guide
2
G ENERAL S ECURITY
Before you start using your Guardian Digital Linux Lockbox we recommend you
read this section covering general security knowledge. This section will help you
understand the goals of your Lockbox and in turn will help you configure it better
for your needs with security in mind and increase the overall security of your
network.
G ENERAL S ECURITY
2.1
Chapter 2
Why Do We Need Security?
In the ever changing world of global data communications, inexpensive Internet
connections, and fast-paced software development, security is becoming more and
more of an issue. Security is now a basic requirement because global computing
is inherently insecure. As your data goes from point A to point B on the Internet,
for example, it may pass through several other points along the way, giving other
users the opportunity to intercept, and even alter it. It does nothing to protect your
data center, other servers in your network, or a malicious user with physical access
to your Lockbox.
2.2
How Secure is Secure?
Security is about defense in depth. Providing physical security as well as a welldesigned network, control over the users and processes on the host itself, and
regular maintenance can go a long way towards providing good security.
In the most basic sense, a system is secure if it does what it’s supposed to do, even
if its users attempt to do something they’re not supposed to do. It protects the
information stored in it from being modified either maliciously or accidentally or
read or modified by unauthorized users.
Consider the security of your household. Perhaps you have an alarm system, but
does it work if the intruder cuts the system power? Security involves tradeoffs.
How much is your data worth? Does it make sense to protect your system with the
level of security you might find protecting Fort Knox, or would that cost more than
the data itself? Guardian Digital provides an extremely functional e-commerce
server, while still retaining all the reliability, configurability, and scalability you
have come to expect with the Linux operating system.
2.3
Security Planning and Policy
Assessing risk and making prudent decisions before the system is installed is the
best approach. You can go a long way towards providing good security by establishing a security policy. A security policy is a written document that outlines
what is permitted behavior on the system. Once written, it is reviewed periodically and distributed to all users of the system. No system can be fully secure, but
with due diligence and attention to detail, many security threats can be mitigated.
20
User Guide
Section 2.3
Security Planning and Policy
Linux is not susceptible to viruses in the strictest sense of the word (no pun intended), but permitting content to enter the system that has not explicitly been
authorized will surely lead to problems.
The Guardian Digital Linux Lockbox has been engineered with the greatest degree of security available on any Linux Open Source e-business server to date.
No longer is it the case that a company can purchase or contract an e-commerce
solution without great concern for the assurance and integrity for the data and information contained within it. Guardian Digital solutions have been engineered
with security as a primary concern, providing that high degree of assurance required to conduct business on the Web today.
This high level of security integrated in to the Guardian Digital Linux Lockbox
requires you follow the guidelines in this manual when configuring and administering the Lockbox. By following these guidelines you can be assured the highest
level of system security at all times.
The Guardian Digital Linux Lockbox
21
3
I N STALLING YOUR L OCKBOX
The Guardian Digital Linux Lockbox provides an easy to use interface for the initial configuration. This interface requires you to configure it from another PC, via
the included cross-over cable to the Lockbox. The client PC can be any operating
system and only requires a browser that supports SSL. Netscape 4+ and Internet
Explorer 5+ will be fine for doing this.
The interface you will be using will guide you step-by-step through the set up
process. We will also outline the steps in more detail in this manual. The Guardian
Digital WebTool will provide the complete ability to configure your Lockbox.
Section 3.1
3.1
Configuring the Client Machine
Configuring the Client Machine
A client machine is required to configure the Lockbox. Included with your Lockbox is a cross-over cable for connecting your client PC to the Lockbox. This is
done so the default settings on your Lockbox don’t interfere with other machines
located on your network, while also maintaining a secure connection.
You must first start by disconnecting your client PC from your network. You can
simply do this by unplugging its network connection. Then change your PC’s
network settings. Don’t forget to write down your old settings to change back to
when you are finished setting up the Lockbox.
Change your client PC’s network settings to the following:
IP Address:
Subnet:
Broadcast:
Network:
192.168.10.110
255.255.255.0
192.168.10.255
192.168.10.0
Once you have changed your settings and the changes have taken effect, you must
make sure all your proxy settings are disabled. To disable your proxy settings in
both Netscape Navigator and Internet Explorer please read Appendix D Firewalls
and Proxy Servers on page 228. Once all changes have been made to the proxy
settings you will be ready to connect to the Lockbox.
If you have difficulty connecting after making the changes above on a Windows
client, you may have to disable the Logon to Windows NT Domain option in your
network configuration. You can do this by selecting Networking from the Control
Panel, then selecting properties for Client for Microsoft Network and unchecking
the Logon to Windows NT Domain check-box. You can now hit the OK button to
finish. You may be asked to reboot your Windows system.
The Guardian Digital Linux Lockbox
23
I NSTALLING
3.2
YOUR
L OCKBOX
Chapter 3
Connecting to Your Lockbox
At this point you have your client PC’s network configuration set up to work with
your Lockbox, and you have it physically connected to your PC via the included
cross-over cable. You are now ready to connect to your Lockbox.
Start by powering up your Lockbox. There is a rocker switch located on the front
panel. Hold the button down until the machine starts to power on.
Now load up the browser on your PC. Either Internet Explorer 4+ or Netscape
Navigator 4+ is required. First you must make certain that you have proxy servers
disabled. You will not be able to successfully connect to the Lockbox with proxy
servers enabled. Type in the following address:
https://192.168.10.100:1023
It will take a few moments to connect. Once the connection is made you will be
informed of a new certificate. Guardian Digital distributes the Lockbox with a
certificate generated by our security team. Since the certificate is not issued by
a certificate authority you will be prompted to accept the certificate. Instructions
on how to do this and more information concerning certificates can be found in
Appendix E Certificate on page 234 if necessary.
After accepting the certificate you will be prompted for a login name and password. This information is pre-set to:
Login: admin
Password: lock&%box
24
User Guide
Section 3.2
Connecting to Your Lockbox
The login and password are case sensitive. During step 2 of the initial configuration you will be prompted to change the password. You MUST change this
password. Otherwise it will remain lock&%box.
The Guardian Digital Linux Lockbox
25
I NSTALLING
3.3
YOUR
L OCKBOX
Chapter 3
Configuring the Lockbox
Once you enter the login name and password you are in the Lockbox Initial Configuration.
Now we are ready to start the initial configuration of your Lockbox. Click on the
Begin Configuration button to start the initial configuration process.
At the main screen you will see a brief outline of the different steps you are about
to be going through, each with a brief description.
From here you can start the initial system configuration. It will guide you through
step-by-step. You can not skip steps here. The next section covers each step of the
configuration process.
3.3.1 Change the Root Password
This first step in the configuration is to set the root password. The root password
will only be used to login to the system from the console. Enter in a password
26
User Guide
Section 3.3
Configuring the Lockbox
that is at least six characters. Mixing numbers, letters and avoiding whole words
is recommended. A few examples would be to take a word like lockbox and break
it up with some letters and numbers. You can use the following characters as well:
!
@
#
$
%
^
&
*
(
)
So you can end up with something along the lines of:
lock%$box
Which will be almost impossible to guess even more difficult to crack.
You have to enter the password a second time to verify they match.
3.3.2 Change the GD WebTool Password
The GD WebTool password will be used every time you login to the WebTool. We
suggest making this password different from the root password but still follow the
suggestions we offered above.
The Guardian Digital Linux Lockbox
27
I NSTALLING
YOUR
L OCKBOX
Chapter 3
3.3.3 Create a New User
You will now need to create a new user. When you access your system via a
Secure Shell (SSH) or from the console you will want to use your regular user
account as often as possible. This is recommended for security reasons and also
for accidents that can happen when always accessing the system as the root user.
You can select Enable remote login so the user has the capability to connect via
an SSH secure connection to the Lockbox. Before a user can SSH in though, their
key will have to be transferred. Information on doing this via the GD WebTool
will be covered in Section 4.4.4 Secure Shell Management on page 79.
28
User Guide
Section 3.3
Configuring the Lockbox
3.3.4 Setup the Network Configuration
Now we are ready to configure the network settings for your Lockbox. This section is pretty straightforward.
Hostname The hostname is another way of labeling your computer. Generally remembering and typing in an IP address for a machine is more difficult then
remembering a domain name. For example, remembering www.guardian
digital.com is not nearly as difficult as remembering 63.87.101.80.
You can set the hostname to any name you wish, as long as it doesn’t conflict with another hostname on the network.
Domain Name Here we simply need the Fully-Qualified Domain Name (FQDN)
without the hostname. For example guardiandigital.com would be
entered in for the host lockbox.guardiandigital.com. For more
information concerning domain names please see FQDN in the glossary.
IP Address An IP address is a unique number used to identify a computer on
a network. Generally you can purchase a block of IP addresses you are
The Guardian Digital Linux Lockbox
29
I NSTALLING
YOUR
L OCKBOX
Chapter 3
allowed to use on the Internet or are assigned one or more IP addresses
from your service provider. Enter in the IP address you want to assign the
Lockbox to here.
Netmask The standard structure of an IP address can be locally modified by using
host address bits as additional network address bits. Essentially, the “dividing line” between network address bits and host address bits is moved, creating additional networks, but reducing the maximum number of hosts that
can belong to each network. These newly designated network bits define a
network within the larger network, called a subnet. The netmask defines the
subnet mask. Enter the appropriate subnet mask for the network, generally
255.255.255.0.
Gateway Computers can only talk to other computers that are on the same network. To give a computer the ability to talk to computers on another network they must communicate through a gateway. You must define the IP
address of the gateway machine here.
Primary DNS Address The primary DNS server, also referred to as the master
DNS server, controls the DNS queries for your zone. Enter in the IP address
of your primary DNS server. More detailed information regarding primary
DNS servers and DNS can be found in Section 4.4.6 DNS Management on
page 85. If this machine is to be configured as the primary DNS for itself,
enter it’s own IP address.
Secondary DNS Address The secondary DNS server, also referred to as the slave
DNS server, is a backup to the primary. If the primary server doesn’t respond or returns no data the secondary DNS server will be queried. This
section is optional if no secondary DNS server exists on your network. Enter the IP address of the secondary DNS server if you wish to here.
When registering a domain name on the Internet, through Network Solutions, for example, a secondary server must be provided. Guardian Digital
can assist you with this. Contact us should you require assistance.
3.3.5 Define Trusted Hosts
In this area you will have to supply a list of hosts that are allowed to access the
GD WebTool. You can list as many hosts as you want, but we recommend listing
only those that are necessary for administration.
You can list them by IP address, and use a blank space as the delimiter between IP
or hostname. Entering the network address will allow access to the entire network.
30
User Guide
Section 3.3
Configuring the Lockbox
3.3.6 Define Your Time Zone
This section allows you to set your time zone. You have a selection of the four
major time zones in the continental U.S. Select Save Settings to finish the setup
process. This will enable default network time services which can be configured
later if necessary.
The Guardian Digital Linux Lockbox
31
I NSTALLING
YOUR
L OCKBOX
Chapter 3
3.3.7 Set up Services that are Active at Boot
Here you have a selection of different services that are available during boot time.
You can select which ones you wish to turn on and off by selecting the check
boxes. It is recommended you only activate services you will be using on this
Lockbox.
3.3.8 Summary
The information you entered during the Initial Configuration will now be displayed back to you for confirmation, as shown in the next screenshot. If everything
is correct click the Confirm button to complete the configuration process.
Click the Start Over button to restart the configuration process. Refer to Figure
3.3.8.
3.3.9 Reboot
All the information from your configuration is now saved on your Lockbox. Select
the Reboot button and the system will be ready to go.
N OTE :
Before the machine reboots you will be returned to the login screen. This is
necessary for a successfull system logout. You do not need to log back in.
Remove your crossover cable and plug your Lockbox into the network. You are
now ready to start administering your server.
32
User Guide
Section 3.3
Configuring the Lockbox
Figure 1: 3.3.8 - Initial Configuration Summary
The Guardian Digital Linux Lockbox
33
4 TH E GD W EB T OOL
The GD WebTool is a secure on-line administration utility accessed using your
browser. You have the capability to control every aspect of the system through
the GD WebTool utility. In this section we will discuss the GD WebTool usage,
interface, and how to take full advantage of everything it has to offer. This section
does not cover using the GD WebTool for the initial machine configuration. You
can find this information in the previous section, Installing your Lockbox.
N OTE :
The GD WebTool is a program that is run on the Lockbox. When you make
changes the WebTool may take a few moments to process the changes. While
this is happening your browser may report “Host contacted. Waiting for reply...”. Do not press back, stop, or reload while this is happening.
Section 4.1
4.1
Connecting and Logging into the GD WebTool
Connecting and Logging into the GD WebTool
The GD WebTool is always running through it own personal mini Web server.
This server is securing your connection with SSL and can be accessed on port
1023. To connect to the GD WebTool program from your browser you will have
to type in the following URL:
https://computername.domain.com:1023/
We used https as opposed to http. This tells your browser you will be using an SSL secured connection to connect to the server. Where computername.domain.com is you will replace with the actual name and domain. For
example, if the computer is named lockbox and the domain is guardiandigital.com you would be connecting to https://lockbox.guardiandigi
tal.com:1023/. The last part of the URL is :1023/, which specifies an explicit port rather than the default port.
https://lockbox.guardiandigital.com:1023/
This tells the browser that instead of connecting to the default port, 80 for nonSSL and 443 for SSL connections, to instead connect to the specified port, 1023
in this situation.
If you are having difficulty connecting at this point, check the DNS settings on
your local PC or enter in the IP address instead of the hostname.
Once the connection is made you will be presented with a new certificate. Guardian
Digital issues the certificate for the GD WebTool. Since the certificate is not issued by a certificate authority you will be prompted to accept the certificate. Instructions on how to do this, and more information concerning certificates, can be
found in Appendix E Certificates on page 234.
Once you enter secure mode in your browser you will notice a lock that will turn
yellow. In Internet Explorer and Netscape Navigator you will see this lock displayed along the bottom of the browser window. Netscape will also display a
closed lock at the top of the browser. This lock will also turn yellow when in
secure SSL mode. If you click on the lock you will be provided with more information about your current secure connection.
4.1.1 Logging in
Once the connection has been established, the GD WebTool will prompt you for a
login name and password.
The Guardian Digital Linux Lockbox
35
THE GD W EB T OOL
Chapter 4
Use the login name and password you specified during the initial installation and
configuration of the machine. If you enter in a wrong name and/or password,
return to the previous screen and you can enter it in again.
36
User Guide
Section 4.2
4.2
The Main GD WebTool Menu Screen
The Main GD WebTool Menu Screen
After a successful login the GD WebTool will bring you to the main screen:
This screen contains the main categories of options for administering your system.
These categories are listed below with explanations:
This section controls Web server virtual hosts and the creation
and deletion of on-line stores.
System Management has all the basic Linux administration
features including user control, network configuration, system time,
ports and addresses settings, interface languages and SSH management.
The system monitor will give you an overview of the current
running state of your system. This includes viewing user processes, a
number of different logs, current drive space, kernel information and
network information.
This is quite a large section. It contains all the configuration
The Guardian Digital Linux Lockbox
37
THE GD W EB T OOL
Chapter 4
for your Certificates, SSL connection, IP access control and the login
banner.
The Guardian Digital Update allows you to safely and securly update the packages on your Lockbox. The GD Update utility will scan your system’s current software and compare it against
the latest available packages. When new packages are found you are
given the ability to upgrade your old ones with the supplied new ones.
This section will allow you to create and view system backups.
38
User Guide
Section 4.3
4.3
Virtual Host Management
Virtual Host Management
The Virtual Host Manager provides complete control over all Web server virtual
host configurations. This section is also where you can create and delete an on-line
store. To enter the Virtual Host Management section click the Virtual Host Management icon. The upper portion of this screen displays a list of virtual servers
you have on your system. It has the port number, hostname and document root of
that virtual host. Below that is the list of Virtual Host options.
If no stores or virtual hosts have been set up yet, your Virtual Servers section will
be empty. At this point you will want to either create a virtual host for a Web
site or create an on-line store, which creates two virtual hosts automatically for
the store, a secure SSL virtual host for purchases and a standard virtual host used
during store browsing. First we will discuss how to create a virtual host.
N OTE :
After making any Web changes you must restart the Web server. You can
restart the server by clicking the Restart Web Server buttong on the main
The Guardian Digital Linux Lockbox
39
THE GD W EB T OOL
Chapter 4
Virtual Host Management page to shut it down. Click the button again to
start it.
4.3.1 Creating a Virtual Host
In this section you will have the ability to create a Virtual Host, also known as a
Virtual Server. This has nothing to do with the store creation process, which is
described later in this section. Creating a Virtual Host through this method will be
for hosting a Web site and will not affect any other virtual hosts or on-line stores.
You must fill in all the required fields. A description of each field is listed below.
Address Here you can enter the IP address of your new virtual host. You are
allowed to have multiple virtual hosts on one IP address. The main reason
to do this is so you can host many sites without the need to register more
IP addresses. The Web server will know how to differentiate between the
different virtual hosts when they are called on.
Administrator E-Mail This will be the default e-mail address that will be displayed to a user who receives an error. Setting this to the owner and/or
system administrator of the virtual host is recommended.
Server Name This will be the name of the server. Enter in a valid FQDN.
40
User Guide
Section 4.3
Virtual Host Management
Webmaster This is the user who will own all of the files for this Web site. You
can choose a user by clicking on “...” or you can type an existing user name
in this box.
Group This is the group that will have access to all of the files for this Web site.
You can select an existing group by clicking on “...” or you can type an
existing group name in this box.
If you wish to create a new group, click on the Create Group button and
create a new group. You can then select this new group using the group
chooser by clicking on “...”.
Create a database for this site If this box is checked, a database will be created
for use with this site. You must enter a user name and password for accessing the database below.
Username If you wish to create a database for this site, this will be the username
associated with accessing the database which is created.
An example username is dbadmin.
Password If you chose to create a database for this site, this will be the password
associated with accessing the database which is created.
An example password is gu@rd1@n.
You can now click the Create button to create the virtual host.
After some processing you will be returned to the Virtual Servers main menu. You
will see the new virtual host you created in the Virtual Servers list. If you created
a new IP address or a new domain name for this virtual host you will have to add
it to your DNS servers. Details on this are later in this section.
After the host is created you will now have the ability to edit that host.
4.3.2 Creating a Secure Virtual Host
In this section you have the ability to create a virtual host secured with SSL.
Creating the secure host is similar to creating a non-secure host.
The Guardian Digital Linux Lockbox
41
THE GD W EB T OOL
Chapter 4
Each field is described in the Creating a Virtual Host section above.
When you are done making changes click the Save button. Don’t forget to create
or upload your certificate for this virtual host. Instructions on doing so can be
found in Section 4.3.3Editing a Virtual Host on the current page found after this
one.
4.3.3 Editing a Virtual Host
You can edit any of your virtual host settings on an existing host by clicking on
the address of the host listed under the virtual servers. This also allows you to
edit virtual host settings for your on-line stores if you purchased the e-commerce
version of the Lockbox.
Once you are brought to the Virtual Server Options page you will be presented
with quite a large number of options. First, before you start making changes,
check at the top of the page, below the Guardian Digital banner, you will see a list
of options. Refere to Figure 4.3.3.
Make sure you are editing the intended host. In place of lockbox.guardiandi
gital.com will be the name of the site you are editing.
The options in this section are for advanced users who have knowledge of the
Apache server. There are many complex options to give you full and complete
control over your virtual host. We recommend you read the main Apache documentation, which can be found at http://www.apache.org/docs, before
making any changes. There are also numerous books available on this subject.
42
User Guide
Section 4.3
Virtual Host Management
Figure 2: 4.3.3 - Edit Virtual Host
Networking and Addresses
In this section you will have the ability to define what interfaces and addresses
this virtual host should listen on.
First you will need to enter in the server administrators e-mail address. Following
that is the Alternate virtual server names section. You have the ability to assign
other names to your host. For example, say you have www.guardiandigital
.com and you also want www.guardiandigital.net to go to www.guard
iandigital.com. You would enter www.guardiandigital.net into
the Alternate virtual server names field.
The Guardian Digital Linux Lockbox
43
THE GD W EB T OOL
Chapter 4
Click the Save button to save your changes.
Document Options
Here you have the option to configure specific Apache settings for the specified
host.
Server-side includes and execs This will give you the ability to turn on server
side includes and allow CGI scripts to be executed within them. Serverside includes are modules or programs that run on the server. CGI and Perl
scripts are both server-side includes because they run on the server, while
Java and JavaScript are executed on the client.
Server-side includes This works the same as the above option except it turns off
the ability to execute CGI scripts.
Generate directory indexes With this option enabled Apache will create a file
index when a directory is specified from the Web browser. It will create a
clean list of files, with modification dates and file types.
44
User Guide
Section 4.3
Virtual Host Management
Error Handling
Error handling is what the Web server does in the event a request is made resulting
in an error. For example, if you try to go to a page that doesn’t exist on a server
you will see the all too common “Error 404: File not found.”. In this menu you
can list the error number and tell Apache to load a specified Web page or display
a specified message if this error is encountered. Below are a list of common
error codes and their meanings. You can refer to the Apache documentation for a
complete list of error codes.
Error Code
301
302
401
403
404
405
500
Meaning
Permament Redirect
Temporary Redirect
Bad Password
Forbidden / Access Denied
File Not Found
Method Not Allowed
Internal Server Error
Aliases and Redirects
This section allows you to set up aliases and redirects. A brief explanation of
the differences between redirects and aliases is a CSR is a request for a signed
certificate you can give to a Certificate Authority to sign. given to avoid confusion.
An Alias allows documents to be stored in the local file system other than the
defined document directory. When a user accesses a document through this alias
The Guardian Digital Linux Lockbox
45
THE GD W EB T OOL
Chapter 4
it will appear in their browser as if it was in the aliased directory, keeping the
actual directory hidden from the user. This can be useful when you don’t want a
user to know where they really are or to have links and URL references that have
a “clean” look. For example if you have files stored in:
/home/httpd/html/updates/products/december/2000/document
ation
you can alias the address to:
/home/httpd/html/documentation
allowing you to keep everything organized neatly on your server while keeping
the URL short for the user.
For the example given above you would need to type in:
updates/products/december/2000/documentation
in the From field and type in
documentation
in the To field.
N OTE :
When setting up an alias the path is relative to the document path setup in the
Web server.
A Redirect maps an old URL into a new one. The new URL is returned to the
client which attempts to fetch it again with the new address. The browser is aware
of this new address and will be visible to the user in the URL location field in their
browser. This could be useful if you wish to point the user to another server. An
example of this could be if you are moving a page:
http://www.guardiandigital.com/documentation/october
46
User Guide
Section 4.3
Virtual Host Management
to another directory on your web site. In this example we are redirecting documents dated from October to the archives section of the website,
http://www.guardiandigital.com/doc/archives
Using the example given above you would need to type in:
documentation/october
in the From field and
doc/archives
in the To field.
N OTE :
As with aliases above, the redirect paths are relative to the URL.
Hopefully you have a clearer understanding between the differences of aliases and
redirects. In this section you will see two fields, Document directory aliases and
URL redirects.
Document directory aliases This will allow you to alias a new document root.
Enter the directory you want the user to see in the From field and where it
will actually be pointing to in the To field.
URL redirects This will allow you to map one URL on to another. Simply enter
in the original URL and where you would like it to point to. The source and
destination must both point to valid URLs.
The Guardian Digital Linux Lockbox
47
THE GD W EB T OOL
Chapter 4
Directory Indexing
This section defines the initial page when the Web browser client requests a URL
without specifying an explicit filename. For example, if you type in www.guardi
andigital.com, it is really loading www.guardiandigital.com/inde
x.html. If the Web server doesn’t find an index file it will return a directory
listing. Generally index.html or index.htm is used. You can specify more
than one.
Certificate Management
There are two types of certificates: "self-signed" certificates and "signed" certificates. A "signed" certificate is issued by a Certificate Authority (CA) such as
Verisign or Thawte. A "self-signed" certificate is simply a certificate that has not
been issued by a CA. This provides the authentication part of the process, because
the certificate has been signed by an external authority.
All of the certificate management can be done in the WebTool. You should not do
any of this by hand unless you have a very good idea of what you’re doing, since
if it is done incorrectly it will cause the Web server to fail. As was said above, the
certificate and key are a pair. If for some reason the certificate and key that are in
place do not "match" each other then the Web server will fail to start. If the Web
server fails to start then all of the other sites on the machine are inaccessible.
48
User Guide
Section 4.3
Virtual Host Management
The Certificate Management section will allow you to configure your SSL certificate. This option will only be available if the virtual host you are editing has SSL
enabled. Once at this menu you will be presented with three options which are
each discussed below.
Generate Certificate and Key
Here you will see a screen similar to the certificate generation screen when creating a virtual host. All the fields are required. Upon completion of this form you
a self-signed certificate and key pair will be created for the site. A description of
each field is given below:
Authority Name The authority name is the name the server the certificate will
be used on. For example www.guardiandigital.com or as in the
The Guardian Digital Linux Lockbox
49
THE GD W EB T OOL
Chapter 4
example above, lockbox.guardiandigital.com.
E-Mail Address The e-mail address for the contact in control of this certificate
should be entered here. An example would be ca@guardiandigital.
com or as in the example above, [email protected]
l.com.
Department Here you can enter in the name of the department this certificate
will be used in. An example would be E-Commerce.
Organization This is the name of the organization who owns the certificate. In
the example above Guardian Digital, Inc. is used.
City This field requires you enter the name of the city in which the organization
resides. You must enter in the full name of the city. In the example above
Upper Saddle River used.
State or Providence Here you will need to enter in the state in which your orgianization resides. You must enter the full name of the state, not an abbreviation. In the example above New Jersey used.
Country Enter in the country in which the organization resides in this field. This
requires an abbreviated name for the country, not the full name as in the
previous two fields. In the example above US was used.
When all the fields are completed click the Generate Key button to create the
certificate and key. You must now go back to the previous screen and click the
Restart Web Server button for the changes to be activated.
Generate Certificate Signing Request
A Certificate Signing Request (CSR) is what is sent to a Certificate Authority
(CA), such as Verisign or Thawte to request a signed certificate for your site. This
section will allow you to create one to be submitted. The form looks similar to the
Generate Certificate and Key form above. You can refer to the previous section
above, Generate Certificate and Key for a description of each of the fields.
There is however, one new field, Create New Certificate/Key Pair. If this option is
selected it will create a new certificate and key with the information you filled in.
It will then allow you to download the certificate to be signed. If you wish request
a new certificate because your old one has expired then d not select the Create
New Certificate/Key Pair.
N OTE :
50
This new certificate will not be used on the site until you upload it. It is meant
to be signed by a Certificate Authority.
User Guide
Section 4.3
Virtual Host Management
Once you have all the fields filled in you can click the Generate Certificate button
and you will be presented with your certificate.
The Guardian Digital Linux Lockbox
51
THE GD W EB T OOL
Chapter 4
Enter Certificate and Key
If you already have a certificate and a key or have sent a CSR to a CA and have
received the signed certificate back, then you would want to upload it here from
your local machine. This section will present you with your current SSL Certificate and give you the ability to upload a new certificate and key.
If you have a certificate and key in place then it shows you four things:
Fingerprint: This is the unique ID of the certificate
Valid: This is the data range for which the certificate is valid.
Subject: This is who the certificate is fore
Issuer: This is who has signed the certificate.
Clicking the Browse... button will allow you to browse through the files on your
local machine and select the certificate and key. You can then click the Save button
to save the certificate and key to the server.
52
User Guide
Section 4.3
Virtual Host Management
Server Configuration
Here you can alter the basic virtual host settings. You have the ability to change
the IP address of your virtual host and the server name of the virtual host. You can
also delete the virtual host and change the database password from here.
4.3.4 Directory Structure
When a Web site is created, the following directory structure will be created on
the Lockbox:
/home/httpd/<sitename>-<port>
Inside of this directory, the following sub-directories will exist:
cgi-bin This is the directory where /cgi-bin/ is aliased to.
html This is the document root.
logs This is where the access, error, and ssl logs are kept.
If a secure site was created, the following will also be created:
ssl
This is where the SSL certificate and key are kept.
The Guardian Digital Linux Lockbox
53
THE GD W EB T OOL
Chapter 4
cgi-bin
The CGI files for you Web site should be located here. For example, if register.cgi was placed, then you would access it by using the following URL:
http://www.linuxlockbox.com/cgi-bin/register.cgi
Using the lockbox.guardiandigital.com example being used in this section the directory URLs would look as follows:
For a standard, non-secure Web server:
/home/httpd/lockbox.guardiandigital.com-80/cgi-bin
/home/httpd/lockbox.guardiandigital.com-80/html
/home/httpd/lockbox.guardiandigital.com-80/logs
/home/httpd/lockbox.guardiandigital.com-80/ssl
For a Secure Socket Layer (SSL) Web server:
/home/httpd/lockbox.guardiandigital.com-443/cgi-bin
/home/httpd/lockbox.guardiandigital.com-443/html
/home/httpd/lockbox.guardiandigital.com-443/logs
/home/httpd/lockbox.guardiandigital.com-443/ssl
In an HTML form, you would use something of the sort:
<FORM ACTION=”/cgi-bin/register.cgi” METHOD=”GET”>
html
This is where the HTML files are kept.
logs This is the directory where the logs are kept. You can set up how often the
logs are analyzed in the Configure Website Log Analysis section of the WebTool.
54
User Guide
Section 4.3
Virtual Host Management
ssl
If this is a secure site, then this is where the certificate and key are kept. You
should never edit anything in this directory by hand.
4.3.5 Setup Name Virtual Hosts
A Virtual Host has to be bound to an IP address. This is required for proper
operation of your virtual host.
Here is where you can enter in the IP address and port of your new Name Virtual
Hosts.
To add a new host select the port from the pull-down menu and enter in the IP
address you want. The port pull-down menu gives you two selections. Port 80 for
normal connections and 443 for secure connections. Choose accourdingly. Click
the Add New IP button after each IP address your your new host will be added.
To delete a named virtual host simply click on the IP address of it.
4.3.6 Configure Web Site Log Analysis
Each virtual host running on your system has it’s own status logs. In here you
have the options to configure these logs. You will first be presented with a list of
the existing nonssl virtual hosts. Select whether you would like to have the Web
statistics generated daily or weekly.
The Guardian Digital Linux Lockbox
55
THE GD W EB T OOL
Chapter 4
In this menu you will have the following options:
Site Name Here you can enter in the name you wish to associate with this site.
Leaving it as the name of the virtual host is a good idea.
Frequency The Web statistics software can be run daily or weekly. It’s up to you
how often you want new statistics generated.
Click the Save Settings button when you’ve finished your selection.
Going to the site name followed by WEBSTATS will display the logs for your
virtual host. Using the example above, you would type in:
http://lockbox.guardiandigital.com/WEBSTATS
User Access Control
Currently your Web statistics are protected so no one can view them without a user
name and password. Since, most likely, your Web statistics are private information
you will want to protect the Web statistics from unauthorized visitors. Here we
will assign user access control.
Here you have two fields, Username and Password. This allows you to assign a
username and password to your statistics directory. When a person tries to access
them, a username/password window will appear. This allows you to define who is
authorized to access your log statistics.
N OTE :
By default no users have access.
4.3.7 Creating an On-line Store
Creating an on-line store can be done in a few minutes using the GD WebTool.
The creation process is broken down into a series of steps. We will outline each
step here.
56
User Guide
Section 4.3
Virtual Host Management
Step 1
In Step 1 we will start by defining some basic information for the store. First
you need the Fully-Qualified Domain Name (FQDN), followed by the store identifier and finally the administrator’s e-mail address. Descriptions of each are listed
below.
Fully-Qualified Domain Name Here you will need to enter in the full host name.
For more information concerning hostnames and the Fully-Qualified Domain Name (FQDN) please refer to the glossary.
Storename Identifier The Storename Identifier is a single string which will be
used to identify the store. This identifier is also used to name the database
for the store and the name of the database user.
Administrator E-Mail The address you enter here will be displayed any time an
error occurs on the site. For example, when Apache sends a 404 error you will have a message along the lines of “Error 404 - File not
found. Contact [email protected] about this error”. For our example we
will use the user name admin. So our e-mail address here will be [email protected]. E-mails to this address are intended for
the system administrator and/or store owner.
Store User Name Here you have a pull-down menu of all available system users.
Select a username and this user will own the images and template files in
the current store. You would most likely want this user to be the stores
owner. If the owner is not listed in the pull-down menu you may have to
create a new user for that person. You can create a new in the 4.4.1 section
on page 70.
The Guardian Digital Linux Lockbox
57
THE GD W EB T OOL
Chapter 4
Store Group Name This assigns a group to the current store. The group will
have access to edit templates and images and also have the ability to run
basic maintenance scripts. You can set the group to be the same as the store
user name above. This is most helpfull if the store owner has additional
people who will be editing and maintaining the store.
Step 2
In Step 2 we will be setting up detailed store information. There are quite a number of categories, and every field needs to be entered. Below is a list of all the fields
and their descriptions. We suggest reading Section 8 AllCommerce on page 159
for a clearer understanding of this section.
Site Name This defines the full name of the site. Depending on how you design your stores templates, the site visitor may see this on every screen.
58
User Guide
Section 4.3
Virtual Host Management
The default templates do not display this, but we HIGHLY recommend customizing your templates. You can find out how to customize your templates
in Section 8 AllCommerce on page 159 . For this entry we will put in the
full store name, Guardian Digital On-Line Store.
Administrator Password Enter in the password you would like to use for administering your store. Information about store administration and how to
access the administration of a store can be found in Section 8 AllCommerce
on page 159 .
Customer Service, Order, and Webmaster E-Mail For all three of these you
will just need to enter in the associated e-mail addresses. These addresses
will be displayed at the appropriate times in the site. For this example we
will use: [email protected], order@guardiand
igital.com, and [email protected].
Pay Process Here you have a pull down menu for your selection. If you will be
using CyberCash CashRegister to handle your payments select the cybercash option, otherwise select none. Directions on setting up a Cybercash
account can be found in Section 8.3 Using CyberCash CashRegister with
Your Store on page 180. Configuring CyberCash via the GD WebTool and
the console will be explained later.
Store State This is the two letter abbreviation of the state the store will be in. We
will be using New Jersey for our example, so enter NJ.
Tax Rate This is the sales tax rate your state charges on items deliver within the
state. The state tax here in New Jersey is 6%. You need to enter the tax
rate in decimal format. So for this example our tax is 6%, so we enter in
06.00.
Database Password This is the password for the database user we just created.
A password is required for the database to prevent any user from being able
to access the information held in the database. We recommend at least 8
characters and mixing numbers with letters.
Database Password Verification You will need to enter your password in here a
second time to double check for typing errors. An incorrect password can
lock you out of your own database.
N OTE :
The password is case sensitive.
The Guardian Digital Linux Lockbox
59
THE GD W EB T OOL
Chapter 4
Reply To E-Mail This will be the address to which all e-mail replies will be sent.
Just enter in a standard e-mail address. We want admin to handle all our
e-mails in this example, so we will be entering in what we had earlier under
the Administrating E-Mail section. For this example we used
[email protected].
Step 3
In Step 3 you have the ability to add the Secure Socket Layer (SSL) to your store.
The Secure Socket Layer (SSL) will encrypt your connection to provide the store
shoppers with the highest level of security while purchasing your products. Using
SSL is optional but recommended.
For this section only Mail Configuration needs to be filled in. Depending on your
selection in SSL Options, you may have to fill in more. Each category will be
explained in detail.
SSL Options
Successfully configuring and setting up SSL can be a difficult task. Using the
WebTool to guide you through the process can make it easy and painless. Here is
a brief overview of the process.
1. First you must select whether you want SSL, already have a certificate and
key, or need to generate a certificate and key pair. This can be done from
the SSL Options menu below.
2. If you chose to create a new certificate you will need to fill out the form
found below under Generate a New Certificate and Key.
60
User Guide
Section 4.3
Virtual Host Management
If you already have a certificate then you can select where to upload your
certificate and key from using the Upload SSL Certificate and Key menu,
also found below. If the certificate you uploaded was not signed by a Certificate Authority you may wish to get it signed. Skip to Part 4 below to
read how to accomplish this.
3. If you created a new certificate your site will automatically use it. By default
this certificate is not signed by a Certificate Authority. If you wish to get it
signed read the next part.
4. To get your certificate signed you must make a request to a Certificate Authority. A Certificate Authority is a company who is approved for signing
certificates. Two such companies are Thawte and Verisign.
To make a request you will need to fill out a Certificate Signing Request
form. Information on filling out a form and handling the CSR can be found
Section 4.3.8 Editing and Deleting a Store on page 64.
5. Once you make your request and receive your signed certificate you must
upload it back to the server. Instructions on how to do this can be found in
Section 4.3.8 Editing and Deleting a Store on page 64.
6. Once everything is uploaded your store is now properly secured.
Do Not Use SSL Selecting this will turn off all secure transactions on the virtual
server you are creating. This is most definitely NOT recommended.
Upload Certificate and Key If you have already created a certificate and key, or
have an existing signed certificate and key, you can enter the path to the
files on your local computer to be uploaded to the Lockbox. The upload of
your certificate and key are secured with 128 bit encryption so they can’t
be intercepted when you upload them. You can enter the file locations into
the SSL Certificate and SSL Key fields located in the Upload SSL Certificate
and Key section below this one.
The Guardian Digital Linux Lockbox
61
THE GD W EB T OOL
Chapter 4
Generate Certificate and Key You can select this option to have a certificate and
key generated for you. If you decide to generate a key you will have to fill
out the form located under Generate a New SSL Certificate and Key. This
form can be found at the bottom of the menu.
N OTE :
A new generated certificate will NOT be signed. Please read Appendix E on
page 234 for information on getting your certificate signed.
Upload SSL Certificate and Key
SSL Certificate If you selected to upload your certificate you can type in the
path to the file that contains your certificate here. You also have the option
to click the Browse... button to bring up a window to browse your local hard
drive for the file. For more information on uploading a certificate you can
read the above section.
SSL Key If you are uploading your certificate and it requires a key to decrypt you
can enter in the path to the file that contains your certificate key here. The
certificate requires a key as a means of authentication. The key will be used
when the Web server is started up. You also have the option to click the
Browse... button to bring up a window to browse your local hard drive for
the file. For more information on uploading a certificate key you can read
the above section.
62
User Guide
Section 4.3
Virtual Host Management
Generate New SSL Certificate and Key
!
Authority Name This should match the site name. If you enter the site name
incorrectly it will warn the user that the certificate may be invalid since
it does not belong to the domain it is on. An example of what would be
entered here is www.guardiandigital.com.
Organization This should be the name of your company or organization that the
store will be owned by. For example Guardian Digital, Inc..
Department This is the only optional field, but if it applies it is recommended
you fill it in. This should contain the department within the company that
owns the site. For example E-Commerce or Sales.
E-Mail Address This should contain the site owner’s or administrator’s e-mail
address. The certificate will be registered under this address.
City Enter the name of the city in which the site resides. For example Saddle
River.
State or Providence Enter the name of the state or providence in which the site
resides. For example New Jersey.
Country Enter the country in which the site is in. For example US.
The Guardian Digital Linux Lockbox
63
THE GD W EB T OOL
Chapter 4
Once you submit the SSL information you will be brought to a summary screen
to confirm your changes. You can make any last minute changes here and click
Preview Changes to update the screen. When you are satisfied with your configuration click the Create Store button to create the store. Please take note of the SSL
status. This will say SSL Will be Enabled if everything was set correctly, unless
you turned SSL off for this store.
It will take a few moments for the store to be created. The WebTool is configuring
the Web server, setting up the database, creating the necessary SSL information
and setting the HTML and CGI scripts properly. While it is doing this do not press
any keys.
N OTE :
If you are using a name virtual host to host your store on you will need to
create one. You only need a name virtual host if you will be hosting the store
from the same IP address. If the store has a unique IP address you will not
need to do this. Information on creating a name virtual host can be found in
Section 4.3.5 Setup Name Virtual Hosts on page 55.
4.3.8 Editing and Deleting a Store
After creating a new store you have the option to edit and delete the new store.
When you select the option from the main screen you will see the following menu.
To delete a store select the check box of the store(s) you want to delete then click
the Delete Selected Stores button.
To edit the store you have five options, AllCommerce, WebServer, SSL, Generate
CSR and, if configured, Cash Register. Each item is discussed below.
N OTE :
64
The Cash Register option will only appear if you selected to use Cash Register with this on-line store.
User Guide
Section 4.3
Virtual Host Management
Figure 3: 4.3.8a - AllCommerce Configuration
AllCommerce
By clicking on the AllCommerce link beneath the selected store you will be
brought to another menu with some familiar categories. Refer to Figure 4.3.8a.
You can update all your AllCommerce information here. Each section is explained
in detail in the Store Creation portion of this section.
WebServer
The Web server section contains simply the Web server FQDN and the site administrators e-mail address. Detailed information on this can be found in the
Store Creation portion of this section. Refer to Figure 4.3.8b.
The Guardian Digital Linux Lockbox
65
THE GD W EB T OOL
Chapter 4
Figure 4: 4.3.8b - WebServer Configuration
SSL
Here we can upload or generate a new certificate. There are several reasons you
may want to upload a new certificate. The two most common would be if you had
a certificate signed or if your old certificate expired after one year and you need to
replace it with a new one. You can also generate a new certificate if your old one
has expired. All certificates expire 365 days, or 1 year after being issued. Refer to
Figure 4.3.8c.
N OTE :
If a certificate already exists for the host it will be overwritten when you
upload or create a new one.
This menu will also display your current certificate, if one exists, and the current
status of SSL for the store.
Generate CSR
A CSR, which is short for Certificate Signing Request, is what you will send to a
certified CA to get your certificate signed and verified. Verisign and Thawte are
two companies that offer such services. Earlier in this section you had the ability
to create a CSR for a virtual host, here you have the ability to create one for your
on-line store.
66
User Guide
Section 4.3
Virtual Host Management
Figure 5: 4.3.8c - SSL Configuration
The Guardian Digital Linux Lockbox
67
THE GD W EB T OOL
Chapter 4
Here you must enter in all the fields, with Department being the only optional
field. Once all the fields are filled in you can click the Generate CSR button.
Once the screen refreshes you will be presented with your Certificate Signing
Request. You can copy and paste this directly into an e-mail or a file on your local
machine.
Once you have your certificate signed you can go to the above SSL section and
use the Upload Certificate and Key feature to add it to your server.
For more information read Appendix E Certificates on page 234 containing certificate information.
Cash Register
If you configured your store to use the CyberCash Cash Register software you
can change the configuration settings here. You have three options here, Account
Type, CyberCash User ID and Merchant Key. Each item is described below.
68
User Guide
Section 4.3
Virtual Host Management
Account Type This option gives you two choices, Normal and Fulfillment. Select
Fulfillment if you will be using Cash Register for fulfillment only and no
sales.
CyberCash User ID This ID string will be assigned to when you sign-up with
CyberCash.
Merchant Key When signing up with CyberCash you will be assigned a personal
Merchant Key.
Once all the fields are completed click the Update Store button and the changes
will take effect.
4.3.9 Configure a Store
The configure a store section provides the ability to administer the content of your
store. This differs greatly from the Edit/Delete a Store section. For example, you
can add and delete order and items from the store. When you click on the Configure a Store link you will be presented with a list of stores currently configured.
They will be listed in the order they were created in. On the left side will be the
store name followed by the URL for the administration portion of the site. To
begin administration click on the URL. You will be brought to the site’s administration page.
For information on how to administer the site please read the on-line documentation found at:
http://support.guardiandigital.com
The Guardian Digital Linux Lockbox
69
THE GD W EB T OOL
4.4
Chapter 4
System Management
"
The System Management section contains all the system configuration options for
administering the system. On the main screen you are presented with a list of all
the user accounts.
Following this section is the main System Management section with all of the main
system options.
We will discuss the user accounts portion first..
4.4.1 User Account Administration
In this section we will describe how to add users, delete users, edit users, and
configure groups. These are the regular system users. Users who wish to have
SSH access to the machine will need an account here. For more information
on users and groups refer to the Groups and Users section in Appendix C.5 on
page 226. You should see all users listed in the table, as follows:
70
User Guide
Section 4.4
System Management
Create a New User
To create a new system user start by clicking on the Create New User button. This
will bring you to this screen:
Here you will enter all basic user information. Below is a brief description of each
option:
Username Enter a unique user name in here. A username can not contain spaces
or special characters and can be no more than 16 characters in length. For
example:
User name
Nick DeClario
nick
Nicholas DeClario
Valid
No
Yes
No
Reason
Contains spaces
<16 characters and no spaces
>16 characters and spaces
Real name The users real name. This will be the real name of the user. You can
enter in their full name. Using the example above, Nick DeClario would be
valid.
Access Enabling this will allow a user to only access their e-mail via a secure
IMAP or POP3 client. This will prevent the user from physically logging
into the machine.
Password Enter in a password for the user. This password will be asked if the
user logs into the console or needs to retrieve their e-mail.
Now we must set up the user in a group. Read the Groups and Users section in
Appendix C.5 on page 226 for more information on user groups.
Primary Group You either can create a new group for this user or use an existing
group.
The Guardian Digital Linux Lockbox
71
THE GD W EB T OOL
Chapter 4
We are now ready to create the user. Press the Create button. You will be brought
back to the main System Management page indicating the user has been created
successfully.
Edit a User
To start editing an existing user, click on the user name for the main System Manager menu. You will be brought to the same screen as for creating a new user,
except it will contain all the information about the user you selected. From here
just change what you wish to change and select Save. The options work exactly
the same as creating a new user in the previous section.
Configure Groups
The last user option in this section is the Configure Groups option. In here you
can change the group ID’s, passwords and members. Click on Configure Groups
to edit the groups. Then select the group you wish to edit.
N OTE :
When creating a new user that user is automatically given their own private
group. For example, user nick will automatically be given group nick. This
allows user nick to have private files that no other user but root can access.
The reason to change a users group would be to change their privileges. For
example, if you want a certain user to be able to administer the Lockbox you may
add that user to the admin group. Perhaps you want a certain user to only be able
to edit their own personal files and the Web files, you may add them to the www
group. A brief explanation of the groups in the example above is explained below:
72
User Guide
Section 4.4
System Management
admin
The admin group will give a user access to some of the systems services. This would be good if you have other trusted users whom you
wish to do administrative tasks such as maintenance, file cleanup and
other needed tasks.
users
This is the group general users would be put in for e-mail access and
basic system access.
mysql
The mysql group is primarily used for running the MySQL server.
This is done for the same reasons as explained above in the named
description. The administrator will also have access to MySQL and
all its databases.
www
The www group is an example group that might be used to control
web files owned by the members of the group. Additional groups
can be created to contain additional users that will be separated from
users in the www group, restricting their write access to files in other
groups.
4.4.2 Network Configuration
Selecting the Network Configuration option from the System Management section
will bring you to the Network Configuration main menu.
The first thing you will see at the top of this menu is the list of interfaces currently
installed in your system. You can edit active interfaces by clicking on the Edit
option to the left of the interface. We will discuss more on editing the device
later in this section. First we want to create a device. If you click on the Network
Interfaces button you will be brought to a new screen:
You will now see a table labeled Persistent Interfaces. Click on an interface to
edit or click the Add a New Interface link to add a new one.
The Guardian Digital Linux Lockbox
73
THE GD W EB T OOL
Chapter 4
Adding a Persistent Interface
If you installed a new ethernet interface and you would most likely wish to make
it available for use with your system by configuring it. You would do so in this
section. Persistent interfaces will be saved permanently so they will be active on
future reboots. Use that section if you wish to have the device start on boot-up.
All the above fields must be filled in to successfully add your new interface. After
clicking Create, the interface will be ready to use.
Name This is the name of the device such as eth0 or eth2. If it is the second
network card in your Lockbox it is eth1, the first card being eth0, the
third card being eth2 and so forth.
IP Address Enter the IP address you wish to assign to the device here. An IP
address is a unique number used to identify a computer on a network. Generally you can purchase a block of IP addresses you are allowed to use on
the Internet or are assigned one or more IP addresses from your service
provider. Enter in the IP address you want to assign the Lockbox to here.
Netmask Enter the appropriate netmask that matches your subnet for the IP address. This is usually 255.255.255.0
Edit an existing interface
To edit a device click on the Edit link to the left of the interface you want to edit.
After selecting an interface to edit you will be presented with the current interface
settings.
74
User Guide
Section 4.4
System Management
Here you will see standard interface options you saw during the set up of the interface. If you need to change these or update them, make the appropriate changes.
However, there is one new field:
Virtual Interfaces This will display the total number of virtual interfaces attached to this device. If the device was just installed it will say 0.
If you want to create a new virtual interface for this device click on the
Add Virtual Interface option found to the right of the number of virtual
interfaces.
Once a new virtual interface is added it will be listed on the main menu
under Persistent Interfaces. Click on the Virtual Interface from this menu
to edit it. In the example below the Virtual Interfaces are highlighted.
Adding a Virtual Interface
A virtual interface acts as another ethernet device but is bound to a real device. A
virtual interface is referenced by the device it is bound to (eth) and assigned a
reference number, (i.e., eth0:1). The virtual interface has it’s own IP address,
netmask, and broadcast. This is especially useful when creating virtual Web hosts.
See Section 4.3 Virtual Host Management on page 39 for more information.
N OTE :
This assumes that this virtual interface is on the same network as the real
device.
The Guardian Digital Linux Lockbox
75
THE GD W EB T OOL
Chapter 4
This section requires all the entry fields to be filled in. Once you have completed
this click the Create button to activate this new virtual interface. After the device
is created you are returned to the previous screen. You will notice that the device
is now listed in the Interfaces Active Now section and will be indented and labeled
with Virtual. You can edit this device by clicking on the name.
Default Route
In this section you can configure the routing table. This is initially configured
when you first set up your Lockbox but if you change the network around and
need to change the routing table, this is where it gets done.
A description of each entry field is explained below:
Default Router You will need to enter in the IP address of the default router you
will be using.
Routing Device This will be the device in your Lockbox that will be used to access the router. Generally eth0 is used for this. Only configured interfaces
will be displayed.
DNS Client
This is where you configure your Lockbox to look for DNS servers. You can list
your DNS servers by IP or hostname in their search order. Fill this in with the
appropriate information for your network. A description of each item is given
below.
76
User Guide
Section 4.4
System Management
DNS Servers Here you can list all the DNS servers you will be using. You need
at least one listed here to be able to access DNS. You have to list the DNS
server(s) by their IP addresses. If your Lockbox is performing the DNS
functions for you network then set this to the IP address on your machine
designated for DNS.
Host Addresses
This contains a list of your static host addresses. One line for each hostname and
IP address will appear here, including IP’s for virtual interfaces. There will be one
entry for each hostname configured on your Lockbox.
Add a New Host Address
To add a host enter in the IP Address followed by a list of all associated hostnames.
The Guardian Digital Linux Lockbox
77
THE GD W EB T OOL
Chapter 4
Click the Create button to apply the changes.
Edit a Host Address
To make changes, edit your changes directly in the appropriate fields. When you
are done editing click the Save button to apply the changes.
To delete the entry just click the Delete button.
4.4.3 Change System Time
This section allows you to change the current system time, or synchronize it with
an Internet or designated local time server.
Changing the time is controlled by pull down menus. Select the current time and
hit Set System Time for the changes to take effect. Normally, system time will be
accurately controlled with the network time services and manually setting it is not
necessary.
It is also possible to configure the Locobox to use Internet time servers to set its
time.
78
User Guide
Section 4.4
System Management
You have three fields to fill in the hostnames of the time servers. Your Lockbox
will use all three servers to synchronize its time. Keeping accurate system time is
extremely important. You have to enter hostnames in here. IP addresses are not
allowed.
4.4.4 Secure Shell Management
Secure Shell (SSH) is a program for logging into a remote machine and for executing commands on a remote machine. It is intended to replace rlogin and
rsh, and provide secure encrypted communications between two untrusted hosts
over an insecure network.
This section will allow you to edit the SSH configuration, generate a new host key
and generate user keys.
Edit the SSH configuration
By clicking on the SSH Configuration icon you are brought to the Edit SSH Configuration page. Here you have the ability to allow and deny groups and users
The Guardian Digital Linux Lockbox
79
THE GD W EB T OOL
Chapter 4
SSH abilities. Be careful when editing these options since you may grant access
or deny access to the wrong people, which could cause problems.
#
In each field you can enter in a group name or user name, whichever is appropriate
for the field, using a blank space as a delimiter. Clicking on the “...” button will
bring up a small window containing a list of users or groups you may select from.
There are a few rules to take note of when configuring access control for SSL.
Below is a short list of basic rules:
Once you add a user or group to the Allow sections, all other users that are
not listed will be denied.
$
If you add a user to the Allow Users section but the group the user belongs
to is in the Deny Groups section, the user will be denied access.
$
The deny rules take precedence over the allow rules.
$
$
You may deny a user but allow the group the user belongs to.
Most configurations will be safe allowing the admin group access. This will automatically deny everyone else who is not part of the admin group.
After you have finished making your changes click the Write Configuration button
for the changes to be saved.
SSH Key Management
The Key Management section allows you to create new SSH keys for your users.
80
User Guide
Section 4.4
System Management
Generate a user key
Generating a user key will allow your users to log in to the Lockbox remotely via
SSH. First click on the Generate User Key button. This will bring you to a new
screen with a form to be filled out. It first requires a user name. You can type in
the name or select it from a list by clicking the “...” button.
An IP address is not required but recommended for increased security. The IP
address will tell the Lockbox where this user is authorized to connect from. If you
do not enter in an IP address it will let this user connect from any IP address.
N OTE :
If no IP address is entered you will need to add the users IP address through
Section 4.6.4 System Access Control on page 109 to give the user access
to the system. Without this IP address the user will be denied access. We
recommend you enter it in at this time.
The description field allows you to enter in a short description. This description
will be displayed back to the user every time they attempt to connect to the Lockbox using an SSH client such as MindTerm. For more information concerning
MindTerm read Section 6 Lockbox Connectivity on page 120.
The Guardian Digital Linux Lockbox
81
THE GD W EB T OOL
Chapter 4
Finally you need to enter a password. Select any password that is at least 5 characters. Now click on the Generate key button.
You will now see a screen with the results of the SSH Key generation.
You now have the option to download your key. You will need to have a copy of
your key to load into your SSH program to so you will be able to gain access to
the machine. Save the file in a secure location.
The key that was generated and downloaded is a public key. Being a public key
you can send it to a user safely through e-mail.
4.4.5 Mail Server Management
The Mail Server Management section will give you complete control over your
mail server, giving you the ability to add/remove users and aliases and other mail
options.
On the main menu you will have four main options, Mail Server Configuration,
Domain Management, Mail Routing and Stop Mail Server.
82
User Guide
Section 4.4
System Management
Mail Server Configuration
Here you have the option to set up various system-wide options.
The Deliver directly option will forward any outgoing mail not destined for users
of your system directly to the given host.
If the mail server is behind a firewall or proxy server to the outside world, you
will need to tell the mail server where to forward non-local mail. You can enter in
a hostname or IP address here.
Domain Management
The Domain Management section allows you to create a new mail domain, explained below, and to edit an already created domain. Creating a new domain is
quite simple. Below the Domain Management menu you will see the Create New
Domain menu. Here you have two options, Domain and Postmaster. Both fields
are required.
Domain The domain is simply the name of the domain you wish to receive
mail for. For example, if you wish for the mail server to receive mail
for guardiandigital.com then you would enter guardiandigital.com into this field.
The Guardian Digital Linux Lockbox
83
THE GD W EB T OOL
Chapter 4
Postmaster If a user sends an e-mail to a non-existent account it will be forwarded to this user. It’s an administrative address that receives all undeliverable mail.
Editing a Domain
To make changes to a domain you have created you can simply click on the domain
name listed under the Domain Management menu. This will present you with the
following screen.
There are quite a large number of options here. We will break down each section
below.
Mail Routing
The mail routing section allows you to select what domains you would like aliased.
If you have a user at the guardiandigital.com domain, and want every user
to be able to receive mail to linuxsecurity.com as well, this menu provides
that ability. Refer to Figure 4.4.5.
Enter in the domain you want the mail aliased as. We used linuxsecurity.com
to create an existing mail route in the above image. We then enter in the Relay mail
to... field the actual domain the mail should go to, guardiandigital.com in
this example.
N OTE :
84
Subdomains are automatically included in the route.
User Guide
Section 4.4
System Management
Figure 6: 4.4.5 - Mail Routing
Select the Add New button and the new options you entered in will appear in the
Existing Mail Routes. Click the Save option to save or the Delete button to delete
a mail route.
4.4.6 DNS Management
The DNS Management section will allow you to fully configure your Lockbox’s
Domain Name System (DNS) settings. You will be able to add and delete master
and slave zones and have the ability to edit all global options.
The Domain Name System (DNS) is the software that is responsible for converting hostnames into numbers that computers can understand. For example,
the name www.guardiandigital.com corresponds to the host IP address
63.87.101.80 and vice versa. The DNS server, sometimes called a name
server, is the process that runs on the Lockbox awaiting incoming name service
requests.
For example, if the DNS server is given an IP address of 63.87.101.80, it
will look it up in a database of addresses and link it to it’s domain name. In
this example 63.87.101.80 will resolve to www.guardiandigital.com.
DNS will also work the other way. Giving it www.guardiandigital.com
will result in 63.87.101.80.
Before you can configure your own DNS server, you must first register your DNS
server and domain name with Network Solutions or another naming authority by
completing their host registration form. You will need to reserve one IP address
The Guardian Digital Linux Lockbox
85
THE GD W EB T OOL
Chapter 4
%
for use by your nameserver. In order to maximize availability, every domain must
have both a primary and secondary DNS server, and both must be registered with
a naming authority such as Network Solutions. Guardian Digital can assist you
with this process if you wish.
The DNS Management section contains three options, as shown below.
This section provides the ability to:
Global Option Forwarders and other various defaults that will apply to all the
zones you manage.
Create a New Master Zone This will bring up the configuration screen to create
a new DNS master zone
Create a New Slave Zone This will bring up the configuration screen to create a
new DNS slave zone
Create a New Master Zone
The domain namespace is divided into regions called zones. For the purposes of
this document, it is sufficient to describe a zone as a domain, or section thereof, for
which the server will be responsible. The host www.guardiandigital.com
is a member of the domain guardiandigital.com, as is mail.guardiand
igital.com and dns.guardiandigital.com.
For example, Figure 4.4.6a shows the guardiandigital.com zone and two hosts
within the zone.
When you select the option to create a new zone you will be presented with the
page in Figure 4.4.6b.
86
User Guide
Section 4.4
System Management
Figure 7: 4.4.6a - Example of the guardiandigital.com zone.
Figure 8: 4.4.6b - New Master Zone Options
The Guardian Digital Linux Lockbox
87
THE GD W EB T OOL
Chapter 4
The above page has quite a few options. Here we will discuss each one in detail.
Zone type The zone type will allow you to choose between forward and reverse
lookup.
Forward lookup allows the client machine to supply a Fully-Qualified Domain Name (FQDN) and the DNS will return the IP address.
Reverse does the exact opposite. You supply an IP address and the DNS
will return an FQDN.
Domain name / Network This contains the actual domain name, or, in the case
of reverse zones, the network address block, that this DNS zone will reside
in. For example, if your Lockbox is like above, lockbox.guardiandig
ital.com, then the domain would be guardiandigital.com.
Master Server This section will contain the IP address of your master DNS
server. The master DNS server, also known as a Primary DNS Server, maintains a list of domain names and their IP addresses. This list is made available to other DNS servers on the Internet so that users can access these sites
over the network. For example, if you own guardiandigital.com
your master server will control guardiandigital.com. You can have
other DNS servers, known as secondary DNS servers, or slave DNS servers,
that act as a backup to the primary DNS server for guardiandigital.com. If your Lockbox is your master DNS server then enter in the
address of your Lockbox.
Email Address The default e-mail address associated with this zone. Generally
this is the e-mail address of the system administrator or whomever is responsible for DNS on your network.
Allow Transfers From... DNS will need to transfer information if you have slave
DNS servers on your network. This should contain a list of IP addresses
and/or a block of IP addresses for other DNS servers that are allowed to
transfer DNS information between each other. You can set the default in the
Default Zone Settings section for this specific zone, which is described later
in this section.
Allow Queries From... Here you can list the IP addresses and/or block of IP addresses for machines that are allowed to query your DNS server. You may
want to limit this to the people inside your network if your Lockbox is
88
User Guide
Section 4.4
System Management
located on your internal or private network. We recommend leaving the default set if you are uncertain. You can set the default in the Default Zone
Settings section, which is described later in this section.
Creating a New Slave Zone
A secondary DNS server, also sometimes referred to as a slave server, for a zone
gets the zone data from another DNS server that is authoritative for the zone,
called its master server. When a secondary name server starts up, it contacts its
master server and requests a copy of the zone data for which it is responsible. This
is called a zone transfer.
A slave server will backup your master server. This is mostly for redundancy if
your master server is not running or is unavailable to answer a query. This section
has everything necessary to create one.
N OTE :
You must configure the master server to allow this new slave server to perform zone transfers from the master server. These changes must be made on
the master server. Information pertaining to this can be found in Section 4.4.6
Edit Master Zone on page 93.
The options on this screen are the same as setting up a master server. Find the
detailed information in the previous section.
However, there is one new category, Master Servers.
The Guardian Digital Linux Lockbox
89
THE GD W EB T OOL
Chapter 4
Master servers In the master servers section you can list all the master servers
that this slave server will obtain its DNS information from. At least one
master server is required in this section.
N OTE :
You are required to list your slave server as a name server on your master
server. You can find information on doing this in the Name Server Section on
page 96.
To finish creating a new slave zone you will need to define a mail route to backup.
Defining a mail route must be done from the master server. You will need either
the Fully-Qualified Domain Name (FQDN) or IP address of the slave server that
will be handling the mail route. Information on configuring this on your master
server can be found on page 97.
A New DNS Management Screen
Once you have completed the zone creation form, click the Create button. You
will be returned back to the main screen. Now you will have a list of options at
the top, followed by a list of your DNS servers.
The first object in this menu is the Global Server Options. Here you have the
ability to create new Master and Slave zones, discussed above, and to edit the
Global Options.
90
User Guide
Section 4.4
System Management
Global Options
&
Global Forwarding and Zone Transfer Options
Servers to Forward Queries to... A forwarder is used for name servers that may
not necessarily be directly-connected to the Internet. This may be due to
being behind a firewall, or inside of a corporate network. Forwarders will
instead query a specified additional name server for its DNS information. If
your DNS server will be responding to a forwarding server you will want
to specify the server(s) it is allowed to contact. See forwarders and forward
zone in the glossary for more information concerning forward queries.
N OTE:
A forward server is still a primary or slave server; don’t get confused here.
All outside queries will be given to it first.
Default Zone Settings
Allow transfers from... This sets the servers that are allowed to perform zone
transfers from the DNS server. When a slave server requests updated information from the master server, the master server will transfer it to the slave
server if authorized. This procedure is known as a zone transfer. No servers
The Guardian Digital Linux Lockbox
91
THE GD W EB T OOL
Chapter 4
are authorized by default. If you are uncertain of what to enter in here, leave
the default set and contact your network administrator.
Allow queries from... This sets from which IPs your DNS server will accept
DNS queries. By default the DNS server will accept queries from all IP
addresses. If you are uncertain about what should be entered in here, leave
the default on.
Existing DNS Zones
The other section on the main DNS page below the Global Server Options is
Existing DNS Zones. This will display the reverse and forward addresses of a
domain. If you click on the address you will be brought to the corresponding
options page to have the ability to make changes. The reverse address page and
the forward address page both have different options. We will discuss both pages
below.
Edit a Slave Server
In this section you have the ability to make changes and delete a slave server.
You should be familiar with these options since they were used to create the slave
92
User Guide
Section 4.4
System Management
server and in the Global Options section. Refer to those sections for more detailed
information.
Edit a Master Zone
Add Address Record
The Address section will allow you to define address records. In the given address
(i.e., smtp.guardiandigital.com) you can define specific servers. The
menu is broken down into two sections, Add Address Record and a table of the
current records listed by IP address followed by the hostname. Take note that
these records are only valid for the defined zone.
The Guardian Digital Linux Lockbox
93
THE GD W EB T OOL
Chapter 4
To create a new Forward Address Record you simply need to fill in the two required fields described below.
'
Hostname The hostname is the Fully-Qualified Domain Name (FQDN) for the
specified machine.
Address In the address entry field you will need to enter in the IP address of the
machine for this record.
Once you have filled in all the fields you can click on the Create button to create
the new forward address. Once the page refreshes you will see it listed at the
bottom of the page.
Edit/Delete a Record
Once a record has been created and you see it listed below the Add Address Record
menu, you will have the ability to edit the record by clicking on the name of it.
This will bring you to a new screen that is similar to the Add Address Record
screen.
To edit the name server simply make your changes directly in the Name Server
field and click the Save button to make the changes. If you wish to delete this
name server record click on the Delete button.
94
User Guide
Section 4.4
System Management
(
Name Alias
The Name Alias section gives you the option to configure an alias for this record.
On this menu you have two options, Alias and Real Name.
Alias The alias needs to be a Fully-Qualified Domain Name (FQDN). In this case
the alias is where you want the user to be redirected to. For example, the
user types in www.guardiandigital.com while really they are being
sent to lockbox.guardiandigital.com.
Real Name The real name of the server also needs to be a Fully-Qualified Domain Name. This is the name that the Alias will really be going to. In the example above you would enter in lockbox.guardiandigital.com.
Edit/Delete an Alias
Once you create a new alias it will appear at the bottom of the page.
Similar to the other sections, you can click on the name to edit the record. After
clicking on the name you will be brought to the Edit Name Alias Record page.
The Guardian Digital Linux Lockbox
95
THE GD W EB T OOL
Chapter 4
You can make your changes by editing the appropriate field. When you are done
with your changes you can click the Save button to set the changes. To delete the
record simply click the Delete button and the alias will be deleted.
Name Server
The Domain Name System (DNS) is the software that is responsible for converting hostnames into numbers that computers can understand. For example,
the name www.guardiandigital.com corresponds to the host IP address
63.87.101.80 and vice versa. The DNS server, sometimes called a name
server, is the process that runs on the Lockbox awaiting incoming name service
requests.
The name server section allows you to specify the name server that will be hosted
here. A name server is required for the domain to function properly.
96
User Guide
Section 4.4
System Management
To add the name server simply type it into the Name Server field and click on the
Create button to submit the changes.
'
Edit/Delete a Name Server
Once you create a new name server you will see it listed below.
You can click on the name to edit the record.
To make changes to the record simply edit the field and click the Save button. To
delete the record click the Delete button.
Mail Server
Here you have the ability to set up a mail server for the domain. You can set up
more than one server and set the priority level of the server. More detail on doing
this will be provided below.
The Guardian Digital Linux Lockbox
97
THE GD W EB T OOL
Chapter 4
You can define your mail server(s) in the Mail Server field. Only one server can be
defined at a time. However, you can have more than one mail server per domain
with different levels of priority. This provides failover. If a particular mail server
is unavailable, DNS will automatically instruct it to use a different mail server.
The order in which the next server is chosen is known as the priority. The lower
number the priority, the higher the precedence. In other words, a mail server
configured with a priority of 10 will receive mail before one with a priority of 20.
You must complete the Mail Server and Priority fields. Once you are done, click
the Create button and the server you just entered in will be displayed at the bottom.
Edit/Delete a Mail Server
Once you have created a mail server it will be listed as shown below.
You can click on the name of the server to bring up the edit screen.
To edit the server simply make necessary changes and click Save. Your changes
will immediately take effect. To delete the server you can click the Delete button.
Edit Zone Parameters
The zone parameters are general settings needed by the zone. You will be presented with a menu of the options with the defaults being displayed. A description
of each item is listed below.
98
User Guide
Section 4.4
System Management
Master Server The Master Server field contains the address of your master DNS
server, also known as a primary DNS server. The master server controls the
DNS for your zone.
For example, if you own guardiandigital.com your master server
will be responsible for the hostnames and IP addresses for guardiandigital.com.
E-mail Address The administrative e-mail address responsible for this zone. Generally this is the e-mail address of the system administrator or whomever is
responsible for DNS for this zone.
When editing is finished, click the Save button to apply the changes.
Edit Zone Options
The zone options are preset to the settings you specified globally in the Global
Options section 4.4.6 on page 91. If you wish to override any global settings you
can do so here.
The Guardian Digital Linux Lockbox
99
THE GD W EB T OOL
4.5
Chapter 4
System Status Monitor
"
4.5.1 Logfile Management
Logfile Management provides the ability to view the system logs. By clicking
on the log you want to view, a new browser window will appear with the log
information.
N OTE :
Logs are rotated on a regular basis. No maintenance is required.
Once a new browser window is open, and the log information is displayed, you
will be presented with a couple of options. At the bottom of the list of logs you
will see Last 20 lines and Refresh. Change the Last Lines option to view more or
less of that particular log and hit Refresh. You can also click Refresh at any time
to view the most recent log entries.
4.5.2 Process Management
The Process Management section allows you to view a list of all running processes
and allows you to alter them. You can view your processes in the following ways:
Ownership
$
Process ID (PID)
$
$
100
CPU Usage
User Guide
Section 4.5
System Status Monitor
In this section you also have an option to view current system statistics.
Viewing processes
To view a list of the currently running processes first choose how you want to
have them sorted. After making your selection you will be presented with a new
page containing all the processes organized according to how you specified. At
the top of the page you have the option to change views. By clicking on a process
ID number you can view more information about the process. In the example
below Sort by User was selected. You will first see the Display section with other
views you may have selected, followed by the user ID with the users full name in
parenthesis. A table of all of the selected user’s processes are listed below. The
image below is showing a small portion of the processes only.
When viewing more information about a PID a new browser window will open.
This new window will display the following information:
the command that started the process
)
the process ID (PID)
)
)
the processes owner
The Guardian Digital Linux Lockbox
101
THE GD W EB T OOL
Chapter 4
amount of RAM in Kb the process is using
the processes parent process
CPU usage
run time
It will show you the command that started the process, the PID, the owner of the
process, the amount of RAM, in Kb that it is using, it’s parent process, CPU usage,
run time, among a few other options. Refer to the General Linux Information
section found in Appendix C on page 220 for more information about processes
and signals.
System Statistics
The System Statistics section contains three smaller sections, System Information,
Disk Usage, and Active Network Connections.
System Information The System Information section displays the results of running uname -a and uptime. The following information will be presented to you:
operating system name
name of the machine
kernel version
date
processor architecture
processor type
current time (12 hour format)
system up-time
number of current users or the system
102
current load average
User Guide
Section 4.5
System Status Monitor
load average over the last five minutes
load average over the last 15 minutes
Disk Usage The Disk Usage section displays:
device name
total size
amount used
amount available
percentage used
where the drive is currently mounted
Active Network Connection The Active Network Connection section will display a list of current connections. It shows the connection type, the local
IP address (your Lockbox), the foreign computer’s address and the current
state of the connection. This is really for informational purposes only.
The Guardian Digital Linux Lockbox
103
THE GD W EB T OOL
Chapter 4
Services Monitor
The Services Monitor gives you a list of your current running services and allows
you to start and stop them and control starting them at boot time.
To start or stop a service click on the State associated with the service. Once you
click on the State the screen will refresh, reflecting the new status of the service.
To change the boot time activation status simply click on the Active at Boot?
option.
The Reboot System and Shutdown System options will both display confirmation
screen before the command is carried out.
N OTE :
104
If you choose Shutdown System it will power down the entire system. You
will have to physically turn the power back on to the system.
User Guide
Section 4.6
4.6
Security
Security
"
Your Lockbox includes all necessary security settings pre-configured. They are
optimally set for the highest level of security without hindering the usage of the
Lockbox. This section will let you configure some of these security settings to
adapt to possible system changes you may make over time. From here you have
the ability to manage certificates, configure SSL encryption, IP access control,
customize your console login banner, and configure the host intrusion detection.
4.6.1 Change WebTool Password
You can change your administrative WebTool password here. You need to enter
it in twice to avoid typing errors. We recommend a password no shorter than six
characters. Mixing letters and numbers is a good idea and avoid full words. See
LinuxSecurity.com for tips on choosing a secure password.
The Guardian Digital Linux Lockbox
105
THE GD W EB T OOL
Chapter 4
4.6.2 Change Administrator E-Mail Address
The administrators address can be entered here to receive a daily summary of
important log information and security alerts.
The Daily Summary
The daily summary is e-mailed out every night at ten minutes past twelve. The
contents will look something like this sample daily summary e-mail:
Log Summary for 10/3/2000
*** Log summary for system logins ***
Total number of:
- root logins via su
- SSH sessions opened
106
- 0
- 5
User Guide
Section 4.6
Security
- console logins
- 0
*** Log summary for GD WebTool logins ***
Total number of:
- successful administrator logins
- 16
- failed logins
- 4
This has been e-mailed to : [email protected]
End of summary for 10/3/2000
Depending on your system configuration and installed packages, you may receive
more or less information in this summary.
Security Alerts
For servers that have the LIDS host intrusion detection service enabled, and someone tries to disable it, but gives an incorrect password three times in a row in under
a one minute interval, an e-mail will be sent to the administrator whose address
was specified in the Change Administrator E-Mail Address section.
N OTE :
Chances are you can safely ignore this section. If you are uncertain of what
to do should this event arise, contact Guardian Digital for further assistance
and we will be glad to help.
The e-mail will contain instructions on how to handle the situation. It will look
similiar to the example below:
A password to disable the host intrusion monitor was entered three (3) times incorrectly. This could be an error of the system administrator or it could be someone attempting to gain unauthorized access.
We suggest checking in to this matter as soon as possible. To check if the host intrusion monitor is properly running login to your Lockbox as the root user. Instructions on this can be found in Section 6 of the documentation, and type:
The Guardian Digital Linux Lockbox
107
THE GD W EB T OOL
Chapter 4
lidsadm -r
This will return the current running status of the intrusion monitor. If the monitor is not running you should turn it back on. Do this by typing:
lidsadm -S -- +LIDS_GLOBAL
It will prompt you for your host intrusion monitor password. Once the password is correctly entered the intrusion monitor will be enabled. You can scan the logs through the GD WebTool for more detailed information. You can also read more on the intrusion monitor in Section 9 of your of your manual.
This error will only occur under the following conditions:
A wrong password is entered in three times in a row to disable LIDS
*
A wrong password is entered in three times in a row to enable LIDS
*
*
A wrong password is entered in three times in a row to reload the LIDS
configuration
What this means is that either a user with root access accidently entered in the
password wrong three times in a row or an unauthorized user has attempted to
gain access.
If you only use the GD WebTool to administer your Lockbox you should rarely
see this message.
In the event of this e-mail, you are welcome to contact Guardian Digital for further
assistance. Read Section 1.7 on page 16 on how to contact Guardian Digital.
4.6.3 WebTool Access Control
This section allows you to control what IP addresses have access to the GD
WebTool. You should allow as minimum as possible. You can enter the IP addresses in a list, entering a new line after each entry.
108
User Guide
Section 4.6
Security
Choosing the Allow from all addresses option can place your system at the greatest
security risk.
4.6.4 System Access Control
This works similar to the WebTool Access Control section except these rules apply
system-wide.
Entering an IP address in the given IP Address field will give that IP Address the
ability to make an SSH connection to the Lockbox. Examples are given above the
IP Address field. Once you have that typed in click the Add Host button and your
new settings will appear below once the screen refreshes.
The Guardian Digital Linux Lockbox
109
THE GD W EB T OOL
Chapter 4
4.6.5 Edit Login Banner
This allows you to alter the login banner the user sees when they connect to the
system or login from the console. Just type in plaintext and hit save when finished. We recommend putting in a warning/disclaimer about illegally accessing
the system. It may be necessary to consult your security or legal department.
110
User Guide
Section 4.7
4.7
System Backup
System Backup
+
Backing up your system is one of the most crucial roles of system administration.
The system backup section allows you to completely backup all characteristics
of your system. You can backup configuration files, users home directories or
the whole system from here. You can restore backups, check for changed files,
schedule regular backup times, view backups and create new backups.
N OTE :
All backups are written to the local hard drive. You have the option to download an archive to your local machine.
4.7.1 Backup Maintenance
The Backup Maintenance section contains all your options for maintaining your
backups.
The main interface for Backup Maintenance is the pull down menu. You can select
your option here. When you make your selection click on the “Execute” button to
continue. The options in the pull down menu are explained below:
Create a New Backup This option allows you to backup your system with the
configuration listed in the pull-down menu. Each configuration is a set of
rules to tell the Lockbox what exactly you want to backup. You won’t be
creating a new backup rule here, but instead actually running the backup
process. More information on creating new backup rules is in the section
Schedule a Named Backup. Select a named backup from the pull-down
menu and hit Execute. Do NOT hit stop, back, or reload in your browser
while this is running. Your system is backing up and when it is finished
your screen will automatically refresh informing you if the back up was
successful or not. This can generally take a few minutes to run, depending
mostly on how much data you are backing up.
The Guardian Digital Linux Lockbox
111
THE GD W EB T OOL
Chapter 4
Restore a Backup This section is used to restore a previous backup. Any backup
you have made with the WebTool will appear listed here.
Simply select which backup you want to restore and click on the Execute button.
Only one backup can be restored at a time. This will overwrite the current data it
is restoring. Examples are given in the screen-shot above.
Delete a Existing Backup When you select to delete a backup you will be presented with a page that has a list of all your backups. You can select multiple
backups to delete by selecting the check-box for the specified backup listed.
When you have selected the appropriate backup, click Execute and it will
be deleted. Examples are given below in the screen-shot.
N OTE : Backups older that 45 days are automatically deleted.
112
User Guide
Section 4.7
System Backup
View the Contents of a Backup Selecting this option will bring up a screen similar the the Delete a Backup and Restore a Backup screens. You can select
one backup at a time and then click the Execute button. The resulting screen
will be a list of all the files in the backup. It will also list file permissions,
modified times, file paths, and file size.
See Which Files Have Been Changed Since Backup This section works like Section 4.7.1 View the Contents of a Backup on page 111. You can select your
backup and click Execute. The result will be a list of files that have changed
since the that backup and in what way they changed.
4.7.2 Schedule a Named Backup
To schedule a backup you will have a list of all your different named backups in
a pull-down menu. Select which backup you would like to schedule then, using
the other pull-down menu, select if you would like to make it weekly or nightly.
When you have made your selections click the Schedule button to set it.
Once the Lockbox enters the new backup into the schedule the page will reload
and you will see the backup listed in the Currently Scheduled Backups section.
All scheduled backups will be listed in that section.
You also have two other options in this section, New Named Backup and Delete a
Named Backup.
The Guardian Digital Linux Lockbox
113
THE GD W EB T OOL
Chapter 4
Creating a Named Backup
Selecting the New Named Backup option will bring up a new screen.
You will also notice a small section above the Create Named Backup section which
will contain a list of all current named backups. The main section contains four
fields:
Name The name will be a text name to label this backup with. This name will be
displayed on all the previous menus to represent the named backup.
Include Here you can list all the files or directories to be backed up. Separate
different filenames and directories by spaces. For example:
What to backup
What to enter in
whole system
some user directories
system logs
system log, kernel & home directories
/
/home/user1 /home/user2
/var/log
/var/log /home /boot
Exclude Exclude works the same way as include except that it excludes the specified directories and files. For example:
114
What to Backup
What to Exclude
Include
Exclude
home directories
whole system
user24’s home directory
/home
/home/user24
home directories and /usr/local
/
/home /usr/local
User Guide
Section 4.7
System Backup
Deleting a Named Backup
Here you will have the option to delete a backup. If you delete a backup from
here it will automatically remove all associated backup files, if it was set up to be
scheduled.
To delete a Named Backup select the name of the backup from the pull-down
menu and click the Delete button. You will then be presented with a screen informing you if the deletion was successful or not.
N OTE :
When deleting a Named Backup you are deleting a backup configuration
type, not actual backed up files. To do that refer to Delete an Existing Backup
above.
The Guardian Digital Linux Lockbox
115
THE GD W EB T OOL
4.8
Chapter 4
Changing a User’s Password
,
As discussed earlier the administrator has the ability to change a users password
from the GD WebTool. To increase security, the GD WebTool does not allow any
user but the administrator access to those sections of the WebTool. To allow a user
to change their own password themselves, a separate URL is provided. By going
to:
https://lockbox.guardiandigital.com:1022
The user can login with their normal login name and password. In the above
example replace lockbox.guardiandigital.com with the FQDN of your
server.
N OTE :
The address is very similar to the regular WebTool but notice the port you are
connecting to. The port 1023 is used for the WebTool, while 1022 is the
user password utility, as in the example above.
If the default Guardian Digital certificate still remains on the system the user will
be prompted to accept it. Instructions on accepting a certificate can be found in
Appendix E on page 234.
Once the user successfully logs in to the system they will be presented with the
following screen.
116
User Guide
Section 4.8
Changing a User’s Password
Here they must enter in their old password first, followed by their new password
twice. The new password is required twice to double check for typing errors.
When everything is entered in you may click the Change Password button for the
changes to take effect. These changes take effect immediately. Please note, you
can abort this process at any time by clicking the Abort button.
The Guardian Digital Linux Lockbox
117
-
5
G D U PDATE
One of the most important aspects of security is keeping up to date with the latest
software packages and bug fixes. Using the latest software will greatly increase
the overall security of your Lockbox. Included with your Lockbox is a utility that
will allow you to easily and securely keep your system up to date.
The GD Update utility is a section of the GD WebTool that will determine what
new software is available, and install any updated software. You will be prompted
to authorize all changes.
All new packages are downloaded directly from Guardian Digital via an SSL Secured connection to insure the highest degree of security and data integrity.
5.1
Running the GD Update
To start GD Update select the GD Update icon from the main menu. A connection
will be made with Guardian Digital’s servers.
If you haven’t logged into the GD WebTool during this session you will be required for your login name and password, which was assigned to you when you
registered your Lockbox.
You will have to wait a few moments as a list of new packages is created for your
Lockbox and compared to what is installed on your system. When the operation is
completed you will be presented with a screen similiar to the one in Figure 5.1a.
Here you will notice a list of packages that have been updated from what is currently installed on the system. If no packages have been updated the page will
return no new packages. You are presented with the name and description of the
packages, the priority of the package, if once the package is installed it requires
the Lockbox to be rebooted, and finally a checkbox to select whether or not to
download the package.
Once you have selected what packages to download by checking the correspsonding box, you can hit the Download Packages button. After a few moments the
packages you selected will download and install on your system. You will then be
presented with a screen similar to the on in Figure 5.1b:
You will have a list of the packages that were successfully installed and where they
were installed from. You system has now been updated with the selected packages.
You can click the Done button at this point to return to the GD WebTool.
Section 5.1
Running the GD Update
Figure 9: 5.1a - GD Update Example
Figure 10: 5.1b - GD Update Download Example
The Guardian Digital Linux Lockbox
119
6
L OCKBOX C ONNECTIVITY
So far the only way we spoke of to connect to your Lockbox was via the GD
WebTool utility. To gain remote access you have another secure alternative. We
provide SSH connectivity to your Lockbox.
Since telnet is extremely insecure, it is not provided on your secure Lockbox.
SSH uses 1024 bit encryption to protect your connection.
Secure Shell (SSH) is a program for logging into a remote machine, as well as for
executing commands on a remote machine. It is intended to replace rlogin and
rsh, and provide secure encrypted communications between two untrusted hosts
over an insecure network.
SSH connects and logs into the specified hostname. The user must prove his/her
identity to the remote machine using one of several methods depending on the protocol version used. For more information on SSH please visit www.openssh.
com, the OpenSSH Project home page.
Section 6.1
6.1
Connecting from Windows 9x/ME/NT/2000
Connecting from Windows 9x/ME/NT/2000
,
Windows-based systems only include telnet capability. Therefore, we have included a utility to make a secure connection to your Lockbox from a Windows
host. MindTerm is a secure SSH client included on your EnGarde CD-ROM that
was shipped with your Lockbox. It can be found in the
x:\dosutils\mindterm directory. Replace the ”x”, in the previous statement with the drive letter of your CD-ROM drive. Installation instructions are in
the next section.
MindTerm provides you the ability to make an SSH connection to your Lockbox.
You will be on a secure, 1024 bit encrypted connection. MindTerm performs
X-Term emulation. You also have SCP capabilities which allows you to copy
files securely over an SSH connection. SCP will be fully explained in the Menus
section.
6.1.1 Installing MindTerm
We have included an installer for Windows based systems to use. You can find
the installer in x:/dosutils/mindterm/setup.exe. You can type in the
command by clicking the Start button, then selecting Run. You can also click on
My Computer, select you CD-ROM drive, then the dosutils folder, followed by
the mindterm folder and finally selecting the setup.exe file. This will start the
MindTerm installer.
Once the installer starts, you will have a few options. You will have to choose
the directory you wish to install MindTerm into. The default is c:\Program
Files\mindterm. We suggest leaving the default. You can then select the
installer to create an icon on your desktop for MindTerm and/or an icon in your
Start Menu. These are both turned on by default.
Once you have made your selection, select Install, which will confirm your selections. If you are satisfied with your settings select Ok and MindTerm will
start installing. You will see all the MindTerm files scrolling in the window as
they are installed. When the installation is done a message box will appear saying: “MindTerm installation successful!”. You can close this box and now use
MindTerm. If you selected the option to install the icon on your desktop you
will see it there. If you also had the installer create the Start Menu icon you will
find Start Menu->Programs->MindTerm->MindTerm and Readme. The readme
is detailed information about MindTerm and how to use it. We will be covering a
general usage of MindTerm in the next section.
The Guardian Digital Linux Lockbox
121
L OCKBOX C ONNECTIVITY
N OTE :
Chapter 6
MindTerm is distributed free. There are other programs for Windows such as
TeraTerm and Secure-CRT that will also work with your Lockbox.
6.1.2 Running MindTerm
MindTerm uses a public/private key cryptography system to connect to your Lockbox. A public key is a key the user is assigned that can be given out to anyone. At
the same time they are also given a private key that no one can have. The public
key is then checked against the private key for authenticity. In the case of a Lockbox they private key is stored on the Lockbox and MindTerm passes the public
key to the Lockbox for authenticity.
You can start up MindTerm by either double clicking on the MindTerm desktop
icon or choosing it from the Start Menu, Start->Programs->Mindterm->Mindterm.
After a few moments you will be displayed with the MindTerm screen.
When you started up MindTerm you may have noticed a MS-DOS Prompt window
appear and it may be located behind your MindTerm window. You may minimize
this window but do not close it. The MS-DOS Prompt window will close when
you shutdown MindTerm.
122
User Guide
Section 6.1
Connecting from Windows 9x/ME/NT/2000
At this point you will need to set up MindTerm so that it knows where to connect
to, who you are and what key to use. First you must have a valid user on the
system you are trying to connect to. If you do not have a user, are uncertain of
the user name or forgot your password then contact your system administrator. To
view and/or modify any of the information mentioned please refer to Section 4.4.1
User Account Administration on page 70.
You are also required to have a key for the system. The key provides the encrypted information MindTerm requires including your password, to authorize
you to connect to the remote host. When your account was created by the system
administrator, a key should have been given to you. If you do not have this key
please contact your system administrator. To generate a new key refer to Section
4.4.4 Secure Shell Management on page 79.
To enter this information into MindTerm select Setting->SSH Connection...
This will pop up a window labeled “MindTerm - New Server”. Here you will need
to enter in the information mentioned above. Each field will be described below.
The Guardian Digital Linux Lockbox
123
L OCKBOX C ONNECTIVITY
Chapter 6
Server In this field you will need to enter in either the IP address or the name of
the server you are trying to connect to. In our example above we want to
connect to lockbox.guardiandigital.com. So lockbox.guard
iandigital.com was entered in to the server field.
Port This field should be preset to port 22, the default SSH port. We suggest
leaving this as is.
Username Here you will need to enter in the user name your system administrator has given you for the server. In our example we are trying to login
as user admin. This user name will automatically be passed to MindTerm.
So you will only need to supply a password when you login. admin was
entered in to the field.
Cipher In this field you will have a pull-down menu giving you a selection of
different cipher methods. A cipher is a method of encrypting plain text
information into encrypted information. There are several different methods. By default the Lockbox is set to use 3DES. Check with your system
administrator to see if they have changed the cipher.
Authentication Here you will need to select your authentication type. The authentication type is the method that will be used to authenticate you when
you log in. By default RSA is used. RSA uses a public and private key
scheme. When your account was created, you should have been given a key
to be used with the server. Forms of authentication other than RSA are not
supported on the Guardian Digital Linux Lockbox.
Identity Here is where you will enter in the path to your key. By default MindTerm
will search in c:\Windows\Java\mindterm for keys. It would be ap124
User Guide
Section 6.1
Connecting from Windows 9x/ME/NT/2000
propriate to place your key in this directory when it is given to you by your
system administrator. You can use the “...” button to browse through other
directories on your local machine. A key will generally end with .key.
Once all the information has been filled in you, can select the OK button to continue. You will be brought back to the screen you began on.
Once you click the OK button MindTerm will attempt to make a connection. If
you have never connected to the server before you will be asked if you want to
add the host to your host key list. Answer Yes to this question.
Once the dialog box is removed, if the connection was successful you will be
prompted for your password.
The Guardian Digital Linux Lockbox
125
L OCKBOX C ONNECTIVITY
Chapter 6
If you do not have the above screen then you most likely received an error. A
couple of common errors are:
Unknown Host: You will receive this error if the name or IP address of the host
was not found or is not responding. Check what you entered in the SSH
Options screen above.
Server refused our key You will receive this error if the key you are using does
not correspond to the key on the server. This can be caused if the key on
the server has changed, you are pointing MindTerm to the wrong key, or
your key is invalid. Double check your settings in the SSH Options. If you
are certain you are passing the correct key, then a new key may have to be
generated. Contact your system administrator if this is the case.
At the password prompt displayed above, enter in your password that was assigned
to you by your system administrator. If you entered in the password correctly you
will now be logged into the system.
126
User Guide
Section 6.1
Connecting from Windows 9x/ME/NT/2000
At this point you are ready to interact with the system.
Now would probably be a good time to save your settings. Saving your settings
allows MindTerm to store the information you entered into the SSH Connection...
dialog so you don’t have to re-enter the data in every time.
The Guardian Digital Linux Lockbox
127
L OCKBOX C ONNECTIVITY
Chapter 6
To save your settings select File->Save Settings.
To exit the system type exit. You will be brought back to the SSH Server/Alias:
prompt. At this point you can shutdown MindTerm by clicking the ’X’ in the corner or from the menu, File->Exit.
It is highly recommended that you log out of the server using the Exit command
before shutting down MindTerm so you are properly logged out.
6.1.3 Secure Copy (SCP)
The Secure Copy (SCP) is a method of copying files over a secured SSH connection. MindTerm supports SCP.
To copy files to and from the server via SCP you will first need to be logged into
the system. Read the section above on logging in with MindTerm. You will then
have the ability to SCP by selecting File->SCP File Transfer....
128
User Guide
Section 6.1
Connecting from Windows 9x/ME/NT/2000
Selecting the SCP File Transfer... option will bring you to the following screen:
Here you can select files and directories to copy to and from. Wildcards are also
accepted here.
You have a few options on this screen. The Change Direction button will change
The Guardian Digital Linux Lockbox
129
L OCKBOX C ONNECTIVITY
Chapter 6
whether you are copying files form your local machine to the server, or copying
files from the server to your local machine. Clicking on the button will reverse
this each time.
You will also notice there is a check-box for Recursive copy. This will allow you
to enter in a directory in the field you are copying from and it will automatically
copy everything in that directory and every directory below it.
Finally you have one last option, Low priority. Selecting this will allow the SCP
file transfer to take place in the background so you can work while it’s copying.
It will take longer to copy files using this method but it will also free system
resources and bandwidth.
When you are ready to start copying files you can click the Start Copy button.
MindTerm will then make an SCP connection to the server and start copying the
files. You will see the following dialog appear giving you the current status on the
file transfer.
Once the copy is finished you can click the Done button to close the dialog. If
you don’t need to transfer any more files at the moment you can click the Close
Dialog button in the SCP File Transfer dialog to close it.
You are now done copying your files and now may work with them.
130
User Guide
Section 6.1
6.1.4
.
Connecting from Windows 9x/ME/NT/2000
M ENUS
The easiest way to learn how MindTerm works and what features it provides is
to look through this brief walk-through of all menus in MindTerm. Given within
parentheses is the keyboard short-cut for each menu item where one exists.
File Menu
New Terminal (Ctrl+Shift+N) This will create a new MindTerm window with
the same settings as the first MindTerm window of this session, i.e. all parameters (command-line or applet) given to MindTerm at startup will have
effect in each new terminal created.
Clone Terminal (Ctrl+Shift+O) This will create a new MindTerm window with
the exact same settings as the window it is created from. If the window
contains a connected session, the new window will be automatically logged
in to the same SSH-server (using the same authentication as was used in the
original window). Note that the new window will not have any open tunnels
since the window from where it is created have the tunnels opened already
(preventing the new window from opening them).
Connect... (Ctrl+Shift+C) This launches the Connect dialog. From this dialog
you may either select to connect to a host whose settings you have saved or
you may create settings for a new host. Note when selecting New Server a
new dialog is shown which is identical to the one described in 4.3.1 SSH
Connection....
Disconnect (Ctrl+Shift+D) This forces the current session to be disconnected.
Note that this will cause all tunnels to be closed and the shell to be abandoned without logging out. The preferred way to disconnect is to logout in
the shell.
Load Settings... Loads settings from a file (extension . MTP) without connecting
to the server.
Save Settings (Ctrl+Shift+S) Saves current settings.
Save Settings As... Creates a new settings file and saves current settings to it.
Useful for creating a short name for a server, or for having more than one
set of settings for a specific server.
The Guardian Digital Linux Lockbox
131
L OCKBOX C ONNECTIVITY
Chapter 6
/
Create RSA Identity... Creates an RSA identity to be used with authentication
type rsa or rhostsrsa. Two files are created, one containing the private
key (default name identity’) and one containing only the public key (default name identity.pub’). The contents in the file with the extension .pub
must be copied to the file authorized_keys on the server (typically found in
~/.ssh/). These RSA key-files are identical to the ones used with the
Unix version of SSH.
SCP File Transfer... In this dialog you can choose files and/or directories to transfer to or from the SSH-server. Local file(s)/dir(s) is a space-separated list
of files and/or directories (if a name contains a space enclose it in quotes
like: a file with spaces). Normal regexp’s can’t be used for local files/dirs,
however names can be given with ONE wild-card (’*’) in it (e.g. *.foo
or foo*bar). If absolute path-names are not given the current directory is
assumed (defaults to MindTerm’s home-directory). If the first file/directory
given contains an absolute path-name this directory is used as current-directory
for the rest of the list (e.g. the list /tmp/foo* *.bar will expand to all
files starting with FOO or ending with . BAR in the directory /tmp’). Remote files(s)/dir(s) are given EXACTLY as they would be with the standard
Unix scp-client (i.e. regexps can be used). The directory assumed on the
remote side is the user’s home-directory (i.e. just like with the standard unix
scp-client).
To change direction of the copy-operation press the Change Direction button (the direction is indicated with the strings (source) and (destination)
after the respective side.
If directories are to be traversed enable Recursive copy. To make the copyoperation use as little bandwidth/CPU as possible set it to be Low priority.
Press Start Copy to start the copy operation. This will launch a small window with progress and statistics of the copy operation. A copy-operation
can be canceled at any time by pressing the Cancel button in this window.
Capture To File... Captures terminal-output to a file. Capture starts immediately
when the file has been selected and ends when this menu item is selected
again. Note that while capturing is active this is indicated by the menu item
being selected.
Send ASCII File... This will send the contents of the selected file to the terminal
as input (i.e. would be the same as if the contents were typed from the
keyboard)
Close (Ctrl+Shift+E) Closes this window. Note that when closing a window
without logging out you are aborting the SSH-connection abnormally, i.e.
132
User Guide
Section 6.1
Connecting from Windows 9x/ME/NT/2000
it is advisable to logout in the shell before closing/exiting MindTerm.
Exit (Ctrl+Shift+X) Closes all windows and exits MindTerm. Note that when
closing windows without logging out you are aborting the SSH-connection
abnormally, i.e. it is advisable to logout in the shell before closing/exiting
MindTerm.
Edit Note, the system clip-board is not available to applets by default. In this
case a local (to MindTerm) clip-board is used. Also note that in some implementations of the Java runtime the clip-board does not work with the
system clip-board.
Copy (Ctrl+Ins) Copies selected text to clipboard. Selection is done by clicking
and holding down left mouse-button while dragging the mouse over the area
to select.
Paste (Shift+Ins) Pastes the contents of the clipboard to the terminal as input (i.e.
would be the same as if typed from keyboard)
Copy & Paste Does a copy followed by a paste.
Select All (Ctrl+Shift+A) Selects all content in scroll-back buffer and in terminal.
Note, this operation is very time-consuming right now.
Find... (Ctrl+Shift+F) Shows Find dialog from which the scroll-back buffer and
terminal contents can be searched for words. The search can be done case
sensitive or case insensitive. Each word found is highlighted. The bell is
sounded when no more matches is found.
Clear Screen Clears screen and sets cursor position to upper left corner.
Clear Scrollback Clears contents of scroll-back buffer.
VT Reset Resets terminal-settings to default (e.g. clears line-draw graphics mode
which might be mistakenly set by displaying a binary file).
Settings
SSH Connection... (Ctrl+Shift+H) In this dialog you can set all SSH parameters. To view all options click the button More options.... When connected
you can set the parameters for the current session. Note that some changes
wont take effect until the next time you connect to this server. When not
connected a new session is created if one is not found with the name of the
server. In this case it is the same dialog that is shown when selecting New
The Guardian Digital Linux Lockbox
133
L OCKBOX C ONNECTIVITY
Chapter 6
Server... from the Connection dialog .
The parameters set in this dialog are (names as given in paragraph 5.):
server
Name (ip-address) of SSH-server port
Port
which SSH-server listens on username
User
name to login as on SSH-server
cipher
Name of block-cipher to use, or if none is
selected no encryption (note, no encryption is
normally not supported by the SSH-server)
authtyp
Method of authentication, or if custom... is
selected a comma- separated list of methods to
try in order given
x11fwd
Selects whether to allow X11-connections to be
forwarded or not
display
The local X11 display to forward X11 connections to
mtu
Maximum packet size to use alive Keep
alive
interval in seconds to use
portftp
Enables port-commands to be used with
FTP-tunnels, don’t enable this if you are not
sure what you are doing
realsrv
Real ip-address of SSH server if it is behind
address translation (used when portftp is enabled)
localhst Address to listen on for local tunnels
idhost
Sets whether to verify identity of the
SSH-server using its host-key through matching
with saved value in the file known_hosts
forcpty
Force allocation of PTY, e.g. necessary to
enable when executing a single command on the
SSH-serverthat requires a non-dumb terminal
prvport
Used to force the local outgoing port
of the connection to the SSH-server to use
a so called privileged port (i.e. < 1024)
134
User Guide
Section 6.1
remfwd
Connecting from Windows 9x/ME/NT/2000
Enables hosts other than the one running
MindTerm to connect through SSH-tunnels
Terminal... (Ctrl+Shift+T) In this dialog you can set the basic terminal parameters, such as terminal type, size, font and colors. The initial window position
can optionally also be set. It is given as a string with the syntax <+/-><xposition><+/-><y-position> a negative sign means it’s relative to the right
or bottom. A value of zero means aligned to the border (i.e. left, right, top,
bottom) e.g. +0-0 means aligned to bottom right corner.
The parameters set in this dialog are (names as given in paragraph 5.):
te
Terminal type
gm
Terminal geometry, number of lines,
columns and optionally initial position
fg
Foreground color, name or when custom rgb
is selected an rgb-value
bg
Foreground color, name or when custom rgb
is selected an rgb-value
cc
Cursor color, name or when custom rgb is
selected an rgb-value
Terminal Misc... (Ctrl+Shift+M) This dialog contains some extra settings for
the terminal.
The parameters set in this dialog are (names as given in paragraph 5.):
sl
Number of lines to save in scroll-back buffer
sb
Position of scrollbar, or disable scrollbar
sd
String containing delimiter characters that
are used when click-selecting words, i.e.
which characters functions as word-delimiters
bs
Indicates whether backspace or delete should
be sent when backspace-key is pressed
The Guardian Digital Linux Lockbox
135
L OCKBOX C ONNECTIVITY
Chapter 6
de
Indicates whether backspace or delete should
be
sent when delete-key is pressed
Local Command-Shell Starts the local command-shell from which one can view
and set all parameters of MindTerm. The command-shell is really only
useful if you don’t have menus (e.g. when running without a GUI) but for
completeness it is available here. Note, the command-shell is only available
if enabled with command-line option –c or applet-parameter cmdsh.
Auto Save Settings Enables/disables automatic saving of settings, when disabled
you must explicitly save settings to file when needed. When enabled settings are saved whenever you disconnect from a server or when you exit
MindTerm. Note that when both auto-save and auto-load is enabled (which
is default), settings-files are created automatically and the user never have
to worry about saving/loading them.
Auto Load Settings Enables/disables automatic loading of settings. When disabled you must explicitly load settings from file if you need to. When enabled, MindTerm tries to load a settings-file with the same name as what
you give at the SSH Server: prompt or in the (Settings -> SSH Connection...)
dialog. These files are located in the MindTerm home-directory. Thus the
server you give at the prompt does not necessarily have to be the name of
the server, it is mainly the name of the settings-file to load. Normally the
user does not have to worry about the settings-files since it is handled automatically. Though to create short-names for servers and to create multiple
settings-files for a single server you have to explicitly create settings-files.
Current Connections... This dialog lists the currently open connections through
the tunnels you have set up. Note that it doesn’t list the tunnels themselves,
only active connections through them. You can close a tunnel by selecting
it and clicking close.
136
User Guide
Section 6.2
6.2
Connecting from Unix
Connecting from Unix
,
The first thing you will need to connect to your Lockbox is an SSH client. For
Unix there is OpenSSH. You can download OpenSSH from
http://www.guardiandigital.com/tools. You will also find OpenSSL,
as you will need this too. If you wish to download OpenSSL you can find it at
http://www.guardiandigital.com/tools. A version of OpenSSL and
OpenSSH are included on the EnGarde CD-ROM.
If you are using Windows, use the included MindBright MindTerm software. You
can find it on the EnGarde CD-ROM under the dosutils directory. Instructions on
installation and usage can be found in the previous section.
6.2.1 Using OpenSSH
The first thing you will have to do is create a user. This is either done by logging in
as root at the console and running adduser or adding a user from the GD WebTool
utility.
If you use the GD WebTool utility to create the user read Section 4.4.1 User Account Administration on page 70 on how to accomplish this.
If you decide to create the user from the console use the following steps:
As the root user run adduser by typing adduser at the prompt. adduser will
prompt you for a user name. Enter the user name you wish to give this user.
Once this is done you will be back at the prompt. You now need to give this user a
password for them to use to access their account. Type passwd username. In place
of username will be the user name you assigned to the user. This will prompt you
for a password and then prompt you again for the password to confirm it.
Once that is done install OpenSSL and OpenSSH on your client machine.
N OTE :
You must be root during the installation of OpenSSL and OpenSSH.
On distributions using RPM:
$ rpm -Uhv openssl-0.9.4_i386.rpm
$ rpm -Uhv openssh-1.2.3_i386.rpm
In Debian (or any distribution using DPKG):
The Guardian Digital Linux Lockbox
137
L OCKBOX C ONNECTIVITY
Chapter 6
$ dpkg -i openssl-0.9.4.dpkg
$ dpkg -i openssh-1.2.3.dpkg
And from tar files:
$
$
$
$
$
$
$
$
$
$
tar zxvf openssl-0.9.4.tgz
tar zxvf openssh-1.2.3.tgz
cd openssl-0.9.4
./configure
make
make install
cd ../openssh-1.2.3
./configure
make
make install
You now must create a key for yourself. You can create a key with OpenSSH by
typing:
$ ssh-keygen
Generating RSA keys: ......ooooooO.................ooooooO
Key generation complete.
Enter file in which to save the key (/home/nick/.ssh/identity):
Enter passphrase (empty for no passphrase):
Enter same passphrase again:
It will prompt you for a filename to save the key in. The default identity.pub
will be fine. It will then prompt you for a new passphrase. After entering your
passphrase twice, your public key will then be generated.
Once you have your key e-mail it to your system administrator and they will insert
it in to the system properly. Read Section 4.4.4 Secure Shell Management on
page 79 for more information. Once this has been completed you will be able to
successfully SSH in to the system.
For more information on SSH and using SSH please read the SSH FAQ which can
be found at:
http://www.linuxsecurity.com/docs
138
User Guide
7
S E CURE E-M AIL
0
The Linux Lockbox provides two methods of retreiving your e-mail remotely,
secure IMAP and secure POP3. Both protocols have been secured using SSL and
both require clients that support SSL secured IMAP and secured POP3.
Securing IMAP and POP3 greatly increases the security and privacy of personal
e-mail. For this reason IMAP and POP3 are only available in a secure form and
therefore the standard, insecure form of IMAP and POP3 are not available on the
Lockbox.
Using a secure form of these protocols requires a client that can support them. We
will discuss how to configure both Netscape Mail for secure IMAP and Microsoft
Outlook for secure IMAP and secure POP3.
S ECURE E-M AIL
7.1
Chapter 7
Configuring Netscape Mail for Secure IMAP
,
The Netscape Communicator package includes Netscape Mail. Netscape Mail is
capable of both IMAP and POP3 but only supports IMAP in secure mode. Below
is a set of instructions for configuring your Netscape Mail for secure IMAP.
N OTE :
You must allow users to access their mail from their machine by adding in
their IP address in the System Access Control Section 4.6.4 on page 109.
To access the Netscape Mail you will first need to start Netscape. Once Netscape
is loaded you can launch the Mail by either selecting Communicator->Messages
or by clicking the mail icon in the lower corner of the browser window.
At this point the Netscape Mail window will appear. Now pull-down the Edit
menu and select Preferences from there.
After selecting Preferences the Preferences window will be displayed. From here
you will want to expand the Mail & Newsgroups section by click on the ’+’ found
in the box. You will then have a new group of options. We will start by configuring
our user name, e-mail address, etc. Click the Identity option from the menu tree
on the left.
140
User Guide
Section 7.1
Configuring Netscape Mail for Secure IMAP
Once the window appears fill in the appropriate information. When you are done
entering everything select Mail Servers from the menu tree on the left. This will
bring up the options for your incoming and outgoing e-mail servers.
The Guardian Digital Linux Lockbox
141
S ECURE E-M AIL
Chapter 7
We will start be creating a new server for the incoming mail. First delete the
default server Netscape includes by clicking on it and selecting the Delete button.
Then click the Add button.
142
User Guide
Section 7.1
Configuring Netscape Mail for Secure IMAP
You will be presented with the following dialog:
1
In the Server Name field you will need to enter in the name of the mail server
given to you by your system administrator. In the example above we used lockbox.guardiandigital.com.
Next we need to select the Server Type. Netscape Mail only supports secure IMAP
so select IMAP Server here.
Finally in the User Name field enter the user name you were assigned to by your
system administrator.
Next click the IMAP tab at the top of the dialog. You will be presented with a
number of IMAP options.
The Guardian Digital Linux Lockbox
143
S ECURE E-M AIL
Chapter 7
Here you will want to make sure all the checkboxes are turned off except for
the User secure connection (SSL) option. Your screen should match the number
above.
144
User Guide
Section 7.1
Configuring Netscape Mail for Secure IMAP
After closing the Mail Server Properies dialog you will see your mail server in
the window labled Incoming Mail Servers. Finally you will have to enter in the
server name for your outgoing e-mail. Enter in the outgoing server name given to
you by your system administrator in the Outgoing mail (SMTP) server field and
enter your user name in the Outgoing mail server user name field.
Once you have completed entering in the information click the OK button. The
Preferences dialog will close and you will see the server name appear in your mail
listing, where you Inbox is located.
The Guardian Digital Linux Lockbox
145
S ECURE E-M AIL
Chapter 7
You are now ready to receive mail from the Lockbox with Netscape Mail using
secure IMAP.
N OTE :
146
You must allow users to access their mail from their machine by adding in
their IP address in the System Access Control Section 4.6.4 on page 109.
User Guide
Section 7.2
7.2
Configuring Outlook for Secure IMAP and POP3
Configuring Outlook for Secure IMAP and POP3
,
Microsoft Outlook 2000 is capable of both IMAP and POP3 and supports both
protocols in secure mode. Below is a set of instructions for configuring Outlook
2000 for secure IMAP and POP3.
N OTE :
Outlook 2000 is required. Previous version of Outlook do not support these
features and will not work.
N OTE :
You must allow users to access their mail from their machine by adding in
their IP address in the System Access Control Section 4.6.4 on page 109.
Begin by starting up Outlook. Once Outlook is loaded you can create a new e-mail
profile by selecting the Tools menu and from there select Options.
N OTE :
If this is the first time you are using Outlook it will automatically start in the
Internet Connection Wizard section to create an e-mail profile. If this is the
case skip down in this section to the Internet Connection Wizard and start
from there.
At this point you will be presented with the Options screen. From here select the
Mail Delivery tab and click the Accounts button from within there.
The Guardian Digital Linux Lockbox
147
S ECURE E-M AIL
Chapter 7
You will now see the Internet Accounts dialog. Our objective is to create a new
e-mail profile first with basic information. Then edit the profile to allow for secure
POP3 or IMAP. So here we want to add the profile, so click the Add button.
148
User Guide
Section 7.2
Configuring Outlook for Secure IMAP and POP3
You will now be prompted with a small “pull-down” type menu. You have two
options in here Mail and Directory Service. Since we are creating a new e-mail
profile select the Mail option.
Now you will see the Internet Connection Wizard start. The Internet Connection
Wizard will go through a step-by-step process to create the basic account. Once
the basic account is created we will have to edit the account to accept secure e-mail
transfers.
The first step in the Internet Connection Wizard is to enter your full name. This is
the name that will be automatically displayed when someone receives e-mail from
you.
Once you have entered your name in click the Next button to continue.
The Guardian Digital Linux Lockbox
149
S ECURE E-M AIL
Chapter 7
Now you will be prompted for your e-mail address. This has most likely been
assigned to you by your system administrator.
Once you have entered in your e-mail address click the Next button to continue.
150
User Guide
Section 7.2
Configuring Outlook for Secure IMAP and POP3
You will now be presented with a few options. You first have the choice of using
POP3 or IMAP for your connection. Select this according to what your system
administrator recommends you use. For the remainder of this example we will be
using POP3.
You now have to enter the mail server you will be contacting. In our example
below our incoming mail server is the same as our outgoing server. In many
situations smtp.servername.com and mail.servername.com are used
for outgoing and incoming mail servers.
Once you have entered in the proper mail server addresses and selected the POP3
or IMAP protocol click the Next button to continue.
The Guardian Digital Linux Lockbox
151
S ECURE E-M AIL
Chapter 7
Now you will need to enter in some account information. First enter in your
account user name assigned to you by your system administrator followed by the
password. You can select the Remember password option if you wish for Outlook
to remember the password for future sessions.
You will also notice a checkbox for Secure Password Authentication (SPA). This
feature isn’t used with the Lockbox so leave it unchecked.
Once you have correctly entered in all the required information click the Next
button to continue.
152
User Guide
Section 7.2
Configuring Outlook for Secure IMAP and POP3
Now you will need to select which method you use to connect to the Internet.
Select the appropriate option and then click the Next button to continue.
The Guardian Digital Linux Lockbox
153
S ECURE E-M AIL
Chapter 7
You will now see a confirmation screen informing you the profile has been created.
Click the Finish button to continue.
154
User Guide
Section 7.2
Configuring Outlook for Secure IMAP and POP3
You will now be returned to the Internet Accounts dialog and will notice the profile
you created listed in the window in the Mail tab. At this point we have to setup
the profile to work with a secure server. Select the Properties button on the right.
The Guardian Digital Linux Lockbox
155
S ECURE E-M AIL
Chapter 7
Here you will see you have four tags, General, Servers, Connection and Advanced.
Select the Advanced tag to continue.
156
User Guide
Section 7.2
Configuring Outlook for Secure IMAP and POP3
You will now see a number of options in this screen. We are only concerned with
the options displayed below the Server Port Numbers section. You will want to
select the box below Incoming mail (POP3), this will say (IMAP) if you selected
IMAP as your server. Once you click the box you will see 995 appear in the text
field, or 993 if you selected IMAP instead of POP3 earlier. At this point you can
click the OK button to finish.
The Guardian Digital Linux Lockbox
157
S ECURE E-M AIL
Chapter 7
Your Outlook mail client is now configured to receive secure e-mail via POP3 and
IMAP.
N OTE :
158
You must allow users to access their mail from their machine by adding in
their IP address in the System Access Control Section 4.6.4 on page 109.
User Guide
8
A LL C OMMERCE
AllCommerce is a scalable Internet application which provides a total e-commerce
solution, including content, customer and inventory management. It is written in
Perl and licensed under the Gnu General Public License (GPL).
The purpose of this document is to provide AllCommerce administrators with
information needed to install, administer and customize the system.
A LL C OMMERCE
8.1
Chapter 8
Introduction to AllCommerce
2
8.1.1 Overview
AllCommerce’s sophisticated database system gives the administrator great flexibility, power and speed. Web content is delivered to the consumer from information bound at run time. The Web is literally spun out of customers responses. This
same late binding allows administrators customization capabilities beyond those
hitherto available in systems of this type.
Object-oriented programmers will be comfortable with the class system within
AllCommerce. Although not as sophisticated as most dedicated OOP platforms,
Perl provides a powerful system implemented within a surprisingly simple framework.
For AllCommerce, each object may have an arbitrary number of attributes (variants). This removes all linear restrictions and facilitates the implementation of
complex Web topologies. It also provides extensibility and enables complex host
applications to be run within the existing framework.
One such application is AllCommerce’s sophisticated search engine technology
which combines AI-like features with a built-in thesaurus to optimally associate
even obscure natural language entries to the correct targets. As an AllCommerce
installation matures, the search engine improves its performance by adding new
synonyms and their associated paths to the thesaurus.
The class system, aptly called lineage, is necessarily a crude one, with no inheritance capabilities. The class system’s best features aren’t familial. The key to its
power originates from how the class system handles the system state as stored in
the data tables.
With AllCommerce, there is a clean separation between the system state, and the
events which change the system state. The state remains static while received
events merely add to the accumulated history of the system. At any time the
system’s current state can be expressed as its static state plus the effect of all
accumulated events. By virtue of the class system, the union of all event classes
provides a map of all allowable state transitions–all others are forbidden.
For more documentation on Zelerate AllCommerce package please refer to their
Web site which can be found at http://www.zelerate.org.
160
User Guide
Section 8.2
8.2
Tutorial for Creating a New Store
Tutorial for Creating a New Store
3
This tutorial will cover step-by-step what needs to be done to create a fully working store. It is highly suggested that you read about the Guardian Digital WebTool
in Section 4 on page 34 since the WebTool is what will be used to complete this
process.
For this tutorial we will be creating the Guardian Digital On-Line Store with the
following parameters:
store.guardiandigital.com will be the URL for the store
4
4
the store will be using the CyberCash CashRegister to make purchases
8.2.1 Part I - Store Creation
Start by logging in to the GD WebTool from your local machine. Instructions on
logging in to the WebTool can be found in Section 4.1 Connecting and Logging
into the GD WebTool on page 35.
Once logged in you will be brought to the main screen. From this main screen
select Virtual Host Management.
Virtual Host Management contains all the utilities necessary for controlling virtual
hosts, SSL virtual hosts, logs for your hosts and store management.
At the bottom of this menu you will see AllCommerce Management. From this
menu you want to select Create a New Store.
N OTE :
If this menu does not appear then you may not have AllCommerce installed.
If you purchased the E-Commerce version of the Lockbox and this menu
does not appear please contact Guardian Digital.
The Guardian Digital Linux Lockbox
161
A LL C OMMERCE
Chapter 8
Store Creation - Step 1
You will now be at the first step for creating an on-line store. You will see the
following menu:
The first option that needs to be completed is the Fully-Qualified Domain Name
(FQDN). Here you will enter in the FQDN. If you purchased a domain name you
would enter that in here. For the Guardian Digital On-Line Store we are using
store.guardiandigital.com.
You can use a new domain name, such as www.gdstore.com as your store if
you own the domain. To buy domain you will need to contact a domain company
such as Network Solutions. Once you have purchased a domain you will need to
set up your DNS servers to point the IP address of your store. If you are using
a certificate on this store you will need a separate IP address for it, unless you a
sharing the certificate with multiple sites. Before you can set up the DNS properly
you will need to set up a Name Virtual Host. You will do this after creating the
store, so continue with configuring the store.
162
User Guide
Section 8.2
Tutorial for Creating a New Store
The next field asks you for the store identifier. This is a name that the Lockbox
will use to recognize your store. This name will not appear on your site anywhere.
For our example gdonline was used.
N OTE :
Only alphanumeric characters can be entered in here.
Administrator E-Mail Address is the next field. Here you can enter in the address
of the administrator of this store. This would most likely be either you or the
owner of the store. For our example we used [email protected]
for our address.
The next two catagories are for assigning file permissions correctly. To give the
store owner the ability to add images, edit their templates and do basic maintenance you will have to give them access to their own files.
The Guardian Digital Linux Lockbox
163
A LL C OMMERCE
Chapter 8
If the store owners name does not appear in the pull-down menu you will have to
create a new user and group for the store owner. To do this read Section 4.4.1 on
page 70.
In this first field select the store owners name. The store owner will be the owner
of all the files they need to edit. These files include templates and images only.
The remaining files are owned by the root user.
After selecting the store owner you will need to assign a group to the store. The
group given here will have access to edit images and temples and some maintenance files. This is most usefull if the store owner will have his own people editing
the store.
This group will only have access to edit templates and images and will have access
to execute tools and the stores maintenance files.
Once you have all this information filled in click the Next Step button to continue.
Store Creation - Step 2
You will now see the following menu:
164
User Guide
Section 8.2
Tutorial for Creating a New Store
The first option in this menu is the name of the store. This field can accept any
characters. The store name will show up on the customers pages and on the administrative pages, though this can be altered in the templates. In this tutorial we
used Guardian Digital On-Line Store.
After entering in the name of the store enter the zip code where you will be shipping your product from. The zip code is used to determine shipping costs for your
products. Since the Guardian Digital On-Line Store will be shipping products
The Guardian Digital Linux Lockbox
165
A LL C OMMERCE
Chapter 8
from Upper Saddle River, NJ, where we are located, the ZIP code, 07548, for
Upper Saddle River, NJ was entered in.
In this next field, Administrator Password you must select a password that the
administrator of the store will use. You will be prompted for this password when
you want to use the backend to maintain your store, adding and removing products, etc.. Choose a password that is impossible to guess and contains symbols as
well as alphanumeric characters. Although the password is blanked out with ’*’
when you type it in we used gd%$store1 for our password.
Here you are asked to confirm your password. Since you are unable to view your
password when you type it in initially you are asked again for it. This is done to
avoid accidental typing errors.
Now we have three e-mail address sections coming up. The first is the e-mail
address you wish to use for customer service. You have the ability to make a
166
User Guide
Section 8.2
Tutorial for Creating a New Store
“phoney” e-mail address that will actually be pointing somewhere else. For our
example we used [email protected]. Since that
address isn’t linked to a real person we have the e-mail being fowarded to several other addresses so that multiple people can get customer service related emails. This is known as e-mail aliasing. In Section 4.3.3 on page 42 you can read
more about aliasing and redirects. Also in Section 4.4.5 on page 82 can be found
information on configuring your mail accounts to maintain the e-mail addresses
properly.
After entering the customer service address in you will need to enter in the order
e-mail address.
And finally the e-mail address for web related e-mail.
The Guardian Digital Linux Lockbox
167
A LL C OMMERCE
Chapter 8
Now you have to select if you wish to use CyberCash as your payment software.
CyberCash is fully supported but other software will work as well, but will not be
configurable via the GD WebTool. For more information on obtaining a CyberCash account, setting up a merchant account with your bank and using CyberCash
refere to Section 8.3 on page 180. For information on configuring CyberCash with
the GD WebTool refer to Section 4.3.8 on page 64. For our example we chose to
use CyberCash.
Next you will need to enter the state in which the store resides, not where products
will be shipped from. This will help determine the amount of tax to charge a
customer.
168
User Guide
Section 8.2
Tutorial for Creating a New Store
This is the amount of sales tax that your state charges. The tax must be entered in
as a precentage. In New Jersey the state tax is 6%, so 06.00 was entered in.
5
Since every item in the store, user account and shipping is stored in a database
a database password is required for database access. We recommend following
the rules spoken of earlier in this example. We used store%$db in the example
below.
As above with the adminstrator password, verification is required. Enter in your
password again to confirm the password.
Finally we have one last e-mail address that needs to be supplied. This is the email address from which replies will be sent. Replies are sent for a number of
The Guardian Digital Linux Lockbox
169
A LL C OMMERCE
Chapter 8
reason including to confirm an order, when an order has been completed, when
there is a problem with an order, etc. The address follows the same rules we
spoke of earlier with the three previous addresses. For our example we used [email protected].
When you have finished entering in data for the necessary field click the “Next
Page” button to continue.
170
User Guide
Section 8.2
Tutorial for Creating a New Store
Store Creation - Step 3
The next screen you will need to configure your secure connection using SSL. SSL
will be used when a transaction is made in your store or when a user is entering in
personal information. You have three options to choose from first.
You can completely disable SSL if you like. We recommend you DON’T do this.
This will allow anyone to scan incoming and outgoing data during a transaction.
If you won’t be handling transactions then you may want to turn this off. You can
find more information about SSL and how it works with your store on page 66.
The Guardian Digital Linux Lockbox
171
A LL C OMMERCE
Chapter 8
Your second option is to upload a certificate and key. This is useful if you have
received a certificate signed and wish to use it with your store. If you don’t have
a certificate you will want to do the next step.
This gives you the option to create an unsigned certifcate. To get a signed certificate you will need to generate a CSR and submit it to a CA. Directions on how to
do this can be found on page 66. You may want to do this in the meantime until
you get a signed one. The advantage of having a signed certificate is it proves the
store validity to the customer ensuring them of a secure money transaction when
they make their purchases.
If you have a signed certificate and key and you wish to upload them then follow
these next few steps. If not skip past them to generate a new certificate and key.
This is asking you for the location of your SSL certificate. This is the location
on your local machine, not on the server. You can type in the location or use the
Browse... button to locate it. In our example we used a Windows machine to save
our certificate on and we saved it on the Windows desktop.
172
User Guide
Section 8.2
Tutorial for Creating a New Store
Once you have selected your SSL Certificate file you will need to supply the corresponding key. If you upload the wrong key your certificate will not work. This
will prevent the Web server from starting.
Once you have entered in your SSL Key you can click the Preview Store button to
continue.
If you don’t have a certificate and key to upload but do wish to use SSL to secure
your store then you will need to generate a certificate and key here.
The first entry box is the Authority Name. This is the name of the host the certificate will be used on. The GD WebTool will fill the field in automatically from
the information you entered in the previous steps. You should not need to change
this. We left the default in the example below.
Now we have to enter in the Organization. The GD WebTool will place the name
of the store in this field automatically. If the store name is the organization then
you can leave this field alone. Otherwise change it to the appropriate organization.
The default was used in our example.
The Guardian Digital Linux Lockbox
173
A LL C OMMERCE
Chapter 8
Next we have the Department. The department is a sub-catagory of the company
name. You should enter in the name of the department that has control over this
store. In the example below we used Sales.
An e-mail address is required next. This is an authoritive contact and does not
have to be an e-mail address with the stores domain. This can be an individuals address, for example the stores owner or system administrator. Questions
and other information regarding the certificate will be referenced and sent to this
address.
Next the name of the city in which the physical server resides is required. Enter
in the city name, a ZIP code is not required. In our example we used Upper
174
User Guide
Section 8.2
Tutorial for Creating a New Store
Saddle River, the location of Guardian Digital, Inc. Our servers are located
on the same location so it is valid to use that city name.
You must now enter the State in which the city you entered previously is located
in. In our example we entered New Jersey since Upper Saddle River is located
in New Jersey.
Lastly is the country. This is a two letter code for your country, for the United
States enter in US.
Upon completing all the required fields click the Preview Store button to continue.
The Guardian Digital Linux Lockbox
175
A LL C OMMERCE
Chapter 8
Store Creation - Step 4
You will now be presented with all your configuration options from the previous
steps. Double check over all the fields, and make changes if needed. If changes
were made you may click the Preview Store button to update the changes and view
them.
If everything is configured properly click the Create Store button to create the
store.
176
User Guide
Section 8.2
Tutorial for Creating a New Store
After clicking the Create Store button you’re browser will be waiting for a reply.
The server is creating your store. This will take a few moments. Please do not
stop your browser as this can interupt the store creation process and result in an
incomplete store.
6
Once the creation process has been completed you will be returned to the main
Virtual Host Management screen. You will be notified if there were problems
during store creation.
The store is now configured and stored on the system. There are still a few more
steps remaining before the store will be fully functional.
8.2.2 Part II - Name Virtual Hosts
We need to configure the server name properly so when someone goes to view
your site there is a route to get to the server. You will need to create a Name
Virtual Host.
From the main Virtual Host Management menu select Setup Name Virtual Host.
You will now be at the Name Virtual Host menu. If this is your first time here you
will only see a form to enter in name virtual hosts. If not, you will see a list of
your name virtual hosts above the form.
You will need to create two name virtual hosts for a store. What you need to enter
in is the IP address you will be using with the store. You will first have to enter it
and select port 80 for standard HTML transactions.
The Guardian Digital Linux Lockbox
177
A LL C OMMERCE
Chapter 8
After entering in the IP address click the Add New IP button. You will now see
the IP and port you just entered in displayed.
Now enter in the IP address again and select port 443. This is used to transfer
HTML over an SSL protected connection.
Again, after entering in the data click the Add New IP button. You will see the
port and address appear. You are now done setting up your name virtual host.
8.2.3 Part III - DNS Configuration
You now have your FQDN set up to an IP address for your store. You will now
need to set up your store so it can be accessed from the Internet. This is accomplished by entering in the proper information into your DNS. If you are behind a
firewall you may need to make configuration changed to it.
To properly configure DNS please refer to the documentation that came with your
DNS server. If your DNS server is a Guardian Digital Linux Lockbox then you
can get instructions in Section 4.4.6 on page 85. You will need the IP address and
the fully-qualified domain name (FQDN) to set up DNS.
8.2.4 Part IV - Firewall / Proxy Configuration
You will need your firewall documentation to configure your firewall to allow
costumers to access your store. You will need the following ports opened:
80
Standard HTML transactions
443
Secure HTML transactions
There is additional firewall and proxy server information that can be found in
Appendix D on page 228.
Once DNS is configured and your firewall is configured you’re store is ready to
start having items added to it and the layout done.
178
User Guide
Section 8.2
Tutorial for Creating a New Store
7
8.2.5 Part V - Store Content Configuration
The page layout is done through a series of templates. The templates are used to
generate the pages so you will not need to edit every page created each time.
You will also need to set up the products for sale in your store through the adminstrative back-end. There is too much information to cover in this brief tutorial.
However you can find documentation on the Guardian Digital website at:
http://support.guardiandigital.com
Once you have your items in your store and the layout completed you are ready to
open to the public.
The Guardian Digital Linux Lockbox
179
A LL C OMMERCE
8
8.3
Chapter 8
Using CyberCash CashRegister with Your Store
Guardian Digital, Inc. has modified the AllCommerce package included with your
Lockbox to have fully integrated support for the CyberCash CashRegister credit
card validation software. With this implementation you will be able to set up a
clean service for your customers to use their credit cards on-line for immediate
purchases. There are two main parts to setting up this service. First you will
need to set up the CyberCash account and banking services. Second you have to
configure the software. We will describe how to do both.
8.3.1 Setting up a Merchant Credit Card Account
Every merchant needs a merchant credit card account. Just as in the physical
world, a merchant on the Internet needs to establish a merchant account with an
acquiring financial institution in order to accept credit cards. Even if a merchant
already has a merchant account, they may not have the type of account required
for accepting transactions over the Internet. A typical merchant account set up
process can take anywhere from 48 hours to 14 business days to complete. However, CyberCash offers an online application that can give you approval in a matter
of minutes. You can also contact a CashRegister compatible financial institution.
This task is among the most critical to the success of the Web store. We recommend visiting CyberCash’s Web site and contacting them for more information,
www.cybercash.com.
You can skip the rest of this section if you are only going to be running CashRegister on a test basis.
N OTE :
You must run CashRegister in test mode if you do not have an account set up.
The following are guidelines and instructions to help merchants get started quickly:
8.3.2 About Merchant Accounts
There are two types of merchant accounts for accepting credit cards:
4
Card Present Account
This type of account requires the consumer and merchant to be physically at the
same location during the time of the transaction. For a card present transaction,
the credit card is typically swiped through a card reader (or physical point-of-sale
terminal), and the consumer signs an authorization slip, or sales receipt.
180
User Guide
Section 8.3
9
4
Using CyberCash CashRegister with Your Store
Mail Order/Telephone Order (MOTO) or Card Not Present Account
In a MOTO transaction, the merchant and shopper are not in the same physical location, and there is no card swiped or signature received. This method of payment
was originally adopted for mail order and catalog businesses. All Internet transactions are treated as MOTO transactions and require a MOTO merchant account.
If the merchant currently accepts credit cards but is not sure if he or she has a
MOTO account, he or she should contact a merchant financial institution. If the
merchant already has a MOTO account, he or she is ready to set up a merchant
account to accept online payments.
8.3.3 Fees and Rates
As a merchant initiates the process of setting up a relationship with an acquiring
financial institution, it is important to check more than one source to compare
costs. Fees and rates will vary widely, based on the financial institution and the
risks associated with the merchant, including the:
Type of products and services being sold
4
Market in which the merchant competes
4
Method in which products and services are being sold and delivered
4
The prices of these products and services
4
The expected volume of transactions
4
What forms of payment the merchant will accept
4
The merchant’s credit history
4
Regardless of these factors, a merchant should expect to pay the financial institution:
Application fee, set up fee or both
4
Discount rate (i.e. percent of each transaction), typically not more than 4%
4
4
Per-transaction and/or monthly fees
The Guardian Digital Linux Lockbox
181
A LL C OMMERCE
Chapter 8
Large fees for research, fraud and dispute resolution
4
4
Additional fees for value added services
Some banks will resell CashRegister services to merchants directly. These banks
may have their own CashRegister fee structure different from the CyberCash direct price.
8.3.4 Understanding Credit Card Processing Models
Not only are there many rules and regulations surrounding credit cards payments,
there are many procedures and processing methods to a transaction. For example, there are two parts to a credit card transaction: the authorization and the
capture. Within these types there are many processes that occur, including processing, billing, reporting, authorization, and settlement.
For more detailed information on establishing an Internet merchant account, and
to become more familiar with the several components of the credit card accepting
process, contact a financial institution for an overview of credit card processing
models.
8.3.5 Before Getting Started
Ask for a merchant handbook that explains how to accept credit card payments,
how to handle and resolve disputes, and how to process voids, returns and partial
credits. Also understand the rights of consumers and the rights of merchants,
and become familiar with Address Verification Services (AVS) and other fraud
detection mechanisms.
8.3.6 Setting Up a Merchant Account
New Account:
If a merchant does not currently have a MOTO account, the merchant must set
up a new account with an acquiring financial institution. There are a number of
financial institutions that have designed an account process specifically for Internet merchants by partnering with Internet payment services, such as CyberCash.
CyberCash offers an online application that can give you approval in a matter of
minutes. You may also contact a CashRegister compatible financial institution.
182
User Guide
Section 8.3
Using CyberCash CashRegister with Your Store
Existing Account:
If a merchant already has a MOTO account, he or she should contact his or her
financial institution or one of its agents to let them know they would like to use
CyberCash to accept Internet transactions. There are more than 26,000 financial institutions in the United States. CyberCash works with over 95% of those
financial institutions in the United States, allowing merchants to maintain their
relationships with their existing financial institutions. If the merchant’s financial
institution does not support CyberCash, the merchant can fill out an online application or contact a CashRegister compatible financial institution.
8.3.7 Setting up the Merchant Account to Accept Online Payments
Regardless of whether a merchant needs a new MOTO account or would like to
keep an existing MOTO account, a merchant should do the following to accept
credit card payments over the Internet:
1. Ask the financial institution if they are authorized to underwrite credit card
services to merchants.
2. Inform the financial institution to set up the merchant account to accept
credit cards over the Internet using the merchant’s choice of Internet payment services, such as CyberCash.
3. Ask the financial institution to explain the details of establishing a merchant account, including the application and approval process, the fees and
charges, and requirements for opening a deposit account for doing business.
4. Plan for the merchant account set up process to take from 48 hours up to 14
business days to complete.
8.3.8 After the Merchant Account is Approved
Once the financial institution approves the merchant for online commerce, the
financial institution will typically perform the following tasks:
1. Issue the merchant a Merchant ID (MID)
2. Issue the merchant a Terminal ID (TID)
The Guardian Digital Linux Lockbox
183
A LL C OMMERCE
Chapter 8
To process a merchant’s transactions, an Internet payment service typically requires specific information on the merchant’s account, including the MID and
TID. CyberCash, for example, accepts merchant account information from only
credit card processors to ensure the protection of this sensitive data from one
trusted source.
The credit card processor in this case would communicate the MID and TID to
CyberCash once the merchant’s account has been approved.
CyberCash will immediately add the merchant bank account information into the
Internet Merchant Registration (IMR) system. If the merchant has already registered for service, CyberCash will send an email indicating that the service is ready
to go live upon request from the merchant. If the merchant has not yet registered
with CyberCash, when the merchant uses the IMR, the pending bank account
information is automatically linked during the sign-up process to accelerate the
merchant’s ability to go live.
As the financial institution is processing the merchant’s account and working on
these tasks, the merchant can continue to integrate his or her storefront with the
payment component(s) and register with an Internet payment service.
Please refer to http://www.cybercash.com/cashregister/support/
for the latest information concerning CashRegister and to sign-up with CyberCash.
8.3.9 Editing the CashRegister templates
The CashRegister templates are store in
/home/httpd/store-name/bits/eng/html/mck. They are standard
HTML with a few variables thrown in where CashRegister knows where to place
variable information.
You can edit the templates via the GD WebTool by following the on-line instructions or edit them by hand. Here is a brief description of each template name and
what it contains:
customReceipt.tem Contains the receipt the user will see upon a successful transaction.
customRedirectResponse This is the page to be redirected to if you use the redirect option.
184
User Guide
Section 8.3
Using CyberCash CashRegister with Your Store
tempDifficulties.tem This page will display any errors that occurred trying to
connect to CyberCash’s systems.
:
failFullfillment.tem This page will display when there were problems with validating the credit card
scriptError.tem This page gets displayed when the script receives an unknown
message
thanks.tem The default “thank you for your purchase” page. Not used in this
implementation.
msw*.tem Templates for using Microsoft Wallet.
Please refer to http://www.cybercash.com for more information and updated documentation on the CyberCash CashRegister.
The Guardian Digital Linux Lockbox
185
9 The Linux Intrusion Detection System (LIDS)
9.1
Introduction to LIDS
With the rapid pace of development and open source nature of Linux, programs are
often evaluated for security vulnerabilities. Between the time the known security
vulnerabilities are found, additional protection is available to provide an extra
layer of security, until the system can be updated.
Since Linux is an art of the open source community, security holes may be found
more easily but can also be patched just as quickly and easily. But when the hole
is disclosed to the public, and the administrator is unable to patch the hole, it could
potentially compromise your system. With the typical Linux systems, a cracker
has absolute control if superuser access is gained. With the added protection of
LIDS, this and many other potential problems can be reduced.
LIDS provides the ability to control all access to files, processes, binaries, memory, raw devices, drives, etc. One of the main features of LIDS is protection from
the superuser, known on a Linux system as the root user.
N OTE :
LIDS requires advanced administration skills to manage properly and therefore should not be modified by inexperienced users.
The root user has control over every single aspect of the system. They can mount
and unmount drives, delete and create files, remove users, access the database,
Section 9.1
Introduction to LIDS
edit the Web page, shutdown the system, etc. So you can see the possible security
hazard here. If someone managed to gain root access, the entire system could be
put into the crackers control. Here is a number of security enhancements LIDS
has to protect the system from this threat.
;
Every single file can be protected. Giving each file its own set of read, write,
or append rules that even the root user must obey. For example, if you set
your log files to append only, no one could go in and delete any trace of
themselves on the system. You can set the login binary as read-only and it
can not be replaced. Even if there was a possible way to overwrite the file
LIDS would know it’s not the same file because it indexes the files by their
inodes, not their file names.
4
Files can also be completely hidden from view and only be accessible by
specific programs. For example, if you want to protect your Apache SSL
server key from everyone including root, you can hide the file so to every
user, including root, it doesn’t exist, but at the same time it allows Apache
to have full access to the file so it can get the information it needs from it.
4
LIDS can also protect processes from being killed by the root user. This
could be used to protect your database server, your Web server, your mail
server, etc. from being taken off-line by an intruder.
4
You can have full control of the Linux kernel “capabilities”. The current
Linux capabilities control what a process can and can’t do. Changing these
capabilities gives you more control over your system. By setting the capabilities to your needs you can prevent all users from rebooting the system,
mounting and unmounting disks, changing network settings, /dev control,
ownership control, loading and unloading of kernel modules, and many others.
4
Root has the ability to turn LIDS off locally for just the current session
or globally. This can be configured so it can only be done locally, and/or
remotely. It also requires a password which is protected by Ripe MD-160
encryption.
4
A built in port scanner allows you to disable promiscuous mode and still
detect port scans.
4
4
All attempts on the system are logged and if any user tried to break one of
the LIDS rules, an e-mail is immediately sent to a predefined e-mail address.
(A cell phone or a pager can be configured to be alerted when this happens
also so you know when someone is making an attempt on your system.)
The Guardian Digital Linux Lockbox
187
The Linux Intrusion Detection System (LIDS)
Chapter 9
Some minor drawbacks to this increased method of security is it could hinder
the use of certain programs by denying them access to needed files if configured
incorrectly. It also makes it more difficult to administer the system from the console but the included GD WebTool includes enhancements that integrate will with
LIDS.
188
User Guide
Section 9.2
9.2
8
Using LIDS
Using LIDS
LIDS is always running on your Lockbox. If you will be doing your administration
via the GD WebTool you can skip this section, but it’s suggested reading anyway.
Minimal maintenance is required to keep LIDS running. Management of LIDS
on servers that are co-located with Guardian Digital is included with your support
contract.
You may sometimes need to change the configuration or add new packages requiring you to disable LIDS. The GD WebTool will automatically enable and disable
LIDS while you administer the system. For adminstration from a shell, a program
called lidsadm is used to interface with LIDS.
First you have to disable LIDS. After logging in as root type:
/sbin/lidsadm -S -- -LIDS
This will prompt you for your password. After entering your password LIDS is
disabled for the current session you are in. This method will still apply all the
LIDS resource settings and rules to every other user on the system while you
administer the system. Optionally, issuing:
/sbin/lidsadm -S -- -LIDS_GLOBAL
will disable LIDS globally. While in this mode no LIDS rules will be applied to
any user or resource. Use this with caution. Once you have LIDS turned off you
may configure your capabilities, file permissions, resource permissions, etc. If
you changed the LIDS configuration while LIDS was turned off you will need to
reload the configuration file into LIDS. Before turning LIDS on enter this:
/sbin/lidsadm -S -- +RELOAD_CONF
This will make sure you have the latest configuration loaded into LIDS. It is suggested you run this command every time you make a change to the LIDS configuration. To turn LIDS protection back on after administration simply issue:
/sbin/lidsadm -S -- +LIDS
or to enable it globally:
The Guardian Digital Linux Lockbox
189
The Linux Intrusion Detection System (LIDS)
Chapter 9
/sbin/lidsadm -S -- +LIDS_GLOBAL
Your system is now protected again by LIDS. When enabling, disabling and reloading the configuration information with lidsadm you will be prompted for a password every time. You will see the following message:
SWITCH
WARNING: Only system administrators should enable/disable
LIDS. Disabling LIDS can open your Lockbox to possible attacks. Make sure you read the LIDS section in your included manual before manually changing options in LIDS.
Incorrect configurations can have drastic effects.
enter password:
At this point you can enter in your password.
9.2.1 Using the lidsadm Utility
The lidsadm utility is a small program you will use to administer your LIDS configuration. It stores all configuration information in /etc/lids/lids.conf.
If you are using the GD WebTool for administering LIDS you do not need to use
lidsadm.
Some basic lidsadm options are as follows:
/sbin/lidsadm -A Add a new entry
/sbin/lidsadm -D Delete an entry
/sbin/lidsadm -Z Delete all entries
/sbin/lidsadm -U Update all entries
/sbin/lidsadm -L List current entries, requires LIDS to be turned off
/sbin/lidsadm -P Creates a new password.
in Ripe MD-160 encryption
It will store the password
/sbin/lidsadm -S Switch LIDS on/off and capabilities
/sbin/lidsadm -r View current status of LIDS
/sbin/lidsadm -h Help
The next section will contain more detailed information about the lidsadm options
190
User Guide
Section 9.2
Using LIDS
<
9.2.2 Adding an Entry
Using this option allows you to add a new item to the LIDS config. You have
the options to add a single file with an attribute, give a file permission to override
another files permissions, and change the capabilities of a file.
lidsadm -A [-s subject] -o object [-t] -j TARGET
To protect a file enter the filename and path using the -o flag, followed by the
attribute, READ, WRITE, IGNORE, DENY, or APPEND under the -j attribute. If
your object is a capability setting you need to use the -t flag to tell lidsadm it’s a
special option. -s is used to point the object to a subject. In the case of capabilities
you, are pointing a capability to the subject or giving the subject the capability.
Same idea with file protections. If you deny access to a file but want the subject
to use it, you point to the denied file(object) to the file to give access to(subject)
then tell it what kind of access to give it -j. Here’s an example of protecting a file:
lidsadm -A -o /path/to/protected_file -j DENY
Now to give a binary full access to the file that was denied to everyone else:
lidsadm -A -s /path/to/binary \
-o /path/to/protected_file -j WRITE
We also want to give the binary the capability to chown, which has been disabled
earlier by LIDS:
lidsadm -A -s /path/to/binary \
-t -o CAP_CHOWN -j INHERIT
When changing a files capabilities we use INHERIT or NO_INHERIT instead of
the READ...APPEND commands. Using INHERIT gives the file access to the
capability while the NO_INHERIT turns off the files abilities to use the given
capability. In a later section capabilities are explained in more detail. In the next
session an example of a package being protected is given.
N OTE :
Don’t forget to do a lidsadm -S – +RELOAD_CONF after changes were made
so they take effect when you reload LIDS.
The Guardian Digital Linux Lockbox
191
The Linux Intrusion Detection System (LIDS)
Chapter 9
=
9.2.3 Deleting an Entry
Deleting an entry is an extremely simple task and there is no need to go into great
detail. If there is a file you no longer want to be protected or wish to change
protection on, you need to delete the entry from the LIDS config. Simply issue
the following command to accomplish this task:
lidsadm -D [-s file] [-o file]
and the file will be removed from the configuration. You can now enter new
attributes for the file, if you like.
9.2.4 Deleting and Updating All Entries
Lidsadm gives you the ability to delete and update all the file entries in your configuration. Issuing:
lidsadm -Z
will delete every entry in your LIDS configuration and you will be starting with a
clean configuration file. The original configuration shipped on your box is stored
in /usr/bin/lids_default_config/ and can be executed to revert LIDS back to it’s
original configuration.
Updating all the file entries works a little differently. The configuration files are
linked to LIDS by their inode number, not their filename. If a file gets deleted
and replaced later it may not be protected by lids because of the inode change. By
issuing:
lidsadm -U
lidsadm will go through your configuration and check every file making changes
as necessary. This should be ran if you upgrade a package too since it’s more than
likely one or more of the files will be overwritten and the inode will change.
192
User Guide
Section 9.2
Using LIDS
7
9.2.5 Password Creation
LIDS uses a user defined password it stores in encrypted form(Ripe MD-160), in
/etc/lids/lids.pw. To create a new password simply type:
lidsadm -P
It will prompt you twice for your new password and then change the password.
This will obviously only work if LIDS is turned off. Once you have done this
every time you need to reload the configuration and turn LIDS on or off you will
have to enter your password in plaintext.
9.2.6 Viewing LIDS Status
You can use:
lidsadm -r
to view the current running status of LIDS. This can be useful for writing scripts
that need to know if LIDS is turned on or not.
9.2.7 Viewing the Current LIDS Configuration
You can use the:
lidsadm -L
option to view a list of all the files and their attributes in the configuration. You
must have LIDS disabled to run this command since it requires access to the
/etc/lids/lids.conf file.
The Guardian Digital Linux Lockbox
193
The Linux Intrusion Detection System (LIDS)
9.3
>
Chapter 9
Protecting Your Files
The Linux Lockbox comes with a default configuration for protecting your files
based on your configuration options and installed packages. If packages are removed, or added LIDS will have to be updated. Most of this can be easily accomplished using the GD WebTool application.
If you wish to do administration of LIDS from the console you will need to use the
lidsadm program. Using the commands described in the previous section we will
remove, add and update files on the Lockbox. Before any administration can be
done you must first turn off LIDS. Turn LIDS off only on your session. Unless you
are working in multiple sessions and feel safe leaving your system unprotected for
the time.
lidsadm -S -- -LIDS
Now with LIDS disabled you can proceed with your work.
9.3.1 An Example: Protecting a Freshly Installed Package
For this example we added a package called my_package.rpm. my_package.rpm
has a configuration file in /etc, a binary in /sbin, a log is kept
/var/log/my_package.log and stores user data in /var/lib/my_pack
age/. my_package.rpm also requires setuid and setgid access. Without reconfiguring LIDS this application won’t function properly. Here is what needs to
be done to add this package to your LIDS configuration. Issuing the following
command will give you a list of the files an RPM uses. Though it won’t tell you
if it needs, read, write and/or append access to them.
rpm -qpl package_name.rpm
The first thing we want to do now is protect the configuration file. The configuration file never needs to be changed by the program so we can give it READ access
only. If you want to make changes in the future simply disable LIDS, make your
changes and enable LIDS. Here is how to protect our config file for READ only
access:
lidsadm -A -o /etc/my_package.conf -j READ
194
User Guide
Section 9.3
Protecting Your Files
Now the file is in the LIDS configuration file and set as read only. We used the -A
option to ADD a new object. The -o object is the file my_package.conf and it’s
-j attribute is READ. Valid attributes are READ, WRITE, APPEND, DENY, and
IGNORE.
N OTE :
These are case sensitive and therefore must be written in all upper case letters.
We have successfully protected the configuration file. Next we will tackle the log
file. The log file is simply a file that maintains a list of program events. The file
never changes previous information and therefore can be set to APPEND only. So
we issue a similar command as the one used for the configuration file:
lidsadm -A -o /var/log/my_package.log \
-j APPEND
This command is almost the same as above except we set the log file to APPEND.
Next we want to protect the user data. We want to be able to read and write to the
user data, but we don’t want root to have the ability to view the data, since it could
be private information. This is also a secure method of protecting sensitive data
from an intruder, if they gain root access. First we have to deny everybody access
from the user data. There could be a slight problem if the user data directory
contains dozens, maybe hundreds of files. This could be quite cumbersome typing
in each file name into lidsadm. Well the lidsadm program allows you to protect a
directory and everything under it. So now lets protect the directory:
lidsadm -A -o /var/lib/my_package/ -j DENY
Now everyone is denied access to that directory and everything in it. In fact, if
you get a directory listing of /var/lib the my_package/ directory will
not even be visible. So now it’s safe. Too safe now actually. You have to give
your my_package binary access to the data for it to run properly. To give the
binary, and only the binary, access to the data, we can issue this command:
lidsadm -A -s /sbin/my_package_binary \
-o /var/lib/my_package -j IGNORE
Once that is issued it gives /sbin/my_package_binary full access to everything in the /var/lib/my_package directory. In the example above we
The Guardian Digital Linux Lockbox
195
The Linux Intrusion Detection System (LIDS)
Chapter 9
-A added a new -o object but this time linked it to a -s subject. So now the user
data is completely protected and is not hindering the usage of the my_package
application.
?
Finally we need to protect the binary from being deleted. So we can simply set it
as read only. We can use the same command that we used for the config file:
lidsadm -A -o /sbin/my_package_binary -j READ
When initially securing the system the entire /sbin directory was protected.
To add /sbin/my_package_binary separately you can do what was done
above or you can update all the items in the LIDS config. Doing this will add the
/sbin/my_package_binary to the config
lidsadm -U
We are now left with one last problem. The my_package_binary needs setuid and
setgid permissions to run properly. By default the setuid and setgid capabilities are
disabled by LIDS (more concerning capabilities will be explained in the following
sections). Using lidsadm you can assign capabilities to a specific file. The lidsadm
command is similar to adding a file:
lidsadm -A
-o
lidsadm -A
-o
-s /sbin/my_package_binary -t \
CAP_SETUID -j INHERIT
-s /sbin/my_package_binary -t \
CAP_SETGID -j INHERIT
Now the /sbin/my_package_binary will inherit the setuid and setgid capabilities in the kernel giving it permission to use. The -t flag is used to tell lidsadm
the object is special, or not a file in this case.
To make certain everything in your LIDS configuration is set properly issuing a:
lidsadm -L
will present you with a list of all the items in the configuration and their attributes.
You must have lidsadm turned off to use this option. Now the entire package is
done. Reload the config into LIDS and finally enable LIDS again:
196
User Guide
Section 9.4
Protecting Your Files
lidsadm -S -- +RELOAD_CONF
lidsadm -S -- +LIDS
@
Now you are ready to go.
When LIDS is initially configured for your Lockbox a script was created that
contains all file attributes. This script can be run at any time to reset you back
to the system defaults. Additionally you can create your own script file for any
additions you make. This makes it much easier if you make a mistake and have
to start over from scratch. A simple command to launch your script will put you
back where you were instead of typing everything back in. If you are using the
GD WebTool this is already done for you. The script can be something basic, here
is a sample script using the example above:
#!/bin/bash
#
### LIDS configuration - 9/13/00
#
#### Configuration for my_package.rpm
#
lidsadm -A -o /etc/my_package.conf -j READ
lidsadm -A -o /var/log/my_package.log -j APPEND
lidsadm -A -o /var/lib/my_package/ -j DENY
lidsadm -A -s /sbin/my_package_binary \
-o /var/lib/my_package -j IGNORE
lidsadm -A -o /sbin/my_package_binary -j READ
lidsadm -A -s /sbin/my_package_binary -o CAP_SETUID \
-j INHERIT
lidsadm -A -s /sbin/my_package_binary -o CAP_SETGID \
-j INHERIT
#
#### End my_package.rpm configuration
You can even add this to your /etc/rc3.d/ (/etc/rc.d/rc3.d/ for RedHat systems)so
the LIDS configuration is freshened on every boot up. Just make sure it’s done
before the kernel is sealed (lidsadm -I). More information about sealing the kernel
is explained in later sections.
If this package is ever removed you will have to delete the entries. Using the
script method above, delete out all the entries then lidsadm -Z and run all the
scripts again. Otherwise you can issue a lidsadm -D for each file entry you have.
For files with multiple entries, you only need enter it in once. Lidsadm will delete
all entries for that file.
The Guardian Digital Linux Lockbox
197
The Linux Intrusion Detection System (LIDS)
9.4
Chapter 9
Kernel Capabilities
A
When a process is created it is given a set of capabilities from the kernel. These
capabilities tell the process what it can and can not do. LIDS gives you the ability
to alter these capabilities in the kernel. You can set the capabilities to apply to
all processes or only specific processes. We saw how to apply capabilities to only
specific processes previously in the Adding an Entry section and in the above
example.
The default capabilities set that LIDS used is defined in the /etc/lids/lids.
cap file. This file contains a list of the capabilities by name, with a number and
a + or - symbol before it. A + enables the listed capability following it and a disables it. Before each capability is a description of what the capability does.
We suggest you keep the default capabilities. You can also find a list of all the
capabilities and definitions at the end of this section and by just typing lidsadm
or lidsadm -h. Issuing:
lidsadm -I
sets all the capabilities listed in the /etc/lids/lids.cap file. By default,
in the Lockbox, the command is entered into the /etc/rc.local file so the
kernel is sealed during boot up. When LIDS is disabled the capabilities return to
their original settings and when you enable the kernel again they return to their
previous state.
Earlier we set capabilities to a binary. We were actually linking a capability a
process the binary creates:
lidsadm -A -s /path/to/binary -t -o CAP_NAME
All processes, however are protected from being killed by anyone but the owner
of the process. This too can be avoided with the above process.
9.4.1 Capability Names and Descriptions
Here is a list of all the capabilities supported by LIDS and what their function is.
CAP_CHOWN In a system with the _POSIX_CHOWN_RESTRICTED option
defined, this overrides the restriction of changing file ownership and group
ownership.
198
User Guide
Section 9.4
Kernel Capabilities
CAP_DAC_OVERRIDE Override all DAC access, including ACL execute
B
access if _POSIX_A
CL is defined. Excluding DAC access covered by CAP_LINUX_IMMUTABLE.
CAP_DAC_READ_SEARCH Overrides all DAC restrictions regarding read
and search on files and directories, including ACL restrictions if _POSIX_ACL
is defined. Excluding DAC access covered by
CAP_LINUX_IMMUTABLE.
CAP_FOWNER Overrides all restrictions concerning allowed operations on files,
where the file owner ID must be equal to the user ID, except where CAP_FSE
TID is applicable. It doesn’t override MAC and DAC restrictions.
CAP_FSETID Overrides the following restrictions that the effective user ID
shall match the file owner ID when setting the S_ISUID and S_ISGID
bits on that file; that the effective group ID (or one of the supplementary
group IDs) shall match the file owner ID when setting the S_ISGID bit on
that file; that the S_ISUID and S_ISGID bits are cleared on successful
return from chown(2) (not implemented).
CAP_KILL Overrides the restriction that the real or effective user ID of a process sending a signal must match the real or effective user ID of the process
receiving the signal.
CAP_SETGID
Allows setgid(2) manipulation
4
Allows setgroups(2)
4
Allows forged gids on socket credentials passing.
4
CAP_SETUID
Allows set*uid(2) manipulation (including fsuid).
4
4
Allows forged pids on socket credentials passing.
CATP_SETPCAP Transfer any capability in your permitted set to any pid,
remove any capability in
your permitted set from any pid.
The Guardian Digital Linux Lockbox
199
The Linux Intrusion Detection System (LIDS)
Chapter 9
CAP_LINUX_IMMUTABLE Allow modification of S_IMMUTABLE and
C
S_APPEND file attributes.
CAP_NET_BIND_SERVICE Allows binding to TCP/UDP sockets below
1024.
CAP_NET_BROADCAST Allow read/write of device-specific registers
CAP_NET_ADMIN
Allow broadcasting, listen to multicast.
4
Allow interface configuration
4
Allow administration of IP firewall, masquerading and accounting
4
Allow setting debug option on sockets
4
Allow modification of routing tables
4
Allow setting arbitrary process / process group ownership on sockets
4
Allow binding to any address for transparent proxying
4
Allow setting TOS (type of service)
4
Allow setting promiscuous mode
4
Allow clearing driver statistics
4
Allow multicasting
4
CAP_NET_RAW
Allow use of RAW sockets
4
Allow use of PACKET sockets
4
CAP_IPC_LOCK
Allow locking of shared memory segments
4
4
200
Allow mlock and mlockall (which doesn’t really have anything to do with
IPC).
User Guide
Section 9.4
Kernel Capabilities
CAP_IPC_OWNER Override IPC ownership checks.
D
CAP_SYS_MODULE Insert and remove kernel modules.
CAP_SYS_RAWIO
Allow ioperm/iopl and /dev/port access
4
Allow /dev/mem and /dev/kmem access
4
Allow raw block devices (/dev/[sh]d??) access
4
CAP_SYS_CHROOT Allow use of chroot()
CAP_SYS_PTRACE Allow ptrace() of any process
CAP_SYS_PACCT Allow configuration of process accounting
CAP_SYS_ADMIN
Allow configuration of the secure attention key
4
Allow administration of the random device
4
Allow device administration (mknod)
4
Allow examination and configuration of disk quotas
4
Allow configuring the kernel’s syslog (printk behavior domain name)
4
Allow setting the domain name
4
Allow setting the host name
4
Allow calling bdflush()
4
Allow mount() and umount(), setting up new smb connection
4
Allow some autofs root ioctls
4
Allow nfsservctl Allow VM86_REQUEST_IRQ
4
Allow to read/write pci config on alpha
4
4
Allow irix_prctl on mips (setstacksize)
The Guardian Digital Linux Lockbox
201
The Linux Intrusion Detection System (LIDS)
Chapter 9
Allow flushing all cache on m68k (sys_cacheflush)
4
E
Allow removing semaphores
4
Used instead of CAP_CHOWN to chown IPC message queues, semaphores
and share memory
4
Allow locking/unlocking of shared memory segment
4
Allow turning swap on/off Allow forged pids on socket credentials passing
4
Allow setting read-ahead and flushing buffers on block devices
4
Allow setting geometry in floppy driver
4
Allow turning DMA on/off in xd driver
4
Allow administration of md devices (mostly the above, but some extra ioctls)
4
Allow tuning the ide driver Allow access to the nvram device
4
Allow administration of apm_bios, serial and bttv (TV) device
4
Allow manufacturer commands in isdn CAPI support driver
4
Allow reading non-standardized portions of pci configuration space
4
Allow DDI debug ioctl on sbpcd driver
4
Allow setting up serial ports
4
Allow sending raw qic-117 commands
4
Allow enabling/disabling tagged queuing on SCSI controllers and sending
arbitrary SCSI commands
4
Allow setting encryption key on loopback file system
4
CAP_SYS_BOOT Allow use of reboot()
CAP_SYS_NICE
Allow raising priority and setting priority on other (different UID) processes
4
4
202
Allow use of FIFO and round-robin (realtime) scheduling on own processes
and setting the scheduling algorithm used by another process.
User Guide
Section .0
Kernel Capabilities
CAP_SYS_RESOURCE
F
Override resource limits. Set resource limits.
4
Override quota limits.
4
Override reserved space on ext2 file system
4
NOTE: ext2 honors fsuid when checking for resource overrides, so you can
override using fsuid too
4
Override size restrictions on IPC message queues
4
Allow more than 64hz interrupts from the real-time clock
4
Override max number of consoles on console allocation
4
Override max number of keymaps
4
CAP_SYS_TIME
Allow manipulation of system clock
4
Allow irix_stime on mips
4
Allow setting the real-time clock
4
CAP_SYS_TTY_CONFIG
Allow configuration of tty devices
4
4
Allow vhangup() of tty
The Guardian Digital Linux Lockbox
203
G
A
Q UICK S TART G UIDE
This appendix is intended to give an overview of the functions of the Guardian
Digital WebTool. After reading this appendix, the reader should be able to perform
the steps required to set up a domain to receive mail, configure DNS services, and
serve Web pages. If your Lockbox will not be used to perform all of the functions
listed above, it is especially important that you read the User Guide and have a
full understanding of each of the services you will be configuring.
Before following the example below, your Lockbox should have already undergone initial configuration and be plugged in and operating on a network. Information regarding the initial configuration can be found in Section 3 Installing your
Lockbox on page 22.
To obtain a fast and most accurate setup, follow the steps in the described order.
Once you have successfully completed each step, proceed in order to the next step.
There are four primary steps required to configure the Lockbox:
1. Configure the network interface
2. Configure the DNS Server
3. Configure the Mail Server
4. Configure the Web Server to prepare for normal and secure websites
After the initial configuration of your Guardian Digital Linux Lockbox, the basic
system and networking functions are operating correctly and is ready to configure
a sample store. We will be configuring our example Lockbox to use the following
initial values entered when the Lockbox was configured:
Hostname: myserver
Domain Name: mydomain.com
IP Address: 192.168.1.70
Netmask: 255.255.255.0
Gateway: 192.168.1.1
Primary DNS Address: 192.168.1.70
Section A.1
Network Interfaces
Secondary DNS Address: 192.168.1.60
In this example, we will be creating the domain linuxlockbox.com that will
be hosting our DNS, routing mail, and serving web pages.
A.1 Network Interfaces
Before any interfaces are created you will need to know the following:
Each SSL-based website requires its own IP address. If more SSL-based
websites are to be served, then a new interface must be created on another
IP address for each website.
4
4
There can be many normal websites on the same IP address, given a Name
Virtual Host defined in the Web server. See the Section 4.3 Virtual Host
Management on page 39 in the User Guide for more information on Name
Virtual Hosts.
Example:
In the WebTool, click on System Management, and then click on Network Configuration. There will already be an interface defined as:
We want to set up a separate IP address for www.linuxlockbox.com, since
we will be creating a Secure Web Server on it. Click on Add a New Interface to
do this. We are now prompted for our information, at which point we enter:
IP Address: 192.168.1.71
Netmask: 255.255.255.0
After clicking the Create button the Persistent Interfaces screen will look like:
The Guardian Digital Linux Lockbox
205
Q UICK S TART G UIDE
Appendix A
We have now successfully configured our network interface.
A.2 DNS Server
The DNS Server is the mechanism that provides name to IP address, and IP address to name mappings. It also provides the information necessary for mail to
be properly routed. DNS was created because IP addresses are often hard to remember. DNS is used to map that address to a name, which is much easier to
remember.
When typing http://www.guardiandigital.com into a Web browser,
for example, the DNS server translates the host name (www.guardiandigital
.com) into the IP address associated with www.guardiandigital.com. The
browser then sends the request to that IP address and responds with the information available at that address.
DNS contains a number of unique characteristics about each host. Each characteristic forms a ’record’ in the database that stores the DNS information. DNS
"zones" are regions of IP addresses or names for which a particular organization
is responsible.
Address Records This is a record that provides a host name to be assigned to an
IP address. All host names are associated with an IP address.
Name Server Records This is a record that defines what name servers are responsible for the zone. In most cases, this will be the same as the hostname
of the machine. Do not alter these records unless you have an explicit reason
to.
Name Alias Records This is a record which provides an "alias" for a pre-existing
host name. There may be multiple aliases for a single host name.
Mail Server Records This is a record which provides the information necessary
to correctly route mail to correctly deliver electronic mail. Multiple e-mail
servers may be defined for the same domain, each with a differing priority.
Servers defined with a lower number have a higher priority and mail will be
delivered to these hosts first.
206
User Guide
Section A.2
DNS Server
Example:
H
Because we are creating a new domain (linuxlockbox.com), we must create
a new forward zone for it. Before your Lockbox can be configured to provide
DNS for this domain, it must have been listed among the list of authoritative name
servers for this domain.
From the System Management menu, select DNS Management. The next step will
be to create a new master zone. Click on the Create a New Master Zone link.
Leave the Forward (Names to Addresses) button checked since that is the type of
zone to be created. Keep the default value of Master server. The rest the input
looks like:
Domain name: linuxlockbox.com
Email Address: [email protected]
Leave the Allow transfers from... set to Allow None, and the Allow queries from...
set to Allow Any. For more information on these fields please refer to the full
manual.
Click on the Create button to see the new zone in the zone listing. To add the
records for our example, click on the linuxlockbox.com link.
Address Records
Hostname: www.linuxlockbox.com
Address:
192.168.1.71
Hostname: mail.linuxlockbox.com
Address:
192.168.1.71
Name Alias Records
Alias:
sales.linuxlockbox.com
Real Name: www.linuxlockbox.com
Mail Server Records
The Guardian Digital Linux Lockbox
207
Q UICK S TART G UIDE
I
Appendix A
Mail Server: mail.linuxlockbox.com
Priority:
10
At this point we have successfully created www.linuxlockbox.com and mail
.linuxlockbox.com to go to 192.168.1.71.
We have now successfully configured the DNS records for our sample domain.
A.3 Mail Server
The mail server provides the mechanism to deliver e-mail to a recipient on the Internet. When an e-mail is sent, the mail server is instructed to deliver the message
to the remote mail server responsible for the recipient’s domain.
Example:
To configure e-mail for our new domain, we must create a new Mail Domain.
From the System Management section select Mail Server Management. Then select Domain Management.
We want to Create [a] New Domain with the following values:
Domain: linuxlockbox.com
Postmaster: ryan
This assumes that there is a user named ryan on the system. Now the Lockbox
has been configured to receive mail for linuxlockbox.com. The local user
ryan has been defined as the Postmaster. More information on the "Postmaster"
account is available in Section 4.4.5 Mail Server Management on page 82.
Once the mail domain is created, individual user accounts can be added by clicking on the linuxlockbox.com link:
Example 1:
E-Mail Username: administrator
Recipient: christi
208
User Guide
Section A.4
Web Server
Example 2:
J
E-Mail Username: info
Recipient: christi
Example 3:
E-Mail Username: webmaster
Recipient: ryan
Example 4:
E-Mail Username: sales
Recipient: [email protected]
Here four e-mail addresses are defined. The following table shows the destination
of various e-mail addresses according to the examples defined above:
Mail Sent To:
Final Recipient:
[email protected]
christi
[email protected]
christi
[email protected]
ryan
[email protected]
[email protected]
[email protected]
ryan
We have now successfully configured our Mail Server.
A.4 Web Server
The Web Server is the mechanism for serving websites. There are two types of
websites: normal and secure. Secure websites utilize SSL encryption to provide
security for sensitive applications such as e-commerce. Normal websites are simply sites that do not utilize SSL.
Secure websites require two things: a certificate and a key. It can be thought of in
the following context:
K
the certificate is what verifies your identity (authentication)
The Guardian Digital Linux Lockbox
209
Q UICK S TART G UIDE
K
Appendix A
the key is what provides the security (encryption)
L
The certificate and key are also tightly tied into each other; they are a matching
pair.
The first time a user connects to a secure site, their browser will store the certificate. Every subsequent time the user connects to the site it verifies that the
certificate is the same to ensure a secure connection. This provides the encryption
portion of the process.
For more information on certificiates please refer to the full User Guide.
Example:
To configure the Web server for our new domain, we must set them up in Section
4.3 Virtual Host Management on page 39.
To create the normal site, go to Virtual Host Management, and select Create a
Virtual Host. We use the following values:
Address: 192.168.1.71
Administrator E-Mail: [email protected]
Server Name: www.linuxlockbox.com
Webmaster: ryan
For Group, we want to first Create [a] Group named lockboxweb, and then select
it.
Group: lockboxweb
If a database is necessary for this site, then we check the Create a database for
this site box and enter in the values:
Username: lockboxweb
Password: l!ock#b0x
210
User Guide
Section A.4
Web Server
We have now successfully created the normal website.
Likewise, to create the secure site, go to Virtual Host Management, and select
Create an SSL Virtual Host. We use the following values:
Address: 192.168.1.71
Administrator E-Mail: [email protected]
Server Name: www.linuxlockbox.com
Webmaster: ryan
Group: lockboxweb
We have now successfully created the secure website.
Once this is done, the following directories for the normal site will be created:
/home/httpd/www.linuxlockbox.com-80/cgi-bin
/home/httpd/www.linuxlockbox.com-80/html
/home/httpd/www.linuxlockbox.com-80/logs
And the following directories for the secure site:
/home/httpd/www.linuxlockbox.com-443/cgi-bin
/home/httpd/www.linuxlockbox.com-443/html
/home/httpd/www.linuxlockbox.com-443/logs
/home/httpd/www.linuxlockbox.com-443/ssl
Once the above steps have been completed, the Lockbox is ready to serve webpages for the following sites:
http://www.linuxlockbox.com/
https://www.linuxlockbox.com/
The next step is to populate your sites with content. For more information on this
and the many other aspects of the WebTool, please refer to the User Guide.
The Guardian Digital Linux Lockbox
211
M
B
IS O C ODES
B.1 Currency Codes (ISO 4217) Needed for AllCommerce
ADP
Andorran Peseta
AED
United Arab Emirates Dirham
AFA
Afghanistan Afghani
ALL
Albanian Lek
ANG
Netherlands Antillian Guilder
AOK
Angolan Kwanza
ARA
Argentinian Austral
ATS
Austrian Schilling
AUD
Australian Dollar
AWG
Aruban Florin
BBD
Barbados Dollar
BDT
Bangladeshi Taka
BEF
Belgian Franc
BGL
Bulgarian Lev
BHD
Bahraini Dinar
BIF
Burundi Franc
BMD
Bermudian Dollar
BND
Brunei Dollar
BOB
Bolivian Boliviano
BRC
Brazilian Cruzeiro
BSD
Bahamian Dollar
Section B.1
Currency Codes (ISO 4217) Needed for AllCommerce
BTN
Bhutan Ngultrum
BUK
Burma Kyat
BWP
Botswanian Pula
BZD
Belize Dollar
CAD
Canadian Dollar
CHF
Swiss Franc
CLF
Chilean Unidades de Fomento
CLP
Chilean Peso
CNY
Yuan (Chinese) Renminbi
COP
Colombian Peso
CRC
Costa Rican Colon
CSK
Czech Koruna
CUP
Cuban Peso
CVE
Cape Verde Escudo
CYP
Cyprus Pound
DDM
East German Mark (DDR)
DEM
Deutsche Mark
DJF
Djibouti Franc
DKK
Danish Krone
DOP
Dominican Peso
DZD
Algerian Dinar
ECS
Ecuador Sucre
EGP
Egyptian Pound
ESP
Spanish Peseta
ETB
Ethiopian Birr
The Guardian Digital Linux Lockbox
213
ISO C ODES
Appendix B
FIM
Finnish Markka
FJD
Fiji Dollar
FKP
Falkland Islands Pound
FRF
French Franc
GBP
British Pound
GHC
Ghanaian Cedi
GIP
Gibraltar Pound
GMD
Gambian Dalasi
GNF
Guinea Franc
GRD
Greek Drachma
GTQ
Guatemalan Quetzal
GWP
Guinea-Bissau Peso
GYD
Guyanan Dollar
HKD
Hong Kong Dollar
HNL
Honduran Lempira
HTG
Haitian Gourde
HUF
Hungarian Forint
IDR
Indonesian Rupiah
IEP
Irish Punt
ILS
Israeli Shekel
INR
Indian Rupee
IQD
Iraqi Dinar
IRR
Iranian Rial
ISK
Iceland Krona
ITL
Italian Lira
214
User Guide
Section B.1
Currency Codes (ISO 4217) Needed for AllCommerce
JMD
Jamaican Dollar
JOD
Jordanian Dinar
JPY
Japanese Yen
KES
Kenyan Schilling
KHR
Kampuchean (Cambodian) Riel
KMF
Comoros Franc
KPW
North Korean Won
KRW
(South) Korean Won
KWD
Kuwaiti Dinar
KYD
Cayman Islands Dollar
LAK
Lao Kip
LBP
Lebanese Pound
LKR
Sri Lanka Rupee
LRD
Liberian Dollar
LSL
Lesotho Loti
LUF
Luxembourg Franc
LYD
Libyan Dinar
MAD
Moroccan Dirham
MGF
Malagasy Franc
MNT
Mongolian Tugrik
MOP
Macau Pataca
MRO
Mauritanian Ouguiya
MTL
Maltese Lira
MUR
Mauritius Rupee
MVR
Maldive Rufiyaa
The Guardian Digital Linux Lockbox
215
ISO C ODES
Appendix B
MWK
Malawi Kwacha
MXP
Mexican Peso
MYR
Malaysian Ringgit
MZM
Mozambique Metical
NGN
Nigerian Naira
NIC
Nicaraguan Cordoba
NLG
Dutch Guilder
NOK
Norwegian Kroner
NPR
Nepalese Rupee
NZD
New Zealand Dollar
OMR
Omani Rial
PAB
Panamanian Balboa
PEI
Peruvian Inti
PGK
Papua New Guinea Kina
PHP
Philippine Peso
PKR
Pakistan Rupee
PLZ
Polish Zloty
PTE
Portuguese Escudo
PYG
Paraguay Guarani
QAR
Qatari Rial
ROL
Romanian Leu
RWF
Rwanda Franc
SAR
Saudi Arabian Riyal
SBD
Solomon Islands Dollar
SCR
Seychelles Rupee
216
User Guide
Section B.1
Currency Codes (ISO 4217) Needed for AllCommerce
SDP
Sudanese Pound
SEK
Swedish Krona
SGD
Singapore Dollar
SHP
St. Helena Pound
SLL
Sierra Leone Leone
SOS
Somali Schilling
SRG
Suriname Guilder
STD
Sao Tome and Principe Dobra
SUR
USSR Rouble
SVC
El Salvador Colon
SYP
Syrian Potmd
SZL
Swaziland Lilangeni
THB
Thai Bhat
TND
Tunisian Dinar
TOP
Tongan Pa’anga
TPE
East Timor Escudo
TRL
Turkish Lira
TTD
Trinidad and Tobago Dollar
TWD
Taiwan Dollar
TZS
Tanzanian Schilling
UGS
Uganda Shilling
USD
US Dollar
UYP
Uruguayan Peso
VEB
Venezualan Bolivar
VND
Vietnamese Dong
The Guardian Digital Linux Lockbox
217
ISO C ODES
Appendix B
VUV
Vanuatu Vatu
WST
Samoan Tala
YDD
Democratic Yemeni Dinar
YER
Yemeni Rial
YUD
New Yugoslavia Dinar
ZAR
South African Rand
ZMK
Zambian Kwacha
ZRZ
Zaire Zaire
ZWD
Zimbabwe Dollar
218
User Guide
Section B.2
Language Codes (ISO 639-2) Needed for AllCommerce
N
B.2 Language Codes (ISO 639-2) Needed for AllCommerce
A list of the most recent language ISO codes can be found at http://lcweb.
loc.gov/standards/iso639-2/englangn.html
Because of the large number of language codes, only a small number of them are
listed here:
baq
Basque
dut
Dutch
eng
English
fre
French
ger
German
gre
Greek, Modern (post 1453)
ita
Italian
per
Persian
por
Portuguese
rus
Russian
spa
Spanish
wel
Welsh
The Guardian Digital Linux Lockbox
219
O
C
C.1
G ENERAL L INUX
Introduction
In this section we will discuss some basic Linux knowledge for administering
your Lockbox from the console or an SSH connection. This section is more for
advanced users. You have to be careful, you can corrupt the system configuration
resulting in improper operation of your Lockbox.
C.1.1
Root Access on Your Lockbox
su is a small program that gives you the ability to login as the root user from a
remote connection. To help increase security you are prevented from running su.
The only ways to gain root access is to either login as root from the console or
make an SSH connection to the Lockbox as the root user.
All logins via SSH, both root logins and normal user logins are logged in /var/lo
g/syslog and are filtered into /var/log/audit/ssh_authorization.
log, / var/log/audit/su_logins.log, and /var/log/audit/su_f
ailed.log. You can find console logins in the /var/log/audit/pam.log
which will contain all successful and failed login attempts from the console.
Section C.2
Basic Bash Commands
P
C.2 Basic Bash Commands
Bash, or the Bourne Again Shell, is the successor to sh. Bash is the default system
shell you will be using to interface with your Lockbox when you login via SSH
or the console. Here we will cover some basic commands for moving around the
system and doing some minor work. If you will be doing most of your editing
from the command line we highly recommend picking up a book on using bash or
general Unix commands.
N OTE :
C.2.1
You will find /bin/sh on your system. It is really a link to /bin/bash.
This is done for compatibility reasons.
Moving Around the System
When you first login you will be sitting in your home directory. Most likely
/home/username/. You can get a listing of the directory contents by typing:
$ ls
or for a long view of the listing with time stamps, file permissions and file ownerships type:
$ ls -l
You can move from directories by typing
$ cd directory-name
cd by itself will bring you back to your home directory.
Directories are referenced with a slash ( / ). / being the root directory. So to go
to the /etc directory you simply type
$ cd /etc
to reference the current directory we use a single period, ’.’ and to reference the
previous directory we use two periods, ’..’. So if you are in your home directory
and you want to go to a different users directory you can type:
The Guardian Digital Linux Lockbox
221
G ENERAL L INUX
Appendix C
$ cd ../different-user
which is equivalent to:
$ cd /home/different-user
At any point using the TAB key after typing a few characters in at the bash prompt
will make bash fill in the rest of the file or directory name that matches what you
have typed. If there is more than one match, tap the tab key twice and it will list
all the matches.
C.2.2
File Manipulation
There are many ways to alter files on your system. You can copy, delete, move,
change attributes etc. Here is the three basic file manipulation commands, cp, rm,
and mv -> Copy, remove and move. They are used as follows:
$ cp file1 file2
ex: $ cp /home/nick/new_httpd.conf /etc/httpd/conf/httpd.conf
$ rm file
ex: $ rm /home/nick/new_httpd.conf
$ mv file1 file2
ex: $ mv /home/nick/new_httpd.conf /etc/httpd/conf/httpd.conf
You also have control over the attributes and ownership of a file. Running chown
and chgrp you can change the files ownerships:
$ chown nick *.html
$ chgrp nick *.html
The above two commands will give user nick complete ownership over every html
file in the current directory. You can shorten the above command by typing:
$ chown nick:nick *.html
This changes both the ownership and group in one shot. You can change the file
permissions using the chmod program. By typing:
$ chmod 644 *.html
That will change the access to read/write by the owner and read only by users in
the specified group and all users. There are many more options, too many to list
here, chmod can use.
222
User Guide
Section C.2
C.2.3
Q
Basic Bash Commands
Editing a File
You basically have two options for file editing from the console, Vi and Pico.
Vi has the most difficult learning curve but is the most powerful editor. Pico is
much easier to learn. All the commands are laid out in front of you. Pico, however
can have some strange effects on files and is not nearly as powerful as the other
two editors.
Your Lockbox comes with Vi and Pico installed on it. To load the Vi editor simply
type:
$ vi fileToEdit
To start the Pico editor type:
$ pico fileToEdit
If you don’t enter a filename it will start by editing a blank document.
We recommend using Vi if you will be doing most of your editing from the console. If you don’t have experience with vi you’ll want to use one of the many
resources as it’s use may not be immediately obvious.
The Guardian Digital Linux Lockbox
223
G ENERAL L INUX
Appendix C
R
C.3 File System Structure
The EnGarde Linux system is designed with the file system standards in mind.
Here is a brief breakdown of the directories and there descriptions (taken from
Filesystem Hierarchy Standard - ver2.1):
/ - the root directory
|-bin
Essential command binaries
|-boot
Static files of the boot loader
|-dev
Device files
|-etc
Host-specific system configuration
|-home
User home directories
|-lib
Essential shared libraries and
|
kernel modules
|-mnt
Mount point for mounting a
|
filesystem temporarily
|-root
Home directory for the root user
|-sbin
Essential system binaries
|-tmp
Temporary files
|-usr
Secondary hierarchy
|-var
Variable data
This is just a brief summary of the main root file system. For more detailed information you can download the Filesystem Hierarchy Standard from http://www
.pathname.com/fhs/ or you can view the PDF or PostScript(. PS) file included in the document directory on the EnGarde CD included with your Lockbox.
224
User Guide
Section C.4
Services and Daemons
C.4 Services and Daemons
S
Linux has the ability to start and stop services and daemons on the fly. A service
is generally something like POP3 or an FTP server and are managed using files
in the /etc/inet.d/ directory. You can also have services ran from the init.d
scripts. Here are a few commands with their results:
$ /etc/init.d/crond start
Starting crond:
[ OK ]
$ /etc/init.d/d stop
Shutting down crond:
[ OK ]
$ /etc/init.d/crond restart
Shutting down crond:
[ OK ]
Starting crond:
[ OK ]
$ /etc/init.d/crond status
crond (pid 18529 18525 18522) is running
Not all commands in this directory have the above options. To get a list of what
each one can do, type the filename by itself.
This is primarily used if you need to shutdown a daemon for maintenance or other
reasons. Remember, when you make modifications to configuration files for a
daemon, you generally have to restart that daemon before the changes can take
effect.
The Guardian Digital Linux Lockbox
225
G ENERAL L INUX
Appendix C
C.5 Groups and Users
T
File and directory permissions are the basic means for providing security on a
system. They are also the last line of defense against an unauthorized user reading
or modifying information that does not belong to them. A properly configured
system contains files and directories which are only accessible to the users in
which were authorized to access those files and directories. The set of rules that
a file or directory is given to tell it who can and can’t access it are known as
permissions. These file and directory permissions are assigned by both user and
group.
Each file and directory has three sets of permissions associated with it. It gives
permissions to owner, group and other. Below is the result of a sample directory
listing produced by executing ls -l, displayed with each field broken down:
Field 1:
Permissions for this file. We will break down these nine file permission settings in the next section.
Field 2:
Number of hard links to this file or directory. These links can be
directories.
Field 3:
Owner of the file. The users user name is displayed, if no user name
is associated with the owner then the user ID number is displayed.
Field 4:
The group to which the file belongs. A group name will be displayed
here, if no group name is associated with the ID then the ID number
is displayed.
Field 5:
This is the size of the file in bytes.
Field 6:
The date of the last time the file was modified.
Field 7:
The name of the file.
There are three options for file permissions. Read (r), write (w) and execute (x).
These three options can each be assigned to the user, group and other attributes
of each file and directory. We can break down field one above as follows:
226
User Guide
Section C.5
Groups and Users
1222333444
-rw-r--r-U
1. Special Flag
2. Owner permissions
3. Group permissions
4. Other permissions
We have S as a special attribute. Here is a list of special attributes:
d - Directory
K
s - socket
K
b - block special file (IE: /dev/hda)
K
c - character special file (IE: /dev/tty)
K
l - sybolic link
K
K
p - named pipe
Next we have the owner of the file, followed by the group and finally the other.
Each one can have their own set of read, write and executable permissions.
The Guardian Digital Linux Lockbox
227
D
V
F IREWALLS AND P ROXY S ERVERS
D.1 Configuring a Firewall or Proxy Server
A firewall is a system designed to keep everything behind it safe from the outside
world. It scans incoming connections and determines whether or not the connection matches one of a list of pre-defined access control rule, accepts or rejecting
the connection.
If you Lockbox will be positioned behind firewall you will need to configure your
firewall to allow the Lockbox access to the outside world. Below are a list of
ports and what they are. You may not have all of the listed ports opened on your
Lockbox if you don’t have it configured to. For example, if your Lockbox is not a
DNS server you will not have the DNS port 53 opened.
22/tcp
This is the SSH port. If you want to allow anyone from outside to
SSH into your machine you must open this port
25/tcp
This is the SMTP service. If this machine will be receiving e-mail
this port must be available.
53/tcp&udp This is the DNS service. You will need to have this opened. Configuring DNS to work through a firewall or proxy server can be difficult
and it is recommended to refer to your firewall manual for complete
instructions.
80/tcp
If the Lockbox is going to be a Web server you will need to enable
access to this port.
443/tcp
If the Lockbox is a Web server and will be hosting a secure site you
will need to open this port to support SSL
993/tcp
If the Lockbox will be offering Secure IMAP you will need to have
this port open.
995/tcp
Secure POP3 will be available from this port if the Lockbox is running it.
1022/tcp
This is the user password changer portion of the GD WebTool. If
you want to give outside users to availability to change their own
password via the GD WebTool you will need to open this port up.
Section D.1
1023/tcp
Configuring a Firewall or Proxy Server
This is the actual GD WebTool for the administrator. If you will be
administrating this from outside you will need to open the port.
For more information about firewalls there are many books and on-line documentation. Refer to your firewall documentation for specific instructions on how to
permit these services through your firewall. Additionally, here are a few references:
Zwicky, Cooper & Chapman. Building Internet Firewalls, June 2000. Copyright O’Reilly & Associates, Inc. 2000.
K
K
Mark Grennan, [email protected]. Firewall and Proxy Server HOWTO,
Feb. 26, 2000. Copyright Mark Grennan, 2000.
The Guardian Digital Linux Lockbox
229
F IREWALLS
AND
P ROXY S ERVERS
Appendix D
W
D.2 Disabling Proxy Settings in Your Browser
You will need to disable proxy and firewall settings in your browser in order to
access the inital configuration tool on the Lockbox. Directions are given below
for both Netscape Navigator and Internet Explorer.
D.2.1 Netscape Navigator
To disable the proxy settings in Netscape Navigator you will need to be at the
main Netscape Navigator window. Click the Edit menu button and then select
Preferences from the pull-down menu.
You will then be brought to the Preferences menu. By clicking on the Advanced
option in the menu “tree” on the left will bring up the Proxy Settings.
230
User Guide
Section D.2
Disabling Proxy Settings in Your Browser
Click the radio button labeled Direct connection to the Internet and then click Ok.
Your Netscape browser is now ready to connect to your Lockbox.
D.2.2 Internet Explorer
To disable the proxy settings in Internet Explorer you will need to be at the main
Internet Explorer window. Click the Tools menu button and then select Internet
Options from the pull-down menu.
The Guardian Digital Linux Lockbox
231
F IREWALLS
AND
P ROXY S ERVERS
Appendix D
Once you select Internet Options you will be presented with the Internet Options
dialog box. At the top of the box there are a list of tabs, select Connection. From
the Connection section click the Lan Settings button.
After clicking the Setup button the proxy information will be displayed. You
want to turn off all your proxy server settings so you have to make sure all the
checkboxes are NOT checked. Once this is done click the OK button to finish.
232
User Guide
Section D.2
Disabling Proxy Settings in Your Browser
You are now ready to connect to your Lockbox with Internet Explorer.
The Guardian Digital Linux Lockbox
233
E
C ERTIFICATES
X
E.1 General Certificate Information
Here we will just briefly cover some basic certificate information you may need
to know to get your certificates properly working.
A new certificate is only valid for 365 days, or 1 year. After this period you must
get a new certificate. If you have a signed certificate you have the option to renew
that certificate, which usually requires a fee.
E.1.1
Getting a Certificate Signed
The two most common certificate companies are Verisign and Thawte. To get a
certificate signed, generate a CSR as described in Certificate Management found
in Section 4.3 and follow their directions to send it to the appropriate CA.
They will then request proof of your right to use the certified organization name
(Articles of incorporation), proof of your registration of the domain name you will
be using (from the InterNIC whois database), to obtain your domain name details
go to:
http://rs.internic.net
And finally a letter of authorization from an agent of your company or organization.
Once everything is authorized they will send you back a signed certificate. Please
read their Web sites:
http://www.verisign.com
http://www.thawte.com
for detailed information on submitting a certificate to be signed or go directly to
their registration pages:
http://digitalid.verisign.com/server/enrollIntro.htm
http://www.thawte.com/certs/server/request.html
If you get a certificate signed by a smaller Certificate Authority, Netscape and
Internet Explorer may bring up a warning that it does not recognize the CA. This
may make some users uncomfortable and insecure about using your site. However,
one of these CAs can provide you with a signed certificate at a much reduced cost.
Section E.2
E.1.2
Y
Accepting an Unsigned Certificate
Certificates, IP and Virtual Host Issues
A certificate is bound to a domain name regardless of the IP address. Therefore
if you register a certificate you will register it under your domain name. Unfortunatly due to current protocal restrictions you can only have one certificate per IP
address.
Using a separate IP for each domain name located on your Lockbox will give you
the ability to assign a separate certificate to each domain.
E.2 Accepting an Unsigned Certificate
During the initial login during the configuration of your Lockbox and/or when
connecting to the GD WebTool you will be prompted with the following screen:
Your browser will ask you if you want to accept the certificate attached to your
Lockbox. The reason for this is Guardian Digital has signed the certificate and is
not a Certificate Authority (CA) such as Verisign and Thawte. Having this certificate signed by a CA is not necessary since you can verify that you are connecting
to your own Lockbox.
The Guardian Digital Linux Lockbox
235
C ERTIFICATES
Appendix E
You will want to accept this certificate. Click the Next button to continue.
Z
This next screen will display brief information concerning the certificate. There
is a button you can click, More Infor... for detailed information concerning the
certificate. Click Next to continue.
236
User Guide
Section E.2
Accepting an Unsigned Certificate
Now you will be asked in what way you want to accept this certificate. You have
three options here. The first option will only accept the certificate for the current
session. So when you shut your browser down you will be prompted with the
same screens the next time you try to login to the GD WebTool.
The second option will tell your browser to never accept the certificate. This will
lock you out of GD WebTool.
Finally the third option will accept the certificate until it expires. When it expires
and a new certificate is put in it’s place you will be prompted again with these
same menus.
If you will be doing your administration via the GD WebTool on the current machine it is recommended you select Accept this certificate forever (until it expires)
option. Once you have made your decision select the Next button.
The Guardian Digital Linux Lockbox
237
C ERTIFICATES
Appendix E
This fourth screen will inform you of the possibility of fraud and insecurity when
using an unsigned certificate. Since you know the Lockbox and certificate both
came from Guardian Digital you can be certain your connection and data will be
secure.
238
User Guide
Section E.2
Accepting an Unsigned Certificate
This is the final step and will inform you of your decision to accept the certificate
and verify your options. Click Finish to fully accept the certificate and enter the
GD WebTool.
The Guardian Digital Linux Lockbox
239
F
F.1
[
L ICENSES
GNU Public License (GPL)
Version 2, June 1991
Copyright (C) 1989, 1991 Free Software Foundation, Inc. 59 Temple Place - Suite
330, Boston, MA 02111-1307, USA
Everyone is permitted to copy and distribute verbatim copies of this license document, but changing it is not allowed.
Preamble
The licenses for most software are designed to take away your freedom to share
and change it. By contrast, the GNU General Public License is intended to guarantee your freedom to share and change free software–to make sure the software is
free for all its users. This General Public License applies to most of the Free Software Foundation’s software and to any other program whose authors commit to
using it. (Some other Free Software Foundation software is covered by the GNU
Library General Public License instead.) You can apply it to your programs, too.
When we speak of free software, we are referring to freedom, not price. Our
General Public Licenses are designed to make sure that you have the freedom to
distribute copies of free software (and charge for this service if you wish), that you
receive source code or can get it if you want it, that you can change the software or
use pieces of it in new free programs; and that you know you can do these things.
To protect your rights, we need to make restrictions that forbid anyone to deny
you these rights or to ask you to surrender the rights. These restrictions translate
to certain responsibilities for you if you distribute copies of the software, or if you
modify it.
For example, if you distribute copies of such a program, whether gratis or for a
fee, you must give the recipients all the rights that you have. You must make sure
that they, too, receive or can get the source code. And you must show them these
terms so they know their rights.
We protect your rights with two steps: (1) copyright the software, and (2) offer you
this license which gives you legal permission to copy, distribute and/or modify the
software.
Also, for each author’s protection and ours, we want to make certain that everyone
understands that there is no warranty for this free software. If the software is
Section F.1
GNU Public License (GPL)
modified by someone else and passed on, we want its recipients to know that what
they have is not the original, so that any problems introduced by others will not
reflect on the original authors’ reputations.
\
Finally, any free program is threatened constantly by software patents. We wish
to avoid the danger that redistributors of a free program will individually obtain
patent licenses, in effect making the program proprietary. To prevent this, we
have made it clear that any patent must be licensed for everyone’s free use or not
licensed at all.
The precise terms and conditions for copying, distribution and modification follow.
TERMS AND CONDITIONS FOR COPYING, DISTRIBUTION AND MODIFICATION
0. This License applies to any program or other work which contains a notice
placed by the copyright holder saying it may be distributed under the terms of this
General Public License. The Program, below, refers to any such program or work,
and a work based on the Program means either the Program or any derivative work
under copyright law: that is to say, a work containing the Program or a portion of
it, either verbatim or with modifications and/or translated into another language.
(Hereinafter, translation is included without limitation in the term modification.)
Each licensee is addressed as you.
Activities other than copying, distribution and modification are not covered by
this License; they are outside its scope. The act of running the Program is not restricted, and the output from the Program is covered only if its contents constitute
a work based on the Program (independent of having been made by running the
Program). Whether that is true depends on what the Program does.
1. You may copy and distribute verbatim copies of the Program’s source code as
you receive it, in any medium, provided that you conspicuously and appropriately
publish on each copy an appropriate copyright notice and disclaimer of warranty;
keep intact all the notices that refer to this License and to the absence of any
warranty; and give any other recipients of the Program a copy of this License
along with the Program.
You may charge a fee for the physical act of transferring a copy, and you may at
your option offer warranty protection in exchange for a fee.
2. You may modify your copy or copies of the Program or any portion of it, thus
forming a work based on the Program, and copy and distribute such modifications
or work under the terms of Section 1 above, provided that you also meet all of
these conditions:
The Guardian Digital Linux Lockbox
241
L ICENSES
Appendix F
a) You must cause the modified files to carry prominent notices stating that you
changed the files and the date of any change.
b) You must cause any work that you distribute or publish, that in whole or in part
contains or is derived from the Program or any part thereof, to be licensed as a
whole at no charge to all third parties under the terms of this License.
c) If the modified program normally reads commands interactively when run, you
must cause it, when started running for such interactive use in the most ordinary
way, to print or display an announcement including an appropriate copyright notice and a notice that there is no warranty (or else, saying that you provide a
warranty) and that users may redistribute the program under these conditions, and
telling the user how to view a copy of this License. (Exception: if the Program
itself is interactive but does not normally print such an announcement, your work
based on the Program is not required to print an announcement.)
These requirements apply to the modified work as a whole. If identifiable sections
of that work are not derived from the Program, and can be reasonably considered
independent and separate works in themselves, then this License, and its terms,
do not apply to those sections when you distribute them as separate works. But
when you distribute the same sections as part of a whole which is a work based on
the Program, the distribution of the whole must be on the terms of this License,
whose permissions for other licensees extend to the entire whole, and thus to each
and every part regardless of who wrote it.
Thus, it is not the intent of this section to claim rights or contest your rights to
work written entirely by you; rather, the intent is to exercise the right to control
the distribution of derivative or collective works based on the Program.
In addition, mere aggregation of another work not based on the Program with
the Program (or with a work based on the Program) on a volume of a storage or
distribution medium does not bring the other work under the scope of this License.
3. You may copy and distribute the Program (or a work based on it, under Section
2) in object code or executable form under the terms of Sections 1 and 2 above
provided that you also do one of the following:
a) Accompany it with the complete corresponding machine-readable source code,
which must be distributed under the terms of Sections 1 and 2 above on a medium
customarily used for software interchange; or,
b) Accompany it with a written offer, valid for at least three years, to give any third
party, for a charge no more than your cost of physically performing source distribution, a complete machine-readable copy of the corresponding source code, to
242
User Guide
Section F.1
GNU Public License (GPL)
be distributed under the terms of Sections 1 and 2 above on a medium customarily
used for software interchange; or,
]
c) Accompany it with the information you received as to the offer to distribute
corresponding source code. (This alternative is allowed only for noncommercial
distribution and only if you received the program in object code or executable
form with such an offer, in accord with Subsection b above.)
The source code for a work means the preferred form of the work for making
modifications to it. For an executable work, complete source code means all the
source code for all modules it contains, plus any associated interface definition
files, plus the scripts used to control compilation and installation of the executable.
However, as a special exception, the source code distributed need not include
anything that is normally distributed (in either source or binary form) with the
major components (compiler, kernel, and so on) of the operating system on which
the executable runs, unless that component itself accompanies the executable.
If distribution of executable or object code is made by offering access to copy
from a designated place, then offering equivalent access to copy the source code
from the same place counts as distribution of the source code, even though third
parties are not compelled to copy the source along with the object code.
4. You may not copy, modify, sublicense, or distribute the Program except as
expressly provided under this License. Any attempt otherwise to copy, modify,
sublicense or distribute the Program is void, and will automatically terminate your
rights under this License. However, parties who have received copies, or rights,
from you under this License will not have their licenses terminated so long as such
parties remain in full compliance.
5. You are not required to accept this License, since you have not signed it. However, nothing else grants you permission to modify or distribute the Program or
its derivative works. These actions are prohibited by law if you do not accept this
License. Therefore, by modifying or distributing the Program (or any work based
on the Program), you indicate your acceptance of this License to do so, and all its
terms and conditions for copying, distributing or modifying the Program or works
based on it.
6. Each time you redistribute the Program (or any work based on the Program),
the recipient automatically receives a license from the original licensor to copy,
distribute or modify the Program subject to these terms and conditions. You may
not impose any further restrictions on the recipients’ exercise of the rights granted
herein. You are not responsible for enforcing compliance by third parties to this
License.
The Guardian Digital Linux Lockbox
243
L ICENSES
Appendix F
7. If, as a consequence of a court judgment or allegation of patent infringement or
for any other reason (not limited to patent issues), conditions are imposed on you
(whether by court order, agreement or otherwise) that contradict the conditions
of this License, they do not excuse you from the conditions of this License. If
you cannot distribute so as to satisfy simultaneously your obligations under this
License and any other pertinent obligations, then as a consequence you may not
distribute the Program at all. For example, if a patent license would not permit
royalty-free redistribution of the Program by all those who receive copies directly
or indirectly through you, then the only way you could satisfy both it and this
License would be to refrain entirely from distribution of the Program.
If any portion of this section is held invalid or unenforceable under any particular
circumstance, the balance of the section is intended to apply and the section as a
whole is intended to apply in other circumstances.
It is not the purpose of this section to induce you to infringe any patents or other
property right claims or to contest validity of any such claims; this section has the
sole purpose of protecting the integrity of the free software distribution system,
which is implemented by public license practices. Many people have made generous contributions to the wide range of software distributed through that system
in reliance on consistent application of that system; it is up to the author/donor to
decide if he or she is willing to distribute software through any other system and
a licensee cannot impose that choice.
This section is intended to make thoroughly clear what is believed to be a consequence of the rest of this License.
8. If the distribution and/or use of the Program is restricted in certain countries
either by patents or by copyrighted interfaces, the original copyright holder who
places the Program under this License may add an explicit geographical distribution limitation excluding those countries, so that distribution is permitted only in
or among countries not thus excluded. In such case, this License incorporates the
limitation as if written in the body of this License.
9. The Free Software Foundation may publish revised and/or new versions of the
General Public License from time to time. Such new versions will be similar in
spirit to the present version, but may differ in detail to address new problems or
concerns.
Each version is given a distinguishing version number. If the Program specifies
a version number of this License which applies to it and any later version, you
have the option of following the terms and conditions either of that version or of
any later version published by the Free Software Foundation. If the Program does
244
User Guide
Section F.1
GNU Public License (GPL)
not specify a version number of this License, you may choose any version ever
published by the Free Software Foundation.
10. If you wish to incorporate parts of the Program into other free programs whose
distribution conditions are different, write to the author to ask for permission. For
software which is copyrighted by the Free Software Foundation, write to the Free
Software Foundation; we sometimes make exceptions for this. Our decision will
be guided by the two goals of preserving the free status of all derivatives of our
free software and of promoting the sharing and reuse of software generally.
NO WARRANTY
11. BECAUSE THE PROGRAM IS LICENSED FREE OF CHARGE, THERE IS
NO WARRANTY FOR THE PROGRAM, TO THE EXTENT PERMITTED BY
APPLICABLE LAW. EXCEPT WHEN OTHERWISE STATED IN WRITING
THE COPYRIGHT HOLDERS AND/OR OTHER PARTIES PROVIDE THE
PROGRAM AS IS WITHOUT WARRANTY OF ANY KIND, EITHER EXPRESSED OR IMPLIED, INCLUDING, BUT NOT LIMITED TO, THE IMPLIED WARRANTIES OF MERCHANTABILITY AND FITNESS FOR A PARTICULAR PURPOSE. THE ENTIRE RISK AS TO THE QUALITY AND PERFORMANCE OF THE PROGRAM IS WITH YOU. SHOULD THE PROGRAM
PROVE DEFECTIVE, YOU ASSUME THE COST OF ALL NECESSARY SERVICING, REPAIR OR CORRECTION.
12. IN NO EVENT UNLESS REQUIRED BY APPLICABLE LAW OR AGREED
TO IN WRITING WILL ANY COPYRIGHT HOLDER, OR ANY OTHER PARTY
WHO MAY MODIFY AND/OR REDISTRIBUTE THE PROGRAM AS PERMITTED ABOVE, BE LIABLE TO YOU FOR DAMAGES, INCLUDING ANY
GENERAL, SPECIAL, INCIDENTAL OR CONSEQUENTIAL DAMAGES ARISING OUT OF THE USE OR INABILITY TO USE THE PROGRAM (INCLUDING BUT NOT LIMITED TO LOSS OF DATA OR DATA BEING RENDERED
INACCURATE OR LOSSES SUSTAINED BY YOU OR THIRD PARTIES OR
A FAILURE OF THE PROGRAM TO OPERATE WITH ANY OTHER PROGRAMS), EVEN IF SUCH HOLDER OR OTHER PARTY HAS BEEN ADVISED OF THE POSSIBILITY OF SUCH DAMAGES.
END OF TERMS AND CONDITIONS
^
The Guardian Digital Linux Lockbox Copyright c 2000 Guardian Digital, Inc.
This program is free software; you can redistribute it and/or modify it under the
terms of the GNU General Public License as published by the Free Software Foundation; either version 2 of the License, or (at your option) any later version.
The Guardian Digital Linux Lockbox
245
L ICENSES
Appendix F
This program is distributed in the hope that it will be useful, but WITHOUT ANY
WARRANTY; without even the implied warranty of MERCHANTABILITY or
FITNESS FOR A PARTICULAR PURPOSE. See the GNU General Public License for more details.
You should have received a copy of the GNU General Public License along with
this program; if not, write to the Free Software Foundation, Inc., 59 Temple Place
- Suite 330, Boston, MA 02111-1307, USA.
246
User Guide
Section F.2
F.2
P
BSD License
BSD License
Copyright (c) 2000, Guardian Digital, Inc. All rights reserved.
Redistribution and use in source and binary forms, with or without modification,
are permitted provided that the following conditions are met:
Redistributions of source code must retain the above copyright notice, this list of
conditions and the following disclaimer.
Redistributions in binary form must reproduce the above copyright notice, this
list of conditions and the following disclaimer in the documentation and/or other
materials provided with the distribution.
Neither the name of the Guardian Digital, Inc. nor the names of its contributors
may be used to endorse or promote products derived from this software without
specific prior written permission.
THIS SOFTWARE IS PROVIDED BY THE COPYRIGHT HOLDERS AND
CONTRIBUTORS “AS IS” AND ANY EXPRESS OR IMPLIED WARRANTIES,
INCLUDING, BUT NOT LIMITED TO, THE IMPLIED WARRANTIES OF
MERCHANTABILITY AND FITNESS FOR A PARTICULAR PURPOSE ARE
DISCLAIMED. IN NO EVENT SHALL THE REGENTS OR CONTRIBUTORS
BE LIABLE FOR ANY DIRECT, INDIRECT, INCIDENTAL, SPECIAL, EXEMPLARY, OR CONSEQUENTIAL DAMAGES (INCLUDING, BUT NOT LIMITED TO, PROCUREMENT OF SUBSTITUTE GOODS OR SERVICES; LOSS
OF USE, DATA, OR PROFITS; OR BUSINESS INTERRUPTION) HOWEVER
CAUSED AND ON ANY THEORY OF LIABILITY, WHE-THER IN CONTRACT, STRICT LIABILITY, OR TORT (INCLUDING NEGLIGENCE OR
OTHERWISE) ARISING IN ANY WAY OUT OF THE USE OF THIS SOFTWARE, EVEN IF ADVISED OF THE POSSIBILITY OF SUCH DAMAGE.
The Guardian Digital Linux Lockbox
247
L ICENSES
Appendix F
_
F.3
Apache License
The Apache Software License,1
Copyright (c) 2000 The Apache Software Foundation. All rights reserved.
Redistribution and use in source and binary forms, with or without modification,
are permitted provided that the following conditions are met:
1. Redistributions of source code must retain the above copyright notice, this
list of conditions and the following disclaimer.
2. Redistributions in binary form must reproduce the above copyright notice,
this list of conditions and the following disclaimer in the documentation
and/or other materials provided with the distribution.
3. The end-user documentation included with the redistribution, if any, must
include the following acknowledgment: "This product includes software developed by the Apache Software Foundation (http://www.apache.or
g/)." Alternately, this acknowledgment may appear in the software itself,
if and wherever such third-party acknowledgments normally appear.
4. The names "Apache" and "Apache Software Foundation" must not be used
to endorse or promote products derived from this software without prior
written permission. For written permission, please contact apache@apach
e.org.
5. Products derived from this software may not be called "Apache", nor may
"Apache" appear in their name, without prior written permission of the
Apache Software Foundation.
THIS SOFTWARE IS PROVIDED “AS IS” AND ANY EXPRESSED OR IMPLIED WARRANTIES, INCLUDING, BUT NOT LIMITED TO, THE IMPLIED
WARRANTIES OF MERCHANTABILITY AND FITNESS FOR A PARTICULAR PURPOSE ARE DISCLAIMED. IN NO EVENT SHALL THE APACHE
SOFTWARE FOUNDATION OR ITS CONTRIBUTORS BE LIABLE FOR ANY
DIRECT, INDIRECT, INCIDENTAL, SPECIAL, EXEMPLARY, OR CONSEQUENTIAL DAMAGES (INCLUDING, BUT NOT LIMITED TO, PROCUREMENT OF SUBSTITUTE GOODS OR SERVICES; LOSS OF USE, DATA, OR
PROFITS; OR BUSINESS INTERRUPTION) HOWEVER CAUSED AND ON
ANY THEORY OF LIABILITY, WHETHER IN CONTRACT, STRICT LIABILITY, OR TORT (INCLUDING NEGLIGENCE OR OTHERWISE) ARISING
248
User Guide
Section F.3
Apache License
IN ANY WAY OUT OF THE USE OF THIS SOFTWARE, EVEN IF ADVISED
OF THE POSSIBILITY OF SUCH DAMAGE.
`
This software consists of voluntary contributions made by many individuals on
behalf of the Apache Software Foundation. For more information on the Apache
Software Foundation, please see <http://www.apache.org/>. Portions of
this software are based upon public domain software originally written at the National Center for Supercomputing Applications, University of Illinois, UrbanaChampaign.
The Guardian Digital Linux Lockbox
249
L ICENSES
F.4
Appendix F
OpenSSL License
a
Copyright (c) 1998-2000 The OpenSSL Project. All rights reserved.
Redistribution and use in source and binary forms, with or without modification,
are permitted provided that the following conditions are met:
1. Redistributions of source code must retain the above copyright notice, this list
of conditions and the following disclaimer.
2. Redistributions in binary form must reproduce the above copyright notice, this
list of conditions and the following disclaimer in the documentation and/or other
materials provided with the distribution.
3. All advertising materials mentioning features or use of this software must display the following acknowledgment: "This product includes software developed
by the OpenSSL Project for use in the OpenSSL Toolkit. (http://www.opens
sl.org/)"
4. The names "OpenSSL Toolkit" and "OpenSSL Project" must not be used to
endorse or promote products derived from this software without prior written permission. For written permission, please contact [email protected].
5. Products derived from this software may not be called "OpenSSL" nor may
"OpenSSL" appear in their names without prior written permission of the OpenSSL
Project.
6. Redistributions of any form whatsoever must retain the following acknowledgment: "This product includes software developed by the OpenSSL Project for use
in the OpenSSL Toolkit (http://www.openssl.org/)"
THIS SOFTWARE IS PROVIDED BY THE OpenSSL PROJECT “AS IS” AND
ANY EXPRESSED OR IMPLIED WARRANTIES, INCLUDING, BUT NOT
LIMITED TO, THE IMPLIED WARRANTIES OF MERCHANTABILITY AND
FITNESS FOR A PARTICULAR PURPOSE ARE DISCLAIMED. IN NO EVENT
SHALL THE OpenSSL PROJECT OR ITS CONTRIBUTORS BE LIABLE FOR
ANY DIRECT, INDIRECT, INCIDENTAL, SPECIAL, EXEMPLARY, OR CONSEQUENTIAL DAMAGES (INCLUDING, BUT NOT LIMITED TO, PROCUREMENT OF SUBSTITUTE GOODS OR SERVICES; LOSS OF USE, DATA, OR
PROFITS; OR BUSINESS INTERRUPTION) HOWEVER CAUSED AND ON
ANY THEORY OF LIABILITY, WHETHER IN CONTRACT, STRICT LIABILITY, OR TORT (INCLUDING NEGLIGENCE OR OTHERWISE) ARISING
IN ANY WAY OUT OF THE USE OF THIS SOFTWARE, EVEN IF ADVISED
OF THE POSSIBILITY OF SUCH DAMAGE.
250
User Guide
Section F.4
OpenSSL License
This product includes cryptographic software written by Eric Young (eay@crypt
soft.com). This product includes software written by Tim Hudson (tjh@cryp
tsoft.com).
The Guardian Digital Linux Lockbox
251
O
G
G LOSSARY
attributes (ext2fs-specific) In addition to standard Unix permissions, the ext2
file system contains additional attributes, which the file system driver honors whenever the file is accessed or modified. Attributes are set or unset
by the CHATTR command, and it is common to refer to the bits set by the
name. The “immutable” bit is particularly popular among system administrators trying to protect critical files from unintentional destruction by an
inattentive ROOT user.
authentication The process of knowing that the data received is the same as the
data that was sent, and that the claimed sender is in fact the actual sender.
backup (or archive) Both of these terms are used as nouns and verbs. The noun
form refers to any copy of a set of files (and the meta-data associated with
them) on some form of removable media. The verb form refers to any process of creating such a set. An extra copy of a set of files to non-removable
storage is sometimes referred to as “a backup”– but this is more precisely
referred to as “replication” or “mirroring” or (in some cases) “version control”
bastion host A computer system that must be highly secured because it is vulnerable to attack, usually because it is exposed to the Internet and is a main
point of contact for users of internal networks. It gets its name from the
highly fortified projects on the outer walls of medieval castles. Bastions
overlook critical areas of defense, usually having strong walls, room for extra troops, and the occasional useful tub of boiling hot oil for discouraging
attackers.
broadcast The broadcast address is a special address that every host on the network listens to in addition to its own unique address. This address is the one
that datagrams are sent to if every host on the network is meant to receive
it. Certain types of data like routing information and warning messages are
transmitted to the broadcast address so that every host on the network can
receive it simultaneously. There are two commonly used standards for what
the broadcast address should be. The most widely accepted one is to use
the highest possible address on the network as the broadcast address. An
example on an internal network would be 192.168.1.255. For some reason
other sites have adopted the convention of using the network address as the
broadcast address. In practice it doesn’t matter very much which you use
Section G.0
but you must make sure that every host on the network is configured with
the same broadcast address.
buffer overflow Common coding style is to never allocate large enough buffers,
and to not check for overflows. When such buffers overflow, the executing
program (daemon or set-uid program) can be tricked in doing some other
things. Generally this works by overwriting a function’s return address on
the stack to point to another location.
denial of service An attack that consumes the resources on your computer for
things it was not intended to be doing, thus preventing normal use of your
network resources for legitimate purposes.
DNS See Domain Name Server.
Domain Name Server The Domain Name System (DNS) is the software that is
responsible for converting hostnames into numbers that computers can understand. For example, the name www.guardiandigital.com corresponds to
the host IP address 63.87.101.80 and vice versa. The DNS server, sometimes called a name server, is the process that runs on the Lockbox awaiting
incoming name service requests.
dual-homed host A general-purpose computer system that has at least two network interfaces.
firewall A component or set of components that restricts access between a protected network and the Internet, or between other sets of networks.
FQDN See Fully-Qualified Domain Name.
forward zone A forward zone contains a listing of the hostnames in that zone
with their correspinding IP addresses. A reverse zone represents address-todomain mapping, such as 63.87.101.80 to www.guardiandigital
.com.
forwarder A forwarder is used for name servers that may not necessarily be
directly-connected to the Internet. This may be due to being behind a firewall, or inside of a corporate network. Forwarders will instead only query
a specified additional name server for its DNS information.
Fully-Qualified Domain Name Domain names reflect the domain hierarchy. Domain names are written from most specific (a host name) to least specific
(a top-level domain), with each part of the domain separated by a dot ’.’.
A fully qualified domain name (FQDN) starts with a specific host and ends
with a top-level domain. An example of this could be:
The Guardian Digital Linux Lockbox
253
G LOSSARY
Name
lockbox.guardiandigital.com
lockbox
guardiandigital.com
com
Appendix G
Type
FQDN
Machine Name
Domain Name
Domain
full backup This is probably the most confusing term that relates to the subject
of backups. It often does not mean “comprehensive.” A “full” backup does
not necessarily mean that it includes every file on a whole system. “Full”
in those cases means “including all files in a given data set without regard
to previous backups.” In other words, it means “not incremental” and not
“differential.”
It is better to use the phrase “level zero” to make this distinction.
GNU GNU’s Not Unix, a recursive acronym. This is the name of a project started
by Richard M. Stallman, and is the mission of the FSF (Free Software Foundation), which he founded.
The purpose of the GNU project is to produce a “free” operating system
and suite of applications, utilities, and programming tools that are nonproprietary and unencumbered. Some might say they are encumbered by
the GPL (see GPL for more information).
When Linus Torvalds created and released his version version of Linux, it
was no accident that there was a large body of freely available utilities, and
programming tools that could be incorporated into Linux distributions- it
benefitted from the ongoing and as yet incomplete GNU project’s interim
development.
GPL To protect the GNU project software from being appropriated for proprietary use by hardware vendors, the Free Software Foundation released their
software under the GPL or General Public License.
hard link An entry in a directory that contains a pointer directly the the inode
bearing the file’s meta-data. All non-symlink directory entries are “ hard
links.”
host A computer system attached to a network.
host key A key the host will store locally and used for authentication when a user
key, stored on the users system, is passed to it. If both keys are valid then
both the host and user.
254
User Guide
Section G.0
IP spoofing IP Spoofing is a complex technical attack that is made up of several
components. It is a security exploit that works by tricking computers in a
trust relationship into thinking that you are someone that you really aren’t.
There is an extensive paper written by daemon9, route, and infinity in the
Volume Seven, Issue Forty-Eight issue of Phrack Magazine.
b
ISO639-2 Language codes. See Appendix A.2 for a brief listing.
ISO4217 Country currency codes. See Appendix A.1 for listings.
ISO9660 The most common file system found on CD-ROMs.
Kernel Unix systems have a kernel that provides a system call interface (including IOCTL () I/O device control interface) to allow programs to interface directly with hardware and files. The Linux kernel provides file systems, networking support for TCP/IP and other protocols, and device drivers. These
can be built into a kernel “statically” or as loadable modules.
LIDS See Linux Instrusion Detection System.
Linux Instrusion Detection System The Linux Intrusion Detection System allows fine tuning of control over resources and file permissions. For detailed
information concerning LIDS and using LIDS please read section 9.
loadable modules Portions of kernel code that have been compiled separately
and that can be loaded during normal operation using modprobe or insmod.
If you have LIDS running it seals the ability to load modules after the system has booted. You must shut LIDS off first, then load your module(s).
Information on controlling LIDS can be found in Section 9.
non-repudiation The property of a receiver being able to prove that the sender of
some data did in fact send the data even though the sender might later deny
ever having sent it.
Open Source Programs for which the original source code is available, for which
relatively permissive opportunities to modify the code and share the results
with others exist, and which are developed by people whose primary means
of communication with each other is the Internet.
ownership The user (UID) and/or group (GID) that is associated with a file, directory, process, or process group.
packet The fundamental unit of communication on the Internet.
The Guardian Digital Linux Lockbox
255
G LOSSARY
Appendix G
packet filtering The action a device takes to selectively control the flow of data
to and from a network. Packet filters allow or block packets, usually while
routing them from one network to another (most often from the Internet to
an internal network, and vice-versa). To accomplish packet filtering, you
set up rules that specify what types of packets (those to or from a particular
IP address or port) are to be allowed and what types are to be blocked.
b
perimeter network A network added between a protected network and an external network, in order to provide an additional layer of security. A perimeter
network is sometimes called a DMZ.
pid Process identifier. A number used by the kernel to keep track of the systemlevel resources necessary to switch between this process and others running
on the system. It is easily visible to a system administrator by use of the ps
command. In the GD WebTool, section 4, you will find detailed instructions
on viewing and deleting processes via the WebTool.
proxy server A program that deals with external servers on behalf of internal
clients. Proxy clients talk to proxy servers, which relay approved client
requests to real servers, and relay answers back to clients.
reverse zone See forward zone.
root Root is the “superuser” of the system. Generally the system administrator
will login with root privileges to administer the system. You can not login
remotely as root, only from the console. It is not recommended to login as
root unless you need to since accidental errors can be easily made.
Secure Shell A secure shell is a telnet type connection made to a remote host.
This connection is protected with SSL 1024bit encryption. Secure shell is
also known for short as SSH.
shared libraries Shared libraries are object files that are dynamically linked to
executable binary programs. Under Linux, shared libraries can be stored in
a number of directories (usually listed in /etc/ld.so.conf). Shared
libraries typically include files under /usr/lib. If the shared libraries
are deleted or become damaged, or of the /etc/ld/so.cache file is
corrupted, then programs that rely on them will fail to execute. Almost all
normal programs on a system rely on glibc.
signal Under Unix and Linux, the signal is the most fundamental and common
form of interprocess communications (IPC). It is also the basis for “eventdriven” programming under these systems. Each Unix implementation defines a set of signals that area associated with various asynchronous events,
256
User Guide
Section G.0
such as a terminal sending an “interrupt request” (SIGINT) or a change in
window size (SIGWINCH).
SSH See Secure Shell
superuser An informal name for ROOT.
symlink Symbolic link. An entry in a directory that is not a file, but contains the
name of another file that should normally be accessed instead. Contrasts a
hard link.
Umask A setting in a Unix process that modifies the permissions on newly created files. It is generally represented as a three-digit octal number that will
be logically ANDed against the mode 666 (rw-rw-rw). Execute bits are not
on newly created files in any case.
Unix The operating system after which Linux is modeled. Although often used
to refer to any operating system that provides features and programming
interfaces that emulate Unix, the term is a trademark legally held by The
Open Group.
user key see host key.
virtual memory Memory beyond what is actually available, but which programs
believe is actually available memory in the system. See paging , and swapping.
zone transfer A zone transfer is when a secondary name server, also sometimes
referred to as a slave server, for a zone gets the zone data from another name
server that is authoritative for the zone, called its master server. When a
secondary name server starts up, it contacts its master server and requests
a copy of the zone data for which it is responsible, storing it in the event a
request is made for information in that zone.
The Guardian Digital Linux Lockbox
257
H
c
R EFERENCES
1. Albitz, Paul & Liu, Cricket. DNS and BIND, Third Edition. O’Reilly &
Associates, Inc. 1998.
2. Carling, M, Degler, Stephen, and Dennis, James. Linux System Administration. New Riders Publishing, 2000.
3. Mark Grennan. Firewall and Proxy Server HOWTO, Feb. 26, 2000.
http://www.linuxdoc.org/HOWTO/Firewall-HOWTO.html. Copyright Mark
Grennan, 2000
4. Hunt, Craig. TCP/IP Network Administration. O’Reilly & Associates, Inc.
1993
5. Laurie, Ben & Lauri, Peter, Apache The Definitive Guide, Second Edition,
O’Reilly & Associates, Inc.. 1999.
6. Dave Wreski and Kevin Fenzi, Linux Security How-to.
http://www.linuxsecurity.com/docs/HOWTO/Security-HOWTO/, 2000
7. Wreski, Dave. It’s a Bad Bad Bad world! But Understanding the ABC’s of
Linux Security Can Make It Better!. Linux Magazine, October 1999, Vol 1,
Num 6, pg 31
8. Wreski, Dave. System Security. Linux Magazine, October 2000, Vol 2,
Issue 10, pg 34.
9. Yarger, Randy Jay, Reese, George & King, Tim. MySQL & mSQL. O’Reilly
& Associates, Inc. 1999
10. Zwicky, Cooper & Chapman. Building Internet Firewalls, June 2000. Copyright O’Reilly & Associates, Inc. 2000.
11. Ziegler, Robert L. Linux Firewalls. New Riders Publishing, 2000.
12. Zwicky, Elizabeth D., Cooper, Simon, & Chapman, D. Brent. Building
Internet Firewalls. O’Reilly & Associates, Inc. 2000.
Index
active network connections, 103
Address Verification Services (AVS),
182
alerts, 106, 107
Aliases, 45
AllCommerce, 159
apache, 42
backup
create named, 114
create new, 111
delete, 112
delete named, 115
restore, 112
schedule named, 113
system, 111
view changed files, 113
view contents of, 112
CashRegister, 180
templates, 184
change password, 26, 27, 116
Client Machine, 23
codes
currency, 212
language, 219
connecting, 24, 35
connectivity, 120
unix, 137
windows, 121
credit card, 180
processing models, 182
CyberCash, 180
daily summary, 106
directory structure, 53
disk usage, 103
DNS, 85
address record, 93
client, 76
Domain Name, 88
master server, 30, 88, 99
master servers, 90
Network, 88
primary server, 30, 88, 99
secondary server, 30, 88
slave server, 30, 88
zone
create new master, 86
create new slave, 89
type, 88
domain name, 29
e-mail, 82
configuration, 83
Netscape, 140
Outlook, 147
secure, 139
IMAP, 139, 140, 147
POP3, 139, 147
Error 404, 57
FQDN, 57, 253
Fully-Qualified Domain Name, 57
gateway, 30
GD Update, 38
group configure, 72
hostname, 29
IE, 24, 35
Installing, 22
interface, edit, 74
IP address, 29
ISO 4217, 212
259
ISO 639-2, 219
d
kernel
capabilities, 198
key generation
OpenSSH, 138
user, 81
key management, 80
LIDS, 186
example, 194
example script, 197
file protection, 194
usage, 189
lidsadm, 189
add entry, 191
delete and update all, 192
delete entry, 192
password creation, 193
using, 190
view configuration, 193
view status, 193
Lockbox Connectivity, 120
log
analysis, 55
rotation, 100
statistics, 56
logfile management, 100
logging in, 35
login banner, 110
mail, 82
merchant
account, 180
fees and rates, 181
merchant account, 180
creation, 182
MindTerm, 121
installing, 121
running, 122
usage, 131
260
netmask, 30
Netscape, 24, 35
network
configuration, 73
interfaces, 73
New User, 28, 71
OpenSSH, 137
key generation, 138
usage, 137
PID, 100, 101
postfix
management, 82
process management, 100
processes, view, 101
RAID, 9
Redirects, 45
Secure Shell Management, 79
security, 19, 37, 105
alerts, 106, 107
server name, 40
services monitor, 104
SSH, 70
definition, 79
edit, 79
management, 79
user, 28
SSL, 35
connection, 121
store
creation, 56
delete, 64
deletion, 64
edit, 64
subnet, 30
mask, 30
system
access control, 109
backup, 38
management, 37, 70
statistics, 102
status, 37, 100
time, 78
time zone, 31
trusted host, 30, 79
update, 38, 118
user
account, 70
edit, 72
User Access Control, 56
virtual host, 41
delete, 53
edit, 42
management, 37, 39
named
create, 55
delete, 55
secure, 41
ssl, 41
virtual interface
create, 75
web directory, 53
WebTool, 1, 22, 34
Access Control, 108
connecting, 35
login, 35
main menu, 37
password, 105
usage, 37
Windows, 121
261