1
2
CONTENTS
Technical data…..………………………………………………………..
General safety rules…….………………………………………………..
Specific safety rules for jig saw….………………………………………
Electrical information …………………………………………………...
Blade installation…………………………………………………………
Operating your jig saw…………………………………………………...
Exploded view and parts list………………………………………………
Warranty…………………………………………………………………
TECHNICAL DATA
Variable Speed Jig Saw
Model:
Motor:
Variable Speed:
Stroke Length:
Cutting Angles:
Weight:
3702
120 V, 60 Hz, 3.5 A
500 to 3000 SPM
3/4"
45º Left, 45º Right & 90º
4.2 lbs
3
3
4
6
8
9
9
11
13
GENERAL SAFETY RULES
Safety is a combination of common sense, staying alert, and knowing how your drill press works.
SAVE THESE SAFETY INSTRUCTIONS.
WARNING: To avoid mistakes that could cause serious injury, do not plug in the Jig Saw until
the following steps have been read and understood.
1. READ and become familiar with this entire instruction manual. LEARN the tool’s applications,
limitations, and possible hazards.
2. AVOID DANGEROUS CONDITIONS. Do not use power tools in wet or damp areas or expose them to
rain. Keep work areas well-lit.
3. DO NOT use power tools in the presence of flammable liquids or gases.
4. ALWAYS keep your work area clean, uncluttered, and well-lit.
5. KEEP BYSTANDERS AT A SAFE DISTANCE from the work area, especially when the tool is
operating. NEVER allow children or pets near the tool.
6. DO NOT FORCE THE TOOL to do a job for which it was not designed.
7. DRESS FOR SAFETY. Do not wear loose clothing, gloves, neckties, or jewelry (rings, watches, etc.)
when operating the tool. Inappropriate clothing and items can get caught in moving parts and draw you in.
ALWAYS wear non-slip footwear and tie back long hair.
8. WEAR A FACE MASK OR DUST MASK as the cutting operation produces dust.
WARNING: Dust generated from certain materials can be hazardous to your health. Always
operate the Jig Saw in a well-ventilated area and provide for proper dust removal. Use dust
collection systems whenever possible.
9. ALWAYS remove the power cord plug from the electric outlet when making adjustments, changing parts,
cleaning or working on the tool.
10. KEEP GUARDS IN PLACE AND IN WORKING ORDER.
11. AVOID ACCIDENTAL START-UPS. Make sure the power switch is in the OFF position before
plugging in the power cord.
12. REMOVE ADJUSTMENT TOOLS. Always make sure all adjustment tools are removed from the drill
press before turning it on.
13. NEVER LEAVE A RUNNING TOOL UNATTENDED. Turn the power switch to OFF. Do not leave the
tool until it has come to a complete stop.
14. NEVER STAND ON A TOOL. Serious injury could result if the tool tips or is accidentally hit.
DO NOT store anything above or near the tool.
4
GENERAL SAFETY RULES (CONTINUED)
15. DO NOT OVERREACH. Keep proper footing and balance at all times. Wear oil-resistant rubber-soled
footwear. Keep the floor clear of oil, scrap, and other debris.
16. MAINTAIN TOOLS PROPERLY. ALWAYS keep tools clean and in good working order. Follow
instructions for lubricating and changing accessories.
17. CHECK FOR DAMAGED PARTS. Check for alignment of moving parts, jamming, breakage, improper
mounting, or any other conditions that may affect the tool’s operation. Any part that is damaged should be
properly repaired or replaced before use.
18. MAKE THE WORKSHOP CHILDPROOF. Use padlocks and master switches and ALWAYS remove
starter keys.
19. DO NOT operate the tool if you are under the influence of drugs, alcohol, or medication that could affect
your ability to use the tool properly.
20. USE SAFETY GOGGLES AT ALL TIMES—that comply with ANSI Z87.1.
Normal safety glasses only have impact resistant lenses and are not designed for
safety. Wear a face or dust mask when working in a dusty environment. Use ear
protection, such as plugs or muffs, during extended periods of operation.
5
SPECIFIC SAFETY RULES FOR JIG SAW
1. Always keep hands and fingers away from the blade.
2. Do not cut material that does not have a flat surface, unless a suitable support is used.
3. Make sure blade is securely locked.
4. Make sure key wrench is removed before turning power on.
5. Always stop the saw before removing scrap pieces.
6. Use clamps or a vise to secure workpiece.
7. Set the jig saw to the speed appropriate for the job.
8. Should any part of your jig saw is missing, damaged, or any electrical component fail to perform properly,
shut power off and unplug jig saw. Replace missing, damaged, or failed parts before resuming operation.
9. Never use in an explosive atmosphere. Normal sparking of the motor could ignite fumes.
10. Use only outdoor extension cords with approved ground connection that are intended for use outdoors
and so marked.
11. Avoid awkward operations and hand positions where a sudden slip could cause your hand to move into
the blade. ALWAYS make sure you have good balance.
12. Allow the motor to come up to full speed before starting a cut to avoid binding or stalling
13. Do not use tool if switch does not turn it on and off. Have defective switches replaced by an authorized
service center.
14. Replacement parts. All repairs, whether electrical or mechanical, should be made by a qualified service
technician at an authorized service center.
15. Keep hands away from cutting area. Do not hand hold pieces so small that your fingers go under the blade
guard. Do not reach underneath work or in blade cutting path with your hands and fingers for any reason.
16. Before making a cut, be sure all adjustments are secure.
17. Always support large work pieces while cutting to minimize risk of blade pinching and kickback. Saw
may slip, walk or slide while cutting large or heavy boards.
18. Do not remove jammed cutoff pieces until blade has stopped.
19. Never start the tool when the blade is in contact with the work piece.
20. Never touch blade or other moving parts during use.
21. Before changing the setup, removing covers, guards or blades, unplug the saw and remove the switch key.
6
SPECIFIC SAFETY RULES FOR JIG SAW (CONTINUED)
22. Always turn off saw before disconnecting it to avoid accidental starting when reconnecting to a power
source.
23. Stay alert and exercise control. Watch what you are doing and use common sense. DO NOT operate tool
when you are tired. DO NOT RUSH!
24. Make sure work area has ample lighting to see the work and that no obstructions will interfere with safe
operation BEFORE performing any work using your saw.
25. Save these instructions. Refer to them frequently and use them to instruct other users. If you loan
someone this tool, loan them these instructions also.
26. AVOID CUTTING NAILS. Pull all nails from work material before starting cutting operation.
27. Don’t cut hollow pipe with this saw.
28. Never touch moving parts with your hand.
7
ELECTRICAL INFORMATION
Guidelines for using extension cords
Make sure your extension cord is in good condition. When using an extension cord, be sure to use one heavy
enough to carry the current your product will draw. An undersized cord will cause a drop in line voltage
resulting in loss of power and overheating. The table below shows the correct size to be used according to
cord length and nameplate ampere rating. If in doubt, use the next heavier gauge. The smaller the gauge
number, the heavier the cord.
Minimum Gauge for Extension Cords (AWG)
(When using 120 V only)
Ampere Rating
More Than Not More Than
0
6
Total Length of Cord
50 Feet
100 Feet
16 Gauge
16 Gauge
25 Feet
18 Gauge
150 Feet
14 Gauge
Make sure your extension cord is properly wired and in good condition. Always replace a damaged extension
cord or have it repaired by a qualified person before using it.
Protect your extension cords from sharp objects, excessive heat and damp or wet areas.
Use a separate electrical circuit for your tools. This circuit must not be less than a #12 wire and should be
protected with a 15 A time-delayed fuse. Before connecting the motor to the power line, make sure the switch
is in the OFF position and the electric current is rated the same as the current stamped on the motor nameplate.
Running at a lower voltage will damage the motor.
8
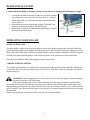
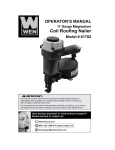
BLADE INSTALLATION
Caution: Before installing or changing a blade, be sure the saw is unplugged from the power supply.
1. Loosen the two blade lock bolts (use hex key supplied) enough
for a blade to be removed or inserted. Note: there is a position
notch in the blade cover and the back plate to which the blade
clip is screwed.
2. Insert blade in slot with teeth facing forward. The blade’s top
should be inserted far enough to touch blade clip.
3. While blade is in fitted slot and touching blade clip top, tighten
the blade lock bolts securely.
OPERATING YOUR JIG SAW
BLADE GUIDE USAGE
The blade guide is a part of the base plate and has a metal roller guide to support the saw blade. When the
back of the blade being used is straight, the blade guide metal roller should be positioned to slightly touch the
blade. If the back of the blade is slanted, the guide should be position slightly behind the slide the base plate
forward or backward until the guide is in the desired position. Now, tighten the two base plate bolts.
Note: the roller should be lubricated frequently when cutting metals.
VARIABLE SPEED CONTROL
The variable speed control is a 6-position roll switch located on the top front of the handle. By rotating the
switch from one to six, the blade speed can be set from 500 to 3000 SPM. Stroke rate should set for specific
material being cut.
WARNING: Before plugging your saw into a power source, press the trigger to ensure the trigger
has not been locked in the on position.
After checking that blade will not contact anything, press the trigger and hold it until the blade
reaches the desired speed. Then put the base plate on the material to be cut and align it on the mark of the
desired starting point. Push the saw slowly into the area to be cut. Continue to follow your cut lines until the
task is complete. Note: Be sure the base plate of your jig saw is in contact with the material being cut through
the operation.
Failure to keep the plate in contact with the work can result in broken blades.
9
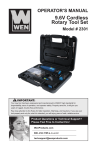
MITER CUTS
The base plate can be tilted to cut any angle between
0º and 45º right and left.
Loosen the two base plate adjustment screws. Then
slide the base plate toward the back of the saw. Rotate
the base left or right to the desired angle, slide the base
plate forward until the blade guide is in the correct
position, then tighten base plate screws. Note: the base
plate has a scale for setting 45º and 90º angles. Use a
protractor to set other angels.
10
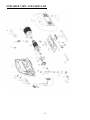
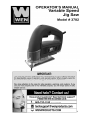
EXPLODED VIEW AND PARTS LIST
11
PATS LIST
Part 1 2 3 4 5 6 7 8 9 10 11 12 13 14 15 16 17 Stock # 3702‐001 3702‐002 3702‐003 3702‐004 3702‐005 3702‐006 3702‐007 3702‐008 3702‐009 3702‐010 3702‐011 3702‐012 3702‐013 3702‐014 3702‐015 3702‐016 3702‐017 Description Speed control PCB Switch Screw ST4.2x19 Right half housing Cord clip Screw ST4.2x13 Cord guard Power cord Stator Bearing Carbon Brush Assembly Rotor Bearing Center Support Washer Gear Guide Case 12
Part 18
19
20
21
22
23
24
25
26
27
28
29
30
31
32
33
Stock # 3702‐018 3702‐019 3702‐020 3702‐021 3702‐022 3702‐023 3702‐024 3702‐025 3702‐026 3702‐027 3702‐028 3702‐029 3702‐030 3702‐031 3702‐032 3702‐033 Description Slide Mass Slide Rod Felt Blade clamp Screw M4x15 Guard Guide roller Bottom board Square nut M4 Left half housing Nameplate Washer board Spring washer Screw ST4.2x45 L spanner M4 Saw blade LIMITED ONE YEAR WARRANTY
WEN Products is committed to build tools that are dependable for years. Our warranties are consistent with this commitment and
our dedication to quality
LIMITED WARRANTY OF WEN CONSUMER POWER TOOLS PRODUCTS FOR HOME USE
GREAT LAKES TECHNOLOGIES, LLC ("Seller") warrants to the original purchaser only, that all WEN consumer power tools
will be free from defects in material or workmanship for a period of one (1) year from date of purchase. Ninety days for all WEN
products, if the tool is used for professional use.
SELLER'S SOLE OBLIGATION AND YOUR EXCLUSIVE REMEDY under this Limited Warranty and, to the extent permitted
by law, any warranty or condition implied by law, shall be the repair or replacement of parts, without charge, which are defective in
material or workmanship and which have not been misused, carelessly handled, or misrepaired by persons other than Seller or
Authorized Service Center. To make a claim under this Limited Warranty, please contact us at 1-800-232-1195.To acquire service,
you will have to provide proof of purchase and may be asked to ship the tool back to us freight prepaid.
THIS LIMITED WARRANTY DOES NOT APPLY TO ACCESSORY ITEMS SUCH AS CIRCULAR SAW BLADES, DRILL
BITS, ROUTER BITS, JIGSAW BLADES, SANDING BELTS, GRINDING WHEELS AND OTHER RELATED ITEMS.
ANY IMPLIED WARRANTIES SHALL BE LIMITED IN DURATION TO ONE (1) YEAR FROM DATE OF PURCHASE.
SOME STATES IN THE U.S., SOME CANADIAN PROVINCES DO NOT ALLOW LIMITATIONS ON HOW LONG AN
IMPLIED WARRANTY LASTS, SO THE ABOVE LIMITATION MAY NOT APPLY TO YOU.
IN NO EVENT SHALL SELLER BE LIABLE FOR ANY INCIDENTAL OR CONSEQUENTIAL DAMAGES (INCLUDING
BUT NOT LIMITED TO LIABILITY FOR LOSS OF PROFITS) ARISING FROM THE SALE OR USE OF THIS PRODUCT.
SOME STATES IN THE U.S. AND SOME CANADIAN PROVINCES DO NOT ALLOW THE EXCLUSION OR
LIMITATION OF INCIDENTAL OR CONSEQUENTIAL DAMAGES, SO THE ABOVE LIMITATION OR EXCLUSION
MAY NOT APPLY TO YOU.
THIS LIMITED WARRANTY GIVES YOU SPECIFIC LEGAL RIGHTS, AND YOU MAY ALSO HAVE OTHER RIGHTS
WHICH VARY FROM STATE TO STATE IN THE U.S., PROVINCE TO PROVINCE IN CANADA AND FROM COUNTRY
TO COUNTRY.
THIS LIMITED WARRANTY APPLIES ONLY TO PORTABLE ELECTRIC TOOLS, BENCH POWER TOOLS, OUTDOOR
POWER EQUIPMENT AND PNUMATIC TOOLS SOLD WITHIN THE UNITED STATES OF AMERICA, CANADA AND
THE COMMONWEALTH OF PUERTO RICO. FOR WARRANTY COVERAGE WITHIN OTHER COUNTRIES, CONTACT
THE WEN CUSTOMER SUPPORT.
13