1
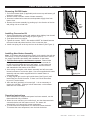
FWAP Conversion Kit
Installation Instructions
http://www.cadetheat.com/products/wall-heaters/com-pak
Features & Benefits
vertical installation shown
•
Converts discontinued FW Series wall can
to newer Com-Pak or Com-Pak Max
•
UL Listed for installation of Com-Pak
model into FW wall can
•
No sheetrock construction necessary saves time and money
•
Vertical or horizontal installation
PARTS INClUDED:
3 Screws
2 Spring Nuts
2 Lead Wires
1 Replacement Grill Label
2 Mounting Screws
1 Conversion Plate
3 Lock Tooth Washers
1 Instruction Guide
TOOlS REqUIRED:
Phillips Screwdriver
Straight Screwdriver
Model: FWAP to be used with any CS model heater
Any of the following models may be replaced using the FW conversion kit:
FW051, RW051, FW052, RW052, FW071, RW071, FW751, RW071, FW752, RW752
FW072, RW072, FW101, RW101, FW102, RW102, FW121, RW121, FW122, RW122
FW151, RW151, FW152, RW152, FW202, RW202, FW252, RW252, FW302, RW302
*The above models may be controlled by either a built-in thermostat or a wall mount thermostat.
General Safety Information
If you are uncomfortable working with electrical appliances, unable to follow these guidelines,
or do not have the necessary equipment, consult a licensed electrician.
home, which could result in a fire and serious property damage.
WARNING!
Replacing with a lower wattage heater may cause insufficient
Turn the electrical power off at the
heat and result in increased energy costs.
electrical panel board (circuit
breaker or fuse box) and lock or
2. All electrical work and materials must comply with the National
tag the panel board door to
Electric Code (NEC), the Occupational Safety and Health Act
prevent someone from turning on
(OSHA), and all state and local codes.
power while you are working on
the heater. Failure to do so could
3. When installing the heater conversion kit, be certain the FW
result in serious electrical shock,
heater being replaced was wired correctly to all electrical codes
burns, or possible death.
and the supply wiring is the correct size and in good condition.
If not, it must be replaced before proceeding.
1.
WARNING
Risk of fire or property damage.
4. If you need to install a new circuit or need additional wiring
DO NOT replace your heater with a higher wattage assembly.
information, consult a qualified electrician.
Replace your heater with the same voltage and wattage that
was originally installed. Replacing it with a higher wattage
5. Protect electrical supply from kinks, sharp objects, oil, grease,
heater could result in an overloaded electrical circuit in your
hot surfaces or chemicals.
SAVE THESE INSTRUCTIONS
cadetheat.com
Tel: 360-693-2505
P.O. Box 1675
Vancouver, WA
98668-1675
©2014 Cadet Printed in U.S.A. 12/14 #720027
1
FWAP Instructions (Back Side)
Removing Old FW Heater
Figure 1
1. Pull off thermostat knob (if applicable) and remove top and bottom grill
screws to remove grill.
2. Remove screw on bottom center of heater assembly.
3. Unscrew insulated wire connectors and separate supply wires from heater wires.
4. Remove the heater assembly by pushing up in the direction of the fan and pulling unit out of wall can.
halfmoon
tabs
Installing Conversion Kit
1. Screw top and bottom screws and washers about halfway into the wall
can with the half-moon tabs facing out (See Figure 1).
2. Push plate down into position.
3. Tighten the screws. NOTE: Star washers MUST be located between
the screw head and painted surface of the conversion plate.
4. Install one spring nut at the top and one at the bottom (See Figure 2).
Figure 2
Spring Nut
Installing New Heater Assembly
Note: If FW heater was wired with the supply circuit entering the wall can
from the top, it may be necessary to add 8 inches of lead wire to each of
the supply lines before proceeding with installation of new heater. 1. The Com-Pak requires a thermostat to operate. Please follow
wiring instructions supplied with either your built-in thermostat kit or wall mount thermostat and your new heater. If new heater has a built-in thermostat, the two mounting screws must be removed and reattached to the bottom of the FWAP.
2. Once wiring is complete, slide heater assembly into half-moon tabs
located on bottom of conversion plate. Use screw supplied with heater
assembly and star washer supplied with kit to attach heater to conversion plate.
3. If using original grill, turn the grill upside down (See Figure 3) and
install using two new #10 screws. If there is a built-in thermostat, be sure it is at the bottom.
4. Affix new label (provided) on inverted grill. It is not necessary to
remove the old label. If using a built-in thermostat, cut thermostat shaft hole out of new label.
Spring Nut
Figure 3
Operation Instructions
1. Once installation is complete and power has been restored, turn the thermostat knob fully clockwise.
2. When the room reaches your comfort level, turn the thermostat knob counterclockwise until the heater turns off. The heater will
auto mat ically cycle around this preset temperature.
3. To reduce the room temperature, turn the knob counterclockwise. To increase the room tempera ture, turn the knob clockwise.
©2014 Cadet Printed in U.S.A. 12/14 #720027