1
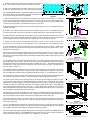
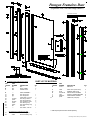
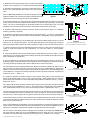
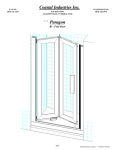
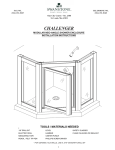
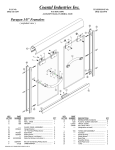
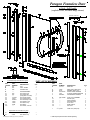
Paragon Frameless Door
w/Oval - Pull Handle
(exploded view, left hand hinge shown)
(OPTIONAL JAMP CAP)
(*) denotes Vinyls used with 3/16” glass
KEY
LETTER
A
B
C
D
d1
d2
d3
d4
d5
d6
d7
* d8
* d9
d10
PART
NUMBER
901
903
928
DESCRIPTION
SILL
WALL JAMBS
STRIKE POST
---920
923
---cp148tw
cp932
812FHP
c944b
c945b
931M
----
DOOR ASSEMBLY
Door Hinge Post
Door Hinge Stile
(designation not used)
Door Hinge Washer
Door Hinge Bushing
Door Assembly Screw
Door Glazing Vinyl
Door Strike Vinyl
Door Strike
Door Glass, 3/16” thk
PART LIST OF MATERIAL
QTY
1
2
1
1
1
--2
2
2
--1
1
1
KEY
LETTER
E
PART
NUMBER
C 914 C
DESCRIPTION
DRIP RAIL
F
G
H
I
J
c956c
98-45
6-8114PHP
1329
638PHPT
SEAL VINYL (Strike Post)
MAGNET (Strike Post)
INSTALLATION SCREWS
PLASTIC SCREW ANCHORS
ADJUSTMENT SCREWS
2
1
6
6
6
K
k1
k2
k3
k4
k5
k6
TA8-CGNW
-------------
OVAL PULL ASSEMBLY
Handles (set)
Plastic Washers
Sleeve Bushings
Screw Post
Metal Washers
Set Screw
1
4
2
2
2
2
cp903
JAMP CAP (wall jamb)
2
L
d7
d8
Vinyls below are used with 1/4” glass
c954b
Door Glazing Vinyl
c955b
Door Strike Vinyl
Frls Paragon Dr w/ ta8-cgnw (C 914 C) 03-02-2007
***
--1
*** Jamb Caps are optional and are ordered separately.
QTY
1
1. Measure the base opening along center of shower curb as shown in
figure 1, then trim Sill (A) to 1/16” less than measurement obtained.
2. With high lip toward exterior of enclosure, position the Sill at center of
shower curb. Temporarily tape Sill to shower curb to prevent movement.
Note: For Door Only Installations; Trim Wall Jambs (B) to the same height
as the Strike Post (C) before proceeding; otherwise leave Wall Jambs as
they are (no trimming) and continue the installation
figure 1
figure 2
3. Place Wall Jambs (B) on to ends of Sill (A) and up against shower walls as shown in figure 2. Plumb the
Jambs, then pencil mark their installation holes locations on shower walls (3 per jamb). Remove Wall Jambs.
Use a 3/16” drill bit (designed to drill through material you are working with) to drill 1-1/4” deep installation holes
in locations previously marked. Insert Plastic Screw Anchors (I) into holes.
4. Reposition Wall Jambs (B) as before and secure Jambs to walls using the six(6) 1-1/2” Installation Screws (H)
provided (3 per jamb).
5. Decide from which side your Door Assembly (D) is to hinge (left or right, your choice). Install Glazing Vinyl (d7)
onto hinge side of glass as shown in the exploded view. Begin glazing at top of glass edge and work down.
6. Before installing the Hinge Stile (d2), wet the Glazing Vinyl (d7) with some diluted liquid soap (do not, wet the
inside of vinyl, as it will slip off the glass). Insert the Hinge Stile (d2) over the Glazing Vinyl and tap into place (with
a rubber mallet) until the Post is firmly seated (top of Hinge Post must be flush with top of glass).
figure 3
(Door always opens in direction shown above)
Figure shows installation for a left hand hinged door
7. Insert the Hinge Post (d1) into the Hinge Stile (d2) as shown in figure 3. Take a minute to check the door
rotation (is it the correct rotation for your configuration)? If it is not, then make it so. When satisfied, proceed.
8. Insert Hinge Washer (d4) and Hinge Bushing (d5) into Hinge Stile (d2) as shown in figure 3. Rotate Hinge
Post (d1) out of the way and secure the bushing with one(1) Door Assembly Screw (d6) as shown in figure.
Repeat step for opposite end.
9. Pick Door Assembly up and insert its Hinge Jamb (d1) into the Wall Jamb from which it is to swing. On strike
edge of glass, center and install Door Strike Vinyl (d8) as shown in exploded view - sheet 1. Insert Door Strike
(d9) over Vinyl (d8) and tap into place (with a rubber mallet) until Strike is firmly seated. Carefully trim any excess
vinyl as required.
10. Insert Strike Post (C) into appropriate Wall Jamb. Measure from bottom of Strike Post (where it sits on Sill)
to the bottom of the Door Pull (d9). Trim bottom Seal Vinyl (F) to a 1/4” more than measurement obtained.
Insert trimmed Seal Vinyl into Strike Post as indicated in exploded view, sheet - 1. Next insert Magnet Strip (G)
into Strike Post. Finally insert remaining Vinyl Seal (F) and trim top excess as required. Snip Seal Vinyl as
shown on sheet - 1, Detail ‘1 - A’.
figure 4
Install Oval-pull Handles as shown above
(Install outside Handle first as shown, then install the
inside Handle)
11. Adjust Door Assembly and Strike Post along curb as required. Note: Bottom of Door Assembly must always
remain parallel to Sill in order for door to operate properly. When satisfied with door operation, secure Hinge
Post and Strike Post to the Wall Jambs using 638PHPT Adjustment Screws (J), see exploded view - sheet 1.
12. If Jamb Caps (L) were purchased, install the End Caps (L) at both the hinge side and the strike side of the
door as shown in exploded view - sheet 1. Trim the End Caps to required lengths before installing.
13. Install oval pull Handles (K) by backing out the two Set Screws (k6) and pulling the Handles (k1) apart.
Unscrew the two Screw Posts (k4) to disassemble bushings and washers. Slip a metal Washer (k5), a plastic
Washer (k2) and Sleeve Bushing (k3) onto the Screw Post (k4) as shown in Figure 4. Insert it into the glass hole
as shown and attach the outside oval pull Handle, (do not forget to attach plastic washer). Hand tighten the
screw and repeat step for bottom portion. When done . . . carefully tighten down assembly with a screw driver.
Take inside Handle (see explode view sheet 1) and insert it onto the Screw Post heads as shown. Finish oval pull
Handle installation by tightening down the two set screws.
figure 5
Insert Drip Rail unto bottom edge of glass
14. With drip wing positioned toward inside of shower enclosure, Insert Drip Rail (E) onto the bottom edge of the
Door Assembly (D) as shown in exploded view - sheet 1 and figure 5. Now snug the Drip Rail up to the vertical
Vinyl; mark the edge of the door glass on the rail and cut off the excess as shown in figure 6.
From inside the shower enclosure, close the shower door and mark where drip wing needs to be notched for
proper closure against door strike (see figure 7). Notch the drip rail as required and reposition the Drip Rail on
the door and check for fit.
Once you are satisfied with the Drip Rail fit, remove the Drip Rail and run a a bead of clear mildew resistant
silicone down the full length the Drip Rail cavity (this will insure a secure Drip Rail installation when you reposition
it on the glass). Reposition the Drip Rail on the glass and press firmly into place.
figure 6
Snug Drip Rail up against the vertical Vinyl, then cut
off the excess as shown in figure.
15. Run a bead of clear mildew resistant caulking down the full length of each Wall Jamb outside where the
Jambs meet the Walls. Now run a bead outside where the Sill meets the curb. Follow caulking manufacturer’s
instructions before using shower (normally 24 hours). Installation is now complete.
figure 7
Frls Paragon Dr w/ ta8-cgnw (C 914 C) 03-02-2007
Paragon Frameless Door
(exploded view, left hand hinge shown)
(OPTIONAL JAMP CAP)
(*) denotes Vinyls used with 3/16” glass
KEY
LETTER
A
B
C
D
d1
d2
d3
d4
d5
d6
* d7
* d8
d9
d10
PART
NUMBER
901
903
928
DESCRIPTION
SILL
WALL JAMBS
STRIKE POST
---920
923
---cp148tw
cp932
812FHP
c944b
c945b
931
----
DOOR ASSEMBLY
Door Hinge Post
Door Hinge Stile
(designation not used)
Door Hinge Washer
Door Hinge Bushing
Door Assembly Screw
Door Glazing Vinyl
Door Pull Glazing Vinyl
Door Pull
Door Glass, 3/16” thk
PART LIST OF MATERIAL
QTY
1
2
1
1
1
--2
2
2
--1
1
1
c954b
c955b
Door Glazing Vinyl
Door Pull Glazing Vinyl
F
G
H
I
J
*** K
PART
NUMBER
C 914 C
DESCRIPTION
DRIP RAIL
c956c
98-45
6-8114PHP
1329
638PHPT
cp903
SEAL VINYL (Strike Post)
MAGNET (Strike Post)
INSTALLATION SCREWS
PLASTIC SCREW ANCHORS
ADJUSTMENT SCREWS
JAMB CAP (wall jamb)
QTY
1
2
1
6
6
6
2
*** Jamb Caps are optional and are ordered separately.
Vinyls below are used with 1/4” glass
d7
d8
KEY
LETTER
E
--1
Frls Paragon Dr w/ CP931 (C914C) 03-02-07
1. Measure the base opening along center of shower curb as shown
in figure 1, then trim Sill (A) to 1/16” less than measurement obtained.
2. With high lip toward exterior of enclosure, position Sill at center of
shower curb. Temporarily tape Sill to shower curb to prevent movement.
Note: For Door Only Installations; Trim Wall Jambs (B) to the same
height as the Strike Post (C) before proceeding; otherwise leave Wall
Jambs as they are (no trimming) and continue the installation
figure 1
figure 2
3. Place Wall Jambs (B) on to ends of Sill (A) and up against shower walls as shown in figure 2. Plumb the
Jambs, then pencil mark their installation holes locations on the shower walls (3 per jamb). Remove Wall
Jambs. Use a 3/16” drill bit (designed to drill through material you are working with) to drill 1-1/4” deep
installation holes in locations previously marked. Insert Plastic Screw Anchors (I) into holes.
4. Reposition Wall Jambs (B) as before and secure Jambs to walls using the six(6) 1-1/2” Installation
Screws (H) provided (3 per jamb).
5. Decide from which side your Door Assembly (D) is to hinge (left or right , your choice). Install Glazing
Vinyl (d7) onto hinge side of glass as shown in the exploded view. Begin glazing at top of glass edge and
work down.
6. Before install Hinge Stile (d2), wet the Glazing Vinyl (d7) with some diluted liquid soap (do not, wet the
inside of vinyl, as it will slip off the glass). Insert the Hinge Stile (d2) over the Glazing Vinyl and tap into
place (with a rubber mallet) until the Post is firmly seated (top of Hinge Post must be flush with top of glass).
figure 3
(Door always opens in direction shown above)
Figure shows installation for a left hand hinged door
7. Insert the Hinge Post (d1) into the Hinge Stile (d2) as shown in figure 3. Take a minute to check the door
rotation (is it the correct rotation for your configuration)? If it is not, then make it so. When satisfied,
proceed.
8. Insert Hinge Washer (d4) and Hinge Bushing (d5) into Hinge Stile (d2) as shown in figure 3. Rotate
Hinge Post (d1) out of the way and secure the bushing with one(1) Door Assembly Screw (d6) as shown in
figure. Repeat step for opposite end.
9. Pick Door Assembly up and insert its Hinge Jamb (d1) into the Wall Jamb from which it is to swing. On
strike edge of glass, center and install Door Pull Vinyl (d8) as shown in exploded view. Insert Door Pull (d9)
over Vinyl (d8) and tap into place (with a rubber mallet) until Door Pull is firmly seated.
10. Insert Strike Post (C) into appropriate Wall Jamb. Measure from bottom of Strike Post (where it sits on
Sill) to the bottom of the Door Pull (d9). Trim bottom Seal Vinyl (F) to a 1/4” more than measurement
obtained. Insert trimmed Seal Vinyl into Strike Post as indicated in exploded view. Next insert Magnet Strip
(G) into Strike Post. Finally insert remaining Vinyl Seal (F) and trim top excess as required. Snip Seal Vinyl
as shown on sheet - 1, Detail ‘1 - A’.
figure 4
Insert Drip Rail unto bottom edge of glass
11. Adjust Door Assembly and Strike Post along curb as required. Note: Bottom of Door Assembly must
always remain parallel to Sill in order for door to operate properly. When satisfied with door operation,
secure Hinge Post and Strike Post to the Wall Jambs using 638PHPT Adjustment Screws (J), see exploded view - sheet 1.
12. If Jamb Caps (K) were purchased, install the Jamb Caps (K) at both the hinge side and the strike side
of the door as shown in exploded view - sheet 1. Trim the End Caps to required lengths before installing.
Next, Install the Rail End Cap (L) on to end of Door Rail (d3) as shown in exploded view - sheet 1.
13. With drip wing positioned toward inside of shower enclosure, Insert Drip Rail (E) onto the bottom edge
of the Door Assembly (D) as shown in exploded view - sheet 1 and figure 4. Now snug the Drip Rail up to
the vertical Vinyl; mark the edge of the door glass on the rail and cut off the excess as shown in figure 5.
From inside the shower enclosure, close the shower door and mark where drip wing needs to be notched
for proper closure against door strike (see figure 6). Notch the drip rail as required and reposition the Drip
Rail on the door and check for fit.
figure 5
Snug Drip Rail up against the vertical Vinyl, then cut
off the excess as shown in figure.
Once you are satisfied with the Drip Rail fit, remove the Drip Rail and run a a bead of clear mildew resistant
silicone down the full length the Drip Rail cavity (this will insure a secure Drip Rail installation when you
reposition it on the glass). Reposition the Drip Rail on the glass and press firmly into place.
14. Run a bead of clear mildew resistant caulking down the full length of each Wall Jamb outside where
the Jambs meet the Walls. Now run a bead outside where the Sill meets the curb. Follow caulking
manufacturer’s instructions before using shower (normally 24 hours). Installation is now complete.
Frls Paragon Dr w/ CP931 (C 914 C) 03-02-07
figure 6