1
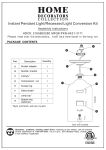
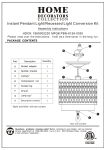
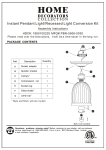
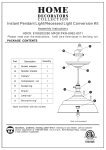
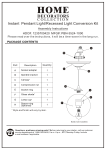
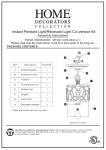
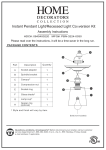
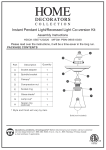
Instant Pendant Light/Recessed Light Conversion Kit
Assem bly Instruction s
HDC#: 1236010280 MFG#: PKN-5624
Please read over the instructions, it will be a time-saver in the long run.
PACKAGE CONTENTS
A
B
D
Part
Description
Quantity
A
Socket adapter
B
Spindle bracket
1
C
Canopy
1
D
Compression nut
1
E
Socket
1
F
Wire Cage
1
G
Glass Shade
1
1
C
D
F
E
G
Style and finish will vary by item.
Bulb (not included)
Questions, problems, missing parts? Before returning to your retailer, call our customer
service department at 1-866-384-9400, 9 a.m.-5 p.m., EST, Monday-Friday . Include
e-mail address if applicable .
PREPARATION
Before beginning assembly of product, make sure all parts are present. Compare parts with package
contents list and diagram above. If any part is missing or damaged. Do not attempt to assemble the
product. Contact customer service for replacement parts.
Estimated Assembly Time: 10-15 minutes
Helpful Tools:
ASSEMBL Y INSTRUCTIONS
1. Adjust excess cord by wrapping it around spindle bracket (B)
just below the socket adapter (A). Position the last wrap
so the cord will hang in the center of your recessed light
fixture.
A
B
Fig.1
2.Screw the adapter (A) into the light bulb socket in your
recessed light fixture.
Recessed
light socket
A
Ceiling
Fig.2
3.After finger loosening the compression nut (D) by turning it
counter-clockwise, slide the canopy (C) up the cord and
against the ceiling.
Recessed
light fixture
C
4.To hold the canopy in place against the ceiling, finger tighten
the compression nut (D) by turning it clockwise.
Ceiling
D
Fig.3
D
Fig.4
B
CAUTION: Do not over-tighten the compression nut (D).
HELPFUL HINT: If the canopy does not sit tight against the
ceiling, loosen the compression nut (D). GENTLY pull down on
the cord to flex the spring arm (B), then slide the canopy (C),
back up and re-tighten.
C
F
5.To install bulb into star cage, first open cage by grabbing pointed
panel with small hook at bottom and pulling outward.Thread bulb
into socket until secure. Then close panel back, making sure the
bottom hook snaps back in place.
G
E
Bulb (notincluded)
2
Fig.5
CARE AND MAINTENANCE
Shut off light and let bulb and glass shade cool if necessary. Wipe glass shade with soft cloth or household
glass cleaner. Do not use abrasive cleaners. For replacement bulbs, use 75 watt maximum, Type A or
suitable medium base bulb (not included) including CFL bulbs.
WARNINGS AND CAUTIONS
WARNING
Risk of fire or electrical shock. Do not alter, relocate, or remove wiring, lampholders, ballasts, or any other
electrical component.
Risk of fire or electrical shock. Install this kit only in the luminaries that have the construction features and
dimensions shown in the photographs and/or drawings.
CAUTION
Do not make or alter any open holes in an enclosure of wiring or electrical components during kit installation.
TROUBLESHOOTING
Problem
Possible Cause
Corrective Action
Canopy does not fit tight
against the ceiling
Cord has stretched out
Loosen the compression nut (D) and GENTLY
pull down on the cord to flex the spring arm (B),
then slide the canopy (C) back up and re-tighten
Bulb is burned out
Power is off
Bad switch
Replace light bulb (not included)
Make sure power supply is on
Test or replace switch
Bulb will not light
WARRANTY
The manufac tur er warra nts again st defec ts in mater ials and workm anshi p for one (1) yea r fro m the date of purch ase to
the origin al purch ase r. If withi n this perio d the product is found to be defec tive , tak e a copy of the bill of sal e as a proof
of purch ase and the product in its origin al packa gin g to the place of purch ase . This warra nty does not cov er product s
becom ing damaged or defec tive cause d by abuse , mis use ,ac cid ents, fault y ins tal lat ion , imp rop er handling and/o r
maint enance, or repairs not car rie d out by the manufac tur er. Ite ms which are not cov ere d by warra nty are those
con sid ere d as parts which are prone to failur e due to general wear and tear (for exa mple, lamps, fuses , gla ss mater ials ).
There will be no obliga tio ns or liabili ty on the part of the manufac tur er for con seq uenti al damages ari sin g from the use
of the product or any ind ire ct damages wit h respe ct to loss of propert y,re ven ue, or costs for rem ova l. Insta llat ion or
the use of the product or any ind ire ct damages wit h respe ct to loss of propert y, rev enue, or costs for rem ova l,
re- ins tal lat ion . As some states do not allo w exclu sio ns of limita tio ns on an implie d warra nty, the above exclu sio n and
lim ita tio n may not apply. This warra nty gives you speci fic rights and you may als o have other rig hts which may var y
fro m state to state.
www. WorthHP.com
Printed in China
U.S. Patent No. 7 ,311,425
3