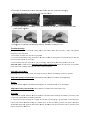
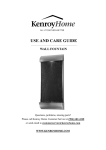
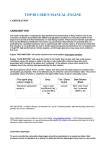
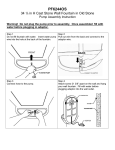
1
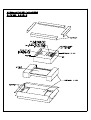
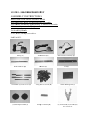
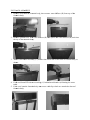
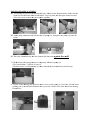
 USE AND
D CAR
RE GU
UIDE
__________
__________________________
_____________
____________
FLO
OOR/W
WALL FOUNTA
F
AIN
Queestions, prroblems, missing
m
paarts?
Please call Kenro
oy Home Customerr Service at
a (904) 6442-4340
or send
s
emaiil to custoomerservice@kenro
oyhome.ccom
NROYHO
WWW.KE
W
OME.CO
OM
MOD
DEL: 50049BRZ/5
50053ST
TST
ASSE
EMBLY INSTRU
UCTIONS
READ AND SAVE
E THESE INSTRUCT
TIONS
Read innstructions all
a the way through
t
prioor to assem
mbly.
This fouuntain shouuld take apprroximately 15 minutes to assemble.
Make suure all partss are firmly tightened.
TOOLS
S REQUIRE
ED:
Level, P
Pencil, Philllips screwdriver.
PARTS
S LIST:
Pump (A)
Trannsformer (B)
LED Clusteer Assembly (C)
(
Waater Diffuser (D)
(
B
Bracket (E)
L
Lid (F)
Channeel & (2) cord covers (G)
(2) Wall Spacer Paads (J)
A bag oof river stones (H)
Water G
Guiding Pad (I)
Pumpp Connector (K)
(
(2) Anchors
rs & (2) Screw
ws (M)
forr cord cover
FOUNT
TAIN ASSE
EMBLY
1. Rem
move roof frrom the fou
untain body,, then remov
ve water difffuser (D) fr
from top of the
t
founntain body.
2. Rem
move plasticc cover from
m water difffuser (D) an
nd replace th
he water difffuser (D) back
b
into
the top of the fountain
fo
bod
dy.
3. Attaach LED cluuster assem
mbly (C) braccket into metal slot on the back off fountain body as
show
wn.
m LED clustter assemblyy (C) behind
d metal braccket (follow
wing the water
4. Feedd cord from
tubee).
5. Placce roof ontoo the fountaain body andd secure witth clips which are attacched to back
k of
founntain body.
6. Peeel paper backking from the wall spaacer pad (J) and apply to back of thhe basin as shown.
s
FOR W
WALL MOU
UNTED AP
PPLICATIIONS:
A1. Loocate desiredd position on
o the wall. Use a level to draw a line on the w
wall, place bracket
b
(E) to the walll and mark three mounnting holes.
A2. Bassed on youur specific wall materrial (wallbo
oard, sheet rock, plasster, concreete etc.),
consuult local harrdware store or professsional to deetermine thee appropriatte anchor ty
ype for 3
piecees to hold the
t weight of your fouuntain (NO
OTE: This fountain
f
is about 40 lb
bs. after
filledd with waterr). Consult local hardw
ware store or
o professio
onal for prop
oper instructtions for
installlation of annchors/screw
ws for walll bracket (E
E). Then secure the braccket (E) to the wall
with three screw
ws. The an
ngled part oof the wall bracket (E
E) should bee on the to
op when
installling.
Warn
ning: Usingg incorrect or under specified fasteners
f
co
ould result in an unstable or
dangeerous condiition.
A) power co
ord through the hole in back of thee fountain bbody. Make sure the
A3. Feeed pump (A
ligght cord is behind metal bracket (Ref: Step
p #4), then join the ligght connecttors and
scrrew the cap to connecto
or tightly toogether.
A4. Inssert pump coonnector (K
K) into the hhole of pum
mp (A), then place the puump (A) intto the
basin.
A5. Aliign bracket (E) on the wall with bbracket on the back off fountain, hhang fountaain body
seccurely on bracket
b
(E) attached tto the wall,, make sure the brackket on the back of
fouuntain is onn the top of the
t wall braacket (E).
A6. Too install the anchors (M
M) for the coord cover ch
hannel (G), place
p
the coord cover ch
hannel
(G
G) on the waall and mark
k two mountting holes. Gently
G
tap or
o press the tip into thee
dryywall, makee sure the fllat side of thhe anchor iss flush with the wall. Iff you encoun
nter a
waall stud whille installing
g the anchorrs (M), pleaase use the mounting
m
sccrews (M) without
w
thee anchor. Thhen secure the
t cord covver channel to the wall with two sccrews (M).
A7. Plaace power coord inside cord
c
cover cchannel (G) and press cord
c
cover ssecurely ontto the
channel (G).
FOR FLOOR AP
PPLICATIO
ONS:
B1. Feeed pump (A) power corrd through tthe hole in back
b
of the fountain boody. Make sure the
lighht cord is beehind the meetal brackett (Ref: Step #4), then jo
oin the lightt connectorss and
screew the cap to
t connect th
he parts tighhtly togetheer.
B2. Inseert pump coonnector (K
K) into the hoole of pump
p (A), then place
p
the puump (A) intto the
basiin.
B3. Place the founttain body on
nto the desiired flat floo
or and against
the w
wall.
7. Fill thhe basin wiith enough water
w
to com
mpletely sub
bmerse pum
mp (A).
(The basin holdss 1.7 gallons of water.))
a bacteriaa build-up.)
(Disttilled water is recommeended to redduce mineraal deposits and
8. Test the water ruunning and adjust the w
water valve on the pum
mp (A) if neeeded. Use th
he water
guidiing pad (I) to
t brush thee fountain faace to provide a better water
w
flow w
when first turning
t
founttain on.
9. Placee lid (F) intoo basin to co
over the bassin, make su
ure the open
n side facingg up.
Thenn place decoorative riverr stones (H) into the lid
d (F).
ump (A) to transformerr (B) and sccrew the capp to connectt the
10. Joinn the connecctor from pu
partts tightly toggether.
11. Plugg power corrd into sock
ket and yourr new fountaain is ready for use!
Troublee shooting::
1. If youur fountain does
d
not worrk, check pluug at the soccket. Make su
ure the plug is fully and properly
inserted into the wall outlet.
2. Next ccheck to makke sure the outlet is powereed.
3. If youu reconnectedd the pump, sometimes
s
thhe water wou
uld not flow, please
p
turn ooff the powerr and turn
back on to help releasse air in the liine.
4. If the fountain still does not worrk or you are unhappy witth anything ab
bout this prodduct, call us at
a
(904) 6442-4340 or seend email to customerser
c
[email protected]. Please do noot return you
ur product
to the stoore where youu purchased it,
i call us for a quick resolution.
mer:
Splashiing disclaim
Splashinng may occur when fountain is initially turned on. Prrotect surroun
nding surfacees as needed.
Importtant pump informatio
on: Pump muust be fully suubmersed in water
w
while opperating.
Water:
To reducce mineral depposits and baacteria build uup the use of distilled wateer is recommeended.
Importtant safety instruction
ns: This founntain is rated for
f indoor and
d outdoor usee.
Warnin
ng:
* Once a week inspecct fountain, floor
fl
and adjaacent wall forr moisture build-up and cleean as necesssary. This
is especiially importannt for humid environments
e
s.
** This unit must bee connected to
t a supply ccircuit that is protected by
y a ground fa
fault circuit in
nterrupter
(GFCI). The GFCI shhould be testted on a routiine basis. To test the GFC
CI, push the ttest button. The
T GFCI
should innterrupt poweer. Push the reset
r
button. P
Power should
d be restored. If the GFCI fails to operaate in this
manner, the GFCI is defective.
d