1
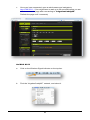
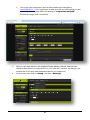
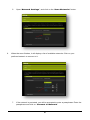
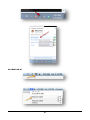
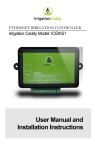
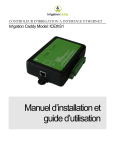
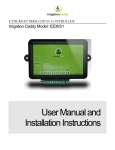
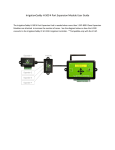
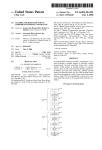
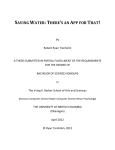
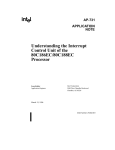
Quick Start Guide IrrigationCaddy IC-W1 Installation Steps W A R N I N G NOTE: The IC is an indoor device. Make sure the device is placed indoors in a dry protected area. Exposure to rain and extreme weather conditions will damage the device. info Steps: 1. Find an appropriate location for the IC, and hold the enclosure in place. 2. Using a pen make marks through the screw mounting holes (A) on the plastic ears protruding from the enclosure. 3. NOTE: If installing on Drywall make sure you use screw anchors 4. Put the device aside, and drill a hole on each one of the marks you made. 5. Put the IC back in place and insert the screws through the mounting holes. Mounting on the Wall Figure 1 Caddy Parts 1 A. WiFi Antenna B. Expansion Port C. Mounting Ear D. Ethernet Port E. USB Port F. Flow Sensor Port G. Rain Sensor Port H. Valve wire connector I. Power Connector J. Power light indicator K. Activity Indicator L. LCD Screen Connecting Valve Wires Steps: 1. If this is a replacement installation, first remove the old Sprinkler Control System, and attach the IC to the wall. Make sure the valve cables can reach the IC. 2. Identify the common cable and connect it to the “com” output. 3. Connect valves 1 through 10, to the corresponding outputs on the IC 4. If your installation includes a master valve, connect the master valve to output #11 (“11 | MV”). 5. Connect the power cable to the IC using the “AC1” “AC2” (B) outputs using the connector provided. 6. Plug the wall transformer to a power outlet. 7. The IC should now be installed, and ready to be configured. 2 Connecting to the Network When you first apply power to the IC, the IC will boot up and create an AdHoc WiFi network called “IrrigationCaddyAP”. This AdHoc network will allow you to gain access to the unit, and configure it so that you can connect it to your own WiFi network ( Router ). To access the unit execute the following steps: Steps: 1. 2. Make sure the unit is plugged in. Connect your computer to the newly created “IrrigationCaddyAP” AdHoc network. On Windows 7: a. Click on the network icon on the taskbar b. Find the “IrrigationCaddyAP” network, open it, and click on “Connect”. If “IrrigationCaddyAP” does not show right away, wait a few seconds until it shows up. You might have to repeat step 2.a to refresh the networks. 3 c. Once you have connected, open a web browser and navigate to http://169.254.1.1 (You might have to wait up to 30 seconds before you are able to access the page after connecting to “IrrigationCaddyAP”. Refresh the page until it connects) On MAC OS X: a. Click on the Wireless Signal indicator on the top bar. b. Find the “IrrigationCaddyAP” network, and select it. 4 c. 3. 4. Once you have connected, open a web browser and navigate to http://169.254.1.1 (You might have to wait up to 30 seconds before you are able to access the page after connecting to “IrrigationCaddyAP”. Refresh the page until it connects) Now you are connected to the IrrigationCaddy AdHoc network, however the objective should be to connect the IC to your own WiFi network, so that you can access the IC like any other networked device you might own. On the menu bar click on “Setup” and then “Settings” 5 5. 6. Open “Network Settings”, and click on the “Scan Networks” button. When the scan finishes, it will display a list of available networks. Click on your preferred network to connect to it. 7. If the network is protected, you will be prompted to enter a passphrase. Enter the passphrase and click on “Connect to Network”. 6 8. The IC will then display a reconnection message, and it will reboot. When the IC reboots it will try to reconnect to the new network just selected. Now you need to connect your laptop/PC/portable device to reconnect to the new network so that you can access the IC in the new network. 9. To go back to the original network once again click on the network icon on the taskbar, and select your preferred network. On Windows 7: 7 On MAC OS X: 8 Connecting Expansion Modules The IC-W1 zone capacity can be expanded to up to 43 zones by adding expansion modules (EXP-800). The expansion modules connect into the “Expansion Port” for the ICW1. Up to 4 expansion modules can be used by adding an expansion module hub (H-500). 9 Reset to factory defaults To reset the unit to its factory default values press the right button and the left button at the same time, and keep them pressed for 4 seconds. The unit will then reset to factory defaults and restart. The display will say “Resetting and Rebooting…”, at this point you can let the buttons go. More The full documentation set can be downloaded at: http://irrigationcaddy.com/Documentation.html 10 11