1
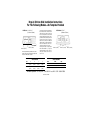
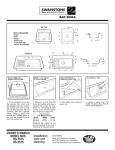
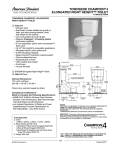
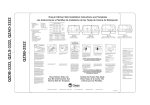
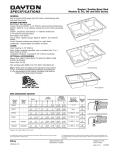
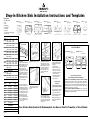
Drop-In Kitchen Sink Installation Instructions and Templates
Tools Required:
•
•
•
•
•
•
•
Ruler/Tape Measure
Drill
Caulk
Masking Tape
Safety Glasses
Screwdriver
Saber Saw
(if counter top cutout is required)
• 1 1/4” Hole Saw
Model
KSSB-2522 25” x 22”
(635mm x 559mm)
KSDB-3322 33” x 22”
(838mm x 559mm)
KSLS-3322 33” x 22”
(838mm x 559mm)
KSLB-3322 33” x 22”
(838mm x 559mm)
KSDB-3120 31” x 20”
(787mm x 508mm)
KSSB-2518 25” x 18”
(635mm x 475mm)
KSRB-18
18 1⁄2” DIA.
(470mm)
B
B
B
C
C
A
DEPTH 9” (229mm)
INSIDE BOWL DIMENSIONS
A
B
C
A
D
DEPTH 10” (229mm)
DEPTH 9” (229mm)
A
B
B
C
C
B
A
B
D
DEPTH 9” (229mm)
DEPTH 9” (229mm)
DEPTH 7” (178mm)
B
D
A
A
A
A
C
D
C
DEPTH 10” (254mm)
DEPTH 10” (254mm)
DEPTH 9” (229mm)
DEPTH 9” (229mm)
DEPTH 7” (178mm)
DEPTH 7” (178mm)
DEPTH 8 1⁄2” (216mm)
D
KSSB-2522
21 1/8”
(537mm)
17 5/8”
(447mm)
15 5/8”
(397mm)
––
KSSB-3322
29 3/4”
(756mm)
19”
(483mm)
16 1/2”
(419mm)
––
KSDB-3322 14 15/16”
(379mm)
18 7/8”
(479mm)
13 3/4”
(349mm)
15 1/4”
(387mm)
KSLS-3322
18 7/8”
(479mm)
19 3/8”
(492mm)
15 5/8”
(413mm)
8 7/8”
(225mm)
KSLB-3322
14 3/8”
(365mm)
18 7/8”
(479mm)
––
––
KSDB-3120
15”
(381mm)
17”
(432mm)
13 3/4”
(349mm)
11”
(279mm)
KSSB-2518
12”
(304mm)
14 3/4”
(374mm)
12 3/8”
(314mm)
8 3/4”
(222mm)
KSRB-18
15 3/4”
(400mm)
1 3/8”
(35mm)
––
––
Gloss Finish Models
KSGF-2522
21 1/4”
(540mm)
16”
(406mm)
––
––
KSGF-3322
14”
(356mm)
18 1/2”
(470mm)
16”
(406mm)
14”
(356mm)
Model
KSSB-3322 33” x 22”
(838mm x 559mm)
SINK CUTOUT MEASUREMENTS
Width
Depth
KSSB-2522
24 3/8” (619mm)
21 3/8” (543mm)
KSSB-3322
32 3/8” (822mm)
21 3/8” (543mm)
KSDB-3322
32 3/8” (822mm)
21 3/8” (543mm)
KSLS-3322
32 3/8” (822mm)
21 3/8” (543mm)
KSLB-3322
32 3/8” (822mm)
21 3/8” (543mm)
KSDB-3120
30 3/8” (771mm)
19 3/8” (492mm)
KSSB-2518
24 3/8” (619mm)
17 3/8” (441)
KSRB-18
17 7/8” (454mm) dia.
CUT OUT AREA
Gloss Finish Models
Model KSGF-2522 25” x 22”
(635mm x 559mm)
Model KSGF-3322 33” x 22”
(838mm x 559mm)
MASKING TAPE
D
A
A
Drop in side:
1. Select the drop-in kitchen sink
template that applies to the model
sink you are installing. Cut out
the inside of the template and
discard the cutout portion.
Locate the template front to rear
and right to left on the countertop
so the bowl will not interfere with
the cabinets below. Attach the
template to the countertop with
masking tape and draw a pencil
line around the inside of the template. Discard the template.
2. Drill starter hole inside of cutout
line.
4. Identify fixture hole locations.
Drill a starter hole from reverse
side. Working from the top side as
illustrated, position a hole saw on
the starter hole and drill to complete the fixture hole. Attach
faucet, drain, and accessories
according to manufacturer’s
instructions.
Care and Cleaning
Instructions
-orInvert sink and position onto the
countertop . Locate sink front to
rear and right to left so the bowl
will not interfere with the cabinets
below. Trace a pencil line around
the outside edge of the sink and
remove the sink from the countertop. Measure in 5/16" (8mm)
from the initial sink outline and
draw a second line inside the first.
Draw a 1-1/2" radius at each corner. The second interior line will
be your cut out line.
6. Connect all faucet supply lines,
disposal (if available), and drain
trap fittings per manufacturer’s
instructions.
CHECK FOR LEAKS:
• Supply user tubes to faucet
• Supply riser tubes to shut off
valves or lower connections
• Fill sink with water and check
for leaks around drain
• Release water from sink and
check for possible leaks
• Tighten as needed
NOTE: This procedure does not
apply to the Gloss Finish models.
3. Using a saber saw, cut inside of
cutout line. Trial fit sink to check
proper fit.
5. For final fit, apply a bead of
caulk (not included) to the underside of the sink flange and position
sink into countertop opening. First,
tighten screws in front, then tighten rear screws.
Clean your Swanstone kitchen sink
with powdered abrasive cleaners.
Use of a Scotch Brite pad is
recommended to remove stubborn
stains. Occasional use of a
mild bleach and water solution
ensures that the original luster is
maintained.
C
B
B
DEPTH 8” (203mm)
DEPTH 8 ” (203mm)
Care and Cleaning Instructions for
Gloss Finish Models KSGF-2522 and KSGF-3322
WARNING: DO NOT USE ABRASIVES AS IT WILL DULL THE GLOSSY FINISH!
This product is made of Swanstone with a gloss finish. While it is stain resistant, it
requires regular and reasonable care. Wash regularly with warm water and a non
abrasive cleaner such as Soft Scrub Liquid Gel with bleach (without abrasives), Clorox
Clean-up with bleach, Top Job or Mr. Clean. Remove hard water stains or mineral
build up with scale removers such as Lime-Away.
DO NOT USE HARSH CLEANSERS OR ABRASIVES such as scouring powders,
abrasive cleansers or scouring pads. Abrasives will dull the finish. Protect the finish
with fiberglass wax or automotive paste wax.
Gloss Finish Models
KSGF-2522
24 3/8” (619mm)
21 3/8” (543mm)
KSGF-3322
32 3/8” (822mm)
21 3/8” (543mm)
Measure the cutout line or the pre-cut opening to be sure it conforms to
the sizes listed.
These Kitchen Sinks Can Also Be Undermounted. See Reverse Side For Templates of Select Models.
These Templates Are For Undermount
Installation Only Of Models: KSSB-2522,
KSSB-3322, KSDB-3322, KSLS-3322,
KSLB-3322, KSGF-3322, and KSGF-2522.
This procedure should be performed by a professional fabricator/installer. This template should be used to create a wood
template which will be used to make the cutout.
The template is designed such that the cutout equals an approximate 3/8" negative reveal. Should something different be
desired, a new template should be constructed accordingly.
Always check fit of wood template to kitchen sink before cutting hole in countertop. Make adjustments as necessary.
If You Require An Undermount Template For Any Additional Models, Please Call Swan Customer Service At 1-800-325-7008.
The Swan Corporation One City Centre Suite 2300 St. Louis, MO 63101
800-325-7008
Form 254-10-03-20M
Drop-In Kitchen Sink Installation Instructions
For The Following Models ––No Template Provided
No template is provided for the installation of
these two kitchen sinks. To install, Invert sink
and position onto the countertop. Locate sink
front to rear and right to left so the bowl will
not interfere with the cabinets below. Trace a
pencil line around the outside edge of the sink
and remove the sink from the countertop.
Measure in 5/16" (8mm) from the initial sink
outline and draw a second line inside the first.
Draw a 1-1/2" radius at each corner. The second interior line will be your cut out line.
Follow steps 2 through 6 to complete drop-in
kitchen sink installation. If you require an
undermount template for either of these two
sinks, please call Swan customer service at
1-800-32-7008.
KSEU-3020 39 3/8” x 20”
(1000mm x 508mm)
A
D
C
B
15 1/2” (394mm)
DEPTH 7 ” (178mm)
DEPTH 8” (203mm)
The Euro Style Bowl design allows for the drain
board to be located on either the left or right side
and comes with a white colander.
INSIDE BOWL DIMENSIONS
Model
KSTB-4422 44” x 22”
(1118mm x 559mm)
A
D
B
C
DEPTH 7 1⁄2” (191mm)
DEPTH 9” (229mm)
SINK CUTOUT MEASUREMENTS
A
B
C
D
KSEU-3020
13”
(330mm)
16 1/2”
(419mm)
12 1/4”
(311mm)
7”
(178mm)
KSTB-4422
14 3/8”
(365mm)
18 1/2”
(470mm)
16”
(413mm)
9”
(229mm)
Model
Width
Depth
KSEU-3020
KSTB-4422
38 3/4” (984mm)
42 1⁄2” (1080mm)
19 3/8 (492mm)
21 3⁄8” (543mm)
Measure the cutout line or the pre-cut opening to be sure it conforms to the sizes listed.
The Swan Corporation One City Centre Suite 2300 St. Louis, MO
Form 254-9-02-20M
63101
800-325-7008
DEPTH 9” (229mm)