Transcript
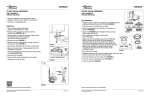
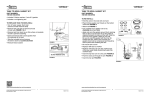
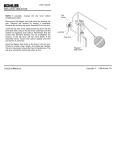
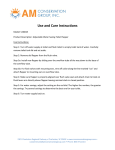
VORMAX™
VORMAX™
SILICONE FLAPPER SEAL
SILICONE FLAPPER SEAL
PART NUMBERS:
7381424-100.0070A
PART NUMBERS:
7381424-100.0070A
To Replace Silicone Seal:
• Turn off water supply; flush toilet
(remove all water from the tank)
• Remove hair pin FIGURE 1
• Remove clevis pin; this frees the teeter bar
from the trip lever arm FIGURE 1
• Place fingers underneath hinge and pull up to
release all 4 hinges FIGURE 2
• Remove original flapper assembly from tank
• Firmly grab silicone gasket and massage the tabs
from one side of the flapper while pulling away
from the plastic frame FIGURE 3
CLEVIS ➞
PIN
➞
HAIR
PIN
YOKE ➞
Complete by Adjusting the Settings:
•D
epress trip lever handle all the way (A)
• Adjust screw on the teeter bar (B) so rear frame (C)
touches the frame stop (D)
• Return trip lever handle (A) to rest position.
•M
ake sure hook (E) is fully engaged under tab on valve body (F),
if not, slightly adjust screw to make sure hook is engaged.
•T
urn water supply on; adjust water level to specified dimension
on back of tank and flush 5 times to prime
FIGURE 1
To Re-Assemble:
• Push the tabs on the silicone flapper through
appropriate openings of flush valve frame FIGURE 3
• Place the black flapper to the black flush valve
body with the overflow tube and the red flapper
to the flush valve body with the red cap and
push all 4 hinges in place
(red to red/black to black)
• Insert the trip lever arm in to the yoke FIGURE 1
• Push the clevis pin through the arm FIGURE 1
• Insert the hair pin FIGURE 1
HOOK
CROCHET
PUSH
UP
NUT &
GASKET
FIGURE 6
➡
(B)
(C)
(A)
(D)
FIGURE 2
(E)
(F)
FRAME ➞
SILICONE ➞
FLAPPER
FIGURE 3
www.americanstandard-us.com/vormaxparts
Product names listed herein are trademarks of AS America Inc.
© AS America Inc. 2014
www.americanstandard-us.com/vormaxparts
1
7302171-103
Product names listed herein are trademarks of AS America Inc.
© AS America Inc. 2014
2
7302171-103