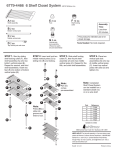
Transcript
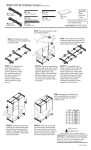
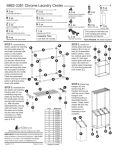
6705-3871-BLK-BB 3 Drawer Cart
©2011 Whitmor, Inc.
I 1 ea
Top
C 3 ea
F 1 ea
Horizontal
shelf
A 2 ea
B 2 ea
Vertical pole Vertical pole
with clip
J 3 ea
Top shelf
Drawer
D 16 ea E 16 ea
Screw
G 1 ea
Washer
H 1 ea
Left side
frame
Right side
frame
STEP 1. Starting with the bottom section, attach vertical
poles (A & B) to two horizontal shelves (C) using screws (D)
and placing washers (E) between poles and shelf.
NOTE: Notice the holes for
screws in parts (A & B) are
recessed on one side, but not
the other. The recessed side
faces out to accommodate
the screw head.
A
D
E
A
D
C
E
D
E
E
D
D
D
E
E
H
D
F
G
E
D
E
D
C
D
B
D
Tools Needed:
Phillips screwdriver
E
E
D
Locking
Wheel
screws in parts (G & H) are
recessed on one side, but not
the other. The recessed side
faces out to accommodate
the screw head.
D
E
E
Wheel
STEP 2. Assemble top section by attaching left and right
side frames (G & H) to top shelf (F) and remaining
horizontal shelf (C). Use screws (D) and place washers (E)
between side frames and shelves.
B
D
E
K 2 ea L 2 ea
This product's intended
use is for storage.
NOTE: Notice the holes for
D
E
C
D
Assembly
Time:
Less than
30 minutes.
E
E
I
STEP 3. With frame assembled,
insert wheels (K & L). Place top (I) on
top shelf. Assemble drawers (J) by
unfolding and placing bottoms into
drawers. Place drawers onto shelves.
Assembly is now complete.
Part
A
B
C
D
E
F
Reference
F7258
F7259
F7260
F7261
F7262
F7263
Part
G
H
I
J
K
L
Reference
F7264
F7265
F7266
F7267
F7268
F7269
8680 Swinnea Road • Suite 103 • Southaven, MS • 38671
L
K
K
L
NEED HELP? For help with assembly, or if you are missing a part,
please call Whitmor’s Customer Service Department, 1-888-944-8667
between 8 a.m. and 4:30 p.m. (Central Standard Time) Monday
through Friday. Or email: [email protected]. Visit us
online at www.whitmor.com
Rev.0 | 6.22.11
Printed in China
![SJ-F70RV_F75RV_B157 [Cover].indd](http://vs1.manualzilla.com/store/data/007316677_1-f23fda29881572c53ea405814afa1717-150x150.png)