Transcript
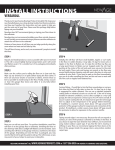
No Calk Flashings
3/26/03 10:04 AM
Flashings - How To Use
Make sure roof is clean and free from any major protrusion
Before roof covering is installed:
No tar, asphalt-based roof cement or "pitch" should be applied to the collar portion of any metallic
No-Calk flashing or the base or collar portion of any Thermoplastic or Flexible No-Calk flashing.
At the discretion of the installer, silicone sealant can be applied over all exposed nails or staples.
Silicone sealant can also be applied to the underside of the base to increase sealing power to the roof
and is recommended in areas where frequent or heavy precipitation is common.
Place correct size No-Calk flashing over vent stack with angle facing down slope of the roof. Push firmly to base
of stack until flashing lies flat on the roof. Flashing size should be equivalent to pipe diameter size (i.e. 1.5"
flashing for 1.5" pipe, 2" flashing for 2" pipe size, etc...). The Oatey logo printed on the flashing represents the
front or down slope side of the flashing.
Using corrosion resistant nails or staples, secure the top of the flashing (the end closes to the crest of the roof) at
teach corner and along the sides at 4"-6" intervals to secure flashing to the roof. One nail or staple in each bottom
corner is appropriate. The top of the flashing will be covered one-quarter to one-half of the way down with
roofing shingles. The bottom edge of the flashing should overlap the shingles beneath it so it shed, not traps,
water.
Oatey Thermoplastic base flashings are designed to fit roof angles from flat to 45 degrees. Flexible, Galvanized,
Aluminum and Copper Base Flashings are designed to fit roof angles from flat to 38 degrees. Oatey All-Flash
High -Rise Thermoplastic Roof Flashings are designed to fit roof angles from flat to 60 degrees.
Page 1 of 1