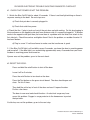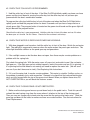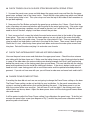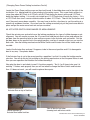
1
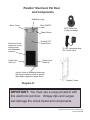
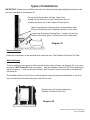
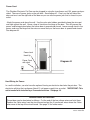
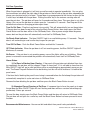
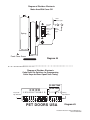
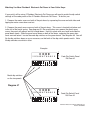
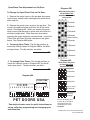
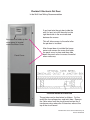
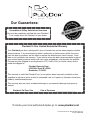
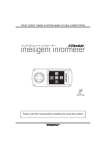
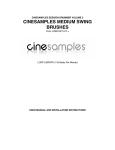
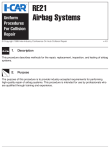
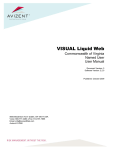
IMPORTANT: You must use a surge
protector with this electronic pet door.
Voltage dips and surges can damage the
circuit board and components.
www.Plexidors.net
*U.S. Patents Pending
*Patents Pending Worldwide
Plexidor® Electronic Pet Door
and Components
Motor Cover
Red Motor Light
Blue ON/OFF
Light
Power Button
Durable PVC
Panel Cover
Shatter resistant
composite acrylic
closing panel
with imbedded
antenna.
Power Jack
Hook Up
RFID Collar Key
(2 Keys Included)
12 volt Transformer and
15ft. Power Cord
Power Jack
Hook Up
Interior Frame of hardened aluminum
with tough, baked on white or bronze
(dark brown) appliance grade finish.
Diagram #1
Exterior Frame
IMPORTANT: You must use a surge protector with
this electronic pet door. Voltage dips and surges
can damage the circuit board and components.
Plexidor® Electronic Owners Manual Pg 2
Version 20101220
Types of Installations
IMPORTANT: Before any installation you must first determine the proper height positioning for the
pet door according to the diagram #2.
Do not mount the pet door too high. Keep it low
enough for the collar key on your shortest pet to be at
or above the lower line of the Antenna Sensing Area.
Upper Line of Antenna Sensing Area - 6 inches down from
the top of the black panel. Centered 3 inches in from sides.
Lower Line of Antenna Sensing Area - 2 inches up from the
bottom of the black panel. Centered 3 inches in from sides
Diagram #2
Collar
Key
Door Installation:
Follow the instructions on the template that came with your The Plexidor® Electronic Pet Door.
Wall Installation:
You may build your own tunnel to finish out the interior of the cut hole, see diagram #3, or you may
purchase a Wall Tunnel Kit from your dealer. See the Plexidor ® Electronic Pet Door template for
more instructions. If you are using a Plexidor® Wall Tunnel Kit see the instructions included with
the tunnel kit.
The Plexidor® Electronic Pet Door can be plugged in using the power cord provided, or you may
have an electrician hard wire the power cord into the wall.
Example of a wall tunnel framing for a
Plexidor ® Electronic Pet Door.
T
Diagram #3
Plexidor® Electronic Owners Manual Pg 3
Version 20101220
Power Cord:
The Plexidor® Electronic Pet Door can be plugged in using the transformer and 15ft. power cord provided. There are 2 power jacks on the pet door. See diagram #1. One is on the left side of the
door and one is on the right side of the door so you can use the power jack that is closest to your
outlet.
Attach the power cord along the wall. Use the nylon wire holders provided to keep the wire neat
and tight against the wall. Leave a loop of slack over the hinge of the door. This will prevent the
power cord being pinched when the house door is opened and closed. Leave enough slack in the
power cord over the hinge that the wire can move freely as the house door is opened and closed.
See diagram #4.
Power Jack
Hook Up
Power Cord
with slack
Diagram #4
Hard Wiring for Power:
In a wall installation, you also have the option of having an electrician hard wire the pet door. The
electrician will plug the transformer (black 12 volt power supply) into an outlet. *IMPORTANT: This
outlet needs to be installed by a licensed electrician. See page 10.
Technical Notes for Electrician
The pet door can be hard wired as follows: Cut the end of the low voltage wires and twist them.
Remove the 2 blue wires from the circuit board and put the 2 transformer wires where the 2 blue
wires were at the top of the circuit board. See page 10 for further notes.
Plexidor® Electronic Owners Manual Pg 4
Version 20101220
Pet Door Operation:
When the pet door is plugged in it will start up and be ready to operate immediately. You can plug
the transformer into either the right side of the pet door or the left side of the pet door, depending on
where your electrical outlet is located. The pet door is preprogrammed at the factory to open for the
2 collar keys included with the pet door. Placing the collar key in the antenna sensing area will
open the pet door. The pet door will open for 9 seconds and then close. This open time is set at the
factory. You can set the pet door to remain open for 1 second to 15 seconds. See Diagram #8 for
detailed instructions on changing pet door open times.
Turn On Pet Door: Plug the transformer into an outlet. This will automatically turn on the pet door.
If the pet door has been turned off by using the Black Power Button, then simply press the Black
Power Button and the door will be in the On/Ready State. After a power outage when the power
comes back on the pet door will automatically reset itself to ON/Ready State.
On/Ready State Indicator: The blue ON/OFF Light is on and blinking every 1.5 seconds. The pet
door is on and waiting to read a collar key to open for your pet.
Turn Off Pet Door: Push the Black Power Button and hold for 3 seconds.
OFF State Indicator: When the pet door is off, but receiving power, the Blue ON/OFF Light will
blink every 3 seconds.
No Power: If the pet door is not receiving power, none of the lights will be on or blinking. When
power is restored or reconnected the pet door will automatically reset itself to ON/Ready State.
Alarm States -
1) Pet Door is Blocked from Closing - If the panel of the pet door gets blocked from closing completely the pet door will first attempt 3 times to close itself. If it is not able to close then the
Blue ON/OFF Light will go to solid and there will be a muted beeping approximately once per second. The Green Program Button will also be blinking, but this will not be visible as it is behind the
panel cover.
If the item that is blocking the panel from closing is removed before the 3rd attempt the pet door will
automatically complete its cycle and return to ON/Read State.
Remove the item blocking the pet door and then press the Black Power Button to reset.
2) Attempted Forced Opening of Pet Door- If someone tries to force the panel up to open
the pet door the Blue ON/OFF Light will start flashing and there will be a constant alarm beep approximately 2 times per second.
To reset the door simply press the Black Power Button and the door will return to ON/Ready State.
The pet door will not open for a collar key until the Black Power Button has been pressed to reset
the door.
Recommended Maintenance: Vacuum out dirt and debris from panel tracks periodically.
Plexidor® Electronic Owners Manual Pg 5
Version 20101220
Training Your Pet to Use the Plexidor® Electronic Pet Door:
Your pet needs to realize that they can go in and out of the pet door. Some pets will get the idea right
away when they approach the door with the collar key on and they see the pet door opening.
If further training is needed, you can keep the pet door in the open position and then coax your pet
through with a treat. Do this several times to get your pet used to going in and out. Never force your
pet through the pet door. To keep the pet door in the open position you hold the collar key in front of
the pet door until it opens. When the panel reaches the fully open position pull out the power plug.
After your pet has gone through a few times return the pet door to its normal closed position. To do
this simply plug it back in and it will reset itself. Then call your pet from the other side of the pet door
and when your pet comes through give them a treat. Do this a few times. That should be all the
training required.
If your pet is not getting close enough to make the door open, use the brown training stickers provided with the template. Put a sticker “button” on both sides of the sliding panel. Then teach the
dog to touch the button with their nose.
IMPORTANT: Never force your pet through the pet door.
Programming Collar Keys:
Your Plexidor® Electronic Pet Door will arrive with 2 collar keys that have been programmed to match
the pet door. If you need to order more collar keys or replacement collar keys you will program them
as follows below. You may program as many collar keys as you need. To program collar key(s):
1. Remove the motor cover by squeezing from both sides and tipping the motor cover down and
out. Once the motor cover is removed you will see the metal spring, motor and green circuit board
of the control panel.
The Program Button, Test Button and green LED Program Light are marked on the green board.
See diagram #5.
2. Take the collar key that you wish to program and bring it in front of the antenna loop area of the
pet door. See diagram #2. Hold the collar key in this area until you see the blue ON/OFF light
flash.
3. Push and hold the Program Button for approximately 4 seconds, until the Program Light flashes
green and you hear a quick beep. The collar key is now programmed.
4. Check to make sure the key is properly programmed by holding the collar key in the antenna
sensing area. The door should open. If the door does not open, check that the blue ON/OFF light
is on and blinking approximately every 1.5 seconds. This is to ensure that the pet door is receiving
power. If the blue ON/OFF light is on and blinking, then repeat steps 1 through 3 above.
When the blue ON/OFF light is rapidly blinking the door is sensing a collar key that has not been
programmed.
Plexidor® Electronic Owners Manual Pg 6
Version 20101220
Diagram of Plexidor® Electronic
Motor Area With Cover Off
Program
Test
LED3
Spring
PanelCover
Cover
Screw
Screw
Red
Motor Light
Program
Button
Blue
On/Off
Light
Green LED
Program
Light
Test
Button
Diagram #5
Diagram of Plexidor® Electronic
Code Panel Dip Switches for Programming
Collar Keys and Door Open/Close Timing
Key Code
Dip Switches
CLOSE TIME
CODE
1 2 3 4 5 6 7 8 9 0 1 2
1
2
OPEN TIME
1 2 3 1 2 3
PET DOORS USA
3
4
5
6
7
8
9
10 11 12
1
2
3
4
5
6
Timing
Dip Switches
Diagram #6
Plexidor® Electronic Owners Manual Pg 7
Version 20101220
Matching 2 or More Plexidor® Electronic Pet Doors to Your Collar Keys:
If your pet(s) will be using 2 Plexidor® Electronic Pet Doors you will need to match the dip switch
settings on the code panels of the 2 Plexidor® Electronic Pet Doors. To do this you:
1. Remove the motor covers on both of the pet doors by squeezing the cover on both sides and
tipping the motor cover down and out.
2. Remove the panel cover screw on both of the pet doors. This screw is located just below and
to the left of the metal spring. See diagram #5. Be careful when you remove the panel cover
screw, the panel will release and fall straight down. Hold it in place with your hand and slide the
panel down slowly. Slide the panel cover down on both of the doors, exposing the green electronic controls board. Locate the code dip switches on the green board. See diagram #6. You will
flip the dip switches down or up as necessary so that both of the dip switch panels match. Note:
the dip switches are white in color.
Example:
CODE
Code Dip Switch Panel
Pet Door #1
1 2 3 4 5 6 7 8 9 0 1 2
1
2
3
4
5
6
7
8
9
10 11 12
1
Match dip switches
on the two panels.
Diagram #7
CODE
1 2 3 4 5 6 7 8 9 0 1 2
1
2
3
4
5
6
7
8
9
10 11 12
Code Dip Switch Panel
Pet Door #2
1
Plexidor® Electronic Owners Manual Pg 8
Version 20101220
Open/Close Time Adjustments on Pet Door:
W Diagram #8B
To Change the Open/Close Time on Pet Door -
1. Remove the motor cover on the pet door by squeezing the cover on both sides and tipping the motor cover
down and out.
2. Remove the panel cover screw on the pet door. This
screw is located just below and to the left of the metal
spring. See diagram #5. When you remove the panel
cover screw, hold the panel in place with your hand or it
will drop straight down. Slide the panel cover down,
exposing the green electronic controls board. Locate the
Close Time and Open Time dip switches on the green
board. See Diagram #8A below.
3. To change Open Times: Flip the dip switches to
match the settings shown in Diagram #8B for the different open times. The dip switches are white.
4. To change Close Times: Flip the dip switches to
match the settings shown in Diagram #8C for the different open times. The dip switches are white.
Diagram #8A
CODE
1 2 3 4 5 6 7 8 9 0 1 2
1
2
4
5
6
7
8
9
10 11 12
1
2
3
7 Seconds
9 Seconds
11 Seconds
13 Seconds
Factory Setting
15 Seconds
17 Seconds
19 Seconds
21 Seconds
Diagram #8C
White Switch Positions
for Panel Close Time
Time allowed to close
before sounding alarm
10 Seconds
CLOSE TIME
OPEN TIME
1 2 3 1 2 3
PET DOORS USA
3
White Switch Positions
for Panel Open Time
Time allowed before door
starts to close
1
2
3
4
5
6
* See inside of motor cover for quick instructions on
set-up, collar key programming and changing open
and close time.
20 Seconds
30 Seconds
Factory Setting
45 Seconds
Obstruction
Sensing
Setting:
Senses for obstruction.
Pauses for 5 seconds if
obstructed, then tries
continuously to close.
No alarm.
Plexidor® Electronic Owners Manual Pg 9
Version 20101220
Plexidor® Electronic Pet Door
In the Wall Hard Wiring Recommendation
Motor
Cover
the screw that holds up the
cover panel is located
under the Motor Cover
Panel Cover
If you hard wire the pet door inside the
wall it is best to install the outlet on the
right hand side in the area indicated
between the arrows.
This will allow access to the outlet after
the pet door is installed.
After the pet door is installed the homeowner can remove the screw that holds
the panel cover in place and then slide
down the panel cover to access the outlet
when necessary.
Technical Notes for Electrician
The pet door can be hard wired as follows: Cut the
end of the low voltage wires and twist them. Remove
the 2 blue wires from the circuit board and put the 2
transformer wires where the 2 blue wires were at the
top of the circuit board.
Plexidor® Electronic Owners Manual Pg 10
Version 20101220
PLEXIDOR ELECTRONIC TROUBLE SHOOTING DIAGNOSTIC CHECKLIST
#1. CHECK THAT POWER IS NOT THE PROBLEM:
1. Watch the Blue On/Off light for about 10 seconds If there is no blue light winking on there is
no power coming to the door. So next steps are:
a) Check that pet door is securely plugged in.
b) Check that outlet has power.
c) Check that the 2 plug in jacks on front of the pet door are both working. Do this by plugging in
the transformer on the opposite side jack from whatever side it is currently plugged in. If the door
works in the opposite side jack then you know there is a problem with the wires that attach to the
first side jack. Check those wires and tighten them if that is the problem, or resolder the wire if it
has been broken.
d) Plug in a new 12 volt transformer to make sure the transformer is good.
2. If the Blue On/Off light is off and blinks every 5 seconds, you know the door is receiving power
and turned off. If the blue light is on and winking approximately every 3 seconds then you know
the door is receiving power and turned on.
If power was not the problem, go on to the next check.
#2 RESET THE DOOR:
Press and hold the on/off button to shut off the door.
Leave it off for 3 minutes.
Press the on/off button to turn back on the door.
Press the Test button on the green circuit board. The door should open and
close. Do this 2 times.
Then hold the collar key in front of the door and see if it opens the door.
Do this a few times.
The door is now reset and should function. An electrical surge may have
cause this problem. Suggest a surge protector to the homeowner to protect
their pet door.
If collar key was not the problem, go on to the next step.
Plexidor® Electronic Owners Manual Pg 11
Version 20101220
#3 CHECK THAT COLLAR KEY IS PROGRAMMED:
1. Hold the collar key in front of the door. If the Blue On/Off light blinks rapidly you know you have
power and the circuit board is sensing the collar key, but the collar key has not yet been programmed with the door's combination number.
To program the collar key hold the key in front of the door and when the Blue On/Off light blinks
rapidly, push and hold the program button for about 3 seconds until you hear a beep and see a
steady green light. The program button is located on the green circuit board and the green light will
be just beneath the program button.
Check that the collar key is now programmed. Hold the collar key in front of the door and see if it makes
the door open as it should. Do this 3 times. Check all of the customer's collar keys.
#4 CHECK THAT MOTOR IS RECEIVING POWER AND WORKING:
1. With door plugged in and turned on, hold the collar key in front of the door. Watch the red motor
light. The red light is supposed to come on when the motor makes the panel open and close. The
motor light should be solid on as the panel goes up and goes down.
2. If the red light comes on but the door does not open, then there may be a motor problem or a
problem with the spring hub.
First check the spring hub: With the motor cover off, press test and watch to see if the red motor
light goes on. If the light goes on but nothing happens, look at the motor and see if it is spinning. If
it is spinning but the hub wheel is not moving you need to replace the motor hub. (We will send
you one if you don't have one in stock) See Replacing Hub Instructions.
3. If it is not the motor hub, it may be a motor problem. This motor is rated for 3 million cycles, so
the problem is probably just a wire connection. Remedy is to check that that red and black motor
wires are fully connected to the top of the green circuit board. When you tighten these wires DO
NOT OVERTIGHTEN or you will break the fastener screws.
#5 CHECK THAT CLOSING PANEL IS NOT OBSTRUCTED:
1. Make sure the closing panel moves up and down freely in the guide tracks. To do this you will
unhook the metal spring strap from the screw where it attaches to the top of the closing panel.
Then you can use a paper clip to hook onto the screw that the spring strap hooks onto. Slide the
panel up and down in the tracks to make sure there are no obstructions. See the instructions for
Panel Replacement.
Plexidor® Electronic Owners Manual Pg 12
Version 20101220
#6 CHECK TENSION ON NYLON GUIDE STRAP BEHIND METAL SPRING STRAP:
1. Unscrew the panel cover screw and slide down the upper panel cover and then flex the upper
panel cover and pop it out of the frame tracks. Check that the nylon guide strap which runs behind
the metal spring strap is taut. This nylon strap runs from the top of the inside of the frame down to
the pet door opening.
2. Now press the Test Button and watch the panel go up and down 4 or 5 times. Check that the
nylon strap does not move and interfere with the panel or the metal spring strap. If the nylon strap
is too loose and causing a problem you will need to shorten it so it will be taut. To do this you will
need to shut off the door, unplug it and then uninstall the pet door.
3. Next, unscrew the 2 screws that attach the metal motor mount plate to the inside of the upper
frame piece. Then you can slide the top frame piece up so you can get to the screw that holds
down the top of the nylon guide strap. Unscrew the strap and pull it taut. Then cut enough off the
strap to make it taut and make a new hole in the strap for the screw. Then screw it back in place.
Check that it is taut, slide the top frame piece back down and screw the motor plate screws back
into place. Reinstall the door and plug it in and make sure it works .
#7 CHECK THAT ANTENNA WIRE TUBE HAS NOT BEEN DAMAGED:
Unscrew the panel cover screw and slide down the upper panel cover. Check the clear antenna
wire tubing with the blue sleeve on it. Make sure the tubing shows no sign of being pinched or bent.
In some of the older doors the antenna tubing can develop enough slack that it gets bunched up
behind the panel cover as the closing panel goes up and down. This can interfere with the closing
panel and sometimes the wire inside the tubing gets broken. If the wire is broken inside you will
need to install a new closing panel with a new antenna wire and the updated attached protective
grommet. If you do not have one with you, you will have to order one and come back and install it.
#8 CHANGE DOWN POWER SETTING:
If resetting the door did not work we are next going to change the Down Power setting on the door.
The Down Power setting can be set too high for your installation. As the panel comes down the
system is sensing for obstructions that may be blocking the panel. If the down power is set too
high, the system will be over sensitive. You will know it is set too high if the closing panel stops
several times on the way down. Adjust the down power lower until the closing panel comes down
slow and smooth.
It will be easier to adjust the Down Power setting if you slide down the panel cover. To do this just
unscrew the panel cover screw (see diagram on Pg 7) and let the panel cover slide down and expose the green circuit board.
Plexidor® Electronic Owners Manual Pg 13
Version 20101220
(Changing Down Power Setting Instructions Contʼd)
Locate the Down Power setting screw on the circuit board. It should be down and to the right of the
test button. It is labeled and has a line pointing to the setting screw. This screw freely rotates in a
range from about 8 O'Clock to 4 O'Clock, with 8 O'Clock being the lowest setting and 4 O'Clock
being the highest setting. It is usually set straight up at 12 O'Clock when it leaves the factory. If it is
at 12 O'Clock then turn it counter clockwise down to about 10 O'Clock. Then hit the Test button and
see if the panel comes down smoothly. You may have to do this a few times to get the setting to a
smooth up and down function. Once you have the setting corrected just put the panel cover back in
place and put the motor cover back on and you are done.
#9 ACTUATOR SWITCH ARM DAMAGE OR MISALIGNMENT:
Check the actuator arm and switch near the locking mechanism for signs of visible damage or misalignment. You will need to unscrew the 10 screws that hold the pet door in place and remove the
pet door from the mounting hole to view and have access to the actuator arm and switch. Set the
pet door down on the ground, but in the upright position, and turn it around so that you can see the
back side. Now the locking mechanism and Micro Switch and Actuator Arm will be visible and accessible.
Look at the Actuator Arm and see if it appears to be in the correct position and if it is damaged or
bent in any way. See photos below.
If the Actuator Arm is not in the correct position, reposition it so that it is under the locking mechanism bar. You will do this by first pushing on the locking mechanism so that the panel flexes in and
then you can reposition the Actuator Arm without bending it.
Now plug the door in and check to see if it functions properly. Test it 4 or 5 times to be sure it is
working. If it does work properly then you will not need to change the Micro Switch and Actuator
Arm. If it does not work, you will need to replace those parts.
Incorrect position:
Actuator Arm on top of lock bar.
Correct position:
Actuator Arm below lock bar.
View of back of pet door
showing lock and micro switch
Plexidor® Electronic Owners Manual Pg 14
Version 20101220
#10 CIRCUIT BOARD FAILURE:
If you have checked all of the above and the pet door still won't function properly, you may have a
faulty circuit board. See Instructions for Replacing Circuit Board
**MAKE SURE THE ELECTRONIC PET DOOR IS PLUGGED IN TO A SURGE PROTECTOR.
POWER SURGES AND LIGHTNING CAN DAMAGE THE CIRCUIT BOARD
Plexidor® Electronic Pet Door
Need Help?
If you have any installation questions or technical issues with your
Plexidor® Electronic Pet Door please call the Plexidor® Technical
Support Line directly at:
941-758-1951
The Technical Support Line is open Monday through Friday from
10am to 4pm eastern time.
You may also email to:
[email protected]
Plexidor® Electronic Owners Manual Pg 15
Version 20101220
Our Guarantees:
Unconditional 90 Day Satisfaction Guarantee
You must be completely satisfied with your Plexidor®.
If not, simply return the Plexidor® to your dealer.
Plexidor® 5 Year Limited Residential Warranty
Your Plexidor® pet door is designed for years of trouble-free service when properly installed
and maintained. If any manufacturing defect, malfunction or failure occurs within five years
from the date of purchase, we will repair or replace the defective part free of charge. Local
labor is not included in the warranty. If you need to return the door, please enclosed a copy of
your original dated purchase receipt with your name and address, and describe the problem.
Package must be shipped at your expense by UPS, FedEx, DHL (or similar carrier) and insured and shipped to:
Plexidor Warranty Dept.
4523 30th Street W. #E502
Bradenton, FL 34207
This warranty is void if the Plexidor® has, in our opinion, been incorrectly installed; or damaged due to misuse or abuse or lack of reasonable care; or if repairs or alterations have been
made by unauthorized persons.
This warranty does not cover accidental damage, or consequential damage to property or
animals.
Plexidor® Pet Door Size ______ Date of Purchase ____________________
To locate your local authorized dealer go to: www.plexidors.net
Plexidor® Electronic Owners Manual Pg 16
Version 20101220