1
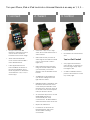
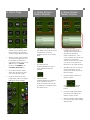
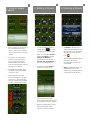
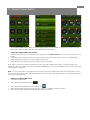
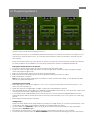
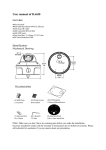
i-Got-Control UNIVERSAL REMOTE User Manual www.i-got-it.com ™ Turn your iPhone, iPad or iPod touch into a Universal Remote is as easy as 1, 2, 3…. 1. Connect • Simply connect the IRB1 Remote to the iPhone or iPod Touch’s Dock Connector located on the bottom edge. • When the iPhone®/iPod® touch is turned ON the IRB1’s LED’s will blink Green. • If the Application has not been installed, the iPhone or iPod Touch will direct you to iTunes App Store to download and install the i-Got-Control remote App. iGi Corp. 2. Select • • • Once the i-Got-Control App starts, click on the ADD button to add a device. Select the Device you want to add using the Left selector wheel (i.e. TV, DVD, Home Control – Lights etc.). Select the Brand of the Device using the center selector wheel. (i.e. Panasonic) or for faster selection use the Scroll Bar at the bottom. • Available IR Code Libraries for your device will appear in the right selector wheel. • Highlight the first code library and hit the Test Power button. If this code works press DONE to save the device. If it does not work, go to the next code set and repeat until your device is found. • To automate this process, use the START SEARCH button to automatically test each command set. Hit STOP SEARCH when the device turns ON or OFF. • Repeat for all Devices • For devices not found in the included Library, skip to the section titled ‘Learning Commands’. -‐ 2 -‐ 3. Control • You’re Done!! • Now Select the saved device and You’ve-Got-Control! • Two pages are loaded for each device. To advance to the next page simply swipe from right to left. • To select a different device, press the Home button on the top of the page. i-Got-Control ™ 4. Home Page 5. Setup Screen – Button Sounds • This is where all of your devices are located. If more than 9 devices are created, another page will be inserted. • • There is no limit to the number of Devices or Pages that can be created, so feel free to add devices from any room in your house, your friends house, your neighbors, the corner bar, the hotel etc. • To Control a device simply select the devices icon from any of the Device pages. • To get to the devices next page simply swipe your finger right to left or left to right. iGi Corp. • • i-Got-Control gives the user the ability to have button press confirmation via sound, vibration or both or be totally silent. Key Click On/Off enables/disables the sound when a Remote Button is pressed. 6. Setup Screen Master Volume • Control allows the user to pick a device as the Master Volume Control for the system (i.e. the TV or the Surround Receiver or any other device). • This allows the user to control the overall volume of the system from within any other Remote page. • From the SETUP screen turn Master Volume Vibrate On/Off enables/disables the ability to have ‘vibration’ when a button is pressed. This can be in addition to or instead of the Key Click sound. -‐ 3 -‐ For Home Theater configurations where all devices play through the TV Speakers or through a Surround Receiver, i-Got- ON . This will enable the Scroll wheel below. • From the Scroll Wheel select the device that will be the Master Volume source. • When complete select DONE from above and these settings will be stored. i-Got-Control ™ 7. Volume ʻswipeʼ Feature 8. Editing a Device • • • Since Volume Up and Down is the command used most often, i-Got-Control allows the user easy ways to control volume. Of course you can use the Volume + and – buttons or you can use the Volume Swipe feature. This feature can be used with any volume (Master or no Master) To enable this feature, From the Setup screen set ‘Swipe Volume’ to ON. • Within any Device page, place your finger on a blank area for 1-2 sec and slowly raise your finger UP or DOWN to raise or lower the volume. 9. Deleting a Device • simply select from the top right of the Home Page. • To Delete a device, from within the EDIT simply press on the devices red ‘x’ located in the top left of the Devices Here you can either Delete a device, re-name a device, change the IR library associated to the device or teach a new IR command on top of an existing button. • This will delete all information related to this device including any ‘learned’ IR commands. • To edit the devices Name select the devices icon. • Note: This will NOT delete the default IR Library for this device, only any learned’ IR commands for this device. • Once in the Device Edit Screen click in the text window to change the devices name. • When complete Select Done from the top right of the screen to save the setting. icon . Vol Up • To edit an existing device, Vol Down iGi Corp. -‐ 4 -‐ i-Got-Control ™ 10. Learning a New IR Command • • If you’ve tried all of the Manufactures IR Codes for a specific device and none are able to control your device, don’t worry, i-Got-Control and the IRB1 can easily learn the codes from your devices original remote. There also may be times a specific command might not be correct or you would just like to add a command that is not automatically placed onto the i-Got-Control remote screen. First add a device you wish to learn to. • From the HOME Screen select the Edit Button. • • Once in the EDIT screen press the devices blue Learning cap. After the Learning Hat is pressed, a Remote Screen for the Source will appear. Select the button to be learned on (i.e. POWER on the iPhone Remote) and the Learn Dialog box will appear. Before pressing the Learn Button, align the i-Got-Control remote and the mfg’s source remote as shown below about 1”-2”’s apart. Make sure there are no bright lights, sun-light or other types of IR interference present. • • • • • • • Press the LEARN button and the IRB1 Led’s will begin to blink GREEN. At this time do a very quick tap of the button to learned on the MFG’s original remote (i.e. POWER in this example). If successful the LED’s will blink SOLID Green and then go out. If Un-successful they will blink RED and an error screen will appear. If Error, please repeat the previous step and remember to use a very ‘quick’ tap of the mfg’s remote. Select TEST to test the learned command and if correct, select Done. Repeat for all commands to be learned. After all desired commands are learned, press the HOME button to return to the Edit Page and then select DONE to store the new commands. TRICKS for Proper Learning: 1) Make sure MFG remote has fresh Batteries 2) direct MFG remote to front left of IRB1 (that is where the learning eye is located) 3) Make sure there is no interference from Sunlight, Florescent light etc. iGi Corp. -‐ 5 -‐ i-Got-Control ™ 11. System Power Button The SYSTEM POWER feature allows you turn multiple devices ON or OFF with a single button. Users can easily select which devices will be included in this automated Macro button. • • • • Setting Up SYSTEM POWER for the first time: If this is the first time you are using this feature simply press the System Power button as shown in the above left image. Once this button is pressed a menu of all devices from your Home screen appear as in the middle image. Simply select each device you want included in this macro. When finished, press DONE in the upper right corner of the screen. Now when you want to turn all of those devices ON or OFF with a single button press, point the remote in the direction of all of the devices and press the SYSTEM POWER button. i-Got-Control will now send out all of the Power commands in a sequence. Note: you must remember to hold the iPhone (iPod touch or iPad) pointing at the devices for the duration of the macro. The i-Got-control screen will display which commands it is sending. When the last command is finished you can resume normal activity. • Editing the SYSTEM POWER button: Go to the Home Screen • Select EDIT in the Top Right corner. • • • Select the SYSTEM POWER buttons Learning Cap After the Learning Hat is pressed you can now ‘select’ or ‘deselect’ devices in the list. When finished, press DONE in the upper right corner of the screen. iGi Corp. -‐ 6 -‐ i-Got-Control ™ 12. Programming Macroʼs Macro’s are customizable buttons you can use for any IR function you desire; A favorite Channel, turning a light ON/OFF, setup your devices for playing a DVD etc…. Macro buttons can have 1 command associated with the button or numerous commands. It is totally up to you and what you want the button to do. You can also name the button what ever you like to associate it to the new function. There are 12 macro buttons for each device you create and since i-Got-Control supports unlimited # of devices, it is quite possible to have Unlimited x 12 macro buttons which last I checked = UNLIMITED MACRO’s!!!! • • • • • • • • • • • • • Setting Up a MACRO button for the first time: To access a devices Macro page, first select the device from the home page. Scroll over to the 3rd page under that device. Advance pages within a device by simply swiping your finger across the page from right to left. Select an un-used Macro button as shown in the above left image. Select anywhere in the NAME field and enter the desired name for this Macro (i.e. HBO). Select DONE when complete Note: Macro buttons require ‘learning’ IR commands for each command you desire, so you will need the MFG remotes you will be learning from. Learning the first Command Before pressing the Learn Button, align the i-Got-Control remote and the mfg’s source remote about 1”-2”’s apart as shown in Section 10. Make sure there are no bright lights, sun-light or other types of IR interference present. Press the LEARN button and the IRB1 Led’s will begin to blink GREEN. At this time do a very quick tap of the button to be learned on the MFG’s original remote (i.e. Channel 5). If successful the LED’s will blink SOLID Green and then go out. If Un-successful they will blink RED and an error screen will appear. If Error, please repeat the previous step and remember to use a very ‘quick’ tap of the mfg’s remote. Select TEST to test the learned command. Adding Delay’s Delays are often desired when doing multiple commands to a single device (i.e. Favorite Channel Macro). I-GotControl allows the ability to insert Delays in-between commands within the Macro. To add a delay Press Add Delay. Each press of this button will add a 0.5second delay. To add more delays, simply press the Add Delay again. Typically for Channel Macro’s, add 2 delays between commands for a total of a 1 second delay. To add another command press the NEXT COMMAND button and repeat the learning process as noted above. iGi Corp. -‐ 7 -‐ i-Got-Control ™ 12. Programming Macroʼs - contʼd • • Repeat this process until the Macro is complete. When complete, press the DONE button to store the Macro. To Edit a previously recorded MACRO: • Go to the home page and select EDIT in the Top Right corned • • • Select the Devices Learning Cap Scroll over to the 3rd page Select the MACRO button you wish to edit and re-record the Macro. Creating a Channel Macro – Quick Instructions! Lets create a Macro for Channel 502 which in my case is HBO 1. Press the Macro button to be programmed 2. 3. Select the Name box in the MENU and Enter HBO Select DONE in the Keyboard 4. 5. 6. Select the LEARN Button. With the MFG remote 1-2” from the IRB1 press and release the channel ‘5’ button Verify the Green led’s indicate successful learning 7. Press the ADD DELAY Button 2x to insert a 1 second delay 8. Press the NEXT COMMAND button 9. With the MFG remote 1-2” from the IRB1 press and release the channel ‘0’ button 10. Verify the Green led’s indicate successful learning 11. Press the ADD DELAY button 2x to insert a 1 second delay. 12. 13. 14. 15. 16. Press the NEXT COMMAND button With the MFG remote 1-2” from the IRB1 press and release the channel ‘2’ button Verify the Green led’s indicate successful learning Press the TEST Button to verify the MACRO After successful test, press the DONE button Repeat this process for each Macro Button you wish to create. iGi Corp. -‐ 8 -‐ i-Got-Control ™ 13. Moving Device icons on the Home Page i-Got-Control allows the user to organize the Home Screen by moving Device icons among the page or pages configured. This is done in the same fashion as moving App icons on the iPhone or iPod touch. • • • • To Move a Device icon: Go to the home page Press and Hold the Device icon until the icons start to ‘dance’. Move the icon to the desired position within the page or to any page available When all icons are arranged to your desire, press the DONE button in the top right corned to store the change. iGi Corp. -‐ 9 -‐ i-Got-Control ™