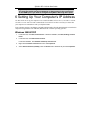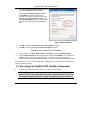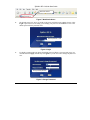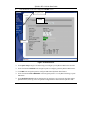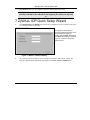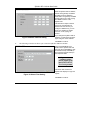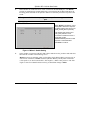
1
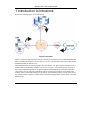
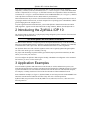
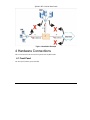
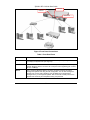
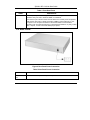
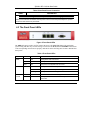
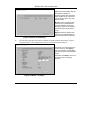
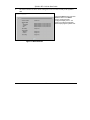
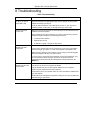
ZyWALL IDP 10
Intrusion Detection and Prevention Appliance
Quick Start Guide
Version 1.00
July 2004
ZyWALL IDP 10 Quick Start Guide
Table of Contents
1 Introduction to Intrusions .....................................................................................................4
2 Introducing the ZyWALL IDP 10 ...........................................................................................5
3 Application Examples............................................................................................................5
4 Hardware Connections..........................................................................................................6
4.1 Front Panel ......................................................................................................................6
4.2 Rear Panel.......................................................................................................................8
4.3 The Front Panel LEDs .....................................................................................................9
5 Accessing Your ZyWALL IDP .............................................................................................10
6 Setting Up Your Computer’s IP Address...........................................................................11
6.1 Accessing Your ZyWALL IDP Via Web Configurator ....................................................12
7 ZyWALL IDP Quick Setup Wizard ......................................................................................15
8 Troubleshooting...................................................................................................................20
List of Figures
Figure 1 Intrusions .................................................................................................................................... 4
Figure 2 Installation Example ................................................................................................................... 6
Figure 3 Front Panel Connections ............................................................................................................. 7
Figure 4 Rear Panel Power Connection .................................................................................................... 8
Figure 5 Front Panel LEDs........................................................................................................................ 9
Figure 6 Set IP Address ........................................................................................................................... 12
Figure 7 Web Site Address ...................................................................................................................... 13
Figure 8 Login......................................................................................................................................... 13
Figure 9 Change Password...................................................................................................................... 13
Figure 10 Home Screen........................................................................................................................... 14
Figure 11 Wizard– Password Setting ...................................................................................................... 15
Figure 12 Wizard– Network Setting........................................................................................................ 16
2
ZyWALL IDP 10 Quick Start Guide
Figure 13 Wizard–Time Setting .............................................................................................................. 16
Figure 14 Wizard– Stealth Setting........................................................................................................... 17
Figure 15 Wizard– State Setting.............................................................................................................. 18
Figure 16 Wizard - Summary .................................................................................................................. 18
Figure 17 Wizard Result.......................................................................................................................... 19
List of Tables
Table 1 Front Panel Ports .......................................................................................................................... 7
Table 2 Rear Panel Power Connection ...................................................................................................... 8
Table 3 Front Panel LEDs ......................................................................................................................... 9
Table 4 Troubleshooting.......................................................................................................................... 20
3
ZyWALL IDP 10 Quick Start Guide
1 Introduction to Intrusions
Refer to the following figure for the introduction.
Figure 1 Intrusions
Figure 1 represents a typical business network consisting of an employee LAN, a DMZ (DeMilitarized
Zone) containing the company web, FTP, mail etc. servers, a firewall and/or NAT router connected to a
broadband modem for Internet access.
Host-based intrusions are what most people call “virus attacks”. The goal of host-based intrusions is to
infiltrate files on an individual computer or server (see 1 in Figure 1) in with the goal of accessing or
destroying confidential information. To protect against host-based intrusions you need to install antivirus software on your computer or/and install a device with anti-virus software such as the Prestige
662HW. Sources of host-based attacks are the Internet, telecommuting employees using VPN to access
the company intranet, employees (inadvertently) using infected floppy disks, memory sticks, removable
hard drives etc.
4
ZyWALL IDP 10 Quick Start Guide
Network-based intrusions have the goal of bringing down a network or networks by attacking
computer(s), switch(es), router(s) or modem(s) (see 1, 2, 3 and 4 in Figure 1). If the LAN and/or DMZ
switch is compromised (see 2 in Figure 1), then those networks are compromised. If the firewall/router
is attacked (see 3 in Figure 1) and/or the Internet access broadband modem (see 4 in Figure 1), then this
is the equivalent of a Denial of Service (DoS) attack on your network(s).
Host-based intrusions may be used to cause network-based intrusions when the goal of the host virus is
to propagate attacks on the network, or attack computer/server operating system vulnerabilities with the
goal of bringing down the computer/server.
To protect against network-based intrusions, you need the ZyWALL Intrusion Detection Prevention
(IDP) Appliance. Typical network-based intrusions are SQL slammer, Blaster, Nimda, MyDoom etc.
2 Introducing the ZyWALL IDP 10
The ZyWALL IDP 10 functions as a plug and play bridge designed to protect networks from intrusions
while allowing safe Internet access.
The default ZyWALL IDP 10 IP address is 192.168.1.3.
An IDP can detect malicious or suspicious packets and respond instantaneously. It can detect intrusions
based on pre-defined attack patterns, violations of protocol standards (RFCs – Requests for Comments)
or abnormal flows such as port scans. The rules that define detections are called “signatures”.
The ZyWALL IDP comes with a built-in signature set that can be regularly updated. Regular updates
are vital as new attack types are constantly evolving.
For people with knowledge of packet header types and OSI (Open System Interconnection), the IDP
allows you to create your own rules.
You can configure the ZyWALL IDP using the friendly, embedded web configurator or the commandline interface you access via the console port.
3 Application Examples
You can install a ZyWALL IDP either between the firewall (or switch) and Internet to protect your
local networks and firewall (or switch) from intrusions from the Internet, behind the firewall (or switch)
to protect the DMZ servers from intrusions from the local network (due to an infected LAN computer,
for example), or ideally, install one in front of the firewall and two others behind the firewall.
In the installation example (see Figure 2) ZyWALL IDPs (A1 and A2) protect the LAN and DMZ from
intrusions from the Internet and from each other. They also receive firewall protection.
ZyWALL IDP (A3) protects the firewall (B), DMZ servers (and LAN). However, it does not receive
firewall protection.
5
ZyWALL IDP 10 Quick Start Guide
Figure 2 Installation Example
4 Hardware Connections
This section describes the front and rear panels of the ZyWALL IDP.
4.1 Front Panel
The front panel contains ports and LEDs.
6
ZyWALL IDP 10 Quick Start Guide
WAN Port
LAN Port
MGMT Port
Figure 3 Front Panel Connections
Table 1 Front Panel Ports
LABEL
DESCRIPTION
WAN 10/100
Connect a firewall, switch or cable/DSL modem to this port depending on where
you deploy the ZyWALL IDP (see Figure 2).
LAN 10/100
Use a crossover Ethernet cable to connect a computer to this port or use a straightthrough Ethernet cable to connect a hub. This port is auto-negotiating (can connect
at 10 or 100Mbps).
MGMT
Use a crossover Ethernet cable to connect a computer to this port in order to
manage the ZyWALL IDP using the web configurator. You can also manage the
ZyWALL IDP via the LAN or WAN port, but the MGMT port is dedicated for
management. If you manage the ZyWALL IDP via the LAN or WAN port then the
ZyWALL IDP itself may be susceptible to being compromised.
7
ZyWALL IDP 10 Quick Start Guide
Table 1 Front Panel Ports
LABEL
CONSOLE
DESCRIPTION
Use this port if you want to configure the ZyWALL IDP using the command-line
interface. See your User’s Guide for details on commands.
Connect the 9-pin male end of the console cable to the console port of the ZyWALL
IDP and the other end to a serial port (COM1, COM2 or other COM port) on your
computer. Your computer should have a terminal emulation communications
program (such as HyperTerminal) set to VT100 terminal emulation, no parity, 8 data
bits, 1 stop bit, no flow control and 9600 bps port speed.
4.2 Rear Panel
Figure 4 Rear Panel Power Connection
Table 2 Rear Panel Power Connection
LABEL
POWER 5V,
4A
DESCRIPTION
Connect the included power adaptor to this power socket.
8
ZyWALL IDP 10 Quick Start Guide
Table 2 Rear Panel Power Connection
LABEL
DESCRIPTION
WARNING: Using an incorrect power adapter will damage your device!
After you’ve made the connections, use the power cord to connect the power adaptor to a power
source and look at the front panel LEDs.
4.3 The Front Panel LEDs
Figure 5 Front Panel LEDs
The PWR LED turns on when you first connect the power. The SYS LED blinks while performing
system testing and then stays on if the testing is successful. The WAN, LAN and MGMT LEDs turn on
if the corresponding connections are properly made. Refer to the following table for more detailed LED
descriptions.
Table 3 Front Panel LEDs
LED
COLOR
PWR
SYS
WAN
10/100
STATUS
DESCRIPTION
Off
The ZyWALL IDP is turned off.
Green
On
The ZyWALL IDP is turned on.
Red
On
The power to the ZyWALL IDP is too low.
Green
Off
The ZyWALL IDP is not ready or has failed.
On
The ZyWALL IDP is ready and running.
Blinking
The ZyWALL IDP is restarting.
Off
The WAN connection is not ready, or has failed.
On
The ZyWALL IDP has a successful 10Mbps WAN
connection.
Green
9
ZyWALL IDP 10 Quick Start Guide
Table 3 Front Panel LEDs
LED
COLOR
Amber
LAN
10/100
Green
Amber
MGMT
Green
Amber
STATUS
DESCRIPTION
Blinking
The ZyWALL IDP is sending or receiving packets on the
10Mbps WAN connection.
On
The ZyWALL IDP has a successful 100Mbps WAN
connection.
Blinking
The ZyWALL IDP is sending or receiving packets on the
100Mbps WAN connection.
Off
The LAN port is not connected.
On
The ZyWALL IDP has a successful 10Mbps LAN Ethernet
connection.
Blinking
The ZyWALL IDP is sending or receiving packets on the
10Mbps LAN connection.
On
The ZyWALL IDP has a successful 100Mbps Ethernet
connection.
Blinking
The ZyWALL IDP is sending or receiving packets on the
100Mbps LAN connection.
Off
The MGMT port is not connected.
On
The ZyWALL IDP has a successful 10Mbps Ethernet
connection on the MGMT port.
Blinking
The MGMT port is sending or receiving packets on the
MGMT port.
On
The ZyWALL IDP has a successful 100Mbps Ethernet
connection on the MGMT port.
Blinking
The MGMT port is sending or receiving packets.
5 Accessing Your ZyWALL IDP
Choose one of these methods to access (and configure) the ZyWALL IDP.
Command line interface via the console port using terminal emulation software.
Web Configurator via the MGMT port using a web browser. To do this your computer must
be in the same subnet as the ZyWALL IDP. See the next section for how to do this.
The default ZyWALL IDP 10 IP address is 192.168.1.3.
10
ZyWALL IDP 10 Quick Start Guide
By default remote management is disabled on both the LAN and WAN ports.
You must first enable remote management on these ports via the console port
or the MGMT port if you want to configure the ZyWALL IDP using these ports.
6 Setting Up Your Computer’s IP Address
Use this section to set up your computer to use a static IP address of 192.168.1.1, 192.168.1.2 or from
192.168.1.4 to 192.168.1.254 with a subnet mask of 255.255.255.0. This is necessary to ensure that
your computer can communicate with your ZyWALL IDP.
Your computer must have an Ethernet card and TCP/IP installed. TCP/IP should already be installed on
computers using Windows NT/2000/XP, Macintosh OS 7 and later operating systems.
Windows 2000/NT/XP
1.
In Windows XP, click Start, Control Panel. In Windows 2000/NT, click Start, Settings, Control
Panel.
2.
In Windows XP, click Network Connections.
In Windows 2000/NT, click Network and Dial-up Connections.
3.
Right-click Local Area Connection and then click Properties.
4.
Select Internet Protocol (TCP/IP) (under the General tab in Windows XP) and click Properties.
11
ZyWALL IDP 10 Quick Start Guide
5.
The Internet Protocol TCP/IP Properties screen
opens (the General tab in Windows XP).
-Click Use the following IP Address and fill in
the IP address (choose an used one from
192.168.1.1, 192.168.1.2 or from 192.168.1.4 to
192.168.1.254), Subnet mask (255.255.255.0),
and Default gateway (192.168.1.3) fields (if your
computer is connected directly to the ZyWALL
IDP.
Figure 6 Set IP Address
6.
Click OK to close the Internet Protocol (TCP/IP) Properties window.
7.
Click OK to close the Local Area Connection Properties window.
Checking Your Computer’s IP Address
1.
In the computer, click Start, (All) Programs, Accessories and then Command Prompt.
2.
In the Command Prompt window, type "ipconfig" and then press ENTER. Your computer’s IP
address must be in the correct range (192.168.1.1, 192.168.1.2 or from 192.168.1.4 to
192.168.1.254) with subnet mask 255.255.255.0 in order to communicate with the ZyWALL IDP.
Refer to your User’s Guide for detailed IP address configuration for other Windows and Macintosh
computer operating systems.
6.1 Accessing Your ZyWALL IDP Via Web Configurator
1.
Launch your web browser. Enter “192.168.1.3” as the web site address.
The ZyWALL allows one management session at a time (console port, SSH
(Secure Shell) or web configurator in that order of priority). Make sure there is
not another management session already running before you try to start one.
12
ZyWALL IDP 10 Quick Start Guide
Default IP address.
Figure 7 Web Site Address
2.
The default password (“1234”) is already in the password field (in non-readable format). Click
Login to proceed to a screen asking you to change your password. Click Reset to revert to the
default password in the password field.
Default password = 1234
Figure 8 Login
3.
It is highly recommended you change the default password. Enter a new password, retype it to
confirm and click Apply; alternatively click Ignore if you do not want to change the password
now.
Change default password
Figure 9 Change Password
13
ZyWALL IDP 10 Quick Start Guide
4.
You should now see the web configurator HOME screen.
Navigation panel
Setup
Wizard
LOGOUT
Figure 10 Home Screen
Click Quick Setup to begin a wizard to help you configure your ZyWALL IDP for the first time.
Click a link under SYSTEM in the navigation panel to configure general ZyWALL IDP features.
Click IDP in the navigation panel to configure IDP-related ZyWALL IDP features.
Click a link under LOG & REPORT in the navigation panel to view ZyWALL IDP logs, reports
and alarms.
Click MAINTENANCE in the navigation panel to configure a new password, time/date settings
upload firmware, back up, restore or upload a configuration file and restart the ZyWALL IDP.
14
ZyWALL IDP 10 Quick Start Guide
Click LOGOUT when you have finished a ZyWALL IDP management session.
The ZyWALL IDP automatically logs you out if a management session (web or
console) is left idle for five minutes. If this happens, you will have to log back
in.
7 ZyWALL IDP Quick Setup Wizard
1.
Click Quick Setup in the HOME screen of the web configurator. The first wizard screen allows
you to change the access password.
It is highly recommended you
change the default password. Enter
a new password, retype it to
confirm and click Next; alternatively
click Next without filling in the fields
if you do not want to change the
password now.
Figure 11 Wizard– Password Setting
2.
The second wizard screen allows you to configure the ZyWALL IDP network settings. The
ZyWALL IDP IP address and subnet mask applies to the LAN, WAN and MGMT ports.
15
ZyWALL IDP 10 Quick Start Guide
Enter the ZyWALL IDP IP address,
subnet mask, gateway IP address
and DNS server IP address in
these fields. The gateway and DNS
entries relate to the e-mail, syslog
and SNMP functions of the
ZyWALL IDP.
The DNS server maps a domain
name to its corresponding IP
address and vice versa. If you
configure a DNS server, you can
enter an IP address or domain
name for e-mail, syslog, etc.
servers.
Figure 12 Wizard– Network Setting
If you change the ZyWALL IDP IP
address, you will need to access it
again using the new IP address.
Click Next to continue.
3.
The following wizard screen allows you to enter the ZyWALL IDP time and date.
Select the Time Zone of the
location of the ZyWALL IDP and
then type the current Date (in yearmonth-date format) and Time (in
hour-minutes-seconds format) in
the respective fields.
If you want to
configure a time
server, please go to
the MAINTENANCE,
Time Setting screen.
This is the date and time the
ZyWALL IDP displays in logs and
reports.
Figure 13 Wizard–Time Setting
Click Next to continue.
16
ZyWALL IDP 10 Quick Start Guide
4.
Enable/disable the stealth function on either or both the LAN and WAN ports. The MGMT
port has no stealth function. Stealth enabled on a port means that the ZyWALL IDP drops all
incoming packets destined for the ZyWALL IDP received on that port with no response to the
sender.
When you enable Stealth on a port, you cannot perform management via that
port.
When Stealth is enabled on a port,
the ZyWALL IDP doesn’t respond
to ICMP requests such as Ping (no
ICMP_ECHO_REPLY packets).
The ZyWALL IDP doesn’t send
TCP_RST packets if a TCP
connection is blocked nor does it
send ICMP_PORT
UNREACHABLE packets for UDP
requests or forwarded traffic.
Click Next to continue.
Figure 14 Wizard– Stealth Setting
5.
Select whether you want the ZyWALL IDP to detect and take action, just detect and send alerts
about attacks or neither in the following screen.
Monitor state may be advisable when you first deploy the ZyWALL IDP in your network. As
each network is different, in Inline mode the ZyWALL IDP may initially block valid traffic
(“false positive”) or allow invalid traffic (“false negative”). When “false positives” and “false
negatives” have been identified and corrected, you should then change to Inline.
17
ZyWALL IDP 10 Quick Start Guide
Inline means the ZyWALL IDP will
both identify suspicious or
malicious packets and perform the
action dictated by the rule for that
type of intrusion (block, log, drop,
send an alarm).
Monitor means the ZyWALL IDP
will function as a traditional IDS
(Intrusion Detection System) by
identifying suspicious or malicious
packets and then sending alerts
(only).
Bypass means the ZyWALL IDP
allows all LAN and WAN traffic to
pass through it without inspection.
Figure 15 Wizard– State Setting
6.
The following read-only screen shows a summary of all the ZyWALL IDP settings you have
configured in this wizard. Changes have not been saved to the ZyWALL IDP yet.
Check that your configurations are
correct and if yes, click Apply to
save your changes to the ZyWALL
IDP and continue to the final wizard
screen.
Otherwise, click Back to return to a
previous screen if a setting is
incorrect.
Figure 16 Wizard - Summary
18
ZyWALL IDP 10 Quick Start Guide
7.
The final wizard screen shows which settings have been saved successfully to the ZyWALL
IDP.
Check the Result screen and click
Close to return to the Home
screen. Fields incorrectly
configured display “Error”. You
need to reconfigure those fields
before deploying the ZyWALL IDP.
Figure 17 Wizard Result
19
ZyWALL IDP 10 Quick Start Guide
8 Troubleshooting
Table 4 Troubleshooting
PROBLEM
None of the LEDs turn
on when you turn on
the ZyWALL IDP.
CORRECTIVE ACTION
Make sure that you have the included power adaptor connected to the ZyWALL
IDP and connected to an appropriate power source. Using an incorrect power
adaptor will damage your device!
Check all cable connections. If the LEDs still do not turn on, you may have a
hardware problem. In this case, you should contact your local vendor.
Cannot access the
console port
Make sure you have the physical connection properly set up as described in the
hardware connections section.
When configuring using the console port, you need a computer with a terminal
emulation program configured to the following parameters:
Cannot access the
ZyWALL IDP web
configurator.
o
VT100 terminal emulation.
o
9600 bits per second.
o
8 data bits, no parity, 1 stop bit, no flow control
Make sure you are using the correct IP address to access the ZyWALL IDP.
Connect to the ZyWALL IDP from the console port, log in to the command line
interface and type “get system” to check the IP address of the ZyWALL IDP.
Make sure the IP address of the computer you are using to access the ZyWALL
IDP and the ZyWALL IDP are in the same subnet.
If you are trying to access the web configurator via the LAN or WAN port, go to
the command line interface and type “get remote” to check that remote
management is allowed on that port. Management is always allowed on the
MGMT port.
Cannot access the
ZyWALL IDP from the
LAN or WAN.
Check the cable connection between the ZyWALL IDP and your computer or
hub. Refer to the section on front panel for details.
Ping the ZyWALL IDP from a LAN computer. Make sure your computer’s
Ethernet card is installed and functioning properly.
Check that the port is not in stealth mode. Go to the command line interface and
type “get interface”.
Check that remote management is allowed on that port. Go to the command line
interface and type “get remote”.
20
ZyWALL IDP 10 Quick Start Guide
PROBLEM
Forgot My Password
CORRECTIVE ACTION
If you forgot your console and web configurator password, then you will have to
enter debug mode to reset the ZyWALL IDP to the factory defaults. See your
User’s Guide for details.
21