1
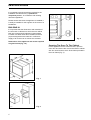
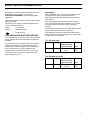
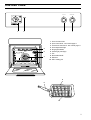
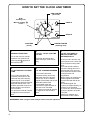
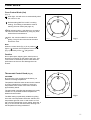
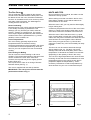
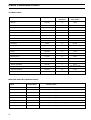
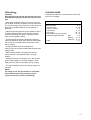
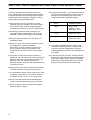
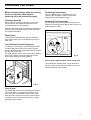
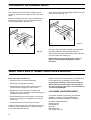
35662-6802
OPERATING AND INSTALLATION MANUAL
ZANUSSI
BUILT-IN OVEN
MODEL
ZSA 15
2
WARNINGS AND GUIDANCE
It is most important that this instruction book should be retained with the appliance for future
reference. Should the appliance be sold or transferred, always ensure that the book is left with
the appliance in order that the new owner can get to know the functions of the appliance and
the relevant warnings.
These warnings are provided in the interest of safety. You MUST read them carefully before
installing or using the appliance.
This oven is heavy and care must be taken when
moving it.
Ensure that you support the grill pan when removing it
from the oven.
Ensure that all packaging, both inside and outside the
oven, has been removed before the oven is used.
Never line any part of the oven with aluminium foil. Do
not allow heatproof cooking material, e.g. roasting
bags, to come into contact with oven elements.
The oven must be installed according to the
instructions supplied. Any electrical work must be
undertaken by a qualified electrician/competent
person.
It is dangerous to alter the specifications in any way.
After installation, please dispose of the packaging with
due regard to safety and the environment.
During Operation
Do not use this oven if it is in contact with water and
never operate it with wet hands.
Ensure that the anti-tip oven shelves are installed in
the correct way (see instructions).
This oven is designed to be operated by adults and
children under supervision. Young children must not
be allowed to tamper with the controls or play near or
with the oven.
CAUTION - accessible parts, especially around the
grill area, may become hot when the oven is in use.
Children should be kept away until it has cooled.
Take great care when heating fats and oils as they
will ignite if they become too hot.
This oven has been designed for cooking edible
foodstuffs only and must not be used for any other
purposes.
Never place plastic or any other material which may
melt in or on the oven.
Only clean this oven in accordance with the
instructions.
Take care to follow the recommendations given for
tending the food when grilling. Use the handle
provided in the recommended way.
Always stand back from the oven when opening the
oven door, to allow any build-up of steam or heat to
release.
Stand clear when opening the drop down oven door.
Do not allow it to fall open - support it using the door
handle, until it is fully open.
Do not place sealed cans or aerosols inside the oven.
They may explode if they are heated.
Do not hang towels or clothes from the oven or its
handle. They are a safety hazard.
After Use
Ensure that all control knobs are in the OFF position
when not in use.
For hygiene and safety reasons, this oven should be
kept clean at all times. A build-up of fats or other
foodstuffs could result in a fire, especially in the grill
pan.
Always allow the cooling fan to cool the cooker down
before switching off at the electrical supply prior to
carrying out any cleaning or maintenance work.
Do not leave utensils containing foodstuffs, e.g. fat or
oil in or on the oven in case it is inadvertently switched
ON.
Ovens and hobs become very hot, and retain their
heat for a long period of time after use. Children
should be kept well away from the cooker until it has
cooled.
Under no circumstances should you attempt to repair
the appliance yourself. Repairs carried out by
inexperienced persons may cause injury or serious
malfunctioning. Refer to your local Zanussi Service
Centre. Always insist on genuine Zanussi spare parts.
Always grill with the oven door closed.
Always remove the grill pan handle when grilling.
Always use oven gloves to remove and replace food
in the oven. Similarly always use oven gloves to
remove and replace the grill pan handle, before and
after grilling.
Your safety is of paramount importance.
Therefore, if you are unsure about any of the
meanings of these WARNINGS, contact the
Customer Care Department
Customer Care Department
Telephone: (01635) 521313
3
CONTENTS
Warnings and Guidance
Page
3
Technical Data
Page
5
Installation
Page
6
Electrical Connections
Page
7
When the oven is first installed
Page
8
Use and Care
Page
9
How to set the clock and timer
Page
10
Controls
Page
11
Using the fan oven
Page 12-13
Oven cooking chart
Page
14
Grilling
Page
15
Helpful hints when buying and preparing food
Page
16
Cleaning the oven
Page
17
Cleaning the Hinged Grill
Page
18
What Happens if something goes wrong
Page
18
Peace of mind for 24 Months
Page
19
This appliance complies with the following E.E.C. Directives:
* 73/23 - 90/683 (Low Voltage Directive);
* 93/68 (General Directives);
* 89/336 (Electromagnetical Compatibility Directive)
and subsequent modifications.
MANUFACTURER:
ELECTROLUX ZANUSSI ELETTRODOMESTICI S.p.A.
Viale Bologna 298
47100 FORLÌ (Italy)
WARNING
Please remember that an appliance used for cooking does
get hot, so make sure that children are kept well away while it is in use.
Please complete and return the 24 months Guarantee card.
In case of a complaint, and for ordering spare parts, you must specify the
model number and serial number which appear on the rating plate situated
on the cavity front panel.
4
TECHNICAL DATA
Model Number: ZSA 15W - ZSA 15B
Recess dimensions
Height
Width
Depth
Oven Capacity
Internal oven dimensions
Height
Width
Depth
Oven Ratings
Oven Element
Grill Element
Convection Fan
Oven Light
Cooling fan
Total Rating
Cable (for UK use)
Cable cross-section
Type of cable
Fuse (min.)
Cable (for Europe use)
Cable cross-section
Type of cable
Fuse (min.)
580 mm
560-570 mm
550 mm
1.9 cu. ft.
320 mm
420 mm
390 mm
2.5 kW
1.8 kW
30 W
15 W
25 W
2.565 kW
6 mm 2
6242 Y
15 amp
2.5 mm2
Ho RR-F
13 amp
5
INSTALLATION
It is mandatory that all operations required for the
installation be carried out by a qualified or
competent person - in accordance with existing
rules and regulations.
Please ensure that when the appliance is installed it
is easily accessible for the engineer in the event of a
breakdown.
BUILDING IN
It is important that the dimensions and materials of
the surround or cabinet into which the oven will be
built are correct and will withstand a temperature
increase of at least 60°C above ambient; and that
proper arrangements are made of a continuous
supply of air to the oven so it does not overheat.
FO 0039
Fig. 3
Dimensions of the appliance and recess required
are given below (Fig. 1-2).
Securing The Oven To The Cabinet
Fit the appliance into the cabinet recess, open the
oven door and secure the oven to the kitchen cabinet
with four wood screws, which fit the holes provided in
the oven frame (Fig. 3).
FO 0374
Fig. 1
FO 0381
Fig. 2
6
ELECTRICAL CONNECTION
We strongly recommend that all operations for the
installation of your oven be carried out by
QUALIFIED PERSONNEL to the relevant British
Standards.
The oven designed to be connected to 240V (50Hz)
electricity supply.
The oven has an easily accessible terminal block
which is marked as follows:
Letter L
-
Live terminal
Letter N
-
Neutral terminal
-
Earth terminal
THIS APPLIANCE MUST BE EARTHED
The cable used to connect the oven to the electrical
supply should have the characteristics indicated in
the table.
It is necessary that you install a double pole switch
between the appliance and theelectricity supply
(mains), with a minimum gap of 3mm between the
switch contacts and of a type suitable for the
required load in compliance with the current rules.
Important
After installation and connecting, the cable must be
placed so that it cannot at any point reach a
temperature of more than 50°C above the ambient
temperature.
Before the appliance is connected, check that the
main fuse and the domestic installation can support
the load; and that the power supply is properly
earthed.
The manufacturer disclaims any responsibility should
these safety measures not be carried out.
This appliance meets the requirements laid down in
EEC Directive No. 89/336 relating to the suppression
of radio and TV interference.
For Uk use only
Models
ZSA15
Rating
Cable cross
section mm2 and
Type of the cable
2565 W
6 mm2
6242 Y
Fuse
min.
15 A
The switch must not break the yellow and green
earth cable at any point.
For Europe use only
Models
ZSA15
Rating
2565 W
Cable cross
section mm2 and
Type of the cable
2,5 mm2
Ho5 RR-F
Fuse
min.
13 A
7
WHEN THE OVEN IS FIRST INSTALLED
Once the oven has been installed, it is important to
remove the protective materials which were put on in
the factory.
Turn knob B on the timer until the manual function
appears in the dial. Switch the oven control knob
to fan ducted cooking
and then set the
thermostat control knob to MAX and leave it to run,
empty, for 30 minutes to remove any unpleasant
new smells.
During this period, an unpleasant odour may be
emitted, it is therefore, advisable to open a window
for ventilation.
REMEMBER: The timer must be set to MANUAL
before the oven can be operated.
This must be done whenever the cooker is
switched off at the wall or when there is a power
failure.
If the oven indicator neons do not glow when the
controls are switched on, it is most likely that the
timer is set for automatic cooking.
Rating Plate
The trivet
When roasting do use the trivet in the meat tin. Fat
and meat juices will drain into the meat tin below and
can be used to make gravy. The trivet also prevents
splashes of fat from soiling the oven interior.
N.B. The meat tin should not be placed on a heated
hotplate as this may cause the enamel to crack.
The cooling fan for the controls
The cooling fan comes on immediately when the grill
is switched on and after a short time when the oven
is in use, and switches off when cooking is
completed.
During the initial period the cooling fan may cycle ON
and OFF, this is quite normal.
It may run on after the oven or grill is switched off to
keep the controls cool.
Always allow the cooling fan to cool the oven down
before switching off the wall prior to carrying out any
cleaning or maintenance work.
The model number of your oven can be found on the
rating plate on the lower front frame of the oven upon
opening the door.
The oven must be protected by a suitably rated fuse
or circuit breaker. The rating of the oven is given on
the rating plate.
NOTE
The action of the cooling fan will depend on how long
the oven or grill has been used and at what
temperature. It may not switch in at all at lower
temperature settings nor run on where the grill or
oven has only been used for a short time.
About condensation and steam
Control panel indicator neon
When food is heated it produces steam in the same
way as a boiling kettle does. The oven is vented to
allow some of this steam to escape. However, always
stand back from the oven when opening the oven
door to allow any build up of steam or heat to
release.
If the steam comes into contact with a cool surface
on the outside of the oven, e.g. a trim, it will
condense and produce water droplets. This is quite
normal and is not caused by a fault on the oven.
To prevent discolouration, regularly wipe away
condensation and also soilage from surfaces.
Cookware
Baking trays, oven dishes, etc. should not be placed
directly against the grid covering the fan at the back
of the oven, or placed on the oven base.
Do not use baking trays larger than 30 cm x 35 cm
(12 in x 14 in) as they will restrict the circulation of
heat and may affect performance. Advice on the
effect of different materials and finishes of bakeware
is given in 'Hints and Tips' in the appropriate oven
section.
8
This light indicates whether the oven or grill is
switched ON. In the case of the oven, the neon also
indicates when the set temperature has been
reached. It will cycle on, and off during use to show
that the temperature is being maintained.
If the neon do not operate as the instructions indicate
the controls have been incorrectly set. Return all
controls to zero and reset following the instructions
for the required setting.
When the oven is set for automatic cooking the neon
should remain unlit during OFF periods.
USE AND CARE
11
12
FUNCTION
TEMPERATURE
1
2
10
0
°C
START
3
8
4
7
6
CLOCK
5
COOKING TIME
B U I LT- I N
1
4
2
1.
2.
3.
4.
5
6
7
3
Oven clock and timer
Oven control knob - see controls page 11
Thermostat control knob - see controls page 11
Oven temperature light
5. Hinged grill element
6. Interior light (oven light)
7. Fan
8. Removable handle
9. Grill trivet
10. Grill / roasting pan
9
8
10
9
HOW TO SET THE CLOCK AND TIMER
RED POINTER
(Seconds)
DIAL
Cooking time
11
Manual cooking
'0' OFF
12
1
KNOB A
2
10
0
3
8
4
7
POINTERS
(Clock)
1
MANUAL OPERATION
START
6
CLOCK
KNOB B
5
COOKING TIME
GREEN POINTER
(Cooking start)
3
CLOCK - TO SET THE TIME
OF DAY
To set the oven for manual
operation turn knob B until
hand symbol
appears in
the left hand dial.
Pull knob B outwards and
while turning it, enter time of
day.
2
TO SET MANUAL COOKING
TIME
4
TO SET THE MINUTE MINDER
Turn knob B and enter the
required cooking time in the
left hand dial (max 180 min).
When time is up an audible
signal will be heard and the left
hand dial will be blank. The
audible signal will continue for
approximately 10 minutes if
not cancelled.
To cancel turn knob B until the
'0' appears on the left hand
dial.
Turn knob B and enter
required cooking time in the
left hand dial (max 180 min).
When time is up an audible
signal will be heard and the left
hand dial will be blank.
The audible signal will
continue for approximately 10
minutes if not cancelled.
To cancel turn knob B until the
'0' appears on the left hand
dial.
REMEMBER: After using the timer always return to manual operation.
10
5
TO SET THE TIMER TO
SWITCH ON AND OFF
AUTOMATICALLY
Press in knob A and turn the
green pointer on the clock dial
to the required cooking start
time.
Turn knob B and enter the
required cooking time in the
left hand dial (max 180 min.)
Then select the required oven
control function and
temperature.
When cooking is complete an
audible signal will be heard
and the left hand dial will be
blank.
The audible signal will
continue for approximately 10
minutes if not cancelled.
To cancel turn knob B until the
symbol '0' appears in the left
hand dial.
Reset oven selector and
thermostat to OFF position.
CONTROLS
Oven Control Knob (fan)
(Fig. 4)
Oven light - this will come on automatically when
the oven is in use.
0
Defrost setting (NB This is NOT a cooking
setting). This setting is intended to assist in
thawing of frozen foods (see page 13).
Fan ducted cooking - this allows you to roast or
roast and bake simultaneously using any shelf,
without flavour transference.
Grill - the oven door MUST be closed when
grilling. The grill cannot be used at the same
time as the oven.
Note:
When the control knob (Fig. 4) is on position (
Fig. 4
FO O770
)
light or ( ) defrost, the temperature control knob
(Fig. 5) should by on the « » (Off) position.
Caution
Do not place pans, dripping pans, biscuit pans or
aluminium foil directly on the base of the oven. This
could cause a heat build-up which could affect the
performance of the oven and damage the oven
enamel.
Thermostat Control Knob (Fig. 5)
100
0
150
FO O769
20
The thermostat controlling the temperature is totally
variable so it is possible to select temperatures
between those marked.
The MAX setting is particularly suitable for grilling.
MAX
Temperature selection starts at 50°C and is marked
in 25°C increments up to maximum, where the
temperature at the centre of the oven will reach
approximately 250°C.
50
COOKING
By turning the oven control knob clockwise, you
select the cooking temperature.
Fig. 5
Once the oven temperature has been selected, the
temperature light will come on and remain on until
the oven has reached the correct setting; after that, it
will go on and off with the thermostat, showing how
the temperature is being maintained.
11
USING THE FAN OVEN
The Fan Oven
HINTS AND TIPS
The air inside the oven is heated by the element
around the fan situated behind the back panel. The
fan draws air from the oven, the element heats the
air which is circulated into the oven via the top, base
and sides of the back panel. The advantages of
cooking with this function are:
Runner positions are not critical, but make sure the
shelves are evenly spread.
Faster Preheating
Because the fan oven quickly reaches temperature, it
is not usually necessary to preheat the oven
although you may find that you need to allow an
extra 5-7 minutes on cooking times. For recipes
which require higher temperatures, best results are
achieved if the oven is preheated first, e.g. bread,
pastries, scones, souffles, etc.
Lower Temperatures
Fan oven cooking generally requires lower
temperatures than conventional cooking.
Follow the temperatures recommended in the charts
or remember to reduce temperatures by about 2025°C for your own recipes which use conventional
cooking.
Even Heating for Baking
The fan oven has uniform heating on all runner
positions. This means that batches of the same food
can be cooked in the oven at the same time.
However, the top shelf may brown slightly quicker
that the lower one.
This is quite usual. There is no mixing of flavours
between dishes (see Fig. 7).
When cooking more than one dish in the fan oven,
place dishes centrally on the shelves rather than
several dishes on one shelf.
When the oven is full, you may need to allow slightly
longer cooking time.
A shelf may be placed on the floor of the oven. Place
dishes on a shelf in this position rather than on the
oven base, to allow air circulation around the food.
When the oven is full of the same food, e.g. equal
trays of small cakes or equal size victoria sandwich
cakes, then they will be cooked in the same time and
removed from the oven together. When different
sizes of trays or types of food, e.g. biscuits and
cakes are cooked, they will not necessarily be ready
together.
The fan oven can be used to heat foods through
without thawing first, e.g. fruit tarts, mince pies,
sausage rolls, and other small pastry items. Use a
temperature of 190-200°C and allow 20-40 minutes
(depending on the quantity of food in the oven).
The use of too high temperatures can cause uneven
browning. Check with the recommendations for oven
temperatures given in the cooking charts, but be
prepared to adjust the temperature by 10°C if
necessary. Remember to reduce temperatures by
about 20-25°C for your own conventional recipes.
The oven is supplied with two anti-tip shelves.
IMPORTANT: The anti-tip oven shelves must be
positoned as shown in Fig. 6.
FO 0336
12
Fig. 6
FO 0061
Fig. 7
Only experience will enable you to determine the
proper settings for your personal cooking needs. The
temperatures are intended as a guide only. It may be
necessary to increase or decrease the temperature
to suit your individual requirements.
The effects of dishes on cooking results
Dishes and tins vary in their thickness, conductivity,
colour, etc. which affects the way they transmit heat
to the food inside them:
A
Aluminium, earthenware, oven glassware and
bright shiny utensils reduce cooking and underneath
browning.
B
Enamelled cast iron, anodized aluminium,
aluminium with non-stick interior and coloured
exterior and dark, heavy utensils increase cooking
and underneath browning.
HINTS AND TIPS
• Place the frozen food a single layer where
possible, and turn it over half way through the
defrosting process.
• The actual speed of defrosting is influenced by
room temperature. On warm days defrosting will
be faster than on cooler days.
• DO NOT leave food at room temperature once it is
defrosted. Cook raw food immediately or store
cooked food in the fridge.
• Care must always be taken when handling foods
in the home. Always follow the basic rules of food
hygiene to prevent bacterial growth and cross
contamination when defrosting, preparing,
cooking, cooling and freezing foods.
Defrosting
The defrosting function allows you to defrost frozen
foods. The oven fan operates without heat and
circulates the air, at room temperature, inside the
oven. This increases the rate at which defrosting
takes place.
This function is particularly suitable for delicate food
which could be damaged by heat, e.g. cream filled
gateaux, iced cakes, pastries, bread and other yeast
products.
HINTS AND TIPS
• Cover food with a lid, aluminium foil or plastic film
to prevent drying out during defrosting.
• Small or thin pieces of fish fillet or peeled prawns,
mince, liver and thin chops will defrost in 1-2
hours. Ensure that they are cooked or refrigerated
immediately after defrosting to maintain good food
hygiene.
• Place the food to be defrosted in a single layer and
turn over half way through the defrosting process,
where possible.
• Joints of meat or poultry MUST BE THAWED
THOROUGHLY BEFORE COOKING. A 1.5 kg/3lb
oven-ready chicken will thaw in approximately 5
hours. The giblets must be removed as soon as
possible during the thawing process.
• Only joints of meat and poultry up to 2kg/4lb in
weight are suitable for defrosting in this way.
ALWAYS COOK THOROUGHLY IMMEDIATELY
AFTER THAWING.
• Take care to follow the basic rules for hygiene
when handling fresh, frozen, raw and cooked foods.
13
OVEN COOKING CHART
COOKING CHART
Food
Temperature
Runner
Positions
Cooking
Time (mins)
Biscuits
160-190
1-3
18-25
Bread, buns, yeast, doughs
170-210
1-3
35-45
Casseroles
140-170
2
90-180
Cakes - small, Queen Victoria sponge
160-180
1-3
20-28
Cakes - madeira, rich fruit
130-150
2
90-150
Choux pastry, eclairs
170-200
1-3
30-35
Fish
160-190
2
20-40
Fruit pies, plate tarts, crumbles
170-200
2-3
50-65
70-90
1-3
90-150
Milk puddings
130-150
2
90-150
Pate, terrine (in baine-marie)
160-180
2
60-90
Pizzas
180-200
1-3
25-30
Puff pastry, sausage rolls, vol-au-vents
200-230
1-3
20-35
Quiches, flans
170-200
1-3
50-60
Scones
210-230
1-3
8-12
Souffle
170-200
2
35-45
Stuffed vegetables
160-190
2
35-45
Meringues
Roast meat & poultry
160-180
2
see meat + poultry
roasting chart
Yorkshire pudding
200-220
2-3
40-50
80-90
1-3
Keep food warm, heat dishes
MEAT AND POULTRY ROASTING CHART
14
Meat
Temperature
Cooking Time
Beef
160-180
20-35 mins per 1/2kg (lb) + 20-35 mins
Beef, boned
160-180
25-35 mins per 1/2kg (lb) + 25-35 mins
Mutton and Lamb
160-180
25-35 mins per 1/2kg (lb) + 25-35 mins
Pork and Veal
160-180
30-40 mins per 1/2kg (lb) + 30-40 mins
Ham
160-180
30-40 mins per 1/2kg (lb) + 30-40 mins
Chicken
160-180
15-20 mins per 1/2kg (lb) + 20 mins
Turkey and Goose
160-180
15-20 mins per 1/2kg (lb) up to 3.5kg (7lb) + 15 mins per 1/2kg
Duck
160-180
25-35 mins per 1/2kg (lb) + 20 mins
GRILLING
COOKING GUIDE
Important
All grilling must be carried out with the oven door
closed and the grill pan handle removed from the
pan.
Cooking time depends on the thickness of the meat
and not on its weight.
- Most foods should be placed on the grid in the grill
pan to allow maximum circulation of air to lift the food
out of the fats and juices. Food such as fish, liver and
kidneys may be placed directly on the grill pan, if
preferred
- Adjust the grid and grill pan runner position to allow
for different thicknesses of food. Position the food
close to the element for faster cooking and further
away for more gentle cooking
- Food should be thoroughly dried before grilling to
minimise splashing. Brush lean meats and fish lightly
with a little oil or melted butter to keep them moist
during cooking
Type of food
Bacon rashers
Chicken joints
Gammon rashers
Lamb chops
Pork chops
Sausages (turning as required)
Steaks (average thickness)
Toast
Mins per side
2-5
15 - 20
5-8
6 - 12
10 - 15
10 - 12
Rare
3-6
Medium
6 - 10
Well done 8 - 12
1 - 1 1/2
- Accompaniments such as tomatoes and
mushrooms may be placed underneath the grid when
grilling meats
- When toasting bread, we suggest that the top
runner position is used with the grid in its 'high'
position
- Preheat the grill on a full setting for a few minutes
before sealing steaks or toasting. Adjust the heat
setting and the shelf as necessary, during cooking
- The food should be turned over during cooking, as
required.
NOTE:
For safety in use, the grill element is controlled
by the thermostat. During cooking, the grill
cycles on and off to prevent overheating.
15
HELPFUL HINTS WHEN BUYING AND PREPARING FOOD
Care must be taken when handling foods in the
home. Always follow the basic rules of food hygiene
to prevent bacterial and microbial growth and cross
contamination when preparing, reheating, cooking,
cooling, defrosting and freezing foods:
1. Always ensure food you purchase is of good
quality and in prime condition. Shop at a reliable
source and buy the 'freshest' looking package avoid shopworn labels or produce covered in dust.
2. Avoid buying chilled or frozen products if you
cannot store them straight away. The use of an
insulated container when shopping is advisable.
3. Buy and consume foods prior to the 'Sell by' or
'Best Before' date.
4. When you arrive home, place perishable foods in
the refrigerator or freezer immediately.
Ensure they are well covered to prevent them
drying out and to prevent any possible cross
contamination with bacteria from raw to cooked
foods.
5. Follow the cooking instructions on packets of
prepacked and cook chill foods, but be prepared to
adjust cooking time and temperatures to suit your
particular oven. For example, the fan oven
generally requires 20-25°C lower temperature than
conventional ovens.
6. Always ensure that cook chill foods are thoroughly
re-heated until they are piping hot throughout.
7. It is preferable to defrost frozen foods slowly in the
refrigerator. Alternatively, a microwave cooker or
the defrost function on your oven may be used.
8. Always cook defrosted foods immediately after
thawing. Thawed food should never be refrozen.
9. Joints of meat and poultry should be thoroughly
defrosted before cooking.
16
10. Cook meat thoroughly - use a meat thermometer
if preferred, which penetrates the joint to check
that the centre temperature has reached the
required temperature (see table below).
MEAT
TEMPERATURES
Beef
Rare - 60°C
Medium - 70°C
Well Done - 80°C
Pork
Well Done - 80°C
Lamb
Medium - 70°C
Well Done - 80°C
11. If not eaten straightaway after cooking, food
should be cooled as quickly as possible (within
one hour) and then refrigerated or frozen as
required. (Do not put hot food into a Refrigerator
or Freezer).
12. In the kitchen keep work tops, chopping boards
and utensils clean with hot soapy water between
preparation stages. Ideally, keep one chopping
board for raw meat and another for other foods.
Keep your dish cloths and tea towels clean.
CLEANING THE OVEN
Before cleaning always allow the cooling
fan to cool the oven down before
switching off at the electricity supply
Replacing Components
Cleaning materials
Replacing The Oven Light
Before using any cleaning materials on your oven,
check that they are suitable and that their use is
recommended by the manufacturer.
Prior to undertaking any maintenance work or
replacing the oven light, be sure to disconnect
appliance from the electricity supply.
Push in and turn the glass lid anticlockwise (Fig. 9).
Remove the faulty bulb and replace with one which is
heat resistant to 300°C.
Cleaners that contain bleach should NOT be used as
they may dull the surface finishes. Harsh abrasives
should also be avoided.
Glass Panel
This should be cleaned with a soft cloth soaked in
warm soapy water. Do not use abrasive scourers or
steel wool.
Oven Shelves and shelf supports
To clean the oven shelves, and shelf supports soak
in warm soapy water and remove stubborn marks
with a well wetted soap impregnated pad. Rinse well
and dry with a soft cloth.
The shelf supports can be removed for easy cleaning
(see Fig. 8). Please ensure the retaining nuts are
secure when refitting the shelf supports.
FO 0287
Fig. 9
Electric bulb: 15W, 220-240 V, 50 Hz, 300°C, E14.
These bulbs are available from your local Zanussi
Service Centre whose address can be found in tho
Zanussi Customer Care Booklet.
1
2
FO 0435
Fig. 8
Oven Cavity
The enamelled oven cavity is best cleaned whilst the
oven is still warm. It is advisable to wipe the oven
over with a soft cloth soaked in warm soapy water
after each use. However, from time to time it will be
necessary to do a more thorough cleaning, using a
proprietary oven cleaner.
17
CLEANING THE HINGED GRILL
This model has been fitted with a hinged top grill
element to enable you to clean the roof of the oven
easily.
Then gently pull the grill downward to allow access to
the oven roof. (see Fig. 11)
Before proceeding ensure the oven is isolated from
the electricity supply. Then undo the screw which
holds the grill in place. (see Fig. 10)
FO 1169
FO 1168
Fig. 10
Fig. 11
Clean the oven roof with a suitable clener and wipe
dry before replacing the hinged grill element.
Gently push up the grill element into place and firmly
screw into place the holding nut.
NOTE: Ensure the grill holding nut is firmly in
place to avoid the grill falling down during
operation.
WHAT HAPPENS IF SOMETHING GOES WRONG
If the oven does not come on:
* Check the oven is in manual operation
* Check that it is plugged in properly
* Check that the socket switch and/or the switch
from the mains supply to the oven are ON
* Replace the fuse in the plug, if required, with
another of the same rating and check that this plug
has been wired up correctly
* Check that the socket, when present, is receiving
power - by plugging in an appliance you know to
be working
* Check that the fuse in the fuse box is intact
In after all these checks, the oven still does not work,
contact your local Zanussi Service Centre quoting
your model and serial number.
18
Please note that it will be necessary to provide proof
of purchase for any inguarantee service calls.
In-guarantee customers should ensure that the
above checks have been made as the engineer
will make a charge if the fault is not a mechanical
or electrical breakdown.
CUSTOMER CARE DEPARTMENT
For general enquiries concerning your Zanussi
appliance, contact our Customer Relations
Department by letter or telephone as follows:
Customer Care Department
Zanussi House
Hambridge Rd.
Newbury
Berks R14 5EP
Tel: 01635 - 521313
PEACE OF MIND FOR 24 MONTHS
ZANUSSI GUARANTEE CONDITIONS
EXCLUSIONS
This guarantee is in addition to your
statutory and other legal rights.
This guarantee does not cover:
We, Zanussi Ltd., undertake that, if, within
twenty four months of the date of the
purchase, this ZANUSSI appliance or any
part thereof is proved to be defective by
reason only of faulty workmanship or
materials, we will, at our option, repair or
replace the same FREE OF ANY CHARGE
for labour, materials or carriage on
condition that:
* The appliance has been correctly
installed and used on the electricity
supply stated on the rating plate.
* The appliance has been used for normal
domestic purposes only, and in
accordance with the manufacturer's
operating and maintenance instructions.
* The appliance has not been serviced,
maintained, repaired, taken apart or
tampered with by any person not
authorised by us.
* Damage or calls resulting from
transportation, improper use or neglect,
the replacement of any light bulbs or
removable parts of glass or plastic.
* Costs incurred for calls to put right
machines improperly installed or calls to
machines outside the UK and the
Republic of Ireland.
* Appliances found to be in use within a
commercial or similar environment, plus
those which are subject to rental
agreements.
* Products of Zanussi manufacture which
are NOT marketed by Zanussi Ltd.
* EU Countries - The standard guarantee
is applicable but subject to the owner's
responsibility and cost to ensure the
appliance meets the standards set by
the country to which the product is
taken. The Zanussi Company in the
country concerned will be pleased to
advise further. Sight of your purchase
receipt will be required by them.
All service work under this guarantee must
be undertaken by a Zanussi Service
Centre.
Home visits are made between 8.30 am
and 5.30 pm Monday to Friday.
Visits may be available outside these hours
in which case a premium will be charged.
Any appliance or defective part replaced
shall become our property.
19