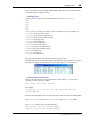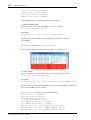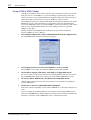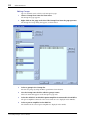
1
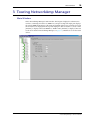
NetworkAmp
Manager
Owner’s Manual
N
K
R
O
W
T
E
N
A
B
U
H
E
2
Important Information
Special Notices
•
•
•
•
•
•
•
•
The software and this owner’s manual are the exclusive copyrights of Yamaha Corporation.
Use of the software and this manual is governed by the license agreement which the purchaser fully agrees to upon breaking the seal of the software packaging. (Please read carefully the Software Licensing Agreement at the beginning of the printed ACU16-C/NHB32-C
Owner’s Manual before installing the application.)
Copying of the software or reproduction of this manual in whole or in part by any means is
expressly forbidden without the written consent of the manufacturer.
Yamaha makes no representations or warranties with regard to the use of the software and
documentation and cannot be held responsible for the results of the use of this manual and
the software.
This disc is a CD-ROM. Do not attempt to play the disc on an audio CD player. Doing so
may result in irreparable damage to your audio CD player.
Copying of the commercially available music sequence data and/or digital audio files is
strictly prohibited except for your personal use.
The screen displays as illustrated in this owner’s manual are for instructional purposes, and
may appear somewhat different from the screens which appear on your computer.
Future upgrades of application and system software and any changes in specifications and
functions will be announced separately.
Trademarks
CobraCAD, CobraNet, and Peak Audio are trademarks of Cirrus Logic, Inc. Ethernet is a
trademark of Xerox Corporation. Windows is a registered trademark of Microsoft Corporation. Yamaha is a trademark of Yamaha Corporation. All other trademarks are the property of their respective holders and are hereby acknowledged.
Yamaha Web Site
Information about NetworkAmp Manager, related products, and other Yamaha professional audio equipment is available on the Yamaha Professional Audio Web site at:
http://www.yamahaproaudio.com/.
Specifications and descriptions in this owner’s manual are for information purposes only.
Yamaha Corporation reserves the right to change or modify products or specifications at
any time without prior notice. Since specifications, equipment, or options may not be the
same in every locale, please check with your Yamaha dealer.
NetworkAmp Manager—Owner’s Manual
3
Contents
1
Welcome . . . . . . . . . . . . . . . . . . . . . . . . . . . . . . . . . 4
Introduction . . . . . . . . . . . . . . . . . . . . . . . . . . . . . . . . . . . . . . . . . . . . . . . . . . . . . . . . 4
What is CobraNet? . . . . . . . . . . . . . . . . . . . . . . . . . . . . . . . . . . . . . . . . . . . . . . . . . . . 5
Using Multiple PCs . . . . . . . . . . . . . . . . . . . . . . . . . . . . . . . . . . . . . . . . . . . . . . . . . . . 6
2
Getting Started . . . . . . . . . . . . . . . . . . . . . . . . . . . . 7
Installing NetworkAmp Manager . . . . . . . . . . . . . . . . . . . . . . . . . . . . . . . . . . . . . . .
Starting NetworkAmp Manager . . . . . . . . . . . . . . . . . . . . . . . . . . . . . . . . . . . . . . . .
Quitting NetworkAmp Manager . . . . . . . . . . . . . . . . . . . . . . . . . . . . . . . . . . . . . . . .
Configuring NetworkAmp Manager . . . . . . . . . . . . . . . . . . . . . . . . . . . . . . . . . . . . .
Working with Projects . . . . . . . . . . . . . . . . . . . . . . . . . . . . . . . . . . . . . . . . . . . . . . . .
3
7
7
7
8
9
Touring NetworkAmp Manager . . . . . . . . . . . . . . . 10
Main Window . . . . . . . . . . . . . . . . . . . . . . . . . . . . . . . . . . . . . . . . . . . . . . . . . . . . . . 10
Menus . . . . . . . . . . . . . . . . . . . . . . . . . . . . . . . . . . . . . . . . . . . . . . . . . . . . . . . . . . . . 11
Network Tree . . . . . . . . . . . . . . . . . . . . . . . . . . . . . . . . . . . . . . . . . . . . . . . . . . . . . . 12
4
NHB Pages . . . . . . . . . . . . . . . . . . . . . . . . . . . . . . . 15
CobraNet Page . . . . . . . . . . . . . . . . . . . . . . . . . . . . . . . . . . . . . . . . . . . . . . . . . . . . . 15
Patch Page . . . . . . . . . . . . . . . . . . . . . . . . . . . . . . . . . . . . . . . . . . . . . . . . . . . . . . . . . 17
Word Clock Page . . . . . . . . . . . . . . . . . . . . . . . . . . . . . . . . . . . . . . . . . . . . . . . . . . . 18
5
ACU Pages . . . . . . . . . . . . . . . . . . . . . . . . . . . . . . . . 19
CobraNet Page . . . . . . . . . . . . . . . . . . . . . . . . . . . . . . . . . . . . . . . . . . . . . . . . . . . . .
Patch Page . . . . . . . . . . . . . . . . . . . . . . . . . . . . . . . . . . . . . . . . . . . . . . . . . . . . . . . . .
Amp Pages . . . . . . . . . . . . . . . . . . . . . . . . . . . . . . . . . . . . . . . . . . . . . . . . . . . . . . . . .
Channel Detail Page . . . . . . . . . . . . . . . . . . . . . . . . . . . . . . . . . . . . . . . . . . . . . . . . .
Threshold Page . . . . . . . . . . . . . . . . . . . . . . . . . . . . . . . . . . . . . . . . . . . . . . . . . . . . .
6
19
20
21
22
24
Other Functions . . . . . . . . . . . . . . . . . . . . . . . . . . . 25
Logging Events . . . . . . . . . . . . . . . . . . . . . . . . . . . . . . . . . . . . . . . . . . . . . . . . . . . . .
Locking NetworkAmp Manager . . . . . . . . . . . . . . . . . . . . . . . . . . . . . . . . . . . . . . .
Using COM & MIDI Modes . . . . . . . . . . . . . . . . . . . . . . . . . . . . . . . . . . . . . . . . . .
Group View . . . . . . . . . . . . . . . . . . . . . . . . . . . . . . . . . . . . . . . . . . . . . . . . . . . . . . . .
Control Link . . . . . . . . . . . . . . . . . . . . . . . . . . . . . . . . . . . . . . . . . . . . . . . . . . . . . . .
25
30
31
32
35
Appendix . . . . . . . . . . . . . . . . . . . . . . . . . . . . . . . . . . . 38
Troubleshooting . . . . . . . . . . . . . . . . . . . . . . . . . . . . . . . . . . . . . . . . . . . . . . . . . . . . 38
Keyboard Shortcuts . . . . . . . . . . . . . . . . . . . . . . . . . . . . . . . . . . . . . . . . . . . . . . . . . 38
Glossary . . . . . . . . . . . . . . . . . . . . . . . . . . . . . . . . . . . . 39
NetworkAmp Manager—Owner’s Manual
Introduction
4
1 Welcome
Introduction
The Yamaha NetworkAmp Manager software is for controlling and monitoring Yamaha
PCxxxxN series power amplifiers, the ACU16-C Amp Control Unit, and the NHB32-C
Network Hub and Bridge. It runs on standard Windows PCs and can be connected to an
ACU16-C or NHB32-C by using either USB or RS-232C. Multiple ACU16-Cs and
NHB32-Cs can be managed from a single PC running NetworkAmp Manager, which can
be connected to any ACU16-C or NHB32-C on the CobraNet network.
NetworkAmp Manager can record log files listing various operations and warnings (e.g.,
output shorts, overheating) for troubleshooting analysis after a performance.
Several PCs running NetworkAmp Manager can be connected to the CobraNet network,
offering simultaneous control and monitoring from several locations within a venue.
NetworkAmp Manager can control and manage the following:
Up to 512 Yamaha PCxxxxN series power amplifiers (32 amps per ACU16-C)
Up to 4,096 amplifier channels (8 channels per amplifier)
Up to 16 ACU16-Cs
Up to 8 NHB32-Cs
PCxxxxN Series Amp Parameters That Can Be Controlled
Parameter
Details
Power1
On/standby
Attenuator
63-step control
Input phase
Normal/reverse
Mute
On/off
1. Affects the entire amplifier. All other parameters can be set for each channel individually.
PCxxxxN Series Amp Parameters That Can Be Monitored
Parameter
Details
Amp mode
Stereo/parallel/bridge
Input level
12-segment meter
Output level
12-segment meter (watt/volt)
Output clip
Output clipping indicator
Impedance
Indicates current load impedance
Protection
Protection system status
Temperature
Heatsink temperature, 12-segment meter (centigrade/Fahrenheit)
NetworkAmp Manager—Owner’s Manual
5
Welcome
What is CobraNet?
CobraNet is technology developed by Peak Audio (Cirrus Logic, USA) that transmits
uncompressed digital audio signals in realtime over a fast Ethernet cable. It can carry up to
64 channels in each direction or 128 channels total for both directions (64 channels total for
both directions in a network that uses a repeater hub). (However, the number of channels
is limited by conditions such as the performance of your equipment and on the type of
audio signal.)
Transmission of up to 100 meters is possible with Category 5 metal cable, or up to 2 km with
multi-mode optical fiber cable.
A CobraNet network can carry digital audio at sampling frequencies of 48 kHz or 96 kHz
and 16/20/24 bit resolutions, but the ACU16-C/NHB32-C support the 48 kHz sampling
frequency at 20/24 bit resolutions. A fixed latency is added to the audio data each time it
passes through a CobraNet network. You can select this latency from 5.33 ms / 2.67 ms /
1.33 ms.
A CobraNet network can carry audio over an existing Fast Ethernet network to which other
devices such as computers and printers are already connected, but we strongly recommend
that you set up a dedicated network for CobraNet.
In a CobraNet network, digital audio is distributed in packets called “bundles.” Each bundle
contains between three and eight channels of audio, depending on conditions such as the
bit depth and latency.
Bundles are assigned a number in the range of 0 through 65,279. Bundles can be transmitted either as “multicast bundles” which occupy more network bandwidth but allow audio
to be distributed to multiple devices simultaneously, or as “unicast bundles” which use less
network bandwidth but can distribute audio to only a single device. The number assigned
to the bundle determines which of these two types it is. Number 0 indicates a null setting
that disables transmission or reception of bundles, numbers 1 through 255 indicate multicast bundles, and numbers 256 through 65,279 indicate unicast bundles. The
ACU16-C/NHB32-C support bundle numbers 0 through 16,383.
The ACU16-C can accept up to four input bundles simultaneously, and the NHB32-C can
use four input bundles and four output bundles simultaneously. However if you set the
latency to 1.33 ms, the number of bundles usable on the NHB32-C will be a maximum of
four (total for input and output).
A CobraNet network also provides a Serial Bridge feature that allows serial data to be transmitted over the network. The ACU16-C and NHB32-C normally use the Serial Bridge to
transmit amp control data, but you can also use COM mode or MIDI mode to send other
data between two NHB32-C units via the Serial Bridge.
A glossary of CobraNet, NetworkAmp Manager, ACU16-C, and NHB32-C related terms is
provided in this manual (see page 39). A wealth of information about CobraNet, with sections especially for designers and installers, is available on the Peak Audio Web site at
http://www.peakaudio.com. If you are designing a CobraNet network, we strongly recommend that you visit this Web site and study the information available in order to take full
advantage of the CobraNet technology. Peak Audio also provide a list of Ethernet devices
that have been tested with CobraNet, including switching hubs and media converters.
NetworkAmp Manager—Owner’s Manual
Using Multiple PCs
6
Using Multiple PCs
•
•
•
Several PCs running NetworkAmp Manager can be connected to the CobraNet network,
offering simultaneous control and monitoring from several locations within a venue.
Up to 16 channels of real-time data (e.g., level meter information) can be transmitted across
the network simultaneously. When operating NetworkAmp Manager on several PCs simultaneously, operation of the meter displays on the following pages may be interrupted:
Amp pages
Channel Detail page
Group View page
When one of the above pages is selected, any other PCs displaying one of these pages will
automatically switch to its Network page and display the same information. For example, if
PC #1 is displaying the Amp 00–07 page, and PC #2 is displaying the Amp 24–31 page, if the
Amp 08–15 page is selected on PC #1, PC #2 will switch to its Network page and display the
same information. PCs that are not displaying one of the above pages do nothing.
NetworkAmp Manager—Owner’s Manual
7
Getting Started
2 Getting Started
Installing NetworkAmp Manager
System requirements and installation instructions for NetworkAmp Manager can be found
in the printed ACU16-C/NHB32-C Owner’s Manual.
Starting NetworkAmp Manager
To start NetworkAmp Manager, double-click the NetworkAmp Manager icon. If a startup
project has been specified on the General Setup dialog box (see page 8), that project is
opened. Otherwise, the Open dialog box appears and you can select the project you want to
open. NetworkAmp Manager can also be started by double-clicking a project file. In either
case, the following dialog box appears.
Disconnect from network: Start NetworkAmp Manager but do not connect to the
network.
Connect to network: Start NetworkAmp Manager and connect to the network, getting
the settings of all devices on the network and updating the project settings accordingly.
Connect & send to network: Start NetworkAmp Manager, connect to the network,
and send the project settings to all devices on the network, updating them accordingly.
Caution: Don’t transmit any audio data until all networked devices (ACU16-C, NHB32-C,
and power amplifiers) have been turned on, the power amplifier’s REMOTE indicators are
on, and the system has stabilized (about 10 seconds). Doing so may produce loud noises.
Note: If you change any settings on the Windows Display control panel, NetworkAmp Manager’s windows may not display properly. In this case, you should reset the Display control
panel settings to their defaults.
Quitting NetworkAmp Manager
To quit NetworkAmp Manager, choose Exit from the File menu, or click the main window’s
Close button. A confirmation message appears. Click Yes to quit. Click No to cancel.
If there are no unsaved changes, NetworkAmp Manager quits. If there are unsaved changes,
a dialog box asking if you want to save the changes before quitting appears. Click Yes to save
the changes and quit. Click No to quit without saving the changes.
NetworkAmp Manager—Owner’s Manual
Configuring NetworkAmp Manager
8
Configuring NetworkAmp Manager
The General Setup dialog box is used to configure NetworkAmp Manager. To open the
General Setup dialog box, choose General Setup from the Option menu.
PC I/F for amp control: These options are used to specify the MIDI interface NetworkAmp Manager should use to communicate with the connected ACU16-C/NHB32-C.
The options available depends on what MIDI drivers you have installed on your PC. Choose
the Yamaha CBX Driver (for use with serial ports) or Yamaha USB Driver (for use with USB
ports). See the ACU16-C/NHB32-C Owner’s Manual for information on installing these
drivers.
Control error caution: When this option is selected, a message is displayed in the Log
window when a parameter is adjusted on another PC or an ACU16-C or NHB32-C.
Default project: These options determine how NetworkAmp Manager behaves when it’s
started. When “None” is selected, the project open dialog box appears automatically and
you can select a project file manually. When the “Specified project” option is selected, the
specified project is opened automatically. Click the Browse button to select the project file
to be opened automatically. If you enter the filename manually, be sure to include the full
path (e.g., C:\My Documents\NetworkAmp Manager\My Project.apj).
Temperature display units: These options determine the units NetworkAmp Manager
uses to display temperature values: Centigrade (˚C) or Fahrenheit (˚F).
Output meter units: These options determine the units NetworkAmp Manager uses to
display power amplifier output values: Watt (W) or Volt (V).
The “PC I/F for amp control” and “Default project” settings are stored in the Windows Registry. All other settings are stored in the project file.
NetworkAmp Manager—Owner’s Manual
9
Getting Started
Working with Projects
•
•
•
•
NetworkAmp Manager setups are stored as projects.
Project files have the file name extension “.apj”.
To create a new project, choose New from the File menu.
To open a previously saved project, choose Open from the File menu.
To save the current project, choose Save from the File menu.
To save the current project with a new name, choose Save As as from the File menu.
Only one project can be open at a time. If you create a new project or open a previously
saved project, you’ll be prompted to save any unsaved changes.
NetworkAmp Manager—Owner’s Manual
Main Window
10
3 Touring NetworkAmp Manager
Main Window
This is NetworkAmp Manager’s main window. The left pane displays the CobraNet network tree, consisting of ACU16-Cs, NHB32-Cs, and power amps. The right pane displays
the various NHB and ACU pages. The name and unit ID of the device currently selected in
the network tree are displayed at the top of the right pane. If it’s an ACU16-C, “ACU - name
[Unit ID]” is displayed. If it’s an NHB32-C, “NHB - name [Unit ID]” is displayed. You can
set the device names in NetworkAmp Manager (see page 13). Unit IDs are set on the actual
devices.
NetworkAmp Manager—Owner’s Manual
11
Touring NetworkAmp Manager
Menus
File
New
Creates a new project
Open
Opens an existing project
Save
Saves the current project
Save As
Saves the current project with a new name
Disconnect from Network1
Disconnects NetworkAmp Manager from the network
Connect to Network1
Connects NetworkAmp Manager to the network
Connect & send to network
Connects NetworkAmp Manager to the network and sends the
project settings to all devices on the network
Exit
Quits NetworkAmp Manager
1. A check mark appears next to either of these commands, indicating the current status. If the connected ACU16-C/NHB32-C is turned off, the check mark appears next to the “DIsconnect from Network” command and a disconnection warning message appears.
Edit
Cut
Moves the currently selected item to the clipboard
Copy
Copies the currently selected item to the clipboard
Paste
Pastes the item on the clipboard to the current location
Delete
Deletes the currently selected item
These commands are available only when an editable text field is selected, including the
threshold values on the ACU Threshold page (see page 24). These commands also appear
on the pop-up Edit menu that appears when you right-click an editable item. The pop-up
menu also has Undo and Select All commands.
View
Group View
Displays the Group View page
Control Link
Displays the Control Link page
Option
Log Setup
Opens the Log Setup dialog box
Operation Lock
Opens the Operation Lock dialog box
COM/MIDI Mode
Opens the COM/MIDI Mode dialog box
General Setup
Opens the General Setup dialog box
Factory Reset
Resets the ACU16-C or NHB32-C connected to your PC
Window
Log Window
Opens the Log window
Help1
Opens this manual (PDF format)
Help Topics
Selects the language, English, Japanese, German, French, or Spanish,
of the NetworkAmp Manager Owner’s Manual
About
Opens the About NetworkAmp Manager window
Help
1. If this command is unavailable, select a language from the Help Topics submenu.
NetworkAmp Manager—Owner’s Manual
12
Network Tree
Network Tree
The network tree displays all the ACU16-Cs, NHB32-Cs, and
power amps in the project in a tree-like structure. Items are displayed in order of unit ID. The tree can be expanded and collapsed by clicking the plus and minus symbols.
The following table lists the items that can appear in the network tree.
Icon
Item
Offline
Online
COM/MIDI
mode
Label
Parent
node
Maximum
number
PRJ
Project name
—
1
ACU
Unit ID + ACU16-C name
PRJ
16
NHB
Unit ID + NHB32-C name
PRJ
8
AMP
Unit ID + amp name
ACU
32 (per
ACU16-C)
CH
Channel name
Amp
8 (per
amp)
Networked devices can be offline, online, or in COM/MIDI mode, and the current status is
indicated by icon color, as shown in the table above. While NetworkAmp Manager is receiving data from a device, the corresponding icon flashes.
When the PRJ icon is gray (offline), no networked devices are being controlled and monitored (i.e., NetworkAmp Manager is disconnected from the network). When it’s green
(online), networked devices are being controlled and monitored (i.e., NetworkAmp Manager is connected to the network). When it’s yellow, COM/MIDI mode is being used.
When an ACU, NHB, AMP, or CH icon is gray (offline), that device is either not turned on
or not connected. When an icon is green (online), the device is turned on and connected
and can be controlled and monitored. When an icon is yellow, COM/MIDI mode is being
used.
NetworkAmp Manager—Owner’s Manual
13
Touring NetworkAmp Manager
PRJ
The PRJ icon always appears at the top of the network tree.
The following menu appears when you right-click the PRJ icon.
Add: Adds an ACU16-C or NHB32-C to the project. When you choose either of these
commands, a dialog box appears for you to specify the device name and unit ID.
Rename: Opens the Rename dialog box so you can rename the project.
ACU
When you click an ACU icon, the ACU pages appear in the main window’s right pane.
The following menu appears when you right-click an ACU icon.
Add: Adds a PCxxxxN series power amplifier to the ACU16-C. When you add an amplifier, a dialog box appears for you to specify the device name, unit ID, and channel mode
(i.e., Parallel, Bridge, or Stereo).
As of this writing, the Yamaha PC9501N/PC6501N/PC4801N/PC3301N/PC2001N/
PC9500N/PC4800N/PC3300N power amplifiers can be added to projects. Please check the
Yamaha Professional Audio Web site at the following URL for news and information on networkable power amplifiers to be released in the future, and for information on other
Yamaha professional audio products: http://www.yamahaproaudio.com/.
Amplifiers are defined in the device definition file. As and when Yamaha introduce new networkable power amps, an updated device definition file will be made available.
Note:
• You can check the version of a device definition file by selecting [About] from the [Help]
menu.
• If you intend to drive the PC3301N power amplifier at a high impedance in Bridge mode,
note the following:
– If the load impedance is 50 Ω or higher (total speaker input is 200W or lower), the impedance indicator will not display the correct value.
– If the load impedance is 500 Ω or higher (total speaker input is 21W or lower), and the
output meter displays the level in watts, the meter will not respond. (If the meter displays
the level in volts, it will display the correct level.)
Delete: Deletes the ACU16-C from the project. A confirmation message appears before
the ACU16-C is deleted.
Rename: Opens the Rename dialog box so you can rename the ACU.
NetworkAmp Manager—Owner’s Manual
Network Tree
14
NHB
When you click an NHB icon, the NHB pages appear in the main window’s right pane.
The following menu appears when you right-click an NHB icon.
Delete: Deletes the NHB32-C from the project. A confirmation message appears before
the NHB32-C is deleted.
Rename: Opens the Rename dialog box so you can rename the NHB.
AMP
When you click an AMP icon, the ACU Amp pages appear in the main window’s right pane.
The following menu appears when you right-click an AMP icon.
Delete: Deletes the amplifier from the project. A confirmation message appears before the
amplifier is deleted.
Rename: Opens the Rename dialog box so you can rename the amplifier.
CH
When you click a CH icon, the ACU Channel Detail page appears in the main window’s
right pane.
The following menu appears when you right-click a CH icon.
Rename: Opens the Rename dialog box so you can rename the amplifier channel.
NetworkAmp Manager—Owner’s Manual
15
NHB Pages
4 NHB Pages
This chapter explains the NHB pages, which can be selected while an NHB32-C is selected
in the network tree.
Devices on a CobraNet network transmit and receive audio data by matching bundle numbers. Matching the bundle number on the transmitting and receiving devices is analogous
to making a physical cable connection between two devices. For example, if the Transmit
bundle assignment (CobraNet Output) on NHB32-C #1 is set to bundle #5, and the Receive
bundle assignment (CobraNet Input) on NHB32-C #2 is also set to bundle #5, audio data
in bundle #5 will be carried from NHB32-C #1 to NHB32-C #2.
CobraNet Page
In this page you can make CobraNet bundle assignments, and specify the audio resolution
and CobraNet network latency for the transmitted bundles.
CobraNet distributes digital audio data in bundles. A single bundle can carry eight channels
of 20-bit/48 kHz digital audio, or seven channels of 24-bit/48 kHz digital audio (with a
latency of 5.33 ms). The NHB32-C supports bundles 0 through 16,383 (multicast and unicast). Bundle 0 is not really a bundle as such, more of a null setting used to disable transmission or reception.
Enable Unicast: If you do not check this check box, you can specify bundle 0 and multicast bundles 1 through 225. If you check this check box, you can specify unicast bundles 256
through 16,383, in addition to bundle 0 and multicast bundles 1 through 225.
Receive bundle assignment: These parameters are used to specify the bundles that
contain the CobraNet channels you want to patch to the NHB32-C’s AES/EBU outputs. You
can patch the individual channels in each bundle on the NHB Patch page (see page 17).
Latency: This parameter is used to specify the latency of audio data distributed from the
NHB32-C to the CobraNet network in msec units. In most cases, select 5.33 ms. You can
also select 2.67 ms or 1.33 ms (low latency). However if you decrease the latency, this will
NetworkAmp Manager—Owner’s Manual
CobraNet Page
16
intensify the restrictions on Ethernet’s packet delivery times, and therefore reduce the maximum number of switches that can be used. For details, refer to the Peak Audio website
(http://www.peakaudio.com).
Note: If the latency is 1.33 ms, the number of bundles that can be handled by this single device
on a CobraNet network will be limited to a total of four bundles for transmission and reception.
When changing the latency to 1.33 ms from some other setting, you will be unable to make
this change if the total number of bundles for transmission and reception is five or more.
The number of channels assignable per single device:
20-bit
24-bit
Latency
Channels
per bundle
Maximum number of bundles
(total of input and output)
Channels
per bundle
Maximum number of bundles
(total of input and output)
5.33ms
8
8
7
8
2.67ms
8
8
8
8
1.33ms
8
4
8
4
Note: You can change the latency setting only while offline. In order to apply the setting to the
NHB32-C or ACU16-C, you must execute “Connect & send to network.” It is possible that
noise will occur somewhere in the system when you change the latency. To prevent damage to
speakers or other components, you should turn down the audio to the CobraNet network or
turn down the output of the power amps before making this change.
Note: If two or more latencies exist within a CobraNet network, there is a danger that the
devices may become unable to communicate correctly with each other. You must make the
same latency setting for all devices in a single network.
Note: If you are unable to change the latency, refer to Troubleshooting (see page 38).
Transmit bundle assignment: These parameters are used to specify the bundles that
contain the CobraNet channels you want to patch to the NHB32-C’s AES/EBU inputs. You
can patch the individual channels in each bundle on the NHB Patch page (see page 17).
Note: Two or more devices cannot transmit data in the same bundle. So do not assign the same
bundle to more than one group.
Audio resolution: This option is used to specify the audio resolution for bundle transmission: 20 or 24 bit. Be sure to select 24-bit if you are using 24-bit digital audio. Otherwise,
your audio will be truncated to 20-bit.
NetworkAmp Manager—Owner’s Manual
17
NHB Pages
Patch Page
This page is used to assign AES/EBU inputs and outputs to individual CobraNet channels
and to store and recall assignment patches. Before making any assignments, you must specify the bundles that contain the CobraNet channels you want to patch (see page 15).
EDIT indicator
AES/EBU inputs and outputs are assigned to CobraNet channels on two 32 x 32 grids, one
for inputs, one for outputs. To make an assignment, click on the grid at the relevant intersection. A blue spot appears when an assignment has been made. To cancel an assignment,
click the blue spot.
Only one AES/EBU input or output can be assigned to each CobraNet channel. For example
if you select a latency of 5.22 ms and a bit depth of 24 bits in the NHB CobraNet page (see
page 15), the number of channels in each group will decrease to 7, and channels 8, 16, 24,
and 32 will be unavailable.
Network efficiency can be optimized by using all channels in each bundle instead of, for
example, using four channels in two bundles or two channels in four bundles.
NetworkAmp Manager—Owner’s Manual
Word Clock Page
18
AES/EBU In to CobraNet: This tab is used to assign AES/EBU inputs to CobraNet
channels.
CobraNet to AES/EBU Out: This tab is used to assign CobraNet channels to AES/EBU
outputs.
Store/Recall: These buttons are used to store and recall patches. A patch consists of all
AES/EBU input and output to CobraNet channel assignments. There are 100 patch memories. Patch #0 is a read-only memory containing initial assignments, with each AES/EBU
input and output assigned to the correspondingly numbered CobraNet input and output.
For example, AES/EBU input #1 is assigned to CobraNet output #1, AES/EBU input #2 is
assigned to CobraNet output #2, and so on. Up to 99 patches can be stored in patch memories 1 through 99.
To store a patch, use the Up and Down arrow buttons to select a patch memory from 1 to
99, enter a title, and then click the Store button. The patch is immediately transferred to,
and stored in the NHB32-C, where it is can be recalled directly from the front panel.
To recall a patch, use the Up and Down arrow buttons to select a patch memory from 0 to
99, and then click the Recall button.
When a patch is edited, the “EDIT” indicator appears next to the patch number. It disappears when the patch is stored or another patch is recalled.
Word Clock Page
This page is used to select the NHB32-C’s wordclock source.
Master clock: This indicator shows the wordclock lock status of the NHB32-C: LOCK or
UNLOCK. It works in unison with the LOCK indicator on the NHB32-C’s front panel.
Word clock source select: These options are used to select the NHB32-C’s wordclock
source, which can be a pair of AES/EBU inputs, the CobraNet network, or the NHB32-C’s
BNC WORD CLOCK IN connector. A confirmation message appears when you change the
wordclock source. The wordclock source can also be selected on the NHB32-C’s front panel.
Note: When you change the wordclock settings of your system, some devices may output noise,
so turn down your power amps beforehand, otherwise you may damage your speakers.
NetworkAmp Manager—Owner’s Manual
19
ACU Pages
5 ACU Pages
This chapter explains the ACU pages, which can be selected while an ACU16-C is selected
in the network tree.
Devices on a CobraNet network transmit and receive audio data by matching bundle numbers. Matching the bundle number on the transmitting and receiving devices is analogous
to making a physical cable connection between two devices. For example, if the Transmit
bundle assignment (CobraNet Output) on an NHB32-C is set to bundle #4, and the Receive
bundle assignment (CobraNet Input) on an ACU16-C is also set to bundle #4, audio data
in bundle #4 will be carried from the NHB32-C to the ACU16-C.
CobraNet Page
In this page you can make CobraNet bundle assignments and specify the latency of the
CobraNet network.
You can specify which bundles you want the ACU16-C to receive. The ACU16-C supports
bundles 0 through 16,383 (multicast and unicast). Bundle 0 is not really a bundle as such,
more of a null setting used to disable transmission or reception.
Enable Unicast: If you do not check this check box, you can specify bundle 0 and multicast bundles 1 through 225. If you check this check box, you can specify unicast bundles 256
through 16,383, in addition to bundle 0 and multicast bundles 1 through 225.
Receive bundle assignment: These parameters are used to specify the bundles that
contain the CobraNet channels you want to patch to the ACU16-C’s analog outputs. You
can patch the individual channels in each bundle on the ACU Patch page (see page 20).
Latency: This parameter is used to specify the latency of audio data received from the
CobraNet network in ms units. Normally, select 5.33 ms. You can also select 2.67 ms or
1.33 ms (low latency).
The number of bundles that can be assigned per unit is always four bundles, regardless of
the latency setting.
Note: You can change the latency setting only while offline. In order to apply the setting to the
NHB32-C or ACU16-C, you must execute “Connect & send to network.” It is possible that
noise will occur somewhere in the system when you change the latency. To prevent damage to
speakers or other components, you should turn down the audio to the CobraNet network or
turn down the output of the power amps before making this change.
NetworkAmp Manager—Owner’s Manual
Patch Page
20
Note: If two or more latencies exist within a CobraNet network, there is a danger that the
devices may become unable to communicate correctly with each other. You must make the
same latency setting for all devices in a single network.
Note: If you are unable to change the latency, refer to Troubleshooting (see page 38).
Patch Page
This page is used to assign individual CobraNet channels to ACU16-C analog outputs.
Before making any assignments, you must specify the bundles that contain the CobraNet
channels you want to patch (see page 19).
CobraNet channels are assigned to ACU16-C analog outputs on a 16 x 32 grid. To make an
assignment, click on the grid at the relevant intersection. A blue spot appears when an
assignment has been made. To cancel an assignment, click the blue spot.
Only one CobraNet channel can be assigned to each ACU16-C output. The bundle number
assigned to each group of CobraNet channels is displayed along the left side of the grid.
NetworkAmp Manager—Owner’s Manual
21
ACU Pages
Amp Pages
The Amp pages are used to control and monitor power
PROTECT indicator
amplifiers. There are four Amp pages: Amp 00–07, Amp
08–15, Amp 16–23, and Amp 24–31. Each page can display
the channels of up to eight power amplifiers. Power amplifiers can have 2, 4, 6, or 8 channels. The screen shot shown here
features two channels of a PC9500N power amplifier.
Amp name: This displays the power amplifier’s name.
Only the first 21 letters of the name are displayed. To display
the name in full, place the mouse pointer over the name.
POWER button: This button is used to set the power
amplifier to On or Standby.
Mode indicator: This displays the power amplifier mode
for each pair of channels: STEREO, PARALLEL, or BRIDGE.
Channel name: Channel names are displayed here. To display the name in full, place the mouse pointer over the name.
To name a channel, right-click its icon in the network tree
and choose Rename from the pop-up menu.
PROTECT indicator: The status of the power amplifier’s
protection system is displayed here. Normally there’s no indication. If the amplifier’s protection system is activated, for
example, the power supply to the power amplifier’s driver
section fails because of overheating, “PROTECT” is displayed. It’s also displayed if the power amplifier is set to
Standby by clicking the POWER button in NetworkAmp
Manager.
Output CLIP indicator: This indicator lights up red
when the channel is clipping.
Output meter: This 12-segment meter displays the channel’s output level in either watts or volts (see preference on
page 8).
Impedance indicator: This displays the channel’s load
impedance.
Temp meter: This 12-segment meter displays the channel’s temperature in either centigrade or Fahrenheit (see
preference on page 8). The value on the right of the meter is
the temp peak hold value. The numerical value below the
meter is the current temperature. To reset peak temp hold,
right-click the meter and choose “Reset temp hold on this
channel” or “Reset temp hold on all channels” from the
pop-up menu.
Input meter: This 12-segment meter displays the channel’s input level in dB.
ATT fader: This fader attenuates the channel’s input signal. The numerical value below
the fader is the current attenuation setting in dB. Attenuation can also be set by clicking the
Up and Down arrow buttons, or by entering a value from the keyboard.
Phase button: This button is used to set the channel’s input signal phase: Normal or
Reversed.
Mute button: This button is used to mute the channel.
NetworkAmp Manager—Owner’s Manual
Channel Detail Page
22
Channel Detail Page
The Channel Detail page offers a detailed view of each channel. It can be opened by clicking
the Channel Detail tab while an ACU16-C is selected in the network tree, or by clicking a
power amplifier channel icon in the network tree.
PROTECT
indicator
Channel select: This section is used to select the power amplifier channel that you want
to view. Use the Amp pop-up menu to select a power amplifier. Use the CH pop-up menu
to select a channel. The names of the selected amplifier and channels are displayed next to
the pop-up menus. The Model information field displays information about the selected
power amplifier.
POWER button: This button is used to set the power amplifier to On or Standby.
PROTECT indicator: The status of the power amplifier’s protection system is displayed
here. Normally there’s no indication. If the amplifier’s protection system is activated, for
example, the power supply to the power amplifier’s driver section fails because of overheating, “PROTECT” is displayed. It’s also displayed if the power amplifier is set to Standby by
clicking the POWER button in NetworkAmp Manager.
NetworkAmp Manager—Owner’s Manual
23
ACU Pages
Mode indicator: This displays the power amplifier mode for each pair of channels: STEREO, PARALLEL, or BRIDGE.
ATT fader: This fader attenuates the channel’s input signal. The numerical value below
the fader is the current attenuation setting in dB. Attenuation can also be set by clicking the
Up and Down arrow buttons, or by entering a value from the keyboard.
Phase button: This button is used to set the channel’s input signal phase: Normal or
Reversed.
Mute button: This button is used to mute the channel.
Output meter: This 12-segment meter displays the channel’s output level in either watts
of volts (see preference on page 8). The Present value is the current output level. The yellow
triangle indicates the warning threshold specified on the Threshold page (see page 24).
Input meter: This 12-segment meter displays the channel’s input level in dB. The Present
value is the current input level.
Temperature: This 12-segment meter displays the channel’s temperature in either centigrade or Fahrenheit (see preference on page 8). The Present value is the current temperature. The maximum temperature is displayed graphically by the green triangle at the right
of the meter, and numerically by the Max hold value. To reset the max hold, right-click the
meter and choose “Reset temp hold on this channel” or “Reset temp hold on all channels”
from the pop-up menu.
Load impedance: This is the channel’s load impedance. The Present value is the current
load impedance.
NetworkAmp Manager—Owner’s Manual
Threshold Page
24
Threshold Page
This page is used to specify the wattage, temperature, and the minimum and maximum
load impedance thresholds at which you want NetworkAmp Manager to issue a warning.
The thresholds can be set individually for each power amplifier channel. Warnings are displayed in the Log window and recorded in the log file.
Amp: This column lists the power amplifiers by ID number and name.
CH: This column lists the power amplifier channels.
Wattage: This column is used to specify the wattage at which you want NetworkAmp
Manager to issue a warning. Range: 1.6–4000.
Temp: This column is used to specify the temperature at which you want NetworkAmp
Manager to issue a warning. Range: 1–127˚C or 34–261˚F.
Impedance max: This column is used to specify a maximum impedance at which you
want NetworkAmp Manager to issue a warning. Range: 0–50Ω. If a value greater than 50Ω
is entered, “Never” appears and the warning is disabled.
Impedance min: This column is used to specify a minimum impedance at which you
want NetworkAmp Manager to issue a warning. Range: 0–50Ω. If a value greater than 50Ω
is entered, “Never” appears and the warning is disabled.
Note: If you enter an invalid value, it will automatically be changed to the nearest valid value.
Warning Enable: These check boxes are used to enable and disable threshold warnings
for each amp. When selected, NetworkAmp Manager issues a warning when the amp
exceeds one of the specified thresholds. When unselected, no warning is issued.
To copy an individual threshold setting, you must double-click it in order to select the actual
value, and then choose Copy from the Edit menu or the pop-up menu that appears when
you right-click. To paste the setting, double-click the destination, and then choose Paste
from the Edit menu or the pop-up menu. Multiple settings can be copied and pasted by
dragging and you can expand or reduce your selection by holding down the Shift key and
using the arrow keys.
NetworkAmp Manager—Owner’s Manual
25
Other Functions
6 Other Functions
Logging Events
NetworkAmp Manager compares the threshold values set on the ACU Threshold page (see
page 24) with the amp’s operating status and issues a warning if a value is exceeded. Warnings are displayed in the Log window (see page 29) and recorded to the log file. Log files are
CSV format text files that can be opened by any text editor, word processor, or spreadsheet.
Note: Don’t open the log file while NetworkAmp Manager is running. Warnings may not be
recorded to the log file properly if you do.
Log Setup
The Log Setup dialog box is used to configure logging. Note that the Log window is not
affected by these settings. To open the Log Setup dialog box, choose Log Setup from the
Option menu.
Enable logging: This check box is used to enable and disable logging to file. Select it to
enable logging.
Record xx days per log file: Here you can specify the number of days to record in each
log file. When the number of days is exceeded, the current log file is closed and subsequent
events are recorded to a new log file.
Automatically delete log files after xx days: When this check box is selected, log
files older than the specified number of days are automatically deleted.
Output file folder: This is used to specify the folder into which NetworkAmp Manager
stores its log files. It also determines the folder that the automatic delete function searches
for old log files. By default, log files are stored in a folder called “Log,” which resides in the
project folder. Use this option when you want to store the log file elsewhere.
Note: Be sure to select a folder that’s on the same hard disk as the project file.
Log files are named using the date on which they were created with the format
“ddmmmyyyy.csv”, where “dd” is the day from 01 to 31, “mmm” is the month (Jan, Feb,
Mar, Apr, May, Jun, Jul, Aug, Sep, Oct, Nov, Dec), and “yyyy” is the year. For example,
“01Aug2002.csv”.
Events are recorded in the log file in chronological order one line at a time, each line being
prefixed with the date and time at which the event took place with the format
“dd/mmm/yyyy, hour:minute:second”. For example, “01/Aug/2002, 21:30:25”.
NetworkAmp Manager—Owner’s Manual
Logging Events
26
There are five types of event: Warning, Online/Offline Status, Power Switch, Error, and Network Mode. These are explained below.
1 Warning Event
This type of event occurs when a specified threshold is exceeded (see page 24).
Date
Time
Type
ACU
Amp
Ch
PTWSO (protect, over temp, over wattage, speaker terminal short, speaker terminal open)
CurrVpre (current pre-fader voltage)
CurrVsp (current speaker terminal voltage)
CurrWsp (current speaker terminal wattage)
CurrImp (current impedance)
CurrClip (current clipping)
CurrTemp (current temperature)
LastVpre (last pre-fader voltage)
LastVsp (last speaker terminal voltage)
LastWsp (last speaker terminal wattage)
LastImp (last impedance)
LastClip (last clipping)
LastTemp (last temperature)
For clarity, the parameters listed above are shown on separate lines.
Each Warning event is recorded in the log file, and displayed in the Log window, on a single
line. Titles are displayed on the top line (i.e., Date, Time, Type, etc), as shown below.
2 Online/Offline Status Event
This type of event occurs when a networked device comes online (e.g., a new device is
detected) or when a device goes offline.
Date, Time, Detect&Lost, Message
For example:
01/Aug/2002, 21:30:25, Detected, New amplifier detected
[ACU#00 AMP#00]
In other words, amp #00, connected to ACU #00, came online at 21:30:25 on 01/Aug/2002.
The Detect&Lost variable can be: Detected (i.e., online) or Lost (i.e., offline)
The Message variable can be any of the following:
New amplifier detected [ACU#xx AMP#yy]
Amplifier gone offline [ACU#xx AMP#yy]
NetworkAmp Manager—Owner’s Manual
27
Other Functions
New ACU16-C detected
ACU16-C gone offline
New NHB32-C detected
NHB32-C gone offline
[ACU#xx]
[ACU#xx]
[NHB#xx]
[NHB#xx]
Online/Offline Status events appear in blue in the Log window.
3 Power Switch Event
This type of event occurs when an amplifier is set to On or Standby.
Date, Time, LineKind, Device
For example:
01/Aug/2002, 21:30:25, PowerOn, [ACU#00 AMP#00]
In other words, amp #00, connected to ACU #00, was turned on at 21:30:25 on
01/Aug/2002.
The LineKind variable can be: PowerOn or Standby
Power Switch events appear in blue in the Log window, as shown below.
4 Error Event
This type of event occurs when either a system error or parameter error occurs.
Date, Time, Error, ErrorMessage
For example:
01/Aug/2002, 21:30:25, Error, Duplicate Unit ID (NHB32-C:#00)
In other words, at 21:30:25 on 01/Aug/2002, it was detected that NHB #00 is set to the same
ID as another NHB32-C on the network.
The ErrorMessage variable can be any of the following:
Duplicate Unit ID [NHB#xx]
Duplicate Unit ID [ACU#xx]
Unit COM/MIDI Mode Conflict!
Too Many COM/MIDI Mode Units!
Unit EEPROM Access Error! [NHB#xx]
Unit EEPROM Access Error! [ACU#xx]
AES/EBU Input Sync Error [NHB#xx AES/EBUx CH1/2]
AES/EBU Input Sync Error [NHB#xx AES/EBUx CH3/4]
AES/EBU Input Sync Error [NHB#xx AES/EBUx CH5/6]
NetworkAmp Manager—Owner’s Manual
Logging Events
28
AES/EBU Input Sync Error [NHB#xx AES/EBUx CH7/8]
Word Clock Unlocked [NHB#xx]
Word Clock Unlocked [ACU#xx]
Unexpected data change detected [NHB#xx...]
Unexpected data change detected [ACU#xx...]
Error events appear highlighted in red in the Log window, as shown below.
5 Network Mode
This type of event occurs when COM or MIDI is activated or deactivated.
Date, Time, NetMode, Mode
For example:
01/Aug/2002, 21:30:25, NetMode, Mode = COM
In other words, COM mode was engaged at 21:30:25 on 01/Aug/2002.
The Mode variable can be: COM, MIDI, or NORMAL
Network Mode events appear in blue in the Log window
NetworkAmp Manager—Owner’s Manual
29
Other Functions
Log Window
The Log window opens automatically, if it’s not already, when an event occurs. This window
can also be opened by choosing Log Window from the Window menu.
Each time an event occurs, the details are displayed in the window, which scrolls automatically.
NetworkAmp Manager—Owner’s Manual
Locking NetworkAmp Manager
30
Locking NetworkAmp Manager
You can lock NetworkAmp Manager to prevent unauthorized operation.
Locking NetworkAmp Manager
1
Choose Operation Lock from the Option menu.
The Operation Lock dialog box shown below appears.
2
Enter a password in the Password and Confirm fields.
3
Click Lock.
NetworkAmp Manager is locked and the Operation Unlock dialog box appears, as shown
below.
4
To unlock NetworkAmp Manager, enter the password in the Password field,
and then click Unlock.
When you enter the correct password and click “Unlock,” the NetworkAmp Manager will
be unlocked, and the “Operation Unlock” dialog box will close.
The password you assign is saved in a text file in the same folder as the folder in which NetworkAmp Manager is installed. If you forget the password, delete the password file, and
then click Unlock, making sure that the Password and the Confirm fields are empty.
NetworkAmp Manager—Owner’s Manual
31
Other Functions
Using COM & MIDI Modes
1
CobraNet’s Serial Bridge feature allows serial data to be transmitted over the network. Normally, the ACU16-C and NHB32-C use the Serial Bridge to transmit amp control data.
However, it can be used to transmit MIDI data (Program Change and Control Change) or
AD824 head amp control data between any two NHB32-Cs on the network.
The Serial Bridge cannot carry Amp Control, MIDI, and AD824 data simultaneously. While
MIDI mode is active, Amp Control data is not transmitted and only communications
between the MIDI ports of the two specified NHB32-Cs takes place. Likewise, while COM
mode is active, only communications between the COM ports of the two specified
NHB32-Cs takes place.
Hookup examples featuring MIDI and COM modes are provided in the printed
ACU16-C/NHB32-C Owner’s Manual.
To use MIDI or COM mode, choose COM/MIDI Mode from the Option menu.
The COM/MIDI Mode dialog box shown below appears.
2
Use the pop-up menus to select two NHB32-Cs on the network.
If both NHB32-Cs are online, the COM and MIDI buttons become available.
3
Click COM to engage COM mode, click MIDI to engage MIDI mode.
The selected mode is activated and all other NetworkAmp Manager functions are inactive.
The COM/MIDI Mode dialog box remains open while COM or MIDI mode is active.
4
To cancel COM or MIDI mode, click Deactivate COM/MIDI mode.
Click Disconnect from network to disconnect from the network without cancelling the
COM or MIDI mode.
5
Click Close to close the COM/MIDI Mode dialog box.
If the Close button is unavailable, cancel COM or MIDI mode, or disconnect from the network.
If you are running NetworkAmp Manager on several PCs, while COM or MIDI mode is
active, the COM/MIDI Mode dialog box appears on all PCs and all control and monitoring
functions are disabled. COM or MIDI mode can be cancelled from any PC.
NetworkAmp Manager—Owner’s Manual
Group View
32
Group View
With Group View you can view and control groups of channels from any amplifiers on the
network. There are eight group pages and up to 16 channels can be displayed on each.
To open the Group View page, choose Group View from the View menu.
The eight groups are selected by clicking the tabs along the top of the page. The Network
tab is used when NetworkAmp Manager is being run on several PCs. For example, if you
select Group View page #1 on PC #1, providing that the Group View page (or ACU Amp
page or Channel Detail page) is open on PC #2, its Network tab will display the same channels as page #1 of PC #1. In fact, all networked PCs will display the same group of channels,
and you will not be able to display different groups on the other PCs. If the Group View window is not open, nothing happens on PC #2.
See the next page for information on editing groups...
NetworkAmp Manager—Owner’s Manual
33
Other Functions
Editing Groups
1
Up to 16 channels can be added to each Group View page.
Choose Group View from the View menu.
The Group View page appears.
2
Right-click on the page and select Edit Group View from the pop-up menu.
The Group View Setup dialog box appears, as shown below.
3
Select a group in the Groups list.
You can sort groups by using the Move up and Move down buttons.
4
Use the Group name field to edit the group’s name.
This is the name that appears on the Group View page tabs.
5
Select the ACU16-C to which the power amplifier is connected in the ACU list.
The power amplifiers connected to the selected ACU16-C are displayed in the AMP list.
6
Select a power amplifier in the AMP list.
The channels of the selected power amplifier are displayed in the CH list.
NetworkAmp Manager—Owner’s Manual
Group View
34
7
Select a channel in the CH list and click the Add [>] button.
The channel is added to the group.
To add all channels, click the Add All [>>] button.
8
To remove a channel from the group, select it and then click the Remove [<]
button.
To remove all channels, click the Remove All [<<] button.
You can sort the grouped channels by using the Move up and Move down buttons.
9
When you’ve finished, click the OK button to apply your edits and close the
Group View Setup dialog box.
If you click the Apply button, your edits are applied to the Group View and the dialog box
remains open. Click Cancel to leave the settings unchanged and close the dialog box.
NetworkAmp Manager—Owner’s Manual
35
Other Functions
Control Link
With Control Link you can group power amplifiers for simultaneous control of power
Standby and On. Up to 16 Control Link groups are available.
To open the Control Link page, choose Control Link from the View menu.
The STANDBY and ON buttons are unavailable when no power amplifiers are in a group
or when the group is disabled. When a group is enabled, you can click the STANDBY button
to simultaneously set all power amplifiers in that group to Standby mode. When an ON
button is clicked, the amplifiers in that group are turned on.
When all power amplifiers in the group are in Standby mode, the STANDBY button appears
depressed. When all power amplifiers in a group are on, the ON button appears depressed.
If some power amplifiers in the group are in Standby mode and some are on, both buttons
appear in the up position.
See the next page for information on editing groups...
NetworkAmp Manager—Owner’s Manual
Control Link
36
Editing Groups
1
Choose Control Link from the View menu.
The Control Link page appears.
2
Right-click on the page and select Edit Control Link from the pop-up menu.
The Control Link Setup dialog box appears, as shown below.
3
Select a group in the Groups list.
4
To enable the group, click its check box.
The check boxes are used to enable and disable groups.
You can sort the groups by using the Move up and Move down buttons.
5
Use the Group name field to enter a name for the group.
This is the name that appears on the Control Link page.
6
Select the ACU16-C to which the power amplifier is connected in the ACU list.
The power amplifiers connected to the selected ACU16-C are displayed in the AMP list.
7
Select a power amplifier in the AMP list and click the Add [>] button.
The power amplifier is added to the group.
To add all power amplifiers, click the Add All [>>] button.
8
To remove a power amplifier from the group, select it and then click the
Remove [<] button.
To remove all power amplifiers, click the Remove All [<<] button.
NetworkAmp Manager—Owner’s Manual
37
Other Functions
9
When you’ve finished, click the OK button to apply your edits and close the
Control Link Setup dialog box.
If you click the Apply button, your edits are applied and the dialog box remains open. Click
Cancel to leave the settings unchanged and close the dialog box.
NetworkAmp Manager—Owner’s Manual
Appendix
38
Appendix
Troubleshooting
Symptom
Advice
The Connect to Network
command in the File menu is
unavailable?
This command is unavailable if no PC interface has been specified.
Choose General Setup from the Option menu and specify interfaces for MIDI IN and MIDI OUT.
Forgotten the password?
Delete the password file located in the folder in which NetworkAmp Manager is installed, make sure that the Password field
and the Confirm field are blank, and then click Unlock.
Pressing the F1 key opens the
help document in the wrong
language?
Choose the required language from the Help—>Help Topics submenu. NetworkAmp Manager will remember your selection and
open the same document the next time you choose Help from the
help menu, or press the F1 key.
You changed the latency
setting, but the actual delay
time does not change. (Nor
does any error message
appear.)
Update the system software version of the ACU-16C/NHB32-C.
For details on updating, refer to the Yamaha website.
http://www.yamahaproaudio.com/
In a project whose latency
setting you changed, executing
“Connect & send to network”
produces an error message
such as “Skip this device,” and
transmission is halted. When
you subsequently go on-line,
the Log window shows a
message such as “Unexpected
data change detected [NHB#xx
Latency].”
The system software of the CobraNet module does not support
changing the latency setting. If you want to change the latency to
other than 5.33 ms, you will need to update the CobraNet module. For details on upgrading, please contact your Yamaha dealer.
Keyboard Shortcuts
File Menu
CTRL+N
Creates a new project
CTRL+O
Opens an existing project
CTRL+S
Saves the current project
SHIFT+CTRL+S
Saves the current project with a new name
Edit Menu
CTRL+X
Moves the currently selected item to the clipboard
CTRL+C
Copies the currently selected item to the clipboard
CTRL+V
Pastes the clipboard contents to the selected position
DELETE
Deletes the currently selected item
Help Menu
F1
Opens this manual (PDF format)
NetworkAmp Manager—Owner’s Manual
39
Glossary
Glossary
This glossary contains terms relevant to NetworkAmp Manager, the ACU16-C, and
NHB32-C. A wealth of information about CobraNet, with sections especially for designers
and installers, is available on the Peak Audio Web site at http://www.peakaudio.com. If you
are designing a network, we strongly recommend that you visit this Web site and study the
information available in order to take full advantage of the CobraNet technology.
100Base-T: See Fast Ethernet.
100Base-FX: Fast Ethernet utilizing multimode fiber optic cables, with a maximum
transmission distance of two kilometers. Single mode fiber supports distances of over 100
kilometers.
100Base-TX: Fast Ethernet utilizing Category 5 (CAT5) twisted pair data grade cables and
RJ-45 connectors. These cables are readily available in a range of lengths and colors. The
maximum allowed cable run in an 100Base-T Ethernet network is 100 meters. If you need
to make custom cables, be sure to maintain the natural twist of the conductors as close to
the connector as possible. More than 25 mm of untwisted cable can affect performance. If
you’re using cable ties, don’t tighten them so as to deform the outer insulation, and do not
bend cables tightly. Doing so may affect the cable’s impedance and degrade performance.
1000Base-T: See Gigabit Ethernet.
APJ: The file name extension of NetworkAmp Manager projects (e.g., My project.apj).
Asynchronous: Not synchronized. Often used to describe communications between
devices that are not synchronized by a common clock, in which data is sent intermittently
rather than in a steady stream. CobraNet’s Serial Bridge is asynchronous. Contrast with Isochronous.
Auto-negotiation: The automatic negotiations that go on between two network devices
in order to determine half/full-duplex operation and data transfer rate (e.g., 10, 100, 1000
Mbps) before actual data transmission commences. Auto-negotiation only works on
switched networks. With repeater networks, all data transfers are half-duplex and the transfer rate is determined by the slowest device on the network. All CobraNet interfaces support
auto-negotiation.
Bundle: CobraNet distributes digital audio data in bundles. One Ethernet packet contains
one bundle. A single bundle can carry eight channels of 20-bit/48 kHz digital audio, or
seven channels of 24-bit/48 kHz digital audio (with a latency of 5.33 ms). Bundles are numbered from 1 through 65,279. Bundles can be transmitted one-to-one (unicast) or
one-to-many (multicast). Network efficiency can be optimized by using all eight channels
in each bundle instead of, for example, using four channels in two bundles or two channels
in four bundles. See also Multicast bundle and Unicast bundle.
Bundle 0: Not really a bundle as such, more of a null setting that can be made on CobraNet devices to disable transmission or reception as necessary.
CAT3: Category 3 twisted pair cable supports a maximum data transfer rate of 10 Mbps
and is used for 10Base-T Ethernet networks.
CAT5: Category 5 twisted pair cable supports a maximum data transfer rate of 100 Mbps
and is used for 100base-TX Ethernet networks.
CobraCAD: Freely available software from Peak Audio for verification and performance
testing of CobraNet network designs. The latest version includes device icons for the
ACU16-C and NHB32-C.
NetworkAmp Manager—Owner’s Manual
Glossary
40
CobraNet: Developed by Peak Audio, CobraNet technology allows real-time uncompressed digital audio distribution over industry standard 100Base-T Ethernet networks. Up
to 128 channels, 64 in each direction, can be carried simultaneously over a switched
100Base-T network (64 channels on repeater networks). CobraNet supports a 48 kHz sampling rate with 16, 20, or 24-bit resolution. CobraNet devices can happily coexist with networked computers, printers, etc., on a switched 100Base-T Ethernet network, however, a
dedicated network infrastructure is strongly recommended.
CobraNet audio channel: In CobraNet terminology, an audio channel is one 48 kHz
digital audio signal with a 16, 20, 24-bit resolution.
CobraNet primary/secondary ports: CobraNet interfaces feature built-in redundancy, with primary and secondary ports for connection to primary and secondary networks. If an unrecoverable fault should occur on the primary network, CobraNet
automatically switches to the secondary network, providing uninterrupted operation. Both
ports are transformer isolated and fully comply with the IEEE 802.3 standard.
Conductor: The device on a CobraNet network that acts as wordclock master and network arbitrator. Only one device can be Conductor at any one time. If that device is
unplugged or fails, another device automatically takes over as Conductor. The conductor
ensures that only one device transmits data in each bundle at any one time. See also Performer.
Crossover Ethernet cable: An Ethernet cable whose data transmit and receive conductors have been swapped. Crossover cables are used to connect two Ethernet devices directly
to each other. They should never be used to connect devices to a hub. Contrast with Straight
Ethernet cable.
CSV: Abbreviation for Comma Separated Value file. CSV files, which are commonly used
to exchange table-like data from spreadsheets and databases, use commas to separate the
individual values on each line. NetworkAmp Manager log files use the CSV format and can
easily be imported into a spreadsheet for further analysis.
Ethernet: The most widely implemented network protocol. The first implementation
10Base-T supports data transfer rates of 10 Mbps. The next implementation, 100Base-T (or
Fast Ethernet) supports 100 Mbps. The newest version, Gigabit Ethernet, supports transfer
rates of 1,000 Mbps (i.e., 1 gigabit).
Fast Ethernet: Also known as 100Base-T, the Ethernet standard that supports data transfer rates of 100 Mbps. CobraNet runs on Fast Ethernet networks.
Gigabit Ethernet: Also known as 1000Base-T, the Ethernet standard that supports data
transfer rates of 1,000 Mbps. CobraNet supports Gigabit Ethernet. A Gigabit switched network can handle up to 1,028 CobraNet audio channels.
Hub: See Repeater hub and Switching hub.
Isochronous: Occurring at fixed intervals in time. Often used to describe real-time communications between devices in which data must be delivered at regular intervals. CobraNet transmits digital audio data isochronously. Contrast with Asynchronous.
LAN (Local Area Network): A network that exists in the same building or group of
buildings. CobraNet is a LAN technology. See also WAN.
Latency: A CobraNet network adds a fixed latency (propagation delay) to all audio data
that is conveyed over the network. You can select this delay from a range of 5.33 ms / 2.67
ms / 1.33 ms. However, decreasing the latency will intensify the limitations on Ethernet’s
packet delivery time, and will therefore decrease the maximum number of switches that can
be used. If you set the latency to 1.33 ms, the number of bundles that can be used by the
NHB32-C will be a maximum total of four for input and output. Also, while some applications will compensate for this, you will need to take into account this latency value when
calculating the appropriate delay time used to compensate for mic positioning or to eliminate the Haas effect.
Managed hub: A type of switching hub that improves network efficiency by segregating
a LAN into smaller virtual LANs.
NetworkAmp Manager—Owner’s Manual
41
Glossary
Media converter: A device that converts from one type of distribution media to another,
for example, Ethernet (100Base-TX) to fiber optic (100Base-FX).
Multicast bundle: CobraNet bundles 1 through 255 are multicast bundles, which means
they are transmitted to all devices on the network regardless of whether any devices are configured to receive them. Multicast bundles allow point-to-multipoint connections and can
be used with repeater hubs or switching hubs. Advantages include the ability to distribute
digital audio to any number of devices simply by configuring those devices to receive the
same bundle. Disadvantages are that all available network bandwidth is used, devices
receive all bundles and must decide for themselves whether to receive or ignore the data,
and any 10Base-T data ports (e.g., computers, printers, etc.) will be flooded with data. It can
be stressful for switching hubs, which must work hard to transmit all incoming data to all
output ports. Contrast with Unicast Bundle.
Network topology: The structure of a network. Common network topologies include
star, ring, tree, and bus. Ethernet networks utilizing hubs are typically wired in a star topology, although a network may consist of various topologies.
Performer: The devices on a CobraNet network that are wordclock slaves. Performers
synchronize to the conductor. See also Conductor.
Repeater hub: A basic network hub that retransmits all incoming data to all of its output
ports.
RJ-45 connector: The type of connector used to connect 10Base-T, 100Base-T, and
1000Base-T Ethernet devices.
RS-232C: A serial interface for connecting serial devices, offering a transmission distance of approximately 15 meters, typically using 9- or 25-pin D-sub connectors.
RS-422: A balanced serial interface for connecting serial devices, offering a transmission distance of approximately 1 kilometer and higher data rates and greater immunity
to interference than RS-232C.
RS-485: A balanced serial interface for connecting serial devices. Similar to RS-422 but
with support for multiple receivers and transmitters, offering bidirectional half-duplex
communications over a single twisted pair.
Sampling rate: CobraNet supports a single sampling rate of 48 kHz.
Serial Bridge: CobraNet’s Serial Bridge feature allows serial data up to 57.6 kbps to be
transmitted over the network. Due to the process of packetizing and re-serializing serial
data, data sent over the Serial Bridge is delayed approximately 10 milliseconds.
Straight Ethernet cable: An Ethernet cable that is wired pin-for-pin (i.e., pin 1 connects to pin 1, pin 2 to pin 2, and so on). Straight cables are used to connect Ethernet devices
to networks. You can easily tell whether an Ethernet cable is crossover or straight by looking
at the wiring of both connectors. If the wiring is identical, it’s a straight cable. If it’s different,
it’s a crossover cable. Contrast with Crossover Ethernet cable.
STP (Shielded Twisted Pair): A cable consisting of two shielded conductors that are
twisted together.
Switching hub: Sometimes referred to as a switch, switching hubs know the network
address of each device on the network and automatically route network traffic accordingly,
so each device receives only data addressed to it.
NetworkAmp Manager—Owner’s Manual
Glossary
42
Unicast bundle: CobraNet bundles 256~65,279 are unicast bundles. (However since the
ACU16-C/NHB32-C support only bundle numbers 0~16,383, they can only use unicast
bundles 256~16,383.) In other words, these are transmitted only if the two devices are set
to transmit and receive that specific bundle. Unicast bundles only allow point-to-point connections and as such are far more bandwidth efficient than multicast bundles. This efficiency means that CobraNet can happily coexist with networked computers, printers, etc.,
on a switched 100Base-T Ethernet network. However, non-CobraNet devices may unpredictably demand a lot of network bandwidth, which may affect CobraNet performance and
even cause audio dropouts, pops, or clicks. A dedicated CobraNet network is strongly recommended for mission critical applications. Unicast bundles can only be used on switched
networks. Unicast bundles can be configured to work like multicast bundles, but that’s
beyond the scope of this glossary. Contrast with Multicast Bundle.
UTP (Unshielded Twisted Pair): A cable consisting of two unshielded conductors that
are twisted together.
WAN (Wide Area Network): A network that covers a wide area, typically made up of
two or more LANs. CobraNet is not a WAN technology. See also LAN.
NetworkAmp Manager—Owner’s Manual
Yamaha Manual Library
http://www.yamaha.co.jp/manual/english/
M.D.G., Pro Audio & Digital Musical Instrument Division, Yamaha Corporation
© 2003 Yamaha Corporation
IP02B0