1
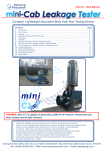
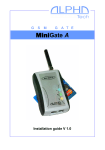
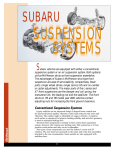
TRK-SR2 Install Guide
8/29/01
10:22 AM
Page 1
TRK-SR2
Roof-Mount Satellite Radio Antenna
Installation Guide
TRK-SR2 Install Guide
8/29/01
10:22 AM
Page 2
TABLE OF CONTENTS
About Installation . . . . . . . . . . . . . . . . . . . . . . . . . . . . . . . . . . . . . . . . . . 2
Introduction. . . . . . . . . . . . . . . . . . . . . . . . . . . . . . . . . . . . . . . . . . . . . . . 3
Applications . . . . . . . . . . . . . . . . . . . . . . . . . . . . . . . . . . . . . . . . . . . . . . 4
Four-Door Sedans . . . . . . . . . . . . . . . . . . . . . . . . . . . . . . . . . . . . . . . . . . . . . 4
SUVs . . . . . . . . . . . . . . . . . . . . . . . . . . . . . . . . . . . . . . . . . . . . . . . . . . . . . . . 4
Two-Door Coupes/Hatchbacks . . . . . . . . . . . . . . . . . . . . . . . . . . . . . . . . . . . . 4
Convertibles . . . . . . . . . . . . . . . . . . . . . . . . . . . . . . . . . . . . . . . . . . . . . . . . . 5
Vans/Minivans. . . . . . . . . . . . . . . . . . . . . . . . . . . . . . . . . . . . . . . . . . . . . . . . 5
Pickup Trucks . . . . . . . . . . . . . . . . . . . . . . . . . . . . . . . . . . . . . . . . . . . . . . . . 5
Installation . . . . . . . . . . . . . . . . . . . . . . . . . . . . . . . . . . . . . . . . . . . . . . . 6
TRK-SR2 Parts. . . . . . . . . . . . . . . . . . . . . . . . . . . . . . . . . . . . . . . . . . . . . . . . 6
Recommended Tools And Supplies. . . . . . . . . . . . . . . . . . . . . . . . . . . . . . . . . 6
Installation Precautions And Tips . . . . . . . . . . . . . . . . . . . . . . . . . . . . . . . . . 6
Installing The TRK-SR2 . . . . . . . . . . . . . . . . . . . . . . . . . . . . . . . . . . . . . . . . . 7
Use And Care . . . . . . . . . . . . . . . . . . . . . . . . . . . . . . . . . . . . . . . . . . . . 10
Troubleshooting . . . . . . . . . . . . . . . . . . . . . . . . . . . . . . . . . . . . . . . . . . . 10
Specifications . . . . . . . . . . . . . . . . . . . . . . . . . . . . . . . . . . . . . . . . . . . . 11
Limited Warranty . . . . . . . . . . . . . . . . . . . . . . . . . . . . . . . . . . . . . . . . . . 12
About XM Satellite Radio . . . . . . . . . . . . . . . . . . . . . . . . . . . . . . . . . . . . 12
ABOUT INSTALLATION
Installation of automotive stereo components can require extensive experience
with a variety of mechanical and electrical procedures.Although the instructions
in this guide explain how to install the Terk TRK-SR2 Roof-Mount Satellite Radio
Antenna in a general sense, they do not show the exact installation methods for
your particular vehicle.
IMPORTANT: If you are not comfortable performing a complex installation,
ask your local mobile audio dealer about professional installation options.
2
Table Of Contents
TRK-SR2 Install Guide
8/29/01
10:22 AM
Page 3
TRK-SR2 INSTALLATION GUIDE
INTRODUCTION
The Terk TRK-SR2 Roof-Mount Satellite Radio Antenna is a high-performance
antenna designed specifically for XM Satellite Radio reception. It has dual-mode
functionality, receiving simultaneous signals from satellites and terrestrial
repeaters, to ensure continuous reception. The result is an antenna that offers all
the benefits of satellite radio and complements the appearance of any vehicle.
Its features include:
•
Low-profile roof-mounted design
•
Mounts to roof of vehicle via special acrylic foam adhesive pads that
provide years of worry-free enjoyment, yet are removable if necessary
•
Attached micro cables are designed to wrap around the rear window and
to fold under rubber molding for an invisible wiring solution
•
Tested and proven to Automotive Environmental Standards
•
Shock- and vibration-proof design
•
Safe for low-clearance conditions, including car washes
The TRK-SR2 is easy to install on most vehicles. The package includes all the
necessary mounting hardware, as well as color-coded cable connectors to
ensure complete compatibility with all XM receivers. Remember to save your
sales receipt and this guide so both are available for future reference.
NOTE: To achieve best XM Satellite Radio reception, also refer to the XM radio’s
owner’s manual.
Figure 1. The Terk TRK-SR2 Roof-Mount Satellite Radio Antenna.
Introduction
3
TRK-SR2 Install Guide
8/29/01
10:22 AM
Page 4
APPLICATIONS
The Terk TRK-SR2 Roof-Mount Satellite Radio Antenna can be installed on a
variety of vehicles, as shown below. For details, see Installation starting on page 6.
FOUR-DOOR SEDANS
Figure 2. The Terk TRK-SR2 is shown installed on the roof of a four-door sedan.
SUVS
Figure 3. The Terk TRK-SR2 is shown installed on the roof of an SUV.
TWO-DOOR COUPES/HATCHBACKS
Figure 4. The Terk TRK-SR2 is shown installed on the roof of a two-door coupe.
4
Applications
TRK-SR2 Install Guide
8/29/01
10:22 AM
Page 5
TRK-SR2 INSTALLATION GUIDE
CONVERTIBLES
Figure 5. The Terk TRK-SR2 is shown installed on the trunk of a convertible.
Note the difference in antenna orientation from other vehicles.
NOTE: The TRK-SR2 can be used on a convertible with a removable metal roof as
long as the top is off. Using the roof may cause interference and degraded reception.
VANS/MINIVANS
Figure 6. The Terk TRK-SR2 is shown installed on the roof of a minivan.
PICKUP TRUCKS
Figure 7. The Terk TRK-SR2 is shown installed on the roof of a pickup truck.
Applications
5
TRK-SR2 Install Guide
8/29/01
10:22 AM
Page 6
INSTALLATION
TRK-SR2 PARTS
(1) Roof-Mount Antenna
(1) Cleaning
Towelette
Cable Cover
(with self-adhesive backs)
Flap
(1) 11' Pair of
Coaxial Cables
(attached to antenna module)
Figure 8. Verify that your TRK-SR2 package includes the above items.
RECOMMENDED TOOLS AND SUPPLIES
Although not necessary, the following tools and supplies may aid in installation:
•
Any tool to help cable routing (e.g., flat dental pick, screwdriver, etc.)
•
Lubricant (e.g., light machine oil to aid cable routing through old molding)
•
Cable tie wraps and adhesive mounting bases (to manage cable routing)
•
Tape measure and level (for positioning the antenna)
INSTALLATION PRECAUTIONS AND TIPS
•
When selecting an antenna location for the TRK-SR2, make sure the
proposed site meets the following conditions:
a. The selected site must have a conductive surface area (e.g., metal or
aluminum roof) of at least 2-1⁄4 square feet and be 6 inches from
rear window molding.
b. Line of sight to satellites must not blocked by any metal obstructions
(e.g., crossbars from a roof rack).
c. Choose the highest possible location on the vehicle’s roof that satisfies
the above conditions and is as flat as possible.
•
6
Although a center position on a roof is the most aesthetically pleasing, if
there is an obstruction (e.g., skid ribs, protruding brake light on roof line,
etc.) consider offsetting the TRK-SR2 from the center. If this doesn’t work,
use the Terk TRK-SR1 Glass-Mount Satellite Radio Antenna instead.
Installation
TRK-SR2 Install Guide
8/29/01
10:22 AM
Page 7
TRK-SR2 INSTALLATION GUIDE
•
If the vehicle is equipped with a roof rack, adjust the crossbar so it’s at
least 6 inches away from the TRK-SR2.
•
If the vehicle is equipped with a metal sunroof (e.g., Mazda 626), which
opens to the outside, allow a minimum distance of 6 inches from the edge
of the open sunroof to the TRK-SR2. If this is not possible, use the Terk
TRK-SR1 Glass-Mount Satellite Radio Antenna instead.
NOTE: A glass sunroof does not require this minimum mounting distance, since
the glass does not block satellite signals nor degrade reception.
•
Before mounting the TRK-SR2, make sure the vehicle’s roof is above 60 °F,
non-condensing, and dry. This will also allow the molding to soften up.
•
At a selected antenna site, survey the planned cable route and look for any
blocked passages. Consider alternate routes to find the best available path.
NOTE: Take advantage of any existing cable channels (e.g., brake light
opening ) or wiring conduits to route the cables.
•
Avoid running cables through components that may cause excessive chafing.
Doing so may erode the jacket and break signal continuity. Also, avoid
kinking, pinching, or twisting a cable during a run.
•
When routing the cable through small openings, consider removing the
plastic cases and inserts from connectors (see Figure 12 on page 9).
•
For convertibles with composite trunk lids, attach an aluminum foil
“ground plane” of at least 2-1⁄4 square feet, centered under the antenna
module, between the lid and liner.
•
When pressing the TRK-SR2 onto the vehicle’s roof, apply an initial
contact force of 15 to 20 PSI (i.e., steady and firm finger-tip pressure) for
60 seconds. Allow 20 minutes for the self-adhesive backing to set before
driving the vehicle.
•
After installation, avoid running the vehicle through a car wash for 72 hours.
INSTALLING THE TRK-SR2
1. At the selected site, use an enclosed Cleaning Towelette to clean the
installation area on the vehicle’s roof.
NOTE: For additional cleaning solution, only use isopropyl alcohol. Do not use
any commercial glass cleaners.
2. Peel off both protective backings from the cable cover and antenna module.
Lightly position the end of the cable cover at the rear window molding, as
shown in Figure 9 on the next page.
NOTE: The end flap should extend over the molding (see Figure 9).
Continued on next page...
Installation
7
TRK-SR2 Install Guide
8/29/01
10:22 AM
Page 8
INSTALLATION
INSTALLING THE TRK-SR2 (CONTINUED)
Cable Cover
TRK-SR2
Flap
Cable Under
Moulding
Figure 9. Positioning the TRK-SR2 on a vehicle’s roof so the cable cover flap
extends over the rear window molding.
3. Continue placing the molding down on the roof, working forward towards the
antenna module. Examine the placement and make any desired adjustments.
4. Using steady pressure, firmly press the TRK-SR2 (including cable cover)
down for a minimum of 60 seconds to secure adhesion to the roof.
5. Push the cables under the rear window molding and route them to the XM
receiver, as shown in Figure 10 below. The cables can be routed separately (as
shown) or together along a single route.
Push Cable
Under
Moulding
TRK-SR2
Cable
Cable
XM Receiver
(In Trunk)
Figure 10. Routing the TRK-SR2’s cable along a vehicle’s rear window.
NOTE: Use any existing cable channels (e.g., brake light opening) or wiring
conduits to route the cables.
8
Installation
TRK-SR2 Install Guide
8/29/01
10:22 AM
Page 9
TRK-SR2 INSTALLATION GUIDE
6. If the XM system is not already installed, temporarily connect power and
ground to the system. Connect the TRK-SR2 to your XM receiver, as directed
by the receiver’s manufacturer (see Figure 11 below).
Antenna
1
2
XM Receiver (Tuner)
Green Case
(Terrestrial)
Curry Case
(Satellite)
Black Wire
Brown Wire
From TRK-SR2
Roof-Mount Anntena
Figure 11. Wiring diagram shows antenna connections to an XM receiver.
NOTE: For the Sony DRN-XM01 Digital Audio Receiver, use a small jeweler’s
screwdriver to remove the plastic case and inserts from each FAKRA-type SMB
connector, as shown in Figure 12 below.
FAKRA-type SMB Connector
(Side View)
Case
Step 1
Lift Tab
Jeweler’s
Screwdriver
Insert
Case
Step 2
Insert
Figure 12. Removing the plastic case and inserts.
7. Turn on the XM system and tune to different XM channels. If there are any
problems, review the installation steps and verify that each one was
performed correctly.Also see Troubleshooting on the next page.
8. After the system has been tested successfully, route the cable from the
antenna to the receiver for best appearance and complete the remaining
system installation.
NOTE: For additional help with cable routing, consult your local mobile
audio dealer.
Installation
9
TRK-SR2 Install Guide
8/29/01
10:22 AM
Page 10
USE AND CARE
In normal daily use, the Terk TRK-SR2 Roof-Mount Satellite Radio Antenna is a
rugged, high-performance antenna that does not require any special attention.
TROUBLESHOOTING
SYMPTOM
XM radio is on, but no channels
are being received.
XM radio displays “Antenna”
or “Check Antenna” message.
SOLUTIONS
•
Check the cables for continuity
from the TRK-SR2 to the XM
receiver. Look for nicks or cuts
along cable route.
•
Call us for help at 1-800-942-TERK
(8375) on any business day,
between 9 A.M. and 5:30 P.M., EST
and ask for Technical Support.
•
Check antenna connections to
the XM receiver.
•
Vehicle may be in an area where
there is no line of sight to satellite
or ground repeater.
W
10 Use And Care/Troubleshooting
TRK-SR2 Install Guide
8/29/01
10:22 AM
Page 11
TRK-SR2 INSTALLATION GUIDE
SPECIFICATIONS
Frequency:
2332.5 to 2345.0 MHz
Bandwidth:
12.5 MHz
VSWR:
2:1
Terrestrial Reception:
Linear polarization
Satellite Reception:
Circular polarization
Input Impedance:
50 ohms
Coverage from Tuner:
Terrestrial antenna is omnidirectional
Current Draw:
110 mA typical per antenna LNA
Input Voltage:
4.5 Vdc typical
LNA Noise Figure:
0.8 dB max.
Terrestrial Noise Figure:
1.3 dB max.
Total Active LNA Gain –
Terrestrial Reception:
Satellite Reception:
18 -22 dB
20 -24 dB
Out of Band Filter Attenuation:
25 dB min.
Cables:
11 feet coaxial
Connectors:
FAKRA-type SMB (color coded)
Mounting Material:
Adhesive pads (3M 5356 acrylic foam)
Materials:
Radome impact-resistant glass-filled
nylon (paintable)
Radiated Immunity:
100 volts per meter, 200 MHz to 2 Ghz
Weight:
6 oz (without cables)
Dimensions –
Antenna Module:
Cable Cover (L x W x H):
4-1⁄4" x 3-3⁄16" x 1-1⁄2"
6-3⁄4" x 5⁄8" x 7⁄32"
Temperature:
Quality and Performance Tests –
XM Approved:
AES Approved:
Terk QA:
-40 °C to +105 °C, operating
-45 °C to +120 °C, storage
Per specification XM-TEC-3-0009-RD
Tested and proven to AES
Shock and Vibration Proof
Terk Technologies strives to maintain and exceed the highest consumer standards. Due to these ongoing
efforts, modifications may be made from time to time to existing products without any prior notice.
Specifications and appearance may differ from those listed or shown in this manual. The XM name and
related logos are trademarks of XM Satellite Radio, Inc. Terk and Terk Technologies are trademarks of
Terk Technologies Corp., Commack, NY.
Part # 49P005
Specifications 11
TRK-SR2 Install Guide
8/29/01
10:22 AM
Page 12
LIMITED WARRANTY
TERK Technologies Corp. (Terk) warrants this product against defects in
materials or workmanship for 1 year from the date of purchase. During this
warranty period this product will be replaced without charge. This warranty
does not cover any damage due to act of God, commercial use, accident,
misuse, abuse or negligence.
This warranty is only valid in the USA. Replacement as provided under this
warranty is the exclusive remedy of the consumer. Terk shall not be liable for
any incidental or consequential damages for breach of any expressed or implied
warranty on this product, except to the extent prohibited by applicable law. Any
implied warranty or merchantability or fitness for a particular purchase on this
product is limited to the duration of this warranty.
ABOUT XM SATELLITE RADIO
For more information about XM Satellite Radio service, visit their web site at:
www.xmradio.com
Terk Technologies Corporation
63 Mall Drive
Commack, NY 11725
VOICE: (631) 543-1900
FAX: (631) 543-8088
INTERNET: www.terk.com