1
Software Version 1.0
®
Xerox Color C60/C70 Printer
User Guide
©2014 Xerox Corporation. All rights reserved. Xerox® and Xerox and Design® are
trademarks of Xerox Corporation in the United States and/or other countries.
SquareFold®, CentreWare®, Scan to PC Desktop®, and Xerox Extensible Interface Platform®,
are trademarks of Xerox Corporation in the United States and/or other countries. Product
status, build status, and/or specifications are subject to change without notice.
Microsoft®, Windows®, Windows XP®, Windows Vista®, and Word are registered trademarks
of Microsoft Corporation in the United States and/or other countries.
Adobe, the Adobe logo, Acrobat, the Acrobat logo, Adobe Reader, Adobe PDF logo are
registered trademarks of Adobe Systems, Inc. PostScript is an Adobe registered trademark
used with the Adobe PostScript Interpreter, the Adobe page description language, and
other Adobe products.
Apple®, Macintosh®, and Mac OS® are trademarks or registered trademarks of Apple
Computer, Inc., registered in the U.S. and other countries. Elements of Apple's Technical
User Documentation used by permission from Apple Computer, Inc.
GBC® and AdvancedPunch™ are trademarks or registered trademarks of General Binding
Corporation.
HP and PCL are registered trademarks of Hewlett-Packard Corporation in the United
States and/or other countries.
Linux® is a registered trademark of Linus Torvalds.
TWAIN is a trademark of TWAIN Working Group.
UNIX® is a registered trademark of the Open Group.
Universal Serial Bus is a trademark of USB Implementors Forum, Inc. (USB-IF)
BR10124
Table of Contents
1 ...............................................................................................................................ii
1 Safety.............................................................................................................1-1
Warning Symbols.................................................................................................................1-1
Notices and Safety..............................................................................................................1-1
Emergency Turn Off...............................................................................................1-2
General Guidelines.................................................................................................1-2
Electrical Safety....................................................................................................................1-3
Electrical Supply......................................................................................................1-3
Emergency Turn Off...............................................................................................1-3
Power Cord Safety Information........................................................................1-4
Operational Safety..............................................................................................................1-5
Printer Location.......................................................................................................1-5
Operational Guidelines.........................................................................................1-5
Consumable Information....................................................................................1-6
Vacuum Cleaner Use for Toner Spills.................................................1-6
Ozone Release..........................................................................................................1-6
Maintenance Safety............................................................................................................1-7
Printer Symbols.....................................................................................................................1-8
Environmental, Health, and Safety Contact Information....................................1-8
2 Product Overview.......................................................................................2-1
Introduction...........................................................................................................................2-1
Printer Configurations........................................................................................................2-2
Parts of the Printer...............................................................................................................2-2
Right-Front View.....................................................................................................2-3
Right-Rear View.......................................................................................................2-4
Duplex Automatic Document Feeder.............................................................2-4
Control Panel............................................................................................................2-5
Internal Components............................................................................................2-6
Paper Trays................................................................................................................2-7
Paper Trays 1 and 2..................................................................................2-7
Paper Trays 3 and 4..................................................................................2-7
Bypass Tray (Tray 5).................................................................................2-7
Offset Catch Tray......................................................................................2-7
Telephone and Fax Connection Option.........................................................2-8
Standard Features...............................................................................................................2-8
Energy Saver Mode.............................................................................................................2-9
Xerox® Color C60/C70 Printer
User Guide
i
Table of Contents
Printer Information.............................................................................................................2-9
Consumables..........................................................................................................................2-9
Drum Cartridges......................................................................................................2-9
Toner Cartridges...................................................................................................2-10
Fuser..........................................................................................................................2-10
Charge Corotron...................................................................................................2-10
Waste Toner Container......................................................................................2-10
Optional Accessories........................................................................................................2-10
Input Devices.........................................................................................................2-10
High-Capacity Feeder............................................................................2-10
Oversized High-Capacity Feeder.......................................................2-11
Finishing Devices..................................................................................................2-11
Business Ready Finisher.......................................................................2-11
Business Ready Finisher with Booklet Maker...............................2-11
Standard Finisher/Booklet Maker Finisher...................................2-12
Xerox® SquareFold® Trimmer..........................................................2-13
GBC® AdvancedPunch™......................................................................2-13
CZ Fold Unit..............................................................................................2-13
Required Finishing Accessories.......................................................................2-13
Interface Module....................................................................................2-14
Vertical Transport Module...................................................................2-14
Getting Additional Information..................................................................................2-14
3 Installation and Setup.............................................................................3-1
Before Using the Printer....................................................................................................3-1
Xerox Welcome Center.........................................................................................3-1
Installation and Setup Overview...................................................................................3-2
Physical Connection............................................................................................................3-2
Turning On the Printer........................................................................................................3-3
Turning On Main Power........................................................................................3-4
General Power On...................................................................................................3-5
Turning Off the Printer.......................................................................................................3-6
General Power Off..................................................................................................3-6
Turning Off Main Power.......................................................................................3-6
Assigning a Network Address..........................................................................................3-8
Using CentreWare Internet Services............................................................................3-8
Finding the Printer's IP Address.......................................................................3-8
Accessing CentreWare Internet Services.......................................................3-9
4 Loading Media...........................................................................................4-1
Accepted Media....................................................................................................................4-1
ii
Xerox® Color C60/C70 Printer
User Guide
Table of Contents
Recommended Media...........................................................................................4-1
General Media Loading Guidelines.................................................................4-2
Printing/Copying on Labels.................................................................................4-2
Printing/Copying on Glossy Paper....................................................................4-2
Media That Can Damage Your Printer...........................................................4-3
Paper Storage Guidelines....................................................................................4-3
Paper Types/Weights Accepted in Trays.....................................................................4-4
Tray Capabilities...................................................................................................................4-5
Loading Paper in Trays 1 - 4.............................................................................................4-5
Loading Paper in Tray 5 (Bypass Tray)........................................................................4-7
Loading Envelopes in Tray 5 (Bypass Tray)................................................................4-8
Loading Paper in the High Capacity Feeder..............................................................4-9
Loading Paper in the Oversized High Capacity Feeder......................................4-10
Loading Paper in the Post-Process Inserter.............................................................4-11
5 Printing..........................................................................................................5-1
Printing Overview.................................................................................................................5-1
Saving a Set of Commonly Used Printing Options in Windows........................5-1
Saving a Set of Commonly Used Printing Options for Macintosh....................5-2
Xerox® Services for UNIX® Systems (XSUS)...........................................................5-2
Launching XSUS...................................................................................................................5-3
Printing from Linux..............................................................................................................5-3
Launching Xerox Printer Manager...................................................................5-3
Printing from a Linux Workstation...................................................................5-3
Printing Features..................................................................................................................5-4
Media Types for Automatic 2-Sided Printing...............................................5-4
Printing a 2-Sided Document.............................................................................5-4
Selecting the Paper to Use..................................................................................5-5
Printing Multiple Pages to a Single Sheet (N-Up)......................................5-5
Color Correction.......................................................................................................5-5
Booklets......................................................................................................................5-6
Cover Pages...............................................................................................................5-6
Insert Pages..............................................................................................................5-7
Exception Pages......................................................................................................5-7
Scaling.........................................................................................................................5-8
Watermarks...............................................................................................................5-8
Creating and Saving Custom Sizes..................................................................5-8
Job Completion Notification..............................................................................5-9
Secure Print Jobs.....................................................................................................5-9
Sample Sets..............................................................................................................5-9
Delayed Printing......................................................................................................5-9
Xerox® Color C60/C70 Printer
User Guide
iii
Table of Contents
Saving Print Jobs to the Printer.........................................................................5-9
Folding.........................................................................................................................5-9
Printing from a USB Flash Drive.....................................................................5-10
Printing from a Media Card Reader..............................................................5-10
6 Copying.........................................................................................................6-1
Basic Copying........................................................................................................................6-1
Document Glass......................................................................................................6-2
Duplex Automatic Document Feeder.............................................................6-2
Basic Settings...........................................................................................................6-3
Selecting Color or Black and White Copies.....................................6-3
Reducing or Enlarging the Image.......................................................6-4
Selecting the Tray to Use for Copies..................................................6-4
Specifying 2-Sided Originals or Copies.............................................6-5
Collated Copies...........................................................................................6-5
Uncollated Copies.....................................................................................6-6
Offset Stacking...........................................................................................6-6
Stapling Copies...........................................................................................6-6
Hole Punching Copies..............................................................................6-7
Image Quality Adjustments...............................................................................6-7
Specifying the Original Type.................................................................6-7
Adjusting the Darkness, Sharpness, and Saturation...................6-8
Automatically Suppressing Background Variations....................6-8
Adjusting the Contrast............................................................................6-8
Selecting Color Effects.............................................................................6-9
Adjusting the Color Balance.................................................................6-9
Adjusting the Color Shift........................................................................6-9
Adjusting the Gloss Level.....................................................................6-10
Layout Adjustments............................................................................................6-10
Book Copying...........................................................................................6-10
2-Sided Book Copying...........................................................................6-11
Specifying the Original Size................................................................6-12
Erasing the Edges of a Copy...............................................................6-12
Shifting the Image.................................................................................6-12
Rotating the Image...............................................................................6-13
Inverting the Image..............................................................................6-13
Output Format Adjustments...........................................................................6-14
Creating Booklets...................................................................................6-14
Including Covers......................................................................................6-15
Page Layout..............................................................................................6-16
Creating Posters......................................................................................6-16
iv
Xerox® Color C60/C70 Printer
User Guide
Table of Contents
Adding Annotations..............................................................................6-17
Adding Watermarks...............................................................................6-18
ID Card Copy............................................................................................6-19
Tab Margin Shift.....................................................................................6-19
Advanced Copying............................................................................................................6-20
Building a Job........................................................................................................6-20
Printing a Sample Copy.....................................................................................6-22
Combining Original Sets....................................................................................6-22
Delete Outside/Delete Inside..........................................................................6-23
Saving Copy Settings..........................................................................................6-23
Folding......................................................................................................................6-24
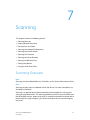
7 Scanning.......................................................................................................7-1
Scanning Overview..............................................................................................................7-1
Loading Original Documents..........................................................................................7-2
Document Glass......................................................................................................7-2
Duplex Automatic Document Feeder.............................................................7-3
Storing a Scan to a Folder................................................................................................7-3
Scanning to a Folder..............................................................................................7-3
Printing Stored Files at the Printer...................................................................7-4
Additional Send from Folder Options.............................................................7-4
Using Job Flow Sheets..........................................................................................7-5
Printing Stored Files Using CentreWare Internet Services.....................7-5
Retrieving Scanned Files to Your Computer Using CentreWare
Internet Services...............................................................................................7-6
Creating a Folder.....................................................................................................7-7
Deleting a Folder.....................................................................................................7-8
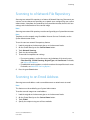
Scanning to a Network File Repository.......................................................................7-9
Scanning to an Email Address........................................................................................7-9
Setting Email Options........................................................................................7-10
Scanning to a Computer.................................................................................................7-11
Scanning to a Home Directory.....................................................................................7-11
Storing to a USB Flash Drive.........................................................................................7-12
Setting Scan Options.......................................................................................................7-13
Scan Settings.........................................................................................................7-13
Additional Scanning Options..........................................................................7-13
Advanced Settings...............................................................................................7-13
Layout Adjustment..............................................................................................7-14
Filing Options/E-mail Options.........................................................................7-14
Xerox® Color C60/C70 Printer
User Guide
v
Table of Contents
8 Faxing.............................................................................................................8-1
Fax Overview..........................................................................................................................8-1
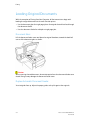
Loading Original Documents..........................................................................................8-2
Document Glass......................................................................................................8-2
Duplex Automatic Document Feeder.............................................................8-2
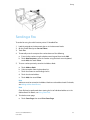
Sending a Fax........................................................................................................................8-3
Server Fax................................................................................................................................8-4
Sending a Server Fax.............................................................................................8-4
Sending an Internet Fax....................................................................................................8-5
Faxing from Your Computer.............................................................................................8-5
Receiving Faxes.....................................................................................................................8-6
Selecting Fax Settings........................................................................................................8-6
Setting 2-Sided Faxing.........................................................................................8-6
Selecting the Original Type.................................................................................8-6
Setting the Fax Resolution..................................................................................8-7
Adjusting Layout.....................................................................................................8-7
Lighten/Darken...........................................................................................8-7
Adjusting the Original Size....................................................................8-7
Book Faxing.................................................................................................8-7
Reduce/Enlarge..........................................................................................8-8
Fax Options...............................................................................................................8-8
More Fax Options....................................................................................................8-9
Internet Fax Options.............................................................................................8-9
Adding Address Book Entries........................................................................................8-10
Adding an Individual Address.........................................................................8-10
Deleting an Individual Address......................................................................8-10
Adding a Group.....................................................................................................8-10
Deleting a Group..................................................................................................8-11
Using Chain Dial...................................................................................................8-11
Creating Fax Comments.................................................................................................8-12
9 Maintenance...............................................................................................9-1
General Precautions............................................................................................................9-1
Locating the Serial Number.............................................................................................9-2
Billing and Usage Information.......................................................................................9-2
Cleaning the Printer............................................................................................................9-3
Cleaning the Document Glass and Document Cover...............................9-3
Cleaning the Exterior.............................................................................................9-4
Ordering Supplies.................................................................................................................9-4
Consumables............................................................................................................9-4
vi
Xerox® Color C60/C70 Printer
User Guide
Table of Contents
When to Order Supplies.......................................................................................9-5
Routine Maintenance Items............................................................................................9-5
Replacing the Toner Cartridges.........................................................................9-5
Replacing the Fuser................................................................................................9-7
Replacing the Waste Toner Container............................................................9-9
Replacing the Drum Cartridges......................................................................9-10
Replacing the Charge Corotron......................................................................9-12
Recycling Supplies.............................................................................................................9-14
10 Troubleshooting....................................................................................10-1
Control Panel Messages..................................................................................................10-1
General Troubleshooting................................................................................................10-2
Printer Does Not Turn On..................................................................................10-2
Printing Takes Too Long.....................................................................................10-2
Printer Resets or Turns Off Frequently.........................................................10-3
2-Sided Printing Problems................................................................................10-3
Scanner Error..........................................................................................................10-3
Troubleshooting Paper Jams........................................................................................10-3
The Printer Pulls Multiple Sheets Together................................................10-3
Paper Jam Message Stays On.........................................................................10-4
Media Misfeeds.....................................................................................................10-4
Clearing Paper Jams...........................................................................................10-5
Clearing Paper Jams from Tray 1, Tray 2, Tray 3, or Tray
4..............................................................................................................10-5
Clearing Paper Jams from Tray 5 (Bypass Tray).........................10-6
Clearing Paper Jams in Document Feeder....................................10-6
Clearing Paper Jams in the High Capacity Feeder....................10-6
Clearing Paper Jams in the Oversized High Capacity
Feeder...................................................................................................10-6
Clearing Paper Jams in the Fuser.....................................................10-6
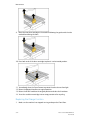
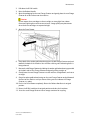
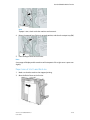
Clearing Jams in the C/Z Folder.....................................................................10-7
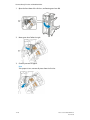
Clearing Jams at 2a in the C/Z Folder............................................10-7
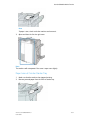
Clearing Jams at 2b in the C/Z Folder............................................10-8
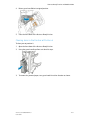
Clearing Jams at 2e in the C/Z Folder..........................................10-10
Clearing Jams at 2f in the C/Z Folder..........................................10-11
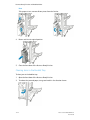
Clearing Jams at 2g in the C/Z Folder.........................................10-13
Minimizing Paper Jams................................................................................................10-14
Print Quality Problems..................................................................................................10-15
Copy and Scan Problems.............................................................................................10-15
Fax Problems.....................................................................................................................10-16
Problems Sending Faxes.................................................................................10-16
Xerox® Color C60/C70 Printer
User Guide
vii
Table of Contents
Problems Receiving Faxes..............................................................................10-17
Getting Help.....................................................................................................................10-18
Control Panel Messages..................................................................................10-18
Alerts......................................................................................................................10-18
Web Resources....................................................................................................10-19
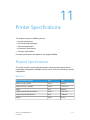
11 Printer Specifications..........................................................................11-1
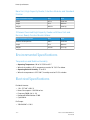
Physical Specifications....................................................................................................11-1
Base Unit.................................................................................................................11-1
Base Unit, High Capacity Feeder, Interface Module, and
Standard Finisher..........................................................................................11-2
2-Drawer Oversized High Capacity Feeder with Base Unit and
Business Ready Finisher/Booklet Maker...............................................11-2
Environmental Specifications.......................................................................................11-2
Temperature and Relative Humidity............................................................11-2
Electrical Specifications..................................................................................................11-2
Performance Specifications...........................................................................................11-3
Resolution...............................................................................................................11-3
Print Speed..............................................................................................................11-3
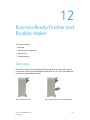
12 Business Ready Finisher and Booklet Maker.............................12-1
Overview................................................................................................................................12-1
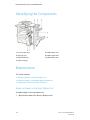
Identifying the Components........................................................................................12-2
Maintenance.......................................................................................................................12-2
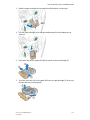
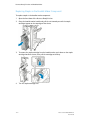
Replacing Staples in the Main Stapler Unit...............................................12-2
Replacing Staples in the Booklet Maker Component............................12-4
Emptying the Hole Punch Waste Container..............................................12-5
Troubleshooting.................................................................................................................12-7
Clearing Jams in the Finisher at Position 3a.............................................12-7
Clearing Jams in the Finisher at Position 3c.............................................12-8
Clearing Jams in the Finisher at Position 3d.............................................12-9
Clearing Jams in the Finisher at Position 4.............................................12-11
Clearing Jams in the Booklet Tray..............................................................12-12
13 Standard/Booklet Maker Finisher..................................................13-1
Standard/Booklet Maker Finisher Components....................................................13-2
Manual Decurling Feature on the Finisher................................................13-4
Folding Feature.....................................................................................................13-5
Fold Types................................................................................................................13-5
Loading Paper/Tabs in Tray T1 (Post-Process Inserter)......................................13-5
Maintenance.......................................................................................................................13-7
Standard/Booklet Maker Consumable Supplies......................................13-7
viii
Xerox® Color C60/C70 Printer
User Guide
Table of Contents
Replace the Standard Staple Cartridge.......................................................13-7
Replace the Booklet Staple Cartridge..........................................................13-9
Replacing the Staple Waste Container on the Finisher......................13-11
Empty the Punch Waste Container............................................................13-13
Finisher Problem Solving..............................................................................................13-15
Paper jams in Tray T1 (Post Process Inserter)........................................13-15
Paper Jams at Lever 1a and Knob 1c........................................................13-16
Paper Jams at Lever 1d...................................................................................13-17
Paper Jams at Lever 1b...................................................................................13-19
Paper Jams at Lever 3b and 3d...................................................................13-20
Paper Jams at Lever 3e and Knob 3c........................................................13-21
Paper Jams at Lever 3g and Knob 3f.........................................................13-22
Paper Jams at Lever 4b and Knob 3a........................................................13-23
Paper Jams at Lever 2a and Knob 3a........................................................13-24
Paper Jams at Lever 2b and Knob 2c........................................................13-26
Paper Jams at 2c, 2e, 2f, and 2d.................................................................13-27
Paper Jams at 2d and Lever 2g...................................................................13-28
Paper Jams at Unit 4 and Knob 4a............................................................13-29
Paper Jams at Finisher Top Tray..................................................................13-30
Paper Jams at Finisher Stacker Tray..........................................................13-31
Paper Jams at the Optional Booklet Maker Tray..................................13-32
Stapler Faults......................................................................................................13-33
Staple Jams in the Standard Staple Cartridge......................................13-34
Staple Jams in the Booklet Maker Cartridge..........................................13-35
Reinserting a Misaligned Standard Staple Cartridge..........................13-37
Fault Codes..........................................................................................................13-40
Specifications...................................................................................................................13-43
Standard/Booklet Maker Finisher Specifications..................................13-43
Optional C/Z Folder Specifications.............................................................13-44
14 SquareFold Trimmer Module...........................................................14-1
Overview................................................................................................................................14-1
Identifying the Components........................................................................................14-3
Main Components...............................................................................................14-3
Paper Path...............................................................................................................14-4
Control Panel..........................................................................................................14-5
Square Fold Feature..........................................................................................................14-6
Square Fold Options............................................................................................14-6
Trimmer Feature................................................................................................................14-7
Trimmer Options..................................................................................................14-8
Trim Guidelines.....................................................................................................14-9
Xerox® Color C60/C70 Printer
User Guide
ix
Table of Contents
Hints and Tips..................................................................................................................14-10
Printing Full-page Images on Booklets.....................................................14-10
Follow These Tips..............................................................................................14-11
Problem Solving...............................................................................................................14-11
Jam Clearance....................................................................................................14-11
Clearing Jams........................................................................................14-12
Clearing E1/E2 jams............................................................................14-12
Clearing E3 Jams..................................................................................14-14
Fault Codes..........................................................................................................14-15
Specifications...................................................................................................................14-17
15 Regulatory Information.....................................................................15-1
Basic Regulations..............................................................................................................15-1
United States FCC Regulations......................................................................15-1
Canada.....................................................................................................................15-2
Certifications in Europe.....................................................................................15-2
European Union Lot 4 Imaging Equipment Agreement
Environmental Information.......................................................................15-3
Environmental Information Providing Environmental
Solutions and Reducing Cost.......................................................15-3
Germany..................................................................................................................15-5
Blendschutz...............................................................................................15-5
Lärmemission...........................................................................................15-5
Importeur...................................................................................................15-5
Turkey RoHS Regulation....................................................................................15-5
Eurasian Economic Community Certification...........................................15-5
Ozone Release.......................................................................................................15-5
Wireless Compliance...........................................................................................15-6
Labeling Requirements.........................................................................15-6
Copy Regulations...............................................................................................................15-6
United States.........................................................................................................15-6
Canada.....................................................................................................................15-8
Other Countries.....................................................................................................15-9
Fax Regulations...............................................................................................................15-10
United States......................................................................................................15-10
Fax Send Header Requirements.....................................................15-10
Data Coupler Information................................................................15-10
Canada..................................................................................................................15-11
Canada CS–03 Issue 9.......................................................................15-12
European Union.................................................................................................15-12
x
Xerox® Color C60/C70 Printer
User Guide
Table of Contents
Radio Equipment and Telecommunications Terminal
Equipment Directive.....................................................................15-12
New Zealand.......................................................................................................15-13
South Africa.........................................................................................................15-14
Safety Certification........................................................................................................15-14
Material Safety Data Sheets......................................................................................15-15
16 Recycling and Disposal......................................................................16-1
All Countries.........................................................................................................................16-1
North America....................................................................................................................16-1
European Union.................................................................................................................16-1
Domestic/Household Environment...............................................................16-2
Professional/Business Environment..............................................................16-2
Collection and Disposal of Equipment and Batteries............................16-2
Business Users in the European Union..........................................16-3
Disposal Outside of the European Union......................................16-3
Battery Symbol.....................................................................................................16-3
Battery Removal...................................................................................................16-3
Other Countries..................................................................................................................16-3
Xerox® Color C60/C70 Printer
User Guide
xi
Table of Contents
xii
Xerox® Color C60/C70 Printer
User Guide
1
Safety
Your printer and the recommended supplies have been designed and tested to meet
strict safety requirements. Attention to the following information ensures the continued
safe operation of your Xerox® printer.
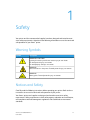
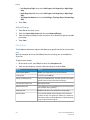
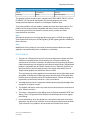
Warning Symbols
Symbol
Description
WARNING or CAUTION:
Ignoring this warning could cause serious injury or even death.
To avoid personal injury, use caution.
To avoid property damage, use caution.
WARNING:
Hot surface on or in the printer. To avoid personal injury, use caution.
WARNING:
Moving parts. To avoid personal injury, use caution.
Notices and Safety
Carefully read the following instructions before operating your printer. Refer to these
instructions to ensure the continued safe operation of your printer.
Your Xerox® printer and supplies are designed and tested to meet strict safety
requirements. Safety requirements include safety agency evaluation and certification,
and compliance with electromagnetic regulations and established environmental
standards.
Xerox® Color C60/C70 Printer
User Guide
1-1
Safety
The safety and environment testing and performance of this product have been verified
using Xerox® materials only.
Warning
Unauthorized alterations, which can include the addition of new functions or connection
of external devices, can affect the product certification. For details, contact your Xerox®
representative.
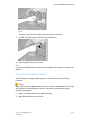
Emergency Turn Off
If any of the following conditions occur, turn off the printer immediately and disconnect
the power cord from the electrical outlet. Contact an authorized Xerox service
representative to correct the problem if:
• The equipment emits unusual odors or makes unusual noises.
• The power cable is damaged or frayed.
• A wall panel circuit breaker, fuse, or other safety device has been tripped.
• Liquid is spilled into the printer.
• The printer is exposed to water.
• Any part of the printer is damaged.
General Guidelines
Warning
Do not push objects into slots or openings on the printer. Touching a voltage point or
shorting out a part could result in fire or electric shock.
Do not remove the covers or guards that are fastened with screws unless you are installing
optional equipment and are instructed to do so. Turn off the printer when performing
these installations. Disconnect the power cord when removing covers and guards for
installing optional equipment. Except for user-installable options, there are no parts that
you can maintain or service behind these covers.
The following are hazards to your safety:
• The power cord is damaged or frayed.
• Liquid is spilled into the printer.
• The printer is exposed to water.
• The printer emits smoke, or the surface is unusually hot.
• The printer emits unusual noise or odors.
• The printer causes a circuit breaker, fuse, or other safety device to activate.
If any of these conditions occur, do the following:
1.
1-2
Turn off the printer immediately.
Xerox® Color C60/C70 Printer
User Guide
Safety
2.
Disconnect the power cord from the electrical outlet.
3.
Call an authorized service representative.
Electrical Safety
Carefully read the following instructions before operating your printer. Refer to these
instructions to ensure the continued safe operation of your printer.
Your Xerox® printer and supplies are designed and tested to meet strict safety
requirements. These include safety agency evaluation and certification, and compliance
with electromagnetic regulations and established environmental standards.
The safety and environment testing and performance of this product have been verified
using Xerox® materials only.
Warning
Unauthorized alterations, which can include the addition of new functions or connection
of external devices, can affect the product certification. For details, contact your Xerox®
representative.
Electrical Supply
The electrical supply for the device must meet the requirements stated on the data plate
on the rear of the device. If you are not sure that your electrical supply meets the
requirements, consult your local electricity provider or a licensed electrician.
Warning
The device must be connected to a grounded electrical circuit. The device is supplied
with a grounded electrical plug that fits into a grounded electrical outlet. The power
cord plug only fits into a grounded electrical outlet. The power cord design is a safety
feature. If you are unable to insert the power cord plug into your electrical outlet, consult
your local electricity provider or a licensed electrician. Always connect the device to a
properly grounded electrical outlet.
Emergency Turn Off
If any of the following conditions occur, turn off the printer immediately and disconnect
the power cord from the electrical outlet. Contact an authorized Xerox service
representative to correct the problem if:
• The equipment emits unusual odors or makes unusual noises.
• The power cable is damaged or frayed.
• A wall panel circuit breaker, fuse, or other safety device has been tripped.
• Liquid is spilled into the printer.
Xerox® Color C60/C70 Printer
User Guide
1-3
Safety
• The printer is exposed to water.
• Any part of the printer is damaged.
Power Cord Safety Information
Carefully read the following instructions before operating your printer. For details, contact
your Xerox representative.
Warning
The electrical supply for the device must meet the requirements stated on the data plate
on the rear of the device. If you are not sure that your electrical supply meets the
requirements, consult your local electricity provider or a licensed electrician.
Do not use an extension cord.
Do not remove or modify the power cord.
Refer to these instructions to ensure the continued safe operation of your printer.
• Use the power cord supplied with your printer.
• Plug the power cord directly into a properly grounded electrical outlet. Ensure that
each end of the cord is connected securely. If you do not know if an outlet is grounded,
ask an electrician to check the outlet.
• Do not use a ground adapter plug to connect the printer to an electrical outlet that
does not have a ground connection terminal.
Warning
Avoid the potential of electrical shock by ensuring that the printer is grounded properly.
Electrical products can be hazardous if misused.
• Verify that the printer is plugged into an outlet that is providing the correct voltage
and power. Review the electrical specification of the printer with an electrician if
necessary.
• Do not place the printer in an area where people can step on the power cord.
• Do not place objects on the power cord.
• Replace the power cord if it becomes frayed or worn.
• Do not unplug or plug the power cord while the printer is turned on.
• To avoid electrical shock and damage to the cord, grasp the plug when unplugging
the power cord.
• The electrical outlet must be near the printer and must be easily accessible.
The power cord is attached to the printer as a plug-in device on the back of the printer.
If it is necessary to disconnect all electrical power from the printer, disconnect the power
cord from the electrical outlet. For details, see Turning Off the Printer.
1-4
Xerox® Color C60/C70 Printer
User Guide
Safety
Operational Safety
Your printer and supplies were designed and tested to meet strict safety requirements.
These include safety agency examination, approval, and compliance with established
environmental standards.
Your attention to the following safety guidelines helps to ensure the continued, safe
operation of your printer.
Printer Location
• Place the printer on a level, solid, non-vibrating surface with adequate strength to
hold the weight of the printer. To find the weight for your printer configuration, see
Physical Specifications.
• Do not block or cover the slots or openings on the printer. These openings are provided
for ventilation and to prevent overheating of the printer.
• Place the printer in an area where there is adequate space for operation and servicing.
• Place the printer in a dust-free area.
• Do not store or operate the printer in an extremely hot, cold, or humid environment.
• Do not place the printer near a heat source.
• Do not place the printer in direct sunlight to avoid exposure to light-sensitive
components.
• Do not place the printer where it is directly exposed to the cold air flow from an air
conditioning system.
• Do not place the printer in locations susceptible to vibrations.
Operational Guidelines
• Do not remove the paper source tray that you selected using either the print driver
or Control Panel while the printer is printing.
• Do not open the doors when the printer is printing.
• Do not move the printer when it is printing.
• Keep hands, hair, neckties, and so on, away from the exit and feed rollers.
• Covers, which require tools for removal, protect the hazard areas within the printer.
Do not remove the protective covers.
• Ensure that the rear right cover is attached. Open this cover when connecting an
interface cable.
Xerox® Color C60/C70 Printer
User Guide
1-5
Safety
Consumable Information
• Store all supplies in accordance with the instructions given on the package or
container.
• Keep all supplies away from the reach of children.
• Never throw toner, print/drum cartridges, or toner containers into an open flame.
• When handling supplies, avoid skin or eye contact. Eye contact can cause irritation
and inflammation.
• Do not attempt to disassemble supplies, which can increase the risk of skin or eye
contact.
Caution
Use of non-Xerox supplies is not recommended. The Xerox Warranty, Service Agreement,
and Total Satisfaction Guarantee do not cover damage, malfunction, or degradation
of performance caused by use of non-Xerox supplies, or the use of Xerox supplies not
specified for this printer. The Total Satisfaction Guarantee is available in the United
States and Canada. Coverage could vary outside these areas. Please contact your Xerox
representative for details.
Vacuum Cleaner Use for Toner Spills
Use a broom or wet cloth to wipe off spilled toner. To minimize generation of dust
particles, sweep or wipe slowly. Avoid using a vacuum. If you must use a vacuum, ensure
the unit is designed to contain combustible dusts. Ensure that the vacuum includes an
explosion rated motor and non-conductive hose.
Ozone Release
This printer produces ozone during normal operation. The amount of ozone produced
is dependent on copy volume. Ozone is heavier than air and is not produced in amounts
large enough to harm anyone. Install the printer in a well-ventilated room.
For more information in the United States and Canada, go to
www.xerox.com/environment. In other markets, please contact your local Xerox
representative or go to www.xerox.com/environment_europe.
1-6
Xerox® Color C60/C70 Printer
User Guide
Safety
Maintenance Safety
Your Xerox® printer and supplies are designed and tested to meet strict safety
requirements. Safety requirements include safety agency evaluation and certification,
and compliance with electromagnetic regulations and established environmental
standards. Refer to these instructions to ensure the continued safe operation of your
printer. For details, contact your Xerox® representative.
• Follow all warnings and instructions marked on, or supplied with, the product, options,
and supplies.
• Do not attempt any maintenance procedure that is not specifically described in the
documentation supplied with your printer.
• Always exercise care when moving or relocating your printer. Contact your Xerox®
representative to arrange the relocation of your printer.
• Never throw toner, print/drum cartridges, or toner containers into an open flame.
Warning
Before cleaning the printer, unplug it from the electrical outlet.
Do not use aerosol cleaners. Aerosol cleaners can cause explosions or fires when used
on electromechanical equipment.
The metallic surfaces in the fuser area are hot. To avoid personal injury, use caution.
Do not attempt to remove paper that is jammed deeply inside the product. Switch off
the product promptly and contact your local Xerox® representative.
Do not apply excessive force on the document glass.
Do not override any electrical or mechanical interlock devices.
Xerox® Color C60/C70 Printer
User Guide
1-7
Safety
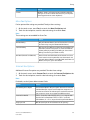
Printer Symbols
Symbol
Description
WARNING or CAUTION:
Ignoring this warning could cause serious injury or even death.
To avoid personal injury, use caution.
To avoid property damage, use caution.
WARNING:
Hot surface on or in the printer. To avoid personal injury, use caution.
Do not burn the waste container.
Do not expose the drum cartridge to light for more than 10 minutes.
Do not touch the drum cartridge.
Hot surface. Wait the indicated time before handling.
WARNING:
Moving parts. To avoid personal injury, use caution.
Environmental, Health, and Safety
Contact Information
For more information on Environment, Health, and Safety in relation to this Xerox product
and supplies, contact the following customer help lines:
United States and Canada:
1-800-ASK-XEROX (1-800-275-9376)
Europe:
+44 1707 353 434
For product safety information in the United States and Canada, go to
www.xerox.com/environment.
For product safety information in Europe, go to www.xerox.com/environment_europe.
1-8
Xerox® Color C60/C70 Printer
User Guide
2
Product Overview
This chapter contains the following sections:
• Introduction
• Printer Configurations
• Parts of the Printer
• Standard Features
• Energy Saver Mode
• Printer Information
• Consumables
• Optional Accessories
• Getting Additional Information
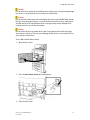
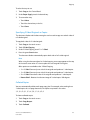
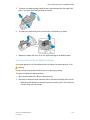
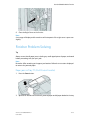
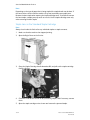
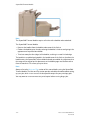
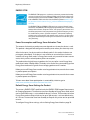
Introduction
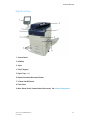
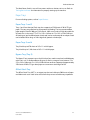
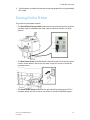
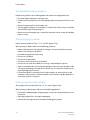
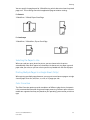
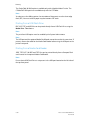
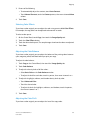
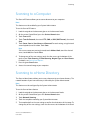
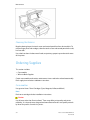
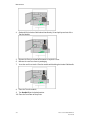
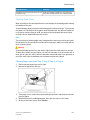
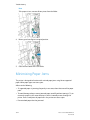
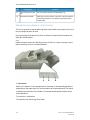
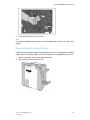
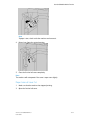
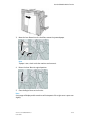
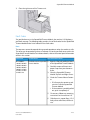
The Xerox Color C60/C70 shown alone and configured with the following: 2-drawer
OHCF, Vertical Transport, CZ-Folder, and Business Ready Finisher with Booket Maker.
Xerox® Color C60/C70 Printer
User Guide
2-1
Product Overview
Your machine is not simply a conventional copier. It is a digital light production printer
capable of being used for copying, scanning, faxing and printing documents both in
color and in black and white.
The Control Panel user interface on the printer is an easy-to-use touch screen for adjusting
settings and performing tasks.
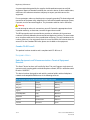
Printer Configurations
Printer Model/Configuration
Description
The Xerox Color 60
This printer model prints at speeds of up to 65 ppm for Black
and white, and up to 60 ppm for color
The Xerox Color 70
This printer model prints at speeds of up to 75 ppm for Black
and white, and up to 70 ppm for color
Parts of the Printer
This section includes:
•
•
•
•
•
•
•
2-2
Right-Front View
Right-Rear View
Document Feeder
Control Panel
Internal Components
Paper Trays
Telephone and Fax Connection Option
Xerox® Color C60/C70 Printer
User Guide
Product Overview
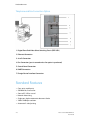
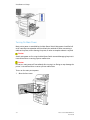
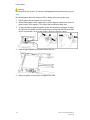
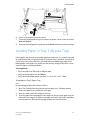
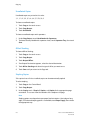
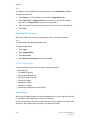
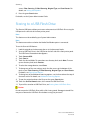
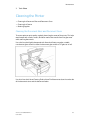
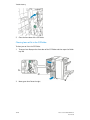
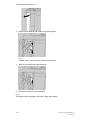
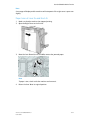
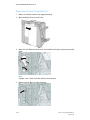
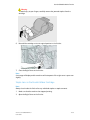
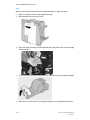
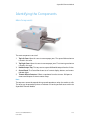
Right-Front View
1. Control Panel
2. USB Port
3. Stylus
4. Tray 5 (Bypass)
5. Paper Trays 1 - 4
6. Duplex Automatic Document Feeder
7. 5. Power On/Off Button
8. Front Cover
9. Main Power Switch (located behind front cover). See Internal Components.
Xerox® Color C60/C70 Printer
User Guide
2-3
Product Overview
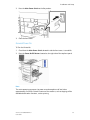
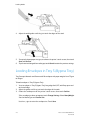
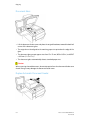
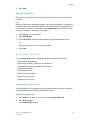
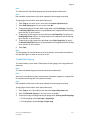
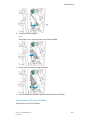
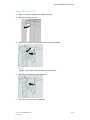
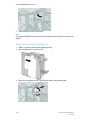
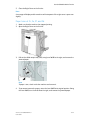
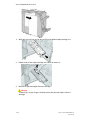
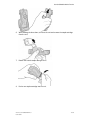
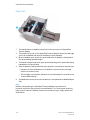
Right-Rear View
1. Output Tray
2. Power Cord
3. Ground Fault Interrupt Switch
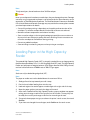
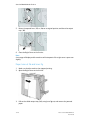
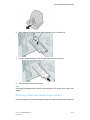
Duplex Automatic Document Feeder
1. Document Feeder Tray
2-4
Xerox® Color C60/C70 Printer
User Guide
Product Overview
2. Document Guides
3. Confirmation Indicator
4. Top Cover
Note
The Document Glass is located under the Top Cover and is used for scanning, faxing
and copying. Use for single pages or paper that cannot be fed using the Document
Feeder.
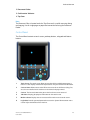
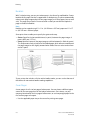
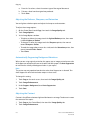
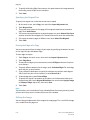
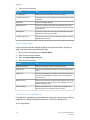
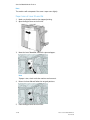
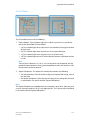
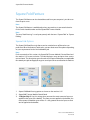
Control Panel
The Control Panel contains a touch screen, pathway buttons, a keypad and feature
buttons.
1
Touch Screen. The touch screen allows you to select all the available programming
features. It also displays fault clearance procedures and general machine information.
2
Services Home. Allows access to the All Services screen where all features (Copy, Fax,
etc.) that are installed on the machine can be viewed and programmed.
3
Services. The Services button takes you to the last Service screen accessed.
4
Job Status. Displays job progress information on the touch screen.
5
Machine Status. Displays the current status of the machine on the touch screen.
6
Log In/Out. Provides password protected access to the System Administration menu
used to adjust the defaults of the machine.
Xerox® Color C60/C70 Printer
User Guide
2-5
Product Overview
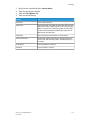
7
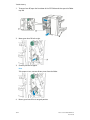
Energy Saver Button. If the Energy Saver option is selected, the machine will immediately enter an energy saving mode. If there are any jobs in the queue, a second pop-up
screen displays.
8
Clear All. If pressed once, resets the default settings and displays the first screen for
the current pathway. If pressed twice, resets all the features to their machine default
settings.
9
Stop. Temporarily stops the current job. Follow the message to cancel or resume your
job.
10
Start. Starts the job.
11
Interrupt. Temporarily stops the current job to allow a priority job to be run.
12
Keypad buttons. Type letters and/or numbers when entering values or a password.
13
Language. Press to change the touch screen language and keyboard settings.
14
Help. Access the Online Help system.
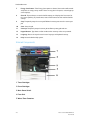
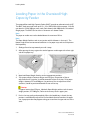
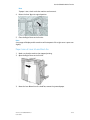
Internal Components
1. Toner Cartridges
2. Drum Cartridges
3. Main Power Switch
4. Fuser Unit
5. Waste Toner Container
2-6
Xerox® Color C60/C70 Printer
User Guide
Product Overview
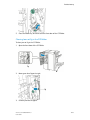
The Main Power Switch is one of three power switches or buttons to turn on. Refer to
Turning On the Printer for information on properly starting up the machine.
Paper Trays
For more feeding options, refer to Input Devices.
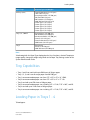
Paper Trays 1 and 2
Trays 1 and 2 are identical. Each tray has a capacity of 520 sheets of 20 lb./75 gsm
paper. The trays are pulled out by the operator for loading. The trays accommodate
paper weights from 64-300 gsm (18 lb. bond - 80 lb. cover) and are fully adjustable for
all stock sizes in the range 7.2 x 5.5 in./182 x 140 mm to 13 x 19.2 in./330 x 488 mm.
All stock types (pre-formatted paper, letterhead) can be used except for envelopes. Stock
can be loaded either long- or short-edge feed (portrait or landscape).
Paper Trays 3 and 4
Tray 3 holds up to 870 sheets of 8.5 x 11 inch/A4 paper.
Tray 4 holds up to 1,140 sheets of 8.5 x 11 inch/A4 paper.
Bypass Tray (Tray 5)
The Bypass Tray is a paper tray on the left side of your machine and can be folded away
when not in use. It accommodates all types of stock in a range of sizes between 7.2 x
5.5 in./182 x 140 mm to 13 x 19.2 in./330 x 488 mm and has a capacity of approximately
250 sheets of 20 lb./75 gsm bond paper or a maximum stack height of 0.4.
Offset Catch Tray
The Offset Catch Tray (OCT) is an output tray that can hold up to 500 sheets of paper
and allows each set or stack to be offset from the previous to enable easy separation.
Xerox® Color C60/C70 Printer
User Guide
2-7
Product Overview
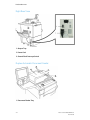
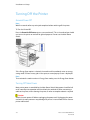
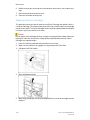
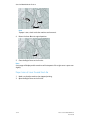
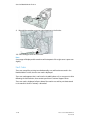
Telephone and Fax Connection Option
1. Digital Front End Video Select Switching Circuit (DFE VSEL)
2. Ethernet Connection
3. A to D Connection
4. Fax Connection (port is covered unless fax option is purchased)
5. Control Panel Connection
6. DADF Connection
7. Foreign Device Interface Connection
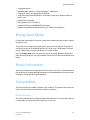
Standard Features
•
•
•
•
•
•
•
2-8
Copy, print, mobile print
Standard fax, Internet fax
Scan to PC, USB, or e-mail
Network Accounting
Single-pass, duplex automatic document feeder
2400 x 2400 dpi resolution
Automatic 2-sided printing
Xerox® Color C60/C70 Printer
User Guide
Product Overview
•
•
•
•
•
•
•
•
Integrated scanner
Standard paper capacity (4 Trays and Bypass): 3,260 sheets
Color touch screen on integrated Control Panel
Xerox Extensible Interface Platform® to connect to third-party software from the
touch screen
Foreign Device Interface
PDL Support for PCL 5 and PCL 6
Support for Ethernet 10/100BaseTX connection
Support for coated and uncoated stock, up to 110 lb cover (300 gsm)
Energy Saver Mode
Energy Saver mode reduces the printer's power consumption when the printer is inactive
for a preset time.
The printer enters energy saving mode after a preset time has elapsed. If no jobs are
sent to the printer for an additional preset time, it then enters Sleep Mode. The touch
screen is dark and the Energy Saver button is lit in both modes.
Press the Energy Saver button to return the printer to normal operation. Receipt of a
job or accessing the printer using CentreWare Internet Services also cancels Power Saver
mode.
Printer Information
Your printer provides status information from the touch screen on the Control Panel and
in printed reports. Usage and billing information are also available from the touch screen.
For details, see Billing and Usage Information.
Consumables
There are several Consumables included in your machine. The machine will inform you
when you need to order a new module and when to install it.
Drum Cartridges
The machine display and this documentation will enable you to successfully install the
new cartridges so you do not have to wait for a service call.
Xerox® Color C60/C70 Printer
User Guide
2-9
Product Overview
Toner Cartridges
The Toner Cartridges can be loaded while the machine is running. Supplied with the
toner cartridge is the waste toner container.
Fuser
The fuser will provide approximately 200,000 prints or copies.
Charge Corotron
The machine display and this documentation will enable you to successfully install the
new Charge Corotron so you do not have to wait for a service call.
Waste Toner Container
The waste toner container will need changing after approximately 30,000 prints or
copies at 6% area coverage.
Optional Accessories
Input Devices
These optional input devices are compatible with your printer.
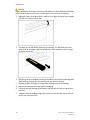
High-Capacity Feeder
The one-tray, high-capacity feeder (HCF) provides a 2,000 sheet,
letter-size (A4) input feeding source (Tray 6).
2-10
Xerox® Color C60/C70 Printer
User Guide
Product Overview
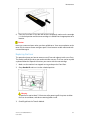
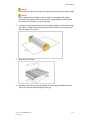
Oversized High-Capacity Feeder
The one-tray or two-tray oversized high-capacity
feeder (OHCF) is an alternative to the high-capacity feeder. It feeds oversized stock up to 13 x
19 in. (330 x 488 mm) paper. Each drawer holds
2,000 sheets of standard weight paper.
Finishing Devices
Your printer is compatible with any of the following finishing devices.
Business Ready Finisher
The Business Ready finisher supports hole punching and stapling.
The Right Top Tray is used for stacked output, and can receive
up to 500 sheets of paper. The Stacker is used for offset and/or
stapled output, and can hold up to 3,000 sheets.
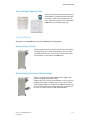
Business Ready Finisher with Booklet Maker
The Business Ready finisher with booklet maker supports hole
punching, stapling, and booklet making.
The Right Top Tray is used for stacked output, and can receive up
to 500 sheets of paper. The Right Center Tray is used for offset
and/or stapled output and can hold up to 1,500 sheets. Both trays
can be used for hole punched output (optional). The Bottom Finisher Tray is used for receiving saddle-stapled booklets.
Xerox® Color C60/C70 Printer
User Guide
2-11
Product Overview
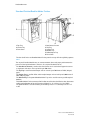
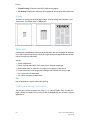
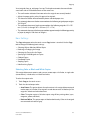
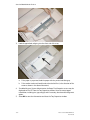
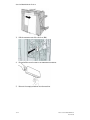
Standard Finisher/Booklet Maker Finisher
1 Top Tray
2 Stacker Tray
3 Front Cover
1 Post Process Inserter
2 Top Tray
3 Stacker Tray
4 Booklet Tray
5 Folder Output Tray
6 Front Cover
The Standard Finisher and Booklet Maker Finisher provide a range of finishing/folding options.
Note
The required Interface Module acts as a communication device and paper path between the
printer and the Light Production C Finishers. It is required for both finishers.
The Post Process Inserter is standard on these devices and is used to load paper that serves
as separators and covers. This tray holds up to 200 sheets.
The Top Tray is used for stacked output and can receive up to 500 sheets of 20 lb. (80 gsm)
paper.
The Stacker Tray is used for offset and/or stapled output and can hold up to 3,000 sheets of
20 lb. (80 gsm) paper.
The Bottom Tray is the optional Booklet Maker Tray and is used for receiving saddle-stapled
booklets.
The Booklet Maker Finisher contains all of the features of the Standard Finisher but also creates
saddle stitched bookets of up to 25 sheets and from 8.5 x 11 in./A4 or 12 x 18 in./SRA3.
The optional Folder is used for C-folding and Z-folding of 8.5 x 11 in./A4 output and 11 x 17
in./A3.
2-12
Xerox® Color C60/C70 Printer
User Guide
Product Overview
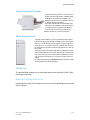
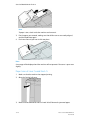
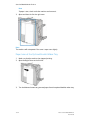
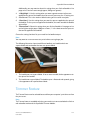
Xerox® SquareFold® Trimmer
This optional finishing device is used in conjunction with a finisher that contains a booklet maker.
The booklet is assembled and stapled in the
booklet area of the finisher and enters the Trimmer Module already assembled.
The trimmer module flattens the booklet spine
which reduces the booklet’s thickness and gives
it the appearance of a perfect-bound book. It
then trims/cuts away the face (edge) of the
booklet, resulting in a neat finished edge.
GBC® AdvancedPunch™
The GBC® AdvancedPunch™ finishing module provides another
level of finishing to your output by allowing you to punch holes
in 8.5 x 11 in./A4 documents that support a variety of binding
styles. For 8.5 x 11 in media, the punch supports from 19 holes
to a maximum of 32 holes. A4 media supports from 21 holes up
to 47 holes.
This device requires an Interface Module and a follow-on finisher.
The Interface Module uncurls paper and provides a communication hub to the print engine and controller. A follow-on finisher,
such as the Standard Finisher, is necessary to gather punched
output.
For more information, go to www.xerox.com and select the GBC
AdvancedPunch User Documentation.
CZ Fold Unit
The optional folder enables you to create publications featuring bi-fold, C-fold, Z-fold,
and Engineering Z-fold.
Required Finishing Accessories
Depending on the type of finishing device you use, one of the following accessories may
also be required.
Xerox® Color C60/C70 Printer
User Guide
2-13
Product Overview
Interface Module
The interface module acts as a communication device and provides
a paper path between the printer and the finishing device.
The interface module is required for use with the Standard Finisher,
the Booklet Maker Finisher, and the GBC Punch.
Vertical Transport Module
The vertical transport module acts as a communication device and
provides a vertical transport path between the printer output location
and the input to the finishing device.
The vertical transport module is required for use with the Business Ready
Finisher and the Business Ready Finisher with Booklet Maker.
Getting Additional Information
Refer to the following sources for more information about your printer and its capabilities.
• Recommended Media List:
-
For the United States:
www.xerox.com/printer-supplies/recommended-paper/enus.html
-
For the European Union: www.xerox.com/europaper
• User Guide (PDF) Software and Documentation: www.xerox.com/support. Enter
Xerox Color C60/C70 Printer in the Search or Choose field and select the desired
documentation.
• Online Support Assistant, driver downloads, and Technical support:
www.xerox.com/Support
• Ordering Supplies: www.xerox.com/Supplies
2-14
Xerox® Color C60/C70 Printer
User Guide
3
Installation and Setup
This chapter contains the following sections:
•
•
•
•
•
•
Before Using the Printer
Installation and Setup Overview
Physical Connection
Turning On the Printer
Turning Off the Printer
Assigning a Network Address
• Using CentreWare Internet Services
Before Using the Printer
Xerox Welcome Center
If you need assistance during or after product installation, visit the Xerox website for
online solutions and support: www.xerox.com/office/worldcontacts.
If you require further assistance, contact our experts at the Xerox Welcome Center:
• Xerox US Welcome Center: 1-800-821-2797
• Xerox Canada Welcome Center: 1-800-93-XEROX (1-800-939-3769)
Note
A local representative telephone number may have been provided when the product
was installed. For convenience and future reference, record the telephone number.
When contacting Xerox, the Welcome Center will need the following information:
• the nature of the problem
• the serial number of the printer
• the fault code (if any)
Xerox® Color C60/C70 Printer
User Guide
3-1
Installation and Setup
• the name and location of your company
To learn the serial number of the printer, follow these steps:
1.
2.
On the Control Panel, press Machine Status.
The Machine Information tab appears. The serial number is displayed on the left
side of the touch screen.
Note
If the serial number cannot be read from the printer's touch screen, it can also be
found on the machine frame inside the lower left cover of the printer.
If you need any additional help using your printer:
• Refer to this User Guide.
• Contact the Key Operator.
• Visit our Customer Website at www.support.xerox.com/support (enter Xerox Color
C60/C70 Printer in the Search or Choose field and select the desired documentation)
or contact the Xerox Welcome Center.
Installation and Setup Overview
Before you can use the printer, you must:
1.
2.
3.
Make sure the printer is connected correctly and switched on.
Install software print drivers and utilities.
Configure the software.
Note
Instructions for installing the print drivers, utilities, and setting up the network are
provided in the System Administrator’s Guide.
Locate the System Administrator Guide at www.xerox.com/support. Enter Xerox Color
C60/C70 Printer in the Search or Choose field and select the desired documentation.
Physical Connection
You can connect to the printer over a network. Connect to a functioning and dedicated
fax telephone line for the optional fax. Communication cables are not included with the
printer and must be purchased separately.
To physically connect the printer:
1.
2.
3-2
Connect the power cable to the printer, and plug it into an electrical outlet.
Connect one end of a Category 5 (or better) Ethernet cable to the Ethernet port on
the left side of the printer. Connect the other end of the cable to your network drop.
Xerox® Color C60/C70 Printer
User Guide
Installation and Setup
3.
If the fax option is installed, connect to a functioning telephone line using a standard
RJ11 cable.
Turning On the Printer
The printer has three power switches:
• The Ground Fault Interrupt Switch, located on the right side of the printer and near
the power cord. At installation and setup, make sure that this switch is in the On
position.
• The Main Power Switch, located behind the front cover door. Verify that this switch
is also in the On Position. Do not use this switch to turn the printer on and off for
general purposes.
• The Power On/Off Button, located on the right side of the top front panel. This is
the power button you will use to turn the printer on and off as workflow requires.
Xerox® Color C60/C70 Printer
User Guide
3-3
Installation and Setup
Turning On Main Power
Main printer power is controlled by the Main Power Switch. Main power should be left
on for normal printer operation and should only be switched off when connecting a
cable to the printer, when cleaning the printer, or when a complete reboot is required.
Caution
Switch main power on first using the Main Power Switch to avoid damaging the printer's
internal hard drive or causing a printer malfunction.
Caution
Do not turn main power off immediately after turning it on. Doing so may damage the
printer's internal hard drive or cause a printer malfunction.
To turn on the main printer power:
1.
3-4
Open the front cover.
Xerox® Color C60/C70 Printer
User Guide
Installation and Setup
2.
Press the Main Power Switch to the On position.
3.
Close the front cover.
General Power On
To Turn the Printer On:
1.
2.
Check that the Main Power Switch, located inside the front cover, is turned On.
Press the Power On/Off button, located on the right side of the top front panel.
Note
The entire powering-up process (to power on and complete a self-test) takes
approximately 3 minutes. Certain functions of the machine, such as copying, will be
available before other functions, such as printing.
Xerox® Color C60/C70 Printer
User Guide
3-5
Installation and Setup
Turning Off the Printer
General Power Off
Note
Wait five seconds after any active job completes before switching off the printer.
To Turn the Printer Off:
Press the Power On/Off button to turn your machine off. This is the method you should
use to turn the printer on and off for general purposes. Do not use the Main Power
Switch.
If the Energy Saver option is selected, the machine will immediately enter an energy
saving mode. If there are any jobs in the queue, a second pop-up screen is displayed.
Note
To re-activate the machine when in Energy Saver mode, press the Energy Saver button.
Turning Off Main Power
Main printer power is controlled by the Main Power Switch. Main power should be left
on for normal printer operation and should only be switched off when connecting a
cable to the printer, when cleaning the printer, or when a complete reboot is required.
Caution
Switch the main power off before unplugging the power cord. Unplugging the power
cord with the main power on may damage the printer's internal hard drive or cause a
printer malfunction.
3-6
Xerox® Color C60/C70 Printer
User Guide
Installation and Setup
Caution
Do not switch main power off immediately after switching it on. Doing so may damage
the printer's internal hard drive or cause a printer malfunction.
Caution
Do not switch the main power off immediately after pressing the On/Off Power Button.
Doing so may damage the printer's internal hard drive or cause a printer malfunction.
Instead, wait until the Control Panel touch screen goes dark, wait an additional 10
seconds, and then turn off the main power.
Caution
Do not switch off the main power while a job is being processed or while the Energy
Saver button is blinking. This may cause damage to the printer's internal hard drive or
cause a printer malfunction.
To turn Off the Main Power Switch:
1.
Open the front cover.
2.
Press the Main Power Switch to the Off position.
3.
Close the front cover.
Xerox® Color C60/C70 Printer
User Guide
3-7
Installation and Setup
Assigning a Network Address
If the network uses a DHCP server, the printer automatically acquires a network address.
To assign a static IP address, configure DNS server settings, or configure other TCP/IP
settings, refer to the System Administrator Guide at www.xerox.com/support. Enter Xerox
Color C60/C70 Printer in the Search or Choose field and select the desired
documentation.
Using CentreWare Internet Services
CentreWare Internet Services provides access to the printer’s embedded Web server. It
enables you to easily manage, configure, and monitor the printer using a Web browser
on a network computer.
CentreWare Internet Services enables you to:
•
•
•
•
Access printer status, configuration, and security settings
Check supplies status from your computer
Access job accounting records to allocate printing costs and plan supplies purchases
Retrieve scanned document files stored in the printer
Note
Some printer capabilities must be enabled using CentreWare Internet Services. Unless
your system administrator has unlocked the printer, you will need to log in as an
administrator to access these settings.
CentreWare Internet Services requires:
• A Web browser and a TCP/IP connection between the printer and the network (in
Windows, Macintosh, or UNIX environments).
• JavaScript must be enabled in the Web browser. If JavaScript is disabled, a warning
message appears and CentreWare Internet Services may not function properly.
• TCP/IP and HTTP must be enabled in the printer.
For details, refer to the System Administrator Guide at www.xerox.com/support. Enter
Xerox Color C60/C70 Printer in the Search or Choose field and select the desired
documentation.
Finding the Printer's IP Address
The printer's IP address is required to use CentreWare Internet Services. If you do not
know the IP Address, print the Configuration Report. The printer's IP address appears
in the Communication Settings section.
3-8
Xerox® Color C60/C70 Printer
User Guide
Installation and Setup
To print the Configuration Report:
1.
2.
3.
4.
At the Control Panel, press the Machine Status button.
Touch the Machine Information tab, then touch Print Reports.
Touch Printer Reports, touch Configuration Report, then press the green Start
button on the Control Panel.
After the report prints, touch Close.
Accessing CentreWare Internet Services
1.
2.
3.
Make sure the printer is connected correctly and switched on.
At your computer, open a Web browser.
Type the IP address of the printer in the Web browser's address field.
The CentreWare Internet Services Welcome page appears.
Xerox® Color C60/C70 Printer
User Guide
3-9
Installation and Setup
3-10
Xerox® Color C60/C70 Printer
User Guide
4
Loading Media
This section includes the following:
• Accepted Media
• Paper Types/Weights Accepted in Trays
• Tray Capabilities
• Loading Paper in Trays 1-4
• Loading Paper in Tray 5 (Bypass Tray)
• Loading Envelopes in Tray 5 (Bypass Tray)
• Loading Paper in the High Capacity Feeder
• Loading Paper in the Oversized High Capacity Feeder
• Loading Paper in the Post-Process Inserter
Accepted Media
Your printer is designed to be used with a variety of media types. Follow the guidelines
in this section to ensure the best print quality and to avoid jams. For best results, use
Xerox printing media specified for your printer.
Recommended Media
A complete list of recommended media types is available at:
• http://www.xerox.com/printer-supplies/recommended-paper/enus.html.
• http://www.xerox.co.uk/printer-supplies/printer-papers/engb.html. Select Colour
Presses and select the appropriate Production device.
Xerox® Color C60/C70 Printer
User Guide
4-1
Loading Media
General Media Loading Guidelines
Follow these guidelines when loading paper and media in the appropriate trays:
• Fan paper before loading it in the paper tray.
• Do not overfill the paper trays. Do not load paper above the maximum fill line in the
tray.
• Adjust the paper guides to fit the paper size.
• Use only paper envelopes. Print envelopes 1-sided only. Use Tray 5 to print envelope
and set Media Type to Heavyweight 2.
• Make sure the correct paper type is selected on the printer’s touch screen after loading
paper in a tray.
Printing/Copying on Labels
Labels can be printed from Trays 1, 2, 3, 4, and 5 (Bypass Tray).
When printing on labels, adhere to the following guidelines:
• Rotate stock frequently. Long periods of storage in extreme conditions can cause
labels to curl and jam in the printer.
• Use labels designed for laser printing.
• Do not use vinyl labels.
• Do not use dry gum labels.
• Print only on one side of the sheet of labels.
• Do not use any sheet where labels are missing; it may damage the printer.
• Store unused labels flat in their original packaging. Leave the sheets of labels inside
the original packaging until ready to use. Return any unused sheets of labels to the
original packaging and reseal it.
• Do not store labels in extremely dry or humid conditions or extremely hot or cold
conditions. Storing them in extreme conditions may cause print quality problems or
cause them to jam in the printer.
Printing/Copying on Glossy Paper
Glossy paper can be printed from Tray 1, 2, 3, 4, and 5 (Bypass Tray).
When printing on glossy paper, adhere to the following guidelines:
• Do not open sealed packages of glossy paper until you are ready to load them into
the printer.
• Store glossy paper flat in the original packaging.
• Remove all other paper from the tray before loading glossy paper.
4-2
Xerox® Color C60/C70 Printer
User Guide
Loading Media
• Load only the amount of glossy paper you plan to use and remove the unused portion
from the tray when you are finished printing. Replace the unused portion in the
original wrapper and seal for later use.
• Rotate stock frequently. Long periods of storage in extreme conditions can cause
glossy paper to curl and jam in the printer.
Media That Can Damage Your Printer
Your printer is designed to use a variety of paper and media types for print jobs. However,
some media can cause poor output quality, increased paper jams, or damage to your
printer.
Do not use the following:
•
•
•
•
•
•
•
•
•
Rough or porous media
Inkjet paper
Paper that has been photocopied
Paper that has been folded or wrinkled
Paper with cutouts or perforations
Stapled paper
Envelopes with windows, metal clasps, side seams, or adhesives with release strips
Padded envelopes
Plastic media
Paper Storage Guidelines
Providing good storage conditions for your paper and other media contributes to optimum
print quality.
• Store paper in dark, cool, relatively dry locations. Most paper is susceptible to damage
from ultraviolet and visible light. Ultraviolet light, which is emitted by the sun and
fluorescent bulbs, is particularly damaging to paper.
• The intensity and length of exposure to visible light on paper should be reduced as
much as possible.
• Maintain constant temperatures and relative humidity.
• Avoid storing paper in attics, kitchens, garages, or basements. These spaces are more
likely to collect moisture.
• Store paper flat, either on pallets, cartons, shelves, or in cabinets.
• Avoid having food or drinks in the area where paper is stored or handled.
• Do not open sealed packages of paper until you are ready to load them into the
printer. Leave stored paper in the original packaging. The paper wrapper usually
contains an inner lining that protects the paper from moisture loss or gain.
• Some specialty media is packaged inside resealable plastic bags. Store the media
inside the bag until you are ready to use it. Keep unused media in the bag and reseal
it for protection.
Xerox® Color C60/C70 Printer
User Guide
4-3
Loading Media
Paper Types/Weights Accepted in Trays
When loading media in a paper tray, refer to the following chart for the paper types and
weights that are accepted in each of the feeder paper trays available. Select the
appropriate tray depending on the media you plan to use.
Note
The Oversize High Capacity Feeder (OHCF) provides the best feeding performance,
especially for coated media.
Paper Type weight range can be selected in one of two ways:
• Select the Paper Type from the following table and apply the proper weight range
using the options available from the Control Panel screen, or
• Select Other Media Selection... and select the specific media weight range from the
available list on the Control Panel screen. Some features such as Printing Reports or
Auto Tray Switching may be limited.
Note
If you want to define the image quality setting with a different paper weight range to
optimize image quality, refer to the Paper Tray Settings section of the System
Administrator Guide.
Paper Trays
Accepted Types and Weights
All Trays
Other Media Selection...
All Trays (cont.)
Plain (64-79 gsm)*
Plain Reloaded (64-79 gsm) *
Recycled (64-79 gsm) *
Hole Punched (64-79 gsm) *
Pre-Printed
Letterhead
Other Type
Heavyweight 1 (106-128 gsm) *
HW 1 Reloaded (106 -128 gsm) *
Heavyweight 2(177-220 gsm)
All Trays (cont.)
HW 2 Reloaded (177-220 gsm)
Heavyweight 3 (221-256 gsm)
HW 3 Reloaded (221-256 gsm)
Hole Punched HW 1 (106-128 gsm) *
Hole Punched HW 2 (177-220 gsm)
Hole Punched HW 3 (221-256 gsm)
Coated 1 (106 -128 gsm) *
Coated 1 Reloaded (106-128 gsm) *
Coated 2 (151-176 gsm) *
4-4
Xerox® Color C60/C70 Printer
User Guide
Loading Media
Paper Trays
Accepted Types and Weights
All Trays (cont.)
Coated 2 Reloaded (151-176 gsm) *
Labels (106-128 gsm) *
Heavyweight Labels (177-220 gsm)
Tab Stock (106-128 gsm) *
HW Tab Stock (177-220 gsm)
X-HW Tab Stock (221-256 gsm)
Custom Type 1 (64-79 gsm)
Custom Type 2 (64-79 gsm)
Custom Type 3 (64-79 gsm)
Custom Type 4 (64-79 gsm)
Custom Type 5 (64-79 gsm)
Trays 5, 6, 7, OHCF
Heavyweight 4 (257-300 gsm)
HW 4 Reloaded (257-300 gsm)
Hole Punched HW 4 (257-300 gsm)
Coated 3 (221-256 gsm) *
Coated 3 Reloaded (221-256 gsm) *
X-HW Labels (221-256 gsm) *
Tray 5
Transparency
Transfer (129-150 gsm) *
X-HW Tab Stock (257-300 gsm)
Note
*Media weight for this Paper Type displayed on the User Interface is limited. To optimize
image quality, change the weight range. Refer to the Paper Tray Settings section of the
System Administrator Guide.
Tray Capabilities
•
•
•
•
•
•
•
•
Trays 1 and 2 can each hold up to 500 sheets of 90 gsm paper.
Trays 1, 2, 3, and 4 can all accept paper from 60-220 gsm.
Tray 1 can accommodate paper sizes from 5.5" x 8.5" to 12" x 18" /SRA3.
Tray 2 can accommodate paper sizes from 5.5" x 8.5" to 11" x 17" /A3.
Tray 3 can hold up to 870 sheets of 90 gsm paper.
Tray 3 can accommodate paper sizes including 8.5" x 11"/A4, 7.25" x 10.5", and B5.
Tray 4 can hold up to 1140 sheets of 90 gsm paper.
Tray 4 can accommodate paper sizes including 8.5" x 11"/A4, 7.25" x 10.5", and B5.
Loading Paper in Trays 1 - 4
To load paper:
Xerox® Color C60/C70 Printer
User Guide
4-5
Loading Media
Warning
Do not open all trays at once. The printer could topple forward, possibly causing injury.
Note
Do not load paper above the maximum fill line. Doing so may cause paper jams.
1.
2.
3.
Pull the paper tray out towards you until it stops.
Before loading paper into the paper trays, fan the edges to separate any sheets of
paper that are stuck together. This reduces the possibility of paper jams.
If required, move the paper tray guides further out to load the new paper. To adjust
the side and front guides, pinch the guide lever on each guide and slide the guides
to their new position. To secure the guides in position, release the levers.
4.
Load the paper against the left-hand side of the tray.
5.
Adjust the guides so they touch the edges of the stack.
4-6
Xerox® Color C60/C70 Printer
User Guide
Loading Media
6.
7.
8.
Push the tray completely into the printer.
If required, choose paper size, type, or color on the printer's touch screen, then touch
Save and Confirm.
If you have not changed the media type, touch Cancel to retain the previous settings.
Loading Paper in Tray 5 (Bypass Tray)
Use the bypass tray for a variety of media types and custom sizes. It is primarily intended
for small quantity jobs using special media. The bypass tray is located on the left-hand
side of the printer. A tray extension is provided to accommodate larger paper. After
loading paper in the bypass tray, make sure that the tray settings on the touch screen
match the paper size and type loaded.
Tray Capabilities
• Tray 5 can hold up to 250 sheets of 90 gsm paper.
• Tray 5 can accept paper from 64-300 gsm.
• Tray 5 can accommodate paper sizes from 4" x 6" to 13.2" x 19.2" /SRA3.
To load paper in Tray 5 (Bypass Tray):
Note
Do not load paper above the maximum fill line.
1.
2.
3.
Open Tray 5 and pull out the extension tray for larger sizes. If already opened,
remove any paper that is a different size or type.
Move the width guides to the edges of the tray.
Insert the paper either long-edge or short-edge first, face up. Larger paper sizes can
only be fed short-edge first. Load punched paper with holes to the right. Load labels
and transparencies face up with top edge towards the front of the tray.
Xerox® Color C60/C70 Printer
User Guide
4-7
Loading Media
4.
Adjust the width guides until they just touch the edges of the stack.
5.
If required, choose paper size, type, or color on the printer's touch screen, then touch
Save and Confirm.
If you have not changed the media type, touch Cancel to retain the previous settings.
6.
Loading Envelopes in Tray 5 (Bypass Tray)
Tray 5 accepts Monarch and Commercial 10 envelopes with paper weights from 75 gsm
to 90 gsm.
To load envelopes in Tray 5 (Bypass Tray):
1.
2.
3.
Insert envelopes in Tray 5 (Bypass Tray) long edge feed (LEF) with flaps open and
at the trail edge.
Adjust the guides until they just touch the edges of the stack.
Choose the envelope size on the printer's touch screen, then touch Confirm.
If the envelope size does not appear, touch Change Settings. Select HeavyWeight
2 as the Media Type and Custom Size.
Use the +,- signs to enter the envelope size. Touch Save.
4-8
Xerox® Color C60/C70 Printer
User Guide
Loading Media
Note
To help avoid jams, do not load more than 30-50 envelopes.
Caution
Never use envelopes with windows or metal clasps; they can damage the printer. Damage
caused by using unsupported envelopes is not covered under the Xerox warranty, service
agreement, or Total Satisfaction Guarantee. The Total Satisfaction Guarantee is available
in the United States and Canada. Coverage may vary outside these areas; please contact
your local representative for details.
• Successful envelope printing is dependent on the quality and construction of the
envelopes. Try another envelope brand if the desired results are not achieved.
• Maintain constant temperatures and relative humidity.
• Store unused envelopes in their original packaging to avoid the excess moisture or
dryness which can affect print quality and cause wrinkling. Excessive moisture can
cause the envelopes to seal before or during printing.
• Do not use padded envelopes.
• Some wrinkling or embossing may occur when printing on envelopes.
Loading Paper in the High Capacity
Feeder
The optional High Capacity Feeder (HCF) is primarily intended for use as a large quantity
feeder and accommodates 8.5 x 11 in./A4 Long Edge Feed (LEF) stock. The High Capacity
Feeder can hold paper of weights between 18 lb./64gsm bond to 80 lb./220 gsm cover,
and can hold a maximum of 2000 sheets of 20lb./75 gsm paper.
Note
Stock can only be loaded long-edge feed (LEF).
Note
The paper or media must not be loaded above the maximum fill line.
1.
2.
3.
4.
5.
6.
7.
Slowly pull out the tray towards you until it stops.
Fan the sheets before loading them into the tray.
Load and register the stack of paper or media against the right side of the tray.
Move the paper guide to just touch the edges of the stack.
After stock is loaded into the High Capacity Feeder, a pop-up window may appear
asking you to change or confirm the type and size of the stock. The tray may not
be ready for use until you change or confirm the size and type of stock.
If required, choose paper size, type, or color on the printer's touch screen, then touch
Confirm.
If you have not changed the media type, touch Confirm on the touch screen.
Xerox® Color C60/C70 Printer
User Guide
4-9
Loading Media
Loading Paper in the Oversized High
Capacity Feeder
The optional Oversized High Capacity Feeder (OHCF) provides an alternative to the HCF.
The OHCF feeds oversized stock up to 13 x 19 in./SRA3/330 x 488 mm paper, 18 lb./64
gsm bond to 110 lb./300 gsm cover stock. Each drawer holds 2000 sheets of standard
weight paper. The OHCF can be either a 1-drawer or a 2-drawer Feeder.
Note
The paper or media must not be loaded above the maximum fill line.
Note
The Paper Weight Switches work in conjunction with the blowers in the tray(s). The
blowers help control environmental conditions in the paper trays and ensure optimum
feed capability.
1.
2.
Slowly pull out the tray towards you until it stops.
After opening the tray, register the stack of paper or media against the front right
side of the paper tray.
3.
4.
Move both Paper Weight Switches to their appropriate positions.
If the paper weight is between 60 gsm and 256 gsm, the position of the air
adjustment levers (switches) should be toward the front of the tray. If the paper
weight is between 257 and 300 gsm, the position of the air adjustment levers
(switches) should be positioned toward the rear of the tray.
Caution
For paper heavier than 256 gsm, slide both Paper Weight switches to the heavier
weight position (257-300 gsm). Failure to do so may result in paper jams.
5.
4-10
Push in the tray gently and completely. When the loaded tray is closed, the tray
position is automatically adjusted in the front/back direction based on the paper
size. A pop-up window may appear asking you to confirm the type and size of the
stock.
Xerox® Color C60/C70 Printer
User Guide
Loading Media
6.
7.
If required, choose paper size, type, or color on the printer's touch screen, then touch
Confirm.
If you have not changed the media type, touch Cancel to retain the previous settings.
Loading Paper in the Post-Process Inserter
The Post-Process Inserter is standard component of the Standard Finisher and Standard
Finisher with Booklet Maker. It is used to load blank or pre-printed paper that will be
used for separators and covers. The Inserter holds a maximum of 200 sheets.
1.
2.
3.
Remove any paper that remains loaded into the Inserter.
Hold the center of the paper guides and slide them to the desired paper size.
Load the paper, aligning to the front side of the tray.
4.
If the paper is preprinted, load the paper with the printed side facing up and with
the tab side to be fed first.
After stock is loaded into the Post-Process Inserter, a pop-up window may appear
asking you to change or confirm the type and size of the stock. The tray may not
be ready for use until you change or confirm the size and type of stock.
If required, choose paper size, type, or color on the printer's touch screen, then touch
Confirm.
5.
6.
7.
If you have not changed the media type, touch Cancel to retain the previous settings.
Xerox® Color C60/C70 Printer
User Guide
4-11
Loading Media
4-12
Xerox® Color C60/C70 Printer
User Guide
5
Printing
This chapter contains an overview of printing from different operating systems and a
brief description of many of the key printing features supported by the printer.
For detailed feature descriptions and instructions on how to use the print drivers, access
the print driver help by clicking the Help button (?) located at the bottom left side of
the print driver dialog.
Printing Overview
1.
Select the appropriate media and ensure the media you want to use is loaded.
If the media is not loaded, load it in the tray and specify the size, color, and type
on the printer touch screen.
2.
3.
4.
5.
6.
In your software application, click File, then Print.
Select your printer from the list.
Access the print driver settings by selecting Properties (Windows) or Xerox Features
(Macintosh). The title of the button may vary depending on your application.
Modify the print driver settings as necessary, then click OK.
Click Print to send the job to the printer.
Saving a Set of Commonly Used Printing
Options in Windows
You can define and save a set of printing options, so that you can quickly apply them
to future print jobs.
To save a set of printing options:
Xerox® Color C60/C70 Printer
User Guide
5-1
Printing
1.
2.
3.
4.
5.
With the document open, in your application click File, then click Print.
Select the printer, then click Properties. Click the tabs in the Properties window,
then click the desired settings.
Click Saved Settings at the bottom of the Properties window, then click Save As.
Type a name for the set of printing options you have chosen, then click OK. The set
of options is saved and the name you specified will appear in the list.
To print using these options, select the name from the list.
Saving a Set of Commonly Used Printing
Options for Macintosh
You can define and save a set of options, so that you can quickly apply them to future
print jobs.
To save a set of printing options:
1.
2.
3.
4.
5.
6.
With the document open in your application, click File, then click Print.
Select your printer from the Printer list.
Select the desired printing options from the drop-down lists on the Print menu
screen.
Click the Presets menu, then click Save As.
Type a name for the printing options, then click OK.
The set of options is saved and will appear in the Presets list. To print using these
options, select the name from the list.
Xerox® Services for UNIX® Systems
(XSUS)
XSUS is an application that allows you to manage and print to multiple printers in UNIX®
and Linux® environments. With XSUS you can:
• Configure and check the status of network-connected printers.
• Set up a printer on your network as well as monitor the operation of the printer once
installed.
• Perform maintenance checks and view supplies status at any time.
• Provide a common look and feel across the many different suppliers of UNIX® and
Linux® operating systems.
5-2
Xerox® Color C60/C70 Printer
User Guide
Printing
Launching XSUS
To launch XSUS from a terminal window prompt as root, type xpadmin, then press Enter
or Return.
Note
XSUS automatically detects if your system's X server is able to run in graphical mode or
not and starts accordingly.
For more information on managing printers and queues through XSUS, see the XSUS
Administrator Online Help.
Printing from Linux
Launching Xerox Printer Manager
To launch Xerox® Printer Manager:
To launch Xerox® Printer Manager from a terminal window prompt as root, type
xeroxprtmgr, then press Enter or Return.
Printing from a Linux Workstation
To print from a Linux Workstation:
1.
Create a print queue.
2.
With the desired document or graphic open in your application, open the Print dialog
box. For most software applications, click File > Print or press CTRL+P.
3.
4.
Select the target print queue.
Close the Print dialog box.
5.
In the Xerox® print driver, select the desired features.
6.
Click Print.
The Xerox® print driver accepts job ticket setting files that select additional settings
or features. You can also submit print requests through the command line using
lp/lpr.
To create a job ticket using the Xerox® print driver:
1.
Open the Xerox® print driver.
2.
Select the desired options.
Xerox® Color C60/C70 Printer
User Guide
5-3
Printing
3.
Click Save As, then store the job ticket in a public location, such as /tmp.
Note
Personally identifiable information, such as a Secure Print passcode, is not saved in
the job ticket. You can specify the information on the command line.
The following commands are examples are how to print using a job ticket:
• lp -d{Target_Queue} -oJT={Absolute_Path_To_Job_Ticket} {Path_To_Print_File}
• lp -dMyQueue -oJT=/tmp/DuplexedLetterhead /home/user/PrintReadyFile
• lp -dMyQueue -oJT=/tmp/Secure -oSecurePasscode=1234 /home/user/PrintReadyFile
Printing Features
Media Types for Automatic 2-Sided Printing
The printer can automatically print a 2-sided document on supported paper. Before
printing a 2-sided document, verify that the paper type and weight are supported. Paper
weights in the range of 60 to 150 gsm can be used for automatic 2-sided printing.
The following paper types can be used for automatic 2-sided printing:
•
•
•
•
•
•
•
•
Plain
Letterhead
Heavyweight
Recycled
Bond
Pre-printed
Gloss
Punched
The following paper and media cannot be used for 2-sided printing:
•
•
•
•
•
•
Reload (paper previously laser printed or copied)
Envelopes
Labels
Any die-cut specialty media, such as business cards
Extra Heavyweight
Heavyweight Gloss
Printing a 2-Sided Document
Options for automatic 2-Sided Printing are specified in the print driver. Application
settings for portrait or landscape orientation are used.
5-4
Xerox® Color C60/C70 Printer
User Guide
Printing
You can specify the page layout for 2-Sided Printing, which determines how the printed
pages turn. These settings override the application page orientation settings.
For Portrait:
2-Sided Print / 2-Sided, Flip on Short Edge
For Landscape:
2-Sided Print / 2-Sided Print, Flip on Short Edge
Selecting the Paper to Use
When you send your print job to the printer, you can choose to let the printer
automatically select which paper to use based on the document size, paper type and
paper color you select, or you can select a specific tray loaded with the desired paper.
Printing Multiple Pages to a Single Sheet (N-Up)
When printing a multiple-page document, you can print more than one page on a single
sheet of paper. Print one, two, four, six, nine, or 16 pages per side.
Color Correction
The Color Correction options provide simulations of different color devices. Automatic
is the recommended correction for general image processing. Different color reference
models are supported and may vary based on your operating system and/or print driver
type.
Xerox® Color C60/C70 Printer
User Guide
5-5
Printing
Booklets
With 2-sided printing, you can print a document in the form of a small booklet. Create
booklets for any paper size that is supported for 2-sided printing. The driver automatically
reduces each page image and prints four page images per sheet of paper (two on each
side). The pages are printed in the correct order so that you can fold and staple the
pages to create the booklet.
Note
Booklets can be created using 8.5 x 11 in. (A4 210 mm x 297 mm) paper and 11 x 17
in. (A3 297 mm x 420 mm) paper.
Some print drivers enable you to specify the gutter and creep.
• Gutter: Specifies the horizontal distance (in points) between the page images. A
point is 0.35 mm (1/72 in.).
• Creep: Specifies how much the page images are shifted outward (in 10ths of a point).
This compensates for the thickness of the folded paper, which otherwise would cause
the page images to shift slightly outward when folded. You can select a value from
zero to 1 point.
If your printer also includes a finisher with a booklet maker, you can use the features of
that device for more robust booklet making capabilities.
Cover Pages
A cover page is the first or last page of a document. You can choose a different paper
source for the cover page than for the body of a document. For instance, use your
company letterhead for the first page of a document, or use heavyweight paper for the
first and last pages of a report.
• Use the applicable paper tray as the source for printing cover pages.
5-6
Xerox® Color C60/C70 Printer
User Guide
Printing
• Verify that the cover page is the same size as the paper used for the rest of your
document. If you specify a different size in the printer driver than the tray you select
as a cover page source, your cover prints on the same paper as the rest of your
document.
You have the following options for cover pages:
• No Covers: Prints the first and last pages of your document from the same tray as
the rest of your document.
• Front Only: Prints the first page on paper from the specified tray.
• Back Only: Prints the back page on paper from the specified tray.
• Front and Back: Same: Front and back cover pages print from the same tray using
blank or pre-printed paper.
• Front and Back: Different: Front and back cover pages print from different trays.
The front cover can be pre-printed, but the back cover must use blank or pre-printed
paper. If you require printing on the back page, you must use an exception page.
Insert Pages
An insert is a divider page or slipsheet that can be inserted after a print job, between
copies of a print job, or between individual pages of a print job. You must specify the
tray to use as the source for the insert pages.
• Insert Options: place insert After Page(s) or Before Page(s).
• Insert Quantity: Specifies the number of pages to be inserted at each location.
• Page(s): Specifies the location, either a page or a range of pages, to place the inserts.
Separate individual pages or page ranges with commas. Specify page ranges with a
dash. For example, to add inserts after pages 1, 6, 9, 10, and 11, type: 1, 6, 9-11.
• Paper: The Paper field displays the Use Job Settings default size, color, and type of
paper to use for the insert pages.
• Job Settings: Displays the attributes of the paper for the majority of the document.
Exception Pages
You can specify the characteristics of any pages in the print job that differ from the
settings used for the majority of the print job.
For example, your print job contains 30 pages that print on standard-sized paper, and
two pages that must print on a different size of paper. In the Add Exceptions window,
set the characteristics of these two exception pages and select the alternate paper size
to use.
• Page(s): Specify the location (page or range of pages) to place the inserts. Separate
individual pages or pages ranges with commas. Specify ranges with a dash. For
example, to add inserts after pages 1, 6, 9, 10, and 11, type: 1, 6, 9-11.
• Paper: The Paper field displays the Use Job Settings default size, color, and type of
paper to use for the exception pages.
Xerox® Color C60/C70 Printer
User Guide
5-7
Printing
• 2-Sided Printing: Choose the desired 2-sided printing option.
• Job Settings: Displays the attributes of the paper for the majority of the document.
Scaling
To reduce or enlarge your printed page images, select a scaling value between 1 and
999 percent. The default value is 100 percent.
Watermarks
A watermark is additional text that can be printed across one or more pages. For example,
terms like Draft and Confidential, which you might stamp on a page before distribution,
can be inserted as a watermark.
You can:
•
•
•
•
•
•
Create a watermark.
Edit an existing watermark’s text, color, density, location, and angle.
Place a watermark on either the first page or every page in a document.
Print a watermark in the foreground or background or blend with the print job.
Use a picture for the watermark.
Use a time stamp for the watermark.
Note
Not all applications support watermark printing.
Creating and Saving Custom Sizes
You can print custom size paper from Trays 1, 2, 3, 4 and 5 (Bypass Tray). Custom size
paper settings are saved in the print driver and are available for you to select in all your
applications.
5-8
Xerox® Color C60/C70 Printer
User Guide
Printing
Job Completion Notification
You can choose to be notified when your job is done printing. A message appears in the
lower right corner of your computer screen with the name of the job and the name of
the printer where it was printed.
Note
This feature is only available when your printer is connected to your computer over a
network. It is not supported in all operating systems.
Secure Print Jobs
The Secure Print job type allows you to print a job after you select your user identification
and enter your passcode at the printer Control Panel.
Sample Sets
The Sample Set job type allows you to send a multiple-copy job, print a sample copy of
the job, and hold the remaining copies of the job at the printer. After you review the
sample copy, you can release or delete the remaining copies.
Delayed Printing
A print job can be delayed for up to 24 hours from the original job submission time.
Enter the time at which you would like the job to print. Use either a 12-hour format or
a 24-hour format.
Saving Print Jobs to the Printer
The Store File in Folder job type stores a print job in a folder in the printer. You can print
the job from the printer Control Panel. The job is not automatically deleted after printing,
but it can be manually deleted at the printer Control Panel.
Folding
If your machine is equipped with a finisher, you can make prints using the folding option.
The option folds your prints in half (single or bifolding) or in thirds (C-fold or Z-fold types).
The folding option is selected from the print driver.
These fold types are available:
•
•
•
•
Single Fold (Bi-Fold)
C-Fold
Z-Fold
Z-Fold Half Sheet
Xerox® Color C60/C70 Printer
User Guide
5-9
Printing
The Single Fold (Bi-Fold) option is available only with a Booklet Maker Finisher. The
C-Fold and Z-Fold options are available only with the C/Z Folder.
Note
In order to use the folding option, the orientation of documents must be short-edge
feed (SEF). You must select a paper tray that contains SEF stock.
Printing from a USB Flash Drive
PDF, JPG, TIFF, and XPS files can be printed directly from a USB Flash Drive using the
Media Print - Text feature.
Note
The print from USB option must be enabled by the System Administrator.
Note
The USB port and the optional Media Card Reader cannot be used at the same time. If
present, remove the cable for the Media Card Reader before using the USB port on the
printer front panel.
Printing from a Media Card Reader
JPEG, TIFF, DCF 1.0 JPEG and TIFF files can be printed directly from a Compact Flash
card inserted in the optional Media Card Reader.
Note
Ensure that a USB Flash Drive is not present in the USB port located on the left side of
the top front panel.
5-10
Xerox® Color C60/C70 Printer
User Guide
6
Copying
This chapter contains the following sections:
• Basic Copying
• Advanced Copying
Basic Copying
To make copies:
1.
On the Control Panel, press the yellow Clear All button to remove previous copy
settings.
2.
Load the original document. Use the document glass for single copies or paper that
cannot be fed using the document feeder. Use the document feeder for multiple or
single pages.
3.
On the Control Panel touch screen, touch Copy.
4.
Use the alphanumeric keypad to enter the number of copies. The number of copies
appears in the upper-right corner of the touch screen.
• To correct the number of copies entered using the alphanumeric keypad, press
the C button, then re-enter the number.
• To stop a copy job, press the red Stop button. On the touch screen, touch Resume
to continue the job, or Cancel to cancel the job completely.
5.
If desired, change the copy settings. For details, see Basic Settings.
6.
Press the green Start button on the Control Panel.
Xerox® Color C60/C70 Printer
User Guide
6-1
Copying
Document Glass
• Lift the document feeder cover and place the original facedown, toward the back-left
corner of the document glass.
• The original must be aligned to the matching paper size printed on the edge of the
glass.
• The document glass accepts paper sizes from 15 x 15 mm (0.59 x 0.59 in.) to A3/297
x 432 mm (11.6 x 17 in.).
• The document glass automatically detects standard paper sizes.
Caution
When scanning a bound document, do not attempt to force the document feeder cover
closed. Doing so may damage the document feeder cover.
Duplex Automatic Document Feeder
6-2
Xerox® Color C60/C70 Printer
User Guide
Copying
Insert originals face up, with page 1 on top. The duplex automatic document feeder
scans both sides of 2-sided documents at the same time.
•
•
•
•
The confirmation indicator illuminates when the originals are correctly loaded.
Adjust the paper guides so they fit against the originals.
The document feeder will automatically detect standard paper sizes.
The automatic document feeder accommodates the following original paper weights:
38-128 g/m2.
• The automatic document feeder accommodates the following originals: 85 x 125
mm (3.3 x 4.9 in) through 297 x 432 mm (11.7 x 17 in).
• The automatic document feeder accommodates approximately the following quantity
of paper by weight: 130 sheets of 80 g/m2.
Basic Settings
The Copy tab appears when the touch screen Copy button is touched. Use the Copy
tab to change the following basic settings:
•
•
•
•
•
•
•
•
Selecting Color or Black and White Copies
Reducing or Enlarging the Image
Selecting the Tray to Use for Copies
Specifying 2-Sided Originals or Copies
Collated Copies
Uncollated Copies
Stapling Copies
Hole Punching Copies
Selecting Color or Black and White Copies
If the original document contains color, you can create copies in full color, in single color
(monochrome), in dual color, or in black and white.
To select the output color:
1.
Touch Copy on the touch screen.
2.
Touch the desired output color:
• Auto Detect: This option detects the color content in the original document and
makes copies in full color if the original is a color document or in black only if the
original is a black and white document.
• Color: This option copies in full color output using all four printing colors (cyan,
magenta, yellow, and black).
• Black and White: This option copies in black and white only. Colors in the original
are converted to shades of gray.
Xerox® Color C60/C70 Printer
User Guide
6-3
Copying
• Dual Color: This option allows you to separate the colors of the original into two
groups of colors for copying. The Source Color will be extracted from the original
and be replaced by the Target Area Color. The rest of the colors will be replaced
by the Non-Target Area Color you select.
• Single Color: This option allows you to copy in one of six preset or custom colors.
Reducing or Enlarging the Image
To reduce or enlarge the image:
1.
Touch Copy on the Control Panel.
2.
To reduce or enlarge the image proportionally, do one of the following:
• Touch the plus or minus buttons.
• Touch More, then touch the plus or minus buttons.
3.
To reduce or enlarge the image proportionally by a preset amount, such as to fit a
particular paper size:
• Touch More.
• Touch Proportional %, then touch one of the Preset % buttons.
Note
You can also use the plus or minus buttons to change the percentage.
• To center the image on the page, touch Auto Center. Touch Save.
• To perform a minor adjustment, select Slight Reduction Improved Fit.
4.
To reduce or enlarge the width and length of the image by different percentages:
• Touch More, then touch Independent X-Y%.
• To scale the width (X axis) of the image, touch the Width percentage plus or
minus buttons.
• To scale the length (Y axis) of the image, touch the Length percentage plus or
minus buttons.
Note
You can also reduce or enlarge an image by touching one of the Presets.
• To center the image on the page, touch Auto Center.
5.
Touch Save.
Selecting the Tray to Use for Copies
The printer automatically selects the paper tray to use for copying based on settings
made by the System Administrator. To use a different paper type for copying on
letterhead, colored paper, or different paper sizes, select the paper tray loaded with the
desired paper.
6-4
Xerox® Color C60/C70 Printer
User Guide
Copying
To select the tray to use:
1.
Touch Copy on the Control Panel.
2.
Under Paper Supply, touch the desired tray.
3.
To use another tray:
• Touch More.
• Touch the desired tray in the list.
• Touch Save.
Specifying 2-Sided Originals or Copies
The document feeder and the document glass can be used to copy one or both sides of
a 2-sided original.
To copy both sides of a 2-sided original:
1.
Touch Copy on the touch screen.
2.
3.
4.
Touch 2 Sided Copying.
Under 2-Sided Copying, touch 2 > 2 Sided.
Press the green Start button.
The document feeder automatically copies both sides of a 2-sided original.
Note
When using the document glass for 2-sided copying, a message appears at the top
of the touch screen when it is time to place the next original on the glass.
Other options are available under 2-Sided Copying:
•
•
•
•
1 –> 1 Sided: Scans only one side of the originals and produces 1-sided copies.
1 –> 2 Sided: Scans only one side of the originals and produces 2-sided copies.
2 –> 1 Sided: Scans both sides of the originals and produces 1-sided copies.
Rotate Side 2: Rotates the side two image of 2-sided copies 180 degrees.
Collated Copies
You can automatically collate multi-page copy jobs. For example, when making three
1-sided copies of a six-page document, the copies are printed in this order:
1, 2, 3, 4, 5, 6; 1, 2, 3, 4, 5, 6; 1, 2, 3, 4, 5, 6
To choose collated copies:
1.
Touch Copy on the touch screen.
2.
Touch Copy Output.
3.
Touch Collated.
Xerox® Color C60/C70 Printer
User Guide
6-5
Copying
Uncollated Copies
Uncollated copies are printed in this order:
1, 1, 1, 2, 2, 2, 3, 3, 3, 4, 4, 4, 5, 5, 5, 6, 6, 6
To choose uncollated copies:
1.
Touch Copy on the touch screen.
2.
Touch Copy Output.
3.
Touch Uncollated.
To choose uncollated copies with separators:
1.
Under Copy Output, touch Uncollated with Separators.
2.
To choose the tray loaded with separator sheets, touch Separator Tray, then touch
Save.
Offset Stacking
To choose Offset Stacking:
1.
Touch Copy on the touch screen.
2.
Touch Copy Output.
3.
Touch Output/Offset.
4.
If an Output Destination appears, select the desired destination.
5.
Touch Offset Stacking and select the type of offset you want to use.
6.
Touch Save until you return to the Copy tab.
Stapling Copies
If the printer has a finisher installed, copies can be automatically stapled.
To select stapling:
1.
Touch Copy on the Control Panel.
2.
Touch Copy Output.
3.
Under Staple, touch 1 Staple, 2 Staples, or 4 Staples for the appropriate page
orientation. The screen shows the location of the staple on the page.
Note
Stapling options are dependent upon paper feed orientation (short edge or long
edge). If the desired stapling option is unavailable, touch Paper Supply, then choose
the appropriate tray.
6-6
Xerox® Color C60/C70 Printer
User Guide
Copying
4.
Touch Save.
Hole Punching Copies
If the printer has an appropriate finisher installed, copies can be automatically hole
punched.
Note
Hole punch options are dependent on paper size and feed orientation. The paper can
be fed from a tray with the paper loaded for short edge feed or long edge feed. If the
desired hole punch option is unavailable, touch Paper Supply, then choose the tray
containing the paper in the correct orientation.
1.
Touch Copy on the Control Panel.
2.
Touch Copy Output.
3.
Under Hole Punch, select the desired hole punch type/location from the list.
Note
Hole punch settings vary by printer configuration.
4.
Touch Save.
Image Quality Adjustments
Use the Image Quality tab to change the following image quality settings:
•
•
•
•
•
Specifying the Original Type
Adjusting the Darkness, Sharpness, and Saturation
Automatically Suppressing Background Variations
Adjusting the Contrast
Selecting Color Effect
• Adjusting the Color Balance
• Adjusting the Color Shift
• Adjusting the Gloss Level
Specifying the Original Type
The printer optimizes the image quality of the copies based on the type of images in
the original document and how the original was created.
To specify the original type:
1.
Touch Copy on the touch screen, then touch the Image Quality tab.
2.
3.
Touch Original Type.
In the Original Type window:
Xerox® Color C60/C70 Printer
User Guide
6-7
Copying
a.
b.
From the 1st column, select the content type of the original document.
If known, select how the original was produced.
c.
Touch Save.
Adjusting the Darkness, Sharpness, and Saturation
You can lighten or darken copies and adjust the sharpness and saturation.
To adjust these image options:
1.
On the Control Panel, touch Copy, then touch the Image Quality tab.
2.
3.
Touch Image Options.
In the Image Options window:
• To lighten or darken the image, touch the Lighten/Darken pointer, then move
it toward Lighten or Darken.
• To sharpen or soften the image, touch the Sharpness pointer, then move it
toward Sharpen or Soften.
• To make the image colors more or less vivid, touch the Saturation pointer, then
move it toward Vivid or Pastel.
• Touch Save.
Automatically Suppressing Background Variations
When you are using originals printed on thin paper, text or images printed on one side
of the paper can sometimes be seen on the other side of the paper. Use Auto Suppression
to minimize the visibility of background colors in your copies.
Note
The printer may not reproduce low densities when Auto Suppression is selected. Turn
Auto Suppression off to achieve better output in these cases.
To change this setting:
1.
Touch Copy on the touch screen, then touch the Image Quality tab.
2.
Touch Image Enhancement.
3.
Under Suppress Background, touch Auto Suppression.
4.
Touch Save.
Adjusting the Contrast
Contrast is the difference between light and dark areas in an image. To reduce or increase
the contrast of the copies:
1.
2.
6-8
Touch Copy on the Control Panel, then touch the Image Quality tab.
Touch Image Enhancement.
Xerox® Color C60/C70 Printer
User Guide
Copying
3.
Do one of the following:
• To automatically adjust the contrast, touch Auto Contrast.
• Touch Manual Contrast, touch the Contrast pointer, then move it toward More
or Less.
4.
Touch Save.
Selecting Color Effects
If you have a color original, you can adjust the color using presets called Color Effects.
For example, the copy colors can be adjusted to be warmer or cooler.
To select a color preset:
1.
On the Control Panel, touch Copy, then touch the Image Quality tab.
2.
Touch the Color Effects button.
3.
Touch the desired color preset. The sample images show how the colors are adjusted.
4.
Touch Save.
Adjusting the Color Balance
If you have a color original, you can adjust the balance of the printing colors between
cyan, magenta, yellow, and black before you print your copy.
To adjust the color balance:
1.
Touch Copy on the Control Panel, then touch the Image Quality tab.
2.
Touch Color Balance.
3.
To adjust the density levels of all four colors:
• Select Basic Color on the Color Balance window.
• To adjust the level for each color, touch its pointer, then move it toward + or –.
4.
To adjust the highlight, midtone, and shadow density levels by color:
• Touch Advanced Color.
• Touch the desired color.
• To adjust the levels for highlights, midtones, and shadows, touch the pointer,
then move it toward + or –.
5.
Touch Save.
Adjusting the Color Shift
If you have a color original, you can adjust the hue of the copy colors.
Xerox® Color C60/C70 Printer
User Guide
6-9
Copying
Note
This feature is only available when the output color is set to Auto Detect or Color.
To adjust the color shift:
1.
Touch Copy on the Control Panel, then touch the Image Quality tab.
2.
Touch Color Shift. The Original Color bar represents the colors of the original
document. The Copy Color bar represents the copy colors.
3.
Touch one of the five buttons from Minus to Plus to select the desired color shift.
4.
Touch Save.
Adjusting the Gloss Level
Gloss level enables you to specify the paper gloss level as normal or enhanced.
Note
This feature does not apply to all paper types.
To adjust the gloss level:
1.
Touch Copy.
2.
Touch Image Quality.
3.
Touch Gloss Level.
4.
Touch Normal or Enhanced and then touch Save.
Layout Adjustments
Use the Layout Adjustment tab to change the following settings:
•
•
•
•
•
•
•
•
Book Copying
2-Sided Book Copying
Specifying the Original Size
Erasing the Edges of a Copy
Shifting the Image
Rotating the Image
Inverting the Image
Specifying the Orientation of the Original
Book Copying
When copying a book, magazine, or other bound document, you can copy either the left
or right page, or both pages onto a single sheet of paper.
You must use the document glass to make copies from books, magazines, or other bound
documents. Do not place bound originals in the document feeder.
6-10
Xerox® Color C60/C70 Printer
User Guide
Copying
Note
This feature and 2-Sided Book Copying cannot be activated simultaneously.
Note
Non-standard size documents will not be separated into two pages accurately.
To copy pages from a book or other bound document:
1.
2.
3.
4.
5.
6.
Touch Copy on the touch screen, then touch the Layout Adjustment tab.
Touch Book Copying. On the next screen, touch On.
To copy both pages of an open book in page order, touch Both Pages. To specify
the Binding Edge Erase amount, the space between the image area and the binding,
touch the plus or minus buttons.
To copy only the left page of an open book touch Left Page Only. To specify the
Binding Edge Erase amount, the space between the image area and the binding,
touch the plus or minus buttons.
To copy only the right page of an open book, touch Right Page Only. To specify
the Binding Edge Erase amount, the space between the image area and the binding,
touch the plus or minus buttons.
Touch Save.
Note
The facing pages of a bound document must be placed in a horizontal orientation on
the document glass as shown on the touch screen.
2-Sided Book Copying
This feature allows you to make 2-Sided copies of facing pages of the original bound
document.
Note
This feature and Book Copying cannot be activated simultaneously.
Note
You must use the document glass to make copies from books, magazines, or pamphlets.
Do not place bound originals in the document feeder.
Note
Non-standard size documents will not be separated into two pages accurately.
To copy pages from a book or other bound document:
1.
Touch Copy on the Control Panel, then touch the Layout Adjustment tab.
2.
3.
Touch 2-Sided Book Copying. In the next screen, touch On.
To specify the copy start page and copy end page, touch Starting and Ending Page.
• For Starting Page: touch Left Page or Right Page.
• For Ending Page: touch Left Page or Right Page.
Xerox® Color C60/C70 Printer
User Guide
6-11
Copying
4.
5.
To specify the Binding Edge Erase amount, the space between the image area and
the binding, touch the plus or minus buttons.
Touch Save.
Specifying the Original Size
To specify the original size so that the correct area is copied:
1.
2.
3.
4.
5.
6.
On the touch screen, touch Copy, then touch the Layout Adjustment tab.
Touch Original Size.
The printer can pre-scan the first page of the originals to determine the area to
copy. Touch Auto Detect.
If the area to be copied matches a particular paper size, touch Manual Size Input
and then touch the desired paper size. To view the entire list, touch the scroll arrows.
If the original contains pages of different sizes, touch Mixed Size Originals.
Touch Save.
Erasing the Edges of a Copy
You can erase content from the edges of your copies by specifying the amount to erase
on the right, left, top, and bottom edge.
To erase edges on copies:
1.
2.
3.
4.
5.
6.
7.
8.
Touch Copy on the touch screen, then touch the Layout Adjustment tab.
Touch Edge Erase.
To erase all the edges by the same amount, touch All Edges and touch the plus or
minus buttons.
To specify different amounts for the edges, touch Individual Edges. For each edge,
touch the plus or minus buttons.
If you selected 2-sided copies: to specify the amount to erase from each edge on
Side 2, touch the plus or minus buttons, or touch Mirror Side 1.
To cancel edge erase, touch Print to Edge.
To specify the original's orientation as you place it in the document feeder or on
the document glass, touch Original Orientation, then touch either Upright Image
or Sideways Image (top to left), then touch Save.
Touch Save.
Note
If preset values such as Hole Punch Erase or Header/Footer Erase were previously saved,
you can touch the preset in the lower-left corner of the window.
Shifting the Image
You can change the placement of the image on the copy page. This is useful if the image
size is smaller than the page size.
6-12
Xerox® Color C60/C70 Printer
User Guide
Copying
Originals must be positioned correctly for image shift to work correctly. For details, see
Basic Copying.
• Document feeder: position originals faceup, left (long) edge entering the feeder first.
• Document glass: position originals facedown, in the back-left corner of the document
glass, long edge to the left.
To change image placement:
1.
2.
3.
4.
5.
6.
7.
8.
9.
Touch Copy on the touch screen, then touch the Layout Adjustment tab.
Touch Image Shift.
To center the image on the page, touch Auto Center.
To shift the image to one of the edges or corners of the paper, touch Corner Shift.
To specify the position of the image, Touch Margin Shift.
To specify the amount of Up/Down and Left/Right shift for Side 1, touch the plus
or minus buttons.
If you selected 2-sided copies: to specify the amount to erase from each edge on
Side 2, touch the plus or minus buttons, or touch Mirror Side 1.
To specify the original’s orientation as you place it in the document feeder or on
the document glass, touch Original Orientation, then touch either Upright Image
or Sideways Image (top to left), then touch Save.
Touch Save.
Note
If preset values were previously saved, select the preset in the lower-left corner of the
window.
Rotating the Image
If the orientation of the paper currently loaded in the selected tray differs from that of
your original, the printer automatically rotates the image to fit on the paper.
1.
2.
Touch Copy on the touch screen, then touch the Layout Adjustment tab.
Touch Image Rotation, then select from the following:
• To cancel rotation, touch Off.
• For automatic rotation of the image of your original to fit correctly on your
selected paper, touch Always On.
• For automatic rotation of the image of your original when Auto Paper Select
or Auto % is selected, touch On during Auto.
3.
Touch Save.
Inverting the Image
Originals can be printed as mirror images; this reflects each image left to right on the
page. Originals can be printed as negative images; the positive image is printed as a
negative.
Xerox® Color C60/C70 Printer
User Guide
6-13
Copying
To invert images:
1.
2.
Touch Copy on the touch screen, then touch the Layout Adjustment tab.
To mirror images, touch Invert Image, then touch Mirror Image. The default is
Normal Image, which does not mirror the images.
To create negative images, touch Negative Image. The default is Positive Image,
which does not print the image as a negative.
Touch Save.
3.
4.
Output Format Adjustments
Use the Output Format tab to make the following changes:
•
•
•
•
•
•
•
•
Creating Booklets
Including Covers
Page Layout
Creating Posters
Adding Annotations
Adding Watermarks
ID Card Copy
Tab Margin Shift
Creating Booklets
Copies can be printed in the form of a booklet. The page images are reduced to print
two images per side of each printed page. The pages can then be folded and stapled
manually, or with the appropriate finisher, they can be creased and stapled automatically.
Note
In this mode, the printer does not print the copies until it has scanned all the originals.
To create a booklet:
1.
Touch Copy on the touch screen, then touch the Output Format tab.
2.
3.
Touch Booklet Creation, then touch On under Booklet Options.
Touch Original Input, then touch 1-Sided Originals, 2-Sided Originals, or 2-Sided
Rotate Side 2.
Folding: If a finisher with booklet making capabilities is installed, touch Off, Fold
Only, or Fold and Staple.
You can add margins in the center binding area to compensate for the thickness of
the booklet:
4.
5.
6.
6-14
a.
Touch Binding Shift, then touch the plus or minus (+/-) buttons to set the shift.
b.
Touch Save.
To add covers, touch Covers, then touch Blank Cover, Print on Both or 1-Sided
Covers Print Outside.
Xerox® Color C60/C70 Printer
User Guide
Copying
7.
8.
9.
a.
Touch the tray loaded with cover paper and the tray loaded with main body
paper. Touch Save.
b.
To print the copy of the last original page on the back cover for Blank Cover
and Print on Both, touch Last Page on Back Cover, then touch Save.
To sub-divide a large booklet into subsets, touch Divide Output, then touch On.
To enter the number of sheets for each subset, touch the plus or minus (+/-) buttons,
then touch Save.
Offset Stacking places each stack of printed pages slightly to the left or right of the
previous stack for easier separation.
a.
Touch Output/Offset.
b.
Touch Center Tray Upper or Center Tray Lower. For automatic fold, touch
Right Middle Tray.
Note
Specific selections may vary based on the finisher installed.
c.
Touch Offset Stacking, then touch System Default, No Offset, Offset Per Set
or Offset Per Job, then touch Save.
10. If desired, select Auto Image Positioning and choose Off or On.
11. Touch Save.
Including Covers
To add covers to a copy job, select different trays for the first and last page. Those trays
can be loaded with heavier stock, color or pre-printed paper. The covers can be blank or
printed.
Note
The paper used for the covers must be the same size as the paper used for the rest of
the document.
To select the type of covers and the tray to use for the cover paper:
1.
2.
3.
4.
Touch Copy on the touch screen, then touch the Output Format tab.
Touch Covers.
Touch the appropriate option for your front cover and back cover.
To include both a front and back cover that use the same tray and printing options:
a.
b.
5.
Touch a printing option for each cover: Blank Cover, Print on Side 1, Print on
Side 2, or Print on Both.
Touch the tray to use for the covers, then touch the tray to use for the main
body.
To include only a front cover or only a back cover:
Xerox® Color C60/C70 Printer
User Guide
6-15
Copying
a.
b.
6.
Touch a printing option for each cover: Blank Cover, Print on Side 1, Print on
Side 2, or Print on Both.
Touch the tray to use for the covers, then touch the tray to use for the main
body of the document.
Touch Save.
Page Layout
You can copy multiple original pages onto one side of a sheet of paper. The size of the
page images is reduced proportionally to fit on the selected paper.
To copy multiple pages on a sheet:
1.
2.
3.
4.
Touch Copy on the touch screen, then touch the Output Format tab.
Touch Page Layout.
Touch Pages per Side.
To select the number of original pages for each sheet of paper, touch 2 Pages, 4
Pages, or 8 Pages. For 4 Pages Up or 8 Pages Up, touch the desired Reading Order.
5. To change the orientation of the copies, touch Original Orientation, then touch
Upright Images, or Sideways Images, then touch Save.
6. To repeat the same image on a page, touch Repeat Image.
7. Touch 2 Times, 4 Times, or 8 Times.
8. To automatically calculate the number of times to repeat vertically or horizontally
(based on document size, paper size, and the enlarge/reduction ratio), touch Auto
Repeat.
9. To specify the number of times to repeat the image vertically or horizontally, touch
Variable Repeat, then touch the plus or minus buttons. You can repeat an image
between 1 to 23 times vertically (columns), and between 1 to 33 times horizontally
(rows). To arrange the images evenly on the page, touch Evenly Spaced. To arrange
the images with no space between them, touch Side by Side.
10. To change the orientation of the copies, touch Original Orientation, then touch
Upright Images or Sideways Images, then touch Save.
Creating Posters
You can create a large size copy of an original, fitting it to more than one sheet of paper.
You then reassemble the pages into a poster and tape them together.
To create a poster:
1.
2.
3.
4.
6-16
Touch Copy > Copy Output > Uncollated on the touch screen.
Touch Poster.
Touch Output Size, then touch the desired size of the poster.
To select the width and length enlargement percentages independently, touch
Enlargement %, then touch the plus or minus buttons. To set the width and length
proportionally, touch Lock X-Y%.
Xerox® Color C60/C70 Printer
User Guide
Copying
5.
To select the paper tray, touch Paper Supply, touch the desired tray, then touch
Save.
Adding Annotations
Annotations, such as page numbers and the date, can be automatically added to copies.
To add annotations:
1.
2.
Touch Copy on the touch screen, then touch the Output Format tab.
Touch Annotations.
To insert a comment:
1.
2.
3.
4.
5.
Touch Comment, then touch On.
On the next screen, touch the desired comment in the list of stored comments.
To create a comment, touch an Available comment, then touch Edit. Using the
touchscreen keyboard, enter the new comment, then touch Save.
Touch Apply To, then touch First Page Only, All Pages, or All Pages Except First,
then touch Save.
To select the location of the comment on the page, touch Position, then touch the
desired location. Touch Save twice.
To insert the current date:
1.
2.
3.
4.
5.
Touch Date, then touch On.
Touch the format to use for the date.
To select which pages the date appears on, touch Apply To, then touch First Page
Only, All Pages, or All Pages Except First, then touch Save.
To select the position of the date stamp on the page, touch Position, then select
the desired position.
Touch Save twice.
To insert page numbers:
1.
2.
3.
4.
5.
Touch Page Numbers, then touch On.
To enter the starting page number, touch the plus or minus (+/-) buttons.
To select which pages the page number appears on, touch Apply To, then touch All
Pages or All Pages Except First, then touch Save.
To select the position of the date stamp on the page, touch Position, then select
the desired position.
Touch Save twice.
To insert a Bates Stamp:
1.
2.
Touch Bates Stamp, then touch On.
Touch an existing stored prefix to use for the Bates Stamp. To create a new prefix,
touch an Available prefix, then touch Edit. Using the touch screen keyboard, enter
the new prefix, then touch Save.
Xerox® Color C60/C70 Printer
User Guide
6-17
Copying
3.
4.
5.
6.
7.
To enter the starting page number, touch the plus or minus (+/-) buttons.
To select which pages the Bates Stamp appears on, touch Apply To, then touch All
Pages or All Pages Except First, then touch Save.
To select the position of the Bates Stamp on the page, touch Position, then touch
the desired position, then touch Save.
To specify the number of digits, touch Number of Digits. To select the minimum
number of digits necessary, touch Auto Assign, then touch Save. To select a specific
number of digits, touch Manual Assign, then touch the plus or minus (+/-) buttons
to insert up to 9 leading zeros, then touch Save.
Touch Save.
To specify the original’s orientation as you place it in the document feeder or on the
document glass:
1.
Under Original Orientation, touch either Upright Images or Sideways Images.
To change the format used for annotations:
1.
2.
3.
4.
Touch Format and Style.
To select the font point size, touch the plus or minus (+/-) buttons. Touch the desired
font color.
To select the placement of the annotations on the second side when printing 2-sided
copies, touch Same as Side 1 or Mirror Side 1.
Touch Save.
Adding Watermarks
You can add a watermark beneath the original image on your copies. Information such
as predetermined text, date and time, and the printer serial number can be added.
1.
2.
3.
4.
5.
6.
7.
8.
9.
6-18
Touch Copy on the touch screen, then touch the Output Format tab.
Touch Watermark.
To add a control number, touch Control Number, touch Add. To select the starting
number, touch the plus or minus buttons.
Touch Save.
To add a stored watermark, touch Stored Watermarks, then touch On. Touch a
stored watermark in the list, then touch Save.
To print the current date and time on the copies, touch Date & Time, touch Add,
then touch Save.
To print the printer's serial number on the copies, touch Serial Number, touch Add,
then touch Save.
The watermark image is faint so the content of the page can be seen. To make the
watermark visible on copies used as originals, touch Watermark Effect, then touch
Embossed or Outline, then touch Save.
Touch Save.
Xerox® Color C60/C70 Printer
User Guide
Copying
ID Card Copy
This feature allows you to copy both sides of a small original, such as an identification
card, onto the same side of a page.
1.
Open the document feeder and place the card in the upper left hand corner of the
document glass.
2.
Close the document feeder, touch Copy on the touch screen, then touch the Output
Format tab.
Note
Place the card slightly away from the top left corner of the document glass to capture
the whole image of the card.
3.
4.
5.
Touch ID Card Copy, touch On, then touch Save.
To scan side one, press the green Start button.
To scan side two, turn the card over without changing its location on the document
glass, then touch Start on the touch screen.
Both sides of the card will then print onto the same side of a sheet of paper.
Tab Margin Shift
The Tab Margin Shift option allows you to copy images from a document onto tabbed
stock.
Note
Only Tray 5 (Bypass) can be used with the Tab Margin Shift option. Load the paper into
Tray 5 with the side to be copied facing up and with the tabbed edge trailing.
1.
2.
3.
Touch Copy on the touch screen, then touch the Output Format tab.
Touch Tab Margin Shift.
Choose from the following options:
a.
b.
The Shift to Tab option will print the edge of the original document image
onto the tab of the tabbed stock. You can change the amount of shift required
by using the Shift Value arrow keys on the touch screen.
The Shift All options are shown here. This option will print the entire original
document image onto the tabbed stock. You can change the amount of shift
required by using the Shift Value arrow keys on the touch screen.
For both shift options, you can specify the Tab Stock Size and Tab Stock Type
using the buttons on the touch screen.
4.
Touch Save.
Xerox® Color C60/C70 Printer
User Guide
6-19
Copying
Advanced Copying
Use the Job Assembly tab to change the following settings:
•
•
•
•
Building a Job
Printing a Sample Copy
Combining Original Sets
Delete Outside/Delete Inside
• Save Copy Settings
• Folding
Building a Job
Complex copy jobs that include a variety of originals requiring different copy settings
can be produced using this feature. Each “segment” can have different copy settings.
After all segments are programmed and scanned, the page images are stored temporarily
in the printer. The complete copy job is then printed.
To build a copy job with multiple segments:
1.
2.
Touch Copy on the touch screen.
Program and scan the first segment:
a.
b.
c.
d.
e.
3.
Place the originals in the document feeder or on the document glass for the
first segment.
Touch the desired copy settings for the first segment.
Touch the Job Assembly tab.
Touch the Build Job button, touch On, then touch Save.
To scan the first set of originals, press the green Start button on the Control
Panel. The Copy screen appears on the touch screen.
Program and scan additional segments:
a.
b.
Place the originals in the document feeder or on the document glass for the
next segment, then touch Next Original.
When printing 2-sided jobs, the start page of the next segment is set using
Chapter Start. To set the start page of the next 2-sided segment, touch Chapter
Start, then choose from the following:
Off: the first page of the next segment prints on the next available side.
On: the first page of the next segment prints on Side 1 of a new sheet of paper.
6-20
Xerox® Color C60/C70 Printer
User Guide
Copying
Pages per Side-New Page: if the first segment has an odd number of pages
the second segment will start on side 1. If the first segment has an even number
of pages the second segment will start on side 2.
c.
d.
4.
5.
Touch Change Settings. Touch the settings for the segment.
To scan the next set of originals, press the green Start button on the control
panel.
For each additional segment you wish to copy, repeat Step 3.
When all segments have been scanned, in the Copy screen, touch Last Original.
The entire copy job prints.
Note
Because all the segments print as one job, you can select options such as covers or
booklet creation that will apply to the entire job.
To select Build Job options:
1.
2.
Touch Copy on the touch screen, then touch the Job Assembly tab.
Touch Build Job, then touch On.
Choose from:
• Copy Output: touch Paper Supply, Stapling, Collation and Output/Offset
options, then touch Save.
• Booklet Creation: (See Creating Booklets.) Select the desired settings, then touch
Save.
• Covers: (See Including Covers.) Select the desired settings, then touch Save.
• Annotations: (See Adding Annotations.) Select the desired settings, then touch
Save.
• Segment Separators: to insert separator pages between segments, touch
Segment Separators, then choose from the following:
No Separators: separators are not inserted. Touch Save.
Blank Separators: blank separators are inserted. To specify the quantity of
separators, touch the plus or minus buttons, then touch Save.
1-Sided Separators Side 1 Only: the first page of the loaded documents is copied
on the front side of a separator. Touch Save.
1-Sided Separators Side 2 Only: the first page of the loaded documents is copied
on the back side of a separator. Touch Save.
2-Sided Separators: the first two pages of the loaded documents are copied
onto each side of a separator. Touch Save.
• Watermarks: (See Adding Watermarks.) Select settings, then touch Save.
• Face Up/Down Output: Select the desired orientation then touch Save.
3.
Touch Save.
Xerox® Color C60/C70 Printer
User Guide
6-21
Copying
Printing a Sample Copy
With a complicated copy job, it can be helpful to print a test copy before printing multiple
copies. This feature prints a single copy and holds the remaining copies. After inspection
of the sample, the remaining copies can be printed using the same settings, or cancelled.
Note
The sample copy is counted as part of the total quantity selected. For example, when
copying a book, if 3 is entered as the number of desired copies; one copy of the book
will be printed, and two other copies will be held until they are released for printing.
To print the sample copy:
1.
2.
3.
4.
5.
Touch Copy on the touch screen, then touch the desired copy settings.
Touch the Job Assembly tab.
Touch Sample Job, then touch On.
Touch Save.
Press the green Start button on the Control Panel; the sample set is printed.
To print the remaining copies or delete the job:
1.
2.
To print the remaining copies of the job, touch Start, or press the green Start button
on the Control Panel.
If the sample copy is unsatisfactory, touch Delete.
Combining Original Sets
If the number of originals exceeds the capacity of the document feeder, you can combine
the sets into one job.
To Combine Original Sets:
1.
2.
3.
4.
5.
6.
Touch Copy on the touch screen. Touch the desired copy settings, then enter the
number of copies using the alphanumeric keypad on the Control Panel.
Touch the Job Assembly tab, then touch Combine Original Sets.
Touch On, then touch Save.
Place the first set of originals in the document feeder.
Press the green Start button on the control panel. Copying begins. The Copy screen
appears on the touch screen.
Scan additional sets:
• Place the originals for the next set in the document feeder.
• In the Copy screen, touch Next Original.
• Touch Start on the touch screen, or press the green Start button on the Control
Panel. Copying continues.
7.
6-22
For each additional set, repeat Step 6.
Xerox® Color C60/C70 Printer
User Guide
Copying
8.
9.
When the final set has been copied, in the Combine Original Sets screen, touch Last
Original. The final copies print.
To cancel the job, touch Delete.
Delete Outside/Delete Inside
This feature allows you to delete everything inside or outside a specified rectangular
area. Up to three areas can be defined for deletion.
To select areas to delete:
1.
2.
3.
Touch Copy on the touch screen, then touch the Job Assembly tab.
Touch Delete Outside/Delete Inside.
To delete everything outside the specified area when copying:
a.
b.
c.
d.
e.
4.
Touch Delete Outside.
The area is defined by the rectangle formed between the points as shown on
the touch screen. Touch Area 1, then touch each coordinate on the touch screen.
Use the alphanumeric keypad on the Control Panel to enter the coordinate
values for X1, X2, Y1 and Y2. When all values have been entered, touch Save.
To apply the deleted area for 2-Sided copying, under Originals touch Both Sides,
Side 1 Only or Side 2 Only.
Touch Save.
Additional areas can be defined by selecting Area 2 and Area 3.
To delete everything inside the specified area when copying:
a.
b.
c.
d.
e.
Touch Delete Inside.
The area is defined by the rectangle formed between the points as shown on
the touch screen. Touch Area 1, then touch each coordinate on the touch screen.
Use the alphanumeric keypad on the Control Panel to enter the coordinate
values for X1, X2, Y1 and Y2. When all values have been entered, touch Save.
To apply the deleted area for 2-Sided copying, under Originals, touch Both
Sides, Side 1 Only, or Side 2 Only.
Touch Save.
Additional areas can be defined by selecting Area 2 and Area 3.
Saving Copy Settings
To use a particular combination of copy settings for future copy jobs, you can save the
settings with a name and retrieve the settings for later use with other copy jobs.
To save the current copy settings:
1.
2.
3.
On the touch screen, touch Copy.
Touch the Job Assembly tab, then touch Stored Programming.
Using the touch screen keyboard, enter a name for the saved settings.
Xerox® Color C60/C70 Printer
User Guide
6-23
Copying
4.
Touch Save.
Folding
If your machine is equipped with a Booklet Maker Finisher and/or the optional C/Z Folder,
you can make copies using the folding option. This option folds your prints in half (Single
or Bi-folding) or in thirds (C-fold or Z-fold types). The folding option for copies is selected
from the Output Format tab.
Note
In order to use the folding option, the orientation of documents must be short-edge
feed (SEF). You must select a paper tray that contains SEF stock.
Fold Types
These fold types are available:
•
•
•
•
Single Fold (Bi-Fold)
C-Fold
Z-Fold
Z-Fold Half Sheet
Note
The Single Fold (Bi-Fold) option is available only with a Booklet Maker Finisher. The
C-Fold and Z-Fold options are available only with the C/Z Folder.
Depending on your overall printer configuration, you can also specify stapling, covers,
and collation options on the Folding page.
Note
To create booklets with booklet formatting, use the Booklet Creation feature. Folding
does not apply the same characteristics to the page.
6-24
Xerox® Color C60/C70 Printer
User Guide
7
Scanning
This chapter contains the following sections:
• Scanning Overview
• Loading Original Documents
• Storing a Scan to a Folder
• Scanning to a Network File Repository
• Scanning to an Email Address
• Scanning to a Computer
• Scanning to a Home Directory
• Storing to a USB Flash Drive
• Setting Scan Options
• Using the Xerox Scan Utility
Scanning Overview
Note
Scanning must be enabled before use. For details, see the System Administrator Guide.
Note
Scanning functions require installation of the Scan Drivers. For more information, see
Installing the Software.
Scanning is an optional printer feature providing several methods for scanning and
storing an original document. The scanning procedure used with the printer differs from
that of desktop scanners. Because the printer is normally connected to a network rather
than directly to a single computer, you select a destination for the scanned image at
the printer.
Xerox® Color C60/C70 Printer
User Guide
7-1
Scanning
The scanning feature allows you to scan a document and store the image to any of the
following destinations:
•
•
•
•
•
•
•
•
Folder on the printer’s hard drive
Document repository on a network server
Email address
Windows computer
Home directory
USB Flash Drive
Computer using Xerox Scan Utility
Application using TWAIN or WIA
Note
Print, copy, and fax jobs can print while you are scanning original documents or
downloading files from the printer’s hard drive.
Note
The printer must be connected to a network to retrieve a scan file.
Loading Original Documents
All scanning tasks begin with loading the original document in the printer. Use the
document glass for single-page jobs, or originals that will not feed through the document
feeder. Use the document feeder for multiple- or single-page jobs.
Document Glass
Lift the document feeder cover and place the original facedown, toward the back-left
corner of the document glass.
7-2
Xerox® Color C60/C70 Printer
User Guide
Scanning
Caution
When scanning a bound document, do not attempt to force the document feeder cover
closed. Doing so may damage the document feeder cover.
Duplex Automatic Document Feeder
1.
2.
3.
Insert originals face up, with page 1 on top.
The confirmation indicator illuminates when the originals are correctly loaded.
Adjust the paper guides so they fit against the originals.
Storing a Scan to a Folder
Storing a scanned file to a folder is the simplest scanning method. A document scanned
at the printer is stored as a file to a folder on the printer's hard drive. You can then print
the file, or you can copy the stored file to your computer using a Web browser and
CentreWare Internet Services.
Folders are accessible to all users unless protected with a password. For details, see
Creating a Folder.
Note
Scanning to a folder must be enabled by the System Administrator.
Scanning to a Folder
To store a scanned file to a folder:
1.
2.
3.
4.
Load the original on the document glass or in the document feeder.
Press the Services Home button.
On the touch screen, touch Store to Folder.
Touch the desired folder. If a password is required, enter the password using the
alphanumeric keypad, then touch Confirm on the touch screen.
Xerox® Color C60/C70 Printer
User Guide
7-3
Scanning
5.
6.
To change any of the scan settings, use the four menus at the bottom of the touch
screen: Color Scanning, 2-Sided Scanning, Original Type, and Scan Presets. For
details, see Setting Scan Options.
Press the green Start button. The Store to Folder progress screen appears on the
touch screen.
When the scan is complete, the touch screen will re-display the Store to Folder tab. The
file is stored to the folder on the printer's hard drive. You can then print the file or retrieve
it to your computer using CentreWare Internet Services.
Printing Stored Files at the Printer
To print a file stored to a folder at the printer:
1.
2.
3.
4.
5.
6.
7.
8.
Press the Services Home button.
On the touch screen, touch Send from Folder.
Touch the desired folder. If a password is required, enter the password using the
alphanumeric keypad, then touch Confirm on the touch screen.
In the file list, touch the desired file. To print multiple files, touch them in succession.
Touch Print.
If desired, select from the following options: Paper Supply, 2-Sided Printing, or
Output.
To set the number of copies, touch Print Quantity, then enter the desired quantity
using the alphanumeric keypad.
Touch Print.
Note
To view a thumbnail preview of the file, from the List drop-down list, select Thumbnail.
Additional Send from Folder Options
To view an enlarged file preview:
1.
2.
3.
While in the Send from Folder view, touch the desired file in the file list.
Touch File Details. Use the icons at the top of the page to enlarge the view. Touch
the scroll buttons to examine the enlarged preview.
To rotate the preview, touch the Rotate View button until you reach the desired
orientation.
Note
Rotating the preview does not rotate the printed output.
4.
When finished, touch Close.
To view a summary of file information:
1.
2.
7-4
While in the Send from Folder view, touch the desired file in the file list.
Touch Review.
Xerox® Color C60/C70 Printer
User Guide
Scanning
3.
When finished, touch Close.
To delete a file:
1.
2.
While in the Send from Folder view, touch the file to be deleted.
Touch Delete twice.
To change a file name:
1.
2.
3.
4.
5.
While in the Send from Folder view, touch the desired file in the file list.
Touch File Details.
Touch Change File Name.
Using the touch screen keyboard, enter the new name.
Touch Save, then touch Close.
To access Job Flow Settings:
1.
2.
If Job Flow Sheets have been created, touch Job Flow Settings. The Job Flow Sheet
currently linked to the folder is displayed.
To make changes to the Job Flow settings, touch Create/Change Link or Select Job
Flow Sheet.
Note
If Send from Folder is not enabled, contact your System Administrator. For details, refer
to the System Administrator Guide at www.xerox.com/support. Enter Xerox Color C60/C70
Printer in the Search or Choose field and select the desired documentation.
Using Job Flow Sheets
Job Flow Sheets allow you to execute a series of registered actions, such as Send as Fax
or Print, for a file stored in a folder. Job Flow Sheets are created by the System
Administrator and are stored in the printer where they can be linked by the user to a
stored file. For details, see the System Administrator Guide.
Printing Stored Files Using CentreWare Internet Services
1.
2.
At your computer, launch your Web browser.
Type the printer's IP address into the Web browser's address bar, then press Enter
to open CentreWare IS.
Note
If you do not know the printer's IP address, see Finding the Printer's IP Address.
3.
4.
5.
6.
Click the Scan tab.
In the Scan navigation pane at the left of the page, click Folder.
In the Folder list, click the desired folder. If required, enter the folder password, then
click Apply. The Folder: List of Files page appears.
Select the desired file.
Xerox® Color C60/C70 Printer
User Guide
7-5
Scanning
7.
8.
9.
Scroll the page to see the Print File section.
If desired, make selections from the following printing options: Paper Supply, Output
Destination, Quantity, 2-Sided Printing, Staple, Hole Punch, or Batch Print.
Click Print File.
Retrieving Scanned Files to Your Computer Using CentreWare
Internet Services
Stored files are retrieved by copying them from the printer folder to your computer’s
hard drive.
1.
2.
At your computer, launch your Web browser.
Type the printer’s IP address into the Web browser’s address bar, then press Enter
to open CentreWare Internet Services.
Note
If you do not know the printer’s IP address, see Finding the Printer's IP Address.
3.
4.
5.
Click the Scan tab.
In the Scan navigation pane at the left of the page, click Folder.
In the Folder list, click the desired folder. If required, enter the folder password, then
click Apply. The Folder: List of Files page appears.
Note
If necessary, scroll down to see all files.
6.
7.
Select the desired file.
Scroll down to reveal Retrieving Format. From the Retrieving Format drop-down
list, click the desired file format. If desired, select options for the file format using
the check boxes and drop-down lists. Options vary by file format.
8. Click Retrieve.
9. On the Retrieve Files from Folder page, click the link to the selected file.
10. Click Save, select the desired storage location, then click Save.
11. If a stored file is no longer needed, select the desired file. In the upper right corner
of the page, click Delete. When prompted, click OK.
Additional File Retrieve Options
The following options are available when retrieving a stored file:
1.
2.
3.
7-6
To retrieve a single page of a multiple-page document, select the Enabled check
box next to Retrieve Page. Type the page number in the Page Number field.
To add a thumbnail view when using XPS format, select the Enabled check box next
to Add Thumbnail.
To apply MRC High Compression to PDF and XPS format files, select the Enabled
check box next to MRC High Compression. Select the desired quality from the
Quality drop-down list.
Xerox® Color C60/C70 Printer
User Guide
Scanning
4.
To create a searchable-text PDF or XPS file:
a.
b.
c.
Select the Enabled check box next to Searchable Text.
From the Language of the Original drop-down list, select the language.
To apply Text Compression, from the Text Compression drop-down list, select
Enabled.
Creating a Folder
To create a folder using the printer’s touch screen:
1.
2.
3.
4.
On the Control Panel, press the Machine Status button.
Touch the Tools tab, then under Setup & Calibration > Setup > Features, touch
Create Folder.
Touch an Available folder.
To assign a password to the folder:
a.
b.
c.
5.
Assign folder attributes:
a.
b.
c.
d.
e.
f.
6.
Under Check Folder Passcode, touch On.
Using the alphanumeric keypad, enter the password.
Touch Save.
Touch Folder Name.
Using the touch screen keyboard, enter the name, then touch Save.
Touch Delete Files After Retrieval, touch Yes or No, then touch Save.
Touch Delete Expired Files, touch Yes or No, then touch Save.
Touch Link Job Flow Sheets to folder, then touch Cut Link or Create Change
Link.
Select Auto Start if you want the job to start automatically.
Touch Close three times to return to the Tools tab.
To create a folder using CentreWare Internet Services:
1.
2.
At your computer, launch your Web browser.
Type the printer’s IP address into the Web browser’s address bar, then press Enter
to open CentreWare Internet Services.
Note
If you do not know the printer’s IP address, see Finding the Printer's IP Address.
3.
4.
5.
Click the Scan tab.
In the Scan navigation pane at the left of the page, click Folder.
In the Folder list, click Create next to an Available folder.
Note
If necessary, scroll the page to see available folders.
Xerox® Color C60/C70 Printer
User Guide
7-7
Scanning
6.
Assign folder attributes:
• Folder Name: type the name.
• Delete Files After Print or Retrieve: set or clear.
• Delete Expired Files: set or clear.
7.
To assign a password to the folder:
• In the Folder Passcode field, type the password.
• In the Retype Passcode field, retype the password.
• In the Check Folder Passcode drop-down list, select Always, Save or Print/Delete.
Your folder is now available for use. Its contents will be stored on the printer’s hard drive.
The folder will appear on the printer’s touch screen, and in the folder list in CentreWare
Internet Services.
Deleting a Folder
Caution
Files in the folder will be deleted.
To delete a folder using the printer touch screen:
1.
2.
3.
4.
On the Control Panel, press the Machine Status button.
Touch the Tools tab, then under Setup & Calibration > Setup > Features, touch
Create Folder.
Touch the desired folder. If a password is required, enter the password using the
alphanumeric keypad, then touch Confirm on the touch screen.
Touch Delete Folder, then touch Delete.
To delete a folder using CentreWare Internet Services:
1.
2.
At your computer, launch your Web browser.
Type the printer's IP address into the Web browser's address bar, then press Enter
to open CentreWare Internet Services.
Note
If you do not know the printer's IP address, see Finding the Printer's IP Address.
3.
4.
5.
Click the Scan tab.
In the Scan navigation pane at the left of the page, click Folder. If necessary, scroll
the page to see available folders.
In the Folder list, click Delete for the folder to be deleted.
Note
If the folder contains files, they must be deleted before the folder can be deleted.
6.
7-8
Click OK to confirm that you want to delete the folder. If required, enter the folder
password, then click Apply.
Xerox® Color C60/C70 Printer
User Guide
Scanning
Scanning to a Network File Repository
Scanning to a network file repository is a feature of Network Scanning. Documents you
scan are sent to a document repository on a network server configured by your system
administrator. A template, also created by the System Administrator, defines the scan
settings and the destination of the scanned image.
Note
Scanning to a network file repository must be configured by your System Administrator.
Note
Templates must be created using CentreWare Internet Services. For details, see the
System Administrator Guide.
To use the scan to a network file repository feature:
1.
2.
3.
4.
5.
Load the original on the document glass or in the document feeder.
On the Control Panel, press the Services Home button.
Touch Network Scanning.
Touch the desired template.
To override the template scan settings:
• For scanning options, use the four menus at the bottom of the touch screen:
Color Scanning, 2-Sided Scanning, Original Type, and Scan Presets. For details,
see Setting Scan Options.
• For additional scanning options, use the three tabs at the top of the touch screen.
For details, see Additional Scanning Options.
6.
Press the green Start button.
Scanning to an Email Address
Scanning to an email address sends scanned documents as attachments to email.
Note
This feature must be enabled by your System Administrator.
To send a scanned image to an email address:
1.
2.
3.
4.
Load the original on the document glass or in the document feeder.
On the Control Panel, press the Services Home button.
Touch E-Mail.
Specify the recipient using one of these methods:
Xerox® Color C60/C70 Printer
User Guide
7-9
Scanning
• Touch New Recipient: using the touch screen keyboard, enter the complete email
address, touch Add, then touch Close.
• Touch Address Book: touch the desired recipient, then touch To.
5.
Repeat Step 4 to add additional recipients to the list. When all recipients have been
added to the list, touch Close.
A default subject is provided for the email. To change the subject, touch Subject.
Using the touch screen keyboard, enter the new subject, then touch Save.
To change any of the scan settings, touch the four menus at the bottom of the
Control Panel: Color Scanning, 2-Sided Scanning, Original Type, and Scan Presets.
For details, see Setting Scan Options.
Press the green Start button.
6.
7.
8.
Setting Email Options
You can override the template settings created by your System Administrator, and
change the following email settings:
•
•
•
•
File Name
File Format
Reply To
Read Receipts
To change the File Name or Reply to E-mail options:
1.
2.
3.
4.
On the printer Control Panel, press the Services Home button.
Touch E-Mail, then touch the E-mail Options tab.
Touch File Name or Reply to. Using the touch screen keyboard, delete or modify
the text.
Touch Save.
To change the file format:
1.
2.
3.
4.
On the printer Control Panel, press the Services Home button.
Touch E-Mail, then touch the E-mail Options tab.
Touch File Format, then select the desired file type. Each file format is described
when selected.
To accept the file format, touch Save.
To request a read receipt:
1.
2.
3.
4.
7-10
On the printer Control Panel, press the Services Home button.
Touch E-Mail, then touch the E-mail Options tab.
Touch Read Receipts, then touch On.
Touch Save.
Xerox® Color C60/C70 Printer
User Guide
Scanning
Scanning to a Computer
The Scan to PC feature allows you to scan a document to your computer.
Note
This feature must be enabled by your System Administrator.
To use the Scan to PC feature:
1.
2.
3.
4.
5.
Load the original on the document glass or in the document feeder.
On the printer Control Panel, press the Services Home button.
Touch Scan to PC.
Touch Transfer Protocol, then touch FTP, SMB, or SMB (UNC Format), then touch
Save.
Touch Server, Save in, User Name, and Password. For each setting, using the touch
screen keyboard, enter the data. Touch Save.
Note
If the server name was previously stored, touch Address Book, touch the desired
server, touch Add, then touch Close.
6.
7.
8.
To change any of the scan settings, touch the four menus at the bottom of the
touch screen: Color Scanning, 2-Sided Scanning, Original Type, and Scan Presets.
For details, see Setting Scan Options.
Press the green Start button.
Access the scanned image at your computer.
Scanning to a Home Directory
The Scan to Home feature allows you to scan a document to your home directory. The
network location of your home directory is defined by the System Administrator.
Note
This feature must be configured by the System Administrator.
To use the Scan to Home feature:
1.
2.
3.
4.
5.
Load the original on the document glass or in the document feeder.
On the printer Control Panel, press the Services Home button.
Touch Network Scanning.
Touch the template created by your System Administrator.
The template defines the scan settings as well as the destination of the image. To
change any of the scan settings, touch the four menus at the bottom of the touch
Xerox® Color C60/C70 Printer
User Guide
7-11
Scanning
6.
screen: Color Scanning, 2-Sided Scanning, Original Type, and Scan Presets. For
details, see Setting Scan Options.
Press the green Start button.
For details, see the System Administrator Guide.
Storing to a USB Flash Drive
The Store to USB feature allows you to scan a document to a USB Flash Drive using the
USB port on the left side of the front printer panel.
Note
This feature must be enabled by your System Administrator.
Note
This feature cannot be used when the Media Card Reader option is connected.
To use the Store to USB feature:
1.
2.
3.
4.
5.
6.
Load the original on the document glass or in the document feeder.
Insert a USB Flash Drive in the USB port on the left side of the front printer panel.
The USB Device Detected window appears.
Touch Store to USB.
Touch Save in.
Touch the desired folder. To move down one directory level, touch Next. To move
up one directory level, touch Previous.
To select the storage location, touch Save.
7.
To change any of the scan settings, touch the four menus at the bottom of the
touch screen: Color Scanning, 2-Sided Scanning, Original Type, and Scan Presets.
For details, see Setting Scan Options.
8. To change any of the additional scanning options, use the three tabs at the top of
the touch screen. For details, see Additional Scanning Options.
9. To scan the original and store the file, press the green Start button.
10. Touch the Services Home button, then remove the USB Flash Drive.
11. To print files stored on a USB Flash Drive, see Printing from a USB Flash Drive.
Caution
Do not remove the USB Flash Drive while a file is being stored. Damage to stored files
may occur. Remove the USB Flash Drive before turning the printer off.
7-12
Xerox® Color C60/C70 Printer
User Guide
Scanning
Setting Scan Options
Scan Settings
Scanning can be adjusted using optional settings. After selecting the desired scanning
method, use the four menus at the bottom of the Control Panel touch screen to change
the following scan settings:
• Color Scanning - Overrides automatic detection; set to Auto Detect, Color, Black &
White, or Grayscale
• 2-Sided Scanning - one side, 2 sides, or 2 sides with second side rotated
• Original Type - Choose from Photo and Text, Text, or Photo
• Scan Presets - Choose from Sharing and Printing, Archival Record, OCR, High Quality
Printing, or Simple Scan
To change the scan settings:
1.
2.
3.
On the printer Control Panel, press the Services Home button.
Touch the desired scan method.
Touch the desired settings in the four menus at the bottom of the touch screen.
Additional Scanning Options
Additional scanning options allow precise control of the scanning process. Many of these
optional settings override the automatic settings. Instructions on the touch screen
describe the use of these options.
After selecting the desired scanning method, use the tabs along the top of the touch
screen to change the following scanning options:
• Advanced Settings
• Layout Adjustment
• Filing Options
Advanced Settings
Advanced settings allow you to control Image Options, Image Enhancements, Scan
Resolution, File Size, Photographs, and Shadow Suppression.
To use Advanced Settings:
1.
2.
3.
On the printer Control Panel, press Services Home.
Touch the desired scan method.
Touch the Advanced Settings tab.
Xerox® Color C60/C70 Printer
User Guide
7-13
Scanning
4.
Touch the desired setting.
Setting
Use
Image Options
Choose from Lighten/Darken or Sharpness/Soften.
Image Enhancement
Choose Background Auto Suppression to hide background color
or Contrast.
Resolution
Choose from 200 to 600 dpi.
Quality/File Size
Choose from Good image quality with small file size, higher
image quality with larger file size, or highest image quality with
largest file size.
Photographs
Enhances the appearance of scans of photographic originals.
Color scanning must be set to Color.
Shadow Suppression
Choose Auto Suppression to hide background color and image
bleed for color scanning.
Layout Adjustment
Layout adjustment provides additional settings for original orientation, original size,
edge erase, Book Scanning and Reduce/Enlarge.
1.
2.
3.
4.
On the printer Control Panel, press Services Home.
Touch the desired scan method.
Touch the Layout Adjustment tab.
Touch the desired setting.
Setting
Use
Original Orientation
Choose from Upright Images or Sideways Images
Original Size
Choose from Auto Detect, Manual Size Input or Mixed Size Originals
Edge Erase
Choose from All Edges, Print to Edge, Individual Edges or from
a previously created Preset. Using the plus or minus buttons,
enter the value.
Book Scanning
Choose from Left Page then Right, Right Page then Left or Top
Page then Bottom. Using the plus or minus buttons, enter the
Binding Edge Erase value.
Reduce/Enlarge
Choose from Proportional %, a Preset, or Enter Output Size.
Using the plus or minus buttons, enter the value.
Filing Options/E-mail Options
Filing Options/E-mail Options provide additional settings for naming images, choosing
image formats, adding meta data, and behavior if a file name already exists.
To use Filing Options:
7-14
Xerox® Color C60/C70 Printer
User Guide
Scanning
1.
2.
3.
4.
On the printer Control Panel, press Services Home.
Touch the desired scan method.
Touch the Filing Options tab.
Touch the desired setting.
Setting
Use
File Name
Enter a filename prefix.
File Format
Choose from: PDF (image Only or Searchable), PDF/A (Image
Only or Searchable), Multi-page TIFF, TIFF (1 file per page),
JPEG (1 file per page), or XPS (Image Only or Searchable).
Choose Compression Method, MRC High Compression or
Optimize for Fast Web View.
Meta Data
Assign descriptive meta data to a scanned image.
File Name Conflict
Choose from: Do Not Save, Rename New File, Overwrite
Existing File, Add to Existing Folder, or AddDateStamp to
File Name.
Login Name
Enter Login Name if required.
Password
Enter password if required.
Xerox® Color C60/C70 Printer
User Guide
7-15
Scanning
7-16
Xerox® Color C60/C70 Printer
User Guide
8
Faxing
This chapter contains the following sections:
•
•
•
•
•
•
•
•
•
Fax Overview
Sending a Fax
Server Fax
Sending an Internet Fax
Faxing from Your Computer
Receiving Faxes
Selecting Fax Options
Adding Address Book Entries
Creating Fax Comments
Fax Overview
Faxing is an optional feature of your multi-function printer. It can be configured in a
variety of different ways to offer you the most convenient method for faxing an original
document.
• Embedded Fax: A document is scanned at the multi-function printer and sent directly
to a fax machine.
• Server Fax: A document is scanned at the multi-function printer and sent over an
Ethernet network to a fax server. The fax server then sends the fax to a fax machine.
• Internet Fax: A document is scanned at the multi-function printer and emailed to a
recipient.
• Faxing from your Computer: Using the settings in the print driver, the current print
job is sent as a fax.
Note
Fax capability must be enabled by the System Administrator before use. For details, see
the System Administrator Guide.
Xerox® Color C60/C70 Printer
User Guide
8-1
Faxing
Loading Original Documents
With the exception of Faxing from Your Computer, all fax transmissions begin with
loading the original document at the multi-function printer.
• Use the document glass for single page jobs or for originals that will not feed through
the document feeder.
• Use the document feeder for multiple or single page jobs.
Document Glass
Lift the document feeder cover and place the original facedown, toward the back-left
corner of the document glass as shown.
Caution
When scanning a bound document, do not attempt to force the document feeder cover
closed. Doing so may damage the document feeder cover.
Duplex Automatic Document Feeder
Insert originals face up. Adjust the paper guides so they fit against the originals.
8-2
Xerox® Color C60/C70 Printer
User Guide
Faxing
Sending a Fax
To send a fax using the multi-function printer's Embedded Fax:
1.
2.
3.
4.
Load the original on the document glass or in the document feeder.
On the Control Panel, press Services Home.
Touch Fax.
To manually enter the recipient fax number do one of the following:
a.
b.
5.
Enter the fax number using the alphanumeric keypad, then touch Add.
Touch New Recipients, enter the number using the touch screen keyboard,
touch Add, then touch Close.
To use a number previously stored in the Address Book:
a.
b.
c.
Touch Address Book.
Select an option from the drop-down list.
Touch the arrows to scroll through the list.
d.
e.
Touch the desired address.
Touch Add, then touch Close.
Note
Addresses must be entered in the Address Book to use the address book. For details,
see Adding Address Book Entries.
Note
Chain Dial can be performed when viewing the list of individual addresses in the
Address Book. For details, see Using Chain Dial.
6.
To include a cover page:
a.
Touch Cover Page, then touch Print Cover Page.
Xerox® Color C60/C70 Printer
User Guide
8-3
Faxing
b.
c.
7.
8.
To add a previously created comment, touch Comments, then under either
Recipient's Comment or Sender's Comment, touch an available comment,
then touch Save. For details, see Creating Fax Comments
Touch Save.
Adjust fax options if required. For details, see Selecting Fax Settings.
Press the green Start button. The printer scans the pages and transmits the
document when all pages have been scanned.
Inserting Pauses in Fax Numbers
Some fax numbers require one or more pauses during the dialing sequence. To insert a
pause in a fax number:
1.
2.
3.
Using the alphanumeric keypad, begin entering the fax number.
Press the Dial Pause button on the control panel to insert a pause, represented by
a hyphen, in the desired location.
Continue entering the fax number.
Server Fax
When using the Server Fax, a document is scanned and sent to a fax server on the
network. The fax server then sends the fax over a telephone line to a fax machine.
Note
The Server Fax service must be enabled before use, and a fax server must be configured.
Note
Server Fax cannot be used together with the Embedded Fax feature. When Server Fax
is in use, the touch screen Fax button activates Server Fax.
Note
Server Fax cannot be used together with the Internet Fax feature. When Server Fax is
in use, the touch screen Internet Fax button does not appear.
Sending a Server Fax
1.
2.
3.
4.
5.
6.
Load the original on the document glass or in the document feeder.
On the Control Panel, touch Services Home.
Touch Fax.
Enter the number using the alphanumeric keypad, then touch Add.
Touch New Recipients, enter the number using the touch screen keyboard, touch
Add, then touch Close.
To use a number previously stored in the Address Book:
a.
8-4
Touch Address Book.
Xerox® Color C60/C70 Printer
User Guide
Faxing
b.
c.
d.
7.
8.
Touch the arrows to scroll through the list.
Touch the desired address.
Touch Add, then touch Close.
Adjust fax options if necessary. For details, see Selecting Fax Settings.
Press the green Start button. The printer scans the pages and transmits the fax
document when all pages have been scanned.
Sending an Internet Fax
If an SMTP email server is connected to the network, a document can be sent to an
email address. This feature eliminates the need for a dedicated telephone line. When
sending an Internet Fax, the document is scanned and sent to an email address.
Note
The Internet Fax service must be enabled before use, and an SMTP server must be
configured. For details, refer to the System Administrator Guide at
www.xerox.com/support. Enter Xerox Color C60/C70 Printer in the Search or Choose
field and select the desired documentation.
To send an Internet Fax:
1.
2.
3.
4.
Place the original on the document glass or in the document feeder.
On the printer touch screen, touch Services Home, then touch Internet Fax.
Touch New Recipient.
To enter the recipient's email address, do one of the following:
• Enter the address using the touch screen keyboard, then touch Add. Repeat for
each recipient, then touch Close.
• Touch Address Book, touch the desired address in the scrolling list, then touch
Add. When all recipients have been added, touch Close.
5.
6.
Adjust fax options if necessary. For details, see Selecting Fax Settings.
Press the green Start button. The printer scans the pages and sends the document
as an email attachment when all pages have been scanned.
Faxing from Your Computer
A document stored on your computer can be sent as a fax using the print driver.
Note
To fax from your computer, fax must be installed in the multi-function printer and
enabled by the System Administrator.
1.
In your software application, click File, then Print.
Xerox® Color C60/C70 Printer
User Guide
8-5
Faxing
2.
3.
4.
Select your printer from the list.
Access the print driver settings by selecting Properties or Preferences (Windows),
or Xerox Features for Macintosh. The title of the button may vary depending on
your application.
Select printer features.
• Windows: Click the Paper/Output tab.
• Macintosh: Click Copies and Pages, then click Xerox Features.
5.
6.
7.
Click the Job Type menu, then click Fax.
Click Add Recipients.
Enter the recipient's name and fax number. If desired, complete the additional
information.
8. If desired, click the Cover Sheet tab, choose an option, then click OK.
9. If desired, click the Options tab, choose your options, then click OK.
10. Click OK.
11. Send the fax:
• Windows: Click OK.
• Macintosh: Click Print.
For details, click the Help button in the Fax window.
Receiving Faxes
The printer must be configured by the System Administrator to receive and print a fax
using the Embedded Fax, Server Fax, and Internet Fax. For more information, see the
System Administrator Guide at www.xerox.com/support. Enter Xerox Color C60/C70
Printer in the Search or Choose field and select the desired documentation.
Selecting Fax Settings
Setting 2-Sided Faxing
1.
2.
Touch Fax on the touch screen.
Touch 2 Sided Scanning, then touch the desired option: 2 Sided or 2 Sided, Rotate
Side 2.
Selecting the Original Type
1.
2.
8-6
Touch Fax on the touch screen.
Touch Original Type, then touch the desired option (Text, Photo and Text, Photo).
Xerox® Color C60/C70 Printer
User Guide
Faxing
Setting the Fax Resolution
1.
2.
Touch Fax on the touch screen.
Touch Resolution, then touch the desired option:
•
•
•
•
Standard 200x100 dpi
Fine 200 dpi
Super Fine 400 dpi
Super Fine 600 dpi
Note
For Server Fax, touch Standard or Fine.
Adjusting Layout
Layout settings allow you to adjust the original size, set page scanning for book faxing,
and reduce or enlarge the fax image.
Lighten/Darken
1.
2.
Touch Fax on the touch screen.
Touch the Layout Adjustment tab, then touch Lighten/Darken.
3.
Adjust the settings to lighten or darken the fax.
4.
Touch Save.
Adjusting the Original Size
1.
2.
3.
Touch Fax on the touch screen.
Touch the Layout Adjustment tab, then touch Original Size.
Touch one of the following:
• Auto Detect, to automatically identify standard size originals.
• Manual Size Input, for manual definition of the scan area using standard paper
dimensions.
• Mixed Size Originals, for scanning originals of different standard sizes.
4.
Touch Save.
Book Faxing
1.
2.
3.
Touch Fax on the touch screen.
Touch the Layout Adjustment tab, then touch Book Faxing.
Touch one of the following options:
• Off (Default).
Xerox® Color C60/C70 Printer
User Guide
8-7
Faxing
• Left Page then Right, then touch Both Pages, Left Page Only or Right Page
Only.
• Right Page then Left, then touch Both Pages, Left Page Only or Right Page
Only.
• Top Page then Bottom, then touch Both Pages, Top Page Only or Bottom Page
Only.
4.
Touch Save.
Reduce/Enlarge
1.
2.
3.
Touch Fax on the touch screen.
Touch the Layout Adjustment tab, then touch Reduce/Enlarge.
Touch a preset percentage, or touch the plus or minus buttons to specify a variable
percentage.
4.
Touch Save.
Fax Options
The Fax Options tab contains options that allow you to specify how the fax is transmitted.
Note
With the exception of Priority Send/Delay Start, these settings are not available for
Server Fax.
To adjust these settings:
1.
On the touch screen, touch Fax, then touch the Fax Options tab.
2.
Touch the desired option, touch the desired settings, then touch Save.
Option
Values
Confirmation Options
Off/On; print report after each fax transmission.
Starting Rate
G3 Auto, Forced 4800 bps
Priority Send/Delay Start
Priority Send: Off/On;Delay Start: Off, Specific Time (touch
Specific Time and then touch desired settings)
Transmission Header Text
Off, Display Header
Recipient Print Sets
1 Set, Multiple Sets (touch Multiple Sets, then touch plus or
minus buttons to set quantity)
Pages per Side
Off/On (touch plus or minus buttons to set quantity)
Remote Folder
Send to Folder: Off/On, Folder Number, Folder Passcode
(enables sending a file directly to a folder on a remote fax
machine by setting the Folder Number and Folder Passcode
using the alphanumeric keypad)
8-8
Xerox® Color C60/C70 Printer
User Guide
Faxing
Option
Values
F Code
Off/On (F Code is a file transmission method enabled by
setting the F Code and Folder Password using the alphanumeric keypad or touch screen keyboard)
More Fax Options
Further optional fax settings are provided. To adjust these settings:
1.
2.
On the touch screen, touch Fax, then touch the More Fax Options tab.
Touch the desired option, touch the desired settings, then touch Save.
Note
These settings are not available for Server Fax.
Option
Values
Remote Polling
Off, poll a Remote Device (retrieve files stored on a remote
fax machine by using the Remote Folder feature)
Store for Polling
Off, Store for Free Polling and Store for Secure Polling (fax
documents stored in the printer are made available for
remote polling by enabling Free Polling or Secure Local
Polling, then touching the folder and file)
On-Hook (Manual Send/Receive)
Manual Send: touch On-Hook, touch Manual Send, then
use the touch screen keyboard to enter destination and
passcode Manual Receive: touch On-Hook, touch Manual
Receive, then press green Start button
Internet Fax Options
Additional Internet Fax options are provided. To make these settings:
1.
2.
On the touch screen, touch Internet Fax, then touch the Internet Fax Options tab.
Touch the desired option, touch the desired settings, then touch Save.
Note
For details, see the System Administrator Guide.
Option
Values
Acknowledgement Report
Confirmation Options: Off, print report after each fax transmission Read Receipts: request read receipt from recipient’s fax
server to be sent to sender indicating the result of the transmission; recipient’s server must support the MDN standard.
Internet Fax Profile
TIFF-S: use for A4, 210 x 297mm (8.5 x 11 in.) originals with
Standard or Fine Resolution TIFF-F or TIFF-J: use for A3,
297x420mm (11 x 17 in.) originals with Superfine Resolution
Pages per Side
Off, On (touch plus or minus buttons to set quantity)
Xerox® Color C60/C70 Printer
User Guide
8-9
Faxing
Option
Values
Starting Rate
G3 Auto, Forced 4800 bps, G4 Auto
Transmission Header Text
Off, Display Header
Adding Address Book Entries
The address book can store email, server, fax, and Internet fax addresses. Addresses can
be stored for individuals, or groups containing multiple individuals.
Note
Address Book entries can also be managed in CentreWare Internet Services. For details,
refer to the System Administrator Guide at www.xerox.com/support. Enter Xerox Color
C60/C70 Printer in the Search or Choose field and select the desired documentation.
Adding an Individual Address
1.
2.
3.
4.
5.
6.
7.
On the Control Panel, press the Machine Status button.
On the touch screen, touch the Tools tab.
Touch Setup + Calibration, touch Setup, then touch Add Address Book Entry.
On the next screen, touch an (available) address in the scrolling list.
Touch Address Type, touch the desired address type, then touch Save. Each address
book type requires different settings.
Touch each desired item in the list, enter the information using the alphanumeric
keypad or touch screen keyboard, then touch Save.
When all desired settings have been configured, touch Save to complete the address
book entry.
Deleting an Individual Address
1.
2.
3.
4.
5.
On the Control Panel, press the Machine Status button.
On the touch screen, touch the Tools tab.
Touch Setup + Calibration, touch Setup, then touch Add Address Book Entry.
On the next screen, touch the desired address in the scrolling list.
Touch Delete Entry, then touch Delete to confirm.
Adding a Group
Create a group to send a fax to multiple individuals. Groups can include both previously
stored individuals and group entries.
Note
Individual entries must be configured before groups can be defined.
8-10
Xerox® Color C60/C70 Printer
User Guide
Faxing
1.
2.
3.
On the Control Panel, press the Machine Status button.
On the touch screen, touch the Tools tab.
Touch Setup and Calibration, touch Setup, then touch Create Fax Group Recipients.
4.
5.
On the next screen, touch an (available) group in the scrolling list.
On the next screen, touch the Group Name field, enter a name for the group using
the touch screen keyboard, then touch Save.
Touch the Speed Dial field, then enter the Speed Dial number for the desired
individual using the alphanumeric keypad.
Touch Add to this Group.
Repeat steps 6 and 7 until all individuals have been added to the group.
When all entries have been added, touch Save, then touch Close.
6.
7.
8.
9.
Deleting a Group
1.
2.
3.
On the Control Panel, press the Machine Status button.
On the touch screen, touch the Tools tab.
Touch Setup and Calibration, touch Setup, then touch Create Fax Group Recipients.
4.
5.
On the next screen, touch the desired group in the scrolling list.
Touch Delete, then touch Delete to confirm.
Using Chain Dial
Chain Dial creates a single fax recipient telephone number by adding two or more fax
numbers together into a single number. For example, an area code or extension number
could be stored separately from the rest of the telephone number. Access Chain Dial
from the Address Book.
1.
2.
3.
4.
5.
On the touch screen, touch Fax.
Touch Address Book.
Touch List all public entries from the drop-down list.
Touch Chain Dial.
To add numbers do one of the following:
• Touch the desired speed dial entry from the scrolling list. Touch the scroll arrows
if necessary.
• Enter a number using the alphanumeric keypad.
• Touch the keyboard button, enter a number using the touch screen keyboard,
then touch Save.
6.
7.
8.
Touch Add. The numbers are added together in the Recipient List.
Touch Save. The combined number appears as a single recipient in the Recipient(s)
list.
Touch Close. The fax can now be sent.
Xerox® Color C60/C70 Printer
User Guide
8-11
Faxing
Creating Fax Comments
1.
2.
3.
4.
On the Control Panel, press the Machine Status button.
On the touch screen, touch the Tools tab.
Touch Setup, then touch Add Fax Comment.
On the next screen, touch an (available) comment in the scrolling list.
5.
6.
Enter the comment using the touch screen keyboard, then touch Save.
Touch Close. The comment is ready to use.
8-12
Xerox® Color C60/C70 Printer
User Guide
9
Maintenance
This chapter contains the following sections:
•
•
•
•
•
•
General Precautions
Locating the Serial Number
Billing and Usage Information
Cleaning the Printer
Ordering Supplies
Routing Maintenance Items
• Recycling Supplies
General Precautions
Warning
When cleaning your printer do not use organic or strong chemical solvents or aerosol
cleaners. Do not pour fluids directly into any area. Use supplies and cleaning materials
only as directed in this documentation.Keep all cleaning materials out of the reach of
children.
Warning
Internal parts of the printer may be hot. Use caution when doors and covers are open.
Warning
Do not use pressurized air spray cleaning aids on or in the printer. Some pressurized air
spray containers contain explosive mixtures and are not suitable for use in electrical
applications. Use of such cleaners can result in a risk of explosion and fire.
Xerox® Color C60/C70 Printer
User Guide
9-1
Maintenance
Warning
Do not remove the covers or guards that are fastened with screws. You cannot maintain
or service any parts that are behind these covers and guards. Do not attempt any
maintenance procedure that is not specifically described in the documentation supplied
with your printer.
To avoid damaging the printer, keep the following guidelines in mind:
• Do not place anything on top of the printer.
• Do not leave the covers and doors open for any length of time, especially in well-lit
places. Light exposure can damage the drum cartridges.
• Do not open covers and doors during printing.
• Do not tilt the printer while in use.
• Do not touch the electrical contacts, gears, or laser devices. Doing so may damage
the printer and cause the print quality to deteriorate.
• Make sure any parts removed during cleaning are replaced before you plug in the
printer.
Locating the Serial Number
When ordering supplies or contacting Xerox for assistance, you will be asked to provide
the printer's serial number.
View the printer serial number from the printer's touch screen:
1.
2.
Press the Machine Status button. The Machine Information tab appears.
Notice the serial number at the left of the Machine Information screen.
If the serial number cannot be read from the printer's touch screen, it can also be found
on the machine frame inside the lower left cover of the printer or inside the front door.
Billing and Usage Information
The Billing Information screen displays billing and printer usage information.
1.
2.
Press the Machine Status button.
Touch the Billing Information tab.
The total impressions counters appear on the left of the screen.
For more detail:
1.
9-2
Touch Usage Counters, then touch the down arrow to choose the desired counter.
Touch the scroll arrows to view the entire list.
Xerox® Color C60/C70 Printer
User Guide
Maintenance
2.
Touch Close.
Cleaning the Printer
• Cleaning the Document Glass and Document Cover
• Cleaning the Exterior
• Ordering Supplies
Cleaning the Document Glass and Document Cover
To ensure optimum print quality, regularly clean the glass areas of the printer. This helps
avoid output with streaks, smears, and other marks that transfer from the glass area
while scanning documents.
Use a lint-free cloth lightly dampened with Xerox Anti-Static or another suitable
non-abrasive glass cleaner to clean the document glass and the CVT glass to its left.
Use a lint-free cloth, Xerox Cleaning Fluid or Xerox Film Remover to clean the under side
of the document cover and the document feeder.
Xerox® Color C60/C70 Printer
User Guide
9-3
Maintenance
Cleaning the Exterior
Regular cleaning keeps the touch screen and control panel free from dust and dirt. To
remove finger prints and smudges, clean the touch screen and control panel with a soft,
lint-free cloth.
Use a cloth to clean the document feeder, output trays, paper trays and outside areas
of the printer.
Ordering Supplies
This section includes:
• Consumables
• When to Order Supplies
Certain consumables and routine maintenance items need to be ordered occasionally.
Each supply item includes installation instructions.
Consumables
Use genuine Xerox® Toner Cartridges (Cyan, Magenta, Yellow, and Black).
Note
Each toner cartridge includes installation instructions.
Caution
Use of toner other than Genuine Xerox® Toner may affect print quality and printer
reliability. It is the only toner designed and manufactured under strict quality controls
by Xerox for specific use with this printer.
9-4
Xerox® Color C60/C70 Printer
User Guide
Maintenance
When to Order Supplies
The printer Control Panel displays a warning when a supply nears its replacement time.
Verify that you have replacements on hand. It is important to order supplies when the
messages first appear to avoid interruptions in printing. The touch screen displays an
error message when the supply must be replaced.
Order supplies from your local reseller or from the Xerox Supplies website at:
www.xerox.com.
Caution
Use of non-Xerox supplies is not recommended. The Xerox Warranty, Service Agreements,
and Total Satisfaction Guarantee do not cover damage, malfunction, or degradation
of performance caused by use of non-Xerox supplies, or the use of Xerox supplies not
specified for this printer. The Total Satisfaction Guarantee is available in the United
States and Canada. Coverage may vary outside these areas; please contact your local
representative for details.
Routine Maintenance Items
Routine maintenance items are printer parts that have a limited life and require periodic
replacement. Replacements may be parts or kits. Routine maintenance items are typically
customer replaceable.
The following items are routine maintenance items:
•
•
•
•
•
Toner cartridges
Fuser Assembly
Waste Toner Container
Drum Cartridge
Charge Corotrons
Replacing the Toner Cartridges
This procedure shows you how to remove a used toner cartridge and replace it with a
new toner cartridge. The machine will notify you when a new toner cartridge is needed,
and when installation is to occur. If you continue copying or printing without replacing
the toner cartridge, a message will appear and the machine will stop after copying or
printing around 1,800 pages for Black, or around 1200 pages for Cyan, Magenta and
Yellow.
Follow the disposal instructions for the old cartridge when you receive with the new
cartridge.
Xerox® Color C60/C70 Printer
User Guide
9-5
Maintenance
Warning
Before you begin the procedure, ensure that the machine has been allowed to cool down.
Failure to do so may result in burns if certain parts of the machine are touched.
1.
Replace the toner cartridge while the machine is on. Open the toner cover, located
just above the machine front door.
2.
Lay paper on the floor before removing the cartridge. This will allow any excess
toner to fall on the paper. Hold the handle of the color indicated in the message,
and gently pull it out.
3.
Remove the toner cartridge by holding the handle on the top of the cartridge while
gently pulling it straight out. Be careful to not get toner on clothing.
Dispose the toner cartridge as normal office waste or recycle the cartridge.
Remove the new toner cartridge from its packaging.
Gently tilt the new cartridge up and down, and then left and right to redistribute
the toner.
4.
5.
6.
7.
9-6
Install the toner cartridge by aligning the arrows on the cartridge evenly with the
printer until you hear a click.
Xerox® Color C60/C70 Printer
User Guide
Maintenance
8.
Close the Front Door. If the door will not close completely, make sure the cartridge
is in the lock position and the toner cartridge is installed into the appropriate toner
location.
Caution
Never use a vacuum cleaner when you clean spilled toner. It can cause explosion as the
toner fills the vacuum cleaner and gets sparks. Use a broom or a cloth moistened with
a neutral detergent.
Replacing the Fuser
This procedure shows you how to remove a used Fuser and replace it with a new Fuser.
The machine will tell you when you need to install a new one. The Fuser can be recycled
so please follow the disposal instructions you receive with the new cartridge.
1.
2.
Make sure the machine has stopped running, and open the Front Door.
Grasp Handle #2 and turn it to the unlocked position.
Warning
To avoid burns wait at least 5-10 minutes after powering off the printer to allow
the fuser to cool down, and observe warning labels inside.
3.
Carefully pull out the Transfer Module.
Xerox® Color C60/C70 Printer
User Guide
9-7
Maintenance
4.
Grab and lift the Amber-Gold colored handle only, lift and pull up and out of the
Transfer Module.
5.
6.
7.
Dispose the Fuser as normal office waste or recycle the fuser.
Remove the new Fuser from its packaging.
Insert the new Fuser into the Transfer module while holding the Amber-Gold handle.
8. Close the Transfer module.
9. Turn Handle #2 to the locked position.
10. Close the Front Door of the printer.
9-8
Xerox® Color C60/C70 Printer
User Guide
Maintenance
Replacing the Waste Toner Container
This procedure shows you how to remove the used Waste Toner Container and replace
it with a new Waste Toner Container. The machine will tell you when you need to order
a new Container and when to install it.
1.
2.
Make sure the machine has stopped running, and open the Front Door.
Open the waste toner container cover, located to the right of the Area #2 lever.
3.
Grip the handle of the waste toner container and pull out about half of it.
4.
Hold the center part on the top of the container, and then remove it.
Caution
Never use a vacuum cleaner when you clean spilled toner. It can cause explosion
as the toner fills the vacuum cleaner and gets sparks. Use a broom or a cloth
moistened with a neutral detergent.
5.
Hold the used waste toner container firmly with both hands and put it into the
provided plastic bag.
Xerox® Color C60/C70 Printer
User Guide
9-9
Maintenance
6.
7.
8.
Hold the center part on the top of a new container and insert it until it comes to a
stop.
Close the waste toner container cover.
Close the Front Door of the printer.
Replacing the Drum Cartridges
This procedure shows you how to remove a used Drum Cartridge and replace it with a
new Drum Cartridge. The machine will tell you when you need to order a new cartridge
and when to install it. The Drum Cartridges can be recycled so please follow the disposal
instructions you receive with the new items.
Caution
Do not expose drum cartridges to direct sunlight or strong light from indoor fluorescent
lighting for more than two minutes. Image quality may deteriorate when the drum
cartridges are exposed to light.
1.
2.
3.
Leave the machine power on and proceed to the next step.
Make sure the machine has stopped running, and open the Front Door.
Pull down the R1-R4 handle.
4.
Raise the Release Handle.
5.
Open a bag including a new drum cartridge. Place the new drum cartridge near the
machine.
9-10
Xerox® Color C60/C70 Printer
User Guide
Maintenance
Caution
Do not touch or scratch the surface of the drum when you take it out from the bag.
Caution
Do not expose drum cartridges to direct sunlight or strong light from indoor
fluorescent lighting for more than two minutes. Image quality may deteriorate
when the drum cartridges are exposed to light.
6.
Unwrap the sheet covering the new drum cartridge and place it under the cartridge.
Some drum cartridges may include a protective film. Remove the the film on the
drum cartridge, if it is present.
7.
Open the Drum Drawer.
8.
Remove the old drum cartridge by holding the finger rings provided at the both
ends of the drum cartridge and gently lifting up.
Xerox® Color C60/C70 Printer
User Guide
9-11
Maintenance
9.
Place the new drum cartridge in the machine following the guides with the side
marked front facing the front.
10. Press both ends of the drum cartridge to place it in a horizontal position.
11.
12.
13.
14.
Immediately close the Drum Drawer to protect the other drums from light.
Return the Release Handle to its original position.
Return the R1-R4 handle to the original position and close the front door.
Insert the used drum cartridge into an empty container for recycling.
Replacing the Charge Corotron
1.
9-12
Make sure the machine has stopped running, and open the Front Door.
Xerox® Color C60/C70 Printer
User Guide
Maintenance
2.
3.
4.
Pull down the R1-R4 handle.
Raise the Release Handle.
Open the packaging for the new Charge Corotron and gently place the new Charge
Corotron on a flat surface near the machine.
Caution
Do not expose drum cartridges to direct sunlight or strong light from indoor
fluorescent lighting for more than two minutes. Image quality may deteriorate
when the drum cartridges are exposed to light.
5.
Open the Drum Drawer.
6.
Grasp both of the amber-gold colored casings on the old Charge Corotron and push
towards the back of the machine. You will hear a clicking noise indicating that it is
being released.
7. Remove the old Charge Corotron by holding the amber-gold colored casings provided
at the both ends of the Charge Corotron and gently pulling straight up.
8. Gently lower the new Charge Corotron into the machine straight down, and not at
an angle.
9. Grasp the amber-gold colored casings on the new Charge Corotron and pull towards
the front of the machine until you hear a clicking noise to indicate the Charge
Corotron is in place.
10. Push in the Drum Drawer completely. Return the Release Handle to its original
position.
11. Return the R1-R4 handle to the original position and close the front door.
12. Insert the used Charge Corotron into an empty container for recycling.
Xerox® Color C60/C70 Printer
User Guide
9-13
Maintenance
Recycling Supplies
For information on Xerox supplies recycling programs, go to www.xerox.com/gwa. Some
routine maintenance items come with a prepaid return label. Please use it to return used
components in their original boxes for recycling.
9-14
Xerox® Color C60/C70 Printer
User Guide
10
Troubleshooting
This chapter contains the following sections:
•
•
•
•
•
•
•
Control Panel Messages
General Troubleshooting
Clearing Paper Jams
Clearing Staple Jams
Print Quality Problems
Fax Problems
Getting Help
Control Panel Messages
The Control Panel touch screen provides information and troubleshooting help. When
an error or warning condition occurs, the touch screen displays a message. The touch
screen may also display an animated graphic showing the location of the problem, such
as the location of a paper jam.
Problems which prevent the full operation of the printer have associated fault codes.
These codes will help pinpoint the specific subsystem with the problem. Current faults
and fault history can be retrieved at any time.
To see a list of the fault messages that have been displayed on the printer:
1.
2.
3.
4.
Press the Machine Status button.
On the touch screen, touch the Faults tab.
Touch Current Faults, Current Messages, or Fault History.
Touch Close.
Xerox® Color C60/C70 Printer
User Guide
10-1
Troubleshooting
General Troubleshooting
This section contains procedures to help you locate and resolve problems. Some problems
can be resolved by simply restarting the printer.
If the problem is not resolved by restarting the printer, see the table in this chapter that
best describes the problem.
Printer Does Not Turn On
Probable Causes
Solutions
The power switch is not correctly turned Turn off the printer using the power switch visible on
on.
the Control Panel. Wait two minutes, then turn the
printer on. Ensure that the main power switch behind
the front cover of the printer is in the On position.
The power cord is not correctly plugged Turn off the printer, and plug the power cord securely
into the outlet.
into the outlet.
Something is wrong with the outlet
connected to the printer.
Plug another electrical appliance into the outlet and
see whether it operates properly. Try a different outlet.
The printer is connected to an outlet
with a voltage or frequency that does
not match the printer specifications.
Use a power source with the specifications listed in
Electrical Specifications.
Caution
Plug the three-wire power cord (with grounding prong) directly into a grounded AC outlet
only. Do not use a power strip. If necessary, contact a licensed electrician to install a
properly grounded outlet.
Printing Takes Too Long
Probable Causes
Solutions
The printer is set to a slower mode
(for example, heavyweight stock).
It takes more time to print with special media. Make sure
that the media type is set properly in the printer driver
and at the printer Control Panel.
The printer is in power saving mode. It takes time for printing to start in power saving mode.
The job is very complex.
10-2
Wait. No action needed.
Xerox® Color C60/C70 Printer
User Guide
Troubleshooting
Printer Resets or Turns Off Frequently
Probable Causes
Solutions
The power cord is not correctly
plugged into the outlet.
Turn off the printer, confirm that the power cord is correctly
plugged into the printer and the outlet, then turn on the
printer.
A system error occurred.
Contact your local Xerox service representative with the
fault information. Check the fault history. For details, see
Control Panel Messages.
2-Sided Printing Problems
Probable Causes
Solutions
Media or settings are not correct.
Make sure that you are using correct media. For details,
see Accepted Media. Envelopes, labels, gloss, and extra
heavyweight stock cannot be used for 2-Sided Printing.
In the print driver, choose 2-Sided Printing.
Scanner Error
Probable Causes
Solutions
Scanner is not communicating.
Turn off the printer using the power button visible on
the right side of the printer top panel. Wait two minutes,
then turn the printer on. Ensure that the main power
switch behind the front cover of the printer is in the On
position.
Troubleshooting Paper Jams
The printer is designed to function with minimal paper jams using Xerox-accepted media
types only. Other media types may cause more frequent paper jams. If accepted media
is jamming frequently in one area, that area may need to be cleaned or repaired.
The Printer Pulls Multiple Sheets Together
Probable Cause
Solutions
The paper tray is too full.
Remove some of the paper. Do not load paper past the
fill line.
The front edges of the paper are not
even.
Remove the media, align the front edges, then reload
it.
Xerox® Color C60/C70 Printer
User Guide
10-3
Troubleshooting
Probable Cause
Solutions
The media is moist from humidity.
Remove the media from the tray, and replace it with
new dry media.
Too much static electricity is present.
Try a new ream of paper.
Unsupported media.
Use only Xerox-approved media. See Accepted Media.
Humidity is too high for coated paper. Feed the paper one sheet at a time.
Paper Jam Message Stays On
Probable Causes
Solutions
Some paper remains jammed in the
printer.
Recheck the media path and make sure that you have
removed all of the jammed paper.
Media Misfeeds
The table below lists solutions to paper jams in the duplex unit, Document Feeder and
paper trays.
Probable Causes
Solutions
Unaccepted media of the wrong size,
thickness, or type is in use.
Do not use unaccepted media. Use only Xerox-approved media. For details, see Accepted Media.
Recheck the paper path inside the module and remove all jammed paper. Make sure you do not have
mixed media types in the tray. Do not print envelopes, labels, extra heavyweight or gloss paper 2
sided.
Warped or wrinkled media is loaded in the Remove the media, smooth it out, and reload it. If
tray. The media is moist from humidity.
it still misfeeds, do not use that media. Remove the
moist media and replace it with new, dry media.
The documents loaded in the document
feeder exceed the maximum capacity allowed.
Place fewer documents in the document feeder.
The document feeder guides are improperly Ensure the media guides fit snugly against the
adjusted.
media loaded in the document feeder.
The media is not correctly positioned in the Remove the misfed media and reposition the media
tray
properly in the tray. Ensure that the media guides
in the tray are set correctly.
The number of sheets in the tray exceeds
the maximum capacity allowed.
Remove the excess paper and load paper below
the fill line.
The media guides are not correctly adjusted Adjust the media guides in the tray to match the
to the media size.
size of the media.
The label sheet is facing the wrong way in Load the label sheets according to the manufacthe tray.
turer's instructions.
10-4
Xerox® Color C60/C70 Printer
User Guide
Troubleshooting
Probable Causes
Solutions
Envelopes are facing the wrong way in Tray Load the envelopes facedown in Tray 5 (Bypass
5 (Bypass Tray).
Tray) with the flaps closed, on the leading edge.
Clearing Paper Jams
When a jam occurs, the control panel touch screen displays an animated graphic showing
the location of the jam.
To avoid damage, always remove misfed media gently, without tearing it. Try to remove
the paper in the direction that the paper would normally feed. Any piece of media left
in the printer, whether large or small, can obstruct the media path and cause further
misfeeds. Do not reload media that has misfed.
Note
The printed side of jammed pages may smudge, and the toner may stick to your hands.
Do not touch the printed side of the media when removing it. Make sure not to spill any
toner inside the printer.
Warning
If you accidentally get toner on your clothes, lightly dust them off as best as you can.
If some toner remains on your clothes, use cool, not hot water, to rinse the toner off. If
toner gets on your skin, wash it off with cool water and a mild soap. If you get toner in
your eyes, wash it out immediately with cool water and consult a doctor.
Clearing Paper Jams from Tray 1, Tray 2, Tray 3, or Tray 4
1.
2.
Pull the tray out toward you until it stops.
Remove the paper from the tray.
3.
If the paper is torn, remove the tray completely and check inside the printer for torn
pieces of paper.
Reload the tray with undamaged paper, then push the tray in until it stops.
On the printer touch screen, touch Confirm.
4.
5.
Xerox® Color C60/C70 Printer
User Guide
10-5
Troubleshooting
Clearing Paper Jams from Tray 5 (Bypass Tray)
1.
2.
3.
4.
Remove the jammed paper from the tray. Make sure there are no sheets of paper
in the paper feed entrance area where the tray connects to the printer.
If the paper is torn, check inside the printer for torn pieces of paper.
Reload the tray with undamaged paper. The leading edge of the paper should lightly
touch the paper feed entrance.
On the printer touch screen, touch Confirm.
Clearing Paper Jams in Document Feeder
1.
2.
3.
4.
5.
6.
7.
Open the Document Feeder Top Cover until it comes to a stop.
Open the Left Cover until it comes to a stop.
If the document is not caught in the document feeder, pull out the document.
Close the Top Cover until it clicks into place.
Close the Left Cover until it clicks into place.
If the document cannot be found, raise the Document Feeder slowly.
Gently return the Document Feeder Tray to its original position.
Clearing Paper Jams in the High Capacity Feeder
1.
2.
3.
4.
5.
6.
Open Tray 6 and remove any jammed paper.
If paper is torn, check for any torn pieces of paper inside the machine.
Gently close Tray 6.
Gently move Tray 6 to the left until it stops.
Open the Tray 6 Top Cover and remove any jammed paper.
Close the Tray 6 Top Cover and gently move Tray 6 to its original position.
Clearing Paper Jams in the Oversized High Capacity Feeder
1.
2.
3.
4.
Open the tray where the paper jam occurred.
Remove the visible jammed paper.
If paper is torn, check for any torn pieces of paper inside the machine.
Gently close the tray.
Clearing Paper Jams in the Fuser
1.
2.
10-6
Open the Bottom Right Cover and tear off the Lead Edge from any jammed sheet.
Also, clear any jammed sheets from the Bypass (Tray 5) feeder. Then, open the
Front Cover.
Turn Handle 2 to the right until it is in the horizontal position, then pull out the
Transfer Module.
Xerox® Color C60/C70 Printer
User Guide
Troubleshooting
Warning
Never touch a labeled area (found on the Fuser or nearby) indicating “High
Temperature” and “Caution”. You may get burned.
3.
4.
5.
6.
7.
8.
9.
Remove the visible jammed paper.
If paper is torn, check for any torn pieces of paper inside the machine.
Move Handle 2a to the right and remove any jammed paper.
Pull down Handle 2b and remove the jammed paper.
Return Handle 2a and Handle 2b to their original position.
Push in the Transfer Module completely and turn Handle 2 to the left.
Close the front cover.
Clearing Jams in the C/Z Folder
This section includes:
• Clearing Jams at 2a in the C/Z Folder
• Clearing Jams at 2b in the C/Z Folder
• Clearing Jams at 2e in the C/Z Folder
• Clearing Jams at 2f in the C/Z Folder
• Clearing Jams at 2g in the C/Z Folder
Clearing Jams at 2a in the C/Z Folder
To clear jams at 2a in the C/Z Folder:
1.
Open the front door of the C/Z Folder.
2.
Lift up green handle 2a.
Xerox® Color C60/C70 Printer
User Guide
10-7
Troubleshooting
3.
Carefully remove the paper.
Note
If the paper is torn, remove all torn pieces from the folder.
4.
Return green handle 2a to its original position.
5.
Close the front door of the C/Z Folder.
Clearing Jams at 2b in the C/Z Folder
To clear jams at 2b in the C/Z Folder:
10-8
Xerox® Color C60/C70 Printer
User Guide
Troubleshooting
1.
Open the front door of the C/Z Folder.
2.
Move green lever 2b to the left.
3.
Carefully remove the paper.
Note
If the paper is torn, remove all torn pieces from the folder.
4.
Return lever 2b to its original position.
Xerox® Color C60/C70 Printer
User Guide
10-9
Troubleshooting
5.
Close the front door of the C/Z Folder.
Clearing Jams at 2e in the C/Z Folder
To clear jams at 2e in the C/Z Folder:
1.
To access lever 2e, open the front door of the C/Z Folder and then open the Folder
tray 2d.
2.
Move green lever 2e to the right.
10-10
Xerox® Color C60/C70 Printer
User Guide
Troubleshooting
3.
Carefully remove the paper.
Note
If the paper is torn, remove all torn pieces from the folder.
4.
Return green lever 2e to its original position.
5.
Close the Folder tray, and then close the front door of the C/Z Folder.
Clearing Jams at 2f in the C/Z Folder
To clear jams at 2f in the C/Z Folder:
Xerox® Color C60/C70 Printer
User Guide
10-11
Troubleshooting
1.
To access lever 2f, open the front door of the C/Z Folder and then open the Folder
tray 2d.
2.
Move green lever 2f to the right.
3.
Carefully remove the paper.
Note
If the paper is torn, remove all torn pieces from the folder.
4.
Return green lever 2f to its original position.
10-12
Xerox® Color C60/C70 Printer
User Guide
Troubleshooting
5.
Close the folder tray, and then close the front door of the C/Z Folder.
Clearing Jams at 2g in the C/Z Folder
To clear jams at 2g in the C/Z Folder:
1.
Open the front door of the C/Z Folder:
2.
Move green lever 2g to the right.
3.
Carefully remove the paper.
Xerox® Color C60/C70 Printer
User Guide
10-13
Troubleshooting
Note
If the paper is torn, remove all torn pieces from the folder.
4.
Return green lever 2g to its original position.
5.
Close the front door of the C/Z Folder.
Minimizing Paper Jams
The printer is designed to function with minimal paper jams using Xerox supported
paper. Other paper types can cause jams.
Adhere to the following:
• If supported paper is jamming frequently in one area, clean that area of the paper
path.
• To avoid damage, always remove jammed paper carefully without tearing it. Try to
remove the paper in the same direction in which it normally moves through the
printer. Even a small piece of paper left in the printer can cause a jam.
• Do not reload paper that has jammed.
10-14
Xerox® Color C60/C70 Printer
User Guide
Troubleshooting
The following can cause paper jams:
• Selecting the incorrect paper type in the print driver.
• Using damaged paper.
• Using unsupported paper.
• Loading paper incorrectly.
• Overfilling the tray.
• Adjusting the paper guides improperly.
Most jams can be prevented by following a simple set of rules:
• Use only supported paper. For details, see the Recommended Media list at:
www.xerox.com/printer-supplies/recommended-paper/enus.html.
• Follow proper paper handling and loading techniques.
• Always use clean, undamaged paper.
Print Quality Problems
Caution
The Xerox Warranty, Service Agreement, or Total Satisfaction Guarantee does not cover
damage caused by using unsupported paper or specialty media. The Total Satisfaction
Guarantee is available in the United States and Canada. Coverage may vary outside
these areas; please contact your local representative for details.
Note
To ensure print quality, toner/print cartridges for many models of equipment are designed
to cease functioning at a predetermined point.
Note
Grayscale images printed with the composite black setting count as color pages, because
color consumables are used. This is the default setting on most printers.
Copy and Scan Problems
When the copy or scan quality is poor, select the closest symptom from the following
table to correct the problem.
If the copy quality does not improve after carrying out the appropriate action, contact
Xerox Customer Support or your reseller.
Xerox® Color C60/C70 Printer
User Guide
10-15
Troubleshooting
Symptom
Solution
Lines or streaks only present in copies
made from the document feeder.
There is debris on the document glass. When scanning,
the paper from the document feeder passes over the
debris creating lines or streaks. Clean all glass surfaces
with a lint free cloth.
Spots present in copies taken from the
document glass.
There is debris on the document glass. When scanning,
the debris creates a spot on the image. Clean all glass
surfaces with a lint free cloth.
The reverse side of the original is show- Copy: Turn on Background Suppression Scan: Turn on
ing on the copy or scan.
Background Suppression
Image is too light or dark.
Copy: Use the Image Quality settings to lighten,
darken or adjust contrast. Scan: Use the Advanced
Settings tab to lighten, darken or adjust contrast.
Colors are off.
Copy: Use the Image Quality settings to adjust color
balance. Scan: Confirm the correct Original Type is set.
Fax Problems
If a fax cannot be sent or received correctly, refer to the following table, then perform
the indicated operation. If a fax still cannot be sent or received correctly, even after
performing the described operations, contact your service representative.
Problems Sending Faxes
Symptom
Cause
The document is not
scanned using the document feeder.
The document is too thick, too Use the document glass to send
thin, or too small.
the fax.
The document is scanned
at an angle.
The document feeder guides Adjust the document feeder guides
are not adjusted to the width to fit the width of the document.
of the document.
10-16
Solution
Xerox® Color C60/C70 Printer
User Guide
Troubleshooting
Symptom
Cause
Solution
The fax is received by the
recipient is blurry.
The document is incorrectly
positioned.
Position the document correctly.
The document glass is dirty.
Clean the document glass.
The text in the document is
too faint.
Adjust the resolution. Adjust the
contrast.
There may be a problem with Check the telephone line, then
the telephone connection.
send the fax again.
There may be a problem with Make a copy to check that your
the caller’s fax machine.
printer is operating correctly, and
then, if the copy was printed correctly, have the recipient check the
condition of their fax machine.
The fax received by the re- The document was loaded in- Document feeder: place the docucipient is blank.
correctly.
ment to be faxed face up. Document glass: place the document to
be faxed facedown.
Fax was not transmitted.
The fax number may be
wrong.
Check the fax number.
The telephone line may be in- Check the telephone line conneccorrectly connected.
tion. If it is disconnected, connect
it.
There may be a problem with Contact the recipient.
the recipient’s fax machine.
Problems Receiving Faxes
Symptom
Cause
The received fax is blank.
There may be a problem with Check that the printer can make
the telephone connection or clean copies. If it can, have the
with the caller’s fax machine. caller send the fax again.
The sender may have loaded
the pages incorrectly.
The printer answers the call, Not enough memory.
but will not accept incoming data.
Xerox® Color C60/C70 Printer
User Guide
Solution
Contact the sender.
If the job contains several graphics, the printer might not have
enough memory. The printer will
not answer if memory is low. Delete stored documents and jobs
and wait for the existing job to
complete. This will increase available memory.
10-17
Troubleshooting
Symptom
Cause
Solution
The received fax size is reduced.
The paper supply in the printer Confirm the original size of the
may not match the document documents. Documents might be
size sent.
reduced based on the available
paper supply in the printer.
Faxes cannot be received
automatically.
The printer is set to receive
faxes manually.
Set the printer to automatic reception.
The memory is full.
Load paper if it is empty, and then
print the faxes stored in the
memory.
The telephone line is incorrectly connected.
Check the telephone line connection. If it is disconnected, connect
it.
There may be a problem with Make a copy to check that your
the sender’s fax machine.
printer is operating correctly. If the
copy was printed correctly, have
the recipient check the condition
of their fax machine.
Getting Help
Control Panel Messages
Xerox provides several automatic diagnostic tools to help you produce and maintain
print quality. The control panel provides you with information and troubleshooting help.
When an error or warning condition occurs, the control panel touch screen displays a
message informing you of the problem. In many cases, the touch screen also displays
an animated graphic showing the location of the problem, such as the location of a
paper jam.
Alerts
Alerts provide messages and instructions to help solve problems. Alerts can be viewed
on:
• The Status page in the CentreWare Internet Services.
• All tabs in the printer driver Properties window. For detailed status information, click
More Status.
Online Support Assistant
The Online Support Assistant is a knowledge base that provides instructions and
troubleshooting help to solve your printer problems. You can find solutions for problems
with print quality, copy quality, media jams, software installation, and more. To access
the Online Support Assistant, go to www.xerox.com/support.
10-18
Xerox® Color C60/C70 Printer
User Guide
Troubleshooting
Web Resources
Xerox provides several websites that offer additional help.
Resource
Link
Technical support information for the
To access the Online Support Assistant, go to
printer includes online Technical Support, www.support.xerox.com/support and enter Xerox
Recommended Media List, Online Sup- Color C60/C70 in the Search or Choose field.
port Assistant, driver downloads, documentation, and more.
Supplies for the printer
http://www.xerox.com/printer-supplies/enus.html
A resource for tools and information,
www.xerox.com/office/businessresourcecenter
such as printing templates, helpful tips,
and customized features to meet your
individual needs.
Local sales and support center
www.xerox.com/office/worldcontacts
Printer registration
www.xerox.com/office/register
Material Safety Data Sheets identify
materials, and provide information on
safely handling and storing hazardous
materials.
www.xerox.com/msds (U.S. and Canada) www.xerox.com/environment_europe (European Union)
Information about recycling supplies
www.xerox.com/gwa
Information about recycling the printer www.xerox.com/gwa (U.S. and Canada) www.xerox.com/environment_europe (European Union)
Xerox® Color C60/C70 Printer
User Guide
10-19
Troubleshooting
10-20
Xerox® Color C60/C70 Printer
User Guide
11
Printer Specifications
This chapter contains the following sections:
•
•
•
•
•
Physical Specifications
Environmental Specifications
Electrical Specifications
Performance Specifications
Controller Specifications
For media specifications and capacities, see Supported Media.
Physical Specifications
This section contains some sample specifications of representative printer/finisher
input/output configurations available with this printer. It may not include your specific
configuration.
Base Unit
Measurement/Description
Unit
Unit
Width, no trays installed
24.41 in
620 mm
Width, with Tray 5 and OCT
61.96 in
1573.8 mm
Depth
32 in
804 mm
Height to top of Document Feeder
45.43 in
1153.9 mm
Height to top of Control Panel
54.72
1390 mm
Weight
544 lb
247 kg
Xerox® Color C60/C70 Printer
User Guide
11-1
Printer Specifications
Base Unit, High Capacity Feeder, Interface Module, and Standard
Finisher
Measurement/Description
Unit
Unit
Width
97.7 in
2481 mm
Depth
32 in
804 mm
Weight
969.3 lb
440.6 kg
2-Drawer Oversized High Capacity Feeder with Base Unit and
Business Ready Finisher/Booklet Maker
Measurement/Description
Unit
Unit
Width of all components
105 in
2567 mm
Depth
32 in
804 mm
Weight
1133 lb
515.1 kg
Environmental Specifications
Temperature and Relative Humidity
•
•
•
•
Operating Temperature: 10° to 28° C/50° to 83° F
When the humidity is 85%, temperature must be 28° C/83° F or below
Operating Relative Humidity: 15 to 85%
When the temperature is 32°C /90° F, humidity must be 62.5% or below
Electrical Specifications
For North America:
•
•
•
•
•
110 - 127 VAC +10/-6 %
Power Consumption 1.936 kVA or less
Frequency 50/60 (Hz) +/- 3%
Receptacle NEMA Number 5-20R
Cycles 60 Hz
For Europe:
• 220-240 VAC +/- 10%
11-2
Xerox® Color C60/C70 Printer
User Guide
Printer Specifications
• Power Consumption 2.2 KVA or less
• Frequency 50/60 (Hz) +/- 3%
• Cycles 50 Hz
This is an ENERGY STAR qualified product.
Performance Specifications
Resolution
Maximum Resolution: 600x600 dpi
Print Speed
Maximum print speeds vary by printer model and whether you are printing color pages
or black and white pages.
Xerox Color C60:
• Color: 60 ppm
• Black and White: 65 ppm
Xerox Color C70:
• Color: 70 ppm
• Black and White: 75 ppm
Xerox® Color C60/C70 Printer
User Guide
11-3
Printer Specifications
11-4
Xerox® Color C60/C70 Printer
User Guide
12
Business Ready Finisher and
Booklet Maker
This section contains:
• Overview
• Identifying the components
• Maintenance
• Troubleshooting
Overview
The Business Ready finisher adds several professional-level finishing options to your
printer while requiring minimal additional space to do so. The finisher is available with
or without an optional booklet maker.
Business Ready Finisher
Xerox® Color C60/C70 Printer
User Guide
Business Ready Finisher with Booklet Maker
12-1
Business Ready Finisher and Booklet Maker
Identifying the Components
1. Finisher Front Cover
5. Booklet Maker Tray
2. Right Top Tray
6. Booklet Staple Unit
3. Right Middle Tray
7. Booklet Maker Unit
4. Staple Cartridge
Maintenance
This section contains:
• Replacing Staples in the Main Stapler Unit
• Replacing Staples in the Booklet Maker Component
• Emptying the Hole Punch Waste Container
Replacing Staples in the Main Stapler Unit
To replace staples in the main stapler unit:
1.
12-2
Open the front door of the Business Ready finisher.
Xerox® Color C60/C70 Printer
User Guide
Business Ready Finisher and Booklet Maker
2.
Hold the stapler assembly by the orange lever R1 and push it to the right.
3.
Grip the staple cartridge by the orange handle and pull it firmly toward you to
remove it.
4.
Pinch both sides of the staple refill (1)and remove it from the cartridge (2).
5.
Insert the front side of the new staple refill into the staple cartridge (1), then push
the rear side into the cartridge (2).
Xerox® Color C60/C70 Printer
User Guide
12-3
Business Ready Finisher and Booklet Maker
Replacing Staples in the Booklet Maker Component
To replace staples in the booklet maker component:
1.
Open the front door of the Business Ready finisher.
2.
Grasp the booklet maker handle and pull the unit toward you until the staple
cartridges appear on the top edge of the device.
3.
To remove the staple cartridge from the booklet maker, push down on the staple
cartridge handle as shown, then pull the cartridge out and up.
4.
Turn the staple cartridge over.
12-4
Xerox® Color C60/C70 Printer
User Guide
Business Ready Finisher and Booklet Maker
5.
To permit the staple cartridge handle to open out and away from the staple refill,
press in the green tabs, then pull back the handle.
6.
To remove the staple refill, press the rear of the refill container as shown.
7.
Replace the staple refill, then return the staple cartridge to the booklet maker.
Emptying the Hole Punch Waste Container
A message appears on the Control Panel when the hole punch waste container is full.
Warning
Do not perform this procedure while the printer is copying or printing.
To empty the hole punch waste container:
1.
Open the front door of the Business Ready finisher.
2.
Remove the hole punch waste container from its slot near the top left of the finisher.
• Wait 10 seconds before reinserting the container into the printer. The hole punch
counter resets after 10 seconds.
Xerox® Color C60/C70 Printer
User Guide
12-5
Business Ready Finisher and Booklet Maker
• If you remove the hole punch waste container before the device instructs you
to, empty the container before you reinsert it into the finisher.
3.
Empty the container.
4.
Insert the container all the way into the finisher.
5.
Close the front door of the Business Ready finisher.
12-6
Xerox® Color C60/C70 Printer
User Guide
Business Ready Finisher and Booklet Maker
Troubleshooting
This section includes:
• Clearing Jams in the Finisher at Position 3a
• Clearing Jams in the Finisher at Position 3c
• Clearing Jams in the Finisher at Position 3d
• Clearing Jams in the Finisher at Position 4
• Clearing Jams in the Booklet Tray
Clearing Jams in the Finisher at Position 3a
To clear jams at position 3a:
1.
If the paper is visible at the output tray exit, remove the paper by pulling it gently
in the direction shown.
2.
Open the front door of the Business Ready finisher.
3.
Lift green handle 3a.
4.
Carefully remove the paper.
• If the paper is torn, remove all torn pieces from the finisher.
Xerox® Color C60/C70 Printer
User Guide
12-7
Business Ready Finisher and Booklet Maker
• If the paper is inaccessible, or if the Control Panel prompts you to release the
paper, turn green handle knob 3b in the direction shown.
5.
Return green handle 3a to its original position.
6.
Close the front door of the Business Ready finisher.
Clearing Jams in the Finisher at Position 3c
To clear jams at position 3c:
1.
Open the front door of the Business Ready finisher.
2.
Move green lever 3c to the left.
12-8
Xerox® Color C60/C70 Printer
User Guide
Business Ready Finisher and Booklet Maker
3.
Carefully remove the paper.
• If the paper is torn, remove all torn pieces from the finisher.
• If the paper is inaccessible, or if the Control Panel prompts you to release the
paper, turn green handle knob 3b in the direction shown.
4.
Return green lever 3c to its original position.
5.
Close the front door of the Business Ready finisher.
Clearing Jams in the Finisher at Position 3d
To clear jams at position 3d:
Xerox® Color C60/C70 Printer
User Guide
12-9
Business Ready Finisher and Booklet Maker
1.
Open the front door of the finisher, and locate green lever 3d.
2.
Move green lever 3d to the right.
3.
Carefully remove the paper.
Note
If the paper is torn, remove all pieces from the finisher.
12-10
Xerox® Color C60/C70 Printer
User Guide
Business Ready Finisher and Booklet Maker
4.
Return green lever 3d to its original position.
5.
Close the front door of the Business Ready finisher.
Clearing Jams in the Finisher at Position 4
To clear jams at position 4:
1.
Open the front door of the Business Ready finisher.
2.
Using the green handle, pull out unit 4until it stops.
3.
To remove the jammed paper, turn green knob 4 in either direction as shown.
Xerox® Color C60/C70 Printer
User Guide
12-11
Business Ready Finisher and Booklet Maker
Note
If the paper is torn, remove all torn pieces from the finisher.
4.
Return unit 4 to its original position.
5.
Close the front door of the Business Ready finisher.
Clearing Jams in the Booklet Tray
To clear jams in the booklet tray:
1.
Open the front door of the Business Ready finisher.
2.
To release the jammed paper, turn green knob 4 in the direction shown.
12-12
Xerox® Color C60/C70 Printer
User Guide
Business Ready Finisher and Booklet Maker
3.
To remove the paper, pull it in the direction shown.
Note
If the paper is torn, remove all torn pieces from the finisher.
4.
Close the front door of the Business Ready finisher.
Xerox® Color C60/C70 Printer
User Guide
12-13
Business Ready Finisher and Booklet Maker
12-14
Xerox® Color C60/C70 Printer
User Guide
13
Standard/Booklet Maker
Finisher
This chapter includes:
• Standard/Booklet Maker Finisher Components
• Loading Paper/Tabs in Tray T1 (Post-Process Inserter)
• Maintenance
• Finisher Problem Solving
• Specifications
Xerox® Color C60/C70 Printer
User Guide
13-1
Standard/Booklet Maker Finisher
Standard/Booklet Maker Finisher
Components
1.
The required Interface Module (IM) which acts as a communication device and
paper path between the machine and the Standard/Booklet Maker Finisher
2.
The Standard or Booklet Maker Finisher (above illustration shows the Booklet Maker
Finisher)
Note
The Standard Finisher or Booklet Maker Finisher may be referred to simply as the
Finisher.
The Standard/Booklet Maker finisher is comprised of the following components:
13-2
Xerox® Color C60/C70 Printer
User Guide
Standard/Booklet Maker Finisher
No.
Component
Function
1
Staple cartridge
Contains staples; remove this cartridge to replace staples
and clear staple jams.
2
Staple waste container
Container for staple waste; remove this container when full.
3
Top tray
The Top Tray is used for stacked output, and can receive up
to 500 sheets of 20 lb./80 gsm paper. Copies are delivered
here when specific output features are selected, such as
Automatic sorting, Collated, Uncollated, or Normal.
4
Stacker (middle) tray
The Stacker Tray is used for offset and/or stapled output,
and can hold up to 2000 sheets of 20 lb./80 gsm paper. This
tray also receives copies when you punched and Z-folded
copies.
Note
Both the Top and Stacker Trays can be used for hole punched
output (optional)
5
Booklet output tray
6
Booklet output tray button This is available only with the Booklet Maker Finisher. When
you press this button, the booklet output tray is raised so you
can retrieve booklets from the output area.
7
Right cover
8
Staple cartridges for book- This is available only with the Booklet Maker Finisher. There
let
are two staple cartridge for booklet. Remove this cartridge
to replace staples and clear staple jams.
9
Punch scrap container
Collects the scraps from the puncher. Open to remove the
scraps.
10
C/Z-Fold output tray (optional)
The optional Folder tray receives copies when you select Cfolding or Z-folding of 8.5 x 11 in./A4 output and 11 x 17
in./A3 media.
11
Left cover.
Open this cover to access the machine and to clear paper
jams.
12
Post-process inserter/Tray
• Tray T1 (Post-Process Inserter) is standard on this finisher
T1
and is used to load paper that will be used as separators
and covers.
• Paper loaded here is not printed on; use this tray for preprinted stock and for insertion into the printed output.
(This tray is also known as the Interposer).
• Tray T1 holds a maximum of 200 sheets when using 20
lb./75 gsm paper.
• Paper can be loaded in the LEF or SEF direction.
Xerox® Color C60/C70 Printer
User Guide
This is available only with the Booklet Maker Finisher. The
Booklet tray receives saddle-stitched booklets when you select
C-Fold or C-Fold + Stapling.
Open to clear paper jams, replace staples, clear jammed
staples, or remove the scraps from the puncher.
13-3
Standard/Booklet Maker Finisher
No.
Component
Function
13
C/Z-Fold output tray button
Press this button to open C/Z-Fold output tray.
14
Manual decurl button
When you press this button, it activates a decurling feature
for the output material. This applies especially to lighter
weight paper.
Manual Decurling Feature on the Finisher
The finisher provides a manual decurling feature which allows you to adjust the curl of
the print output at point of need.
Pressing the Decurler button on the finisher switches the decurl feature between the
Auto, On, and Off modes.
Note
Before the paper reaches the decurling unit on the finisher, it passes through a more
robust decurling unit on the Interface Module.
1. Auto button
When this indicator is lit, the appropriate curl correction is automatically performed
depending on the paper type, size, and orientation of the printed output. The button
should be set to Auto for most situations. The button automatically switches to the
Auto mode when:
The machine is switched on
The machine exits the Energy Saver mode
13-4
Xerox® Color C60/C70 Printer
User Guide
Standard/Booklet Maker Finisher
2. Prevent Upward Curl button
When this button is pressed and the upward curl indicator is lit, upward curl correction
is performed on all printed output. If your output is curled upward, press this button
to prevent upward curls.
3. Prevent Downward Curl button
When this button is pressed and the downward curl indicator is lit, downward curl
correction is performed on all printed output. If your output is curled downward, press
this button to prevent downward curls.
Note
When no indicator is lit, the machine does not perform any curl correction to the printed
output.
Folding Feature
If your machine is equipped with the Booklet Maker Finisher and/or the optional C/Z
Folder, you can make prints using the folding option. The option folds your prints in half
(single or bifolding) or in thirds (C-fold or Z-fold types). The folding option is selected
from the print driver.
Note
In order to use the folding option, the orientation of documents must be short-edge
feed (SEF). You must select a paper tray that contains SEF stock.
Fold Types
Note
The Single Fold (Bi-Fold) option is available only with a Booklet Maker Finisher. The
C-Fold and Z-Fold options are available only with the C/Z Folder.
These fold types are available:
•
•
•
•
Single Fold (Bi-Fold)
C-Fold
Z-Fold
Z-Fold Half Sheet
Loading Paper/Tabs in Tray T1
(Post-Process Inserter)
1.
2.
If necessary, remove any remaining media that is currently loaded in Tray T1.
Hold the center of the paper guides and slide them to their desired paper size.
Xerox® Color C60/C70 Printer
User Guide
13-5
Standard/Booklet Maker Finisher
3.
Load the paper/tabs, aligning it to the front side of the tray.
a.
b.
4.
5.
13-6
If the paper is preprinted, load the paper with the printed side facing up.
If the media is tab stock, load the tab side to be fed first (in the direction of the
arrow as shown in the above illustration).
If enabled by your System Administrator, the Paper Tray Properties screen may be
displayed on the UI. From the Tray Properties window, enter the correct paper
information, including size, type, weight, and if necessary, decurler and/or alignment
option.
Select OK to save the information and close the Tray Properties window.
Xerox® Color C60/C70 Printer
User Guide
Standard/Booklet Maker Finisher
Maintenance
Standard/Booklet Maker Consumable Supplies
Xerox supplies, including staples, staple cartridges, and staple waste containers can be
ordered from Xerox by going to www.xerox.com and clicking on either the Contact Us
link for specific contact information/telephone numbers in your area or by clicking on
the Supplies and entering/selecting your specific machine information (product family
and model type).
Note
Always refer to www.xerox.com for the latest Consumable Replaceable Units (CRUs)
part numbers.
Store supply items and Xerox parts in their original packages in a convenient location.
Supply Item
Supply Unit Shipped with finisher/reorder quantity
Staple cartridge / staple waste 4 staple cartridges (5000 staples per cartridge) and 1 staple
container
waste container per carton
Booklet Maker Finisher staple 4 pack: 5000 staple refills each
cartridge
Replace the Standard Staple Cartridge
A message displays on the UI when it is time to replace a staple cartridge.
1.
2.
Make sure that the machine has stopped printing.
Open the Right Cover on the finisher.
3.
Grasp the Staple Cartridge handle located at R1, and pull out the staple cartridge
from the finisher.
Xerox® Color C60/C70 Printer
User Guide
13-7
Standard/Booklet Maker Finisher
4.
Hold the positions as indicated by the arrow and remove the staple cartridge from
the unit.
5.
Push a new staple cartridge into the unit.
6.
Reinstall the cartridge unit to its original position in the finisher.
13-8
Xerox® Color C60/C70 Printer
User Guide
Standard/Booklet Maker Finisher
7.
Close the Right Cover on the finisher.
Note
A message will display and the machine will not operate if the right cover is open even
slightly.
Replace the Booklet Staple Cartridge
In addition to the standard stapler, the Booklet Maker Finisher is equipped with a booklet
stapler. When this booklet stapler needs to be replaced, a message appears on the UI.
1.
2.
Make sure that the machine has stopped printing.
Open the Right Cover on the finisher.
Xerox® Color C60/C70 Printer
User Guide
13-9
Standard/Booklet Maker Finisher
3.
While pressing the lever to the right, pull out the booklet staple cartridge unit.
4.
Hold the tabs of the staple cartridge unit and lift to remove it.
5.
While holding the tabs of a new staple cartridge, push it into the unit.
6.
Push the staple cartridge unit to its original position in the machine.
13-10
Xerox® Color C60/C70 Printer
User Guide
Standard/Booklet Maker Finisher
7.
Close the Right Cover on the finisher.
Note
A message will display and the machine will not operate if the right cover is open even
slightly.
Replacing the Staple Waste Container on the Finisher
The machine displays a message indicating that the Staple Waste Container is full. To
replace the container:
1.
2.
Make sure that the machine has stopped printing.
Open the Right Cover on the finisher.
3.
Locate the Staple Waste Container ( R5) in the finisher, and move the lock lever to
the unlock position.
Xerox® Color C60/C70 Printer
User Guide
13-11
Standard/Booklet Maker Finisher
4.
Hold R5 as shown in the figure and remove the staple waste container from the
machine.
5.
Place the used staple waste container into a supplied plastic bag.
Note
Do not return a disassembled (used) container to the Customer Support Center.
6.
Hold the new staple waste container by the R5 handle area and push it into the
machine.
13-12
Xerox® Color C60/C70 Printer
User Guide
Standard/Booklet Maker Finisher
Note
To prevent injury, do not put your fingers on top of the container.
7.
Push R5 until the lock lever moves to the locked position.
8.
Close the Right Cover on the finisher.
Note
A message will display and the machine will not operate if the right cover is open even
slightly.
Empty the Punch Waste Container
The UI displays a message indicating when it is time to empty the Punch Waste
Container.
Caution
Only remove the Punch Waste Container while the system is powered ON. If you switch
off the power when emptying the container, the machine cannot detect that the
container was emptied.
1.
2.
Make sure that the machine has stopped printing.
Open the Right Cover on the finisher.
Xerox® Color C60/C70 Printer
User Guide
13-13
Standard/Booklet Maker Finisher
3.
Pull the container out of the finisher ( R4).
4.
Discard all the punch scraps in an appropriate container.
5.
Reinsert the empty container into the machine.
13-14
Xerox® Color C60/C70 Printer
User Guide
Standard/Booklet Maker Finisher
6.
Close the Right Cover on the finisher.
Note
A message will display and the machine will not operate if the right cover is open even
slightly.
Finisher Problem Solving
Tip
Always ensure that all paper jams, including any small ripped pieces of paper, are cleared
before proceeding with your print jobs.
Note
Remedies differ according to the paper jam location. Follow the instructions displayed
to remove the jammed paper.
Paper jams in Tray T1 (Post Process Inserter)
1.
Press the Cover button.
2.
Open cover 1e and then remove the jammed paper and all paper loaded in the tray.
Xerox® Color C60/C70 Printer
User Guide
13-15
Standard/Booklet Maker Finisher
Note
If paper is torn, check inside the machine and remove it.
3.
4.
Fan the paper you removed, making sure that all four corners are neatly aligned,
and then load them again.
Push cover 1e until you hear it click into place.
Note
A message will be displayed and the machine will not operate if the cover is open even
slightly.
Paper Jams at Lever 1a and Knob 1c
1.
2.
Make sure that the machine has stopped printing.
Open the finisher left cover.
3.
Move lever 1a downwards and turn knob 1c left. Remove the jammed paper.
13-16
Xerox® Color C60/C70 Printer
User Guide
Standard/Booklet Maker Finisher
Note
If paper is torn, check inside the machine and remove it.
4.
Return lever 1a to the original position.
5.
Close the finisher left cover completely.
Note
The machine will not operate if the cover is open even slightly.
Paper Jams at Lever 1d
1.
2.
Make sure that the machine has stopped printing.
Open the finisher left cover.
Xerox® Color C60/C70 Printer
User Guide
13-17
Standard/Booklet Maker Finisher
3.
Move lever 1d upwards and remove the jammed paper.
Note
If paper is torn, check inside the machine and remove it.
4.
Move the lever 1d to the original position.
5.
Close the finisher left cover completely.
Note
The machine will not operate if the cover is open even slightly.
13-18
Xerox® Color C60/C70 Printer
User Guide
Standard/Booklet Maker Finisher
Paper Jams at Lever 1b
1.
2.
Make sure that the machine has stopped printing.
Open the finisher left cover.
3.
Move the lever 1b to the right and remove the jammed paper.
Note
If paper is torn, check inside the machine and remove it.
4.
Move the lever 1b to the original position.
5.
Close the finisher left cover completely.
Xerox® Color C60/C70 Printer
User Guide
13-19
Standard/Booklet Maker Finisher
Note
The machine will not operate if the cover is open even slightly.
Paper Jams at Lever 3b and 3d
1.
2.
Make sure that the machine has stopped printing.
Open the Right Cover on the finisher.
3.
Move the levers 3band 3d; remove the jammed paper.
Note
If paper is torn, check inside the machine and remove it.
4.
Return the levers 3b and 3d to their original positions.
5.
Close the Right Cover on the finisher.
13-20
Xerox® Color C60/C70 Printer
User Guide
Standard/Booklet Maker Finisher
Note
A message will display and the machine will not operate if the right cover is open even
slightly.
Paper Jams at Lever 3e and Knob 3c
1.
2.
Make sure that the machine has stopped printing.
Open the Right Cover on the finisher.
3.
Move the lever 3e and turn the knob3c; remove the jammed paper.
Note
If paper is torn, check inside the machine and remove it.
4.
Return the lever 3e to its original position.
Xerox® Color C60/C70 Printer
User Guide
13-21
Standard/Booklet Maker Finisher
5.
Close the Right Cover on the finisher.
Note
A message will display and the machine will not operate if the right cover is open even
slightly.
Paper Jams at Lever 3g and Knob 3f
1.
2.
Make sure that the machine has stopped printing.
Open the Right Cover on the finisher.
3.
Move the lever 3g and turn the knob 3f and remove the jammed paper.
13-22
Xerox® Color C60/C70 Printer
User Guide
Standard/Booklet Maker Finisher
Note
If paper is torn, check inside the machine and remove it.
4.
Return the lever 3g to its original position.
5.
Close the Right Cover on the finisher.
Note
A message will display and the machine will not operate if the right cover is open even
slightly.
Paper Jams at Lever 4b and Knob 3a
1.
2.
Make sure that the machine has stopped printing.
Open the Right Cover on the finisher.
3.
Move the lever 4b and turn the knob 3a; remove the jammed paper.
Xerox® Color C60/C70 Printer
User Guide
13-23
Standard/Booklet Maker Finisher
Note
If paper is torn, check inside the machine and remove it.
4.
Return the lever 4b to its original position.
5.
Close the Right Cover on the finisher.
Note
A message will display and the machine will not operate if the right cover is open even
slightly.
Paper Jams at Lever 2a and Knob 3a
1.
2.
Make sure that the machine has stopped printing.
Open the Right Cover on the finisher.
13-24
Xerox® Color C60/C70 Printer
User Guide
Standard/Booklet Maker Finisher
3.
Move the lever 2a and turn the knob 3a; remove the jammed paper.
Note
If paper is torn, check inside the machine and remove it.
4.
Return the lever 2a to its original position.
5.
Close the Right Cover on the finisher.
Note
A message will display and the machine will not operate if the right cover is open even
slightly.
Xerox® Color C60/C70 Printer
User Guide
13-25
Standard/Booklet Maker Finisher
Paper Jams at Lever 2b and Knob 2c
1.
2.
Make sure that the machine has stopped printing.
Open the Right Cover on the finisher.
3.
Move the lever 2b to the left and turn the knob 2c to the right; remove the jammed
paper.
Note
If paper is torn, check inside the machine and remove it.
4.
Return the lever 2b to its original position.
13-26
Xerox® Color C60/C70 Printer
User Guide
Standard/Booklet Maker Finisher
5.
Close the Right Cover on the finisher.
Note
A message will display and the machine will not operate if the right cover is open even
slightly.
Paper Jams at 2c, 2e, 2f, and 2d
1.
2.
Make sure that the machine has stopped printing.
Open the Right Cover on the finisher.
3.
Pull out the folder output tray (2d), swing lever 2e/2f to the right, and remove the
jammed paper.
Note
If paper is torn, check inside the machine and remove it.
4.
If you cannot remove the paper, return the lever 2e/2f to its original position. Swing
the lever 2e/2f, turn the knob 2c to the right, and remove the jammed paper.
Xerox® Color C60/C70 Printer
User Guide
13-27
Standard/Booklet Maker Finisher
5.
Return the opened lever ( 2f) or ( 2e) to its original position, and close the output
tray ( 2d).
6.
Close the Right Cover on the finisher.
Note
A message will display and the machine will not operate if the right cover is open even
slightly.
Paper Jams at 2d and Lever 2g
1.
2.
Make sure that the machine has stopped printing.
Open the Right Cover on the finisher.
3.
Pull out the folder output tray (2d), swing lever 2g out, and remove the jammed
paper.
13-28
Xerox® Color C60/C70 Printer
User Guide
Standard/Booklet Maker Finisher
Note
If paper is torn, check inside the machine and remove it.
4.
Return the opened lever (2g) to its original position, and close the output tray (2d).
5.
Close the Right Cover on the finisher.
Note
A message will display and the machine will not operate if the right cover is open even
slightly.
Paper Jams at Unit 4 and Knob 4a
1.
2.
Make sure that the machine has stopped printing.
Open the Right Cover on the finisher.
Xerox® Color C60/C70 Printer
User Guide
13-29
Standard/Booklet Maker Finisher
3.
Pull out unit 4.
4.
Turn the knob 4a to remove the jammed paper from the left side of unit 4.
Note
If paper is torn, check inside the machine and remove it.
5.
Return unit 4 to its original position.
6.
Close the Right Cover on the finisher.
Note
A message will display and the machine will not operate if the right cover is open even
slightly.
Paper Jams at Finisher Top Tray
1.
2.
Make sure that the machine has stopped printing.
Remove jammed paper from the finisher top tray.
13-30
Xerox® Color C60/C70 Printer
User Guide
Standard/Booklet Maker Finisher
Note
If paper is torn, check inside the machine and remove it.
3.
Open and close the finisher right cover.
Note
The machine will not operate if the cover is open even slightly.
Paper Jams at Finisher Stacker Tray
1.
2.
Make sure that the machine has stopped printing.
Remove jammed paper from the finisher stacker tray.
Xerox® Color C60/C70 Printer
User Guide
13-31
Standard/Booklet Maker Finisher
Note
If paper is torn, check inside the machine and remove it.
3.
Open and close the finisher right cover.
Note
The machine will not operate if the cover is open even slightly.
Paper Jams at the Optional Booklet Maker Tray
1.
2.
Make sure that the machine has stopped printing.
Open the Right Cover on the finisher.
3.
Turn knob 4a and remove any jammed paper from the optional booklet maker tray.
13-32
Xerox® Color C60/C70 Printer
User Guide
Standard/Booklet Maker Finisher
Note
If paper is torn, check inside the machine and remove it.
4.
Close the Right Cover on the finisher.
Note
A message will display and the machine will not operate if the right cover is open even
slightly.
Stapler Faults
Follow the procedures provided when the output is not stapled or the staples are bent.
Contact our Customer Support Center if the problem persists after you have tried the
following solutions. Stapler faults on output may look similar to the ones shown in the
following illustration.
1.
2.
3.
4.
5.
6.
7.
No staple
Bent staple
One side of staple rising up
Staple bent in reverse direction
Flattened staple
Entire staple rising up
Staple rising up with center pressed in
If the output is stapled as shown in the figure above, contact our Customer Support
Center.
Xerox® Color C60/C70 Printer
User Guide
13-33
Standard/Booklet Maker Finisher
Note
Depending on the type of paper that is being stapled, the stapled nails may be bent. If
the bent nails are stuck inside the machine, they may eventually cause paper jams.
Remove the bent staple when opening the staple cartridge cover. If you do not remove
the bent staple, a staple jam may occur as a result. Use the staple cartridge cover only
when removing the bent staple.
Staple Jams in the Standard Staple Cartridge
Note
Always check inside the finisher for any individual staples or staple remnants.
1.
2.
Make sure that the machine has stopped printing.
Open the Right Cover on the finisher.
3.
Grasp the Staple Cartridge handle located at R1, and pull out the staple cartridge
from the finisher.
4.
Check the inside of the finisher for any remaining staples, and if necessary, remove
them.
Open the staple cartridge unit as shown and remove the jammed staple.
5.
13-34
Xerox® Color C60/C70 Printer
User Guide
Standard/Booklet Maker Finisher
Warning
To avoid injury to your fingers, carefully remove the jammed staples from the
cartridge.
6.
Reinstall the cartridge unit to its original position in the finisher.
7.
Close the Right Cover on the finisher.
Note
A message will display and the machine will not operate if the right cover is open even
slightly.
Staple Jams in the Booklet Maker Cartridge
Note
Always check inside the finisher for any individual staples or staple remnants.
1.
2.
Make sure that the machine has stopped printing.
Open the Right Cover on the finisher.
Xerox® Color C60/C70 Printer
User Guide
13-35
Standard/Booklet Maker Finisher
3.
While pressing the lever to the right, pull out the booklet staple cartridge unit.
4.
Hold the tabs of the staple cartridge unit and lift to remove it.
5.
Remove the jammed staples from the cartridge.
Warning
To avoid injury to your fingers, carefully remove the jammed staples from the
cartridge.
13-36
Xerox® Color C60/C70 Printer
User Guide
Standard/Booklet Maker Finisher
6.
While holding the tabs of a new staple cartridge, push it into the unit.
7.
Push the staple cartridge unit to its original position in the machine.
8.
Close the Right Cover on the finisher.
Note
A message will display and the machine will not operate if the right cover is open even
slightly.
Reinserting a Misaligned Standard Staple Cartridge
Use this procedure if the standard staple cartridge is inserted incorrectly into the machine.
Xerox® Color C60/C70 Printer
User Guide
13-37
Standard/Booklet Maker Finisher
Note
Always check inside the finisher for any individual staples or staple remnants.
1.
2.
Make sure that the machine has stopped printing.
Open the Right Cover on the finisher.
3.
Grasp the Staple Cartridge handle located at (R1), and pull out the staple cartridge
from the finisher.
4.
If necessary, raise the staple cartridge unit as shown and remove the jammed staple.
5.
Move the lever on the rear of the staple cartridge unit in the downward direction.
13-38
Xerox® Color C60/C70 Printer
User Guide
Standard/Booklet Maker Finisher
6.
While holding the lever down, turn over the unit and remove the staple cartridge
from the unit.
7.
Detach the outside staples along the line.
8.
Push a new staple cartridge into the unit.
Xerox® Color C60/C70 Printer
User Guide
13-39
Standard/Booklet Maker Finisher
9.
Reinstall the cartridge unit to its original position in the finisher.
10. Close the Right Cover on the finisher.
Note
A message will display and the machine will not operate if the right cover is open even
slightly.
Fault Codes
If an error caused the printing to end abnormally, or a malfunction occurred in the
Booklet Maker Finisher, then an error code is displayed.
If an error code appears that is not listed in the table below, or if an error persists after
following the listed solution, then contact your Xerox Customer Support Center.
If an error code is displayed, all print data of the machine as well as print data stored
in the machine's built-in memory is discarded.
13-40
Xerox® Color C60/C70 Printer
User Guide
Standard/Booklet Maker Finisher
Fault Code
Possible Cause
012-125, 012-132, 012211, 012-212, 012-213,
012-214, 012-215, 012216, 012-217, 012-218,
012-219, 012-221, 012223, 012-225, 012-226,
012-227, 012-228, 012229, 012-230, 012-235,
012-236, 012-237, 012238, 012-239, 012-240,
012-241, 012-243, 012246, 012-247, 012-248,
012-250, 012-251, 012252, 012-253, 012-254,
012-255, 012-260, 012263, 012-264, 012-265,
012-282, 012-283, 012291, 012-296
The Finisher malfunctioned
012-400
Staple Waste Container near Follow the procedures to remove and
full
replace the staple waste container in
the finisher.
012-949
Finisher Puncher Waste Con- Check that the punch waste container
tainer is not attached
is installed in the finisher and inserted
correctly.
024-931
The Staple Waste Container
is full or near full
Remove the Staple Waste Container
and reinstall a new one.
024-932
The Staple Waste Container
is not attached
Check that the Staple Waste Container is installed in the finisher and inserted correctly.
024-943
The booklet staple cartridge Check the staple cartridge and reset
is empty or stapling error oc- correctly. If necessary, replace with a
curred.
new cartridge. Resume job.
024-957
Inserter trays are empty / out Add paper to the paper trays of the
of paper
Inserter.
024-974
Designated paper size and
the size of paper in the tray
differs when feeding paper
Reset the paper or cancel the job.
024-976
Finisher staple fault
Check staples and reset correctly.
024-977
Finisher staple feeding is not Check staples and reset correctly.
ready
024-978
Booklet Finisher staple opera- Check staples and reset correctly.
tion is not ready
024-979
The staple cartridge is empty Check staples. Follow procedures to
remove and replace staple cartridge.
Xerox® Color C60/C70 Printer
User Guide
Recommended Solution
• Check for any obstructions in the
paper path and clear them.
• Power Off/On the machine, and if
necessary, resend/restart your
print job. If the error persists, contact the Customer Support Center.
13-41
Standard/Booklet Maker Finisher
Fault Code
Possible Cause
024-980
The finisher stacker tray is full Remove all paper from the stacker
tray.
024-981
The finisher top tray is full
024-982
The finisher stacker tray lower Remove all paper from the stacker
safety warning is on
tray and remove any other obstructions.
024-983
The finisher booklet tray is full Remove all paper from the booklet
tray.
024-984
The booklet stapler low staple Remove all paper from the booklet
F signal is on
tray.
024-985
The booklet stapler low staple Remove all paper from the booklet
R signal is on
tray.
024-987
The booklet folder tray is full Remove all paper from the tray. Set
the output tray for threefold.
024-988
The booklet folder tray is full Check that the folder tray is correctly
attached and set.
024-989
There is a problem with the
booklet maker stapler
Check the staple cartridge and reset
correctly.
047-320
A communication error has
occurred with the Finisher
Power Off/On the machine. If the error persists, contact the Customer
Support Center.
112-700
Punch Waste Container is full Remove and empty the waste containor near full
er and reinstall.
116-790
The settings for stapling are Confirm the staple position and try
canceled and prints the data to print again.
124-705
The settings for punching are Confirm the punching position and
canceled
try to print again.
124-706
The settings for folding are
canceled
124-709
The number of pages exceeds Decrease the number of pages, or
the number of pages that can cancel the stapling settings, then try
be stapled
to print again.
13-42
Recommended Solution
Remove all paper from the finisher
top tray.
Confirm the folding settings and try
to print again.
Xerox® Color C60/C70 Printer
User Guide
Standard/Booklet Maker Finisher
Specifications
Standard/Booklet Maker Finisher Specifications
Item
Specification
Top Tray
Capacity: 500 sheets
Supported paper sizes: Maximum: SRA3, 13x19 in., 12.6 x 19.2
in., 330x488mm (custom size) Minimum: 100x148mm (SEF), 4x6
in. (SEF), A6 (SEF) postcards
Supported paper weight: 64-300 gsm
Transparencies: send to top tray of the finisher only; stacker
middle tray cannot accept
Collated / uncollated
Stacker (middle) tray
Capacity: 2,000 sheets, 200 sets
Supported paper sizes: Maximum: SRA3, 13x19 in., 330x488mm
(custom size) Minimum: B5, Executive (7.25 x 10.5 in.)
Supported paper weight: 64-300 gsm
Collated / uncollated (offset available)
Tray T1 (Post-Process Insert- Supported paper sizes: Maximum: A3/11 x 17 in. Minimum: B5,
er; also called “Interposer”) Executive (7.25 x 10.5 in.)
The machine does not print on paper loaded in Tray 8.
Capacity: 200 sheets when using Xerox 20 lb./75 gsm paper.
Paper type: 64-220 gsm
Optional C/Z Fold tray
Capacity: minimum 30 sheets
Supported paper weight: 64-90 gsm
Supported paper sizes: A4 (SEF) and 8.5x11 in. (SEF)
Xerox® Color C60/C70 Printer
User Guide
13-43
Standard/Booklet Maker Finisher
Item
Specification
Booklet Creation/Single Fold Maximum number of sheets:
• Fold and Staple: 25 sheets (64 - 79 gsm) (May need service
call to enable.)
• Fold only: 5 sheets
When using Xerox 20 lb./75 gsm paper, only 14 sheets can be
stapled if adding a cover. Paper sizes:
• Maximum: A3, 13 x 18 in.
• Minimum: A4 SEF, 8.5 x 11 in. SEF
Paper Type: Fold only or Fold and Staple: 64-220 gsm uncoated,
106-220 gsm coated up to 17 inches long.
Paper Weights/Booklet Capacity:
• 64-79 gsm, Uncoated: 25 sheets (May need service call to
enable.)
• 80-90 gsm, Uncoated: 20 sheets
• 91-105 gsm, Uncoated: 10 sheets
• 106-128 gsm, Uncoated: 10 sheets, Coated: 10 sheets
• 129-150 gsm, Uncoated: 10 sheets, Coated: 10 sheets
• 151-176 gsm, Uncoated: 10 sheets, Coated: 10 sheets
• 177-220 gsm, Uncoated: 5 sheets, Coated: 5 sheets
Note
When using light-weight stocks, media jams may occur with Booklet Creation, Single
Fold, and stapling for output that is 25 sheets or more. If media jams do occur, it is
recommended that a different media type is selected for the job.
Optional C/Z Folder Specifications
Item
Specification
Z-Fold Half Sheet
Z-paper size: 11 x 17 in./A3, 10 x 14 in./B4, 8K
Paper type: 16-24 lb./64-90 gsm
Output tray: Stacker (middle) tray
Maximum Capacity: 80 sheets (A3/11 x 17 in. Xerox 20 lb./75
gsm paper Z folding) 20 sheets for 8K and 10 x 14 in./B4
13-44
Xerox® Color C60/C70 Printer
User Guide
Standard/Booklet Maker Finisher
Item
Specification
C-Fold and Z-Fold
Paper size: A4/8.5 x 11 inches
Number of sheets to be folder: 1 sheet
Minimum capacity: 30 sheets when using Xerox 20 lb. / 75
gsm paper.
Paper Type: 16-24 lb. / 64-90 gsm
Output Tray: C/Z Folder tray
Single Fold
Xerox® Color C60/C70 Printer
User Guide
Refer to Booklet Creation/Single Fold specifications for more
information
13-45
Standard/Booklet Maker Finisher
13-46
Xerox® Color C60/C70 Printer
User Guide
14
SquareFold Trimmer
Module
This chapter includes:
• Overview
• Identifying the Components
• Square Fold Feature
• Trimmer Feature
• Hints and Tips
• Problem Solving
• Specifications
Overview
The SquareFold Trimmer Module is an optional finishing device that is used in conjunction
with another optional finishing device that contains a booklet maker.
Xerox® Color C60/C70 Printer
User Guide
14-1
SquareFold Trimmer Module
Note
The SquareFold Trimmer Module requires a finisher with a booklet maker attached.
The SquareFold Trimmer Module:
• Receives the booklet from the booklet maker area of the finisher
• Flattens the booklet spine, thereby reducing the booklet's thickness and giving it the
appearance of a perfect-bound book
• Trims/cuts away the face (edge) of the booklet, resulting in a neat finished edge
The booklet is assembled and stapled in the booklet area of the finisher; therefore, the
booklet enters the SquareFold Trimmer Module already assembled. Any adjustments to
the image of the original and its placement on the booklet page must be done either
from the machine's UI or from your print driver.
Note
Always refer to the Hints and Tips section of this manual before using the SquareFold
Trimmer Module. The Hints and Tips section provides valuable information about setting
up your jobs, which in turn ensures the best possible output for your print/copy jobs.
You may want to run one or more test prints/copies before running larger jobs.
14-2
Xerox® Color C60/C70 Printer
User Guide
SquareFold Trimmer Module
Identifying the Components
Main Components
The main components consist of:
1.
2.
3.
4.
5.
Top Left Cover: Open this cover to remove paper jams. The square fold mechanism
is found in this area.
Top Right Cover: Open this cover to remove paper jams. The trimming mechanism
is found in this area.
Booklet Output Tray: This tray receives square-fold booklet output from the finisher.
Control Panel: The Control Panel consists of a mimic display, buttons, and various
indicator lights.
Trimmer Waste Container: Collects scrap/waste from the trimmer. Pull open to
remove and dispose of trimmer waste scraps.
Note
The top covers cannot be opened during normal operation or when the machine is idle.
The covers can be opened only when an indicator is lit and a jam/fault occurs within the
SquareFold Trimmer Module.
Xerox® Color C60/C70 Printer
User Guide
14-3
SquareFold Trimmer Module
Paper Path
1.
2.
3.
4.
5.
The booklet leaves the booklet area of the finisher and enters the SquareFold
Trimmer Module.
The Booklet Exit sensor (in the SquareFold Trimmer Module) detects the lead edge
(spine) of the booklet and moves the booklet to square fold area.
Once the booklet spine reaches the square fold area, the booklet is clamped and
the square-folding operation begins.
The booklet is flattened and the spine squared according to the square-fold setting
indicated on the Control Panel.
After the booklet is flattened and the spine squared, it is moved to the trimmer area.
• Based on the finished booklet size, the booklet is moved until the trail edge
reaches the trimmer cutter.
• The trail edge is trimmed/cut (based on the finished booklet size entered for the
Trimmer Mode Setting).
6.
The booklet then moves to the exit area where it is transported to the Booklet Output
Tray.
Note
Booklets exiting/leaving the SquareFold Trimmer Module may contain trim
remnants/scraps from the previously trimmed booklet. This is due to static electricity
build-up and is normal. If booklets contain trim remnants/scraps, simply remove and
discard them.
14-4
Xerox® Color C60/C70 Printer
User Guide
SquareFold Trimmer Module
Control Panel
The Control Panel consists of the following:
1.
Fault indicators: These indicators light when a fault or jam occurs in a particular
area of the SquareFold Trimmer Module.
• 1a) This indicator lights when a jam occurs as the booklet is leaving the exit area
of the finisher.
• 1b) This indicator lights when a jam occurs in the square fold area.
• 1c) This indicator lights when a jam occurs in the trimmer area.
• 1d) This indicator lights when the Trimmer Waste Container is pulled out or when
it is full.
Note
If one of these indicators (1a, 1b, 1c) is lit, the top covers can be opened, and the
jam/fault cleared; otherwise, during normal operation or when the machine is idle,
the top covers cannot be opened.
2.
Square Fold options: This area of the control panel contains the following:
• 2a) Settings button: Press this button to adjust the Square Fold setting; refer to
the next item.
• 2b) Square Fold options: Select the desired setting; these settings are discussed
in more detail in the section entitled “Square Fold options.”
Note
The Square Fold options are available from your computer’s print driver, from your print
server, or from your machine’s UI (if it is a copier/printer). This is discussed in more detail
in the section entitled "Square Fold options."
Xerox® Color C60/C70 Printer
User Guide
14-5
SquareFold Trimmer Module
Square Fold Feature
The Square Fold feature can be selected/accessed from your computer’s print driver or
from the print server.
Note
The Square Fold feature is available only when your machine is connected to both a
finisher with a booklet maker and the SquareFold Trimmer Module.
Note
The term “Book Pressing” is used synonymously with the terms “Square Fold” or “Square
Folding.”
Square Fold Options
The Square Fold (Book Pressing) feature can be switched on or off based on user
preference. When the feature is switched on, you can select one of five options depending
on your requirements for the finished booklet job.
Note
For the remainder of this section, the SquareFold Trimmer Module’s Control Panel and
the machine's UI screen are shown. The individual print server and print driver screens
are not shown. The descriptions given for each of the Square Fold options are applicable
for network print jobs and apply to any print server/print driver connected to the machine.
1.
2.
3.
14-6
Square Fold/Book Pressing options as shown on the machine’s UI
SquareFold Trimmer Module Control Panel
+2/Higher/High 2: Use this setting when you want the most amount of pressure
applied to the spine of the booklet. The more pressure applied to the booklet, the
more square the booklet spine will be. +2 is the greatest amount of pressure that
can be applied to the booklet.
Xerox® Color C60/C70 Printer
User Guide
SquareFold Trimmer Module
Additionally, you may want to select this setting when your finished booklet is five
pages or less and on heavier weight paper (200 gsm or greater).
4.
5.
6.
7.
+1/High/High 1: Use this setting when you want a greater amount of pressure
applied to the spine of the booklet, but not as much pressure as the +2 setting uses.
Auto/Normal: This is the machine default setting and is used for most jobs.
-1/Low/Low 1: Use this setting when you want less pressure applied to the spine of
the booklet. The less pressure applied to the booklet, the more rounded the booklet
spine will be.
-2/Lower/Low 2: Select this setting when your finished booklet is five pages or less
and on lighter weight paper (100 gsm or lower). -2 is the least amount of pressure
that can be applied to the booklet.
Choose the setting that best fits your needs for the booklet output.
Note
You may want to run one or more test prints before running larger jobs.
The following illustration shows two different booklets: one booklet which was
square-folded and one booklet that was not square-folded.
1.
2.
This booklet was not square-folded. It has a more rounded, thicker appearance to
the spine of the booklet.
This booklet was square-folded. The booklet spine is flattened and squared, giving
it the appearance of a perfect-bound book.
Trimmer Feature
The Trimmer Feature can be selected/accessed from your computer’s print driver or from
the print server.
Note
The Trimmer feature is available only when your machine is connected to both a finisher
with a booklet maker and the SquareFold Trimmer Module.
Xerox® Color C60/C70 Printer
User Guide
14-7
SquareFold Trimmer Module
Trimmer Options
When using the Trimmer Options, always consider the following:
• Booklets exiting/leaving the SquareFold Trimmer Module may contain trim
remnants/scraps from the previously trimmed booklet. This is due to static electricity
build-up and is normal. If booklets contain trim remnants/scraps, simply remove and
discard them.
• The Trimmer feature can be switched on or off based on user preference. When the
feature is switched on, you can adjust the trim setting in 0.1 mm/0.0039 in. increments
depending on your requirements for the finished booklet job.
Note
For the remainder of this section, the machine's UI screen is shown. The individual print
server and print driver screens are not shown. The descriptions given for each of the
Trimmer options are applicable for network print jobs, and apply to any print server/print
driver connected to the machine.
1.
2.
Select the buttons to decrease or increase the trimmer setting. Adjustments are
made in 0.1 mm/0.0039 inch increments.
The trimmer setting is based on:
•
•
•
•
The number of sheets in the finished booklet,
The finished booklet width size (such as 8.5 in./210 mm or 5.5 in./149 mm),
The media type (for example coated/uncoated, glossy), and
The media weight
Note
Important! You may have to experiment with various settings in order to determine the
best settings for your particular job. Also, you may want to run one or more test prints
before running larger jobs in order to ensure the best possible booklet output.
14-8
Xerox® Color C60/C70 Printer
User Guide
SquareFold Trimmer Module
Note
Trim settings cannot be adjusted to remove less than 2 mm (0.078 in.) or more than 20
mm (0.787 in.) of edge material from the booklet. Adjustments less than 2 mm (0.078
in.) may produce poor trim quality, and adjustments greater 20 mm (0.078 in.) will result
in no trimming to the booklet edge.
Choose the setting that best fits your needs for the booklet output.
Trim Guidelines
The following table shows various scenarios using different paper weights, media types,
and trim setting selections. Use this table as a guideline when selecting a trim setting
for your specific job.
Note
The settings shown in the following table are provided as examples and are not meant
to represent every possible job scenario; again, use this table as a guideline only.
Paper Size
Finished Booklet
Size
Paper Weight
(lbs / gsm)
1
8.5x11 in./A4
(210x298mm)
5.5x8.5 in.
(149x210mm)
20 lbs. (75 gsm) 130
20
2
8.5x11 in./A4
(210x298mm)
5.5x8.5 in.
(149x210mm)
24 lbs. (90 gsm) 125
14
3
8.5x11 in./A4
(210x298mm)
5.5x8.5 in.
(149x210mm)
32 lbs.
(120gsm)
135
10
4
8.5x11 in./A4
(210x298mm)
5.5x8.5 in.
(149x210mm)
20 lbs. (75 gsm) 125
10
5
8.5x11 in./A4
(210x298mm)
5.5x8.5 in.
(149x210mm)
80 lbs.
(120gsm)
12
6
8.5x14 in./B4
(250x353mm)
8.5x7 in.
(250x176.5mm)
20 lbs. (75 gsm) 172
6
7
8.5x14 in./B4
(250x353mm)
8.5x7 in.
(250x176.5mm)
24 lbs. (90 gsm) 170
6
8
11x17 in./A3
(297x420mm)
8.5x11 in./A4
(210x297mm)
24 lbs. (90 gsm) 200
14
9
11x17 in./A3
(297x420mm)
8.5x11 in./A4
(210x297mm)
80 lbs.
(216gsm)
5
10
11x17 in./A3
(297x420mm)
8.5x11 in./A4
(210x297mm)
20 lbs. (80 gsm) 210
22
11
11x17 in./A3
(297x420mm)
8.5x11 in./A4
(210x297mm)
24 lbs. (90 gsm) 210
8
Xerox® Color C60/C70 Printer
User Guide
Trim Setting Pages in
(mm)
Finished
Booklet
135
205
14-9
SquareFold Trimmer Module
Paper Size
Finished Booklet
Size
Paper Weight
(lbs / gsm)
Trim Setting Pages in
(mm)
Finished
Booklet
12
11x17 in./A3
(297x420mm)
8.5x11 in./A4
(210x297mm)
80 lbs.
(120gsm)
205
10
13
12x18 in.
(305x458mm)
6x9 in.
(152x229mm)
80 lbs.
(120gsm)
220
6
14
12x18 in.
(305x458mm)
6x9 in.
(152x229mm)
80 lbs.
(120gsm)
215
5
15
12x18 in.
(305x458mm)
6x9 in.
(152x229mm)
80 lbs.
(120gsm)
210
4
16
12x18 in.
(305x458mm)
6x9 in.
(152x229mm)
28 lbs.
(105gsm)
220
16
17
12x18 in.
(305x458mm)
6x9 in.
(152x229mm)
80 lbs.
(120gsm)
210
14
Hints and Tips
Printing Full-page Images on Booklets
When using full-page images, ensure that the finished booklet size accommodates any
full-page images, and that when the booklet is trimmed, these images are not truncated.
Refer to the illustration.
1.
2.
This booklet has preprinted front and back covers with a full-page image. It was
printed on 8.5 x 14 in./B4 paper. The front cover, which was trimmed, displays the
entire image.
This same booklet was printed on 8.5 x 11 in./A4 paper. The image on the front
cover is truncated after trimming it.
14-10
Xerox® Color C60/C70 Printer
User Guide
SquareFold Trimmer Module
Before you print any booklet job, you should consider your whole job, including the
following:
•
•
•
•
•
What is the desired size of the finished booklet?
Does the booklet contain full-page images?
Are you using preprinted covers with full-page images?
Are you trimming the booklet?
Do you need to shift any full-page images in order to ensure they fit on the finished
booklet?
These are important questions which can affect the output of your booklet jobs, especially
if you are using full-page images and trimming the booklet edges.
Follow These Tips
Follow these tips to ensure you get your desired output:
• Always run one or more test prints of your job before running a larger output quantity.
• Review your test prints for truncated images/text.
• If any images/text need shifting, use the various selections from your application's
print driver; refer to your print driver's Help information.
• Remember: it may take one or more test prints before you achieve your desired
output.
Problem Solving
Jam Clearance
Note
The top covers cannot be opened during normal operation or when the machine is idle.
The covers can be opened only when an indicator is lit and a jam/fault occurs within the
SquareFold Trimmer Module. For indicator details, refer to the Control Panel information
earlier in this section.
Xerox® Color C60/C70 Printer
User Guide
14-11
SquareFold Trimmer Module
The paper path is shown in the above illustration. Clear any paper jams that may occur
along the paper path. If a jam occurs, the machine stops printing, and a message may
be displayed on the User Interface (UI).
Note
To determine if the jam/fault is within the finisher or with the SquareFold Trimmer
Module, always begin your troubleshooting with the SquareFold Trimmer Module.
Clearing Jams
Use the following procedure to clear jams or faults and then resume printing:
1.
2.
Follow the instructions displayed on the machine's UI.
If instructed by the machine's UI, open the Top Left Cover and the Top Right Cover
of the SquareFold Trimmer Module.
3. Look for any jammed booklets within the SquareFold Trimmer Module paper path
and remove them.
4. Check for loose trim scraps along the paper path and remove them.
5. Close the Top Left and Right Covers.
6. Empty the Trimmer Waste Container.
7. Ensure that the Trimmer Waste Container is completely pushed in/closed.
8. Ensure that all covers on the SquareFold Trimmer Module are closed.
9. If the SquareFold Trimmer Module Control Panel and/or the machine’s UI indicate
there is a still a jam, recheck the SquareFold Trimmer Module (steps 1-8).
10. If necessary, open the finisher to look for jams/faults along the finisher path.
11. Follow the instructions displayed on the machine’s UI to resume printing.
Clearing E1/E2 jams
Use the following procedure to clear jams when the E1 and/or E2 LED is lit on the
SquareFold Trimmer Module Control Panel.
1.
Make sure that the machine is not in operation, and press the button on the left
cover of the Trimmer unit to open the cover.
14-12
Xerox® Color C60/C70 Printer
User Guide
SquareFold Trimmer Module
2.
Remove the jammed paper.
3.
If you cannot remove the paper in Step 2, open the right cover of the finisher.
4.
Turn the knob 4a to the right, and then remove the jammed paper.
Xerox® Color C60/C70 Printer
User Guide
14-13
SquareFold Trimmer Module
5.
Close the left cover of the Trimmer unit.
6.
If you opened the right cover of the finisher in Step 3, close the cover.
Note
A message will be displayed and the machine will not operate if the right cover of the
finisher is even slightly open.
Clearing E3 Jams
Use the following procedure to clear jams when the E3 LED is lit on the SquareFold
Trimmer Module Control Panel.
1.
Make sure that the machine is not in operation, and press the button on the right
cover of the Trimmer unit to open the cover.
2.
Remove the jammed paper.
14-14
Xerox® Color C60/C70 Printer
User Guide
SquareFold Trimmer Module
3.
Close the right cover of the Trimmer unit.
Fault Codes
If a jam/fault occurs in the SquareFold Trimmer Module, the machine’s UI displays a
jam/fault message. The following table provides a list of fault codes for the SquareFold
Trimmer Module and a list of related finisher fault codes.
Note
The top covers cannot be opened during normal operation or when the machine is idle.
The covers can be opened only when an indicator is lit and a jam/fault occurs within the
SquareFold Trimmer Module. For indicator details, refer to the control panel information
earlier in this section.
Fault Code
Possible Cause
Recommended Solution
013-100013101013-102013103013-104013105013-106013303013-915013916013-917013918013-919
Jam/fault with the SquareFold 1.
Trimmer Module
2.
3.
4.
Open the Top Left and Right Covers
of the SquareFold Trimmer Module.
Carefully remove all sheets and
paper scraps from jam clearance
areas.
Close the SquareFold Trimmer
Module Top Left and Right Covers.
Check the Trimmer Waste Container:
• If full, empty the container and
reinsert it into the SquareFold
Trimmer Module
• If the container is partially pulled
out, push it completely in
5.
6.
Xerox® Color C60/C70 Printer
User Guide
If necessary, follow any remaining
instructions on the machine’s UI.
If fault persists, repeat Steps 1-5; if
fault persists after that, call for service.
14-15
SquareFold Trimmer Module
Fault Code
Possible Cause
Recommended Solution
013-221013222013-223013224013-225013226013-227013228013-229013230013-231013232013-233013234013-235013236013-237013238013-239013240013-241013242013-243013246
Jam or communication error 1.
with the SquareFold Trimmer
2.
Module
Power off/on the machine.
If fault persists, call for service.
013-303013-304
A top cover is open.
Open the Top Left and Right Covers
of the SquareFold Trimmer Module.
Close the SquareFold Trimmer
Module Top Left and Right Covers.
If fault persists, power off/on the
machine.
If fault persists, call for service.
1.
2.
3.
4.
013-208013940013-941
The Trimmer Waste Container 1.
is full or has a fault.
2.
3.
4.
5.
6.
013-943
Booklet Tray on the SquareFold Trimmer Module is full.
1.
2.
3.
14-16
Pull open the container and empty
any trimmer scraps from it.
Reinsert the container into the
SquareFold Trimmer Module.
Ensure that the container is fully
pushed in, and that the indicator
light is not lit.
If fault persists, repeat steps 1-3.
If fault persists, power off/on the
machine.
If fault persists, call for service.
Remove any booklets from the tray.
If fault persists, power off/on the
machine.
If fault persists, call for service.
Xerox® Color C60/C70 Printer
User Guide
SquareFold Trimmer Module
Fault Code
Possible Cause
Recommended Solution
012-115012264012-302
Finisher jam or fault.
1.
2.
3.
4.
If machine’s UI continues to reflect
a fault/jam, open the finisher and
remove any jams. Close the finisher
covers.
Follow the instructions shown on
the machine’s UI to resume printing.
If fault persists, power off/on the
machine.
If fault persists, call for service.
Specifications
Item
Paper Size
Specifications
• Maximum: 13x18 in. (330x457 mm)
• Minimum: 8.5x11 in./A4 SEF
Note
The SquareFold Trimmer Module requires both Interface Module
and the Booklet Maker Finisher.
Trim Capacity
Paper Weights
Xerox® Color C60/C70 Printer
User Guide
• 5-20 sheet booklet (up to 80 imaged sides) at 24 lb. (90 gsm)
• 5-25 sheet booklet (up to 100 imaged sides) at 200 lb. (79
gsm)
• Cut amount: 2-20mm, adjustable in 0.1 mm increments
16 lb. bond-90 lb. cover (60-220 gsm)
14-17
SquareFold Trimmer Module
14-18
Xerox® Color C60/C70 Printer
User Guide
15
Regulatory Information
This chapter includes:
• Basic Regulations
• Copy Regulations
• Fax Regulations
• Product Safety Certification
• Material Safety Data Sheets
Basic Regulations
Xerox has tested this printer to electromagnetic emission and immunity standards. These
standards are designed to mitigate interference caused or received by this printer in a
typical office environment.
United States FCC Regulations
This equipment has been tested and found to comply with the limits for a Class A digital
device, pursuant to Part 15 of the FCC Rules. These limits are designed to provide
reasonable protection against harmful interference when the equipment is operated in
a commercial environment. This equipment generates, uses, and can radiate radio
frequency energy. If the equipment is not installed and used in accordance with these
instructions, it can cause harmful interference to radio communications. Operation of
this equipment in a residential area is likely to cause harmful interference. Users are
required to correct the interference at their own expense.
Xerox® Color C60/C70 Printer
User Guide
15-1
Regulatory Information
If this equipment does cause harmful interference to radio or television reception, which
can be determined by turning the equipment off and on, the user is encouraged to try
to correct the interference by one or more of the following measures:
• Reorient or relocate the receiving antenna.
• Increase the separation between the equipment and receiver.
• Connect the equipment into an outlet on a circuit different from that to which the
receiver is connected.
Consult the dealer or an experienced radio/TV technician for help.
Changes or modifications to this equipment not approved by Xerox can void the authority
of the user to operate this equipment.
Warning
To ensure compliance with Part 15 of the FCC rules, use shielded interface cables.
Canada
This Class A digital apparatus complies with Canadian ICES-003.
Cet appareil numérique de la classe A est conforme à la norme NMB-003 du Canada.
Certifications in Europe
The CE mark applied to this equipment symbolizes a declaration of conformity
by Xerox with the following applicable Directives of the European Union as of
the dates indicated:
December 12, 2006 Council Directive 2006/95/EC as amended. This is a directive
on the approximation of the laws of the member states related to low voltage
equipment.
December 15, 2004 Council Directive 2004/108/EC as amended. This directive
is an approximation of the laws of the member states related to electromagnetic
compatibility.
A full declaration of conformity, defining the relevant directives and referenced
standards, can be obtained from your authorized local dealer.
Warning
Changes or modifications to this equipment not specifically approved by the Xerox
Corporation may void the user's authority to operate this equipment.
External radiation from Industrial, Scientific, and Medical (ISM) equipment can interfere
with the operation of this Xerox® device. If external radiation from ISM equipment
interferes this device, contact your Xerox® representative for assistance.
This is a class A product. In a domestic environment, this product can cause radio
frequency interference, in which case the user can be required to take adequate measures.
Shielded cables must be used with this equipment to maintain compliance with Council
Directive 2004/108/EC.
15-2
Xerox® Color C60/C70 Printer
User Guide
Regulatory Information
European Union Lot 4 Imaging Equipment Agreement
Environmental Information
Environmental Information Providing Environmental Solutions and
Reducing Cost
The following information has been developed to assist users and has been issued in
relation to the European Union (EU) Energy Related Products Directive, specifically the
Lot 4 study on Imaging Equipment. This requires manufacturers to improve environmental
performance of in scope products and supports the EU action plan on energy efficiency.
In scope products are Household and Office equipment that meet the following criteria:
• Standard monochrome format products with a maximum speed less than 66 A4
images per minute.
• Standard color format products with a maximum speed less than 51 A4 images per
minute
Environmental Benefits of Duplex Printing
Most Xerox® products have duplex printing, also known as 2-sided printing, capability.
This enables you to print on both sides of the paper automatically, and therefore helps
to reduce the use of valuable resources by reducing your paper consumption. The Lot 4
Imaging Equipment agreement requires that on models greater than or equal to 40
ppm color or greater than or equal to 45 ppm monochrome the duplex function has
been auto enabled, during the setup and driver installation. Some Xerox® models below
these speed bands may also be enabled with 2-sided printing settings defaulted on at
the time of install. Continuing to use the duplex function will reduce the environmental
impact of your work. However, should you require simplex/1-sided printing, you may
change the print settings in the print driver.
Paper Types
This product can be used to print on both recycled and virgin paper, approved to an
environmental stewardship scheme, which complies with EN12281 or a similar quality
standard. Lighter weight paper (60 g/m²), which contains less raw material and thus
save resources per print, may be used in certain applications. We encourage you to check
if this is suitable for your printing needs.
Xerox® Color C60/C70 Printer
User Guide
15-3
Regulatory Information
ENERGY STAR
The ENERGY STAR program is a voluntary scheme to promote the development and purchase of energy efficient models, which help to reduce environmental impact. Details on the ENERGY STAR program and models qualified to ENERGY STAR can be found at the following website: www.energystar.gov/index.cfm?fuseaction=find_a_product.showProductGroup&pgw_c
ode=IEQ.
The ENERGY STAR and ENERGY STAR mark are registered United States
trademarks. The ENERGY STAR Imaging Equipment Program is a team effort
between United States, European Union, and Japanese governments and
the office equipment industry to promote energy-efficient copiers, printers,
fax, multifunction printers, personal computers, and monitors. Reducing
product energy consumption helps combat smog, acid rain, and long-term
changes to the climate by decreasing the emissions that result from generating electricity.
Power Consumption and Energy Saver Activation Time
The amount of electricity a product consumes depends on the way the device is used.
This product is designed and configured to enable you to reduce your electricity costs.
After the last print, the device switches to Ready mode. In this mode, the device can
print again immediately. If the device is not used for an interval of time, the device
switches to Energy Saver mode. In Energy Saver mode, only essential functions remain
active, which permits reduced product power consumption.
The product takes slightly longer to produce the first print after it exits Energy Saver
mode than it takes in Ready mode. This delay is the result of the system waking up from
Energy Saver mode and is typical of most imaging products on the market.
Before you turn off Energy Saver mode or set a long activation time, consider the increase
in product power consumption.
Before you turn off Energy Saver mode or set a long activation time, consider the increase
in product power consumption.
To learn more about Xerox participation in sustainability initiatives, go to:
www.xerox.com/about-xerox/environment/enus.html.
Default Energy Saver Settings for Product
The printer is ENERGY STAR® qualified under the ENERGY STAR Program Requirements
for Imaging Equipment. The transition time from Standby to Energy Saver mode, which
can be up to 240 minutes, is set to a default value of 1 minute. The transition time from
Energy Saver mode to Sleep, which can be up to 240 minutes, is set to a default value
of 1 minute. The transition time from Standby to Sleep for this printer can be up to 480
minutes.
To configure Energy Saver settings, refer to Setting Energy Saver Mode on page 28.
15-4
Xerox® Color C60/C70 Printer
User Guide
Regulatory Information
Germany
Blendschutz
Das Gerät ist nicht für die Benutzung im unmittelbaren Gesichtsfeld am
Bildschirmarbeitsplatz vorgesehen. Um störende Reflexionen am Bildschirmarbeitsplatz
zu vermeiden, darf dieses Produkt nicht im unmittelbaren Gesichtsfeld platziert werden.
Lärmemission
Maschinenlärminformations-Verordnung 3. GPSGV: Der höchste Schalldruckpegel beträgt
70 dB(A) oder weniger gemäß EN ISO 7779.
Importeur
Xerox GmbH
Hellersbergstraße 2-4
41460 Neuss
Deutschland
Turkey RoHS Regulation
In compliance with Article 7 (d), we hereby certify "it is in compliance with the EEE
regulation."
“EEE yönetmeliðine uygundur.”
Eurasian Economic Community Certification
Russia, Belarus, and Kazakhstan are working to establish a common customs union, the Eurasian Economic Community, or EurAsEC. The Eurasian
Economic Community members anticipate sharing a common regulatory
scheme and common EurAsEC certification mark, the EAC Mark.
Ozone Release
This printer produces ozone during normal operation. The amount of ozone produced
is dependent on copy volume. Ozone is heavier than air and is not produced in amounts
large enough to harm anyone. Install the printer in a well-ventilated room.
For more information in the United States and Canada, go to
www.xerox.com/environment. In other markets, please contact your local Xerox
representative or go to www.xerox.com/environment_europe.
Xerox® Color C60/C70 Printer
User Guide
15-5
Regulatory Information
Wireless Compliance
This product generates 13.56 MHz using an Inductive Loop System as a Radio Frequency
Identification Device (RFID). This RFID device complies with the requirements specified
in FCC Part 15, Industry Canada RSS-210, European Council Directive 99/5/EC, and all
applicable local laws and regulations.
Operation of this device is subject to the following two conditions:
• This device may not cause harmful interference.
• This device must accept any interference received, including interference that may
cause undesired operation.
Changes or modifications to this equipment not specifically approved by the Xerox®
Corporation may void the user's authority to operate this equipment.
Labeling Requirements
United States
Radio Frequency Identification Device (RFID) manufacturer and model name must be
listed on the RFID device.
European Union
A CE mark is required on the host product. A notified body number is required next to
the CE mark in cases where a notified body was involved in the RFID approval process.
Notified Body involvement is not mandatory.
Brazil
A Radio Frequency Identification Device model name must be listed on the device.
Copy Regulations
United States
Congress, by statute, has forbidden the reproduction of the following subjects under
certain circumstances. Penalties of fine or imprisonment may be imposed on those guilty
of making such reproductions.
15-6
Xerox® Color C60/C70 Printer
User Guide
Regulatory Information
1.
Obligations or Securities of the United States Government, such as:
• Certificates of Indebtedness.
• National Bank Currency.
• Coupons from Bonds.
• Federal Reserve Bank Notes.
• Silver Certificates.
• Gold Certificates.
• United States Bonds.
• Treasury Notes.
• Federal Reserve Notes.
• Fractional Notes.
• Certificates of Deposit.
• Paper Money.
• Bonds and Obligations of certain agencies of the government, such as FHA and
so on.
• Bonds. United States Savings Bonds may be photographed only for publicity
purposes in connection with the campaign for the sale of such bonds.
• Internal Revenue Stamps. If it is necessary to reproduce a legal document on
which there is a canceled revenue stamp, this may be done provided the
reproduction of the document is performed for lawful purposes.
• Postage Stamps, canceled or uncanceled. For philatelic purposes, Postage Stamps
may be photographed, provided the reproduction is in black and white and is
less than 75% or more than 150% of the linear dimensions of the original.
• Postal Money Orders.
• Bills, Checks, or Drafts of money drawn by or upon authorized officers of the
United States.
• Stamps and other representatives of value, of whatever denomination, which
have been or may be issued under any Act of Congress.
• Adjusted Compensation Certificates for Veterans of the World Wars.
2.
Obligations or Securities of any Foreign Government, Bank, or Corporation.
Xerox® Color C60/C70 Printer
User Guide
15-7
Regulatory Information
3.
Copyrighted materials, unless permission of the copyright owner has been obtained
or the reproduction falls within the "fair use" or library reproduction rights provisions
of the copyright law. Further information of these provisions may be obtained from
the Copyright Office, Library of Congress, Washington, D.C. 20559. Ask for Circular
R21.
4.
Certificate of Citizenship or Naturalization. Foreign Naturalization Certificates may
be photographed.
5.
Passports. Foreign Passports may be photographed.
6.
Immigration papers.
7.
Draft Registration Cards.
8.
Selective Service Induction papers that bear any of the following Registrant's
information:
• Earnings or Income.
• Court Record.
• Physical or mental condition.
• Dependency Status.
• Previous military service.
Exception: United States military discharge certificates may be photographed.
9.
Badges, Identification Cards, Passes, or Insignia carried by military personnel, or by
members of the various Federal Departments, such as FBI, Treasure, and so on
(unless photograph is ordered by the head of such department or bureau).
Reproducing the following is also prohibited in certain states:
• Automobile Licenses.
• Drivers' Licenses.
• Automobile Certificates of Title.
The preceding list is not all inclusive, and no liability is assumed for its completeness or
accuracy. In case of doubt, consult your attorney.
For more information about these provisions contact the Copyright Office, Library of
Congress, Washington, D.C. 20559. Ask for Circular R21.
Canada
Parliament, by stature, has forbidden the reproduction of the following subjects under
certain circumstances. Penalties of fine or imprisonment may be imposed on those guilty
of making such reproductions.
• Current bank notes or current paper money
• Obligations or securities of a government or bank
15-8
Xerox® Color C60/C70 Printer
User Guide
Regulatory Information
• Exchequer bill paper or revenue paper
• The public seal of Canada or of a province, or the seal of a public body or authority
in Canada, or of a court of law
• Proclamations, orders, regulations, or appointments, or notices thereof (with intent
to falsely cause same to purport to have been printed by the Queens Printer for
Canada, or the equivalent printer for a province)
• Marks, brands, seals, wrappers, or designs used by or on behalf of the Government
of Canada or of a province, the government of a state other than Canada or a
department, board, Commission, or agency established by the Government of Canada
or of a province or of a government of a state other than Canada
• Impressed or adhesive stamps used for the purpose of revenue by the Government
of Canada or of a province or by the government of a state other than Canada
• Documents, registers, or records kept by public officials charged with the duty of
making or issuing certified copies thereof, where the copy falsely purports to be a
certified copy thereof
• Copyrighted material or trademarks of any manner or kind without the consent of
the copyright or trademark owner
This list is provided for your convenience and assistance, but it is not all-inclusive, and
no liability is assumed for its completeness or accuracy. In case of doubt, consult your
solicitor.
Other Countries
Copying certain documents may be illegal in your country. Penalties of fine or
imprisonment may be imposed on those found guilty of making such reproductions.
• Currency notes
• Bank notes and checks
• Bank and government bonds and securities
• Passports and identification cards
• Copyright material or trademarks without the consent of the owner
• Postage stamps and other negotiable instruments
This list is not inclusive and no liability is assumed for either its completeness or accuracy.
In case of doubt, contact your legal counsel.
Xerox® Color C60/C70 Printer
User Guide
15-9
Regulatory Information
Fax Regulations
United States
Fax Send Header Requirements
The Telephone Consumer Protection Act of 1991 makes it unlawful for any person to
use a computer or other electronic device, including a fax machine, to send any message
unless such message clearly contains in a margin at the top or bottom of each transmitted
page or on the first page of the transmission, the date and time it is sent and an
identification of the business or other entity, or other individual sending the message
and the telephone number of the sending machine or such business, other entity, or
individual. The telephone number provided may not be a 900 number or any other
number for which charges exceed local or long-distance transmission charges.
For instructions on programming the Fax Send Header information, refer to the section
of the System Administrator Guide on Setting Transmission Defaults.
Data Coupler Information
This equipment complies with Part 68 of the FCC rules and the requirements adopted
by the Administrative Council for Terminal Attachments (ACTA). On the cover of this
equipment is a label that contains, among other information, a product identifier in the
format US:AAAEQ##TXXXX. If requested, this number must be provided to the Telephone
Company.
A plug and jack used to connect this equipment to the premises wiring and telephone
network must comply with the applicable FCC Part 68 rules and requirements adopted
by the ACTA. A compliant telephone cord and modular plug is provided with this product.
It connects to a compatible modular jack that is also compliant. See installation
instructions for details.
You can safely connect the printer to the following standard modular jack: USOC RJ-11C
using the compliant telephone line cord (with modular plugs) provided with the
installation kit. See installation instructions for details.
The Ringer Equivalence Number (REN) is used to determine the number of devices that
can be connected to a telephone line. Excessive RENs on a telephone line could result
in the devices not ringing in response to an incoming call. In most but not all areas, the
sum of RENs should not exceed five (5.0). To be certain of the number of devices that
can be connected to a line, as determined by the RENs, contact the local Telephone
Company. For products approved after July 23, 2001, the REN is part of the product
identifier that has the format US:AAAEQ##TXXXX. The digits represented by ## are the
REN without a decimal point (for example, 03 is a REN of 0.3). For earlier products, the
REN is separately shown on the label.
15-10
Xerox® Color C60/C70 Printer
User Guide
Regulatory Information
To order the correct service from the local Telephone Company, you could also have to
quote the codes in the following list:
• Facility Interface Code (FIC) = 02LS2
• Service Order Code (SOC) = 9.0Y
Caution
Ask your local Telephone Company for the modular jack type installed on your line.
Connecting this machine to an unauthorized jack can damage telephone company
equipment. You, not Xerox, assume all responsibility and/or liability for any damage
caused by the connection of this machine to an unauthorized jack.
If this Xerox® equipment causes harm to the telephone network, the Telephone Company
could temporarily discontinue service to the telephone line to which it is connected. If
advance notice is not practical, the Telephone Company notifies you of the disconnection
as soon as possible. If the Telephone Company interrupts your service, they can advise
you of your right to file a complaint with the FCC if you believe that it is necessary.
The Telephone Company could change its facilities, equipment, operations, or procedures
which could affect the operation of the equipment. If the Telephone Company changes
something that affects the operation of the equipment, they should notify you in order
for you to make necessary modifications to maintain uninterrupted service.
If you experience trouble with this Xerox® equipment, please contact the appropriate
service center for repair or warranty information. Contact information is contained in
the Machine Status menu on the printer and in the back of the Troubleshooting section
of the User Guide. If the equipment is causing harm to the telephone network, the
Telephone Company may request you to disconnect the equipment until the problem
is resolved.
Only a Xerox Service Representative or an authorized Xerox Service provider are
authorized to make repairs to the printer. This applies at any time during or after the
service warranty period. If unauthorized repair is performed, the remainder of the
warranty period is null and void.
This equipment must not be used on party lines. Connection to party line service is
subject to state tariffs. Contact the state public utility commission, public service
commission, or corporation commission for information.
Your office could have specially wired alarm equipment connected to the telephone line.
Make sure that the installation of this Xerox® equipment does not disable your alarm
equipment.
If you have questions about what could disable alarm equipment, consult your Telephone
Company or a qualified installer.
Canada
This product meets the applicable Industry Canada technical specifications.
Xerox® Color C60/C70 Printer
User Guide
15-11
Regulatory Information
A representative designated by the supplier should coordinate repairs to certified
equipment. Repairs or alterations made by the user to this device, or device malfunctions,
could cause the telecommunications company to request you to disconnect the
equipment.
For user protection, make sure that the printer is properly grounded. The electrical ground
connections of the power utility, telephone lines, and internal metallic water pipe systems,
if present, must be connected together. This precaution could be vital in rural areas.
Warning
Do not attempt to make such connections yourself. Contact the appropriate electric
inspection authority, or electrician, to make the ground connection.
The REN assigned to each terminal device provides an indication of the maximum
number of terminals allowed to be connected to a telephone interface. The termination
on an interface could consist of any combination of devices. The only limitation to the
number of devices is the requirement that the sum of the RENs of the devices does not
exceed 5. For the Canadian REN value, please see the label on the equipment.
Canada CS–03 Issue 9
This product has been tested to and is compliant with CS–03 issue 9.
European Union
Radio Equipment and Telecommunications Terminal Equipment
Directive
This Xerox® device has been self-certified by Xerox® for pan-European single terminal
connection to the analog public switched telephone network (PSTN) in accordance with
Directive 1999/5/EC.
This device has been designed to work with the national public switched telephone
networks and compatible PBX devices of the following countries:
Pan-European Analog PSTN andCompatible PBX Certifications
Austria
Greece
Netherlands
Belgium
Hungary
Norway
Bulgaria
Iceland
Poland
Cyprus
Ireland
Portugal
Czech Republic
Italy
Romania
Denmark
Latvia
Slovakia
Estonia
Liechtenstein
Slovenia
Finland
Lithuania
Spain
15-12
Xerox® Color C60/C70 Printer
User Guide
Regulatory Information
Pan-European Analog PSTN andCompatible PBX Certifications
France
Luxembourg
Sweden
Germany
Malta
United Kingdom
This product has been tested to and is compliant with TBR21 OR ES 103 021-1/2/3 or
ES 203 021-1/2/3 technical specifications for terminal equipment for use on
analog-switched telephone networks in the European Economic Area.
If you have problems with your product, contact your local Xerox representative. This
product can be configured to be compatible with other country networks. Before
reconnecting the device to a network in another country, contact your Xerox
representative for assistance.
Note
Although this product can use either loop disconnect (pulse) or DTMF tone signaling,
Xerox recommends that you use DTMF signaling. DTMF signaling provides reliable and
faster call setup.
Note
Modification of this product, or connection to external control software or control
apparatus not authorized by Xerox, invalidates its certification.
New Zealand
1.
The grant of a Telepermit for any item of terminal equipment indicates only that
Telecom has accepted that the item complies with minimum conditions for
connection to its network. It indicates no endorsement of the product by Telecom,
it does not provide any sort of warranty, and it does not imply that any Telepermitted
product is compatible with all Telecom network services. Above all, it provides no
assurance that any item will work correctly in all respects with another item of
Telepermitted equipment of a different make or model.
The equipment may not be capable of correct operation at the higher data speeds
designated. 33.6 kbps and 56 kbps connections are likely to be restricted to lower
bit rates when connected to some PSTN implementations. Telecom will accept no
responsibility for difficulties that arise in such circumstances.
2.
Immediately disconnect this equipment should it become physically damaged, then
arrange for its disposal or repair.
3.
This modem shall not be used in any manner which could constitute a nuisance to
other Telecom customers.
4.
This device is equipped with pulse dialing, while the Telecom standard is DTMF tone
dialing. There is no guarantee that Telecom lines will always continue to support
pulse dialing.
5.
Use of pulse dialing, when this equipment is connected to the same line as other
equipment, may give rise to 'bell tinkle' or noise and cause a false answer condition.
If you encounter such problems, do not contact the Telecom Faults Service.
Xerox® Color C60/C70 Printer
User Guide
15-13
Regulatory Information
6.
DTMF tones dialing is the preferred method because it is faster than pulse (decadic)
dialing and is readily available on almost all New Zealand telephone exchanges.
No '111' or other calls can be made from this device during a mains power failure.
7.
This equipment may not provide for the effective hand-over of a call to another
device connected to the same line.
8.
Some parameters required for compliance with Telecom Telepermit requirements
are dependent on the equipment (computer) associated with this device. The
associated equipment shall be set to operate within the following limits for
compliance with Telecom Specifications:
For repeat calls to the same number:
• There shall be no more than 10 call attempts to the same number within any 30
minute period for any single manual call initiation, and
• The equipment shall go on-hook for a period of not less than 30 seconds between
the end of one attempt and the beginning of the next attempt.
For automatic calls to different numbers:
The equipment shall be set to ensure that automatic calls to different numbers are
spaced such that there is no less than five seconds between the end of one call
attempt and the beginning of another.
9.
For correct operation, total of the RNs of all devices connected to a single line at
any time should not exceed five.
South Africa
This modem must be used in conjunction with an approved surge protection device.
Safety Certification
This device is certified by the following agencies using the following safety standards:
Agency
Standard
Underwriters Laboratories Inc. (US/Canada) UL60950-1 (2007) 2nd EditionCSA 22.2 No. 609501-07 2nd Edition
Underwriters Laboratories Inc. (Europe)
15-14
IEC60950-1:2005 (2nd Edition) +A1:2009EN609501:2006 (2nd Edition) +A11:2009
+A1:2010+A12:2011 (CB Scheme)
Xerox® Color C60/C70 Printer
User Guide
Regulatory Information
Material Safety Data Sheets
For Material Safety Data information regarding your printer, go to:
• North America: www.xerox.com/msds
• European Union: www.xerox.com/environment_europe
For the Customer Support Center phone numbers, go to
www.xerox.com/office/worldcontacts.
Xerox® Color C60/C70 Printer
User Guide
15-15
Regulatory Information
15-16
Xerox® Color C60/C70 Printer
User Guide
16
Recycling and Disposal
All Countries
If you are managing the disposal of your Xerox product, please note that the printer
may contain lead, mercury, perchlorate, and other materials whose disposal may be
regulated due to environmental considerations. The presence of these materials is fully
consistent with global regulations applicable at the time that the product was placed
on the market. For recycling and disposal information, contact your local authorities.
Perchlorate Material: This product may contain one or more Perchlorate-containing
devices, such as batteries. Special handling may apply, please see
www.dtsc.ca.gov/hazardouswaste/perchlorate.
North America
Xerox operates an equipment take-back and reuse/recycle program. Contact your Xerox
representative (1-800-ASK-XEROX) to determine if this Xerox product is part of the
program. For more information about Xerox environmental programs, visit
www.xerox.com/environment, or for recycling and disposal information, contact your
local authorities.
European Union
Some equipment may be used in both a domestic/household and a professional/business
application.
Xerox® Color C60/C70 Printer
User Guide
16-1
Recycling and Disposal
Domestic/Household Environment
Application of this symbol on your equipment is confirmation that you
should not dispose of the equipment in the normal household waste stream.
In accordance with European legislation, end of life electrical and electronic
equipment subject to disposal must be segregated from household waste.
Private households within EU member states may return used electrical
and electronic equipment to designated collection facilities free of charge.
Please contact your local disposal authority for information.
In some member states, when you purchase new equipment, your local
retailer may be required to take back your old equipment free of charge.
Please ask your retailer for information.
Professional/Business Environment
Application of this symbol on your equipment is confirmation that you
must dispose of this equipment in compliance with agreed national procedures.
In accordance with European legislation, end of life electrical and electronic
equipment subject to disposal must be managed within agreed procedures.
Prior to disposal, please contact your local reseller or Xerox representative
for end of life take-back information.
Collection and Disposal of Equipment and Batteries
These symbols on the products and/or accompanying documents mean
that used electrical and electronic products and batteries should not be
mixed with general household waste.
For proper treatment, recovery, and recycling of old products and used
batteries, please take them to applicable collection points, in accordance
with your national legislation and the Directive 2002/96/EC and
2006/66/EC.
By disposing of these products and batteries correctly, you will help to save
valuable resources and prevent any potential negative effects on human
health and the environment which could otherwise arise from inappropriate
waste handling.
For more information about collection and recycling of old products and
batteries, please contact your local municipality, your waste disposal service
or the point of sale where you purchased the items.
Penalties may be applicable for incorrect disposal of this waste, in accordance with national legislation.
16-2
Xerox® Color C60/C70 Printer
User Guide
Recycling and Disposal
Business Users in the European Union
If you wish to discard electrical and electronic equipment, please contact your dealer or
supplier for further information.
Disposal Outside of the European Union
These symbols are only valid in the European Union. If you wish to discard these items,
please contact your local authorities or dealer and ask for the correct method of disposal.
Battery Symbol
This wheeled bin symbol may be used in combination with a chemical
symbol. Use of this symbol establishes compliance with the requirements
set out by the Directive.
Battery Removal
Batteries should only be replaced by a manufacturer-approved service facility.
Other Countries
Please contact your local waste management authority to request disposal guidance.
Xerox® Color C60/C70 Printer
User Guide
16-3
Recycling and Disposal
16-4
Xerox® Color C60/C70 Printer
User Guide