1
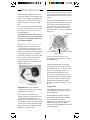
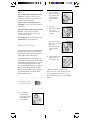
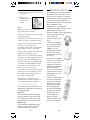
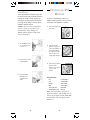
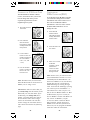
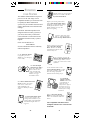
WIRELESS
MOUSEREMOTE
MODEL UR86A
OWNER’S MANUAL
READ THIS FIRST!
Safety Considerations
Remember to exercise good common
sense when using your X10 wireless
MouseRemote for home automation
applications. There can be some
unexpected consequences if not used with
care. For example, an empty coffee pot
can be remotely turned on. If that should
happen, your coffee pot could be
damaged from overheating. If an electric
heater is turned on by remote control
while clothing is draped over it, a fire
could result. DO NOT USE the system
for the control of high power heating
appliances such as portable heaters.
Caution: To reduce the risk of electric
shock, do not disassemble any part of the
Home Automation System. No userserviceable parts are inside. If you spill
liquid on any accessory unit (Modules,
etc.) disconnect the unit from the AC
outlet to prevent possible fire or shock
hazard and consult authorized service
personnel.
Powerline operated equipment or
accessories connected to any of these
units should bear the UL listing or CSA
certification mark and should not have
been modified in any way that might
defeat their safety features.
Warning: To prevent electric shock
hazard, do not expose any part of the
Home Automation System to rain or
moisture.
FCC CAUTION
THIS DEVICE COMPLIES WITH PART
15 OF THE FCC RULES.
OPERATION IS SUBJECT TO THE
FOLLOWING TWO CONDITIONS:
(1) THIS DEVICE MAY NOT CAUSE
HARMFUL INTERFERENCE, AND
(2) THIS DEVICE MUST ACCEPT
ANY INTERFERENCE RECEIVED,
INCLUDING INTERFERENCE THAT
MAY CAUSE UNDESIRED
OPERATION.
This equipment generates and uses radio
frequency energy, and if not installed and
used properly, that is, in strict accordance
with the manufacturers instructions, it
may cause interference to radio and
television reception. It has been type
tested and found to comply with the limits
for remote control devices in accordance
with the specifications in Sub-Parts B and
C of Part 15 of FCC Rules, which are
designed to provide reasonable protection
against such interference in a residential
installation. However, there is no
guarantee that interference will not occur
in a particular installation. If this
equipment does cause interference to
radio or television reception, which can
be determined by unplugging the
equipment, try to correct the interference
by one or more of the following
measures.
• Reorient the antenna of the radio/TV
experiencing the interference.
• Relocate the interface with respect to
the radio/TV.
• Move the interface away from the
radio/TV.
• Plug the interface into an outlet on a
different electrical circuit from the
radio/TV experiencing the interference.
• If necessary, consult your local Dealer
for additional suggestions.
NOTE: Modifications to any of the
components in this kit will void the user’s
authority to operate this equipment.
2
3
CONTENTS
INTRODUCTION ................................................5
BATTERY INSTALLATION ..................................6
SETTING UP YOUR MOUSEREMOTE ..................7
B UTTON DESCRIPTIONS ........................... 7
B UTTON DEFAULTS ................................. 9
MOUSE OPERATION ............................... 10
SOFTWARE INSTALLATION ....................... 10
USB RECEIVER INSTALLATION ............... 10
MOUSE SOFTWARE CONFIGURATION ....... 11
T YPICAL APPLICATION S CENARIO ........... 15
SETTING UP FOR TV, VCR, CBL, AUX 16
USING AUX TO CONTROL A SECOND
TV, VCR, OR CABLE BOX ................... 17
SEARCHING FOR CODES ........................ 18
IDENTIFYING CODES FOUND USING
THE SEARCH PROCEDURE ...................... 20
LEARNING ............................................ 21
HOME AUTOMATION .......................................23
C ONTROLLERS AND MODULES ................ 23
HOUSE CODES AND UNIT CODES ........... 24
INSTALLING HOME AUTOMATION
C OMPONENTS ....................................... 25
T RANSCEIVER MODULE ......................... 25
L AMP MODULE .................................... 26
CONTROLLING X10 MODULES ........................27
C HANGING THE X10 HOUSE CODE: ....... 28
C ONTROLLING AN IR M INI CONTROLLER 29
EXPANDING YOUR SYSTEM .............................30
TROUBLESHOOTING .......................................32
MOUSE RELATED P ROBLEMS ........... 33
SYSTEM REQUIREMENTS ................. 34
WARRANTY ...................................................35
4
INTRODUCTION
Congratulations on your purchase of the
X10 MouseRemote and Wireless
Receiver.
Wireless Mouse....
The UR86A remote control works with
the wireless USB receiver (CM19A) or
VGA Video Sender (VT37A). You install
software for it from X10’s Web Site. The
remote control sends wireless RF signals
to the CM19A or VT37A which is
connected to the USB port on your PC.
This lets you use the remote as a wireless
mouse. You use the mouse pad on the
remote to move the cursor around the PC
screen, and use the left and right mouse
buttons just like you would on a regular
mouse. There is also a “Drag” button that
acts like you are clicking and holding the
left mouse button. It’s that simple! The
MouseRemote also lets you configure the
remote’s special function buttons. You
can configure these buttons to perform
special functions such as launching your
WEB Browser, for example.
Universal Remote....
You can use the MouseRemote as a
Universal Remote, to control most audio/
video products. Control your TV, VCR,
Cable Box, Satellite Receiver, etc., all
from the same convenient and easy to use
remote.
Make your lights and appliances go to
work for you....
The X10 MouseRemote controls most or
all of your video and audio equipment.
But what really sets it apart from other
universal remotes is that you can also
control almost any light or appliance in
your home - even in another room! And
it’s easy to install. Within minutes, you
can be using your X10 MouseRemote to
dim the lights, start brewing a fresh pot of
coffee and play your favorite movie!
(Requires X10 Transceiver and Modules,
sold separately).
5
Here are just some of the things you can
do with your X10 MouseRemote...
• Control your entire audio/video and
lighting setup for the ultimate Home
Theater experience.
• Turn on lights at night to scare away
intruders if you hear a noise.
• Start the coffee from your bedroom
when you wake up.
SETTING UP
YOUR MOUSEREMOTE
BUTTON DESCRIPTIONS
INDICATOR LIGHT
The indicator light (LED) illuminates
when a key is pressed (if the key is
available in the selected mode).
• Turn on your electric blanket before
the movie ends, so it’s nice and warm
when you go to bed.
POWER
Works in the same way as your original
remote. Turns All Lights On in X10
mode.
Use this manual to become familiar with
your MouseRemote....
PC
Press first to enable the mouse and PC
functions.
This manual will explain how to set up
your MouseRemote to use it with your PC
as a wireless mouse.
S (SETUP)
Used to set up the remote to control your
TV, VCR, Cable box, etc.
Next, it shows you how to set it up to
control your existing Audio/Video
equipment.
TV, VCR, CBL, AUX
Used to select the device you want to
control.
Next, it will show you how you can use it
with an X10 Transceiver Module X10
Modules (sold separately) to operate
electrical devices in your home.
Finally, the manual will show how you
can expand your system with some of the
many additional X10 products you can
purchase.
Battery Installation
1. Push the tab and
lift off the battery
cover.
X10
Lets you control X10 Modules to operate
lamps and appliances around the home.
(Transceiver, sold separately, is required).
MOUSE PAD
Moves the cursor around the screen.
MOUSE BUTTONS, L AND R
Used as left and right mouse buttons.
HAND SYMBOL
Used to drag a selection after clicking on
it with the L mouse button.
+/- (UP/DOWN)
Works like your original remote. Also
brightens and dims lamps in X10 mode.
Works as Line Up/Down in PC mode.
VOLUME
+/- (UP /DOWN)
Works like your original remote. Also
works as On and Off in X10 mode. Also
works as Page Up/Down in PC mode.
CHANNEL
2. Insert four AAA
alkaline batteries,
taking care to
match the + and marks in the
battery
compartment.
6
MUTE
Works the same as your original remote.
Turns All Modules off in X10 mode.
7
LEARN
Used to learn codes from existing
remotes.
0-9
Used as with your original remote and to
enter device codes. Can also be
configured to perform PC functions.
ENT
Used to confirm certain entries.
A-B
Used as a TV/VCR button.
UP/DOWN/LEFT/RIGHT CURSORS
Used to navigate menu functions
OK
Selects a function.
MENU
Used for menu selections on DBS
receivers.
EXIT
Exits from the Menu function.
A, B, C, D BUTTONS
Special function buttons.
PLAY, REW, FF, STOP, REC, PAUSE
Work the same as on your original VCR
remote. You must press the REC button
twice to begin recording.
Note that the mouse pad and the L, R, and
drag buttons on the remote are only active
after you press the PC button. They are
not active in TV, VCR, CBL, AUX, or
X10 modes. Note that the mouse cursor
will move faster as you press and hold the
mouse pad. To adjust mouse speed
settings click on the RemoteMouse’s tray
icon and select Configure. You can also
configure the MouseRemote here to work
with X10’s ShowTime™ digital photo
viewer (sold separately).
8
The MouseRemote buttons can be
programmed to perform various functions
using X10’s MouseRemote software, but
they are pre-programmed with the
following defaults:
When PC mode is selected the keys
default to the following:
Key
PC mode
Power
0
1
2
3
4
5
6
7
8
9
Ent
A.B
Close current application.
0
1
2
3
4
5
6
7
8
9
Return.
Toggle between maximize
and restore for current
window.
Up arrow Nudge mouse cursor up.
Down arrow Nudge mouse cursor down.
Left arrow Nudge mouse cursor left.
Right arrow Nudge mouse cursor right.
OK
Return.
Play
Play, default player*
Stop
Stop, default player*
FF
FF, default player*
REW
REW, default player*
Rec
REC, default player*
Pause
Pause, default player*
Vol+
Volume Up, default player*
VolVolume Down, default
player*
Mute
Mute, default player*
Menu
Bring up Windows Start
Menu.
Exit
Esc (Escape).
* The default player is Windows Media
Player.
9
MOUSE OPERATION
The UR86A MouseRemote works with
the wireless USB receiver (CM19A). The
remote control sends wireless RF signals
(from up to 40 ft. away) to the receiver
which is connected to your PC’s USB
port.
Or, if you already own X10’s ShowTime ™
PC to TV Photo Viewer, the VT37A that
came with it, also acts as a receiver for
the MouseRemote.
CAUTION: Do not use both receivers
at the same time. If you own ShowTime
use the receiver that came with it and
do not use the CM19A.
You can also use the Drag button to act as
if you were clicking and holding the left
mouse button to move an object. It’s that
simple!
Note that the mouse pad and the L, R, and
drag buttons on the remote are only active
after you press the PC button. They are
not active in TV, VCR, CBL, AUX, or
X10 modes. Note that the mouse cursor
will move faster as you press and hold the
mouse pad.
Mouse pad
MOUSE SOFTWARE INSTALLATION
Install the software from the link you
received in the e-mail sent to you after
you purchased the MouseRemote. (You
need to be connected to the Internet while
you install the software). If instructed by
the software installer (VT37A only), shut
down your PC, connect the VT37A to
your USB port and restart your PC.
Windows will detect new hardware and
install the driver for it.
CM19A
USB connector.
IMPORTANT: Do not connect the
CM19A to your USB port until you have
installed the X10 software.
Wait for about 10 seconds after rebooting. Then press the PC button. Now
you can use the MouseRemote as a
wireless mouse. You use the mouse pad
on the remote to move the cursor around
the PC screen, and use the left and right
mouse buttons just like the left and right
buttons on a regular mouse.
10
Left mouse button
Right mouse button
Drag button
You can, at any time, still use your
existing mouse, which always overrides
the MouseRemote.
Using the MouseRemote to move the
cursor around the screen and open and
close applications is very easy to do and
allows you, for example, to give PC
presentations from across the room.
However, the advanced features of the
MouseRemote let you configure many of
the remote’s buttons to perform special
function such as launching your Web
Browser, or a DVD or CD player in your
PC, etc.
Configuration
Click the MouseRemote tray icon and
select Maximize, to bring up a picture of
the MouseRemote.
The MouseRemote buttons which are
programmable are shown in a different
color. Some buttons cannot be
programmed, e.g., (setup/PC/TV/VCR/
CBL/AUX/X10/Learn), etc. Rightclicking on the programmable buttons lets
you program them.
11
When you right-click on a button that is
programmable a window like the one
shown below is displayed.
This window lets you configure the
button for what you want it to do. There
are 6 different things that you can
program a button to do. These are:
Launch
Web
Multimedia
Edit
System
Advanced
Launch lets you launch any application
you choose from the button. For example:
To set up button number 1 to launch your
word processor:
Launch the MouseRemote from the Start
Menu, or from its shortcut. Or maximize
it from the task bar if its minimized.
When you see the picture of the Mouse
Remote, right-click on the number 1
button.
When you see the dialog box above, click
on the Launch tab.
Next click in the File Name box and type
in the path and name for your word
processor, or browse to find its location.
Click OK to exit the above window. Now
anytime you press PC followed by 1 on
the MouseRemote, you will launch your
word processor.
12
Web lets you program any key to launch
your default browser and go straight to
whatever URL you designate. When you
click on the Web tab you will see a
window with a dialog box into which you
type the Web address that you want the
button to take you to.
Multimedia lets you control your PC’s
CD, DVD, or MP3 player, etc., with the
buttons you program. For example, rightclick on the Play button, select the
Multimedia tab. Select the type of Media
Player you want the key to activate, and
Play for the function. Repeat the above
steps for Stop, FF, REW, Pause, etc.
Edit lets you set up any key to perform
tasks such as Page Up, Page Down, Tab,
Home, Type, Copy, Paste, etc. Type
allows to you assign text to a button so
that it will be “typed” into any box you
place the cursor over. For example you
could assign a password to any button
and then “type” it into a dialog box with
the press of a button after you launch
America Online,® etc.
System lets you set up any button to
maximize, minimize, or resize windows,
close applications, shut down Windows ®
select the Windows Start button, etc.
Advanced. This is an advanced feature
that will primarily be used by
programmers. It allows application
specific information to be directed to the
associated windows application. Click on
the help button for more information.
Normally you will configure the Mouse
Remote’s buttons by clicking on the Tray
icon and then clicking Maximize. If the
tray icon is NOT visible in the system
tray (because you closed it) Select Start,
then Programs, then Remote, then launch
the RemoteMouse, to again show the
RemoteMouse and the tray icon.
There is extensive help available for the
MouseRemote software. It is suggested
that you refer to this help for more
details.
13
TYPICAL APPLICATION S CENARIO
Here’s a typical scenario that gives you an
idea of what you can do with the power of
the MouseRemote:
Program a couple of Web Sites into the
numeric keys (e.g. 1 for www.x10.com, 2
for www.x10.com/support, etc.), then sit
back in your armchair and press the PC
button followed by the appropriate
number button to launch your Web
Browser and go to the address you
programmed. Then using the channel up
and down button s and volume up and
down button s as scroll functions, page
through the site, while listening to a CD
that you started playing earlier.
After a while, skip back to track 7 on the
CD by pressing the button you
programmed to launch your PC’s CD
player, followed by the button you
programmed to skip back.
Then return to Web browsing mode by
pressing the button you programmed to
launch your Web Browser.
Later still, as it starts to get dark, press
the X10 key and turn on the living room
lights.*
Then pause your CD while you answer
the phone.
Press the Power button to close your Web
Browser and then press the button that
you previously configured to dial your
voice mail to pick up messages on your
PC.
To configure the above:
Right-click button 1. Click on the Web
tab, then type the desired Web address.
Click OK. Repeat the process for each
URL you want to program for each
numeric button.
Right-click on the button you want to
launch your PC’s CD player, then click on
the Multimedia tab. Select your media
device and function (Play). Repeat the
process for Stop, Pause, FF, REW, Mute,
numeric keys.
Program other buttons to perform other
functions, for example:
Program button 4 to launch your MP3
player, then program Play, Stop, Pause
etc., to operate your MP3 player after
you press 4.
Program button 5 to launch your
Windows Media Player, then program
Play, Stop, Pause etc., to operate your
Windows Media Player after you press 5.
Program button 6 to launch your PC’s CD
or DVD Player, then program Play, Stop,
Pause etc., to operate it after you press 6.
Etc.
Note, in practise you probably won’t need
to program all the buttons for your
selected Media Player as the default
buttons (Play, Stop, etc.) will most likely
work just fine.
* (Requires X10 Transceiver and
Modules, sold separately).
Click the MouseRemote’s tray icon and
select Maximize.
14
15
SETTING UP FOR TV, VCR,
CABLE, CD, AND SATELLITE
RECEIVER
1. Turn on the device
you want to control
(TV, VCR, cable
box, etc.).
USING AUX TO CONTROL A
SECOND TV, VCR, CABLE BOX
OR SATELLITE RECEIVER
The AUX button is normally used to
control an audio component such as a CD
player, but it can also be configured to
control a second TV, VCR, cable box or
satellite receiver.
1. Turn on the device
you want to control.
2. Press and hold
SETUP until the
LED indicator lights
steadily. Release the
SETUP button.
3. Press and release
the mode button*
that matches the
device you want to
control. The LED
blinks once. Use
AUX for CDs.
4. Enter the 3 digit
Code from the
Library Code Tables.
The LED turns off
after the last digit
entered.
5. Point the remote at
the device and press
the POWER button.
Your device should
turn off.
6. Turn your device on
and press CH +. If
the device responds,
setup is complete.
* You can store any code (TV, VCR, CBL,
SAT, CD etc.) under any mode except TV.
16
2. Press and hold
SETUP until the
LED indicator lights
steadily. Release
Setup button.
3. Press the AUX
button.
4. Enter the 3 digit
Code from the
Library Code Tables.
The LED turns off
after the last digit
entered.
5. Point the remote at
your A/V component
and press the
POWER button.
Your A/V
component should
turn off.
6. Turn your A/V
component on and
press CH +. If it
responds, setup is
complete.
17
Notes:
If your audio/video component does not
respond, try the other codes for your
brand. If it still doesn’t respond, try the
Code Search method below.
If some buttons do not operate your
equipment, try one of the other codes for
your brand.
If the LED blinks rapidly when you enter
the code, you may have entered an
invalid code. Recheck the code in the
code list and try again.
3. Press the mode
button that matches
the equipment you
want to control.
The LED blinks
once.
4. Press CH +
repeatedly* until the
device to be
controlled changes
channel.
For CD players use the AUX button. For
Laser Disks use the VCR button.
SEARCHING FOR CODES
You can store any type of code under any
mode key except TV. e.g. you can store
any code (TV, VCR, CBL, SAT, CD etc.)
under modes VCR, CBL or AUX.
The procedure below assumes that you
want to store VCR codes under the VCR
key, Cable codes under CBL, etc. If you
want to store a VCR code under CBL,
etc., first follow the procedure on page 17
and try ANY CBL code from the code
tables, e.g. press CBL in step 3, on page
17, then enter ANY VCR code. Then
follow the steps below.
If you accidentally
go past the code, just
press CH repeatedly until the
channel changes
again.
5. Press and release the
ENTER button to
complete the setup.
*Note: You may have to press CH +
many times (50+). If the device does not
have a Channel Up function, use the
PLAY button (VCR only) or the POWER
button.
1. Turn on the device
you want to control.
2. Press and hold
SETUP until the
LED indicator lights
steadily. Release
Setup button.
18
19
IDENTIFYING CODES FOUND USING
THE SEARCH PROCEDURE
LEARNING
1. Press and hold
SETUP until the
LED indicator lights
steadily. Release
Setup button.
Your UR86A Remote has the codes for
most TVs, VCRs, etc. in its code library.
However, if the code for your particular
device is not found in the library, you can
learn these codes from your existing
remote. Or if you find a code from the
code tables included with this owner’s
manual that “almost” matches your
device, but a few buttons are missing, you
can learn just those buttons.
2. Press the mode
button that matches
the equipment you
want to identify
The LED blinks
once.
1. Point your existing
remote at the
UR86A Remote with
a distance of about 1
inch between the
remotes.
3. Press and release
SETUP. The LED
blinks once.
2. Press and hold
SETUP until the
LED indicator lights
steadily. Release the
Setup button.
4. To find the first
digit, press each
number button from
0 to 9 until the LED
blinks. The number
you pressed is the
first digit of the
code.
5. Press each number
button from 0 to 9
again as above to
find the second digit.
3. Press the mode
button that matches
the equipment you
want to learn. The
LED blinks once.
4. Press and release the
LEARN button. The
LED blinks once.
5. Press and release the
button on the
UR86A Remote that
you want to teach.
(e.g. POWER) The
LED blinks once.
6. Press each number
button in turn to find
the third digit. When
the third digit has
been found, the LED
will go out.
6. Press the button on
your existing remote
that you want to
learn. Hold the
button until the LED
on the UR86A
Remote blinks off.
20
21
HOME AUTOMATION
7. Repeat steps 5 and 6 for each button you
want to learn.
8. When you’ve
finished learning all
the keys, press
SETUP.
Notes:
Make sure you have fresh batteries in
both remotes before learning.
Take care not to move either remote while
pressing the buttons.
Experiment with the distance between the
remotes if you have a problem learning.
Some remotes do not have their LED in
the center so you might need to
experiment with the side-to-side position
of the remotes relative to each other.
Do not sit directly under an incandescent
lamp while teaching the remote.
In most cases you will hold the button on
the remote you are learning from until the
LED goes out on the UR86A Remote. In
some cases however, you might find that
the LED on the UR86A Remote doesn’t
go out until you release the key on the
remote you are learning from.
You cannot store any functions under the
following keys: Learn, Setup, TV, VCR,
CBL, AUX, X10, the Mouse pad or its
Left, Right, or Grab buttons.
Although up to 150 buttons can be
learned, only one different remote type
can be stored under any one Mode.
RESTORING THE DEFAULTS
If you have problems learning keys, try a
Mode Reset or Master Reset, and then try
learning them again.
Mode reset
Press and hold Setup until LED lights,
then press Mode, Learn, Learn, Setup.
This restores the default code for that
particular Mode (TV, VCR, CBL, AUX).
Master reset
Press and hold Setup until LED lights,
then press Learn, Learn, Setup. This
restores the default for ALL keys.
22
The first thing you need to understand is
that there are two different devices you
need to control your house; Controllers
and Modules. Any light or appliance that
you want to control is plugged into a
Module and that Module is then plugged
into a standard AC outlet.
Modules receive commands from
Controllers. Examples include the Lamp
Module (sold separately). The
Transceiver Module (also sold separately)
is another example (although
it also doubles as a
Controller as described
later).
Controllers are plugged
into standard wall outlets
and send commands to
Modules over your
existing electrical wiring
in your house without
affecting your electricity
in any way.
The Transceiver Module
works as a Controller when
it is used with a remote
control such as the X10
MouseRemote. When the
Transceiver Module
receives a command from
a remote control it sends
digital signals over your
existing house
wiring to a Module which
receives the signals and
executes the command.
The Remote uses radio
frequency (RF) signals
to send commands to
the Transceiver Module.
RF signals can go right
through walls, so you
can use the Mouse
Remote to control
lights or appliances from
anywhere in your home.
23
HOUSE CODES AND UNIT C ODES
UNIT CODE
DIAL
INSTALLING HOME
AUTOMATION
COMPONENTS
TRANSCEIVER MODULE
HOUSE CODE
DIAL
Each Module has a specific address made
up of a House Code (red dial on the face
of the Module) and a Unit Code (black
dial on the face of the Module).
The Controller first sends an address and
then a command on the AC power lines.
Only the Module with a matching address
will execute the command. If more than
one Module has the same address, both
Modules will execute the command.
Addresses are set on the Module by
turning the two dials on the front of the
Module to the desired letter and number
(using a small screwdriver or a coin). The
House Code is selected from the letters A
through P, and the Unit Code is selected
from the numbers 1 through 16.
The Transceiver Module (sold separately)
receives radio frequency (RF) commands
from the MouseRemote to operate a lamp
or appliance plugged into it. The
Transceiver Module also passes on
commands over your house wiring to
control other X10 Modules. Note that
(unlike the Lamp Module) you cannot
dim and brighten a lamp connected to the
Transceiver Module.
You should locate the Transceiver
Module centrally in the home for
maximum range when controlled by the
MouseRemote.
1. Set the House Code
to ‘A’ .
2. Plug a lamp or
appliance into the
Transceiver Module.
3. Plug the Transceiver
Module into a
convenient AC
outlet. Fully extend
the antenna.
24
25
LAMP MODULE
The Lamp Module (sold separately) may
be used to control any incandescent lamp
rated up to 300W. It is not suitable for
other types of lamps such as fluorescent
or energy saving lamps, or lamps which
include a dimmer control.
Caution: Do not connect an appliance
such as a coffee pot or heater to the
Lamp Module. It may damage the
Module and the appliance and could
cause a fire hazard.
1. Set the House Code
to ‘A’ and the Unit
Code to ‘2.’
CONTROLLING X10
MODULES
If you have installed the Transceiver
Module (sold separately) you can control
it and other X10 modules as follows:
1. Press and release the
X10 button.
2. Use the number
buttons to enter the
Unit Code number of
the chosen module.
(You do not need to
enter ‘0’ first for a
single digit number.)
2. Plug a lamp into the
Lamp Module.
3. Press the appropriate
button for the
function you require,
e.g. Ch+ (see
below).
3. Plug the Lamp
Module into a
convenient AC
outlet.
X10 Functions:
On:
Off:
Bright:
Dim:
All Lights On:
All Modules Off:
CHANNEL +
CHANNEL –
VOLUME +
VOLUME –
POWER
MUTE
Note: You cannot dim or brighten an
Appliance Module. If the module was off
and you press Bright or Dim (VOLUME+
or VOLUME-) this will simply turn the
module on.
26
27
CHANGING THE X10 HOUSE C ODE
The MouseRemote defaults to House
Code A, and in most cases you will not
need to change this unless you are
experiencing interference from a
neighboring X10 system.
1. Press and release the
X10 button.
CONTROLLING AN
IR MINI CONTROLLER (IR543)
If you already own an IR Mini Controller,
you will need to change the X10 Home
Automation code in the remote to use it.
The code for standard X10 Home
Automation is 780. The code to control
the IR543 Mini Controller is 781. To
change the code:
1. Press and hold
SETUP until the
LED indicator lights
steadily. Release the
SETUP button.
2. Press and hold
SETUP until the
LED indicator lights
steadily. Release the
Setup button.
3. Use the number
buttons to enter the
number equivalent to
the chosen House
Code (1=A, 2=B
..16=P).
4. Press the ENTER
button to confirm the
House Code. The
LED turns off.
Note: The Housecode you choose must
match the Housecode on the Transceiver
Module you are using it with.
IMPORTANT: make sure above that you
press X10, Setup, then the number for the
Housecode you want, then Enter. If you
accidentally press Setup, X10, then a
number, you might change the code for
the X10 button, and it will no longer
work as an X10 button. You will then
need to change the X10 button back to
code 780 as described on the following
page.
28
2. Press and release the
X10 button.
3. Enter 781 to control
an IR Mini
Controller, 780 for
standard X10
control. The LED
turns off after the
last digit entered.
Note: In most cases, you will not need to
use an IR543 Mini Controller to receive
commands from the MouseRemote - the
Transceiver Module (or any X10 Security
System) does this for you and has the
added advantage of working through
walls. It also has the advantage of letting
you control up to 16 X10 Modules - i.e.
with a Transceiver when you press 1-6ON you turn on Module number 16. With
an IR543 when you press 1-6-ON you
turn on Modules 1 AND 6. The IR543 can
only control 10 Modules (1-9 plus
0=10). You cannot control the IR543
Mini Controller and the Transceiver
Module at the same time from the X10
button, but you can program an IR Mini
Controller under the AUX button.
29
EXPANDING
YOUR SYSTEM
The modules illustrated below represent
just a few of the wide range of X10
compatible modules you can choose from
to expand your Home Automation
system. They are available from electrical
outlets, department stores and mail order
catalogs.
Switch entrance or garage lights on
from your car with the convenient
Keychain Remote KR21A.
Replace your existing wall switches
with the Wall Switch Module WS467.
Installs like a regular dimmer. On/Off
and Bright/Dim functions. Other
models available for 3-way and
fluorescent lighting.
X10 Home Automation products also
integrate with X10 security systems, so
you can use the security remotes that
come with them to control macros and
flash lights when the security system is
tripped.
Check out our Web Site at:
WWW.X 10.COM
for more information on these and many
other X10 products.
Use the Mini Timer MT10A
to program up to 4 X10
Modules to go on and off up
to twice a day.
Replace existing AC wall outlets
with the Receptacle Module
SR227. Has one 15A/1800W
controlled outlet and one outlet
which is always on.
Remote
15 • 1 •
•
5
•
11
7
• 9
•
•
UNIT
O •A •
C
•
E
•
I •
G
•
HOUS
E
T
Use the isolated contacts on the
Universal Module UM506 to control
pool pumps, sprinklers, drapes and
other low voltage equipment.
Includes built in warning beeper.
A
13
5
M
E
9
I
POWERF
LASH
INTERFA
INPUT
A B
1
CE
MODE
2 3
S OFF
The PowerFlash Module PF284
connects to dry contact or low
voltage alarm terminals on your
burglar alarm system and flashes
X10 controlled lights when it is
triggered.
30
t Set-Bac
osta
kC
rm
o
he
ller
ro
nt
ALL UNIT
1
E
I
OFF LO
Power
Adapter
CONTR
OLLED
A
•
•
M
I
1
•
E
•
•
13
•
5
•
•
9
Use a controller to trigger the
Remote Chime Module SC546 to
call Dad up for dinner, or warn
people you’re about to turn on the
sprinklers.
3
13
•
K
TEST
M
Chime
•
Fit a Wireless Wall Switch SS13A/
SS15A anywhere you need an
extra switch - with no wires.
Sends commands to the
Transceiver Module just like a
remote.
A
5
9
Control a ceiling light, closet
light, etc. with the convenient
Screw-in Lamp Module LM15A.
M
The Dual Floodlight
Motion Detector PR511
turns on at dusk and/or
when it detects movement, and sends X10
signals to control other
modules, or trigger
ActiveHome macros.
1
13
M HI
ON
OFF
1
A
13
5
M
E
9
I
UNIVERS
CONTINUOU
MOMENTARYS
AL MOD
ULE
SOUND
ER ONLY
SOUND
ER & RELAY
RELAY
ONLY
The Thermostat
Setback Controller
TH2807 mounts below
your thermostat to
reduce the room
temperature at night or
at the times you set to
save energy. No wiring
needed to your existing
thermostat.
Plug in a Heavy Duty Module
HD245 to control 220V appliances
such as air conditioners and water
heaters.
A
•
•
M
I
•
1
•
E
•
HOUSE
•
13
5
•
9
•
UNIT
Heavy
Applian Duty
ce Modul
e
Also compatible with FireCracker
Computer Interface. See www.x10.com
for details.
31
TROUBLESHOOTING
The Transceiver doesn’t respond to the
remote:
• Check the House Code on the
Transceiver is set to A. If you have
changed the Housecode on the remote
(see p. 28), check that it matches the
Housecode on the Transceiver.
• If you changed the code for the X10
button, change it back to code 780, see
page 29.
• Press the ON/OFF button on the front
of the Transceiver to confirm it
operates the equipment connected to
it. Check that you have power to the
AC outlet.
The Transceiver works, but other
modules don’t respond:
• Check that the module has the same
Housecode as the Transceiver.
• Try plugging the Module into a
different AC outlet.
The Remote won’t control your A/V
equipment, or doesn’t work at all:
• Use manual controls or the original
remote control to confirm the
equipment is working properly.
• Be sure you pressed the device key for
the device you want to control, TV,
VCR, etc.
• Re-enter the code for your A/V
product from the code listings included
on a separate sheet.
• Try searching for the code as described
on page 18.
• Replace the MouseRemote’s batteries.
The Remote won’t control my audio
CD player:
MOUSE RELATED PROBLEMS:
No mouse control or PC operation at all:
• Ensure the remote is in PC mode by
pressing the PC button before you
operate the mouse pad, mouse buttons
or any of the programmed keys.
• The remote might have lost its
programmed code for PC mode
somehow. Reprogram it by pressing
the Setup button (S) until the red light
comes on, then press PC, 5,8,0.
No mouse control or no cursor in
Windows:
• Ensure that the CM19A Receiver is
plugged into your USB port.
• Ensure that you are not using more
than one receiver. If you own
ShowTime, use its receiver and don’t
use the CM19A.
• Ensure that a compatible driver is
loaded (by installing the X10 software
for the MouseRemote, see page 10).
• A DOS driver might be loaded and
could be leaving the system in an
unknown state before Windows starts.
Remove all DOS mouse drivers, and
restart Windows.
Cursor jumps when a button on the
MouseRemote is pressed:
• The X10 mouse driver has not been
installed. Install it as discussed on
page 10.
Cursor movement seems slow or
sluggish:
• Try different speed settings in the
RemoteMouse Properties Sheet (select
Configure from the tray icon).
Tray Icon not visible:
• You can program a button on the
MouseRemote to control the CD
player in your PC. To control an
external audio CD player set it up
under the AUX key. Press Setup, then
AUX, then enter the code from the
code listings under the heading CD
Codes (on separate sheet, included).
32
33
WARRANTY
• You might have selected close from
the Menu that comes up when you
click on the tray icon. Select Start,
then Programs, then Remote, then
launch the MouseRemote, to again
show the MouseRemote and its tray
icon.
• The X10 mouse driver has not been
installed, or the MouseRemote has not
been detected. Check in Device
Manager that the driver has been
installed and that all mouse
connections have been made correctly.
Note: mouse speed, etc. can be adjusted
from the RemoteMouse Properties Sheet
in the tray icon. If the tray icon is not
visible in the system tray (because you
closed it) then a launch the Mouse
Remote from the Start menu and select
Configure.
Refer to the online help for more
information.
More information on X10 products can
be found at
www.x10.com
Software updates and bug fixes for the
MouseRemote software can be found at
www.x10.com/software (case sensitive).
System Requirements
12 MONTH LIMITED WARRANTY
X10.COM A DIV. OF X10 WIRELESS TECHNOLOGY,
INC. (X10) WARRANTS ITS PRODUCTS TO BE FREE
FROM DEFECTIVE MATERIAL AND WORKMANSHIP
FOR A PERIOD OF ONE (1) YEAR FROM THE
ORIGINAL DATE OF PURCHASE AT RETAIL. X10
AGREES TO REPAIR OR REPLACE, AT ITS SOLE
DISCRETION, A DEFECTIVE X10 PRODUCT IF
RETURNED TO X10 WITHIN THE WARRANTY
PERIOD AND WITH PROOF OF PURCHASE.
IF SERVICE IS REQUIRED UNDER THIS
WARRANTY:
1.
CALL 1-800-675-3044, OR VISIT
WWW.X10.COM, OR E-MAIL [email protected]
TO OBTAIN A RETURN MERCHANDISE
AUTHORIZATION (RMA) NUMBER.
2.
RETURN THE DEFECTIVE UNIT POSTAGE
PREPAID TO THE ADDRESS BELOW
3.
ENCLOSE A CHECK FOR $4.00 TO COVER
HANDLING AND RETURN POSTAGE.
4.
ENCLOSE A DATED PROOF OF PURCHASE.
5.
X10 IS NOT RESPONSIBLE FOR SHIPPING
DAMAGE. UNITS TO BE RETURNED SHOULD
BE PACKED CAREFULLY.
THIS WARRANTY DOES NOT EXTEND TO ANY X10
PRODUCTS WHICH HAVE BEEN SUBJECT TO
MISUSE, NEGLECT, ACCIDENT, INCORRECT
WIRING OR TO USE IN VIOLATION OF OPERATING
INSTRUCTIONS FURNISHED BY US, NOR EXTEND
TO ANY UNITS ALTERED OR REPAIRED FOR
WARRANTY DEFECT BY ANYONE OTHER THAN
X10. THIS WARRANTY DOES NOT COVER ANY
INCIDENTAL OR CONSEQUENTIAL DAMAGES AND
IS IN LIEU OF ALL OTHER WARRANTIES
EXPRESSED OR IMPLIED AND NO
REPRESENTATIVE OR PERSON IS AUTHORIZED TO
ASSUME FOR US ANY OTHER LIABILITY IN
CONNECTION WITH THE SALE OF OUR PRODUCTS.
Minimum:
SOME STATES DO NOT ALLOW LIMITATIONS ON
HOW LONG AN IMPLIED WARRANTY LASTS, AND/
OR THE EXCLUSION OR LIMITATION OF
INCIDENTAL OR CONSEQUENTIAL DAMAGES SO
THE ABOVE LIMITATIONS AND EXCLUSIONS MAY
NOT APPLY TO THE ORIGINAL CUSTOMER. THIS
WARRANTY GIVES YOU SPECIFIC RIGHTS AND
YOU MAY ALSO HAVE OTHER RIGHTS WHICH
VARY FROM STATE TO STATE.
Windows 9x/2000/Me/XP, Pentium
processor, 8MB RAM.
Visit www.x10.com/warranty to register on-line.
Note: The system requirements are not
defined by the MouseRemote, but by the
applications that will be enhanced with
the use of the MouseRemote.
For more help please visit:
www.x10.com/support
* All trademarks or registered trademarks
are trademarks or registered trademarks
of their respective owners.
X10.com a division of
X10 Wireless Technology, Inc.
3824 North 5th St., Suite C,
North Las Vegas, NV 89032
Web Site: www.x10.com
34
35
X10.com a division of
X10 Wireless Technology, Inc.
3824 North 5th St., Suite C,
North Las Vegas, NV 89032
Web Site: www.x10.com
Printed in China
UR86A-01/02