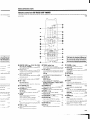
1
KENWOOD
AUDIO VIDEO SURROUND RECEIVER
VR-6060
KRFW806OD
INSTRUCTION MANUAL
KENWOOD CORPORATION
This instruction manual is for some models. Model availability and features
(functions) may differ depending on the country and sales area.
About the supplied remote control
Compared to standard remote controls, the remote control supplied with this receiver has several
operation modes These modes enable the remote control to control other audlokldeo components. In
order to effectively use the remote control It IS Important to read the operating lnstructlons and obtain a
proper understandlng of the remote control and how to switch Its operation modes (etc.).
Using the remote control wlthout completely understanding Its design and how to switch the operation
modes may result In Incorrect operations.
660-5188-00
00 Mj4 (K, P, M, X) :k:-:
0109
.
,
_
Before applying the power
A
Units
Unpacking
Contents
Unpack the unit carefully and make sure that all accessorres are present
Caution
are designed
for operation
AC 120 V only
AC 240 V only
AC 220 V only
V switchable*
+ AC voltage selection
The AC voltage selector swatch on the rear panel IS set to the voltage
that prevails rn the area to whrch the unrt IS shipped. Before
zonnectrng the power cord to your AC outlet, make sure that the
setting posrtron of thus swatch matches your line voltage. If not, It
nust besettoyourvoltage,naccordancewlththefollowlngdlrectlon
AC voltage selector
: Read this page carefully
to ensure
safe
nrmratinn
as follows.
U.S.A. and Canada.. .........................................
Australia
...........................................................
China and Russia .............................................
Other countries..
........ AC 110-120 I 220-240
Caution
Before applying the
FM indoor antenna (1)
: Read thf
safe ope
AM loop antenna (1)
AS’
A
RF remote antenna [l)
(For VR-6060 only)
N
S
switch
Move switch lever to
match your line voltage
with a small screwdriver
or other pointed tool.
Note:
3ur warranty does not cover damage caused by excessrye line
voltage due to improper settrng of the AC voltage selector swatch.
For ‘JR-6060
Remote control unrt (I)
RC-R0816
Batteries (RG/AA) (2)
e
For KRF-V8060D
Remote control unit (1)
RC-R0725
Batteries (RG/AA) (2)
P
---------
---------
*AC plug adaptor (2)
@
Safety precautions
WARNING :
TO PREVENT FIRE OR ELECTRIC SHOCK,
DO NOT EXPOSE THIS APPLIANCE TO
RAIN OR MOISTURE.
@
*Use to adapt the plug on the powr :r
cord to the shape of the wall otrtlet
,s”ecessary) only for regrons wRere us e
(Accessory
It any acccessorres are missrng. or It the unrt IS damaged or tails to
operate, notrfy your dealer rmmedrately If the unit was sbpped to you
directly, notrfy your shrpper rmmedrately Kenwood recommends that
you retarn the oqnal carton and packing materrals I” case you need to
move or shop the unrt rn the future.
Keep this manual handy for future reference.
Maintenance
of the unit
When the front panel or case becomes drrty, wrpe with a soft, dry
cloth Do not use thrnner, benzene, alcohol, etc for these agents may
cause drscoloratron
In regard to contact cleaner
Do not use contact cleaners because It could cause a malfunction Be
specrally careful not to use contact cleaners contarnrng 011,for they
may deform the plastic component
CAUTION: TO REDUCE THE RISK OF ELECTRIC SHOCK, DO NOT
REMOVE COVER (OR BACK). NO USER-SERVICEABLE PARTS
INSIDE. REFER SERVICING TO QUALIFIED SERVICE PERSONNEL
THE LIGHTNING FLASH WITH ARROWHEAD SYMBOL,
WITHIN AN EQUILATERAL TRIANGLE, IS INTENDED TO
ALERT THE USER TO THE PRESENCE OF UNINSULATED
“DANGEROUS VOLTAGE” WITHIN THE PRODUCT’S ENCLOSURE THAT MAY BE OF SUFFICIENT MAGNITUDE TO
CONSTITUTE A RISK OF ELECTRIC SHOCK TO PERSONS
AL
THE EXCLAMATION POINTWITHIN AN EQUILATERALTRIANGLE IS INTENDED TO ALERT THE USER TO THE PRESENCE OF IMPORTANT OPERATING AND MAINTENANCE
(SERVICING) INSTRUCTIONS IN THE LITERATUREACCOMPANYING THE APPLIANCE.
2 EN
erati
1
I
I
Isure safe
Before applying the power
Contents
smes
Caution
are present.
tir the U.S.A.
: Read the pages
safe operation.
marked
A
carefully
FCC WARNING
to ensure
n Before applying the power ........-................... 2
ASafety
precautrons
Unpackrng .F
How to use thus manual
Special features
2
2
4
4
Names and functions of parts .......-.............
5
Main Unit
5
Remote control unrt (R-R08161 (VR-6060)
.6
Remote control unrt (RC-R07251 IKRF-V8060D) 7
Setting up the system ........................................ 8
‘AA) (2)
‘AA)
(2)
I
5
Connectrng audio components
Connectrng vrdeo components
Drgrtal connectrons
Connecting video components
(COMPONENT VIDEO)
Connecting a DVD player Gzhannel Input).
Connectrng the speakers
Connecting the termrnals
Connectrng to the AV AUX jacks
Connecting the antennas
Connectrng the system control
Connectrng the RF antenna and external
IR Repeater (For VR-6060 only)
Preparrng the remote control
RF remote control function (For VR-6060 only)
9
10
11
12
13
14
15
16
16
17
18
19
19
Preparing for surround sound ....................... 20
Speaker settings
-i
slug on the power
,f the wall outlet
regions where use
damaged or falls to
was shopped to you
)d recommends that
j in case you need to
Normal playback .............................................. 22
Preparrt?g for playback
Lrstenrng to a source component
Adjusting the sound
,e a malfunctror Be
rtalnlng oil, for they
22
23
NOTE:
Thusequrpment has been tested and found to comply with the limrtsfor
a Class B drgrtal device, pursuant to Part 15 of the FCC Rules. These
lrmrts are designed to provrde reasonable protection against harmful
Interference rn a residential rnstallatron Thus equrpment may cause
harmful Interference to radro communrcatrons, if It IS not rnstalled and
used rn accordance with the rnstructrons. However, there IS no guarantee that interference will not occur rn a partrcular installation. If this
equrpment does cause harmful Interference to radio or televisron
receptron, whrch can be determrned by turnrng the equipment off and
on, the user IS encouraged to try to correct the Interference by one or
more of the followrng measures.
- - Reorrent or relocate the receiving antenna.
- - Increase the separation between the equrpment and receiver.
- - Connect the equipment Into an outlet on a crrcuit drfferent from
that to whrch the receiver IS connected.
- - Consult the dealeroran experienced radio/n/technician
for help.
tir the U.S.A.
FCC Compliance Notice
Audro-vrdeo Recerver, VR-6060
These devices comply wrth Part 15 of FCC Rules. Operatron IS subject
to the followrng two condrtrons: (I) This device may not cause harmful
interference. and 12)this device must acceptanyinterference recerved,
rncludrng Interference that may cause undesrred operatron.
KENWOOD U S.A. CORPORATION
2201 East Domrnguez St., Long Beach, CA 90801-5745
Telephone. 31 o-639-9000
For Canada
Recording .......................................................... z
Recording audro (analog sources)
Recordrng vrdeo
Recording audro (drgrtal sources)
25
25
Operatron IS subject to the followrng two conditrons (I) This devrce
may not cause Interference, and (2) this devrce must accept any
interference, lncludlnginterferencethatmaycauseundesiredoperation
Listening to radio broadcasts ....................... z
Tuning radio statrons
Presettrng radro stations manually
Recervrng preset statrons
Recervrng preset statrons rn order iP CALL)
lpe wrth a soft, dry
#rthese agents may
20
Thusequipment may generate or use radiofrequencyenergy. Changes
or modrfrcatrons to this equrpment may cause harmful interference
unless the modifrcatrons are expressly approved rn the rnstruction
manual The user could lose the authority to operate thus equipment
If an unauthorrzed change or modrfrcation IS made.
26
26
27
27
Ambience effects ............................................. 28
Surround modes
Surround play
DVD 6-channel playback
Convenent functrons
.28
30
31
32
Basic remote control operations for other
components ....................................................... 34
Registering setup codes for other
components
Operatrng other components
Storing the remote control code of
the other components (For VR-6060 only)
Setup code chart CRC-R08161 (VR-6060)
and (RC-R0725) (KRF-V8060D)
CASSETTE deck, CD player & MD recorder
operatrons
Otlher components’ operatrotx
34
35
For the U.S.A.
Thus remrnder IS provrded to call the CATV system installer’s attention
to Artrcle 820-40 of the NEC that provrdes gurdelrnes for proper
groundrng and, in partrcular, specrfres that the cable ground shall be
connected to the grounding system of the buildrng, as close to the
pornt of cable entry as practrcal.
AS an ENERGY STAR@ Partner, Kenwood Corporatron has determined that this product meets the
gurdelrnes for energy effrcrency.
Thus product can save energy Savrng energy reduces arr pollution and lowers utility bills.
35
36
37
38
In case of difficulty.. ........................................ 40
f~~~r~~t~~~ 5 Specifications .................................................. 42
3 EN
Names am
Before applying the power
How to use this manual
This manual is divided Into four sectlons,
Remote Control, and AddItIonal InformatIon
Dolby PRO LOGIC g
Preparations,
Operations,
Preparations
Shows you how to connect your audio and video components to the
receiver and prepare the surround processor.
Since this receiver works with all your audio and video components, we
WIII guide you In setting up your system to be as easy as possible
Operations
Shows you how to operate the various functions
receiver
available on the
Remote Control
Shows you how to operate other components using the remote control,
as well as a detalled explanation of all remote control operations. Once
you have registeredyourcomponents
with the proper setup codes, you’ll
be able to operate both this receiver and your other AV components (TV,
VCR, DVD player, CD player, etc.) using the remote control supplied with
this receiver
Additional information
Shows you addItIonal InformatIon such as “In case of difficulty”
shooting) and “Specrflcatlons”
(trouble-
DOLBY PRO LOGIC II, whilst totally compatible with Its predecessor
PRO LOGIC. orovldes areater advantaaes In surround sound It allows
the user to &joy the Iconventional st&eo or Dolby Surround with a
convincing “5.1 Ilke” presentation PRO LOGIC II offers special features for controlllng the overall spatial, dlmenslonality and frontal sound
field Imaging. PRO LOGlCIl produces an Impressive surround sound
from video software marked ~~~DOL~IW~OUNDI
and three-dImensIonal
space from musrc CD When llstenlng to music, you WIII be able to enjoy
the experience of sheer STEREO surround sound
Main unit
OTS-ES
The DTS-ES (DIgItal Theater System-Extended Surround) ISa 6 1-channel
Discrete Surround format which IS extended to DTS-ES Discrete 6 I,
DTS-Matrix 6.1 and DTS NEO.6 It IS a 6 1 channel expanded from 5 1
surround which Includesan addItIonal surround centerchannel developed
wlthln surround left and surround right DTS-ES WIII be able to produce
the origInal sound recorded srmrlar to the theatrlcal effects
In the DTS-ES mode, the 5.1 or6 1 channel dIgItal Input from a DTS CD,
LD or DVD disc (carrying the “DTS” or “DTS-ES” markIng) can be
played In DIgItal Surround
Important
When a DTS disc IS played on a CD, LD or DVD player, noise may be
output from the analog output. It IS recommended that you connect the
digital output of the player to the digital input of this unit
Multi channel surround sound
(SRS Circle Surround II CO>CS)
SRS Circle Surround lIrM Improves on Its predecessor CS-5 1TMresultIng In the CS-6.1TM system, enabling you to listen to reallstlc, multichannel, surround sound playback from a stereo source or conventlonal
surround-encoded video source. You already enjoy llstenlng to Dolby
dIgItal sound/DTS multi-channel sound with your multi-speakers Now
you can Itsten to audio CDs. MDs. Broadcast and Home Theater using
your multi-speakers. You WIII dlscover a new type of sound through
SRS Circle Surround II
For VR-6060
OSP surround modes
The DSP (DIgItal Signal Processor) used for this receiver lI?corporates
a variety of high quality adjustable sound fields, llke “ARENA”, “JAZZ
CLUB”, “THEATER”, “STADIUM” and “DISCO” It is compatible with
almost any kind of program source
Memory back up function
Please note that the followlng Items will be deleted from the unit’s
memory if the power cord IS dlsconnected from the AC outlet for
approximately 1 day.
Power mode.
Input selector settings
l Picture output.
l Speaker ON/OFF.
l Volume level.
l BASS, TREBLE, INPUT level
l TONE ON/OFF.
. LOUDNESS ON/OFF.
l Dimmer level.
l MD/TAPE settings.
l RF-BAND. (VR-6060 only)
l Listen mode setting.
l Speaker settings.
l
l
l
l
l
l
l
l
l
l
l
l
l
l
l
SW RE-MIX ON/OFF
Distance setting.
Input mode setting
MIdnIght mode setting.
PRO LOGIC II mode setting.
CS II mode setting.
Broadcast band.
Frequency setting.
Preset stations
Tunrng mode
DSP mode
ACTIVE EQ mode
SPEAKER EQ mode.
OVO g-channel input
If you own a DVD player equipped with 6-channel output, this receiver
allows you toobtaln the full surround sound impact of DVD source material
featuring multi-channel encoding. Since the source signals are dIgItal and
each channel ISInput Independently, the resulting ambience is far superior
to what can be achieved with conventional surround sound systems
ACTIVE EQ
ACTIVE EQ mode WIII produce a more dynamic sound quality In any
condition You can enjoy a more lmpressve sound effect when ACTIVE
EQ IS turned on during Dolby DIgItal and DTS playback.
SPEAKER EQ
TheSPEAKER EQfunctlon WIII automatlcally detect thevanousfeatures
of each speaker and effectively creates a stereoscopic sound effect
Remote control
This remote control has two kinds of slgnal
Universal IR IInfraRed) remote control
Special features
True home theater sound
This receiver Incorporates a wide variety of surround modes to bring you
maxImum enjoyment from your video software. Select a surround mode accordIng to your equipment or the software you are going to play and enjoy! -&
Dolby Digital and Dolby Digital EX
The DOLBY DIGITAL mode lets you enjoy full dIgItal surround from
software processed rn the Dolby DIgItal format Dolby DIgItal provides
up to 5 1 channels of Independent dlgital audio for better sound quality
and more powerful presence than conventIonal Dolby Surround
As for Dolby Digital EX, it creates SIX full-bandwldth output channels
from the 5.1 channel sources This IS done using a matrix decoder that
derives three surround channels from the two In the origInal recording
For best results, Dolby Digital EX should be used with movie soundtracks recorded with Dolby DIgItal Surround EX
qEN
In addition to the basic receiver, the remote control supplled with this
receiver can also operate almost all of your remote controllable audio
and video comoonents Just follow the simole setuo urocedure to
register the components you have connected
RF remote signal (For VR-6060 only)
You can operate the receiver by gendlng RF remote slgnal from the
remote control The controllable range of the remote control IS not
Influenced by surroundings such as dtstance or an obstructlo”
0 POWER ON/OFF
(For KRF-V80601
Use to turn the n
0 ON/STANDBY (
(For KRF-V80601
Use to turn the [:
the POWER IS tu
STANDBY indic,
0 POWER ON/ST1
(For VR-6060)
Use to turn the F
STANDBY indic
0 A SPEAKERS B
Use to turn the i
0 LOUDNESS key
Use to switch th
0 SPEAKER EQ kc
Use to select SP
0 Surround indici
DSP indicator
Lights when the
SPEAKER EQ in
Llahts when the
Ea mode
ACTIVE EQ indi
Lights when the
mode
DOLBY DIGITAl
Lights when th
DIgItal mode
Standby mode
While the standby /
to the system to ba
Under the condltlor
urxt
Names and functions of parts
vith Its predecessor
und sound. It allows
by Surround with a
1 offers special fealty and frontal sound
;,ve surround sound
d three-dlmensional
1wll be able to enjoy
Main unit
Speaker MUTE
indicators indicator
CLIP
Indicator
Input mode
indicators
Speaker selection indicators
Input channel Indicators
Output channel Indicators
lurid) USA6 1-channel
ITS-ES Discrete 6 1,
I expanded from 5.1
rrchanneldeveloped
II be able to produce
II effects.
nput from a DTS CD,
S” marking) can be
Listen mode
indicators
Frequency display
Preset channel display
Surround mode display
)layer, noise may be
that you connect the
his unit.
ssor CS-5.1 TMresult37 to reallstlc. multi)urce or conventional
xy llstenlng to Dolby
nultl-speakers Now
Home Theater using
,a of sound through
For VR-6060
ecelver Incorporates
ke “ARENA”, “JAZZ
It IS compatible with
I output, this receiver
f DVD source material
signals are dIgItal and
nblence lsfarsupenor
Id sound svstems
sound quality I” any
I effect when ACTIVE
yback
tthevanousfeatures
~ODIC sound effect
rol supplied with this
lte controllable audio
setup procedure to
note slgnal from the
zmote control 1s not
in obstructlon
A A
0 POWER ON/OFF key
(For KRF-V8060D)
-_2Y
Use to turn the maln power ON/OFF
0 ON/STANDBY f&z ) key
(For KRF-V8060D)
-EL
Use to turn the power ON/STANDBY when
the POWER IS turned ON
STANDBY indicator
0 POWER ON/STANDBY (0 I key
-j&
(For VR-6060)
Use to turn the power ON/STANDBY
STANDBY indicator
0 A SPEAKERS B keys
-L??.
Use to turn the A/B speakers ON/OFF
0 LOUDNESS key
-2%
Use to switch the status of LOUDNESS.
-24
0 SPEAKER ECl key
Use to select SPEAKER EQ’s setting
0 Surround indicators
-&
DSP indicator
Lights when the receiver IS In the DSP mode
-zc
SPEAKER EQ indicator
Lights when the receiver IS In the SPEAKER
EQ mode
-2%
ACTIVE EQ indicator
Lights when the receiver IS in the ACTIVE EQ
Inode
-2c
DOLBY DIGITAL indicator
Ltghts when the receiver IS in the Dolby
DIgItal mode
0
0
0
0
@
0
0
@
0
@
DTS indicator
-LX
Lights when the receiver IS in the DTS mode
CS II indicator
-E
Lights when the receiver IS in the CIRCLE
SURROUND ll mode
-14
ACTIVE EQ key
Use to select ACTIVE EQ’s setting
-L&L
DSP key
Use to select any of the DSP mode.
-22
STEREO key
Use to switch the ilsten mode to STEREO
INPUT MODE key
-,8,
Use to switch between the full auto, dIgItal
and analog Inputs
DIMMER key
-g
Use to select the REC MODE
Use to adjust the brightness of the display
-2%
-LX
VOLUME CONTROL knob
-124
MUTE key
Use to temporarily mute the sound
-,2x,
PHONES jack
Use for headphone llstenlng
-EL
Input Selector keys
(DVD/GCH, CD/DVD, PHONO, TUNER,
VIDEO 1, VIDEO 2, VIDEO 3, MD/TAPE)
Use to select Input sources
- 22
SOUND key
Use to adjust the sound quality and the amblence effects
@ BAND key
-m
Use to select the broadcast band.
0 AUTO key
-EL
Use to select the auto or manual tuntng
mode
@ TONE key
-lZL
Use to switch the status of TONE control
-a
@ MEMORY key
Use to store radio statlons in the preset
memory
@ SETUP key
-EL
Use to select the speakers’ settings etc.
@ A/V keys
-GE
Usefor selectlonad~ustmentsdunngSOUND,
SETUP and PRESET CHANNEL functions.
@ MULTI CONTROL knob
-!Z
Use to control a variety of settings.
-M@ LISTEN MODE knob
Use to select the listening mode.
@ AV AUX (S VIDEO, VIDEO, AUDIO L/R)
jacks
-W
@ AV AUX key
-QE
Use to switch the Input to AV AUX.
Standby mode
Connection at POWER ON/OFF key (for KRF- V806OD)
While the standby lndlcator IS llt, a small amount of power IS supplled
to the system to back up the memory This IS called standby mode
Under the condition, the system can be turned ON by remote control
umt
The power In this equipment WII not be completely cut off from the AC
wall outlet when the main switch IS turned OFF.
gEN
Names and functions of parts
Names and functio
Remote control unit (RC-R0816)(I/R-6060)
Remote contrc
This remote control unrt can be use not only for Kenwood products but also for other non-Kenwood products by setting the appropriate manufacturer’s
setup codes
- 36
This remote control ur
setuo codes
If the name of a function is different on
the receiver and on the remote control
the name of the remote control key In
this manual is indicated in parentheses.
0 LCD (Liquid Crystal Display)
0 LEARN key
43
Use to memorize the operation of the other
remote controls
0 REMOTE MODE keys (DVD, CBL, DSS/
SAT, VCR, TV, OTHERS)
-LX
Use to select the components registered at
the respectrve Input.
0 Numeric keys
-14,
Provide functrons rdentrcal to those of the
orrgrnal remote control supplred with the component you are controllrng
0 INPUT MODE key
-,B
Use to swrtch between the full auto, digital
and analog inputs.
0 STEREO key
-22
Use to switch the lrsten mode to STEREO
Q CH +I- keys
Use to select the channels
tw DVD I* keys
When rn DVD player operatrons, these keys
functron as skrp keys.
0 TV CONTROL keys
Use when in TV operatron
0 TOP MENU key
Use to operate the DVD component
SET UP key
-2%
Use to select the speakers’ settrngs etc
0 Joystick
ENTER
Use to operate other components
MULTI CONTROL A/r
-A
Use to control a variety of settings
Use to operate other components
P.CALL 1w4 /DOWN 4 and P.CALL/UP ä II
-22
F
Useforselectronadfustmentsdunng
SOUND,
SET UP and PRESET channel functrons
6 EN
@ PAGE A/V key
Use to operate the DVD componerv
@ OSD key
Use to operate the DVD component
@ TUNING 44/bt
keys
- ?6
Use to operate the tuner mode
If CD, MD or TAPE IS selected as the input
source, these keys function as search keys
8 DISC SKIP key
If CD IS selected as the input source, thus key
functions as the multr-CD player drsc skip key
A/B key
If TAPE IS selected as the Input source, this IS
A and B deck of a double cassette deck
0 DISC SEL key
Use to operate other components
INPUT SEL key
Use to operate other components
@ INPUT SELECTOR keys (DVLl/GCH, CD/DVD,
PHONO, TUNER, VIDEO 1, VIDEO 2, VIDEO 3,
MD/TAPE, AV AUX)
Use to select the Input sources
-23,
@ LOUDNESS key
-24,
Use to swatch the status of LOUDNESS
Q SOURCE (0 I key
Use to turn the other components ON/OFF
0 POWER (0 1 key
-,??
Use to turn the receiver ON/OFF
@ RECEIVER key
Use to return to the operatron of the recerver
- 30
@ LISTEN MODE a/V keys
Use to select the lrstenrng mode
@ ACTIVE EQ key
- ?d
Use to select ACTIVE EQ’s setting
- 24
@I SPEAKER EQ key
Use to select SPEAKER EQ’s setting
- 30.
QI DSP MODE key
Use to select any of the DSP MODE
- 2%
@ MUTE key
Use to temporarrly mute the sound
@ VOLUME +/- keys
- ??
Use to adjust the receiver volume
Q MENU key
Use to operate other components
SOUND key
- 32_
Use to adjust the sound quality and tile ambrence effects
@ RETURN key
Use to operate other cormponents
@ 4 key
Use to operate other components
FLIP key
Use to operate other components
@ W/II key
If CD IS selected as the rt?ptlt SOIIIC~, this key
functrons as the play/pause key
IfMDorTAPE keyrsselectedasrnp~~tsource,
thus key functions as tire play key
BAND key
- ?6_
Use to select the broadcast band
Q, n key
If CD, MD, or TAPE IS selected as the Input
source, this key functions as tire stop key
AUTO key
- 2%
Use to select the auto or rmar?ual tunrng
mode
- 33_
@ DIMMER key
Use to adjust the brightness of the drsplay
II key
Use to operate other components
@ BASS BOOST key
- 22
Use to select the max~mrlm acljustrnent setting for the low freqrlency range
@I TONE key
- -23
Use to swatch the status of TONE control
0 REMOTE MODE
SAT, VCR, TV, 0
Use to select the
the respective inp
Q Numeric keys
Provide functions
orrgrnal remotecor
ponent you are cc
0 INPUT MODE ke
Use to switch bei
and analog inputs
0 STEREO key
Use to swatch the
Q CH +I- keys
Use to select the
))I DVD 144 ke\
When in DVD pla
functron as skip k
0 TV CONTROL ke
Use when rn TV c
0 TOP MENU key
Use to operate th
SET UP key
Use to select the
0 Joystick
ENTER
Use to operate 0
MULTI CONTRO
Use to control a s
Use to operate 0
P.CALLl44 /DO’
.
Useforselectlonz
SET UP and PRE
0 PAGE n/o key
Use to operate tl
@ OSD key
Use to operate tl
Names and functions of parts
Remote control unit (RC-R0725)(KRF-V806OD)
(rate manufacturer’s
-A
Thrs remote control unrt can be used not only for Kenwood products but also for other non-Kenwood products by setting the appropriate manufacturer’s
setup codes
:ion is different on
ae remote control,
ote control key in
ed in parentheses.
If the name of a function is different on
the receiver and on the remote control,
the name of the remote control key in
this manual is indicated in parentheses.
- ,&
0 REMOTE MODE keys (DVD, CBL, DSSI
e the sound
-13_
d/e, volume
0
)mponents
-.&
quality and the ambr-
0
omponents
0
xnponents
0
3mponents
Input source, this key
3use key
ected as Input source,
re play key
-I&
least band
0
selected as the Input
ms as the stop key
-pj
to or manual tunrng
0
0
- 22
tness of the display
omponents
-2
num adjustment set7cy range
-I&
IS of TONE control
0
@
-LXSAT, VCR, TV, OTHERS)
Use to select the components registered at
the respectrve Input
-Sk
Numeric keys
Provrde functions rdentrcal to those of the
orrgrnal remotecontrol supplred wrth thecomponent you are controllrng
INPUT MODE key
-,9_
Use to swatch between the full auto, drgrtal
and analog Inputs
--&L
STEREO key
Use to switch the Irsten mode to STEREO
CH +I- keys
Use to select the channels
ä II DVD 144 keys
\iVhen rn DVD player operatrons, these keys
functron as skrp keys
TV CONTROL keys
Use when rn TV operatron
TOP MENU key
Use to operate the DVD component.
SET UP key
-X
Use to select the speakers’ settings etc
Joystick
ENTER
Use to operate other components
MULTI CONTROL A/r
-A
Use to control a variety of settrngs
Use to operate other components
P.CALL 144 /DOWN 4 and P.CALL/UP WI
- 27
Ese foi selectIon adfustrmentsdunng SOUND,
SET UP and PRESET channel functrons.
PAGE n/o key
Use to operate the DVD component
OSD key
Use to operate the DVD component
-kK
keys
0 TUNING 44/w)
Use to operate the tuner mode.
if CD, MD or TAPE is selected as the Input
source, these keys function as search keys
@ DISC SKIP key
If CD IS selected as the Input source, this key
functronsas themultr-CDplayerdrscskrp
key
A/B key
If TAPE ISselected as the Input source, thus IS
A and ‘8 deck of a double cassette deck
@ DISC SEL key
Use to operate other components.
INPUT SEL key
Use to operate other components.
@ lNPUTSELECTORkeys(DVD/GCH,CD/DVD,
PHONO,TUNER,VIDEO l,VIDE02,VIDE03,
MD/TAPE, AV AUX)
-LTL
Use to select the Input sources
-c
0 LOUDNESS key
Use to swatch the status of LOUDNESSb
0 SOURCE ((9 I key
Use to turn the other components ON/OFF.
0 POWER (0 ) key
-E
Use to turn the receiver ON/OFF
@ RECEIVER key
Use to return to the operation of the tecerver
__~
0 LISTEN MODE n/o keys
-&L
Use to select the lrstening mode.
@ ACTIVE EQ key
-UB
Use to select ACTIVE EQ’s settrng.
-I-~@ SPEAKER EQ key
Use to select SPEAKER EQ’s settrng
@ DSP MODE key
-A
Use to select any of the DSP MODE
@ MUTE key
-2t
Use to temporarily mute the sound
@ VOLUME +I- keys
-La
Use to adjust the receiver volume.
Bi MENU key
Use to operate other components
SOUND key
-m
Use to adjust the sound qualrty and the ambience effects.
@ RETURN key
Use to operate other components.
0
4 key
Use to operate other components.
FLIP key
Use to operate other components.
@ F/II key
If CD IS selected as the Input source, this key
functrons as the play/pause key.
If MDorTAPE keyrsselectedasrnputsource,
thus key functrons as the play key.
BAND key
-m
Use to select the broadcast band.
@ n key
If CD, MD, or TAPE IS selected as the Input
source, this key functrons as the stop key.
AUTO key
-@
Use to select the auto or manual tunrng
mode.
@J DIMMER key
-Lg
Use to adfust the brrghtness of the display
II key
Use to operate other components.
-E
0 BASS BOOST key
Use to select the maxrmum adjustment settrng for the low frequency range.
-m
@ TONE key
Use to swatch the status of TONE control
7 EN
Setting up the system
Make connections
as shown in the following
pages.
When connecting
the related system components,
be sure
to refer to the instruction
manuals supplied with the components you are connecting.
Do not connect
the power cord to a wall outlet
until all
connections
are completed.
Notes
1. Be sure to Insert all connection cords securely If therr connectrons are
Imperfect. sound may not be produced or there WI/I be norse Inference
2. Be sure to remove the power cord from the AC outlet before pluggrng
or unpluggrng any connectron cords Pluggrnglunpiuggrng connectron
cords wrthout drsconnectrng the power cord can cause malfunctrons
and may damage the unrt
3. Do not connect power cords from components whose power consumption IS larger than what IS indicated on the AC outlet at the rear
of thrs unrt
Setting up the svstt
Connecting al
Input mode settings
CWDVD, VIDEO 2 and DVD/GCH inputs each Include jacks fat drgrtal
audio Input and analog audio InpLrt
You must select beforehand which type of rrlpLrt ISto be llsecl for each
connected component
The initial factory settings for audio signal playback for CDIDVD,
VIDEO 2 and VIDEO 3 are full auto.
To use the analog audro Input for playback instead llf, for example, you
have connected aVCR to theVIDEO 2 or VIDEO 3 input), you must set
the Inpitt mode for the correspondrng Input to the analog Imode
After completrng connectrons and tLrrnrng on the recerver, follow the
steps below
INPUT,MODE
Analog connections
Audio connectrons are made usrng RCA pm cords These cables transfer
stereo audro signal rn an “analog” form Thus means the audio signal
corresponds to the actual audro of two channels These cables usually
have 2 plugs on each end, one red for the rtght channel and one white for
the left channel. These cables are usually packed together wrth the
source unit, or are avarlable at your local electroncs retailer
Input
Selector
0 Use the Input Selector keys to select CD/DVD, VIDEO 2, VIDEO 3
or DVDIGCH.
0 Press the INPUT MODE key.
though all connectrons have been made properly, reset the microcomputer refemng to “In case of drffrculty”
Each press switches
CAUTION
In DTS play mode
I FULL AUTO (drgrtai input, analog 1npi1t1
c1 2 DIGITAL MANUAL idrgrtal Input)
Be sure to adhere to the following, or proper ventilation will be
blocked causing damage or fire hazard.
l Do not place any objects imparnng heat radratron onto the top of the
unit.
l Leave some
space around the unrt (from the largest outside
drmensron rncludrng projection) equal to or greater than, shown
below.
Back panel : 10 cm
Top panel : 50 cm
Side panel : 10 cm
the setting
as follows:
In CD/DVD, VIDEO 2, VIDEO 3 or DVD/GCH play mode
I FULL AUTO (drgrtal Input, analog Input)
2 DIGITAL MANUAL (drgital Input)
3 6CH INPUT fDVD/GCH Input)
c 4 ANALOG (analog Input)
Digital input:
Select this setting to play dIgital srgnals from a DVD, CD, or LD
player
Analog input:
Select this settrng to play analog signals from a cassette deck, VCR,
or record player
Auto detect:
In “FULL AUTO” mode (AUTO DETECT rr-idlcator kght up), the
receiver detects the drgrtal or analog Input srgr?als automatrcally.
Prrorrty IS given to drgrtal signal during input rmode selectron. The
recerver will select the Input mode and lrstenrng mode automatically
during playback to match the type of Input slgnal (Dolby Drgrtal,
PCM, DTS) and the speaker setting The OPTICAL and COAXIAL
rndrcator on the drsplay will lrght up when dlgrtal slgnal IS detected
If the Input signal IS analog, the ANALOG rndrcator ~111lrght up
To keep the recerver set to the currently selected lrstening mode,
use the INPUT MODE key to select “DIGITAL MANUAL” (manual
sound) However, even when thus settrng IS selected, there may be
cases rn whrch the listenrng mode IS selected automatrcally to
match a Dolby Digital source sr@naldepending on the combrnatron
of lrstening mode and source slgnal
If the INPUT MODE key IS pressed qurckly, sound may not be
produced Press the INPUT MODE key agarn
8 EN
Settinu UIJthe system
Connecting audio components
Shaoe of AC outlets
;tobeusedforeach
yback for CWDVD,
c
iIf, for example, you
Input), you must set
,e analog mode
rece\ver, follow the
SYSTEM CONTROL
-&
jacks
To AC wall outlet
I, VIDEO 2, VIDEO 3
S:
t)
H play mode
ItI
I
1 a DVD, CD, or LD
cassette deck, VCR,
llcator light up), the
ignals automatically
node selection The
1mode automatlcally
;Ignal (Dolby DIgItal,
HCAL and COAXIAL
al slgnal IS detected.
cator will light up
zted listening mode,
MANUAL” imanual
lected, there may be
ted automatically to
j on the comblnatlon
OUT
I
Cassette deck or
MD recorder
I
IN
OUT’ o
ho-CD or DVD player
-’
Moving coil (MC) cartridge
record player cannot be used
directly from the receiver unit.
It can only be used when
another equalizer amplifier is
connected.
sound may not be
Record player
9 EN
Settine UD the svstem
Seffing up the syst
Connecting video components
Digital tonne
S Video jacks
About the S VIDEO
jacks
The dqtal I” lacks car
format digital signals
If vou have connecter
Use the S VIDEO jacks to
make connections
to
video components
with
S VIDEO IN/OUT jacks.
. If yoii use the S VIDEO
lackstoconnectyourvldeo
playback components, be
we to use the S VIDEO
jacks when connecttng
your monitor and video
recording components
Monitor
Video
IN/OUl
TV-
Audio
IN/OUT
Video deck
.
Audio Inputs
and outputs
Video inputs and outputs
(Yellow RCA pin cords)
DVD player or LD player
OUT
1 A video component
lOEN
I
with digital audio outputs
DVD player or LD player
should be connected
OUT
to the VIDEO 2 or VIDEO 3 jacks.
To connect an LO
Next, connect the
Connect the vide
Settina UIJthe svsfem
Digital connections
he S VIDEO
The dIgItal tn lacks can accept DTS, Dolby DIgItal, or PCM signals Connect components capable of outputting DTS, Dolby Digital, or standard PCM (CD)
format dIgItal signals
If you have connected any dIgItal components to the receiver, be sure to read the “Input mode settings” section carefully
c
S VIDEO jacks to
connections
to
:omponents
with
D IN/OUT jacks.
use the S VIDEO
oconnectyourvideo
xk components, be
o use the S VIDEO
when connecting
monitor and video
OPTICAL DIGITAL OUT (AUDIO)
CD or DVD player
OPTICAL DIGITAL OUT (AUDIO)
\
Optical fiber cable
Component with DTS,
Dolby Digital, or PCM
OPTICAL DIGITAL OUT
Connect the video signal and digital
audio signals to the VIDEO 3 jacks.
(See “Connecting video components”.)
-a
COAXIAL DIGITAL OUT (AUDIO)
Component with DTS,
Dolby Digital, or PCM
COAXIAL DIGITAL OUT
I
I
Connect the video signal and analog
audio signals to the VIDEO 2 jacks.
(See “Connecting video components”.)
-x
demodulator
DOLBY DIGITAL RF
OUT (AUDIO)
PCM OUT
LD player
I To connect an LD player with a DIGITAL RF OUT, connect the LD player to the KENWOOD RF digital demodulator
(DEM-9991D).
Next, connect the DIGITAL OUT jacks of the demodulator to the DIGITAL IN jacks of the receiver.
Connect the video signal and analog audio signals to the VIDEO 2 or VIDEO 3 jacks. (See “Connecting video components”.)
Setting up the system
Setting up the sysf
Connecting video components (COMPONENT VIDEO)
Connecting a
If you have connected the recewer to a wdeo component wth COMPONENT jacks, you can get a better picture quality than by connecting to the S-VIDEO
jacks.
If you have connecte
7
Monitor TV
(with component
Y OUT
l
jacks)
Connect to the VIDEO cord.
Video Recorder, DVD Recorder,
Satellite Cable Tune,: &.Game Player
(wnn component jacrsj
When connecting
12EN
I
the TV to the COMPONENT jacks, be sure to connect all the other components
to the COMPONENT jacks.
I
Setting up the system
Connecting a DVD player (6-channel input)
cting to the S-VIDEO
If you have connected a DVD player to the receiver wth dIgItal connection, be sure to read the “Input mode settings”
VIDEO OUT
(Yellow RCA
pr cord)
section carefully
-LX
COAXIAL
DIGITAL OUT
(AUDIO)
DVD player
lo
S VIDEO cord
jacks.
13EN
_
Settim up the system
Setting URthe svsl
Connecting the speakers
Connecting tl
0 Strip coating.
r-Surround Speakers
(Be sure to connect both
surround speakers)
Powered
Right
Left
0 Insert.
Surround BacklSubwoofer
Use this terminal If you wsh to
connect to a Surround Back
speaker wth the SETUP of
“6ch AMP SB” or to col?nect
to a subwoofel speaker wItI
the SETUP of “6ch AMP SW”
f
(rc
-I
L-.-L.0 Strip coating.
0 Insert the cord
,
“f
Connection of bt
l
Sound will not be
l
FRONT B
l
Never short cu
If the left and II
cords are con
Llnnatural with
speakers CONE
Speaker impeda
,
L~eft
Right
Front Speakers
Power amplifier
Surround
Back
I
Right
I
I
Left
Front Speakers A
14EN
B
After confirmIng t
rear panel of the I
ante ratings Usin
indicated on the re
or damage to the
Setting UP the system
Connect& ths terminak
0 Strip coating.
Speaker placement
0 Loosen.
0 Secure.
:t
Front
speaker
h
1
Surround
speaker
0 Strip coating.
0 Insert the cord.
Q Push the lever.
0 Return the lever.
2=--m
k3J
Connection of banana plugs (For the U.S.A. and Canada)
t3 Insert.
7,
F0
9
l
Sound wrll not be heard If the speaker termrnal IS not fully secured
l
l
Never short circurt the + and -speaker cords
If the left and rrght speakers are connected Inversely or the speaker
cords are connected with reversed polarrty, the sound wrll be
unnaturalwithambrguousacousttcrmagtng
Besuretoconnectthe
speakers correctly
ii
Listening
position
Surround
backsraeaker
Front speakers
Place at the front left and right of the lrstening
oosrtton. Front speakers are required for all surround modes.
Center speaker Place front and center. This speaker stabtlizes the
sound rmageand helps recreate sound motion. Requrredforsurround
slayback
Surround speakers
Place at the direct left and right, or slightly
oehtnd, the lrstenrng posttron at even heights, approximately 1 meter
above the ears of the listeners These speakers recreate sound
notron and atmosphere. Required for surround playback.
Subwoofer
Reproduces powerful deep bass sounds.
Surround back speaker : Place the speaker directly at the rear of the
rstenrng posItron. The optrmum posrtron depends mainly on the room
:ondrtron
‘Although the Ideal surround system consrsts of all the speakers
listed above, If you don’t have a center speaker or a subwoofer, you
can divrde those srgnais between the available speakers rn the
speaker settings steps to obtain the best possrble surround reproe&-g
ductron from the speakers you have available.
Channel space switching
(Except for the U.S.A., Canada, U.K., and Australia)
The space between radto channels has been set to the one that
prevails in the area to which the system IS shipped. However, If the
current channel space setting does not match the setttng tn the area
where the system IS to be used, for Instance when you move from
area 1 or area 2 shown rn the followtng table or vice versa, proper
reception of AM/FM broadcasts cannot be expected. In this case,
change the channel space setting rn accordance with your area by
refernng to the followrng table
After confirmIng the speaker Impedance rndrcattons prtnted on the
ante ratrngs Ustng speakers wrth a rated Impedance other than that
tndrcated on the rear panel of the recervercould result II- maifunctrons
or damage to the speakers or recetver.
ers B
Turn the power OFF by pressrng the POWER key before movrng the
switch level. Move swatch lever to match your area wrth a small
screwdrrver or other pointed tool, then turn the power on agafn.
Setting up the system
Setting up the sys
Connecting to the AV AUXjacks
Connecting the antennas
The AV AUX jacks are convenient for connectlot- of video components
such as a camcorder or a wdeo game
AM loop antenna
AV AUX
Connecting 1
The suppiled loop antenna IS for use indoors Place It as far as possible
from the iecelver, TV set, speaker cords and power cord, and adjust the
dIrection for best reception
AM antenna terminal connections
0 Push lever.
0 Insert cord.
..Y
0 Release lever.
Connecting syste
audio componeni
system control 0
I
This unit is camp
control operatior
lXS81, IXSI. or tX
If yourcomponen
components to tl
FM indoor antenna
The suppiled Indoor antenna IS fol temporary use only For stable signal
reception we recommend us,ng an oL(tdoor antenna Disconnect the
indoor antenna when you connect one outdoors
l
FM antenna terminal connections
Insert cord.
You may connec
lack
EXAMPLE: [SL16
The underlIned po
tmode
S VIDEO cord
[&pg
[XSI IX!
IsJa
[XSI IX!
FM outdoor antenna
Lead the 75R coaxial cable connected to the FM outdoor iintenna Into the
room and connect it to the FM 75<2 termnal
[XSI
l
VIDEO OUT
S VIDEO OUT
ttach to the stand
Camcorder, other VCR,
I
video game, digital camera, AUDIO OUT
or portable MD player
l
AM loop antenna
FM Indoor antenna
L-1
- To select the source connected to the AV AUX jacks press AV
-AUX key.
* When you connect the audio source such as the MD player, you
do not need to connect the video cable.
* When you connect the unit and the component with the S
VIDEO cord, you can get better picture quality.
16EN
l
(Commercially
available)
/
b
FM outdoor antenna
In order to take
components mu
player It must be
(or MD recorder)
using more than
speclfled lacks n
Some CD player
[SLI 61systeln cc
eqwpment that I
Some MD playe
make system cc
Notes
1 ISL161 equIpme
equipment for I
this kind of con
trol cords Ever
can be camed (
2 Do not connec
than those spe
and damage yo
3 Be sure the sys
system control
1
Setting up tffe system
:e it as far as possible
:r cord, and adjust the
) Release lever.
Connecting system control cords after connecting a KENWOOD
audio component system lets you take advantage of convenient
system control operations.
This unit is compatible only with the [SL-161 mode. The system
control operation is not available if the unit is connected in the
[XS81, [XSI, or [XRI connection mode.
If your component has the mode select switch, set the connected
components to the ISL161 mode.
l
YOLIrmay cotltlect the system control cord to either the up or down
jack
EXAMPLE: ISL161 mode connections
The underlIned portion represents the setting of the systetn control
mode
tsL161
Receiver
[sL161 [XSI IXS81 [XRI
Cassette deck
or MD recorder
~tdoorantenna Into the
IsL161 [XSI LXS81
CD player
--li
Q
0
Li
3
IXSI
-1
l
l
l
lop antenna
ldoor antenna
‘b
jutdoor antenna
Automatic Operation
When you start playback from a source component, the input selector
on thus unit swatches to that component automatrcally.
Synchronized Recording
Lets you synchronrze recording wrth the start of playback when
recording from CD, MD or analog discs.
I Regrstermg
. . setup codes for KENWOOD audio components
only For stable slgnal
enna Drsconnect the
) Attach to the stand
SYSTEM CONTROL OPERATIONS
Remote Control
Lets you operate thus unit with the system remote supplred wrth the
recerver.
SYSTEM
CONTROL
cord
In order to take advantage of the system control operatrons, the
components must be conrxcted to the correct jacks To use a CD
player It must be connected to the CD jacks To use a cassette deck
(or MD recorder) It must be connected to the MDRAPE tacks When
usrng more than one CD player (etc.) only the one connected to the
specrfred jacks may be connected for system control.
Some CD players and cassette decks are not compatrble with the
ISLI 61system control mode Do not make system connections wrth
equrpment that IS tnot ISLIE] compatrble
Some MD players are not system control compatrble You cannot
make system control connectrons to this kind of equrpment
Notes
1 ISL161 equrpment carnnot be combrned wrth IXRI, [XSI, and IXS81
eqlripment for system operatrons If your equrpment consrsts of
thus kind of combination, please do not connect any system control cords Even without system control cords, normal operatrons
can be camed out wrthout effectrng performance
2 Do not connect system control cords to any cotnponents other
than those specrfred by KENWOOD It may cause a malfunctron
and darnage your equipment
3 Be sure the system control plugs are Inserted all the way II?to the
system control termrnals
If you own remote controllable KENWOOD audio components that
are not compatible wrth system control, registering the setup code
enables you to control those components using the remote control
supplled with this unit (without connecting system control cords). To
register setup codes for your remote controllable KENWOOD audio
components, see “Regtstenng setup codes for other components”
-m
Setting up the system
Setting up the sysb
Connecting the RF antenna and external IR Repeater (For ~~-6060only)
Preparing the
The remote control for this receiver has the RF (radio frequency) and IR (infrared rays) transmrssron functron IR repeaters enables you to control
components located rn cabrnets or behind glass doors You can enjoy a wider remote control srgnal range by placrng the RF antenna and IR repeater away
from the recerver.
KENWOOD components (except DVD player): System control
Other components: (Registering setup codes) IR REPEATER
Loading the batte
Q Remove the co
- &
-22
0 Close the cove,
1 l Insert two AA-sire
RF remote co,
I he remote control
remote function Th
mands even when tt
signal can hardly acce
equipped wrth the RF
br-drrectronal commu
functron with equrpn
Changing the RF tr
The RF remote functl
etc. In thus case, the
To change the RF ri
0 Change the I
(For RF Transmitter, select either
1. RF REMOTE Band I, or
2. RF REMOTE Band 2)
After changrng tt
change that of th
Connecting IR repeater
0 Connect the IR repeater to the device as described
repeater’s manual.
Q Change the
l Press and h
for more th
Each time ym
changes as
in the
Q Connect the IR repeater cable(s) to the IR REPEATER OUT
jack(s).
j, “RF REI
2, “RF REI
c1 3 “RF REI
Shape of plug to be connected.
Notes
l
IR repeaters send a srgnal srmrlar to the device’s own remote control.
Xantech repeaters (models 282-00, 286-00, or 283-001 are compatrble
with Your new audio-vrdeo recerver.
Cynecting
the RF remote antenna
@ Insert the jack of the provided
RF REMOTE ANTENNA jack.
RF remote antenna into the
0 Place the antenna wire vertically and fix it.
l
Place the antenna away from the metallic panel.
18EN
l
IR OUT SPECIFICATION:
Terminal
IR OUT LCD
~~~ot~
To Tip
Signal
To Sleeve
Ground
Select the
swtch of tl
Settinrr URthe system
Remote control operation
\ables you to control
and IR repeater away
Loading the batteries
0 Remove the cover.
6 Insert the batteries.
When the STANDBY lndlcator IS Itt. the power turns ON when you press
the POWER (0) key on the remote control. When the power comes ON,
press the key you want to operate.
Operating other component
range IIR Transmitted
I
jm
Q Close the cover.
IR Transmitter
l
Insert two AA-size (R6) batteries as indicated by the polarity ImarkIngs
Operating receiver range (RF Transmitter)
RF r@fI?Ofe
COnfrO/
fUI?CfiOn
RF Remote antenna
(FOG~~-60600nl~4
The remote control has the RF remote fuvctlon I” addltlon to the IR
remote function The VR-6060 can receive the remote control commands even when they are lnstalied in a posItIon where the IR remote
signal can hardly access, for example InsIde a cabinet The receiver IS not
equipped with the RF remote bi-dIrectIonal communlcatlon function The
bi-directional communication IS avaIlable only when using the IR remote
function with equipments other than the recelver
Changing the RF transmission frequency
The RF remote function may be unavatlable due to radio wave cross talk,
etc In this case, the transmlsslon frequency can be changed
To change the RF remote transmission
frequency:
0 Change the RF switch setting
l
l
Aftel changing the RF frequency of remote control, be also sure to
change that of the receiver
0 Change the receiver’s RF reception frequency.
* Press and hold the SETUP key on the front panel of the receiver
for more than 2 seconds
Each timeyou press theSETUP key, the RF reception frequency
changes as follows
--
-
1
L-
1 “RF REMOTE BAND 1I
2 “RF REMOTE BAND 2”
3 “RF REMOTE OFF”
The remote control stgnal recerved by mafn unit IR and RF signals.
When pressing more than one remote control key successively, press the
keys securely by leaving an Interval of 1 second or more between keys.
Notes
1 The supplled batteries may have shorter ltves than ordinary batteries
due to use during operation checks.
2 When the remote-controllable distance gets shorter than before, replace both batteries with new ones.
3 Placing the remote sensor I” direct sunlight. or in direct light from a
high frequency fluorescent lamp may cause a malfunction.
In such a case, change the locatlon of the system lnstallatlon to prevent malfunction
Important notes
Here is list of adjustment which can maximize the operation of
your remote control. For optimal operation of the remote control:
1 Aim the remote control toward the room where the receiver IS
located
i Do not posltton the receiver and remote control near metal (such
as heat ducts) Metal cat- absorb RF signals
3 Make sure the batteries I” the remote control are fully charged
Weak battetles WIII affect the range of the remote control.
4 When there IS an obstruction around other equipments that send
signal from the remote control, the control distance of the RF
remote slgnal WIII be short
-%ect
the same number as the posItIon number of the RF
switch of the remote control
Note
The tests for range limits of the remote control and the recever are
conducted in open-afr distance test. Actual distance of the slgnal will
be based on the construction of the bulldIng where the unit IS being
used I” as well as other factors such as outside Interference
l
lgEN
Preparing for surround sound
Preoarina for surro
Speaker settings
To enable you to obtarn optrmum enjoyment from the receiver’s listening
modes, make sure to complete the speaker settrngs (subwoofer, front,
center, and surround speakers) as descrrbed below
0 Use the MULTI CONTROL knob or Joystick
the appropriate subwoofer setting.
ON/STANDBY 0
POWER
(KRF48060D)
ON/STANDBY 0 I
(VR-6060)
I
to select
If you selected
I SURRI
I SUBW ON : Subwoofer settrng mode to tile recerver IS
ON
2 SUBW OFF : Subwoofer setting rmode to the receiver IS
OFF
M/JLTl CONTROL
SETUP
I
c
(A/VI
2 SURRI
When the se1
to step 0
l
The rnltral setting IS “SUBW ON”
l When the settrng
“SUBW OFF” IS selected, the front speakers
are automatrcally set to “FRNT LARGE” and the procedure skrps
to step 0
Before step 0, press the SETUP key to accept the settrng
*When subwoofer output sound IS reqtrrred, select “FRNT
NORMAL”,orselectboth”FRNTLARGE”and”SWRE-MIXON”
l After setting
SW isubwooferl from OFF to ON, 6ch AMP setLIp
display will appear to enable you to reselect either SW or SB from
the surround back or subwoofer speaker terminal
l
POWER-ON/OFF
AiV
(KRF48060D)
POWER 0
0 Press the A k
l The surrounc
@ Use the MUL
appropriate s
If you selecte
I SBNO
0 Press the A key or Joystick (b) to accept the setting.
*The front speakers setnng rndrcatlon “FRNT” appears
z SBLAI
SBOFI
3
SET UP
Joystick
(MULTI CONTROLA/~,
DOWN 4 IUPt)
0 Use the MULTI CONTROL knob or Joystick
the appropriate front speakers setting.
1 FRNT LARGE
q
Turn on the power to this receiver by pressing fhe POWER
ON/STANDBY & (for VR-6060) or POWER ON/OFF and ON/
STANDBY6 (for KRF-V806OD)key or POWER o key.
c
Press the SETUP key fo enter the SETUP mode.
The Surround Back and Subwoofer speaker output selectrons are
displayed as follows
c
to select
If you selecte
: Large front speakers are connected
to the receiver
: Average srze front speakers are connected to the recervel
For “FRNT LARGE” selectron, no sound wrll be heard from
subwoofer speaker even when rt IS set to ON However, If you
select SPEAKER EQ mode when subwoofer IS selected, you
wrll be able to hear sound from the subwoofer
When rn STEREO mode, the sound goes drrectly to front
speaker
l
a
2 FRNT NORMAL
(A/V)
0 6ch AMP SB
@ 6ch AMP SW
UsetheMULTlCONTROLknoborJoystlck(~/T)toselectthespeakers
Press the SETUP key to proceed to the next SET UP selectron
0 Press the A key or Joystick ItI to accept the setting.
*The center speaker settrng rndrcatlon “CNTR” appears
Use A/V keys or Joystick (r/,)
,3 SP SETUP
@ TEST TONE
@ SP DISTANCE
3 DISP MODE
c @ EXIT
0 Use the MULTI CONTROL knob or Joystick
the appropriate center speaker setting.
for the following displays.
If you selected “LARGE”
I CNTR LARGE
2 CNTR NORMAL
The flow of the SET UP IS as follows:
:
SP SETUP /+TEST
T. TONE
TONE
3 CNTR OFF
IA/Y)
: A large center speaker IS connected
to the receiver
: An average srze center speaker IS
connected to the recerver
: Center speaker setting mode to the
receiver IS OFF
2 SBOF
After settrng
drspiay WIII a
the surrounr
l
Q Press the A
and “SURR:I
l
Surr mrx is \
produce SOI
enable the I
@ Use the MU
the followin
I SURF
“SUBW ON” appears.
: Center speaker settrng mode to the recerver IS ON
2 CNTR OFF : Center speaker settrng mode to the recerver rs OFF
If surround
vrsible and
l
0 Press the A
l The subwo
8 Use the M11
the appropr
I SWF
C
If you selected “LARGE” as the center speaker setting,
I SURRLARGE
2 SURR NORMAL
3 SURR OFF
2 SURF
as the front speakers setting,
0 Press the A key or Joystick (,I again to accept the setting.
*The surround speaker settrng rndrcatron “SURR” appears
d
0 Use the MULTI CONTROL knob or Joystick (A/T)
to select
the appropriate surround speaker setting.
0 Select the SP SETUP and press the SETUP key again so
on
as the front speakers setting,
If you selected “NORMAL”
c
SB
to select
1 CNTR ON
setting indication
c
c
T TONE
that the subwoofer
1
: Large surround speakers are connected to the recever
: Average size surround speakers are
connected to the receiver
Surround speaker settrng mode to
the recerver is OFF
l
2
SWF
If subwoofc
0 Pressthe SE
l The recervt
l
In steps I
channels c
I
Preuarinu for surround sound
ck (A/Y)
to select
q
Ifyouselectedotherthan”LARGE”asthecenterspeakersetting,
I SURR ON
de to the receiver IS
#deto the receiver IS
d, the frol?t speakers
1the procedure skips
ept the setting
Ired, select “FRNT
Id “SW RE-MIX ON”
ON, 6ch AMP setup
either SW or SB from
rmlnal
: Surround speaker setting mode to the recetver IS ON
c 2 SURR OFF : Surround speaker setting mode to the lecelvei IS OFF
s
l When the setting
“SURR OFF” IS selected, the procedure skips
to step 0
From your usual llstenlng posItion, adjust the volume levels. The
volume levels from each speaker should be the same.
0 Press the A/V
If you selected “LARGE”
1 SB NORMAL
c
the setting.
NT” appears
2 SBLARGE
3 SBOFF
:
:
as the surround
keys or Joystick
(4~)
to select TEST TONE.
0 Press the SETUP key for the following
c
0 Press the A key or Joystick (~1 again to accept the setting.
l The surround
speaker setting lndlcatlon “SE” appears
@ Use the MULTI CONTROL knob or Joystick (r/r)
appropriate surround back speaker setting.
Adjust the speaker volume level.
; t:%::
displays:
%AL
0 The selection of AUTO/MANUAL
TEST TONE is done by the
MULTI CONTROL knob or Joystick
Press the SETUP key again to begin TEST TONE.
(A/V).
to select
(A/Y)
Use the MULTI CONTROL knob or Joystick
to adjust
the volume level of the test tone output from the speaker
channel to be adjusted.
speaker setting,
Average size surround back speaker IS
connected to the iecelver
Large surround
back speaker IS
connected to the receiver
Surround back speaker setting mode to
the receiver IS OFF
ForAUTOselection,thefirsttesttoneisheardfromthefrontleft
speaker for 2.5 seconds. The next test tone is heard from the
speakers in the following sequence for 2 seconds each.
+ LEFT SUBW-
CNTR
-
RIGHT
SL-
SB -
SR-
The channel indlcatlon blinks while the test tone is being output
ick (A/V) to select
If you selected “NORMAL”
iakers are connected
ont speakers are co,,eceiver
i wtll be heard from
ON However, If you
ofer IS selected, you
oofer
,es directlv to front
t the setting.
4TR” appears
,ick (r/V)
c
l
as the surround
speaker setting,
I SB ON : Surround back speaker setting rmode to the
receiver IS ON
2 SB OFF : Surround back speaker setting mode to the
receiver IS OFF
@ Press the A key or Joystick 1~) again to accept the setting
and “SURR:MIX” appears.
l Surr mx
IS when the SL and SR speakers signals are mixed to
produce sound from the surround back speaker which would
enable the listener to enjoy sound coming from the back
speaker IS connected
~ng mode to the re-
0 Use the MULTI CONTROL knob or Joystick
the following.
(A/T)
to select
1 SURR:MIX ON
: Surround mix setting mode to the
receiver IS ON
c 2 SURR:MIX OFF : Surround mix setting mode to the
receiver is OFF
* If surround back speaker is turned OFF, SURR MIX setting IS not
vlslble and the procedure skips to step @
mg mode to the re0 Press the A key or Joystick 1,) again to accept the setting.
l The subwoofer
remix setting indlcatlon “SW RE-MIX” appears
accept the setting.
SURR” appears
:ick IA/V)
9.
to select
leaker setting,
j speakers are con3celver
rrround speakers are
le receIvei
ter setting mode to
3FF
If you change the volume level settings for the speakers while
llstenlng to mux, the settings referred to on this page are also
-E
changed
If the speaker setting selects are OFF, the speaker level settings
are reset.
For MANUAL selection, press the 4~ keys or Joystick (r/b)
each time to select the speaker channel.
0 Press the SETUP key again.
l The test tone IS turned off and return to the maIn setup displays.
q
input the distance to the speakers.
0 Press the A/V keys or Joystick (r/b)
to select the SP
DISTANCE on setup displays and press the SETUP key again.
0 Measure the distance from the listening
the speakers.
askers setting,
speakers setting,
l
After setting SB (sunound back) from OFF to ON, 6ch AMP setup
display WIII appear to enable you tore-select either SW or SB from
the surround back or subwoofer speaker terminal
to select
e center speaker IS
le receiver
setting mode to the
l
Jot down the
Dtstance to
Distance to
Distance to
Distance to
Distance to
Distance to
Distance to
distance to each of the
Front left speaker (L)
Center speaker (C)
Front right speaker (RI
Surround right (SRI
Surround back ISB)
Surround left ISL)
Subwoofer (SW)
position
speakers.
_
feet
_
feet
_
feet
_
feet
_
feet
_
feet
_
feet
to each of
(meters)
(meters)
(meters)
(meters)
(meters)
(meters)
(meters)
0 Use the A/V keys or Joystick (4~)
to select the speakers
and the MULTI CONTROL knob or Joystick (A/V)
to adjust
the distance to the front speakers.
The speaker Indicator to be adjusted blinks.
8 Use the MULTI CONTROL knob or Joystick
the appropriate subwoofer re-mix setting.
(A/V)
to select
I SW RE-MIX ON : Subwoofer re-mix setting Imode to
the receiver IS ON
c 2 SW RE-MIX OFF: Subwoofer re-mix setting tnode to
the receiver IS OFF
l
If subwoofel ISturned OFF, subwoofer re-mix setting ISnot vlslble
lndlcatlon II- feet
l
@ Press the SETUP key again to return to the main setup displays.
l The recefvei enters the speaker volume level adlustment
Inode
* II? steps q and q , lndlcatlolx appeal only for the selected
channels of the speakers that require adlustIng
lndicatlon in meters
The allowable setting range IS 1 to 30 feet (0.3 to 9 0 m).
adjustable I” 1 foot 10 3 m) Increments
Continued
to next page.
21 EN
Preparing for surround sound
Q Repeat steps 0 to input the distance for each of the speakers.
Normal p/a yback
Normal playback
Preparing for playback
Listening to a
borne preparatory steps are needed betore startrng playback
0 Press the SETUP key again to return to main setup displays.
l The speakers You have selected should appear on the drsplay
Confrrm that all the speakers have been correctly selected
q
A SPEAKERS
Select the display mode.
0 Pressthe~lv
ON/STANDBY
0
(KRF-V8060D)
0
(VW6060)
I
I3
I
INPUT MODE
keyorJoystick(r/w)toselecttheDlSPMODE.
0 Press the SETUP key for the following
c
POWER
ON/STANDBY
L DISP SELECTOR
,a DISP LISTEN
displays:
Input
: Drsplays the current input selector
: Drsplays the current listen (node
0 Use the MULTI CONTROL knob or Joystick
the display mode.
(r/r)
s&
to select
POWER-ON/OFF
(KRFV8060D)
MD/TAPE
Turning on the receiver
0 Turn on the power to the related components.
0 Press the SETUP key again to accept the setting.
0 Use the A key or Joystick
Q Turn on the power to this receiver by pressing the POWER
ON/STANDBY 0 key (for VR-60601 or POWER ON/OFF and
ON/STANDBY 0 (for KRF-V8060D) key.
(,I to select EXIT.
q
Selecting the input mode
If You have selected a component connected to the CD/DVD, VIDEO 2,
VIDEO 3 or DVD/GCH jacks, make sure that the wlput mode settrng IS
correct for the type of audio signal to be used
-P
0 Press the SETUP key to exit the SET UP mode.
Input level adjustment (analog sources only)
Selecting a sourc
1 “DVDIGCH
2 “CDIDVD”
3 “PHONO”
4 “TUNER”
5 “VIDEO 1”
6 “VIDEO 2”
7 “VIDEO 3”
8 “MD/TAPE
9 “AV AUX”
Selecting MD/TAPE
If the Input level of an analog source signal IStoo high, the CLIP rndrcator
will blink to indrcate the source signal. Adjust the Input level
89%w
El q EE
Select the source name correspondrng to the component connected
to the MDRAPE lacks The rnrtral factory setting IS “TAPE” To
change the source to “MD”, follow the steps below
Hold down the MD/TAPE key for more than 2 seconds.
0 Use the Input Selector keys to select the source of which the
input level you want to adjust.
0 The source rndrcatron changes to “MD”
l To return to the orrgrnal rndrcatron, repeat the above procedLrre
q
Selecting the speaker system
*You can store a separate input level for each Input source
@9Press the SOUND and A/V keys or Joystick (r/w)
until the “INPUT” indication appears.
repeatedly
0 Use the MULTI CONTROL knob or Joystick (A/V) to adjust the
input level.
l
l
The adjustment mode is drsplayed for approxrmately 8 seconds
The Input level may be adjusted to any one of three settings’
OdB. -3dB. and -6dB. (The rnrtral settrng IS OdB )
Sound from the speakers connected to the SPEAKERS A
termrnals on the rear panel
: Sound from the speakers connected to the SPEAKERS B
BON
termrnals on the rear panel No sound wrll be heard from
the subwoofer
A+B ON : Sound from both the speakers connected to the
SPEAKERS A and B terminals on the rear panel
A+B OFF: No sound from the speakers. Use this settrng when
listening with headphones for stereo sound in all playback
modes The drsplay segments are different depending on
the type of input srgnal
:
The Indicator for the speakers
you want to use should be lit.
Q Press the SOUND key again to return to the input indication.
l
22EN
Selecting “6CH INPUT” by pressrng the INPUT MODE key, whereby
“DVDIGCH” ISthe Input source wrll cause SPEAKERS A to be selected
automattcally
Start playback
m Use the VOLUtl
adjust the volu
Press the A SPEAKERS B key to select the speaker system to be
used.
AON
Use the /nput S
source you wai
‘I
I
Normal playback
Adjusting the sound
listening to a source component
g playback
VOLUME
CONTROL
YO
‘)
A SPEAKERS
I
TO,NE
0
MYLTI
CONTROL
; MODE
PHONEi
LdUDNESS
AiV
MUiE
POWER
VOLUME
0
ACTIVE EQ
SPEAKER EQ
VOLUME +/-
MUTE
+/-
UME
TROL
VO
co
Joystick
(MULTI CONTROLdr,
DOWN. /UPC)
INPUT SELECTOR
LOUDNESS
ing the POWER
IR ON/OFF and
a
: CD/DVD, VIDEO 2,
nput mode setting IS
-&
1 “DVD/GCH”
2 “CDIDVD”
3
4
s
6
“PHONO”
“TUNER”
“VIDEO 1”
“VIDEO 2”
7 “VIDEO 3”
8 “MD/TAPE”
9 “AV AUX”
seconds.
aker system to be
to the SPEAKERS A
to the SPEAKERS B
I wtll be heard from
cted to the
rear panel
j setting when
sound rn all playback
ferent dependrng on
Use the Input Selector and AV AUX keys to select the
source you want to listen to.
Selectrng a source usrng each key.
iponent connected
3 “TAPE” TO
3W:
love procedure
BASS BOOST
TONE
q
q
Start playback from the selected source.
Use the VOLUME CONTROL knob or VOLUME +/- keys to
adjust the volume.
Adjusting the TONE
You can adjust the sound quality when the recerver is rn the PCM stereo
and analog stereo mode
0 Press the TONE key to select the TONE mode.
e Use the MULTI CONTROL knob or Joystick
TONE ON/OFF.
0 When in TONE ON selection,
following displays.
(r/r)
to select
press the TONE key for the
BASS
: Select this to adjust the low frequency range.
TREBLE : Select thus to adjust the high frequency range.
0 Use the MULTI CONTROL knob or Joystick
sound quality.
w
I.. -I
(r/r)
to adjust the
3;;#$4
T*+-
*The bass and treble levels are adfustable from -10 to +I0 in 2 step
rncrements
l The adjustment
Item IS drsplayed for approxrmately 8 seconds.
Once-touch low frequency emphasis (BASS BOOST)
(remote control only)
You can adjust the sound qualrty when the recerver IS rn the PCM stereo
and analog stereo modes
r MODE key, whereby
KERS A to be selected
Press the BASS BOOST key.
Press the key once to select the maxrmum f+lO) low frequency
emphases settrng.
l Thus key does not function
when the recerver IS rn the sound qualrty
or ambience effects adjustment mode
l
Switching back to the previous setting
Press the BASS BOOST key again.
23 EN
Recording
Normal olavback
Recording au
Adjusting the LOUDNESSmode
Listening with headphones
You can adjust the Loudness functron which controls the low volume
settrngs to marntarn the musrc’s rrchness. The adfustment can be made
when the receiver IS rn the PCM stereo and analog stereo mode.
0 ;re~;;e
Press the LOUDNESS key to turn the LOUDNESS setting
A and B Speaker keys so that the speaker indicator
Make sure the SPEAKERS
rndrcators are turned off
ON.
To cancel
Press the LOUDNESS key again so that the “LOUDNESS”
indicator goes off.
l
Muting the sound
If you turn off all of the speakerswhen rn surround mode, the surround
mode wrll be canceled as well, resultrng rn stereo playback
Q Connect headphones
to the PHONES jack
The MUTE key lets You mute the sound of the speakers
Recording a music
0 Usethe Input Seh
TAPE”) you wani
8 Set the MD or TA
Press the MUTE key.
0 Start playback, tl
Blinks
0 Use the VOLUME CONTROL knob or VOLUME +/- keys to
adjust the volume.
To cancel
Press the MUTE key again so that the “MUTE” indicator goes off.
l MUTE ON can also be deactrvated by turning the VOLUME
CONTROL knob or pressrng VOLUME +/- keys
ACTIVEEQmode
You can enfoy a more Impressive sound effect when ACTIVE EQ is
turned ON during Dolby Digital and DTS playback and, when rn PCM and
analog stereo mode.
Press the ACTIVE ECI key for the following
selections;
rj ACTIVE EQ MUSIC
: Effective when llstenrng to music
(The ACTIVE EQ rndrcator lights up 1
lpmACTIVE EQCINEMA : Effective when watchrng a movre.
(The ACTIVE EQ rndrcator lights up 1
: Effective when watching TV.
@ ACTIVE EQ TV
(The ACTIVE EQ rndrcator ltghts up.)
: The ACTIVE EQ function IS turned OFF
3 ACTIVE EQ OFF
(The ACTIVE EQ indicator goes off.1
l “ACTIVE EQ” will scroll from right to left.
*When ACTIVE EQ and SPEAKER EQ are OFF and ACTIVE EQ
(MUSIC) IS turned ON, SPEAKER EQ (SMALL) will turn ON
automatrcally
*ACTIVE EQ functron WIII not be available when REC MODE, AUTO
TUNlNGorPRESETMEMORY1sON,andduring96kHzLPCMplayback
Recording via
0 Use the Input sels
“VIDEO 1”) you G
Q Set the video dec
l Select the REC P
0 Start playback, tl
l Recordrng may I.
to the copy guar
Recording au
Switch on the REC N
Usually use the AUTf
the dIgItal mode than
audro Input source m
&cording music i
SPEAKEREQmode
SPEAKER EQ’s functron wrll automatrcally detect the various features of
each speaker and effectrvely creates a stereoscopic sound effect
Press the SPEAKER EQ key to switch the following
setting;
: To select a small srze speaker.
(TheSPEAKER EQrndrcatorlrghtsup 1
) SPEAKER ECI NORMAL : To select an average size speaker
(The SPEAKER EQ rndrcator lrghts up.1
: To select a large size speaker.
8 SPEAKER EQ LARGE
(The SPEAKER EQ rndrcator lights up i
The SPEAKER EQ functron IS turned
6 SPEAKER EQ OFF
OFF
(The SPEAKER EQ rndrcatorgoes off 1
l “SPEAKER EQ” wrll scroll from right to left
l SPEAKER EQ cannot be turned OFF when ACTIVE EQ is turned ON
l SPEAKER EQ functron wrll not be available when REC MODE, AUTO
TUNING or PRESET MEMORY IS ON, and during 96kHr LPCM
playback.
3 SPEAKER EQ SMALL
I
24 EN
0 Use the Input St
DVD/GCH, VlDEl
Q Set the MD or T
Recording
audirr (analog sources)
0 Press and hold the DIMMER key for more than 2 seconds to
select the AUTO REC or MANUAL REC mode.
speaker indicator
I REC MODE off
1
MD/TAPE
rnd mode, the surround
ereo playback
: The drgrtal Input record mode is
switched off.
: The drgrtal input signals (DTS, Dolby
2 AUTO REC mode
Drgrtal, or PCM) are identified automatically and converted Into stereo
srgnals that are ready for recording.
3 MANUAL REC mode : The input srgnal type at the moment
thus mode ISselected is held throughout this mode.
Recording a music source
0 Use the Input Selector keys to select the source (other than “MD/
TAPE”) you want to record.
0 Set the MD or TAPE recorder to record.
0 Start playback, then start recording.
JME +/-keys
to
0 Use the Input selector keys to select the video source (other than
“VIDEO 1”) you want to record.
0 Set the video deck connected to VIDEO 1 to record.
l Select the REC MODE to record a drgrtal Input source
0 Start playback, then start recording.
l Recordrng may not be normal for some video software
to the copy guard condrtron
This IS due
->B
audio (digital sources)
Svwtch 011the REC MODE to record a drgital input source
Usually lose tileAUTO REC MODE to record audio Input sources When
the dIgItal n?otie changes durlrng recordrng in the AUTO REC MODE, the
audro Input sowce may be rntenupted momentarily
I 8 rnfJ8 0”
~u fjfl fl 1;;; 1) #.J 111‘,,I’ :I::i’ *yY&yy
0 Start playback, then start recording.
l
Recording music in AUTO REC or MANUAL REC mode
omc’L
If the audio reproductron stops rn the mrddle due to change in the
Input signals, etc , press the DIMMER key
DIMMER
I
lnpui Selector
0 Use the Input Selector keys to select the source (CD/DVD,
DVD/GCH, VIDEO 2, VIDEO 3) you want to record.
0 Set the MD or TAPE recorder to record.
25 EN
Listening to radio broadcasts
Listening to radio I
The mmver can store up to 40 stations in the memory and recall them
by one-touch operation
Presetting radio stations manually
Tuning radio stations
Receiving prt
MULTI CONTROL
CONTROL
B?NDMULTI
I
Numeric key!
TUNER
TUNER
q
q
AUTO
m
MEMORY
Tune to the station you want to store.
Press the MEMORY key while receiving the station.
Blinks for 5 seconds
Lights for 5 seconds
*BAND
-TUNER
l
q
Use the TUNER key to select the tuner.
l
Each press switches
l
the band.
Use the AUTO key to select the desired tuning method.
Each press switches the tuning method to either auto or manual
tuning.
“AUTO” indicator lights up in the drsplay.
q
Press the MEMORY key again to confirm the setting.
Use the BAND key to select the desired broadcast band.
l
Normally, set to “AUTO” (auto tunrng) If the radio waves are weak
and there IS a lot of Interference, swatch to manual tunrng. iWIth
manual tunrng. stereo broadcasts wrll be recerved rn monaural )
Use the MULTI CONTROL knob or Joystick (r/r),
++ /W
keys to select the station.
“STEREO”
or TUNING
lights when a broadcast IS being recerved rn stereo
“TUNED” is displayed when a station IS received
Auto tuning
Manual tuning
26EN
For “15”, pr
For “20”. pr
Proceed to step EI within 5 seconds.
(If more than 5 seconds elapse, press the MEMORY key again).
m Use the MULTI CONTROL knob or Joystick (A/V) to select
one of the station presets (1 - 40).
q
Enter the numf
(up to “40”).
(MULTI CON1‘ROLAlV)
AUTO
q
q
q
Press the TUN
Press the nume
-Joystick
TUNING
a
: The next station IS tuned automattcally
: Turn the knob or use the Joystrck (r/Vi
select the desired station.
to
Repeat steps 0. 8, El, and q to store as rmany statlons as
necessary
If you store a statron at a prevrously used preset, the old statron WIII
be replaced by the new one
If you make a r
key repeatedly
Listening to radio broadcasts
Receiving preset stations in order (P.CALL)
~~c~;ving preset stations
:ONTROL
Numeric keys
Joystick
(P.CALL IM~HI)
TUNER
1 the station.
Lights for 5 seconds
iTlilto-
a
Press the TUNER key to select tuner as the source.
a
Enter the number of the preset station you want to receive
(up to “40’1.
Press the numeric
For “15”. press
For “20”. press
keys in the following
ml
[3q
order:
, lq
, I+101 , fq
IEMORY key again).
l
If you make a Imistake entering a two dlglt number, press the +10
key repeatedly to return to the original display and start agaIn
TUNER
q
q
Press the TUNER key to select the tuner as the source.
Use the Joystick to adjust the P.&ILL I-/W
select the desired station.
l
direction to
Each time you push the JoystIck. another preset station IS recewed
in order.
Pushing the Joystick to P.CALL HI does the following:
01 - 02 - 03 - 38 - 39 + 40
ick (A/V) to select
Pushing the Joystick
n the setting.
as Inany
to P.CALL 144 does the following:
01 -02+03-...+...38+39+40
StatIOnS
as
‘set, the old station will
Holding the Joystick on WI or Idirection, lets You skip
through the presets, receiving each preset station at 0.5 second
intervals.
Ambience effects
Ambience effects
This receiver is equipped with listening modes that allow
you to enjoy an enhanced sonic ambience with a variety of
video sources.
In order to obtain the optimum effect from the surround
modes, make sure to input the proper speaker settings
beforehand.
-2g
Surround modes
Dolby Digital
The Dolby Digrtal surround format lets you enjoy up to 5 1 channels
of drgrtal surround sound from Dolby Drgrtal program sources (such as
Laserdrsc or DVD software marked on@%
DIGITAL ) Compared with prevlous Dolby surround, Dolby Drgrtal provides even better sound quality,
greater spatral accuracy, and Improved dynamic range
Note
4lthough a full set of speakers (front left, right, and center, surround
left and right. and a subwoofer) IS requrred for true 5 1 channel Dolby
Digital surround sound, this receiver lets you enjoy Dolby Drgrtal (and
Dolby Surround) program sources, even If you connect only the front
speakers.
/I
Dolby Digital EX
Multi channel su
Dolby DIgItal EX IS an extensron of Dolby DIgItal tecirt?ology, Dolby
Drgrtal EXcreatess,xfull-bandwldthoutputchanl?elsfronl6
I-channel
sources This IS done using a matrix decoder that derrves three
surround channels from the two In the orrgrnal recordrng
This rsachreved by usrng threedifferent surroundsrgnals, surround left,
surround rrght and surround back, each drlvrng Its own array of
speakers Think of It as adding a center channel for the rear speakers,
which grve more diffuse and natural surround effect, even rf you
wanted the abrlrty to completely encrrcle the audrerxe wrtil sound,
positronrng sound effectsexactlywhere
theywolud be heard II, real Ilie
For best results, Dolby Drgrtal EXshould be used wrth rmovresoundtracks
recorded wrth Dolby DIgItal Surround EX whrch contarn a drgrtal flag that
will automatrcally activate thus feature However, for titles released
prior to late 2001, thus feature has to be actrvated rmantrally
SRS Circle Surroul
resultrng in the CSmulti-channel, surr
conventronal sun0
lrstenrng to Dolby C
multr-speakers. No\
Home Theater user
type of sound throw
The CS system drar
multr-channel conte
the Ilstener “rnsrde’
both hi-ii audro and
The CS decoder al
TruBassTM. Focus
speaker locatron to
bass !n small speak
Note
Although a full set of speakers (front left, right, and center, surround
left and right, surround back and a subwoofer) IS requred for true 6 1
channel Dolby Digital Surround EX soirnd. this recelvel lets you enjoy
Dolby DigItal (and Dolby Surround) program sources, even If you
connect only the front speakers
Center speaker
Front speakers (L, R)
*Optional rn thus mode
Surround
speakers (L, R)
+ LFE = Low Frequency Effects Thus channel delrvers separate
non-directIonal bass sgnals to the subwoofet for rmore dynamrc
deep bass sound effects
Although only Dolby Digital soundtracks rncotporate a separate
low frequency channel, connecting a subwoofet WIII also Improve
deep bass performance in the other surround modes
The rndrcatlon “LFE” appears rn the display whet? a slgnal IS
being rnput for thus channel
*Optional rn this mode
* LFE = Low Frequency Effects. Thus channel delivers separate
non-directional bass signals to the subwoofer for more dynamrc
deep bass sound effects
Although only Dolby Digrtal soundtracks incorporate a separate
low frequency channel, connectrng a subwoofer will also rmprove
deep bass performance rn the other surround modes
The indication “LFE” appears rn the drsplay when a signal IS
berng Input for this channel
mbi
”
SURROUND
Manufactured under lrcense from Dolby Laboratones “Dolby”, “Pro
Logic” and the double-D symbol are trademarks of Dolby
Laboratones.
“Crrcle Surround II and the (~)~symbol
are trademarks of SRS Labs,
Inc. Crrcle Surround II technology ISrncorporated under lrcense from SRS
Labs, Inc”.
28 EN
Using a DVD player
and the receiver, y
material in all Its s
each channel IS if
sense of spacrousr
Dolby PRO LOGICZZ
EXTENDED
“DTS”. “DTS-ES Extended Surround”
and “Neo:6” are trademarks of Drgrtai
Theater Systems, Inc.
DVD &channel n
Dolby Pro Logrc II was designed specrflcally to provrde a ~newsense of
spatlalrty, drrectronality and articulation of sounds from Dolby Surround
encoded sources (such as vrdeo and LaserdIsc software marked
~~~DDL~YSURROUNO/
1 This IS achieved with an rntellrgent, burlt-tn feedback
logic design, a matrix surround decodrng and the decodrng of stereo, full
bandwidth surround outputs The PRO LOGIC11modes programmed Into
this receiverare “MOVIE”, “MUSIC” and “PRO LOGIC” .The “MOVIE”
mode of the PRO LOGIC II has preset charactenstlcs to produce a
calibrated, high-level surround sound playback while the “MUSIC” rmode
has user-adjustable characterrstrcs to offer the three optional controls, like
“Drmensron”, “CenterWIdth” and “Panorama” modes toallowoptrrnrzation of the soundfields as desrred The “Drmensron” control allows the
user to gradually adjust the soundfield erther towards the front or towards
the rear, the “Center Wrdth” control allows variolrs adjustment of the leftcenter-right speakers’ balance, the “Panaroma” mode extet?ds the front
stereo Image to Include the surroirnd speakers for an excltrng “wraparound” effect wrth srde wall rmagrng
* LFE = Low Freqr
directional bass :
bass sound effer
Ambience effects
ral technology, Dolby
I?& from 6 1-channel
:r that derrves three
recordrng
slgtmls, surroilnd left,
ng Its OWI? array of
for the rear speakers,
d effect, even If you
audience wrth sound,
ud be heard rn real life
irth movre soundtracks
~ntain a drgrtal flag that
el, fat titles telexed
xl manually
and center, surround
s requrred for true 6 1
ecelvel lets you enjoy
sources, even If you
Multi channel surround sound (SRS Circle Surroundll)
DSP mode
SRS Circle Surround IITM Improves on Its predecessor CS-5 lTM
resultrng 117the CS6 lrM system, enablrng you to listen to realrstrc,
multr-chat?nel, surround sound myback from a stereo source or
conventronal surround-encoded vtdeo source You already enjoy
Irstenrng to Dolby Digital sound/DTS multr-channel sound wrth your
multr-speakers Nowyoucanl~stentoaud~oCDs,
MDs, Broadcastand
Home Theater usrng your multr-speakers You WIII drscover a new
type of sound through SRS Circle Surround II
The CS system dramatrcally reduces storage space requrrements for
multi-channel content It creates a lrstenrng envrronment that places
the listener “rnsrde” rnus~c performances, and dramatically rrmproves
both hi-f1 audro and conventional surround-encoded vrdeo materral
The CS decoder also Includes the SRS technologres FocusTM and
TruBassTM Focus electronrcally rarses the sound stage from the
speaker Iocatron to an optrmal posrtion TruBass creates deep, rrch
bass I” small speaker systems without the need for a subwoofer
ihe DSP mode lets you add the atmosphere of a loveconcert or hall to
almost any type of program source These modes are partrcularly effectrve
Nhen used wrth stereo program sources, lrke CD, televrsron, and FM radro.
You mrght enjoy trying the ARENA, JAZZ CLUB, THEATER, STADIUM or
DISCO mode the next time you watch a concert or sportrng event!
What’s LISP?
XP stands for Drgrtal Srgnal Processor
The way a sound IS heard rn an actual environment depends on a
iarrety of drfferent factors One of the most Important is reverberation
the act of decayrng elements of sound echorng rn varrous places)
The DSP modes produce the feeling of presence by using the DSP to
xeate reverberatron, wrthout sporlrng the sound quality of the orrgrnal
3gnal
DTS-ES
L
r
delivers separate
:r for more dynamic
DVD 6-channel made
Using a DVD player or the lrke equrpped wrth SIX(5 I) output channels
and the receiver, you can enjoy multWchannel encoded DVD source
naterlal I” all Its splendor Since the source signals are dtgrtal and
aach channel IS Input Independently, the resulting sound qualrty,
sense of spacrousness, and dynamrc range are superb
xporate a separate
ofer will also lrnprove
d modes
whet- a srgnal is
I
rrovlde a new sense of
s from Dolby Surround
frsc software marked
Irgent, burlt-rrr feedback
decodrng of stereo, full
lodes programmed Into
-0GIC” The “MOVIE”
:terlstrcs to produce a
lde the “MUSIC” mode
aeoptIonal controls, like
lodes to allowoptrmrzaion” control allows the
rds the front or towards
s adjustrment of the leftnode extends the front
for an excltirng “wrap-
The DTS-ES (Drgrtal Theater System-Extended Surround) represents
6 l-channel Discrete Surround format, expanding upon 5.1 surround
DTS-ES format IS a 6 1 channel sound system for movre theaters that
Includes as additional surround-center channel matrrxed wrthrn
surround-left and surround-right It’s compatrble on predecessor DTS
5 1 system The extra channel allows more accurate placement and
steerrng of sound accross the rear soundstage.The DTS-ES recerver
wrll be required, to experience a discrete 6.1.channel mrx.
The DTS-ES decoders used rn home crnema systems have decodrng
optrons for utrlrzrng the extra channel, II- addrtron to processrng
exrstrng 5.1 channel surround sound
DTS-ES Drsctete 6.1 and DTS-ES Matrrx 6.1 add the surround back
channel audro to the DTS 5 l-channel format to Improve the acoustrc
posrtronrng and makes acoustrc Image movement more natural with
the 6.1.channel reproductron NE0 6 IS a new technology which
decodes 2-channel signals Into B-channel srgnals using high-accuracy
drgrtal matrix technology. For best results, DTS-ES should be used
wrth movre soundtracks recorded wtth DTS-ES which contain a drgital
flag that wrll automatrcally activate thus feature. However, for some
titles, this feature has to be actrvated manually.
According to the srgnals to be played back, DTS NEO.6 uses erther the
NEO~CINEMAmodeopt~m~zedformovreplaybackortheNEO
MUSIC
mode optrmrzed for music playback.
’ LFE = Low Frequency Effects Thus channel delrvers separate anondrrectronal bass srr?gnals to the subwoofer for more dynamic deep
bass sound effects
L
Front speakers (L, R)
* Optronal rn this mode.
’ LFE = Low Frequency Effects. Thus channel delrvers separate nondrrectronal bass signals to the subwoofer for more dynamrc deep
bass sound effects
DTS has a 1 or LFE channel
The lndlcatron “LFE” appears rn the drsplay when a srgnal IS being
Input for thus channel
29 EN
Ambience effects
Ambience effects
Surround play
The DTS compatrble models can reproduce a CD, DVD, or LD carrying the
DTS mark.
DOLBY DIGITAL can be used when playtng DVD or LD software bearing
the on@
DIGITAL mark and DOLBY DIGITAL format drgttal broadcasts (etc.)
DOLBY PRO LOGIC can be used when playing video, DVD, or LD
software bearing the ~~~DDL~YSU~ROUND~
mark
SRS Circle Surround II enables you to llsten to mult channel sound from
the stereo source.
DSP 1-r
When you select DOLBY DIGITAL
“DOLBY DIGITAL” wrll be dlsplayed
q
DSP can produce
the original music
0 Pressing the
current DSP F
@ Each press of
bellow:
When the DTS or DTS-ES (matrix or discrete) signal is input:
: (DTS rndrcator lights up.1
1 DTS5.lch
: (DTS MATRIX rndlcator lkghts up )
2 DTS MATRIX
3 DTS DISCRETE : (DISCRETE rndrcator lights up )
4 STEREO
INPUT MODE
L
When the analog signal or the digital signal (except for
DOLBY DIGITAL or DTS signal) is input:
-
Input Selector
LISTEN
1 PLIl MOVIE
MODE
2 PLII MUSIC
3 PRO LOGIC
*LISTEN
INPUT MODE
MODE alo
4 NEO:CINEMA
‘DSP MODE
5 NEO:MUSIC
6 CSII CINEMA
INPUT
SELECTOR
7 CSg MUSIC
8 CSII MONO
-
Preparations
l Turn ON related
components
-SC
0 Complete “Preparing for surround sound” (speaker settings).
l Use the Input
Selector keys to select the component you wash to play
back with surround sound.
l Use the INPUT MODE key to select the Input mode (analog or drgrtal)
- ,e;
for the source you wish to play back.
l
Norse will be produced when a DTS source IS played by selectrng the
analog Input.
0
q
Start playing the video software.
Use the LISTEN MODE knob or LISTEN MODE n/o
select the listening mode.
keys to
The listening mode settings are stored separately for each Input If
the Input mode IS set to full auto (“AUTO DETECT” Ilghts), the
receiver selects the opttmal llstenrng mode automatically based on
the type of input signal and the speaker settings
Each turn of the LISTEN MODE knob or press of the LISTEN
MODE A/V keys switches the setting as listed below.
The listening mode settings are different
of input signal.
depending
on the type
When the DOLBY DIGITAL signal is input:
(The DOLBY DIGITAL or PRO LOGIC, rndlcator lights up 1
‘3 DOLBY DIGITAL : DOLBY DIGITAL surround
: DOLBY DIGITAL EX surround
12, DOLBY D EX
: PRO LOGIC 11surround MOVIE mode
3: PLII MOVIE
(The PRO LOGIC lndlcator lrghts up 1
: PRO LOGIC II surround MUSIC mode
4‘ PLII MUSIC
(The PRO LOGIC rndrcator irghts up 1
: PRO LOGIC II surround PRO LOGIC mode
$ PRO LOGIC
(The PRO LOGIC rndicator lights up 1
: Normal stereo playback
6 STEREO
30EN
DSP mode (Digr
l
9 STEREO
PRO LOGIC Ii surround MOVIE mode
(The PRO LOGIC rndrcator kghts up I
PRO LOGIC II surround MUSIC mode
(The PRO LOGIC rndrcatot lrghts up i
PRO LOGIC II surround PRO LOGIC mode
(The PRO LOGIC lndlcator lrghts up 1
NE0 6 surround
(The NE0 6 indicator lights ilp 1
NEO:6 surround
(The NE0 6 lndcator lights up )
CS 6 1 surround
(The CS II lndrcator lights up )
CS 6 1 surround
(The CS II rndrcator kghts up 1
CS 6 1 surround
(The CS II rndrcator lights up 1
Normal stereo playback Sorrnd IS produced
from the two front channels only
(The STEREO lndlcator lights up )
Dolby DigItal or DTS srgnal having more channels thar the maxrmum number of playback channels available using the recerver’s
current settrngs is Input, downmrxrng IS performed to match the
number of avaIlable channels
1 ARENA
2 JAZZC
3 THEATI
4 STADII
5 DISCO
l TheDSPmoc
l
q
Forflneadlus
the sound”
Adjust the volul
Notes
Depending on the t\
modes cannot be sr
l When playback is si
the Input source IS
l To enjoy Dolby Drglt
from a single camp
source component
l
Ambience effects
DVD Cchannel playback
q
DSP mode (Digital Signal Processor).
DSP can produce these effects wrthout sporlkng the sound qualrty of
the ongrnal musrc or vrdeo source
0 Pressing the DSP key or DSP MODE key will display
current DSP MODE status.
0 Each press of the key will switch to the next status as shown
bellow:
,ete) signal is input :
JP 1
x lrghts up )
rghts up 1
L
ignal (except for
l
rnd MOVIE mode
rcator lrghts up j
Ind MUSIC mode
rcator lights up.)
rnd PRO LOGIC mode
rcator lights up 1
lights up )
lrghts up 1
ghts up 1
the
l
q
I ARENA
2 JAZZCLUB
3 THEATER
4 STADIUM
5 DISCO
:
:
:
:
:
DSP
DSP
DSP
DSP
DSP
surround
surround
surround
surround
surround
UsingaDVDplayerortheIlkeequlppedwlths~x(5.1)outputchannelsand
the recerver, you can enjoy surround sound playback.
When you try to play a disc other than Dolby Drgrtal such as DTS CD, no
sound is produced or, nor-se may be heard. To avord this situatron, make
sure that you connect the component to the recerver’s DVD/GCH INPUT
lacks through a surround processor whrch can decode the surround
srgnal you want to listen to.
Connectrng a DVD player whrch can decode the surround signal Itself IS
also acceptable
ARENA mode
JAZZ CLUB mode
THEATER mode
STADIUM mode
DISCO mode
The DSP mode selectron ISdrsplayedforapproxrmately3 seconds
For fine adjustment of the DSP effects, please referto “Adjustrng
the sound”
-&
DVDIGCH
Adjust the volume.
Notes
l Depending on the type of the signal or speaker settrng, some lrstenrng
modes cannot be selected
l When playback IS started, the sound may be cut or Interrupted
before
the Input source IS confirmed as Dolby Drgrtal
l To enjoy Dolby Drgrtal surround (as well as all the other lrstenrng modes)
from a single component, be sure to use a Dolby Drgrtal compatrble
source component
INPUT MODE
hannels than the maxr)le usrng the recerver’s
erformed to match the
VOLUME +/-
DVDIGCH
ghts up 1
ights up )
ick Sound IS produced
hannels only
tor lrghts up 1
VOLUME
INPUT MODE
Preparations
Connect your DVD player to the DVD/GCH lacks of the receiver.
*Turn on all other components that will be used.
l Complete “Preparing for surround sound”.
-a
l
n
Press “DVD/GcH” as the input source.
l
If speaker system B is on when “DVD/GCH” ISselected as the input
source, it swatches off and speaker system A turns on automatrtally.
H Select “SCH INPUT” by pressing the INPUT MODE key.
E) Start playback of the DVD software.
q
Adjust the volume.
l
It IS not possrble to adjust the volume level or sound qualrty (SET
UP, SOUND) of the channels separately when the receiver IS in the
DVD/GCH mode. Adjust the volume with the controls of the DVD
player.
For the powered subwoofer, you can adjust the volume of the
subwoofer using the subwoofer’s own volume control.
Ambience effects
Ambience effects
Convenient functions
STEREO
DIMMER
0 Use the MULTI CONTROL knob or Joystick
ON or OFF setting.
(A/V) to select the
MULTI CONTROL
Center mage will
The ad]ustment Item IS displayed for approximately 8 seconds
*Some Dolby DIgItal software may not be col??patlble with the
MidnIght mode
l
SOUND
A/V
LISTEN MODE
I
-LISTEN
MODE alo
l
Panorama mode (Pro Logic II Music mode only)
When llstenlng to music, you WIII be able to enjoy the “wtaparound”
socind effect when you adjust the panorama mode
Circle Surround ll
0 Press the SOUND key, then press the A/V keys or Joystick (4/b)
until “PANORAMA”
appears on the display.
When you select the
multi surround sound
0
Usethe LISTEN MODI
STEREO
-SOUND
Joystick
When in other p
~~ghtspeaketsca
Use the MULTI CONTROL knob or Joystick
PANORAMA ON or OFF.
(MULTI CONTROLllV,
DOWN 4 /UP,)
c
I PANORAMA
2 PANORAMA
(A/V) to select
ON : PANORAMA mode IS ON
OFF: PANOR.4MA mode IS OFF
DIMMER
Center Foetrs mod,
Center focus elevate
sound when you se/E
soLlnd Image to an 01
the center image
Adjusting the sound
You can make further adjustments
playback in the surround mode
to the sound while llstenlng to
0 Press the SOUND key and then use to the A/V keys or joystick
(r/w) until the desired item appears in the display.
Each time You press the A/V keys or Joystick I*/,),
the menu
changes as follows:
Note that some items are not displayed in certain modes.
6 CNTR (Center speaker level ad]ustment)*
2, SR (Right surround speaker level adjustment)*
D SB (Surround back speaker level adlustmend”
,& SL (Left surround speaker level adjustment)”
&I SUBW (Subwoofer level adjustment)*
9 INPUT (Input level adjustment-analog
mode only)
-2
#C MIDNIGHT (MIdnIght mode ON/OFF-Dolby DIgItal mode only)
@PANORAMA (Panorama mode ON/OFF)**
3 DIMENSION (Dlmenslon adjustment)**
0 CENTER WIDTH (Center width adlustment)**
0 CENTER FOCUS (Center focus adlustmenti*‘*
I2 CSII DLY (Rear speaker delay ad)ustment)***
B CSII GAIN (Input gain ad]ustmentI***
@ TruBass (Trubass adjustment)***
:
0 Press the SOUND key, then press the A/V keys or Joystick 14,)
until “DIMENSION” appears on the display.
0 Use the MULTI CONTROL knob or Joystick (A/T)
the soundfield towards the rear or the front.
Q Use the MULTI (
center elevation
l The adjustment
to adjust
SoundfIeld IS adlusted towards the front
l
CENTER FOCU:
CS II Rear Delay z
CS II Rear Delay adlu
speakers
Soundfield IS In neutral posItIon.
0 Press the SOUNI
until “CSU DLY’
*
The adjustment IS only temporary for the current Input selectIon
The value will return automattcallytothe orIgInal setup value when
the power ISturned on/off or when the Input selection ISchanged
** Pro Logic II MUSIC mode only
*** CS II mode only
sic mode only)
Dimension mode (Pro Logic II
When llstenlng to music with certain recordings, you WIII also be able to
acheve a silltable balance from all the speakers by adlilstlng the
dlmenslon imode
0 Use the MULTI 1
rear speaker.
l The adlustmen.
.L
Soundfield IS adjusted towards the rear.
8 Use the MULTI CONTROL knob or Joystick (A/V) to adjust the
setting as desired.
l The adjustment
Item IS dlsplayed for approximately 8 seconds
CS U Gain adjust]
Center Width mode (Pro LogicH Music made only)
Midnight mode (Dolby Digital mode only)
When watching movies at night , you might noT be able to raise the
volume as loud as normal. MIdnIght mode compresses the dynamic
range of previously specified parts of the Dolby DIgItal sound track (like
scenes with sudden increases in volume) to mlnlmlze the difference I”
volume between the specified and non-speclfled parts. This makes It
easy to hear all of the sound track. even when listening at low volumes
Center width adjustment allows you to enloy an elxhanced sound wizen
Ilstei?lng to n?us~cthrough? center Image from only center speaker, or left
and right speakers or various comblnatlons adjustments
0 Press the SOUND key, then press the A/V keys or Joystick (-/)I
until “CENTER WIDTH” appears on the display.
l
l
0 Press the SOUND key, then press the A/V keys or Joystick (4,
I
until “MIDNIGHT” appears on the display.
l This can be selected only If CDIDVD. DVD/GCH, VIDEO 2 or VIDEO 3 IS
selected as the source and the llsten mode ISset to “DOLBY DIGITAL ”
32EN
The CENTER WIDTH lndlcatlon scrolls across the cllsplay
When the center speaker IS swltched OFF, this mode will not be
effective
0 Use the MULTI CONTROL knob or Joystick
left-center-right
output.
(A/T)
to adjust the
CS II GAIN allows u
processing
0 Press the SOUN
until “CSII GAII
0 Use the MULTI
input gain.
l The adlustmen
Ambience effects
(r/r)
to select the
TruBass adjustment mode (CSll mode only)
T~uBass adjustment
provides
deep,
wIthout
the need of a subwoofer
Center
Imately 8 seconds
compatible
witI?
joy the
de
II:WJ~ WIII lbe Iheal-d fl-om left and right speakers
0 Use the MULTI CONTROL knob or Joystick
following;
I
2
3
4
“wtaparound”
Circle Surround II mode
When yoi~ select the circle swround
II mode, yoil WIII be able to enjoy the
tmulti SUIIOLI~~~ sound from the stereo source
k (r/r)
UsetheLlSTENMODE
IS
ON
speakers
TruBass
TruBass
TruBass
TruBass
(r/r)
to select the
OFF
SW
LR
SW + LR
After selecting
2, 3 or 4 ,TruBassspeakers~zeandlevelad~ustment
selection
WI/I be awlable
l
eysor Joystick 14))
Y.
Je
to small
0 Press the SOUND key, then press the A/V keys or Joystick (r/w)
until “TruBass” appears.
ot?ly
the
to select
rich bass sound
0 For TruBass speaker selection, use the MULTI CONTROL knob
or Joystick (A/V) to select any of the following display;
knoborLlSTEN MODE o/n keysforCSIIselection.
Center focus mode (CSII mode only)
Je IS OFF
Cellter focus elevate level adjustment
allows you to enjoy an enchanced
sotlnd v4leil you select CS I[ CINEMA/MUSIC/MONO
It leposltlons
tile
sound image to an optlmal positIon mole natural to the Ilstener tl?rough
the center image
c
I TruBass LARGE
z TruBass MID
3 TruBass SMALL
0 Use the MULTI CONTROL knob or Joystick
TruBass Level.
l
0 Press the SOUND key, then pressthe A/V keys or Joystick (4,)
until “CENTER FOCUS” appears on the display.
The adjustment
range
IS from
0 (TruBass
(A/T)
to adjust the
OFF) to 10
you ~111 also be able to
kers hy adjusting
the
teys or Joystick (4,)
IV.
k (r/r)
nt.
8 Use the MULTI CONTROL knob or Joystick
center elevation level.
0 The adlustment
range
IS flom
to adjust the
(A/T)
Subwoofer adjustment
It IS easy to adjust the volume
of the subwoofer
using the remote
control
0 to 10
0 Press the SOUND key, then press the A/V keys or Joystick (4,)
until “SUBW” appears on the display.
to adjust
0 Use the MULTI CONTROL knob or Joystick
volume.
e CEItiTFR
FOCUS w/l tnot be wallable
wllen
the celxer
weaker
l
IS OFF
The adjustment
range
IS from
-10
dB to +I0
(A/T)
to adjust the
dB
CSII Rear Delay adjustment mode (CS II mode only)
CS II Real Delay ad~~lslt-nent
speakers
:....
:...:
i,
i::.
i ‘.i
sowd
effect
from tl?e rear
Display dimmer adjustment
0 Use the MULTI CONTROb knob or Joystick
rear speaker.
The dimmer
function
lets you select the brightness
of the receiver’s
display
You mlgl?t find this useful If you darken your room to watch
movies or listen to I~USIC
ad]clsln?ent
Ianye
(A/T)
to adjust the
IS flown 0 ms to 25 ems
Each time you press the DIMMER key, the display’s
changes among the three available settings.
Select the brightness level you find most pleasing.
i .y.
i
317chalxed sound wizen
y cetxer speaker, oi left
lsttments
<eysor Joystick (r/w)
splay.
xss the dtsplay
this Imode will tnot be
to adjust the
CS II GAIN allows
processing
osel to adjust
the Input gall? toI tlw CII&
Sunou~~l
II
96kHz LPCM playback
0 Press the SOUND key, then press the A/V keys or Joystick
until “CSII GAIN” appears on the display.
0 Use the MULTI CONTROL knob or Joystick
input gain.
0 The ddlustivent
brightness
I Bright
2 Medium
3 Dark
CS II Gain adjustment mode (CSh’ mode only)
?de only)
:k (A/T)
a bettel
0 Press the SOUND key, then press the A/V keys or Joystick (4/b)
until “CSH DLY” appears on the display.
*The
‘.. p
ptovldes
fange
IS ftom
0 to 18
(A/T)
(4/b)
Tile receiver
IS conlpatlble
36kHz DVD, set the listen
with
mode
the 96kHr LPCM
to “STEREO”
playback
To play a
to adjust the
l
l
In FULL AUTO Illput mode the Ilsten mode wll automatically
be STEREO
When I” DIGITAL MANUAL Input mode (lIsten mode IS not STEREO),
“FS 96kHz” WIII appear II? the display and no sound can be heard from
the speakers
Press the LISTEN MODE or STEREO key (the listen mode changes to
tile STEREO mode) to output sound from the speakers
Basic remote control operations for other components
The remote control supplied with this receiver is also capable
of controlling components from a variety of manufacturers
once you register the appropriate setup codes into the
remote control unit.
0 The OTHERS key enables you to operate another
DSS/SAT, VCR or TV component.
Hold down the OTHERS key and press the numeric
enter the setup code.
Replace all two batteries with new ones when you notice a shortening
of the distance from which the remote control will operate
l
For LCD remote control fRCR0816)
The remote control is designed to retart- setup codes rn memory whrle
you change batteries
l
Operating 0th
This operatron lets yc
KENWOOD audio cc
automatrcallv wrth th
For OTHERS key;
Low battery warning
keys to
Example After you have regrstered the KENWOOD DVD player,
press “804” to register another DVD playerwhrch ISmanufactured
by Panasonrc
If you push an InvalId key, the letnote control WIII display
“ERROR” and exit the setup mode
aPress any of the REMOTE MODE key and then press the
SOURCE 0 key to check that the component you want to
control turns on.
For non-LCD remote control fRCR0725)
After changrng batteries, please re-enter the setup codes
Registering setup codes for other components
INI
SELECl
If the component does not react, and there is more than one
setup code, enter another setup code and try again.
l
SOURCE 0
REMOTE
DVD, CBL,
If the component IS already on, pressrng the SOURCE ti
turn rt off
key WI/I
l
MODE
q
Numeric keys
Repeat steps q to m to register additional components until
all components have been registered.
l
Alternative REMOTE MODE key.
Thus operation IS optronal and IS convenient when you lrnk an INPUT
SELECTOR key to the REMOTE MODE key Whrle operating one
component, the INPUT SELECTOR key functrons as an alternative
REMOTE MODE key to select another component
INPUT
SELECTOR
-1
l
q
Find the setup code of the component to be registered.
*Refer to the setup code lrsts to find the setup code for the
component to be registered
-36
Example: To regrster a DVD made by KENWOOD, you would enter
“805”
Input
I Component
I
Maker
1
Code
1
Key
Example REMOTE MODE (DVD) key can be lrnked to the INPUT
SELECTOR (VIDEO I) key as described below,
0 After registering the setup code, press and hold the SOURCE
0 key and then press the REMOTE MODE (DVDI key.
0 While holding down SOURCE 6 press the INPUT SELECTOR
(VIDEO 1 I key.
l
l
Now the VIDEO 1 key WIII functron as a DVD key whrch can be
selected at the same trme while operating a CD player
Repeat step 0 to 0 to link other INPUT SELECTOR keys
Note
Although each setup code IS designed to work with a inumber of
different rmodels, certain codes rmay not work with some models
(Also, certain codes may only operate some of the functrons avaIlable
on a grven model )
l
q
When you ope
DSS/SAT recei,
When you oper
Tuner with sys
Press the SOUR
l
q
Pressing the INP
on the recerver
To return to the r
Press the opera
The remote con1
wish to operate
Note
Be sure to point
recerverwhenyou\
by system control
component you wI
Storing the re
components i
I ne remote
components
control unit
the remote
control i
and you
The rem
control II
Storing on thet key
You can store the rel
q
Registering components for REMOTE MODE (DVD, CDL,
DWSAT, VCR, TV, OTHERS) keys.
0 For DVD, CBL, DSS/SAT, VCR or TV keys;
Hold down the SOURCE 0 key and press the numeric keys to
enter the setup code.
Numeric
* Example: Press “805” to register a DVD player manufactured by
KENWOOD
l If you push an rnvalrd key, the remote
control will drsplay
“ERROR” and exrt the setup mode
CHSkrp..I.
TOP MI
[‘I
34 EN
I
[:‘I
tt
PAGE’
RETI
44 Re
Fast fan
DISC
DISC :
Basic remote control ooerations for other comoonents
? another
DVD, CBL,
Operathy other components
This operation lets you operate the reglstered components
KENWOOD audio components with system control turn on and off
autolnatlcally wth the receiver via the system control connections
the numeric
@ Point the infrared ray system part of another remote control unit
to the remote sensor of the remote control unit.
keys to
,SOURCEb
‘RECEIVER
iNWOOD DVD player,
which ISmanufactured
lnfthred ray system
part
0 Press the LEARN key.
? control WIII display
l
snd then press the
uonent you want to
INPUT
SELECTOR
I”““”
re is more than one
try again.
: SOURCE 0 kev WIII
This remote control IS ready to receive the remote control code from
the other source
q
Ll~~i;~e INPUT SELECTOR keys to select the component you
*Pressq
lhelNPUTSELECTOR
on tihe receiver
al components until
keysalsochangestlle~~-iputselector
0 Press any of the REMOTE MODE (DVD, CBL, DSSISAT, VCR, TV,
OTHERSI keys to select the input of the desired remote control
unit.
0 Press the desired key of the remote control
unit.
[T]
*When you operate your registered DVD player, Cable tuner,
DSS/SAT receiver, VCR or TV, go to step q .
,en you IInk an INPUT
While operating one
ons as an alternatIve
,nt
,e linked to the INPUT
IW.
md hold the SOURCE
DE (DVDI key.
he INPUT SELECTOR
IVD key which can he
i CD player
LECTOR kevs
0 When you operate the CD player, Cassette deck, MD player, or
Tuner with system control connection, go to step El.
q
Press the SOlJRCEti key.
l
QTo retlit I?to the receiver operatton mode, press the RECEIVER key
l
The remote control code IS sent to the remote control unit
“OK” appears when fInIshed
-3:
u Press the operation keys you desire.
i”“”
The remote control mode remains at the selected input. If you
wish to operate another component, repeat step 0 or El.
l
Note
Be sllre to point the iemote control at the remote sensor on the
recelvwwhen you want to operate KENWOOD components connected
by systen? control cords Otherwise, point the remote control at the
compot3ent yowl want to operate
Storing the remote control code of the other
lfbr VR-6060 ~~1~~
The remote control linlt can store the remote control code of the other
components and yoil can operate the other components from the remote
control ~II?II Tile remote control code IS stored on the key or memory of
tile remote control ~11111
Storing on the key
YOLIcall stole tile Iemote control code to the key as show
Ibelow
SOURCE0
Numeric keys
CH+
Sktp t.ir14.
TOP MENU
OSD
yg;;;;;
4.
Rewind
w-w Fast forward
DISC SEL
DISC SKIP
!
MENU
Cursor Al. 41.
I ENTER
) .‘!I (Play’Pausei
. Flip
II Pause
. stop
When the appropriate code IS not properly stored, “AGAIN” will be
dIsplayed Repeat from step 0 onwards
I”^“”
l
COm~O~~~tS
oik wlth a trumber of
k with some models
the functions avallable
0 From the remote control unit of the other source, press the key
that you want to store.
l
If the code cannot be stored after a few attempts, “ERROR” WIII
appear Repeat from step 0 onwards
If LEARN Inode’s storage IS full, “FULL” appears on the display.
0 The remote control
control unit.
code is stored on the key of this remote
0 Press the LEARN key again to exit the learning
mode.
Basic remote control oaerations for other comwonents
Setup code chart (RMO816) (VR-6060)and (RC-RO725)(KRF4806OD)
CASSETTEde
TV Setup codes
You can perfom IrlE
equipped with system
Maker
t AKAI
VCR Setup codes
1
Setup
I
175
LBELL+HOWELL
U”LU
1
3 IHrl
HITACHI
I .IVC
102.122,129
lJ,i,
)
I
114,115
113
138, 139
123, 124
109,147
121
121
111.112.122
109: 147
116
KTV
)
)
[
PROSTAN
iqo
129
117
1
1
110
101
143, 144
120
111, 118
107. 108
CBL codes
Maker
GEMINI
G.I.
HAMLIN
JERROLD
Setup
codes
The LCD panel is or
I
,
LOEWE
MAGNAVOX
MARANTZ
MITSUBISHI
PANASONIC
PHILIPS
PIONEER
&AR;
SONY
SYMPHONIC
TOSHIBA
QUASAR
ZENITH
Maker
Cassette deck ope
142
126
127
136 140 141 145
CENTURION
CORONAD
DAEWOO
1 G.E.
codes
1
Setup
codes
218
209
210, 21 I, 234, 235
201, 202, 224, 225, 226, 227,
FISHER
GE
GOLD STAR
GO-VIDEO
HITACHI
JVC
MAGNAVOX
MITSUBISHI
NEC
ORION
PANASONIC
PHILIPS
QUASAR
RCA
SAMSUNG
SANYO
SCOTT
SHARP
SHINTOM
SONY
SYNPHO
TEKNICA
TOSHIBA
ZENITH
330, 341, 342,
307, 321
323
347, 348, 353
307. 308, 328,
324, 325, 326,
311, 312, 313
315, 316, 317,
344,345
335
309,310
313
309, 310, 311,
308
332, 339,340
351
331
319, 320
333
301, 302, 303,
346
346, 350
314
322
343
329
327
318, 357, 358
312
304, 305, 306
DVD player Setup codes
1 Maker
1
Setup
HITACHI
JVC
KENWOOD
MITSUBISHI
ONKYO
t PANASONIC
7=HILIPS
1
1
]
1
i
812
801
805, 808
810
815. 816
804
807
PROSCAN
RCA
JNG
1
1
1
7~IfIRIFFR
codes
I
8rl1
811
811
814
OSS/SAT codes
Maker
36 EN
Setup
S&NY
1
907
TOSHIBA
1
904
codes
-----I
--7
MD recorder oper
Basic remote control operations for other components
ck, CDplayer i? MD recorder operations
You can perform these basic operations using the keys described below when connected to KENWOOD cassette deck, CD player or MD ret
recorder
equipped with system control operations
-a
The LCD panel is only for remote control RC-I?0816
K-R0816 (VR-6060 modell.
les
Cassette deck operations keys ’
CD player operation keys
.- YE---zz
mvl//i
0 6,
1 r7 1-t
1.: 13 u
,-) :3 (3 :
i.ij !$ (3 CZ
,,‘~
, @ ‘3 2
1.2 p-y 0 r:
-‘c
.:
,, (3 cti c_TQ
I- ITI3 00
1
0 .~ 0
J
17.1
I
.,
‘< j. .
._
;03. 304. 305. 306
FE-R081 61RO725
RC-RO8161RO725
Jes
RC-R0816lR0725
MD recorder operation keys
RC-R0816iR0725
37 EN
1,.‘
----I
Basic remote control operations for other components
Basic remote contt
Other components’ operations
MS/SAT receiver (I
Refer to the followlng for the type of remote control operations available for each component
l
0 Select the input source.
0 Press the keys corresponding to the operations
Refer to the following sections for details.
you desire.
l
When pressing keys in succession, press each key flrtnly and be sure
to wait at least 1 second before pressing the [next key
Numeric keys functlon the same as the numeric keys 011the onglnal
(emote
These keys can be used to perform the basic operations of KENWOOD and other manufacturers’
component had been entered beforehand.
The LCD panel is only for remote control RC-R0816 FIR-6060 model).
TV operation keys
components
which the setup code for each
-_36
SOUR
(Source ps
VCR operation keys
DVD player operati
Numeric keys
MUTE
VOL+/(Volume + I-)
Q(POW
on/off)
INPUT SEL
(Input selecllon)
CH+/(Channel + I -)
ENTER
sou
isource,
Nunw
tseieci
TOP
RC-R0816lR0725
RC-R0816lR0725
. . (Backward
*. Forward
38EN
:
:
I
Basic remote control operations for other components
Cable tuner operation keys
DSS/SAT receiver operation keys
tey fm++ and be sure
ixt key
c keys on the orlglnal
setup code for each
-&
- MENU
,.
.
.
I L.
K-R081
RC-R0816iR0725
DVD player operation keys
PAGE
1~’
rPage up or down)
OSD
.-
,Backward Searchi‘
. . ,FOrvmd Search)
\
FGRO816lR0725
(Cursorup)
(Cursordown)
(Cursorleft)
(Cursori,Qh,)
i
6lRO725
In case of difficulty
In case of difficulty
Remote control unit
Resetting the Microcomputer
For the U.S.A. and Canada
The microcomputer
may malfunction (unit cannot be operated, or
shows an erroneous display) if the power cord is unplugged while
the power is ON, or due to some other external factor. If this
happens, execute the following procedure to reset the microcomputer and return the unit to its normal operating condition.
Unplug the power cord from the wall outlet, then plug it
back in while holding down the POWER ON/STANDBY
0 key.
puts cann
remote control.
For other countries
Remote control opt
l
Please note that resetting the mtcrocomputer will clear the contents
of the memory and returns the unit to the state It was I” when It left
the factory.
With the power cord plugged
in, turn the POWER
OFF key OFF. Then, while
holding
down
the
STANDBY 0 key, press POWER ON/OFF.
ON/
ON/
Amplifier
SVhptctm
No sound from the speakers.
The speaker cords are disconnected
l
*VOLUME IS set to the minimum position
. MUTE IS ON
*The SPEAKERS switches are set to OFF
The standby
not output.
indicator
blinks and sound is
Sound is not output from the surround
speakers and I or the center speaker, or their
sound is very small.
l
l
The speaker cord IS disconnected
l
The surround speaker cords and/at the center
speaker cord IS dlsconnected
A surround mode has not been engaged
The surround and/or center volume controls
are set to the mlnlmum level
l
The audio cord from the record player IS Inot
connected to the PHONO lacks
The record player IS Inot grounded
l
l
When playing a Dolby Digital source signal
using a DVD player, the sound is cut off soon
after it starts.
No sound is produced during playback from
a DVD player.
A video source cannot be recorded
normally.
l
Speaker cords are short-cIrcuited
l
A humming noise is generated when the
PHONO input selector is selected.
l
l
l
l
There are many possible causes for this problem, depending on the type of DVD player
used
l
Connect them properly referring to “Conl?ect- 14
trig the speakers”
Adlust the volume to a propel level
- 2%
Turn OFF the MUTE
Set the SPEAKERS switches to ON
- 22.
l
Turn the power off, elimnate the shot t-ciicult~ng. then turn on the power agal,,
Connect It properly referring to “Connecting
- 14
the speakers”
Connect It properly refet ring to “Coivectlng
- 14the speakers”
Select a surround mode
Adlust the speaker levels using tile test tone
- 21
l
l
l
Insert the audio cold plugs securely Into the
PHONO lacks
Connect the grounding wire to the GhlD termsnal on the rear panel
l
l
Set the input mode to dIgItal manual before
starting playback of the Dolby DIgital source
- 8
l
l
The Input mode IS set to dIgital manual
l
l
The software IS copy-guarded
l
Press the INPUT MODE key to select to full
auto mode
- aCopy-guarded video softwate
corded
cannot be re-
Tuner
---
Interference.
A station which was preset cannot be received by pressing the corresponding
numeric key.
I
-.....,x,-.. ^._
,xxxxx.
.^^^^
No antenna IS connected
l The broadcast
band IS not set properly
*The frequency of the desired station IS not
tuned
- 16
Connect an antenna
l Set the broadcast
band propel ly
*Tune the frequency of the desired statloh
- 26
Noise due to lgnitlon noise from an automobile
*Noise due to Interference from al? electric
appliance
l
Noise due to a nearby TV set
Install the outdoor antenna away from the
road.
*Turn off the power to the appliance
l
l
The preset statjon belongs to a frequency that
cannot be received
*The preset memory was cleared because the
power cord had been icnplugged for a long
period of time
l
l
l
l
Install th& receiver farther away frov the TV
l
Preset a station with a iece~vable frequency
l
Preset the statlon again
81:
y--_I-_.
In case of difficultv
Cause
Zertain inputs cannot be selected using the
.emote control.
demote control operation
down
the
ON/
aferrrng to “Connect-1.:4_
mper level
- 24
- -2
ches to ON
I
nate the short-orcurtNer agaIn
IrIng to “Connecting
- 2%
I ring to “Connecting
s using the test tone
.rgs securely into the
vrretotheGNDtermi-
dIgItal rmanoal before
Dolby
-7
ftware cannot be re-
-
! 6
properly
-he desired statron
me applrance
w away from the TV
recervable frequency
,
is not@ossible.
l
No setup codes regrstered for the respective
input(s)
The retmote control IS set to a different operatron mode
l Batteries are exhausted
*The remote control unrt IS too far away from
the marn system, controllrng angle rstoo large,
or there IS an obstacle between the recerver
and the remote
*The audro cords and system control cords are
not connected properly
l No software ISloaded rn the source component
l
*An attempt IS imade to play a tape whrch IS
berng recorded rn the cassette deck
*The remote control has not been set to the
operation mode for the component you wish
to control
l
Register a setup code at the respectrve input(s).
-p&
Press the source select keys or SOURCE 6
keys to select the appropriate operation mode
l Replace with new batteries.
*Operate the remote control unrt wrthrn the
controllable range.
l
l
l
l
l
Connect properly referring to “Setting up the
system”
Place software rn the source component you
want to play
Wart untrl recordrng has completed.
Press the source select keys or SOURCE 6
key to activate the operation mode for the
component
you want to control before
-m
operation
Specifications
Caution
: Read this page carefully
operation.
to ensure
safe
Specifications
For the U.S.A and Canada
For other countries
AUDIO section (VR-6060)
AUDIO section (KRF4806OD)
DIGITAL AUDIO set
Rated power output
Effective power output during STEREO operation
1 kHz, 10 %, 8 R
.._....._.......110 W + 110 W
Rated power output during STEREO operation
Sampling frequency
Input level I impeda
Optical
Coaxial
during STEREO operation
100 watts per channel minimum RMS, both channels driven,
at 8 Q from 20 Hz to 20 kHz with no more than 0.09% total
harmonic distortion. (FTC)
Effective power output during SURROUND operation
FRONT (20 - 20 kHz, 0.09 % T.H.D. at 8 Q one channel driven)
. ... .... ... ... .. ... ..
1oow+1oow
CENTER (20 - 20 kHz, 0.09 % T.H.D. at 8 Q one channel
driven) ........................ .
. . .... ............................... 100 W
SURROUND (20 - 20 kHz, 0.7 % T.H.D. at 8 R one channel
driven)
100 W + 100 W
SURROUND. BACK/SUBWOOFER (20 - 20 kHz, 0.09 % T.H.D.
at 8 R one channel driven) . ......... . ............ .......... 100 W
Total harmonic distortion . ...... ..... .... .. 0.009 % (1 kHz, 50 W, 8 Q)
Frequency response
Line (CD/DVD, TAPE, VIDEO 1, VIDEO 2, VIDEO 3, DVD/GCH)
...... .............. . ‘. ..............
10 Hz - 100 kHz, +0 dB . -3.0 dB
PHONO ‘RIAA’ response .. ..... .... 40 Hz - 20 kHz, +1.5 dB - -3.0 dB
Maximum input level
PHONO (MM) ... . ..... ..... ..... .. 45 mV, 1 % T.H.D. at 1 kHz
Signal to noise ratio (IHF’66)
PHONO (MM) ...................................... . . . . . .. ............ 75 dB
Line (CD/DVD, TAPE, VIDEO 1, VIDEO 2, VIDEO 3, DVD/GCH)
.. ... ..
95 dB
Loudness control
VOLUME at -30 dB level .
+6 dB (100 Hz)
Input sensitivity / impedance
PHONO (MM) . .. .............. .. . .. .............
. ..... 6.0 mV / 47 kc1
Line (CD/DVD, TAPE, VIDEO 1, VIDEO 2, VIDEO 3, DVD/GCH)
... ..
500 mV / 47 kR
Output level / impedance
TAPE REC .
500 mV / 1 kc1
PRE OUT (SURROUND BACK CHANNEL)
2.5 V / 1 kQ
PRE OUT (SUBWOOFER)
2.5 V / 1 kn
Tone control
BASS ............... .. . . ......... .. ..................... . +I0 dB (at 100 Hzl
TREBLE ......................
........... ....
210 dB (at 10 kHz)
42
I
!
EN
100 watts per channel minimum RMS, both channels driven,
at 8 Q from 20 Hz to 20 kHz with no more than 0.09% total
harmonic distortion. (FTC)
Effective power output during SURROUND operation
FRONT (1 kHz, 10% T.H.D. at 8 R one channel driven)
.
11ow+11ow
CENTER (I kHz, 10% T.H.D. at 8 L1 one channel driven)
11ow
SURROUND (1 kHz, 10% T.H.D. at 8 LL one channel driven)
11ow+11ow
SURROUND BACK/SUBWOOFER (1 kHz, 10% T.H.D. at 8 <1
one channel driven) ..._...........__.__...........,,....,,,..........,,...,,,,. 110 W
Total harmonic distortion
0.009% I1 kHz, 50 W, 8 11)
Frequency response
Line (CD/DVD, TAPE, VIDEO 1, VIDEO 2, VIDEO 3, DVD/GCH)
10 Hz - 100 kHz, +0 dB - -3.0 dB
PHONO ‘RIAA’ response ..__...___....__
40 Hz . 20 kHz, 1.5 dB - -3.0 dB
Maximum input level
PHONO (MM)
45 mV, 1 % T.H.D. at 1 kHz
Signal to noise ratio (IHF’66)
PHONO (MM)
75 dB
Line (CD/DVD, TAPE, VIDEO 1, VIDEO 2, VIDEO 3, DVD/GCH)
95 dB
Loudness control
VOLUME at -30 dB level
+6 dB (100 Hz)
Input sensitivity / impedance
PHONO (MM)
.._....._..................................... 6.0 mV / 47 kQ
Line (CD/DVD, TAPE, VIDEO 1, VIDEO 2, VIDEO 3, DVD/GCH)
500 mV I47 kQ
Output level / impedance
TAPE REC ._..................................,....,,..........,,....,,..
500 mV / 1 kl1
PRE OUT (SURROUND BACK CHANNEL)
2.5 V / 1 kll
PRE OUT (SUBWOOFER)
2.5 V / 1 kl1
Tone control
BASS
~10 dB (at 100 Hz)
TREBLE
..._.__.____........................................ *lo dB (at 10 kHz)
VIDEO section
VIDEO inputs / outpl
VIDEO (compos
S VIDEO inputs /out1
S VIDEO (lumini
S VIDEO (chrolr
COMPONENT VIDEC
COMPONENT V
COMPONENT V
FM tuner section
Tuning frequency
Usable sensitivity
VR-6060
ra
(r\
1.3
KRF-V8060D
1.6
50 dB quieting sensi
STEREO
..__
Total harmonic distc
MONO (1 kHz, 7
STEREO (1 kHz,
Signal to noise ratio
MONO (1 kHz, 7
STEREO (1 kHz,
Stereo separation II
Selectivity (+400 kHi
Frequency response
Notes
1 KENWOOD follow
2 The full aerfommn
:o ensure
safe
Specifications
DIGITAL AUDIO section
AM tuner section
tion
.,......,. 110 w + 110 w
n
Sampling frequency
32 kHz, 44.1 kHz, 48 kHz, 96 kHz
Input level 1 impedance I wave length
Optical .._....,..........._....... (-15 dBm .. -24 dBml, 660 nm ~30 nm
Coaxial
0.5 Vp-p / 75 11
Tuning frequency range
10 kHz step ................................
530 kHz - 1,700 kHz (VR-6060)
10 kHz step ......................... 530 kHz - 1,610 kHz (KRF-V8060D)
9 kHz step ......................... 531 kHz - 1,602 kHz (KRF-V8060D)
Usable sensitivity (30% mod, S/N 20 dB)
........................................................................
16 pV I (600 pV/m)
Signal to noise ratio (30% mod, 400 Hz)
..........................................................
50 dB (60 dBp VEMF input)
peration
lnnel driven)
11ow+11ow
lannel driven)
.....
110 w
mechannel driven1
110 w + 110 w
10% T.H.D. at 8 0
.......
..... 110 w
9% (1 kHz, 50 W, 8 (2)
VIDEO inputs / outputs
VIDEO (composite)
1 Vp-p
S VIDEO inputs /outputs
S VIDEO (luminance signal) ......... ......... . ....... ..... 1 Vp-p
S VIDEO (chrominance signal) ..__......._.......... 0.286 Vp-p
COMPONENT VIDEO inputs /outputs
COMPONENT VIDEO (luminance signal) .... ...... .. 1 Vp-p
COMPONENT VIDEO (CBCR-signal)
.... ...... ~0.32 Vp-p
VIDEO section
VIDEO 3, DVD/GCH)
I kHz, +0 dB - -3.0 dB
kHz, 1.5 dB - -3.0 dB
/ 75 L2.
i 75 L1
/ 75 11
/ 75 0
i 75 12
FM tuner section
Tuning frequency
Usable sensitivity
range
(MONO)
87.5 MHz - 108.0 MHz
GENERAL
Power consumption
VR-6060 .......................................................
3A
KRF-V8060D ...........................................
300 W
AC outlet
SWITCHED
Dimensions..
VR-6060 ..................... (total 150 W, 1.25 A max.)
KRF-V8060D .............................
(total 90 W max.)
...................................................
W : 440 mm(17-5/16”)
H : 159 mm (6-l/4”)
D : 392 mm(15-7/16”)
Weight (Net)
VR-6060 ................................................................
KRF-V8060D ........................................................
9.4 kg (20.7 lb)
10.0 kg (22.0 lb)
VR-6060
1.3 pV (75 Q)/ 13.2 dBf (75 kHz dev, SINAD 30 dBl
V, 1 % T.H.D. at 1 kHz
KRF-V8060D
,,....,................... 75 dB
VIDEO 3, DVD/GCH)
..,...,.,,................ 95 dB
+6 dB (100 Hz)
6.0 mV / 47 kl1
VIDEO 3, DVDIGCH)
500 mV / 47 k<l
500 mV / 1 k<L
2.5 V / 1 kQ
2.5 V / 1 k<I
.._..___._................................................................
1.6 uV (75 <I)/ 15.2 dBf (75 kHz dev, SINAD 30 dB)
50 dB quieting sensitivity
STEREO
28 pV (75 ill/ 40.2 dBf
Total harmonic distortion
MONO (1 kHz, 75 kHz dev) ,..........__............. 0.5% (65 dBf input)
STEREO (1 kHz, 67.5 + 6.75 kHz dev)
0.7% (65 dBf input)
Signal to noise ratio
MONO (1 kHz, 75 kHz dev) ,,___...,.___......_....
75 dB (65 dBf input)
STEREO (1 kHz, 67.5 + 6.75 kHz dev)
68 dB (65 dBf input)
Stereo separation (1 kHz) _...,..._,,,,.,.._,,.........,.............................
40 dB
Selectivity (2400 kHz) (VR-6060) . ....
. ...
..
.
70 dB
(KRF-V8060D)
50 dB
Frequency response (30 Hz w 15 kHz)
+0.5 dB, -3.0 dB
-*IO dB (at 100 Hz1
-*IO dB (at 10 kHz)
Notes
1 KENWOOD
follows
2 Tlx full pelfownance
a policy of continuous
~may tnot be exlvblted
advancements
in an extremely
111development
cold locatIon
For this reason spectflcatlons
may be changed
(under a water-freezlng
temperature)
wlthout
notlce.
3
KENWOOD
For your records
Record the sertal number, found on the back of the ~1, r the spaces
designated on the warranty card, and in the space provided below Refer
to the tmodel and serial numbers whenever you call upon your dealer fol
InformatIon or serwe on this product
Model
44EN
Serial Number
(EN)
Please read all of the safety and operating IIlstructlons
before
opet-atlng this appliance. Adhere to all warnings on the appliance
and II? the Instructlot
manual Follow all the safety and operating
Instructions.
These safety and operating lnstluctlons
should be
retalned for future reference
1. Power sources - The appllarice sllould be connected
to a
power s~~pply only of the type described In the InstructIon
manual or as marked on the appliance
If you are not sure of
the type of power supply to your home, consult your appliance
dealer or local power company
For appliances intended to
operate from battet-y power, or other sources, refer to the
lnstructlon manual
2.
3.
6. Temperature
- The appliance may not function
used at extremely
low, or freezing temperatures.
IS above +5”C (41°F).
ambient temperature
7.
Heat - The appliance should be situated away from heat
sources such as radiators. heat registers, stoves, or other
appliances (Including ampllflers) that produce heat. Do not
place a flaming object, such as a candle or lantern, on or near
the appliance.
8.
Electric shock - Care should be taken so that objects do not
fall and liquid is not spllled Into the enclosure through openings.
If a metal objects, such as a hair pin or a needle, comes into
contact with the inside of this appliance, a dangerous electric
shock may result For families with children, never permit
chlldrentoputanythlng,
especiallymetal,
insidethisappllance.
9.
Enclosure
removal
- Never remove the enclosure.
If the
Internal parts are touched accidentally, a serious electric shock
mtaht occur
Power-cord
protection
- Power-supply
cords should be
routed so that they are 110: likely to be walked on or plnched by
Items placed upon or against them, pay particular attention to
colds at plugs, convenience
receptacles, and the point where
they exit flom the appliance
CAUTION
-
P o I arlza
. t’ Ion - This appliance
tnay be
properly if
The ideal
equipped with a polarized alternating-current
line plug ia plug
having one blade wider than the other). This plug WIII fit Into the
power outlet only one way. This IS a safety feature If you are
unable to IIlsert the plug fully Into the outlet, try reversing the
plug If the plug should still fall to fit, contact your electrlcian to
replace YOUI-obsolete outlet. Do not defeat the safety purpose
of the polarized plug.
4.
5.
Ventilation
- Slots al?d openings In the cabinet are provided
for ventllatlon and to ensure reliable operation of the appliance
and to protect It from overheating,
and these openings must
inot be blocked or covered The appliance should be situated so
that Its locatlon or posltioll does not Interfere with Its propel
ventllatlon
To maintain good ventllatlon, do not put records or a table-cloth
on the appliance Place the appliance at least 10 cm away from
the walls
Do not use the appliance on a bed, sofa, rug or similar surface
that may block the ventilation openings. This appliance should
not be placed In a bulit-in installation such as a bookcase ot rack
unless proper ventilation
IS provided or the manufacturer’s
InstructIons have been adhered to
10. Magnetic
magnetic
motorized
fields - Keep the appliance away from sources of
fields such as TV sets, speaker systems, radios,
toys or magnetized oblects.
11. Cleaning - Unplug thrs appliance from the wall outlet before
cleaning
Do not use volatile solvents such as alcohol, paint
thinner, gasoline, or benzine, etc. to clean the cabinet. Use a
clean dry cloth.
12. Accessories-Do
not place this appliance on an unstable cart,
stand, tripod. bracket, or table. TheapplIance
may fall, causing
serious injury to a child or adult, and serious damage to the
appliance. Use only with a cart, stand, tripod, bracket, or table
recommended
by the manufacturer,
or sold with the appliance.
Anymountingof
theappllanceshouldfollowthemanufacturer’s
InstructIons,
and should
use a mounting
accessory
recommended
by the manufacturer.
An appliance and cart
combination should be movedwlth care. QuIckstops, excessive
force, and uneven surfaces may cause the appliance and cart
comblnatlon
to overturn.
Water and moisture-The
appliance should /not be used neal
water-for
example, near a bathtub, washbowl,
kitchen sink,
laundry tub, In a wet basement, or near a swlmmlng pool, etc
Do not place an object containing Ilquid, such as a flower vase,
oii the appliance
858-0964-1303
(EN)
13.Lightning
- For added protectron for thus applrance durrng a
lrghtnrng storm, or when rt IS left unattended and unused for
long periods of t,me, unplug rt from the wall outlet and
disconnect
the antenna or cable system
Thus wrll prevent
damage to the applrance due to lrghtntng and power-lrne
c
surges
18.Power
lines - An outside antenna system should not be
located rn the vrctnrty of overhead power lines or other electric
light or power crrcuits, orwhere It can fall into such power lines
orcrrcurts. When Installing an outsrdeantenna
system, extreme
care should be taken to keep from touching such power lines
or circuits as contact with them might be fatal.
14.Abnormal
smell
- If an abnormal
smell or smoke
IS
detected,
rmmedrately
turn the power OFF and unplug
the appliance from the wall outlet Contact
your dealer or
nearest servtce center
19.AC outlets
- Do not connect
other audio equipment
with a power consumptron
larger than that specified
to
the AC outlet on the rear panel.
Never connect
other
electrrcal
applrances,
such as an Iron or toaster,
to it to
prevent
fire or electric
shock
15.Damage
requiring
service
- The applrance
should be
serviced
by qualrfied
service personnel
when
A. The power-supply
cord or the plug has been damaged.
B. Objects
Ihave fallen, or lrqurd has been spelled Into
the appltance
C. Tile applrance
has been exposed
to ram or water.
D. The applrarlce
does not appear to operate
normally
by folIowIng the Instructron manual Adjust only those controls
that ale covered by the rnstructron rnanual as an Improper
adjustment
of other controls may result rn damage and WIII
often rreyurre extensrve work by a qualrfred techrircran to
rrestoie the applrance to its normal operatron
E. Tile applrance
Ihas been dropped,
or tile enclosure
damagecl
F. Tile applrance exhrbrts a marked change II? performance
lG.Servicing
- Tile user should not attempt
to servrce the
appliance
beyond
that descrrbed
in tile instruction
manual All other servrcrng should be referred to qualrfied
-servrce personnel
20. Overloading
- Do not overload wall outlets, extensron cords,
or Integral convenience
receptacles as this can result in a risk
of fire or electric shock.
21. Attachment
- Do not use attachments
not recommended
the appliance manufacturer
as they may cause hazards.
by
22. Replacement
parts-When
replacement
parts are required,
be sure the service technrcran has used replacement
parts
specrfred by the manufacturer or have the same characteristrcs
as the original parts. Unauthorized substitutrons
may result in
fire, electric shock, or other hazards.
23. Safety check - Upon completron of any service or repairs to
this appliance, ask the service technician to perform safety
checks to determine that the appliance is In proper operating
condrtron
17.0utdoor
antenna
grounding
- If an outside antenna IS
connected
to the appliance,
be sure the antenna system
IS grounded
so as to provide
some protection
against
voltage surges and built up statrc charges
Article 810 of
the Natronal Electrrcal
Code
ANSIINFPA
70, provrdes
rnformatron
with respect
to proper
groundrng
of the
tmast and supportrng
structure,
grounding
of the lead-in
wire to an antenna
discharge
unit, size of groundrng
conductors,
locatron
of antenna
discharge
unit,
connectron
to grounding
electrodes,
and reaurrements
for the groundrr?g electrode.
See Figure
Notes
1 Itern 3 IS not requrred except for grounded or polarized equipment.
2 Item 17 and 18 are rnot requrred except for units provided wrth antenna
termrnals
3 Item 17 compiles with UL rn the U S A
858-0964-I 3 03
VR-606O/KRFV806OD
P-191sEN
Rfremote control function (For VR-6060 only)
WRONG
The remote control has the RF remote function in addition to the IR remote function.
The VR-6060 can receive the rernote control commands even when they are installed
in a position where the IR remote signal can hardly access, for example inside a
cabinet. The receiver is not equipped with the RF remote bi-directional communication
function. The bi-directional communication is available only when with equipments
other than the receiver using the IR remote function.
CORRECT
The remote control has the RF remote function in addition to the IR remote function.
The VR-6060 can receive the remote control commands even when they are installed
in a position where the IR remote signal can hardly access, for example inside a
cabinet.
VR-6060
P-19 FR
Fonction RF de la tblbcommande
ERRON/!
La telecommande possede la fontion de commande a distance RF en plus de la
fonction de commande a distance IR. Ce modele peut recevoir les commandes de
la telecommande meme lorsque ces commandes proviennent d’un endroit ou le
signal de controle a distance IR ne peut que tres difficilement acceder, par exemple
dans un meuble. Le recepteur n’est pas equipe d’un fonction de communication de
commande a distance bi-directionelie. La communication bi-directionelle n’est
disponible que lorsque vous utilisez la fonction de commande a distance IR avec des
appareils autres que le receptuer.
CORRECT
La telecommande possede la fontion de commande a distance RF en plus de la
fonction de commande a distance IR. Ce modele peut recevoir les commandes de
la telecommande meme lorsque ces commandes proviennent d’un endroit 012le
signal de controle a distance IR ne peut que tres difficilement acceder, par exemple
dans un meuble.
B58 -1875 - 00
VR=606O/KRFV806OD
VR=605O/KRFV706OD/KRFV606OD
P-20EN(for VR-606O/KRFV806OD)
P- 18EN(for VR-605O/KRFV706OD/KRFV606OD)
Speaker settings (WRONG)
m 0
l
For “FRNT LARGE” selection, no sound will be heard from
subwoofer speaker even when it is set to ON. However, if you
select SPEAKER EQ mode when subwoofer is selected, you
will be able to hear sound from the subwoofer.
When in STEREO mode, thesound goesdirectlytofrontspeaker.
Speaker settings (CORRECT)
q
0
l
For “FRNT LARGE” selection, no sound will be heard from
subwoofer speaker even when it is set to ON. However, if you
select “SW RE-MIX ON” when subwoofer is selected, you
will be able to hear sound from the subwoofer.
When in STEREO mode, the sound goes directlytofront speaker.
B58-1874-00
LIMITED WARRANTY
CERTIFICATE
,5
m
RETAIN THIS CARD FOR YOUR RECORDS
Z
Note: We suggest you attach your bill of sale to this card
as proof of warranty coverage.
Name of purchaser, to whom warranty runs
4
<
Model Number
Serial Number
SEE REVERSE SIDE FOR TERMS AND CONDITIONS.
PLEASE READ IT CAREFULLY.
0
USE THIS CARD WHEN:
Inquiring about warranty service and information
l
Obtaining warranty service
l
For your nearest KENWOOD
Authorized Service Center call:
0
IN THE CONTINENTAL UNITED STATES
I- 800 - 536 - 9663
24 HOURS A DAY, 7 DAY A WEEK
u
99/3 B46 - 0330 - 03 01 (K, Y) m
KENWOOD LIMITED WARRANTY
KENWOOD Audio products are designed and manufactured with advanced technology and craftsmanship. This product is warranted to be free from defects in material and workmanship as listed. This
limited warranty remains in effect for the period indicated from the date of the original consumer
purchase.
2 years pads and labor
LIMITATIONS OF LIMITED WARRANTY
Except as specified below, this warranty covers all defects in material and workmanship for this product. The
following items are not covered under the terms of this limited warranty.
1. Voltage and/or line frequency conversions.
2. Damage caused by accident, negligence, misuse, abuse, improper operation, unauthorized product
modification or failure to follow instructions contained in the owner’s manual.
3. Periodic check-ups which do not disclose any defects covered by the warranty.
4. Installation and/or removal charges, damages based upon inconvenience, or loss of use of the
product.
5. Units on which the serial number has been defaced, modified or removed.
6. Damage resulting from repair or attempted repair by someone other than KENWOOD or an
Authorized KENWOOD Service Center.
7. Damage due to unsuitable packing and/or shipment method.
(Claim must be presented to the shipper).
8. Cosmetic items such as external cabinet, including but not limited to appearance items such as
knobs, speaker grills, cartridges or styli and batteries.
9. Product purchased or serviced outside the United States and it’s territories, except product
purchased through the United States Military Exchange.
10. Damage resulting from installation of parts or accessories which do not conform to the specification
and quality of the original item.
WARRANTY COVERAGE
KENWOOD will pay for the labor and parts expenses for items covered under the terms of the limited
warranty. This warranty is extended only to the original purchaser. A purchase receipt or other proof of date
of original purchase will be required before warranty service is rendered.
HOW TO OBTAIN WARRANTY SERVICE
If your KENWOOD product requires service;
1. Take or ship it to any KENWOOD Authorized Service Center in the U.S.A. along with a complete
description of the problem. Warranty service is not available outside the United States. (If you are
uncertain as to whether a Service Center is authorized, please call l-800-KENWOOD, 1-800-5369663, for the nearest Service Center)
2. You are responsible for transporting product for repair, for installation and removal charges, and
payment for any initial shipping charges. KENWOOD will pay for the return shipping charges for
product which is received in this manner.
LIMITATION OF IMPLIED WARRANTIES
ALL IMPLIED WARRANTIES, INCLUDING WARRANTIES OF MERCHANTABILITY
AND FITNESS
FOR PARTICULAR PURPOSE, ARE LIMITED IN DURATION TO THE LENGTH OFTHIS WARRANTY.
EXCLUSION OF CERTAIN DAMAGES
KENWOOD’S LIABILITY FOR ANY DEFECTIVE PRODUCT IS LIMITED TO THE REPAIR OR REPLACEMENT OF SAID PRODUCT, AT OUR OPTION, AND SHALL NOT INCLUDE DAMAGES OF ANY
KIND, WHETHER INCIDENTAL, CONSEQUENTIAL OR OTHERWISE. SOME STATES DO NOT ALLOW LIMITATIONS ON HOW LONG AN IMPLIED WARRANTY LASTS AND/OR DO NOT ALLOW THE
EXCLUSION OR LIMITATION OF INCIDENTAL OR CONSEQUENTIAL DAMAGES, SO THE ABOVE
LIMITATIONS AND EXCLUSIONS MAY NOT APPLY TO YOU.
This warranty gives you specific legal rights, and you may also have other rights which vary from state to state.
If a problem develops during or after the Limited Warranty Period, or if you have any questions regarding
the operation of the product, you should contact your KENWOOD Authorized Dealer or Authorized Service
Center. If the problem or your question is not handled to your satisfaction, please contact our Customer
Relations Department at the address listed below.
KENWOOD SERVICE CORPORATION
2201 East Dominguez Street,
P.O. Box 22745,
Long Beach, CA 908015745
U.S.A.
Phone: (310) 639 - 5300