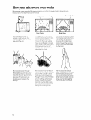
1
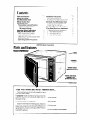
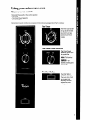
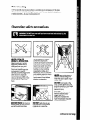
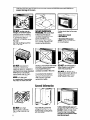
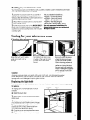
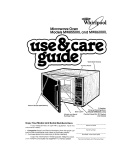
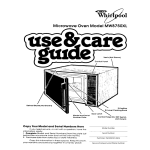
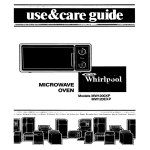
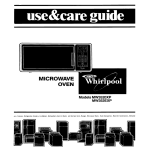
MICROWAVE
OVEN
Model MW81OOXR
s, ~~~~~~~~
~~~~~~~~~~~~~~~~~~~~~
he mkers
Dishwashers
Bu~ll-In
Ovens
and Surface
Units.
Ranges.
MlcrDwave
Owns.
Trash Compactors.
Room AM Condltloners.
Dehumldl
Contents
Jogc
2 installation
Parts and Features
Before You Install
Your Microwave
Oven
Before You Use Your
Microwave
Oven
Precautions
to Avoid Possible
Exposure to Excessive
Microwave
Energy
Important
Safety Instructions
Using Your Microwave
Oven
Mlcrc Nave Oven Controls
Setting the Controls
Defrosting
In Your MIcrowave
BI-Level Cooking
Operating
Safety
i
Grounding
InstructIons
Bi,tldlng
In Your MIcrowave
Caring
for Your Microwave
CIeanlng
Replacing
the MIcrowave
the Light Bulb
How Your Microwave
If You Need Service
L
5
5
6
6
7
Oven
1
2
3
4
“uge
Instructions
Oven
9
19
11
4,
Oven
II
1L
Over
Oven Works
or Assistance
’2
‘3
13
13
‘3
13
Before Calling
for Assistance
If You Need Assistance
if You Need Service
:f You Have CI Probiem
7
Precautions
I
~1985
Whirlpool
Corporation
Parts and features
Model MW8100XR
/
-
VENTS
CONTROL
PANEL
DEFROSTGUIDE
(Behind Oven Door)
MODEL AND SERIAL
NUMBER PLATE
(Behind Oven Door)
Copy Jour Model and Serial Numbers here...
If you reed
this information
service
or call
ready.
with a question,
1. Complete
Model and Serial Numbers
plate just behind
the microwave
oven
the oven frame]
2. Purchase
date
from
sales
[from
door
hove
the
on
slip
Copy this information
in these spaces.
Keep this
book, your warranty
and sales slip together
in a
handy
place. There is no warranty
registration
to
return. Proof-of-purchase
is all that IS required
for
in-warranty
service.
Model
Number
Serral Number
Purchase
Service
Date
Company
~~~~
Phone Number
I
Fill out and
mlsslng
return
oleasi’
send
Wh~rlpoc
MlcrowcJe
Admlnlstr
2000 US
Benton H
the “Microwave
the model
Corporation
Reglstratlor
Itlve Center
33 North
arbor Mlchlgan
This Informat
!,n ~NIII help
mlcrotiade
ovt n
Registration
number
Card”
of your
attached
mlcrowave
to the oven door. If the card
oven.
with
your
to pass
along
name
and
address
Information
about
IS
to
Department
49022
iis reach
you
If there
IS ever
a need
your
Before vou install your microwave oven
Read and carefully follow the “INSTALLATION INSTRUCTIONS”
tound on page 9 of this “Use & Care Guide!’
Before vou use your microwave oven
l
Read ths Ust. & Care Guide
carefully
for important
Store In a convcnlent
place
for future use
It is your personal
I
I
l
Has been
oven should
l
l
l
l
l
responsibility
installed
where
use and
lnformatlon
and obligation
It IS protected
be at a temperature
safety
above
to be sure your microwave
The microwave
50 F (10 C) for proper operation.
from the elements
Has been Installed
on a surface
strong enough
to support
Its weight
Has been properly
connected
to electrical
supply
and grounded
[See ‘Installation
Instructions”)
Is not used by anyone
unable
to operate
It properly
Is properly
maIntained
Is used only for jobs expected
of a home mlcrowave
oven
PRECALJTIONS TO AVOID
POSSIBLE EXPOSURE TO EXCESSIVE
MICROWAm
ENERGY...
DO NOT attempt to operate this oven with the door
open since open-door
operation can result in harmful exposure to microwave
energy. It is important not to
defeat or tamper with the
safety interlocks.
DO NOT place any object
between the oven front
face and the door or allow
soil or cleaner residue
to accumulate
on sealing
surfaces.
DO NOT operate the
oven If it IS damaged.
It IS
particularly
important that
the oven door close
properly and that there is
no damage
to the
(1) Door (bent),
(2) Hinges and latches
(broken or loosened],
13) Door seals and sealing
surfaces.
DO NOT operate
the
microwave
oven if the
door window is broken.
The microwave
oven
should be checked for
microwave
leakage
by
qualified
service personnel
after a repair is made.
The oven should not be
adlusted or repaired by
anyone except properly
qualified service
personnel.
DO NOT operate the
microwave
oven with
the outer cabinet removed.
oven:
Microwave
ovens have been used successfully
in homes for a number of years.
They are thoroughly
tested for safe and efficient operation.
However, as with
any appliance,
there are special installation
and safety precautions
which must
be followed to ensure safe and satisfactory
operation
and prevent damage to
the unit.
WARNING -
To reduce the risk of burns, electric shock.
fire, injury to persons or exposure to excessive mlcrowave energy
1. Read all InstructIons
before
using
applianc?
2. Read and follow the specific “PRECAUTIONS TO AVOID POSSIBLE EXPOSURE TO
EXCESSIVE MICROWAVE ENERGY” found
on page 3.
3. This appliance
must be grounded. Connect only to properly grounded
outlet. See
“GROUNDING
INSTRUCTIONS”
found on
page 10.
4. Install or locate this appliance
only in
accordance
with the provided
“INSTALLATION INSTRUCTIONS” found on page 9.
5. Some products such as whole eggs and
sealed containers
- for example,
closed
glass jars - may explode
and should not
be heated in this oven.
6. Use this appliance
use as described
only for its intended
in this manual.
7. As with any appliance,
close supervision is necessary when used by children.
8. Do not operate this appliance
if it has a
damaged
cord or plug, if it is not working
properly,
or if it has been damaged
or
dropped
Electric shock, fire or other hazards may result.
9. This appliance
should be serviced only
by qualified
service
personnel.
Call a
Whirlpool authorized
TECH-CARE@ Service
Company
for examination,
repair
or
adjustment.
10. Do not cover or block any opening
the appliance,
for fire may result.
SAVE THESE
A
on
11. Do not use outdoors for damage
oven or electric
to the
shock may result
12. Do not Immerse cord or plug in water for
electric shock may result.
13. Keep cord away from heated
for electric shock may result.
surfaces
14. Do not let cord hang over edge of table
or counter for electric shock may result.
15. See door surface cleaning
on page 11.
16. To reduce
cavity
instructions
the risk of fire in the oven
a. Do not overcook food. Carefully attend
appliance
if paper, plastic, or other combustible materials
are placed
inside the
oven to facilitate cooking. Paper can char
or burn, and some plastics can melt if used
when heating foods.
b. Test dinnerware
or cookware
before
using.
See page
8.
Some
dishes
(melamine,
Centura,” etc.) absorb microwave energy, becoming
too hot to handle
and slowing cooking times. Remove wire
twist-ties from paper or plastic bags before
placing
bag in oven. Cooking
in metal
containers can damage the oven. So can
containers with hidden metal (twist-ties, foillining, staples, metallic glaze or trim.)
c. If materials inside the oven should ignite,
keep oven door closed, turn oven off, and
disconnect
the power cord, or shut off
power at the fuse or circuit breaker panel.
17. Read and follow “OPERATING SAFETY
PRECAUTIONS” starting on page 7.
INSTRUCTIONS
Using your microwave oven
Microwave oven controls
There are three parts in the control
-The Timer
-The Cook Power Selector
-The Start Button
Instructions
for each
control
section:
are covered
on the followlng
pages,
Read
them
carefully,
The Cook Power Selector
The Cook Power
Selector
allows you
to control the
cooking speed.
HIGH -for normal
cooking.
DEFROST-for
slower cooking and
defrosting.
The Start Button
The START Button
starts the cooking.
The oven door must
be closed
and
securely
latched
before the oven
will operate.
Setting
the controls
Be sure You understand
the basics
recipes
from your MICRO MENUS*
on mlcrowave
oven cooklng
before you start
Cookbook
Follow the dIrectIons
carefullv
1. Place
2. Set cooking
times up to 25
minutes by turning the Timer
Knob clockwise.
To reduce
the
cooking
time, turn the Timer
Knob counterclockwise.
Each
close
food in the oven, then
the door. The oven won’t
work if the door isn’t closed
tightly.
Start with
To set the timer for less than
minute, turn Timer Knob pas
1 minute, then to desired time.
mark is 30 seconds for the
first 10 minutes. After 10 minutes, each mark is 1 minute.
3. Set Cook Power Selector
to HIGH or DEFROST.
4. Push the START Button. The
oven light will come on and
cooking
will begin. You will
hear the fan running during
oven operation.
When the set time is up, the
oven WIII shut off automatically. You will hear a bell, the
light will go off and the fan
will stop.
To stop the oven
1. Turn the Timer Knob
counterclockwise
to 0.
OR
2. Open
the oven
door.
To restart the oven
1. Close the oven door
Defrosting in your
microwave oven
2. Set the Timer (If needed)
to
the desired
cooklng
time
3. Push the START Button
Use the DEFROST setting to thaw
frozen food before
cooking.
See the Defrost Guide on the
top oven door frame or your
MICRO MENUS@Cookbook
for
suggested
defrost times.
Bi-level cooking
A removable
Br-Level Cookrng Rack IS available
as an accessory
lets you cook or reheat foods together as a meal. Ask your dealer
l MK800 (832985)
- Bi-Level Cooking Rack Kit
kit. This rack
for details on..
Operating safety precautions
NEVER COOK OR
REHEAT A WHOLE EGG.
Steam build-up in whole
eggs may cause them to
burst and burn you, and
possibly damage
the oven.
Slice hard boiled eggs before heating. In rare instances, poached
eggs have
been known to explode.
Cover poached
eggs and
allow a standing time of one
minute before cutting into
them.
Liquids heated in certain
containers
[especially
cylindrical-shaped
containers]
may become overheated.
The
liquid.may
splash out with a
loud noise during or after
heating or when adding
ingredients
(coffee, etc.)
resulting in harm to the oven
and possible personal injury.
For best results stir any
liquid several times before
heating or reheating.
NEVER lean on the door or
allow a child to swing on it
when the door is open. Injury
could result.
DO NOT can foods in the
oven. Closed glass jars may
explode
resulting in damage
to the oven or possible
personal injury.
DO NOT use the oven to
sterilize objects (baby
bottles, etc.). It is
difficult to maintain the
high temperature
required
for safe sterilization.
USE HOT PADS. Microwave
energy does not heat containers, but the hot food does.
DO NOT heat, store or use
flammable
or inflammable
materials in or near the
oven.
continued
on next page
7
CAUTION: DO NOT use the oven until you have read and understand
prevent damage
to the oven.
DO NOT use the oven for
storage. Do not leave paper
products, books or cooking
utensils in the oven when not
in use. Fire may result if
someone occidentally
starts
the oven.
Don’t let anything touch the
top of the oven.
DO NOT pop popcorn,
except in a microwaveapproved
popcorn
popper or
commercial
package
designed
especially
for microwave
ovens. Results ore the manufacturers responsibility.
NEVER try to pop corn
in Q paper bag. Overcooking
may result in smoke and fire.
DO NOT OVERCOOK
POTATOES. Fire could result.
At the end of the recommended cooking time they
should be slightly firm.
Wrap in foil and set aside
for 5 minutes. They will finish
cooking while standing.
Startina a microwave
oven when
it’s em&
is not recommended.
If you experiment,
put a
container of water in the oven.
It is normal for the inside of
the oven door to look wavy
after the oven has been
running for a while.
ALL precautions
to
If a fire should start in the oven
cavity:
l keeD
. door closed
l turn oven
off
l disconnect
the power
supply at the cord, fuse box
or circuit breaker.
DO NOT use newspaper
or
other printed paper inthe
oven. Fire could result.
DO NOT dry flowers, fruit,
herbs, wood, paper, gourds
clothes in the oven. Fire or
other hazards may result.
or
General information
DO NOT try to melt
paraffin wax in the oven.
Fire or other hazards may
result.
8
If your electric power line
voltage is less than the normal 120 volts, cooking times
may be longer.
To test a dish for safe use, put it
into the oven with a cup of water
beside it. Cook on high Cook
Power for one minute. If the
dish gets hot and water stays
cool, do not use ft.
Installation
instructions
BEFORE YOU BEGIN, READ THE FOLLOWING
Installing
INSTRUCTIONS
COMPLETELY AND CAREFULLY.
your microwave oven
1. Empty
the microwave
oven and clean inside if
with a soft, damp cloth. Check for damage
such
as misaligned
door, damage
around the door or
dents inside the oven or on the exterior. If there is
any damage,
do not operate the unit until it has
been checked
by an authorized
trained service
technician
and any repair made.
2. Put the oven on a cay, counter, table or shelf
that is strong enough to hold the oven, the food
and the utensils you put in it. (The control sfde of
fhe unlt is the heavy side. Use care when handllng.) The weight of the oven is approximately
59 Ibs. (26.76 kg].
TOP
SIDE
3. Do not block the vent openings
at the
front of the oven or the air intake opening
on the bottom or rear of the oven. Blocking
vent or air intake openings can cause poor
cooking results.
-pI
SIDE
4. Do not install the oven next to a conventional surface unit or in any area where
excessive
heat and steam are generated.
This could damage
the outside of the cabinet.
Make sure the microwave
oven legs are in
place. Do not set the oven on anything that
will block the air intake openings.
9
5. Electrical
requirements
Observe all governing
codes and ordinances.
A 120 Volt, 60 Hz., AC only, 15 or 20 amp fused electrical
supply is required. (Timedelay fuse is recommended.]
It is recommended
that a separate circuit serving only this
appliance
be provided.
6.
GROUNDING INSTRUCTIONS
Improper
use of the grounding
plug can result in a risk of
’ electrical
shock.
DO NOT, UNDER ANY CIRCUMSTANCES,
REMOVE THE POWER
SUPPLY CORD GROUNDING
PRONG.
WARNING.
7. For your personal safety, this appliance
must
be grounded.
In the event of an electrical
short
circuit, grounding
reduces the risk of electric
shock by providing an escape wire forthe electric current. This appliance
is equipped
with a
l-PRONG
GROUNDING
PLUG
WALL RECEPTACLE
GROUNDING
polarized
J-prong grounding
plug. It must be
plugged
Into a correct
polarized
mating 3prong grounding
type wall receptacle,
properly installed
and grounded
in accordance
with the National
Electrical
Code and local
codes and ordinances.
If a mating wall receptacle is not available
or if you are not sure if the
w
‘8.
Plug the oven into the proper electrical outlet and put about one cup
1250 ml) of cold water in a alass container in the
&en. Ciose the door. Make sure it latches. Follow the directions on page 6 to set the oven to
COOK for T/Z minutes. When the time is up, the
water should be heated.
wall receptacle
is properly grounded
and polarized,
have
it checked
by a qualified
electrician.
It is the personal responsibility
and obligation
of
the customer to have a properly grounded
and
correctly polarized
3-prong wall receptacle
installed by a qualified
electrician.
Consult a qualified electrician
if the grounding
instructions are not completely
understood, or if
doubt exists as to whether the appliance
is
properly grounded.
It is NOT recommended
to use an extension
cord with your microwave
oven, but if you find
it necessary
to do so temporarily
(until a
properly
grounded
and polarized
3-prong
receptacle
is installed),
use only a heavy
duly UL listed 3-wire grounding
type extension cord containing
three 16-gauge
(minimum) copper
wires. It must not be longer than
10 feet [cords longer than 10 feet may affecl the
cooking
performance
of your microwave
oven). The plug on the extension cord must fit
into a 3-prong grounding
type wall receptacle
[as shown on this page) and the receptacle
end of the extension cord must accept the 3prong grounding
plug of the microwave
oven.
9. This microwave
oven is designed
for use in
the household
only and must not be used for
commercial
purposes.
- .
DO NOT remove the outer case, door, or control panel at any time. The unit is equipped
with
high voltage and should not be serviced unless
bv an authorized
Whirloool
trained
service
technician.
SAVE THESE INSTRUCTIONS
Building
in your microwave oven
Your microwave
oven is not limited to carts, counters
easy with kits available
from Your dealer.
1. Build the microwave oven into a cabinet or
wall by itself or over built-in single ovens in the
Whirlpool RDE, REE,RGE. RB and SB model series or
Imperial 7200 single gas ovens
2. Attach the mrcrowave
or with cabinets over It.
oven to a wall by itself
3. Put the microwave
oven on the MICRO SHELF*
Hood over a cooktop. The hood is available
ducted or as a recirculating
hood, and includes
cooktop lights
or tables. Custom installations
Ask Your dealer
for details
are made
on...
832987 -30-inch
Built-in Kit
l 832989
- 24-inch Built-in Kit
l 832991-27-inch
Built-in Kit
l 832993 -Wall
Mounting Kit
. RH3330XR - MICRO SHELFR Hood
Use only approved
installation
kits.
Obtain these kits from your authorized
Whirlpool
dealer.
l
Caring for your microwave oven
Cleaning the microwave oven
Wrpe often with warm sudsy
water and a soft cloth or
sponge
For stubborn soil, boil a cup
of water in the oven for 2 or 3
minutes Steam will soften
the soil
Be sure to cleyn the areas
where the door and oven
frame touch when closed.
When cleaning
surfaces of
door and oven that come together on closing the door,
use only mild, non-abrasive
soaps or detergents applied
wrth a sponae or soft cloth.
Rinse well. -
Caution:
Abrasive cleansers, steel ‘wool pads, gritty wash cloths. etc can damage
the control
panel, electronics, and the interior and exterior oven surfaces Use a soft cloth or a
sponge with a mild detergent or spray glass cleaner
Replacing the light bulb
The microwave
To replace:
oven light should come
on whenever
1. Unplug, or turn off at fuse box or circuit
breaker.
2. Open the oven door.
3. Remove the 3 screws from the front of the
stirrer cover.
4. Pull down the front portion of the cover.
(It is creased across its width to form a hinge.)
5. Replace bulb with a 25-watt candelabra
base bulb (FSP 313760). Obtain bulb from
Your authorized
Whirlpool dealer.
6. Close the cover and replace
the screws
7. Plug in, or turn on the marn power
supply.
the door is opened
or the oven is operating
How your microwave oven works
Mtcrowave
heat, and
ovens are safe Microwave
energy
It’s this heat that cooks the food
Mode
Oven
Mixer
IS not hot
It causes
food
to make
Ceramic
Magnetron
Cavity
Its own
Bottom
Metal’Floor
Mrcrowaves
are like TV
waves
or light waves
you
can’t see them but you can
see what they do
A magnetron
In the mrcrowave oven produces
mrcrowaves
The microwaves
move into the oven where
they are scattered
or stirred
by a mode mrxer (like a fan]
Microwaves
bounce
off
metal oven walls and are
absorbed
by food
The ceramic
bottom
of your
mlcrowave
oven lets mrcrowaves
through
Then they
bounce
off a metal floor,
back through
the ceramic
bottom
and are absorbed
by the food
Microwaves
pass through
glass, paper
and plastic
without heating
them so food absorbs the energy
Microwaves
bounce
off metal pans so
food does not absorb
the
energy
Microwaves
may not reach
the center
of a roast The heat
around
the outstde
IS what
cooks the roast all the way
through
This IS one of the reasons for IeHing some foods
(roasts. baked
potatoes)
stand for a while after cooking, or for stirring some foods
during
the ccoking
time
The microwaves
drsturb
water molecules
in the food
As the molecules
bounce
around
bumping
into each
other, heat is made, like rubDing your hands together
This is the heat that cooks.
12
If you need service or assistance,
we suggest you follow these four steps:
If you need service?..
1. Before calling for assistance...
3.
Performance
problems
things you can find and
of any kind
Whirlpool
has
a
nationwide
network of franchised
TECH-CARE@
service
Companies.
TECH-CARE service
technicians
are
trained
to fulfill the
product
warranty
and provide
afterwarranty
servlce. anywhere
in the United States.
To locate
TECH-CARE sewIce
in your area, call
our COOL-LINE
service
assistance
telephone
number
[see Step 2) or look In your telephone
directory
Yellow Pages under-
If nothing
often
result from llt’le
fix yourself
without tools
operates:
l
Is the power supply
cord plugged
into a live
circuit with the proper
voltage?
[See page 10)
l
Have you checked
your
circuit breaker
box?
9 Have you checked
a power
failure?
If the microwave
home’s
the electric
main
fuses or
company
for
oven will not run:
Is the Timer set?
9 Is the door firmly closed
and latched?
l Did
you push the START Button?
l Did
you follow
the directions
on page
exactly’
l
If the microwave
long:
l
l
l
cooking
times
seem
6
too
Is the electric
supply
to your home
low or
lower
than normal’
Your electric
company
can tell you It the line voltage
IS low
Is the Cook Power set correctly?
Are you allowing
for more time when cooking
more food at one time?
APPLIANCES-HOUSEIiOLDMAJORSERVICE h REPAIR
OR
ELECTRICAL
APPLIANCESMAJORREPAIRING
6 PARTS
WHIRLPOOLAPPLIANCES
FRANCHISED TECH CARL SERVICE
WHIRLPOOL APPLIANCES
FRANCHISED TECti.CARE SERVICE
SERVICE
XYL SkRVICE CO
123Map1e
SERVICE
XYZ SERVICE CO
123 Maple
rOMIJ.%x,t
995.9999
COMPANIES
999.9999
OR
WASHING MACHINES.
DRYERS
L IRONERSSERVICING
WHIRLPOOL APPLIANCES
FRANCHISED TECH CARE SERVICC
.SEXVI(‘E
XYZ SERiICE CO
123 Mapie
COMPANIES
999 9999
2. If you need assistance?..
4. If you have a problem?..
Call the Whirlpool
sistance telephone
Continental
U.S.
Michigan
Alaska & Hawaii
Call our COOL-LINE
service
assistance
telephone number
(see Step 2) and talk with one of
our Consultants,
or if you prefer, write to:
Mr. Stephen
E. Upton
Senior Vice President
Whirlpool
Corporation
Administrative
Center
2000 US-33 North
Benton Harbor,
Ml 49022
COOL-LINE@’ service
asnumber. Dial free from:
(800) 253-1301
(800) 632-2243
.
(800) 253-1121
and talk with one of our trained
Consultants
The
Consultant
can instruct you on how to obtain
satisfactory
operation
from your appliance
or. If
service
IS necessary,
recommend
a qualified
service
company
In your area
0
FSP
will
mode
used
111 ughl
to the
to build
FSP 1s o reglstered
trademark
of Whfrlpool
Corporot~on
for
quollfy
parts
took
lor lhls
symbol
of quality
whenever
you need
o replacement
port
8
for your Whirlpool
oppl~once
FSP replacement
ports
and
work
right
because
they
ore
some
every
*If you must call or write, please
provide.
model
number, serial number, date of purchase,
and a
complete
description
of the problem.
This information
IS needed
in order to better respond
to
your request
for assistance.
exoctlng
speclflcotlons
new Whirlpool
oppl!once
13
Notes
14
Notes
15
Home % Appliances
Maklng your world a little easer
Part No. 313664
,I985 Whirlpool
Makers
Dishwashers.
Built-In
Ovens
Corporation
and Surface
Units,
Printed in U.S.A.
Ranges.
MIcrowave
Ovens.
Trash Compactors,
Room Air Condltloners,
Dehumldlflers.
Automatic
Washers.
Clothes
0