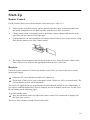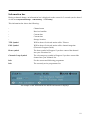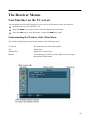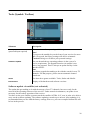
1
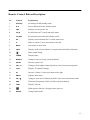
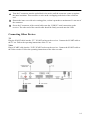
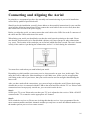
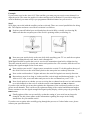
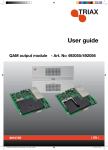
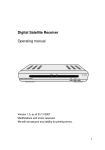
TRIAX SR 110
Digital satellite receiver
350008
User Guide
2
Contents
Introduction........................................................................................................................................5
Nice to know ................................................................................................................................5
Typographical Conventions .........................................................................................................6
Safety Instructions .............................................................................................................................7
Batteries .......................................................................................................................................8
Disposal........................................................................................................................................8
Device Overview: SR 110 ..................................................................................................................9
Front Panel ...................................................................................................................................9
Rear Panel ....................................................................................................................................9
Remote Control ..........................................................................................................................10
Remote Control Button Description ..........................................................................................11
Package Supplied .......................................................................................................................12
Connecting the Receiver..................................................................................................................13
Fitting the Aerial Cable..............................................................................................................13
Connecting Other Devices .........................................................................................................14
Connecting and Aligning the Aerial ...............................................................................................16
Start-Up.............................................................................................................................................18
Remote Control ..........................................................................................................................18
Receiver .....................................................................................................................................18
Information bar ..........................................................................................................................19
The Receiver Menus.........................................................................................................................20
User Interface on the TV screen ....................................................................................................20
Understanding the Window of the Main Menu .........................................................................20
Navigating through the Menus...................................................................................................21
Menu Structure...............................................................................................................................21
Channel (Symbol: TV set) .........................................................................................................22
Favourite ................................................................................................................................23
Move ......................................................................................................................................23
Find ........................................................................................................................................23
Sort .........................................................................................................................................23
Edit .........................................................................................................................................23
Type .......................................................................................................................................24
Installation (Symbol: Satellite aerial) ........................................................................................24
System Setup (Symbol: Receiver) .............................................................................................26
Timer......................................................................................................................................27
Tools (Symbol: Toolbox)...........................................................................................................28
Software update via satellite (not activated) ..........................................................................28
Special Function Keys......................................................................................................................29
TV/SAT......................................................................................................................................29
TV/RADIO.................................................................................................................................29
ZOOM........................................................................................................................................29
LIST ...........................................................................................................................................29
AUDIO.......................................................................................................................................29
EPG ............................................................................................................................................29
TEXT .........................................................................................................................................30
3
M/P (Multipicture) .....................................................................................................................30
MUTE ........................................................................................................................................30
FAV............................................................................................................................................30
RECALL ....................................................................................................................................31
INFO – Acoustic signal for aligning the satellite aerial.............................................................31
0 key – Sleep timer.....................................................................................................................31
Disassembly and Cleaning...............................................................................................................32
Disassembly ...................................................................................................................................32
Cleaning .........................................................................................................................................32
Troubleshooting ...............................................................................................................................33
Technical Data..................................................................................................................................35
Manufacturer ...................................................................................................................................36
Declaration of Conformity .............................................................................................................36
Glossary ............................................................................................................................................37
4
Introduction
This user guide intends to provide you with knowledge of how your new digital satellite receiver
(called a receiver for short) functions.
We assume that you have a general knowledge of how to handle electrical and electronic consumer
equipment such as television, radio, video cassette recorder and DVD-player.
To make sure that you will be familiar with your new receiver and that you will be able to use all
the advanced features, please read this user guide carefully and have it ready for later reference.
Nice to know
You can use this receiver for receiving unencrypted digital satellite programmes via a satellite
aerial. To use this receiver you need to have a suitable satellite aerial. The satellite aerial must be
mounted and aligned to the desired satellite.
The pre-programming of the receiver has been extensive in order to provide you with easy access to
all your favourite channels.
As new channels may be introduced regularly it is advisable to scan the satellites to detect new
channels.
All operations are easy to carry out using the remote control and the user interface (menu) on the
TV screen.
The multilingual user interface supports the following languages:
•
English
•
French
•
Turkish
•
Spanish
•
Italian
•
Portuguese
•
German
•
Greek
•
Croatian
•
Czech
•
Danish
•
Dutch
•
Hungarian
•
Norwegian
5
•
Polish
•
Slovakian
•
Swedish
•
Slovenian
•
Finnish
Ex works the following satellites are pre-programmed:
•
Astra1 19E
•
Hotbird 13E
•
Türksat 42E
•
Sirius2 5E
•
Amos/Atlantic 4-5W
•
Astra2 28E
•
HispaSat 30W
•
Eutel W2 16E
•
HellaSat 39E
•
Astra 23,5E
Typographical Conventions
In the following you can read about the typographical conventions used in the user guide. You can
easily distinguish whether the text is
normal text,
•
organization of facts, or
instructions on how and what to do
- names of menus, submenus, names of icons, buttons etc. displayed on the screen and
the remote control are written as shown in the example at the beginning of this sentence.
Menu names
6
Safety Instructions
Always follow the safety instructions below to avoid the risk of injury to yourself or damage to
your equipment.
•
In order to ensure adequate air circulation, place the receiver on a smooth, flat surface, and do
not place any articles on the top of the receiver. Ventilation slots designed to assist circulation
and to allow heat to dissipate from the receiver are located here.
•
Do not place the receiver on an unstable cart, stand, tripod, bracket, or table. The receiver may
fall, causing serious personal injury and damage to the receiver.
•
Never place the receiver near or over heat sources such as heating appliances.
•
Do not place the receiver in an enclosure such as a cabinet without proper ventilation.
•
Do not stack the receiver on top of or below other electronic devices.
•
Do not place the receiver where it is exposed to direct sunlight and avoid places with
unusually high amounts of dust.
•
Operate the receiver using only the type of power source indicated on the marking label.
Unplug the receiver by gripping the electric plug and not the power cable.
•
Lay the power cable and the aerial cable in such a way that nobody can tread on them or trip
over them.
•
Use only wall sockets that have been put up by qualified specialised staff.
•
Do not place burning objects such as lighted candles on top of the receiver.
•
Do not splash it with a liquid, or place any liquid-filled containers such as vases on the top of
the receiver.
•
It is recommended that you unplug the receiver from the mains socket and the antenna in case
of a thunderstorm or when left unused for long periods of time.
•
Do not remove the cover of the receiver. Always have servicing work done by qualified
specialised staff. Otherwise you are endangering yourself and others.
Disconnect the mains plug from the power socket immediately and contact specialised staff:
•
if the power cable is damaged or the power switch is malfunctioning
•
if the receiver has been exposed to foreign bodies or liquid
•
if there is an operating malfunction
•
if the cover has been damaged
The receiver is used for receiving unencrypted digital satellite channels (free-to-air) in the private
sphere. It is exclusively intended for this purpose and may only be used for this. This also includes
adherence to all information in this operating manual, in particular the safety instructions.
Any other use is deemed to be not as intended and can lead to damage to property or even personal
injury. In addition it means the immediate invalidation of the warranty.
The manufacturer accepts no liability for damage which arises from use which is not as intended.
7
Batteries
For the remote control you need two batteries of the micro type: AAA/1.5 V. In connection with the
batteries please pay attention to the information below
•
Observe the prescribed polarity when you put batteries into the battery compartment.
•
Always change both batteries at the same time and use batteries of the same type.
•
Change batteries that are becoming weak in good time.
•
Leaking batteries can cause damage to the remote control. If the receiver is not used for a long
time, take the batteries out of the remote control.
•
Batteries can contain toxins. Take care that the batteries do not get into children’s hands.
Children might put batteries in their mouths and swallow them.
Disposal
Under no circumstances throw the receiver and batteries away in the normal household refuse.
Enquire at your municipal or community council about the possibilities for disposing of the device
in an environmentally sound and appropriate way. Hand the used batteries in at a collection point.
8
Device Overview: SR 110
Front Panel
Rear Panel
9
Remote Control
10
Remote Control Button Description
No.
Symbol
Explanation
1
Standby
Switching on and standby mode
2
0-9
Select channel directly/ Number input
3
FAV
Display own favourites list
4
TV/R
Switch between TV mode and radio mode
5
TV/SAT
Switch between normal and satellite aerial
6
OK
Display current channel list/ Confirm menu item
7
V-
Reduce volume/ Cursor movement to the left
8
BACK
Quit menu or menu item
9
INFO
Display of the current channel’s reception data (Sat-finder function)
10
Mute sound setting
11
TIMER
Display timer
12
RECALL
Change to the previously selected channel
13
ZOOM
Increase picture size
14
CH+/▲
Change to next higher channel position/ Cursor movement upwards
15
LIST
Display TV channel listings
16
V+
Increase volume/ Cursor movement to the right
17
MENU
Display main menu
18
CH-/▼
Change to next lower channel position/Cursor movement downwards
19
EPG
Electronic Programme Guide (if offered by broadcaster)
20
TEXT
Display Teletext
21
22
Multi-picture function , display picture preview
AUDIO
Change audio mode
11
Package Supplied
Check the package supplied after purchase:
No.
Quantity
Explanation
1
1
Receiver
2
1
Remote control
3
2
Batteries type AAA/1,5 V
-
1
Operating manual (not shown)
Note that:
•
The coaxial and SCART cables are not included in the package supplied.
12
Connecting the Receiver
Do not connect the receiver to the mains power supply until you have connected it properly to
all devices and to the aerial. Otherwise the receiver may be damaged.
The wire mesh and the inner wire of the coaxial cable carry electrical current during
operation.
Fitting the Aerial Cable
The receiver is connected to your satellite aerial via a coaxial cable and the F-connector.
For fitting the F-connector onto the coaxial cable you need wire strippers and wire-cutting pliers.
Cut 8 mm of coaxial cable at each end down to the inner core.
Carefully strip 10 mm of the outer insulation off, so that the wire mesh is free.
Peel the wire mesh back over the outer insulation, so that it is not touching the inner wire.
Remove the inner insulation up to 2 mm in front of the wire mesh.
13
Turn the F-connector onto the peeled-back wire mesh, until the connector comes up against
the inner insulation. There must be no wire mesh overlapping at the back of the connector
end.
Shorten the inner core with wire-cutting pliers, so that it protrudes a maximum of 1 mm out of
the connector.
Screw the F-connector of the coaxial cable onto the “LNB IN” aerial connection on the
receiver. The other end of the coaxial cable should be firmly screwed onto the LNB.
Connecting Other Devices
TV
Plug the SCART cable into the “TV” SCART socket on the receiver. Connect the SCART cable to
the TV set. Follow the operating instructions of the TV set.
Video
Plug a SCART cable into the “VCR” SCART socket on the receiver. Connect the SCART cable to
the video recorder. Follow the operating instructions of the video recorder.
14
Stereo system - analogue
If you wish to connect a stereo system, connect the cinch connector of the cinch cable with the
“AUDIO R” and “AUDIO L” sockets of the receiver. Follow the operating instructions of the stereo
system.
Never connect the phono input of your stereo system with the receiver, which can
destroy your stereo system.
Stereo system - digital
If you want to use the 5-channel audio transmission (Dolby Digital Sound/AC3), you must connect
your digital audio amplifier/receiver with the coaxial output of the receiver. Plug the coaxial cable
into the “COAXIAL” connection on the receiver. Connect the coaxial cable with the digital audio
amplifier/receiver. Follow the operating instructions of your digital audio receiver/amplifier.
15
Connecting and Aligning the Aerial
In principle we recommend you have the assembly and commissioning of your aerial installation
carried out by qualified specialised staff.
Should you do the installation yourself, please adhere to the assembly instructions for your satellite
aerial and the following instructions. Please connect the aerial cable to the receiver first, then after
this connect the receiver to the power supply.
Before you align the aerial, you must connect the aerial cable to the LNB. Screw the F connector of
the cable onto the LNB connection of the aerial.
When fitting your aerial you should take care that the aerial must be pointing to the south. Please
note that the aerial must never be fitted behind a balcony rail, house parapet or other obstructions
(e.g. trees). The location of the sun helps you to find out which direction is south. The sun is located
exactly in the south at 1 pm during the summertime, and at 12 o’clock during the wintertime.
You must face south when you stand behind your aerial.
Depending on which satellite you want to receive, there must be an open view in this angle. This
must above all be adhered to when installing to a wall. Make sure, before you fix an appropriate
wall fitting to the wall of your house, that your aerial can also turn far enough without hitting the
house wall.
After you have made all the connections, you can now begin to align the aerial. Please check again
whether the receiver is connected with the LNB on the aerial and also with the TV set. If these cable
connections have been properly carried out, you can switch on the device.
Step 1:
Switch your TV set on. Please take care that your TV set is adjusted to the receiver. With a SCART
connection the TV set must be on the appropriate AV channel.
Step 2:
Now switch the receiver on. Please note in doing this that the receiver is pre-programmed for the
most common satellites and their channels and that you only have to enter the channel numbers via
the number pad on your receiver remote control
16
Example:
If you want to receive the Astra 19.2° East satellite, you must put your receiver onto channel 1 to
align the aerial. The same also applies for other satellites such as Hotbird. If you wish to align your
aerial to Hotbird, you must call up a pre-programmed Hotbird channel on your receiver.
Step 3
Now align your aerial with the satellite you have selected. There are several possibilities for doing
this. The simplest and most cost-effective solution is as follows:
Position yourself behind your aerial and place the aerial fully vertically (see drawing B).
Make sure that the reception part of the aerial is pointing south (see drawing A).
Drawing A
Drawing B
Now turn your aerial slowly to the east (left) while watching your TV set, until the reception
part is pointing directly east, that is, turn it through 90°.
With digital satellite reception the receiver receives the transmitter signal with a slight time lag.
Therefore turn the aerial very slowly and wait at each position for a few seconds, until the receiver
displays the signal strength on the screen menu.
Now position your aerial 1° (degree) more towards the vertical. To do this pull on the top of
the aerial. Now move the aerial slowly back to the start point in a southerly direction.
Now set the aerial another 1° higher and move the aerial left again in an easterly direction.
Repeat these steps for as long as it takes until the vertical angle and horizontal angle, e.g. for
Astra at 19.2° east, cross each other and you receive the set channel on your TV set.
Now check again as to whether you are receiving the set channel on the receiver and continue
to switch channels on the receiver with the remote control CH+/▲ and CH-/▼ buttons.
If you have the satellite you want, then optimise the alignment of the aerial until you have a clear
picture on all channels. This is achieved by optimum setting of the vertical and horizontal angles.
Please continue to use the signal strength and signal quality display, which you get by pressing the
INFO button.
Finally tighten all the screws carefully, so that the setting of your aerial can no longer be
changed. For this please adhere to the information regarding the torque in the fitting
instructions for your satellite aerial.
If you have no reception after carefully going through the process or if other faults occur, please
contact your specialist dealer.
17
Start-Up
Remote Control
For the remote control you need two batteries of the micro type: AAA/1.5 V.
•
Observing the prescribed polarity, put two batteries into the battery compartment and close
the battery compartment cover again carefully until the cover locks in position.
•
Change batteries that are becoming weak in good time. Always change both batteries at the
same time and use batteries of the same type
•
Leaking batteries can cause damage to the remote control. If the receiver is not used for a long
time, take the batteries out of the remote control.
•
The remote control transmits infrared signals to the receiver. Point the remote control at the
front of the receiver and press the appropriate button once for a short time.
Receiver
Check the proper connection of all devices and the aerial, before you connect the receiver to the
mains power supply.
Switch the TV set on and then switch the AV channel on.
On the back of the receiver, turn on the mains switch. The device will be in normal mode. The
current channel position will be displayed.
The receiver is supplied with pre-programmed television channels and can be used immediately. If
you want to establish whether there are new channels, activate a channel search scan. For this, read
the information on the following pages.
To go into standby mode:
Press the red button on the top right of the remote control. The current time is displayed on
the front of the receiver.
The device only consumes around 2 watts in this mode.
18
Information bar
During a channel change, an information bar is displayed on the screen for 5 seconds (can be altered
via the menu System Settings – OSD Setting – OSD Delay).
This information bar shows the following:
-
Channel name
-
Received satellite
-
Current date
-
Current time
-
Storage location
TTX Symbol
Will be shown if selected station offers Teletext
EPG Symbol
Will be shown if selected station offers channel magazine
(Electronic Program Guide)
Heart symbol
The heart symbol will appear if you have entered the channel
into your favourites list
Channel Group Symbol
The relevant group symbol will appear if you have entered the
channel into your channels list.
Info
For the current and following programme
Info
The currently active programmes list
An example of the information bar and the information it displays.
19
The Receiver Menus
User Interface on the TV screen
You can adjust the individual settings of your receiver via the menus of the user interface.
Switch on the receiver and the TV set.
Press the MENU key on your remote control to display the main menu
Press the EXIT key to leave this menu, or press the MENU key again.
Understanding the Window of the Main Menu
The window displaying the main menu consists of the following areas:
To the left
The main menu presented by symbols
Top
Menu name
Followed by
Submenus or menu items
Bottom
Area showing you the keys with which you can navigate
through the current menu
20
Navigating through the Menus
You can navigate through the menus using the CH+/▲ and CH-/▼, V+ and V-. The chosen menu
items will be marked. Selection is via the OK key on the remote control. Some of your changes may
have to be confirmed via the OK key. You can leave the menus using the EXIT key.
In every menu, you will find an area at the bottom which will show you the selection options
assigned to the various buttons on the remote control.
Example: Set Receiver to Summer Time
•
Press Menu key on the remote control.
•
Select System Setup using the CH+/▲ and CH-/▼ keys.
•
Select Time & Timer Settings and press the OK key.
•
Select Time and press the OK key.
•
Under the menu item GMT-offset shift to ”GMT+02:00”.
•
Press the EXIT key to leave the menu.
Settings for Central Europe:
Summer time: GMT+02:00
Winter time: GMT+01:00
Menu Structure
Main menu
Submenu
Explanation
Language
Language list
Selecting the language of
OSD menus
TV Channel List
See following text
Radio Channel List
See following text
Delete All
See following text
Antenna Setup
See following text
TP Scan
See following text
Preset Scan
See following text
Auto Scan
See following text
Audio Language
See following text
(Symbol: relevant country flag)
Channel
(Symbol: TV set)
Installation
(Symbol: Satellite aerial)
System Setup
21
(Symbol: Receiver)
TV System
See following text
Channel Setup
See following text
Time & Timer Setting
See following text
OSD Setting
See following text
Parental Lock
See following text
LNB Power
See following text
Tools
Factory Reset
See following text
(Symbol: Toolbox)
Software Update
See following text
Game
See following text
Information
See following text
Channel (Symbol: TV set)
Submenu
Description
TV Channel List
1 Favourite, 2 Move, 3 Find, 4 Sort, 5 Edit, 6 Type, CH+/▲ CH-
/▼ Select, Green/yellow button Group, OK Enter, BACK Back
Radio Channel List
As above.
Delete All
Deleting the whole programme list. To do so: Input password
(Factory setting 0000) and confirm warning message query with
Yes.
22
Favourite
Having selected a channel you determine your favourite by pressing the 1 key. Next to the relevant
channels, a heart symbol will appear.
Move
When the 2 key is pressed, the move symbol appears behind the selected channel. Using the CH▲
CH▼ keys, the channel is moved to the required location. The action must be confirmed with OK.
Find
Channel search function. Channels can be found selectively by entering alphabetic characters on the
OSD keyboard.
Sort
Sorting the complete channel list according to options on offer. The list must be confirmed with OK.
As long as nothing has been confirmed, the last status before confirmation is still valid.
Edit
After inputting the password (Factory setting 0000), new selection options appear.
Submenu
Description
Edit
1 Delete, 2 Skip, 3 Lock, 4 Create, 5 Edit, 6 Delete, CH+/▲ CH-
/▼ Select, Green/yellow button Group, V- V+ Page, BACK Back
Delete
Using the 1 key, the selected channels can be marked for deletion. Please confirm the selection
using the OK key.
23
Skip
Using the 2 key, selected channels can be marked for skipping. Selected channels will then be
jumped during zapping (channel hopping). Please confirm the selection using the OK key. You can
still see the channel if you press the channel number.
Lock
Using the 3 key, selected channels can be marked for locking. Please confirm the selection using
the OK key. Access to marked channels will then require a password (protection of children).
Create
You can get into edit mode via the 4 key. Here you can change the individual parameters as you
like. Please confirm the selection using the OK key
Edit
Using the 5 key, you can enter a new channel by directly inputting a frequency and the PID.
Delete
Using the 6 key, all channels can be marked for deletion. Thereafter, individual channels can be
removed from the selection using the 1 key. Please confirm the selection using the OK key.
Type
Here, you can allocate selected channels to certain channel groups (types) as you like. Please
confirm selection using the OK key.
You can leave the menu by pressing the EXIT key.
Installation (Symbol: Satellite aerial)
24
Submenu
Description
Antenna Setup
Satellite
Satellite selection
(e.g. Astra1° East).
LNB type
Select LNB type
(Standard setting is ”Universal”).
22K
Activating 22KHz
(Note: With LNB type ”Universal” the
activation is automatic)
DiSEqC
Select DiSEqC level
DiSEqC Switch
Select DiSEqC command
Example:
Astra og Hotbird double reception
Astra = 1/4
Hotbird 2/4
Positioner
You can access the DiSEqC motor control
menu via the OK key. Please consult the
operating guide of your DiSEqC motor.
Polarity
”Horizontal”, ”Vertical”, ”H/V”
(automatic)
TP Scan
(manual channel search run)
Preset Scan
With this search function, you can search the pre-set frequencies
(transponder) individually. The transponder data can be changed
manually. The search is started by pressing the OK key to Search.
Searching through pre-programmed frequencies (transponder).
(Normal automatic search run).
Here, you can search completely through a selected satellite (e.g.
Astra1 19° East) for new channels. No particular details are
(unique function, can be
carried out without any prior required for this. You can choose to search for free or all TV and
radio channels. The search is started by pressing the OK key to
knowledge)
Search.
Auto Scan
Particularly recommended for Türksat.
25
System Setup (Symbol: Receiver)
Submenu
Description
Audio Language
First audio
Pre-selection of audio language (if offered by
channel).
Second audio
Pre-selection of audio language (if offered by
channel).
Display mode
Selection of transmission system. Standard
selection: PAL
Aspect mode
Selection of image format.
Standard selection: 4:3 (Letterbox)
Video Output
Only the video signal CVBS is offered.
Dolby digital
Only if the receiver is connected to a digital
amplifier via the coaxial digital output will you
activate this function.
Channel Setup
Startup Channel
Determination of the desired TV or radio switch-on
channel.
Time & Timer Setting
Time
Possibility of time and time zone. (See the example
of how you set the receiver to summer time).
Timer
See following section.
Subtitle display
Activating subtitle.
OSD timeout
The number of seconds the information bar is
displayed when you switch over channels.
OSD transparency
Transparency of menu and information bar.
Load default OSD
OSD factory setting can be restored.
TV System
OSD Setting
26
setting
Parental Lock
LNB Power
Factory password is: 0000
Installation Lock
Switching password input on/off in the main menu
item Installation.
Channel Lock
Switching password input on/off for locked
channels (child protection).
New password
Determining a new password (new password must
be remembered).
Gonfirm password
Confirm new password.
Switching LNB power supply on and off. Preset is ”On”.
Timer
Submenu
Description
Timer number
Selection of timer number 1-8.
Timer mode
Type of repetition (Once, Daily, Weekly, Monthly, Annually, Off). If set
to “Off”, the timer is de-activated.
Timer service
Switching between the functions TV channels, radio channels and
reminder.
Wakeup channel
If Timer service setting is ”Message”, the options are : Birthday,
Anniversary, General.
If Timer service setting is ”TV Channel” or “Radio Channel”, you can
choose between the various channels when you have pressed the OK key.
Having marked the desired channel press the OK key to select it.
Wakeup date
Date input.
On time
Time input.
Duration
Duration of switched-on time.
The timer can also be programmed via the EPG mode.
Example
•
Press the EPG key.
•
Using the 1 key you will receive an events list..
•
With the CH+/▲ CH-/▼ keys you can select the desired event.
•
Use the 2 key to transfer it directly to the timer.
27
Tools (Symbol: Toolbox)
Submenu
Description
Factory Reset
Reset receiver to factory settings. All changes are reset.
Note!
If you press the standby key on the front of your receiver for more
than 10 seconds, the factory settings will also be reinstated.
Caution!! Doing so will delete your personal settings.
(password input required)
Software Update
You can download new operating software in the event of a
service requirement. The upgrade function via satellite is not
active, but prepared. There is always an update facility via the
interface RS232.
Note
A software upgrade has nothing to do with the search for new TV
channels. For that purpose, please start an automatic channel
search run.
Game
You have three games available: Tetris, Snake and Othello.
Information
Display of the hardware and software versions.
Software update via satellite (not activated)
The update has got nothing to do with the storage of new TV channels, but serves only for the
renewal of the operating software of the receiver. Under normal circumstances, an update is not
necessary for the orderly operation of the receiver.
You have to aim your satellite system towards the satellite ASTRA 19.2° east, in order to be able to
carry out the software updating. The software updating can take up to an hour. After updating, it is
recommended that you also load the factory settings; however, your own compiled channel list will
be lost in the process.
28
Special Function Keys
TV/SAT
Using this key, you can switch between TV function and satellite function. (This function must be
available on your TV set, however).
Press the TV/SAT key repeatedly, until the desired function is achieved.
TV/RADIO
With this key you can switch between TV function and DVB radio function. The receiver is now
transmitting a radio channel and displaying a background image.
Press the TV/RADIO key repeatedly, until the desired function is achieved.
ZOOM
You can enlarge an image section using the zoom function.
Press the ZOOM key twice.
You can select the image section using the keys CH+/▲CH-/▼, V- V+.
Every time you press the ZOOM key, the image section will be enlarged in maximum 6 stages.
When you press the key for the seventh time, the image returns to its original size. You can leave
this mode using the EXIT key.
LIST
As already described above under the section “Channel”, you have the opportunity here to edit the
channel list.
Press the LIST key once.
AUDIO
Using the Audio key, you can select the sound track if a channel offers multi-channel sound.
Furthermore, here you can activate the Dolby Digital mode for which you will need additionally a
Dolby Digital system; the connection is made at the rear of the unit via the coaxial socket.
EPG
This key activates the Electronic Program Guide which provides you with detailed information for a
selected event.
Press the EPG key to activate this function.
Using the CH+/▲ CH-/▼ keys, you can choose an event.
29
On the right-hand side, the current and following event is indicated.
Press the 1 key to display the complete events list.
Using the V- V+ keys, you can scroll through the days, and using the CH+/▲ CH-/▼ keys, you
can scroll back and forth through the events.
Press the 1 key to obtain detailed information for a selected event.
Using the 2 key, you can transfer this directly into the timer.
TEXT
In order to receive Teletext, the selected channel must support this function. When changing
channels, the TXT symbol will be displayed.
Press the TEXT key to switch on Teletext.
Press the EXIT key or the TEXT key to switch off Teletext.
Fasttext functions
The coloured keys on the remote control unit are used for Fasttext navigation and will become
active after calling up a further Teletext page.
M/P (Multipicture)
In multipicture mode an outline of 9 channels in parallel will appear, starting with the current
channel.
Use the CH+/▲ CH-/▼ and V- V+ keys to navigate the yellow marking. The marked channel
is in real time, the non-marked channels show only still pictures.
Press the OK key to activate the desired channel.
Press the EXIT key to leave the multipicture mode. The channel that was marked last will
appear as a full image on your screen.
MUTE
This key switches off the sound.
Press the MUTE key to switch off the sound. When pressing the key again, the sound is
switched on again.
FAV
This key displays a list of your specified favourites.
Press the FAV key. On the screen will appear a list of your specified favourites.
Use the CH+/▲ CH-/▼ keys to navigate, and press the OK key to select the marked channel.
Using the V- V+ keys you can switch between the channel groups.
30
RECALL
This key takes you back to the previously chosen channel.
Press the RECALL key to return to the previously chosen channel.
INFO – Acoustic signal for aligning the satellite aerial
This key is used for aligning the satellite aerial via an acoustic signal. Besides the current reception
parameters, you will also be shown signal strength and signal quality. In addition, you can activate
an acoustic signal using the 1 key that will be output via the TV set. The louder and higher the
signal, the better the aerial is aligned
0 key – Sleep timer
During normal operation, you can access the sleep timer via the 0 key (zero key). The following
settings are available: switched off, 10, 30, 60, 90, 120 minutes. After this time, the receiver will be
switched off automatically
31
Disassembly and Cleaning
Disassembly
•
Separate the receiver and the connected units from the power supply.
•
Unscrew the LBN cable from the receiver.
•
Remove the batteries from the remote control unit if you are not going to use the receiver for
quite some time.
•
Pack the receiver, the cables and the remote control unit in the carton.
•
Store the receiver and all accessories in a dry and dust-free place.
•
Protect the receiver against frost.
Cleaning
The receiver must not get wet. Never clean it with a wet cloth only with a dry cloth.
Do not use any cleansing products containing solvents like petrol or thinners. These can damage the
surface of the housing.
32
Troubleshooting
Symptom?
Cause?
Remedy
Can’t find satellite, or no
signal.
Example: ASTRA19° East
Key 1 (pre-programming: ”Das
Erste”).
INFO key(”Das Erste”,
FR11837).
Both signal and quality are 0 %.
Align vertical mirror to the
south. Turn a few millimetres
to the left, wait about 3
seconds, then repeat until both
signal and quality are shown.
With a signal of about 60%, the
black background will
disappear, and a TV image will
appear.
For a different satellite, please
select a current channel from
the pre-programmed channel
list, then press the INFO key.
Front display dark, no clock
time visible.
Power cable not connected.
Connect the power cable to the
mains socket.
Switch on main switch.
Short circuit at the aerial supply
possible: Check connections.
Clock time visible.
Receiver in standby mode.
Press the power key on the
remote control unit (or on the
receiver). The receiver will
switch on and the channel will
be shown on the TV screen.
No sound or picture, but menu The aerial is not aligned with the Align your aerial correctly.
displays of the receiver
satellite.
present.
No signal (with symbol).
Check the cable connection
from LNB to receiver and from
receiver to the connected units.
Align your aerial.
Channel place visible, TV set
showing no image.
Poor picture, blocking fault,
formation of small blocks, no
sound.
The system is not connected
correctly.
Check the connection of the
SCART cable.
The TV set is not in AV mode.
Switch the TV set to the
appropriate AV input.
The aerial is not aligned
precisely with the satellite.
Align your aerial more
precisely. To do this, use the
INFO key on the remote control
unit. Signal indication for the
aerial alignment will be shown.
33
The LNB is defective.
Replace the LNB.
No picture, no sound, signal
strength present, no signal
quality.
The satellite aerial is aligned
with the wrong satellite.
Bad reception of: Tele5, DSF,
etc.
Cordless phone causing
interference (DECT standard)
Move the cordless phone, use
better quality satellite cable.
The remote control unit does
not work.
Batteries discharged.
Replace batteries.
The remote control unit is
aligned wrongly.
Align the remote control unit
with the front of the receiver
and ensure that nothing is
placed between the remote
control unit and the receiver.
Channel has got a new
frequency.
Delete TV channel, then carry
out automatic search run.
If faulty function still cannot be corrected, pleased contact your expert dealer.
34
Technical Data
Receiver
Input frequency range
950 MHz ~ 2150 MHz
LNB power supply
13/18 V, 0.30 A max. Overload protection
IF Band width
55 MHz/8MHz (below 5MS/s)
LNB control
22 KHz +/- 2KHz, 0,6 V pp +/- 0,2 V
DiSEqC control
Version 1.0, version 1.2, Tone-Burst A/B
Symbol rate
1 ~ 35 MS/s
Bit rate
115200 Bit/s
Input speed
Max. 15 Mbit/s
Error correction
1/2, 2/3, 3/4, 5/6, 7/8, auto
Video
MPEG-2 MP@ML
Audio
MPEG – 1/2 audio Layer I and Layer II
Aspect ratio
4:3 Letterbox, 4:3 PanScan, 16:9
Video resolution
720 x 576 (Pal), 720 x 480 (NTSC)
Audio mode
Left, Right, Stereo, AC3 digital sound
Options of connection
LNB F input
Type F, IEC 169-24
TV SCART (output only)
Video CVBS, Audio L, R
VCR SCART (output and input)
Video CVBS, Audio L, R
RCA (CINCH)
Audio L, R
SPDIF, coaxial
Digital audio output
Power supply
Mains input voltage
100-240 V~, 50/60 Hz
Power consumption
Ca. 10 W (operation with single LNB)
Ca. 2 W ( standby)
Physical specification
Dimensions in mm (W x D x H)
280 x 157 x 44
Weight in grams, approx.
Receiver 1100 g. Remote control unit 80 g (less batteries)
Operating temperature
0°C~ +40° C
Storage temperature
-40° C ~ + 65° C
35
Manufacturer
Dear Customer,
Should you require technical assistance and in the event that your expert dealer was unable to help
you, please contact us.
Triax A/S
Bjørnkærvej 3
8783 Hornsyld
Denmark
Declaration of Conformity
The manufacturer herewith declares that this product meets the following directives and standards:
Low voltage directive 73/23/EEC
•
EN 60 065
European EMC Directive 89/336/EEC
•
EN 55 013
•
EN 55 020
•
EN 61000-3-2
•
EN 61000-3-3
Appliance type/Type: Digital Satellite Receiver SR 110
Svend Kristiansen
Quality Manager
TRIAX A/S
Bjørnkærvej 3
DK 8783 Hornsyld
DENMARK
36
Glossary
AC
Alternating Current. Connection for AC.
DC
Direct Current. Connection for DC.
Cinch connector
Coaxial connector for the connection of TV set or stereo system.
DiSEqC
Digital Satellite Equipment Control
Digital system with which the receiver can control various
components of the outer unit. It is employed particularly to choose
between several satellite positions.
DVB
Digital Video Broadcasting. Broadcasting of digital TV programmes.
EPG
Electronic Programme Guide
Program guide providing you with detailed information on all
available programmes.
F connector
Coaxial connector to connect the LNB aerial cable.
FTA
Free-to-air services
Free services that can be received without special decoders.
Coaxial cable
The connecting cable between the LNB and the receiver. Used for
transferring the received signals and for supplying power to the LNB
unit.
LNB
Low Noise Block Amplifier/Converter
Appliance in the centre of the aerial which converts the high
frequency signals from the satellite into a lower frequency range and
simultaneously amplifies them.
MPEG-2
International standard for the transmission of video signals.
OSD
On Screen Display
Menu navigation visible on the screen.
PID
Packet ID
ID number of a received data stream. The PIDs ensure that a station
can be received in its entirety.
Receiver
Receiving appliance that converts the signals from the aerial into
video and audio signals.
SCART
21-pin connector to connect the TV set to the receiver.
Swap function
Swap between the current and last viewed programme.
Transponder
Satellite frequency. Several digital channels can be broadcast
simultaneously on one transponder.
VCR
Abbreviation for Video Cassette Recorder.
37
38
39
www.triax.com
08-2008-A
40