1
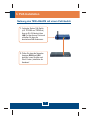
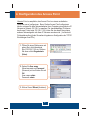
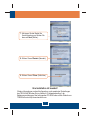
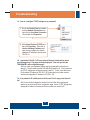
Quick Installation Guide
TEW-434APB
Table ofofContents
Table
Contents
Deutsch .....................................................................................................
1. Bevor Sie anfangen ...........................................................................
2. Installation der Hardware ..................................................................
3. PoE-Installation ..................................................................................
4. Konfiguration des Access Point .........................................................
1
1
2
3
5
Troubleshooting ........................................................................................ 8
Version 01.08.2007
1. Bevor Sie anfangen
Packungsinhalt
TEW-434APB
Kurzanleitung zur Installation
CD mit Bedienungsanleitung
Netzteil (7,5 V, 1 A)
1 abnehmbare 2dBi-Antenne
Systemanforderungen
Webbrowser wie der Internet Explorer (5.5 oder höher)
Computer mit korrekt installiertem Netzwerkadapter
Netzwerk-Switch oder -Hub mit freiem LAN-Port
RJ-45-Netzwerkkabel
PoE-Switch (optional)
TPE-101I (optional)
Anwendung
54Mbps 802.11g Wireless
PoE Access Point
(TEW-434ABP)
Workstation with
Wireless PCI Adapter
(TEW-423PI)
Notebook with
Wireless PC Card
(TEW-421PC)
PoE + Data
Power over Ethernet
(PoE) Injector
(TPE-101i)
Data
Internet
Cable/DSL
Modem
Cable/DSL 4-Port Firewall Router
(TW100-BRF114)
Workstation with
PCI Adapter
(TE100-PCIWN)
100Mbps
Hinweis: Der TEW-434APB unterstützt nur PoE-Geräte (Stromversorgung über
Ethernet), die dem Standard IEEE 802.3af Modus A (Stifte 1, 2, 3, 6)
entsprechen.
1
Deutsch
2. Installation der Hardware
Hinweis: Suchen Sie nach einem optimalen Einsatzort für den Access Point.
Der beste Standort eines Access Points liegt normalerweise im Zentrum Ihres
drahtlosen Netzwerks. Verbinden Sie den Computer, über den Sie den
TEW-434APB konfigurieren, bitte mit dem gleichen Switch/Hub.
1. Verbinden Sie den Switch/Hub
über ein RJ-45-Kabel mit dem
LAN-Port des Access Points und
schließen Sie dann die
abnehmbare 2dBi-Antenne an.
2. Verbinden Sie den Stromadapter
mit dem Access Point und stecken
Sie ihn in eine Steckdose.
3. Kontrollieren Sie, dass auf der
Vorderseite die folgenden
Anzeigen leuchten:
WLAN und LAN.
2
Deutsch
3. PoE-Installation
Nutzung des TEW-434APB mit einem PoE-Switch
1. Verbinden Sie den PoE-Switch
(z.B. TPE-S88 von TRENDnet)
über ein RJ-45-Kabel mit dem
LAN-Port des Access Points und
schließen Sie dann die
abnehmbare 2dBi-Antenne an.
2. Prüfen Sie, dass die folgenden
Anzeigen WLAN und LAN
leuchten. Lesen Sie bitte auch
Schritt 3 unter „Installation der
Hardware“.
3
Deutsch
Nutzung des TEW-434APB mit einem TPE-101I
1. Verbinden Sie das Stromkabel mit
dem Netzteil.
2. Verbinden Sie das Netzteil mit
dem Anschluss DC 48V IN des
TPE-101I. Stecken Sie das
Stromkabel in eine Steckdose.
3. Verbinden Sie den Umschalter
über ein Kat.-5-Kabel mit dem
DATA IN-Port des TPE-101I.
4. Verbinden Sie den LAN-Port des
TEW-434APB über ein Kat.-5Kabel mit dem POE OUT-Port des
TPE-101I.
5. Prüfen Sie, dass die folgenden
Anzeigen WLAN und LAN
leuchten. Lesen Sie bitte auch
Schritt 3 unter „Installation der
Hardware“.
4
Deutsch
4. Konfiguration des Access Point
Hinweis: Es ist zu empfehlen, den Access Point von einem verdrahteten
Computer aus zu konfigurieren. Bevor Sie den Access Point konfigurieren
können, müssen Sie dem Netzwerkadapter Ihres Computers eine statische IPAdresse im Subnetz 192.168.1.x zuweisen. Die standardmäßige IP-Adresse
des Access Points lautet 192.168.1.100. Achten Sie also darauf, dass keine
anderen Netzwerkgeräte mit dieser IP-Adresse versehen sind. (Im Abschnitt
Problembehandlung finden Sie weitere Angaben zur Konfiguration der TCP/IPEinstellungen Ihres PCs.)
1. Öffnen Sie einen Webbrowser und
geben Sie in die Adressleiste
http://192.168.1.100 ein. Drücken
Sie dann auf die Eingabetaste
(Enter).
2. Geben Sie User name
(Benutzername) und Password
(Kennwort) ein und klicken Sie auf
OK.
User name: admin
Password: admin
3. Klicken Sie auf Wizard (Assistent).
5
Deutsch
4. Klicken Sie auf Next (Weiter).
5. Geben Sie ein neues Kennwort für
Ihren Access Point ein, bestätigen
Sie das Kennwort und klicken Sie
dann auf Next (Weiter.) (Wenn Sie
kein neues Kennworteingeben,
wird das Standardkennwort admin
verwendet.)
6. Geben Sie eine SSID für Ihren
Access Point ein und klicken Sie
dann auf Next (Weiter).
6
Deutsch
7. Aktivieren Sie bei Bedarf die
Verschlüsselung und klicken Sie
dann auf Next (Weiter).
8. Klicken Sie auf Restart (Neustart).
9. Klicken Sie auf Close (Schließen).
Ihre Installation ist beendet!
Weitere Informationen zu den Konfigurations- und erweiterten Einstellungen
des TEW-434APB finden Sie im Abschnitt „Problembehandlung“ der
Bedienungsanleitung auf der beiliegenden CD-ROM oder auf der Website von
TRENDnet unter http://www.trendnet.com.
7
Deutsch
Troubleshooting
Q1: How do I configure TCP/IP settings on my computer?
1. Go into the Control Panel and doubleclick the Network Connections icon,
right-click the Local Area Connection
icon and then click Properties.
2. Click Internet Protocol (TCP/IP) and
then click Properties. Then click on
Use the following IP address, and
make sure you assign your network
adapter an IP address in the subnet of
192.168.1.x.
Q2: I typed http://192.168.1.100 in my Internet Browser's Address Bar, but an
error message says “The page cannot be displayed.” How can I get into the
TEW-434APB's web configuration page?
A2: First, check your hardware settings again by following the instructions in
section 2. Second, make sure the LAN and WLAN lights are lit. Third, make sure
the TCP/IP settings are configured properly (see Q1). Fourth, since the Access
Point's default IP address is 192.168.1.100, make sure that no other network
devices are assigned an IP address of 192.168.1.100.
Q3: If my network's IP is different than the Access Point's range, what should I
do?
A3: You should still configure the Access Point first. After all the settings are
applied, go to the Access Point's configuration page, click on TCP/IP settings and
change the IP address of the Access Point to match your network's IP.
8
Q4: After I successfully configured the Access Point to match my network
settings, I can not connect to my network using wireless computers.
A4: If you have a DHCP server in your network, you need to go into TCP/IP
settings again and re-select "Obtain an IP address automatically" to allow the PC
to regain an IP address from your DHCP server.
Q5: All the settings are correct, but I can not make a wireless connection to the
Access Point.
A5: First, double check that the WLAN light on the Access Point is lit. Second,
power cycle the Access Point by unplugging the power to the Access Point. Wait
15 seconds, then plug the power back in. Third, contact the manufacturer of your
wireless network adapter. Make sure the wireless network adapter is configured
with the proper SSID. The default SSID of the Access Point is TRENDnet.
Q6: The TEW-434APB does not power on when I plug the device into a PowerOver-Ethernet switch or splitter. What should I do?
A6: First, verify that the PoE device supports IEEE 802.3af protocol. Second,
verify that the TEW-434APB powers up using the provided 7.5V, 1A power
adapter. Third, power cycle the PoE switch. Fourth, unplug power to the switch,
wait 15 seconds, then plug the power back in. Fifth, plug the device into a
different port on the PoE switch. Sixth, try using another Cat-5e cable.
If you still encounter problems or have any questions regarding the TEW-434APB,
please contact TRENDnet's Technical Support Department.
9
Certifications
This equipment has been tested and found to comply with FCC and CE Rules.
Operation is subject to the following two conditions:
(1) This device may not cause harmful interference.
(2) This device must accept any interference received. Including interference that may
cause undesired operation.
Waste electrical and electronic products must not
be disposed of with household waste. Please
recycle where facilities exist. Check with you Local
Authority or Retailer for recycling advice.
NOTE: THE MANUFACTURER IS NOT RESPONSIBLE FOR ANY RADIO OR TV
INTERFERENCE CAUSED BY UNAUTHORIZED MODIFICATIONS TO THIS
EQUIPMENT. SUCH MODIFICATIONS COULD VOID THE USER’S AUTHORITY TO
OPERATE THE EQUIPMENT.
ADVERTENCIA
En todos nuestros equipos se mencionan claramente las caracteristicas del adaptador de
alimentacón necesario para su funcionamiento. El uso de un adaptador distinto al
mencionado puede producir daños fisicos y/o daños al equipo conectado. El adaptador
de alimentación debe operar con voltaje y frecuencia de la energia electrica domiciliaria
existente en el pais o zona de instalación.
TRENDnet Technical Support
US . Canada
Toll Free Telephone: 1(866) 845-3673
24/7 Tech Support
Europe (Germany . France . Italy . Spain . Switzerland . UK)
Toll Free Telephone: +00800 60 76 76 67
English/Espanol - 24/7
Francais/Deutsch - 11am-8pm, Monday - Friday MET
Worldwide
Telephone: +(31) (0) 20 504 05 35
English/Espanol - 24/7
Francais/Deutsch - 11am-8pm, Monday - Friday MET
Product Warranty Registration
Please take a moment to register your product online.
Go to TRENDnet’s website at http://www.trendnet.com
20675 Manhattan Place
Torrance, CA 90501
USA
Copyright ©2007. All Rights Reserved. TRENDnet.