1
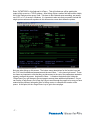
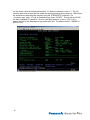
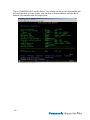
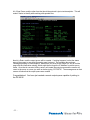
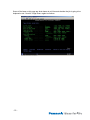
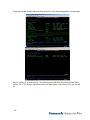
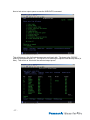
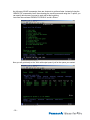
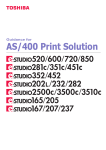
AS/400® Printing through a Remote Output Queue
using the WORKiO®
DP-2310/3010/3510/3520/4510/4520/6010/6020
-1-
Contents
Section
Page
Overview …………………………………………………………………………………. 3
Printing to the DP-23/30/35/45/6010/35/45/6020………………………………….
5
Creating the output queue ………………………………………………………………5
Sending a print job to the DP-6010…………………………….. ………………………12
Changing Spooled File Attributes………………………………. ………………………13
Working with the Output Queue………………………………… ………………………17
Quick Setup Guide ……………………………………………………………………… 20
Trademarks………………………………………………………………………………..21
-2-
Overview
This document is designed to provide basic information regarding printing
from an IBM AS/400 server running the OS400 operating system V5R1 and
higher to the Panasonic DP-2310, DP-3010, DP-3510, DP-3520, DP-4510, DP4520, DP-6010 and DP-6020 multi-functional devices. Since many volumes of
data exist on printing from an AS/400, it is intended that this document only
summarize the basics of printing specifically to these devices.
To better understand the AS/400 printing environment, there will be some new
terms and definitions you may or may not be familiar with. This document will
explain some of those as it progresses but will also provide these in an appendix
at the end. Some of these terms need to be defined first so let’s start with those
that cause the most head-scratching, the TLA’s (Three Letter Acronyms).
All of the command structures within the operating system can be broken down
to a TLA or an XTLA (eXtended Three Letter Acronym). When these TLA’s are
combined, they form a command that can be typed on the command line to
execute an internal program or menu. Some of these are:
CFG = Configure
CRT = Create
WRK = Work with
END = End or stop
STR = Start
GO = Go to a menu
Some of the various menus or programs also use TLA’s or XTLA’s:
STS = Status program
DEVD = Device Description program
WTR = Printer Writer program
And the devices that exist are also referenced in the same manner:
OUTQ = Output Queue
PTR = Printer
SPLF = Spooled Files
When you put these items together, you form a command structure. An example
would be:
CRTOUTQ = create and output queue
WRKSPLF= work with spooled files
WRKCFGSTS = Work with Configured Status’
-3-
Some of the other TLA’s you might hear when discussing the AS/400 and printing are:
SCS Printing = SNA Character String
AFP Printing = Advanced Function Printing
IPDS Printing = Intelligent Printer Data Stream
These are different types of printer data streams that are supported by the AS/400. Each of
these support different types of data, along with different types of equipment and each has it’s
own unique characteristics. SCS has a limited number of commands, so this will limit the
amount of formatting you can do with the output. IPDS supports an extremely complex set of
commands, so it will allow various formatting options. As you can see, this will affect the end
result requirements dramatically.
SCS, being a simple data stream is primarily utilized by line printers. It supports a feature set
comprising of overstrikes, margins, sub and super-script text, underscores and the like. While
AFP data streams includes support for objects and text. This means it supports forms
processing, overlays and various additional fonts. It is generally known that IPDS printers
support AFP data streams as well.
Since IPDS is more complex, it supports both text and data as well as forms, fonts and overlays.
It also supports bi-directional communications between the OS and the printer. IPDS enabled
printers can supply various information such as job status, error recovery and reporting as well
as resource management of things such as fonts, forms etc.
Host Print Transform
For users who don’t need all of the advanced printing features of AFP and/or IPDS, or
who don’t want to spend the extra dollars required to obtain these more expensive printers, HPT
is included in all versions of the base operating system. Whereas IPDS printers process the
data stream after it’s sent to the printer, HPT’s data stream is processed on the AS/400 and
then sent to the printer as ASCII text. While this does add to the workload of the AS/400 itself, it
will support any printer that can interpret or print ASCII (plain text). This allows the printer to be
attached to the AS/400 in various ways. This can be a Twinaxial connection (dual coaxial cable
for direct connection to the AS/400), or it can be attached directly to a workstation or terminal or
another AS/400. Or it can be a LAN connection, such as our DP-35/45/6010. Since it is ASCII
that is being sent, support the most popular page description languages, PCL and PostScript,
exists. This can be advantageous for embedding commands for formatting data within the print
stream.
-4-
Printing to the DP-6010
For the purposes of this document, we will assume that a DP-6010 has already been
setup with an IP Address, has the DA-PC300 installed and is functioning correctly on the
network. We will also assume the appropriate PTF’s1 have been installed on the AS/400. We
will now go through the process needed to print to the DP-6010.
Creating the output queue
The first step is to create a remote output queue. The command to accomplish this is
CRTOUTQ. This command will also create the print writer object with the same name as the
output queue. At the command line of the AS/400, type CRTOUTQ and hit <Enter>.
This screen is the first menu screen shown after login. Typing the number of the listed menu
item will open that menu or if you know the command structure, typing it will accomplish the
same tasks.
1. Program Temporary Fix (yet another TLA!). This is an upgrade or service pack type file installed to the OS400 operating system.
See page 19 for more information.
-5-
The screen that appears shows the various optional settings for the output queue. Note that the
top of the screen shows the command you entered so you can be sure you are on the correct
screen.
Note that also on the bottom of the screen, the status line shows that on this screen, the
parameter OUTQ is a required entry for this command to execute. Enter the name of the
desired output queue. The default entry for Library is ‘*CURLIB’. This indicates in which library
the OUTQ will be created and usually isn’t changed unless the system administrator deems it
necessary. For this example, our OUTQ is to be called ‘DP6010’. Upon entering the name,
press the <TAB> key to proceed down to the ‘Remote system’ field.
-6-
Enter ‘*INTNETADR’ in this field and hit <Enter>. This will indicate we will be sending the
output of this queue to a TCP/IP address. After hitting <Enter> another field will become visible,
this is the ‘Remote printer queue’ field. Tab down to this field and enter something, we usually
use ‘LPR’ or ‘LP’ as we do in Windows. It is important to also note that you need to include the
single quote marks as well anywhere in this document a screen shot shows the quotes.
Note two other things on this screen. The bottom menu descriptions for the function keys has
the ‘F10’ listed for additional parameters and the word ‘More…’ in the lower right corner. These
two items are important to note that they provide access to the rest of the parameters needed to
properly configure the queue. Anytime the ‘More…’ is listed on the bottom right, hitting the
<Page Down> key will change to the next page to access those additional parameters. So you
can use the <Page Down> and <Page Up> keys to scroll through the pages to be sure you have
entered all the pertinent information prior to hitting <enter> to complete the creation of the
queue. At this point, hit the <Page Down> key to get to the next page.
-7-
On this screen, enter the following information. At ‘Writers to autostart’, enter a ‘1’. This will
allow the print writer to start after we create the output queue and at any power up. Without this,
we would have to start the writer manually using the ‘STRRMTWTR’ command. For
‘Connection type, enter ‘*IP’ and at ‘Destination type’ enter ‘*OTHER’. This will tell the AS/400
we want a standard IP connection. Be sure ‘Host print transform’ is set to ‘*YES’ (it is by
default) and tab to the ‘Manufacturer type and model’ field. The default choice is ‘*IBM42011’.
Now hit <F4>.
-8-
Hitting <F4> allows you to see the choices for this particular field. You could use the <F4> key
for each choice to see the available options for that particular field. Use the <Page Down> key
to scroll the listing and you will find the choices for our devices.
-9-
Type in ‘*PANASONIC6010’ and hit <Enter>. You will now see the previous screen again with
the new information you have chosen. Now tab down to ‘Internet address’ and enter the IP
Address of the machine within the single quotes.
- 10 -
Hit <Page Down> and the other item that should be entered is just a text description. This will
make it easier to identify while working with spooled files.
Now hit <Enter> and the output queue will be created. If nothing happens, look at the status
area of the screen to see what information wasn’t entered. The example above shows
‘Messages pending on other displays.’ Means that you must hit the <Page Up> key to find the
page with the information missing, which might be we forgot the IP Address or remote queue
name. Once that is corrected, hitting <enter> will create the output queue and the screen will
revert to the menu or screen you were on before typing ‘CRTOUTQ’. The message area on that
screen will show that the output queue was created.
Congratulations! You have just created a remote output queue capable of printing to
the DP-6010!
- 11 -
Sending a print job to the DP-6010
First of all, we must generate a print job so that we can direct it to the correct output
queue. For this discussion, we will print generic system information. Your situation may vary
and in all likelihood, there will already be spooled files available to print, contact your system
administrator to re-direct them. On the command line enter the ‘prtsysinf’ command and hit
<enter>.
After hitting <enter>, the following should be displayed with a slight delay based on the amount
of information printed.
- 12 -
As you can see by the status line, the information was printed successfully!
Now we need to access those printed files to direct them to the newly created output queue.
We do this by using the ‘WRKSPLF’ command (Work with Spooled Files).
Select the file you want to change by entering a ‘2’ on the line next to it. This will bring up the
‘Change Spooled File Attributes’ screen.
The first change we can make is what printer to send it to. On this field make sure it says
‘*OUTQ’. Then, as it shows the <F10> key is available, hit <F10>. Now you can hit the <Page
Down> key to access the rest of the parameters.
- 13 -
Now we can change the output queue this job is directed to. For our example, enter ‘DP-6010’
in this field.
Some other important items we can change on this screen is Output priority and Save file.
Output priority will signify order of importance in the queue. The lower the number, the higher
the priority. Save file will print the file but won’t delete it. Now hit the <Page Down> key and
we’ll look at the other attributes we might want to change.
- 14 -
Some of the items on this page are what drawer to pull from and whether the job is going to be
duplexed or not. Now hit <Page Down> again to continue.
- 15 -
These are the last 2 pages, although there really isn’t much here that applies to our machines.
Now hit <Enter> to process the job. This will bring you back to the Work with Spooled Files
screen. Hit <F12> and you should be back to the main menu, if not then hit <F3> and you will
be.
- 16 -
Now to look at our output queue we use the ‘WRKOUTQ’ command.
This will bring up a list of all output queues we could work with. Tab down to the ‘DP6010’
queue’s Opt line and enter a ‘5’. The Opt line is for entering the options listed directly above (in
blue). This will let us ‘Work with’ the selected output queue.
- 17 -
As with many AS/400 commands, there are shortcuts to get there faster. Instead of using the
‘WRKOUTQ’ command by itself, then choosing the correct queue and using the ‘5’ option, you
can specify which queue you want to work with at the beginning.
Just enter the command ‘WRKOUTQ DP6010’ and hit <Enter>.
Now you will get directly to the ‘Work with output queue’ just for the queue you wanted.
- 18 -
Our example above has 3 files ‘queued’ for printing and their status is ‘RDY’, yet another TLA, it
of course stands for ‘Ready to print’. On the Opt field, we can enter ‘2’ to change the attributes
for that particular file or we could enter a ‘6’ to release it for printing. If it hasn’t printed already,
enter a ‘6’ and hit <Enter>.
Congratulations! You have just successfully printed from the AS/400!
A note about PTF’s.
A Program Temporary Fix is a patch file provided by IBM for either updating or
enhancing the operating system. The requirement for printing to the DP-35/45/6010
series will be included in version V5R3 of the OS400 operating system. Support for
printing to these machines on V5R1 and V5R2 is provided via PTF. These can be
obtained from IBM for supported installations of OS400. The required PTF’s are as
follows:
OS 400 Version
V5R1
V5R2
New WCO
New MFRTYPDMDL’s
(Workstation Customization Object)
(Manufacturer Type and Models)
SI08528, SI11177
SI08548, SI11246
SI11179
SI11270
These PTF’s can be obtained from IBM through their web-site at:
http://www-912.ibm.com/
- 19 -
Quick Setup Guide
Remote Output Queue setup
Command
CRTOUTQ
Output queue
Enter desired name (e.g. DP6010, etc.)
Remote system
*INTNETADR
Remote printer queue
‘lpr’
Writers to autostart
1
Connection type
*IP
Destination type
*OTHER
Host print transform
*YES
Manufacturer type and model
*PANASONIC6010 (or PANASONIC2310 or PANASONIC4520)
Internet address
Enter unit’s IP Address within single quotes (e.g. ‘192.168.0.60’)
Text description
Enter a brief description of the queue or printer
- 20 -
Notes:
®
AS/400 is a registered trademark of IBM Corporation
®
WORKiO is a registered trademark of Matsushita Electric Industrial, Co. Ltd.
All other brand or product names are the property of their respective holders.
- 21 -